
Skapa 3D-effekter i presentationer med C++
Översikt
Aspose.Slides för C++ kan skapa, redigera, bevara och rendera PowerPoint‑liknande 3D‑formatering för former och text. Den här artikeln täcker 3D‑effekter såsom rotation, extrusion, avfasningar, belysning, material, gradient‑ eller bildfyllningar och 3D‑text.
Note
Den här artikeln handlar om 3D‑formateringseffekter på PowerPoint‑former och -text. Den handlar inte om att infoga eller redigera fristående 3D‑modellsfiler. När du exporterar en bild till en bild, PDF eller HTML renderar Aspose.Slides dessa 3D‑effekter i den exporterade 2D‑utdata.3D‑formateringskoncept
Använd metoden IShape::get_ThreeDFormat för att tillämpa 3D‑formatering på en form. Metoden returnerar IThreeDFormat, som styr 3D‑scenen för den formen.
För text, använd metoden ITextFrameFormat::get_ThreeDFormat. Detta tillämpar 3D‑formatering på textrutan istället för formens kropp.
De viktigaste metoderna är:
| Metod | Vad den styr | När den ska användas |
|---|---|---|
| get_Camera | Vypunkt, förinställd kameratyp, rotation, zoom och perspektiv. | Rotera objektet i 3D‑rum eller matcha en PowerPoint‑3D‑rotationsförinställning. |
| get_LightRig | Ljusförinställning, riktning och ljusrotation. | Ändra hur högdagrar och skuggor visas på 3D‑ytan. |
| set_Material | Ytmaterial, t.ex. platt, matt, plast eller metall. | Få samma geometri att se plattare, mjukare, glansigare eller metallisk ut. |
| set_ExtrusionHeight | Hur långt formen sträcker sig bakåt från sin främre yta. | Omvandla en platt form till ett tydligt tjockt 3D‑objekt. |
| get_ExtrusionColor | Färg på de extruderade sidorna. | Gör djupet synligt eller samordna sidofärgen med frontal fyllning. |
| set_Depth | Ytterligare 3D‑djup som används av PowerPoint‑3D‑formatering. | Finjustera djupet för former eller text, särskilt tillsammans med avfasnings‑ och materialinställningar. |
| get_BevelTop och get_BevelBottom | Upphöjda eller avrundade kanter på främre och bakre ytor. | Lägg till en mjukad eller formad kant istället för en skarp platt yta. |
| get_ContourColor och set_ContourWidth | Kontur runt 3D‑objektet. | Betona objektets gräns i renderad utdata. |
Skapa en 3D‑form
En form behöver vanligtvis fyra typer av inställningar innan den ser övertygande 3D‑ut.
- Kamerainställningar, eftersom standardframåtsyta kan dölja extrusionen.
- Ljusinställningar, eftersom belysning gör ytorna och sidorna läsbara.
- Materialinställningar, eftersom ytan påverkar hur ljuset renderas.
- Extrusions‑ eller djupinställningar, eftersom en platt form behöver tjocklek.
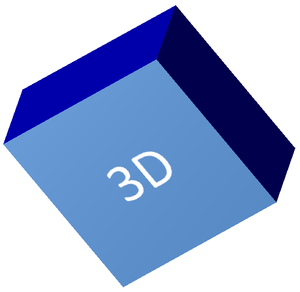
Följande exempel skapar en rektangel, lägger till text på dess främre yta och tillämpar 3D‑formatering. Kamerarotationsvärdena är i grader, och extrusionshöjden är 100 punkter. Exemplet renderar bilden till en PNG‑fil med dubbla standarddimensioner och sparar presentationen som PPTX.
#include <DOM/CameraPresetType.h>
#include <DOM/FillType.h>
#include <DOM/IAutoShape.h>
#include <DOM/ICamera.h>
#include <DOM/IColorFormat.h>
#include <DOM/IFillFormat.h>
#include <DOM/ILightRig.h>
#include <DOM/IParagraph.h>
#include <DOM/IParagraphFormat.h>
#include <DOM/IPortionFormat.h>
#include <DOM/IShapeCollection.h>
#include <DOM/ISlide.h>
#include <DOM/ITextFrame.h>
#include <DOM/IThreeDFormat.h>
#include <DOM/LightRigPresetType.h>
#include <DOM/LightingDirection.h>
#include <DOM/MaterialPresetType.h>
#include <DOM/Presentation.h>
#include <DOM/ShapeType.h>
#include <Export/SaveFormat.h>
#include <IImage.h>
#include <drawing/color.h>

using namespace Aspose::Slides;
using namespace Aspose::Slides::Export;
using namespace System::Drawing;

const auto imageScale = 2.0f;

auto presentation = System::MakeObject<Presentation>();
auto slide = presentation->get_Slide(0);

auto shape = slide->get_Shapes()->AddAutoShape(ShapeType::Rectangle, 200.0f, 150.0f, 200.0f, 200.0f);

shape->get_TextFrame()->set_Text(u"3D");
shape->get_TextFrame()->get_Paragraph(0)->get_ParagraphFormat()->get_DefaultPortionFormat()->set_FontHeight(64.0f);

auto frontColor = Color::get_CornflowerBlue();
shape->get_FillFormat()->set_FillType(FillType::Solid);
shape->get_FillFormat()->get_SolidFillColor()->set_Color(frontColor);

auto extrusionColor = Color::get_Blue();
shape->get_ThreeDFormat()->get_Camera()->set_CameraType(CameraPresetType::OrthographicFront);
shape->get_ThreeDFormat()->get_Camera()->SetRotation(20.0f, 30.0f, 40.0f);
shape->get_ThreeDFormat()->get_LightRig()->set_LightType(LightRigPresetType::Flat);
shape->get_ThreeDFormat()->get_LightRig()->set_Direction(LightingDirection::Top);
shape->get_ThreeDFormat()->set_Material(MaterialPresetType::Flat);
shape->get_ThreeDFormat()->set_ExtrusionHeight(100.0);
shape->get_ThreeDFormat()->get_ExtrusionColor()->set_Color(extrusionColor);

auto thumbnail = slide->GetImage(imageScale, imageScale);
thumbnail->Save(u"shape_3d.png");
thumbnail->Dispose();

presentation->Save(u"shape_3d.pptx", SaveFormat::Pptx);
presentation->Dispose();
Den renderade bildsidan visar rektangeln som ett tjockt 3D‑block:
Rotera en form med kameran
I PowerPoint konfigureras 3D‑rotation via rutan 3‑D‑rotation. X‑, Y‑ och Z‑rotationsvärdena motsvarar rotationen du ställer in via kamera‑API:et.
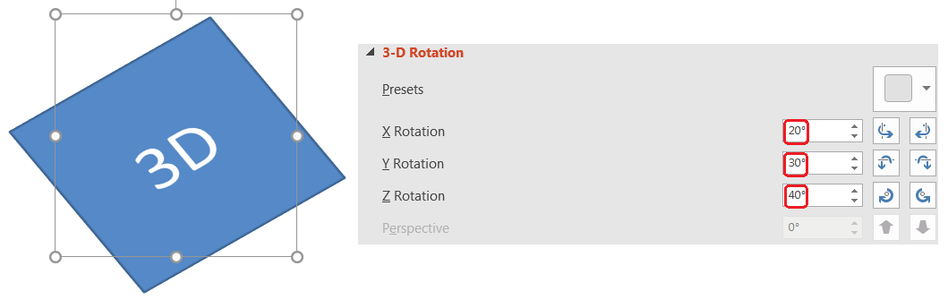
I Aspose.Slides får du åtkomst till kameran via IThreeDFormat::get_Camera. Detta exempel skapar en rektangel, väljer en ortografisk frontvy och sätter dess X‑, Y‑ och Z‑rotationer till 20, 30 respektive 40 grader. Det konfigurerar formen i minnet utan att spara en fil:
#include <DOM/CameraPresetType.h>
#include <DOM/IAutoShape.h>
#include <DOM/ICamera.h>
#include <DOM/IShapeCollection.h>
#include <DOM/ISlide.h>
#include <DOM/IThreeDFormat.h>
#include <DOM/Presentation.h>
#include <DOM/ShapeType.h>

using namespace Aspose::Slides;

auto presentation = System::MakeObject<Presentation>();
auto slide = presentation->get_Slide(0);

auto shape = slide->get_Shapes()->AddAutoShape(ShapeType::Rectangle, 200.0f, 150.0f, 200.0f, 200.0f);

shape->get_ThreeDFormat()->get_Camera()->set_CameraType(CameraPresetType::OrthographicFront);
shape->get_ThreeDFormat()->get_Camera()->SetRotation(20.0f, 30.0f, 40.0f);

presentation->Dispose();
Använd kameran när du behöver ändra hur betraktaren ser objektet. Den ändrar inte 2D‑formgeometrin på bilden. Den ändrar 3D‑vy‑punkten som används av PowerPoint och av Aspose.Slides vid rendering.
Lägg till extrusion och djup
Extrusion får en form att se tjock ut genom att förlänga den bakom den främre ytan. I PowerPoint bestämmer djupkontrollen denna synliga tjocklek, och färgkontrollen sätter färgen på sidoytorna.
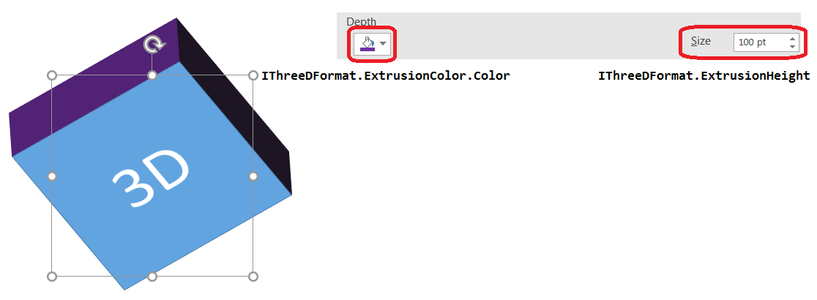
Ställ in IThreeDFormat::set_ExtrusionHeight för tjockleken och IThreeDFormat::get_ExtrusionColor för sidfärgen. Detta exempel ger en rektangel en 100‑punkts extrusion med lila sidor och roterar kameran för att visa dess tjocklek. Det konfigurerar formen i minnet utan att spara en fil:
#include <DOM/CameraPresetType.h>
#include <DOM/ILightRig.h>
#include <DOM/LightRigPresetType.h>
#include <DOM/LightingDirection.h>
#include <DOM/MaterialPresetType.h>
#include <DOM/IAutoShape.h>
#include <DOM/ICamera.h>
#include <DOM/IColorFormat.h>
#include <DOM/IShapeCollection.h>
#include <DOM/ISlide.h>
#include <DOM/IThreeDFormat.h>
#include <DOM/Presentation.h>
#include <DOM/ShapeType.h>
#include <drawing/color.h>

using namespace Aspose::Slides;
using namespace System::Drawing;

auto presentation = System::MakeObject<Presentation>();
auto slide = presentation->get_Slide(0);

auto shape = slide->get_Shapes()->AddAutoShape(ShapeType::Rectangle, 200.0f, 150.0f, 200.0f, 200.0f);

shape->get_ThreeDFormat()->get_Camera()->set_CameraType(CameraPresetType::OrthographicFront);
shape->get_ThreeDFormat()->get_Camera()->SetRotation(20.0f, 30.0f, 40.0f);
shape->get_ThreeDFormat()->get_LightRig()->set_LightType(LightRigPresetType::Flat);
shape->get_ThreeDFormat()->get_LightRig()->set_Direction(LightingDirection::Top);
shape->get_ThreeDFormat()->set_Material(MaterialPresetType::Flat);
shape->get_ThreeDFormat()->set_ExtrusionHeight(100.0);

auto extrusionColor = Color::get_Purple();
shape->get_ThreeDFormat()->get_ExtrusionColor()->set_Color(extrusionColor);

presentation->Dispose();
IThreeDFormat::set_Depth‑metoden sätter djupet för en 3D‑form. set_ExtrusionHeight‑metoden styr höjden på extrusionseffekten, som visas i detta exempel.
Använd gradient‑ eller bildfyllningar med 3D‑effekter
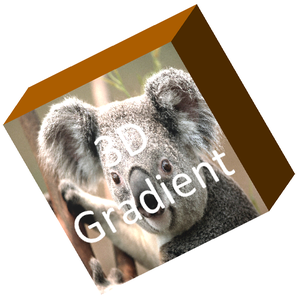
3D‑formatering är oberoende av formens fyllning. Du kan tillämpa en solid färg, gradient, mönster eller bildfyllning på den främre ytan och fortfarande använda samma kamera-, ljus-, material- och extrusionsinställningar.
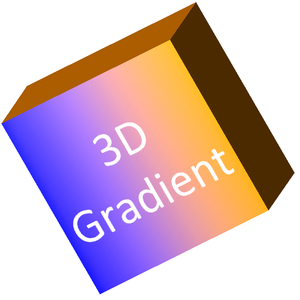
Detta exempel tillämpar en blå‑till‑orange gradient på den främre ytan och en mörkorange färg på 150‑punkts extrusionen. Gradientstopp vid 0 och 100 markerar början och slutet på gradienten. Kamerarotationsvärdena är i grader. Bilden renderas till en PNG‑fil med dubbla standarddimensioner:
#include <DOM/CameraPresetType.h>
#include <DOM/FillType.h>
#include <DOM/IAutoShape.h>
#include <DOM/ICamera.h>
#include <DOM/IColorFormat.h>
#include <DOM/IFillFormat.h>
#include <DOM/IGradientFormat.h>
#include <DOM/IGradientStopCollection.h>
#include <DOM/ILightRig.h>
#include <DOM/IParagraph.h>
#include <DOM/IParagraphFormat.h>
#include <DOM/IPortionFormat.h>
#include <DOM/IShapeCollection.h>
#include <DOM/ISlide.h>
#include <DOM/ITextFrame.h>
#include <DOM/IThreeDFormat.h>
#include <DOM/LightRigPresetType.h>
#include <DOM/LightingDirection.h>
#include <DOM/MaterialPresetType.h>
#include <DOM/Presentation.h>
#include <DOM/ShapeType.h>
#include <IImage.h>
#include <drawing/color.h>

using namespace Aspose::Slides;
using namespace System::Drawing;

const auto imageScale = 2.0f;

auto presentation = System::MakeObject<Presentation>();
auto slide = presentation->get_Slide(0);

auto shape = slide->get_Shapes()->AddAutoShape(ShapeType::Rectangle, 200.0f, 150.0f, 250.0f, 250.0f);
shape->get_TextFrame()->set_Text(u"3D Gradient");
shape->get_TextFrame()->get_Paragraph(0)->get_ParagraphFormat()->get_DefaultPortionFormat()->set_FontHeight(64.0f);

auto firstGradientColor = Color::get_Blue();
auto secondGradientColor = Color::get_Orange();
shape->get_FillFormat()->set_FillType(FillType::Gradient);
shape->get_FillFormat()->get_GradientFormat()->get_GradientStops()->Add(0.0f, firstGradientColor);
shape->get_FillFormat()->get_GradientFormat()->get_GradientStops()->Add(100.0f, secondGradientColor);

auto extrusionColor = Color::get_DarkOrange();
shape->get_ThreeDFormat()->get_Camera()->set_CameraType(CameraPresetType::OrthographicFront);
shape->get_ThreeDFormat()->get_Camera()->SetRotation(10.0f, 20.0f, 30.0f);
shape->get_ThreeDFormat()->get_LightRig()->set_LightType(LightRigPresetType::Flat);
shape->get_ThreeDFormat()->get_LightRig()->set_Direction(LightingDirection::Top);
shape->get_ThreeDFormat()->set_Material(MaterialPresetType::Flat);
shape->get_ThreeDFormat()->set_ExtrusionHeight(150.0);
shape->get_ThreeDFormat()->get_ExtrusionColor()->set_Color(extrusionColor);

auto thumbnail = slide->GetImage(imageScale, imageScale);
thumbnail->Save(u"gradient_3d.png");
thumbnail->Dispose();

presentation->Dispose();
Den renderade utdata behåller gradienten på den främre ytan och renderar extrusionen separat:
För att använda en bildfyllning istället, lägg till bilden i presentationen och tilldela den till formens fyllning. Detta exempel kräver en befintlig fil med namn “image.jpg” i arbetskatalogen. Den sträcker bilden för att fylla rektangeln, tillämpar en 150‑punkts extrusion och sätter kamerarotation i grader. Den konfigurerar formen i minnet utan att spara eller rendera en fil:
#include <DOM/CameraPresetType.h>
#include <DOM/ILightRig.h>
#include <DOM/LightRigPresetType.h>
#include <DOM/LightingDirection.h>
#include <DOM/MaterialPresetType.h>
#include <DOM/FillType.h>
#include <DOM/IAutoShape.h>
#include <DOM/ICamera.h>
#include <DOM/IColorFormat.h>
#include <DOM/IFillFormat.h>
#include <DOM/IImageCollection.h>
#include <DOM/IPictureFillFormat.h>
#include <DOM/IShapeCollection.h>
#include <DOM/ISlide.h>
#include <DOM/ISlidesPicture.h>
#include <DOM/IThreeDFormat.h>
#include <DOM/PictureFillMode.h>
#include <DOM/Presentation.h>
#include <DOM/ShapeType.h>
#include <drawing/color.h>
#include <system/io/file.h>

using namespace Aspose::Slides;
using namespace System::Drawing;
using namespace System::IO;

auto presentation = System::MakeObject<Presentation>();
auto slide = presentation->get_Slide(0);

auto shape = slide->get_Shapes()->AddAutoShape(ShapeType::Rectangle, 200.0f, 150.0f, 250.0f, 250.0f);

auto imageData = File::ReadAllBytes(u"image.jpg");
auto image = presentation->get_Images()->AddImage(imageData);

shape->get_FillFormat()->set_FillType(FillType::Picture);
shape->get_FillFormat()->get_PictureFillFormat()->get_Picture()->set_Image(image);
shape->get_FillFormat()->get_PictureFillFormat()->set_PictureFillMode(PictureFillMode::Stretch);

auto extrusionColor = Color::get_DarkOrange();
shape->get_ThreeDFormat()->get_Camera()->set_CameraType(CameraPresetType::OrthographicFront);
shape->get_ThreeDFormat()->get_Camera()->SetRotation(10.0f, 20.0f, 30.0f);
shape->get_ThreeDFormat()->get_LightRig()->set_LightType(LightRigPresetType::Flat);
shape->get_ThreeDFormat()->get_LightRig()->set_Direction(LightingDirection::Top);
shape->get_ThreeDFormat()->set_Material(MaterialPresetType::Flat);
shape->get_ThreeDFormat()->set_ExtrusionHeight(150.0);
shape->get_ThreeDFormat()->get_ExtrusionColor()->set_Color(extrusionColor);

presentation->Dispose();
Bilden renderas på den främre ytan, medan extrusionen renderas som 3D‑sidoytan:
Tillämpa 3D‑formatering på text
Formens 3D‑formatering påverkar formkroppen. Textens 3D‑formatering påverkar textrutan. Detta är användbart för WordArt‑liknande effekter där bokstäverna själva behöver extrusion, material, belysning och kamerainställningar.
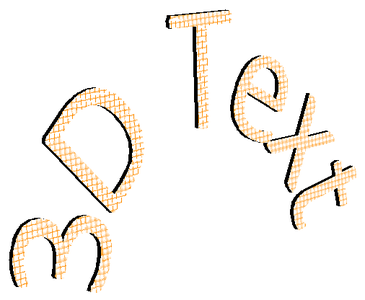
Följande exempel skapar text med ett orange‑och‑vitt rutmönster, tillämpar en uppåtriktad båge och konfigurerar 3D‑inställningarna via ITextFrameFormat::get_ThreeDFormat. Extrusionshöjden och djupet är i punkter, och ljusrotationen är i grader. Formens fyllning och kontur är dolda så att endast texten är synlig. Exemplet renderar en PNG‑fil med dubbla standarddimensioner och sparar presentationen som PPTX:
#include <DOM/CameraPresetType.h>
#include <DOM/FillType.h>
#include <DOM/IAutoShape.h>
#include <DOM/ICamera.h>
#include <DOM/IColorFormat.h>
#include <DOM/IFillFormat.h>
#include <DOM/ILightRig.h>
#include <DOM/ILineFillFormat.h>
#include <DOM/ILineFormat.h>
#include <DOM/IParagraph.h>
#include <DOM/IParagraphFormat.h>
#include <DOM/IPatternFormat.h>
#include <DOM/IPortion.h>
#include <DOM/IPortionFormat.h>
#include <DOM/IShapeCollection.h>
#include <DOM/ISlide.h>
#include <DOM/ITextFrame.h>
#include <DOM/ITextFrameFormat.h>
#include <DOM/IThreeDFormat.h>
#include <DOM/LightRigPresetType.h>
#include <DOM/LightingDirection.h>
#include <DOM/MaterialPresetType.h>
#include <DOM/PatternStyle.h>
#include <DOM/Presentation.h>
#include <DOM/ShapeType.h>
#include <DOM/TextShapeType.h>
#include <Export/SaveFormat.h>
#include <IImage.h>
#include <drawing/color.h>

using namespace Aspose::Slides;
using namespace Aspose::Slides::Export;
using namespace System::Drawing;

const auto imageScale = 2.0f;

auto presentation = System::MakeObject<Presentation>();
auto slide = presentation->get_Slide(0);

auto shape = slide->get_Shapes()->AddAutoShape(ShapeType::Rectangle, 200.0f, 150.0f, 250.0f, 250.0f);

shape->get_FillFormat()->set_FillType(FillType::NoFill);
shape->get_LineFormat()->get_FillFormat()->set_FillType(FillType::NoFill);
shape->get_TextFrame()->set_Text(u"3D Text");

auto portion = shape->get_TextFrame()->get_Paragraph(0)->get_Portion(0);
portion->get_PortionFormat()->get_FillFormat()->set_FillType(FillType::Pattern);

auto foregroundColor = Color::get_DarkOrange();
auto backgroundColor = Color::get_White();
portion->get_PortionFormat()->get_FillFormat()->get_PatternFormat()->get_ForeColor()->set_Color(foregroundColor);
portion->get_PortionFormat()->get_FillFormat()->get_PatternFormat()->get_BackColor()->set_Color(backgroundColor);
portion->get_PortionFormat()->get_FillFormat()->get_PatternFormat()->set_PatternStyle(PatternStyle::LargeGrid);

shape->get_TextFrame()->get_Paragraph(0)->get_ParagraphFormat()->get_DefaultPortionFormat()->set_FontHeight(128.0f);

auto textFrameFormat = shape->get_TextFrame()->get_TextFrameFormat();
textFrameFormat->set_Transform(TextShapeType::ArchUp);
textFrameFormat->get_ThreeDFormat()->set_ExtrusionHeight(3.5);
textFrameFormat->get_ThreeDFormat()->set_Depth(3.0);
textFrameFormat->get_ThreeDFormat()->set_Material(MaterialPresetType::Plastic);
textFrameFormat->get_ThreeDFormat()->get_LightRig()->set_Direction(LightingDirection::Top);
textFrameFormat->get_ThreeDFormat()->get_LightRig()->set_LightType(LightRigPresetType::Balanced);
textFrameFormat->get_ThreeDFormat()->get_LightRig()->SetRotation(0.0f, 0.0f, 40.0f);
textFrameFormat->get_ThreeDFormat()->get_Camera()->set_CameraType(CameraPresetType::PerspectiveContrastingRightFacing);

auto thumbnail = slide->GetImage(imageScale, imageScale);
thumbnail->Save(u"text_3d.png");
thumbnail->Dispose();

presentation->Save(u"text_3d.pptx", SaveFormat::Pptx);
presentation->Dispose();
Texten renderas som krökt, extruderad 3D‑bokstavstext:
Behåll text platt på en 3D‑form
För att hålla texten läsbar samtidigt som en forms 3D‑utseende bevaras, anropa ITextFrameFormat::set_KeepTextFlat via ITextFrame::get_TextFrameFormat. När värdet är true hålls texten utanför 3D‑scenen. När det är false deltar texten i scenen och följer dess 3D‑orientering.
Denna inställning tar inte bort formens 3D‑formatering: dess kamera, belysning, material och extrusion förblir konfigurerade via IShape::get_ThreeDFormat. Det skiljer sig också från vanlig rotation. IShape::set_Rotation roterar formen i bildplanet, medan ITextFrameFormat::set_RotationAngle styr textens anpassade rotation inom dess omgivningsruta. Att hålla texten utanför 3D‑scenen återställer inte någon av dessa vinklar.
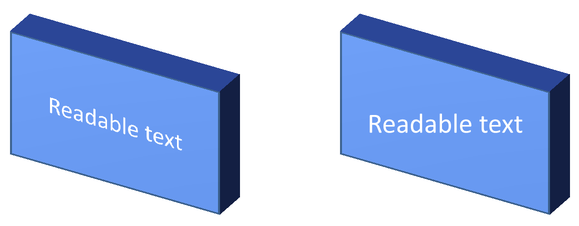
Det följande fristående exemplet skapar en blå rektangel med text och klonar den bredvid originalet. Båda formerna har samma 3D‑formatering; endast textinställningen skiljer sig: false till vänster och true till höger. Kamera‑vinklarna är i grader och extrusionshöjden är 40 punkter. Exemplet sparar presentationen som PPTX och renderar jämförelsesidan till PNG med dubbla standarddimensioner.
#include <DOM/ITextFrameFormat.h>
#include <DOM/TextAlignment.h>
#include <DOM/TextAnchorType.h>
#include <DOM/CameraPresetType.h>
#include <DOM/FillType.h>
#include <DOM/IAutoShape.h>
#include <DOM/ICamera.h>
#include <DOM/IColorFormat.h>
#include <DOM/IFillFormat.h>
#include <DOM/ILightRig.h>
#include <DOM/IParagraph.h>
#include <DOM/IParagraphFormat.h>
#include <DOM/IPortionFormat.h>
#include <DOM/IShapeCollection.h>
#include <DOM/ISlide.h>
#include <DOM/ITextFrame.h>
#include <DOM/IThreeDFormat.h>
#include <DOM/LightRigPresetType.h>
#include <DOM/LightingDirection.h>
#include <DOM/MaterialPresetType.h>
#include <DOM/Presentation.h>
#include <DOM/ShapeType.h>
#include <Export/SaveFormat.h>
#include <IImage.h>
#include <drawing/color.h>

using namespace Aspose::Slides;
using namespace Aspose::Slides::Export;
using namespace System::Drawing;

auto presentation = System::MakeObject<Presentation>();
auto slide = presentation->get_Slide(0);

auto shape = slide->get_Shapes()->AddAutoShape(ShapeType::Rectangle, 70.0f, 160.0f, 240.0f, 140.0f);

shape->get_TextFrame()->set_Text(u"Readable text");
shape->get_TextFrame()->get_Paragraph(0)->get_ParagraphFormat()->get_DefaultPortionFormat()->set_FontHeight(28.0f);
shape->get_TextFrame()->get_Paragraph(0)->get_ParagraphFormat()->set_Alignment(TextAlignment::Center);
shape->get_TextFrame()->get_TextFrameFormat()->set_AnchoringType(TextAnchorType::Center);
shape->get_FillFormat()->set_FillType(FillType::Solid);
shape->get_FillFormat()->get_SolidFillColor()->set_Color(Color::get_CornflowerBlue());

shape->get_ThreeDFormat()->get_Camera()->set_CameraType(CameraPresetType::OrthographicFront);
shape->get_ThreeDFormat()->get_Camera()->SetRotation(30.0f, 30.0f, 0.0f);
shape->get_ThreeDFormat()->get_LightRig()->set_LightType(LightRigPresetType::Flat);
shape->get_ThreeDFormat()->get_LightRig()->set_Direction(LightingDirection::Top);
shape->get_ThreeDFormat()->set_Material(MaterialPresetType::Flat);
shape->get_ThreeDFormat()->set_ExtrusionHeight(40.0);
shape->get_ThreeDFormat()->get_ExtrusionColor()->set_Color(Color::get_RoyalBlue());
shape->get_TextFrame()->get_TextFrameFormat()->set_KeepTextFlat(false);

auto clonedShape = slide->get_Shapes()->AddClone(shape, 400.0f, 160.0f);
auto flatTextShape = System::ExplicitCast<IAutoShape>(clonedShape);
flatTextShape->get_TextFrame()->get_TextFrameFormat()->set_KeepTextFlat(true);

presentation->Save(u"keep_text_flat.pptx", SaveFormat::Pptx);
auto image = slide->GetImage(2.0f, 2.0f);
image->Save(u"keep_text_flat.png");
image->Dispose();
presentation->Dispose();
Till vänster följer texten 3D‑orienteringen. Till höger förblir den platt och lättare att läsa. Båda rektanglarna behåller samma synliga extrusion och 3D‑orientering.
Export‑ och renderingsbeteende
Aspose.Slides bevarar 3D‑formatering vid sparande till PowerPoint‑format som PPTX. Vid rendering eller export till fasta layout‑format rasteriseras 3D‑scenen eller ritas in i utdata som ett 2D‑resultat. Detta gäller när du renderar bilder till PNG, exporterar till PDF, exporterar till HTML, eller genererar ramar för videokonvertering.
Kom ihåg följande punkter:
- Exporterade bilder och PDF‑filer är inte interaktiva. Objektet kan inte roteras av betraktaren efter export.
- Det slutgiltiga utseendet beror på kombinationen av kamera, ljusrigg, material, extrusion, fyllning och bildskalning.
- Om du behöver inspektera ärvda eller temabaserade formateringsvärden, läs effektiva formegenskaper.
- Vissa utdataformat kan inte lagra redigerbar PowerPoint‑3D‑formatering. I dessa format renderas det visuella resultatet snarare än att bevaras som redigerbara 3D‑inställningar.
FAQ
Kan Aspose.Slides skapa interaktiva 3D‑presentationer?
Aspose.Slides skapar och renderar PowerPoint‑3D‑effekter för former och text. Det gör inte exporterade bilder, PDF‑filer eller HTML‑sidor till interaktiva 3D‑scener som en betraktare kan rotera. I PPTX förblir 3D‑formateringen redigerbar i PowerPoint där formatet stöder det.
Vad är skillnaden mellan en 3D‑modell och en 3D‑effekt?
En 3D‑modell är ett separat 3D‑objekt som infogas i en presentation. En 3D‑effekt är formatering som tillämpas på en vanlig PowerPoint‑form eller -text, såsom rotation, extrusion, avfasning, belysning och material. Denna artikel behandlar 3D‑effekter.
Vilka inställningar krävs för en synlig 3D‑form?
Som minimum måste du sätta en kamerarotation och antingen extrusion eller djup. I praktiken bör du också sätta en ljusrigg och material så att de renderade ytorna får tydliga högdagrar och skuggor.
Kan jag tillämpa 3D‑effekter på både former och text?
Ja. Använd IShape::get_ThreeDFormat för formkroppen och ITextFrameFormat::get_ThreeDFormat för text.
Kommer 3D‑effekter att visas vid export till bilder, PDF, HTML eller videoramar?
Ja. Aspose.Slides renderar 3D‑effekter när du producerar bildutdata, PDF‑utdata, HTML‑utdata och ramar som används för videokonvertering. Den exporterade utdata innehåller den renderade utseendet, inte ett redigerbart 3D‑objekt.
Kan jag läsa de slutgiltiga 3D‑värdena efter arv och temainställningar har tillämpats?
Ja. Använd de effektiva formaterings‑API:erna som beskrivs i Shape Effective Properties för att läsa de slutgiltiga kamer‑, ljusrigg‑, avfasnings‑ och relaterade 3D‑värdena.