
在 C++ 中格式化 PowerPoint 形状
介绍
在 PowerPoint 中,您可以向幻灯片添加形状。由于形状由线组成,您可以通过修改或应用效果到其轮廓来格式化它们。此外,您还可以通过指定控制内部填充方式的设置来格式化形状。
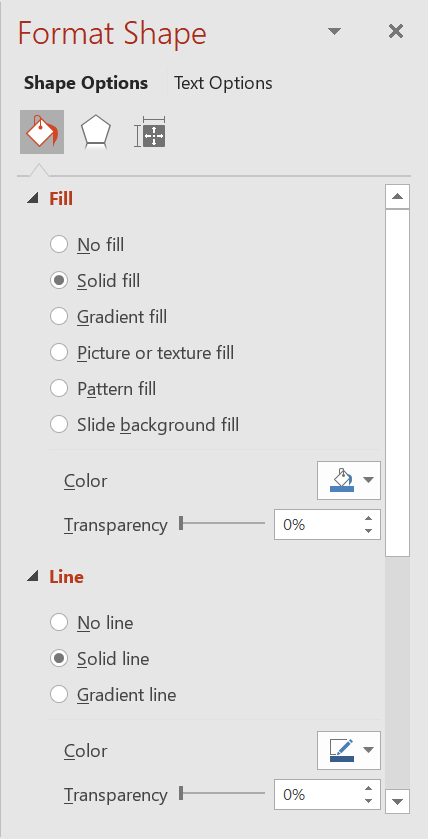
Aspose.Slides for C++ 提供了接口和方法,使您可以使用 PowerPoint 中相同的选项来格式化形状。
格式化线条
使用 Aspose.Slides,您可以为形状指定自定义线条样式。以下步骤概述了该过程:
- 创建一个 Presentation 类的实例。
- 通过索引获取幻灯片的引用。
- 向幻灯片添加一个 IAutoShape。
- 设置形状的 line style。
- 设置线宽。
- 设置线条的 dash style。
- 设置形状的线条颜色。
- 将修改后的演示文稿保存为 PPTX 文件。
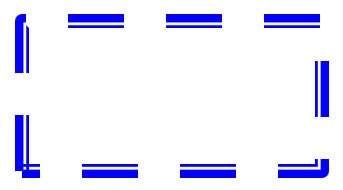
以下代码演示了如何格式化矩形 AutoShape:
#include <DOM/FillType.h>
#include <DOM/IAutoShape.h>
#include <DOM/IColorFormat.h>
#include <DOM/IFillFormat.h>
#include <DOM/ILineFillFormat.h>
#include <DOM/ILineFormat.h>
#include <DOM/IShapeCollection.h>
#include <DOM/ISlide.h>
#include <DOM/LineDashStyle.h>
#include <DOM/LineStyle.h>
#include <DOM/Presentation.h>
#include <DOM/ShapeType.h>
#include <Export/SaveFormat.h>
#include <drawing/color.h>
#include <system/smart_ptr.h>
using namespace Aspose::Slides;
using namespace Aspose::Slides::Export;
using namespace System;
using namespace System::Drawing;

// 实例化表示演示文稿文件的 Presentation 类。
auto presentation = MakeObject<Presentation>();

// 获取第一张幻灯片。
auto slide = presentation->get_Slide(0);

// 添加一个矩形类型的自动形状。
auto shape = slide->get_Shapes()->AddAutoShape(ShapeType::Rectangle, 50, 150, 150, 75);

// 为矩形形状设置填充颜色。
shape->get_FillFormat()->set_FillType(FillType::NoFill);

// 对矩形的线条应用格式设置。
shape->get_LineFormat()->set_Style(LineStyle::ThickThin);
shape->get_LineFormat()->set_Width(7);
shape->get_LineFormat()->set_DashStyle(LineDashStyle::Dash);

// 为矩形的线条设置颜色。
shape->get_LineFormat()->get_FillFormat()->set_FillType(FillType::Solid);
shape->get_LineFormat()->get_FillFormat()->get_SolidFillColor()->set_Color(Color::get_Blue());

// 将 PPTX 文件保存到磁盘。
presentation->Save(u"formatted_lines.pptx", SaveFormat::Pptx);
presentation->Dispose();
对形状线条应用素描效果
素描效果使形状线条看起来像手绘。使用 IShape::get_LineFormat 访问线条设置,使用 ILineFormat::get_SketchFormat 访问素描设置,并使用 ISketchFormat::set_SketchType 从 LineSketchType 枚举中选择值。
以下 C++ 代码展示了如何应用 LineSketchType::Curved 效果,读取显式分配的值,并使用 LineSketchType::None 移除该效果:
auto presentation = MakeObject<Presentation>();

auto slide = presentation->get_Slide(0);
auto shape = slide->get_Shapes()->AddAutoShape(ShapeType::Rectangle, 50, 50, 200, 100);

// Access the shape's line format and its sketch format.
auto sketchFormat = shape->get_LineFormat()->get_SketchFormat();

// Apply a sketch effect.
sketchFormat->set_SketchType(LineSketchType::Curved);

// Read the sketch effect assigned directly to the shape.
auto explicitSketchType = sketchFormat->get_SketchType();
Console::WriteLine(u"Explicit sketch type: {0}", explicitSketchType);

// Remove the sketch effect.
sketchFormat->set_SketchType(LineSketchType::None);

presentation->Dispose();
由 ISketchFormat::get_SketchType 返回的值表示直接分配给形状的设置。
如果线条格式可以从主题、母版幻灯片或布局幻灯片继承,请使用 ILineFormat::GetEffective,访问 ILineFormatEffectiveData::get_SketchFormat,并读取 ISketchFormatEffectiveData::get_SketchType。有效值反映了继承解析后实际应用的格式:
auto presentation = MakeObject<Presentation>(u"presentation.pptx");

auto shape = presentation->get_Slide(0)->get_Shape(0);
auto lineFormat = shape->get_LineFormat();

auto explicitSketchType = lineFormat->get_SketchFormat()->get_SketchType();
auto effectiveLineFormat = lineFormat->GetEffective();
auto effectiveSketchType = effectiveLineFormat->get_SketchFormat()->get_SketchType();

Console::WriteLine(u"Explicit sketch type: {0}", explicitSketchType);
Console::WriteLine(u"Effective sketch type: {0}", effectiveSketchType);

presentation->Dispose();
格式化连接样式
以下是三种连接类型选项:
- 圆形
- 斜接
- 斜面
默认情况下,PowerPoint 在以角度连接两条线(例如形状的角点)时使用 Round 设置。然而,如果您绘制的形状具有尖锐角度,可能更喜欢 Miter 选项。
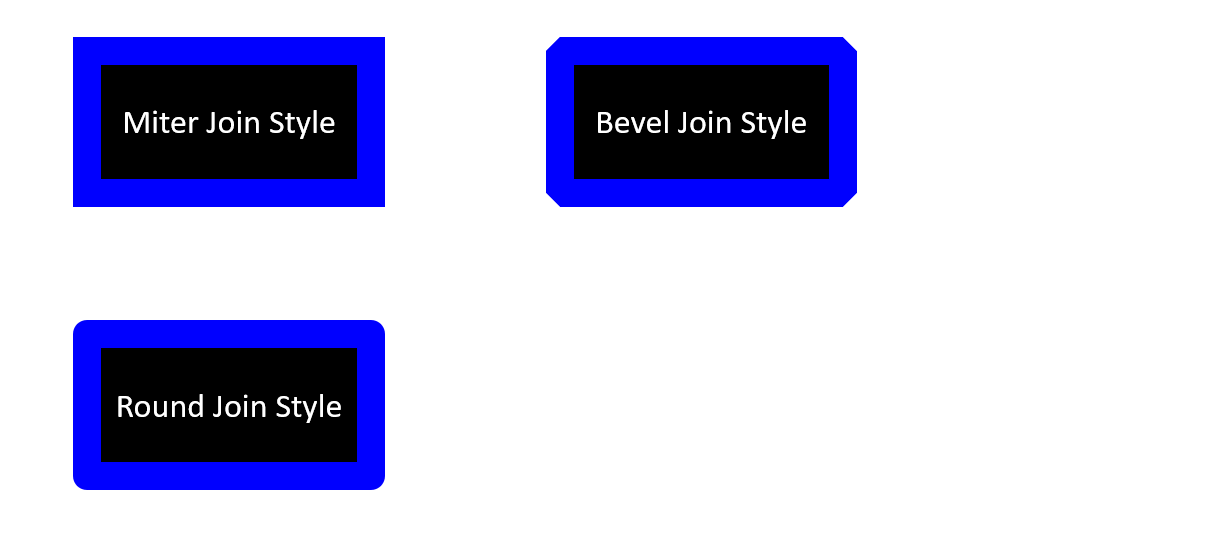
以下 C++ 代码演示了如何使用 Miter、Bevel 和 Round 连接类型设置创建图中所示的三个矩形:
#include <DOM/FillType.h>
#include <DOM/IAutoShape.h>
#include <DOM/IColorFormat.h>
#include <DOM/IFillFormat.h>
#include <DOM/ILineFillFormat.h>
#include <DOM/ILineFormat.h>
#include <DOM/IShapeCollection.h>
#include <DOM/ISlide.h>
#include <DOM/ITextFrame.h>
#include <DOM/LineJoinStyle.h>
#include <DOM/Presentation.h>
#include <DOM/ShapeType.h>
#include <Export/SaveFormat.h>
#include <drawing/color.h>
#include <system/smart_ptr.h>
using namespace Aspose::Slides;
using namespace Aspose::Slides::Export;
using namespace System;
using namespace System::Drawing;

// 实例化表示演示文稿文件的 Presentation 类。
auto presentation = MakeObject<Presentation>();

// 获取第一张幻灯片。
auto slide = presentation->get_Slide(0);

// 添加三个矩形类型的自动形状。
auto shape1 = slide->get_Shapes()->AddAutoShape(ShapeType::Rectangle, 20, 20, 150, 75);
auto shape2 = slide->get_Shapes()->AddAutoShape(ShapeType::Rectangle, 210, 20, 150, 75);
auto shape3 = slide->get_Shapes()->AddAutoShape(ShapeType::Rectangle, 20, 135, 150, 75);

// 为每个矩形形状设置填充颜色。
shape1->get_FillFormat()->set_FillType(FillType::Solid);
shape1->get_FillFormat()->get_SolidFillColor()->set_Color(Color::get_Black());
shape2->get_FillFormat()->set_FillType(FillType::Solid);
shape2->get_FillFormat()->get_SolidFillColor()->set_Color(Color::get_Black());
shape3->get_FillFormat()->set_FillType(FillType::Solid);
shape3->get_FillFormat()->get_SolidFillColor()->set_Color(Color::get_Black());

// 设置线宽。
shape1->get_LineFormat()->set_Width(15);
shape2->get_LineFormat()->set_Width(15);
shape3->get_LineFormat()->set_Width(15);

// 为每个矩形的线条设置颜色。
shape1->get_LineFormat()->get_FillFormat()->set_FillType(FillType::Solid);
shape1->get_LineFormat()->get_FillFormat()->get_SolidFillColor()->set_Color(Color::get_Blue());
shape2->get_LineFormat()->get_FillFormat()->set_FillType(FillType::Solid);
shape2->get_LineFormat()->get_FillFormat()->get_SolidFillColor()->set_Color(Color::get_Blue());
shape3->get_LineFormat()->get_FillFormat()->set_FillType(FillType::Solid);
shape3->get_LineFormat()->get_FillFormat()->get_SolidFillColor()->set_Color(Color::get_Blue());

// 设置连接样式。
shape1->get_LineFormat()->set_JoinStyle(LineJoinStyle::Miter);
shape2->get_LineFormat()->set_JoinStyle(LineJoinStyle::Bevel);
shape3->get_LineFormat()->set_JoinStyle(LineJoinStyle::Round);

// 为每个矩形添加文本。
shape1->get_TextFrame()->set_Text(u"Miter Join Style");
shape2->get_TextFrame()->set_Text(u"Bevel Join Style");
shape3->get_TextFrame()->set_Text(u"Round Join Style");

// 将 PPTX 文件保存到磁盘。
presentation->Save(u"join_styles.pptx", SaveFormat::Pptx);
presentation->Dispose();
渐变填充
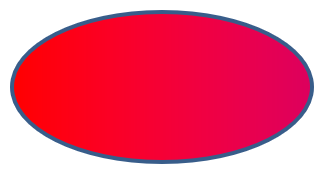
在 PowerPoint 中,Gradient Fill 是一种格式化选项,允许您对形状应用连续的颜色渐变。例如,您可以以一种颜色逐渐淡入另一种颜色的方式应用两种或更多颜色。
以下是使用 Aspose.Slides 对形状应用渐变填充的方法:
- 创建一个 Presentation 类的实例。
- 通过索引获取幻灯片的引用。
- 向幻灯片添加一个 IAutoShape。
- 将形状的 FillType 设置为
Gradient。 - 使用 IGradientFormat 接口暴露的渐变停止集合的
Add方法,添加两个首选颜色并定义位置。 - 将修改后的演示文稿保存为 PPTX 文件。
#include <DOM/FillType.h>
#include <DOM/GradientDirection.h>
#include <DOM/GradientShape.h>
#include <DOM/IAutoShape.h>
#include <DOM/IFillFormat.h>
#include <DOM/IGradientFormat.h>
#include <DOM/IGradientStopCollection.h>
#include <DOM/IShapeCollection.h>
#include <DOM/ISlide.h>
#include <DOM/Presentation.h>
#include <DOM/PresetColor.h>
#include <DOM/ShapeType.h>
#include <Export/SaveFormat.h>
#include <system/smart_ptr.h>
using namespace Aspose::Slides;
using namespace Aspose::Slides::Export;
using namespace System;

// 实例化表示演示文稿文件的 Presentation 类。
auto presentation = MakeObject<Presentation>();

// 获取第一张幻灯片。
auto slide = presentation->get_Slide(0);

// 添加一个椭圆类型的自动形状。
auto shape = slide->get_Shapes()->AddAutoShape(ShapeType::Ellipse, 50, 50, 150, 75);

// 对椭圆应用渐变格式。
shape->get_FillFormat()->set_FillType(FillType::Gradient);
shape->get_FillFormat()->get_GradientFormat()->set_GradientShape(GradientShape::Linear);

// 设置渐变的方向。
shape->get_FillFormat()->get_GradientFormat()->set_GradientDirection(GradientDirection::FromCorner2);

// 添加两个渐变停止点。
shape->get_FillFormat()->get_GradientFormat()->get_GradientStops()->Add(1.0f, PresetColor::Purple);
shape->get_FillFormat()->get_GradientFormat()->get_GradientStops()->Add(0.0f, PresetColor::Red);

// 将 PPTX 文件保存到磁盘。
presentation->Save(u"gradient_fill.pptx", SaveFormat::Pptx);
presentation->Dispose();
图案填充
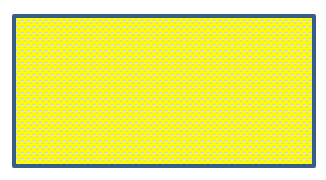
在 PowerPoint 中,Pattern Fill 是一种格式化选项,允许您对形状应用双颜色设计——例如点、条纹、交叉线或方格。您可以为图案的前景色和背景色选择自定义颜色。
Aspose.Slides 提供了超过 45 种预定义的图案样式,您可以将其应用于形状,以增强演示文稿的视觉效果。即使选择了预定义图案,仍然可以指定其使用的确切颜色。
以下是使用 Aspose.Slides 对形状应用图案填充的方法:
- 创建一个 Presentation 类的实例。
- 通过索引获取幻灯片的引用。
- 向幻灯片添加一个 IAutoShape。
- 将形状的 FillType 设置为
Pattern。 - 从预定义选项中选择图案样式。
- 设置图案的 Background Color。
- 设置图案的 Foreground Color。
- 将修改后的演示文稿保存为 PPTX 文件。
#include <DOM/FillType.h>
#include <DOM/IAutoShape.h>
#include <DOM/IColorFormat.h>
#include <DOM/IFillFormat.h>
#include <DOM/IPatternFormat.h>
#include <DOM/IShapeCollection.h>
#include <DOM/ISlide.h>
#include <DOM/PatternStyle.h>
#include <DOM/Presentation.h>
#include <DOM/ShapeType.h>
#include <Export/SaveFormat.h>
#include <drawing/color.h>
#include <system/smart_ptr.h>
using namespace Aspose::Slides;
using namespace Aspose::Slides::Export;
using namespace System;
using namespace System::Drawing;

// 实例化表示演示文稿文件的 Presentation 类。
auto presentation = MakeObject<Presentation>();

// 获取第一张幻灯片。
auto slide = presentation->get_Slide(0);

// 添加一个矩形类型的自动形状。
auto shape = slide->get_Shapes()->AddAutoShape(ShapeType::Rectangle, 50, 50, 150, 75);

// 将填充类型设置为 Pattern。
shape->get_FillFormat()->set_FillType(FillType::Pattern);

// 设置图案样式。
shape->get_FillFormat()->get_PatternFormat()->set_PatternStyle(PatternStyle::Trellis);

// 设置图案的背景色和前景色。
shape->get_FillFormat()->get_PatternFormat()->get_BackColor()->set_Color(Color::get_LightGray());
shape->get_FillFormat()->get_PatternFormat()->get_ForeColor()->set_Color(Color::get_Yellow());

// 将 PPTX 文件保存到磁盘。
presentation->Save(u"pattern_fill.pptx", SaveFormat::Pptx);
presentation->Dispose();
图片填充
在 PowerPoint 中,Picture Fill 是一种格式化选项,允许您在形状内部插入图片——实质上将图片用作形状的背景。
以下是使用 Aspose.Slides 对形状应用图片填充的方法:
- 创建一个 Presentation 类的实例。
- 通过索引获取幻灯片的引用。
- 向幻灯片添加一个 IAutoShape。
- 将形状的 FillType 设置为
Picture。 - 将图片填充模式设置为
Tile(或其他首选模式)。 - 从要使用的图片创建一个 IPPImage 对象。
- 将图片传递给
ISlidesPicture.set_Image方法。 - 将修改后的演示文稿保存为 PPTX 文件。
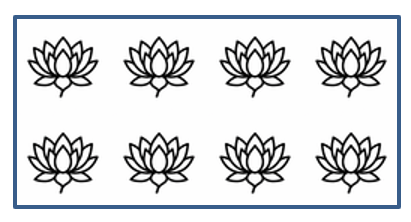
假设我们有一个名为 “lotus.png” 的文件,其中包含以下图片:

#include <DOM/FillType.h>
#include <DOM/IAutoShape.h>
#include <DOM/IFillFormat.h>
#include <DOM/IImageCollection.h>
#include <DOM/IPictureFillFormat.h>
#include <DOM/IShapeCollection.h>
#include <DOM/ISlide.h>
#include <DOM/ISlidesPicture.h>
#include <DOM/PictureFillMode.h>
#include <DOM/Presentation.h>
#include <DOM/ShapeType.h>
#include <Export/SaveFormat.h>
#include <IImage.h>
#include <Util/Images.h>
#include <system/smart_ptr.h>
using namespace Aspose::Slides;
using namespace Aspose::Slides::Export;
using namespace System;

// 实例化表示演示文稿文件的 Presentation 类。
auto presentation = MakeObject<Presentation>();

// 获取第一张幻灯片。
auto slide = presentation->get_Slide(0);

// 添加一个矩形类型的自动形状。
auto shape = slide->get_Shapes()->AddAutoShape(ShapeType::Rectangle, 50, 50, 255, 130);

// 将填充类型设置为 Picture。
shape->get_FillFormat()->set_FillType(FillType::Picture);

// 设置图片填充模式。
shape->get_FillFormat()->get_PictureFillFormat()->set_PictureFillMode(PictureFillMode::Tile);

// 加载图像并将其添加到演示文稿资源中。
auto image = Images::FromFile(u"lotus.png");
auto picture = presentation->get_Images()->AddImage(image);
image->Dispose();

// 设置图片。
shape->get_FillFormat()->get_PictureFillFormat()->get_Picture()->set_Image(picture);

// 将 PPTX 文件保存到磁盘。
presentation->Save(u"picture_fill.pptx", SaveFormat::Pptx);
presentation->Dispose();
将图片平铺为纹理
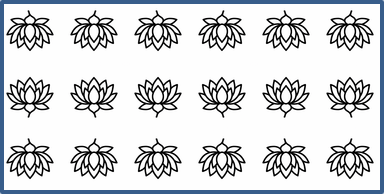
如果您想将平铺的图片设置为纹理并自定义平铺行为,可以使用 IPictureFillFormat 接口和 PictureFillFormat 类的以下方法:
- set_PictureFillMode:设置图片填充模式——
Tile或Stretch。 - set_TileAlignment:指定平铺在形状内的对齐方式。
- set_TileFlip:控制平铺是水平翻转、垂直翻转,还是两者皆翻转。
- set_TileOffsetX:设置平铺相对于形状原点的水平偏移(以点为单位)。
- set_TileOffsetY:设置平铺相对于形状原点的垂直偏移(以点为单位)。
- set_TileScaleX:定义平铺的水平缩放比例(百分比)。
- set_TileScaleY:定义平铺的垂直缩放比例(百分比)。
以下代码示例展示了如何添加一个带有平铺图片填充的矩形形状并配置平铺选项:
#include <DOM/FillType.h>
#include <DOM/IAutoShape.h>
#include <DOM/IFillFormat.h>
#include <DOM/IImageCollection.h>
#include <DOM/IPictureFillFormat.h>
#include <DOM/IShapeCollection.h>
#include <DOM/ISlide.h>
#include <DOM/ISlidesPicture.h>
#include <DOM/PictureFillMode.h>
#include <DOM/Presentation.h>
#include <DOM/RectangleAlignment.h>
#include <DOM/ShapeType.h>
#include <DOM/TileFlip.h>
#include <Export/SaveFormat.h>
#include <IImage.h>
#include <Util/Images.h>
#include <system/smart_ptr.h>
using namespace Aspose::Slides;
using namespace Aspose::Slides::Export;
using namespace System;

// 实例化表示演示文稿文件的 Presentation 类。
auto presentation = MakeObject<Presentation>();

// 获取第一张幻灯片。
auto firstSlide = presentation->get_Slide(0);

// 添加一个矩形自动形状。
auto shape = firstSlide->get_Shapes()->AddAutoShape(ShapeType::Rectangle, 50, 50, 190, 95);

// 将形状的填充类型设置为 Picture。
shape->get_FillFormat()->set_FillType(FillType::Picture);

// 加载图像并将其添加到演示文稿资源中。
auto sourceImage = Images::FromFile(u"lotus.png");
auto presentationImage = presentation->get_Images()->AddImage(sourceImage);
sourceImage->Dispose();

// 将图像分配给形状。
auto pictureFillFormat = shape->get_FillFormat()->get_PictureFillFormat();
pictureFillFormat->get_Picture()->set_Image(presentationImage);

// 配置图片填充模式和瓦片属性。
pictureFillFormat->set_PictureFillMode(PictureFillMode::Tile);
pictureFillFormat->set_TileOffsetX(-32);
pictureFillFormat->set_TileOffsetY(-32);
pictureFillFormat->set_TileScaleX(50);
pictureFillFormat->set_TileScaleY(50);
pictureFillFormat->set_TileAlignment(RectangleAlignment::BottomRight);
pictureFillFormat->set_TileFlip(TileFlip::FlipBoth);

// 将 PPTX 文件保存到磁盘。
presentation->Save(u"tile.pptx", SaveFormat::Pptx);
presentation->Dispose();
纯色填充
在 PowerPoint 中,Solid Color Fill 是一种格式化选项,可使用单一均匀颜色填充形状。这种纯色背景不包含任何渐变、纹理或图案。
使用 Aspose.Slides 对形状应用纯色填充,请遵循以下步骤:
- 创建一个 Presentation 类的实例。
- 通过索引获取幻灯片的引用。
- 向幻灯片添加一个 IAutoShape。
- 将形状的 FillType 设置为
Solid。 - 为形状分配您首选的填充颜色。
- 将修改后的演示文稿保存为 PPTX 文件。
#include <DOM/FillType.h>
#include <DOM/IAutoShape.h>
#include <DOM/IColorFormat.h>
#include <DOM/IFillFormat.h>
#include <DOM/IShapeCollection.h>
#include <DOM/ISlide.h>
#include <DOM/Presentation.h>
#include <DOM/ShapeType.h>
#include <Export/SaveFormat.h>
#include <drawing/color.h>
#include <system/smart_ptr.h>
using namespace Aspose::Slides;
using namespace Aspose::Slides::Export;
using namespace System;
using namespace System::Drawing;

// 实例化表示演示文稿文件的 Presentation 类。
auto presentation = MakeObject<Presentation>();

// 获取第一张幻灯片。
auto slide = presentation->get_Slide(0);

// 添加一个矩形类型的自动形状。
auto shape = slide->get_Shapes()->AddAutoShape(ShapeType::Rectangle, 50, 50, 150, 75);

// 将填充类型设置为 Solid。
shape->get_FillFormat()->set_FillType(FillType::Solid);

// 设置填充颜色。
shape->get_FillFormat()->get_SolidFillColor()->set_Color(Color::get_Yellow());

// 将 PPTX 文件保存到磁盘。
presentation->Save(u"solid_color_fill.pptx", SaveFormat::Pptx);
presentation->Dispose();

设置透明度
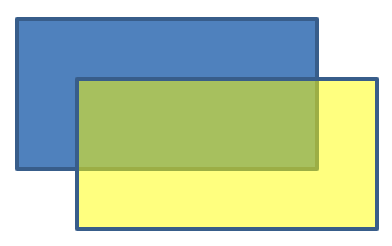
在 PowerPoint 中,当您对形状应用纯色、渐变、图片或纹理填充时,还可以设置透明度级别以控制填充的不透明度。更高的透明度值会使形状更透明,从而部分显示背景或底层对象。
Aspose.Slides 通过调整用于填充的颜色的 alpha 值来设置透明度。以下是操作方法:
- 创建一个 Presentation 类的实例。
- 通过索引获取幻灯片的引用。
- 向幻灯片添加一个 IAutoShape。
- 将形状的 FillType 设置为
Solid。 - 使用
Color定义具有透明度的颜色(alpha组件控制透明度)。 - 保存演示文稿。
#include <DOM/FillType.h>
#include <DOM/IAutoShape.h>
#include <DOM/IColorFormat.h>
#include <DOM/IFillFormat.h>
#include <DOM/IShapeCollection.h>
#include <DOM/ISlide.h>
#include <DOM/Presentation.h>
#include <DOM/ShapeType.h>
#include <Export/SaveFormat.h>
#include <drawing/color.h>
#include <system/smart_ptr.h>
using namespace Aspose::Slides;
using namespace Aspose::Slides::Export;
using namespace System;
using namespace System::Drawing;

// 实例化表示演示文稿文件的 Presentation 类。
auto presentation = MakeObject<Presentation>();

// 获取第一张幻灯片。
auto slide = presentation->get_Slide(0);

// 添加一个实心矩形自动形状。
auto solidShape = slide->get_Shapes()->AddAutoShape(ShapeType::Rectangle, 50, 50, 150, 75);

// 在实心形状上添加一个透明矩形自动形状。
auto transparentShape = slide->get_Shapes()->AddAutoShape(ShapeType::Rectangle, 80, 80, 150, 75);
transparentShape->get_FillFormat()->set_FillType(FillType::Solid);
transparentShape->get_FillFormat()->get_SolidFillColor()->set_Color(Color::FromArgb(204, 255, 255, 0));

// 将 PPTX 文件保存到磁盘。
presentation->Save(u"shape_transparency.pptx", SaveFormat::Pptx);
presentation->Dispose();
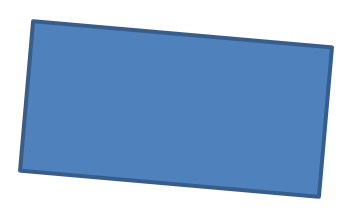
旋转形状
Aspose.Slides 让您在 PowerPoint 演示文稿中旋转形状。这在需要特定对齐或设计需求的视觉元素定位时非常有用。
要在幻灯片上旋转形状,请遵循以下步骤:
- 创建一个 Presentation 类的实例。
- 通过索引获取幻灯片的引用。
- 向幻灯片添加一个 IAutoShape。
- 将形状的旋转属性设置为所需角度。
- 保存演示文稿。
#include <DOM/IAutoShape.h>
#include <DOM/IShapeCollection.h>
#include <DOM/ISlide.h>
#include <DOM/Presentation.h>
#include <DOM/ShapeType.h>
#include <Export/SaveFormat.h>
#include <system/smart_ptr.h>
using namespace Aspose::Slides;
using namespace Aspose::Slides::Export;
using namespace System;

// 实例化表示演示文稿文件的 Presentation 类。
auto presentation = MakeObject<Presentation>();

// 获取第一张幻灯片。
auto slide = presentation->get_Slide(0);

// 添加一个矩形类型的自动形状。
auto shape = slide->get_Shapes()->AddAutoShape(ShapeType::Rectangle, 50, 50, 150, 75);

// 将形状旋转 5 度。
shape->set_Rotation(5);

// 将 PPTX 文件保存到磁盘。
presentation->Save(u"shape_rotation.pptx", SaveFormat::Pptx);
presentation->Dispose();
添加 3D 倾斜效果
Aspose.Slides 通过配置形状的 ThreeDFormat 属性,允许您对形状应用 3D 倾斜效果。
要向形状添加 3D 倾斜效果,请遵循以下步骤:
- 实例化 Presentation 类。
- 通过索引获取幻灯片的引用。
- 向幻灯片添加一个 IAutoShape。
- 配置形状的 ThreeDFormat 以定义倾斜设置。
- 保存演示文稿。
#include <DOM/BevelPresetType.h>
#include <DOM/CameraPresetType.h>
#include <DOM/FillType.h>
#include <DOM/IAutoShape.h>
#include <DOM/ICamera.h>
#include <DOM/IColorFormat.h>
#include <DOM/IFillFormat.h>
#include <DOM/ILightRig.h>
#include <DOM/ILineFillFormat.h>
#include <DOM/ILineFormat.h>
#include <DOM/IShapeBevel.h>
#include <DOM/IShapeCollection.h>
#include <DOM/ISlide.h>
#include <DOM/IThreeDFormat.h>
#include <DOM/LightRigPresetType.h>
#include <DOM/LightingDirection.h>
#include <DOM/Presentation.h>
#include <DOM/ShapeType.h>
#include <Export/SaveFormat.h>
#include <drawing/color.h>
#include <system/smart_ptr.h>
using namespace Aspose::Slides;
using namespace Aspose::Slides::Export;
using namespace System;
using namespace System::Drawing;

// 创建 Presentation 类的实例。
auto presentation = MakeObject<Presentation>();

auto slide = presentation->get_Slide(0);

// 向幻灯片添加形状。
auto shape = slide->get_Shapes()->AddAutoShape(ShapeType::Ellipse, 50, 50, 100, 100);
shape->get_FillFormat()->set_FillType(FillType::Solid);
shape->get_FillFormat()->get_SolidFillColor()->set_Color(Color::get_Green());
shape->get_LineFormat()->get_FillFormat()->set_FillType(FillType::Solid);
shape->get_LineFormat()->get_FillFormat()->get_SolidFillColor()->set_Color(Color::get_Orange());
shape->get_LineFormat()->set_Width(2.0);

// 设置形状的 ThreeDFormat 属性。
shape->get_ThreeDFormat()->set_Depth(4.0);
shape->get_ThreeDFormat()->get_BevelTop()->set_BevelType(BevelPresetType::Circle);
shape->get_ThreeDFormat()->get_BevelTop()->set_Height(6);
shape->get_ThreeDFormat()->get_BevelTop()->set_Width(6);
shape->get_ThreeDFormat()->get_Camera()->set_CameraType(CameraPresetType::OrthographicFront);
shape->get_ThreeDFormat()->get_LightRig()->set_LightType(LightRigPresetType::ThreePt);
shape->get_ThreeDFormat()->get_LightRig()->set_Direction(LightingDirection::Top);

// 将演示文稿保存为 PPTX 文件。
presentation->Save(u"3D_bevel_effect.pptx", SaveFormat::Pptx);
presentation->Dispose();

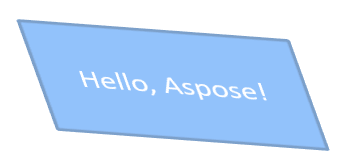
添加 3D 旋转效果
Aspose.Slides 通过配置形状的 ThreeDFormat 属性,允许您对形状应用 3D 旋转效果。
要对形状应用 3D 旋转:
- 创建一个 Presentation 类的实例。
- 通过索引获取幻灯片的引用。
- 向幻灯片添加一个 IAutoShape。
- 使用 set_CameraType 和 set_LightType 定义 3D 旋转。
- 保存演示文稿。
#include <DOM/CameraPresetType.h>
#include <DOM/IAutoShape.h>
#include <DOM/ICamera.h>
#include <DOM/ILightRig.h>
#include <DOM/IShapeCollection.h>
#include <DOM/ISlide.h>
#include <DOM/ITextFrame.h>
#include <DOM/IThreeDFormat.h>
#include <DOM/LightRigPresetType.h>
#include <DOM/Presentation.h>
#include <DOM/ShapeType.h>
#include <Export/SaveFormat.h>
#include <system/smart_ptr.h>
using namespace Aspose::Slides;
using namespace Aspose::Slides::Export;
using namespace System;

// 创建 Presentation 类的实例。
auto presentation = MakeObject<Presentation>();

auto slide = presentation->get_Slide(0);

auto shape = slide->get_Shapes()->AddAutoShape(ShapeType::Rectangle, 50, 50, 150, 75);
shape->get_TextFrame()->set_Text(u"Hello, Aspose!");

shape->get_ThreeDFormat()->set_Depth(6);
shape->get_ThreeDFormat()->get_Camera()->SetRotation(40, 35, 20);
shape->get_ThreeDFormat()->get_Camera()->set_CameraType(CameraPresetType::IsometricLeftUp);
shape->get_ThreeDFormat()->get_LightRig()->set_LightType(LightRigPresetType::Balanced);

// 将演示文稿保存为 PPTX 文件。
presentation->Save(u"3D_rotation_effect.pptx", SaveFormat::Pptx);
presentation->Dispose();
控制形状的黑白渲染
使用 IShape::set_BlackWhiteMode 方法指定在以黑白模式查看或处理演示文稿时,单个形状的渲染方式。它本身并不会启用黑白显示,也不会改变形状在正常彩色模式下的填充、线条或其他格式。
使用 BlackWhiteMode 枚举中的值选择所需行为。例如,Automatic 让渲染应用程序自行选择转换方式,Gray 和 LightGray 使用灰色,BlackWhite 仅使用黑白,Black 和 White 强制单色,Color 保持正常着色,Hidden 在黑白模式下隐藏形状,NotDefined 表示未分配形状级别的模式。
以下 C++ 代码创建一个彩色形状,并在黑白显示模式下使其呈现为灰色:
#include <DOM/BlackWhiteMode.h>
#include <DOM/FillType.h>
#include <DOM/IAutoShape.h>
#include <DOM/IFillFormat.h>
#include <DOM/IShapeCollection.h>
#include <DOM/ISlide.h>
#include <DOM/Presentation.h>
#include <DOM/ShapeType.h>
#include <Export/SaveFormat.h>
#include <drawing/color.h>
#include <system/smart_ptr.h>

using namespace Aspose::Slides;
using namespace Aspose::Slides::Export;
using namespace System;
using namespace System::Drawing;

auto presentation = MakeObject<Presentation>();
auto slide = presentation->get_Slide(0);

auto shape = slide->get_Shapes()->AddAutoShape(ShapeType::Rectangle, 50, 50, 200, 100);
shape->get_FillFormat()->set_FillType(FillType::Solid);
shape->get_FillFormat()->get_SolidFillColor()->set_Color(Color::get_Orange());

// 保持橙色填充在彩色模式下,但在黑白模式中将形状渲染为灰色。
shape->set_BlackWhiteMode(BlackWhiteMode::Gray);

presentation->Save(u"shape_black_white_mode.pptx", SaveFormat::Pptx);
presentation->Dispose();
在正常彩色模式下,矩形保持橙色填充。在黑白显示工作流中,由于其模式设置为 Gray,因此使用灰色。这样您可以保留全彩幻灯片,同时为打印、预览或其他遵循演示文稿黑白显示设置的工作流定义不同的外观。
重置格式
以下 C++ 代码展示了如何重置幻灯片的格式,并将 LayoutSlide 上所有带占位符的形状的位置、大小和格式恢复为默认设置:
#include <DOM/ISlide.h>
#include <DOM/ISlideCollection.h>
#include <DOM/Presentation.h>
#include <Export/SaveFormat.h>
#include <system/enumerator_adapter.h>
#include <system/smart_ptr.h>
using namespace Aspose::Slides;
using namespace Aspose::Slides::Export;
using namespace System;

auto presentation = MakeObject<Presentation>(u"sample.pptx");

for (auto&& slide : System::IterateOver(presentation->get_Slides()))
{
    // 重置幻灯片上在布局中具有占位符的每个形状。
    slide->Reset();
}

presentation->Save(u"reset_formatting.pptx", SaveFormat::Pptx);
presentation->Dispose();
常见问答
形状格式化会影响最终演示文稿的文件大小吗?
几乎没有。嵌入的图片和媒体占据了文件的大部分空间,而形状的参数如颜色、效果和渐变仅作为元数据存储,几乎不增加额外大小。
如何检测幻灯片上具有相同格式的形状,以便将它们分组?
比较每个形状的关键格式属性——填充、线条和效果设置。如果所有对应的值均匹配,则视为样式相同,并在逻辑上将这些形状分组,这有助于后续的样式管理。
我可以将一组自定义形状样式保存到单独的文件,以便在其他演示文稿中重复使用吗?
可以。将带有所需样式的示例形状存储在模板幻灯片或 .POTX 模板文件中。创建新演示文稿时,打开该模板,克隆所需的已样式化形状,并在需要的地方重新应用其格式。