
管理 Python 中的 PowerPoint 演示文稿主题
介绍
演示文稿主题定义了一套协调的颜色、字体、背景样式、填充、线条和效果。支持主题的对象引用这些共享定义,而不是将每个视觉属性存为固定值,因此更改主题时可以一次性更新许多对象。
在 Aspose.Slides 中,演示文稿级别的主题可通过 Presentation.master_theme 属性获取。演示文稿还可以在更低层级包含主题覆盖。母版可以通过 MasterThemeManager.override_theme 覆盖演示文稿主题,布局可以通过 BaseOverrideThemeManager.override_theme 覆盖继承的主题,单个幻灯片也可以如此操作。实际上,幻灯片的实际主题通过以下继承链解析:演示文稿主题 → 母版覆盖 → 布局覆盖 → 幻灯片覆盖。
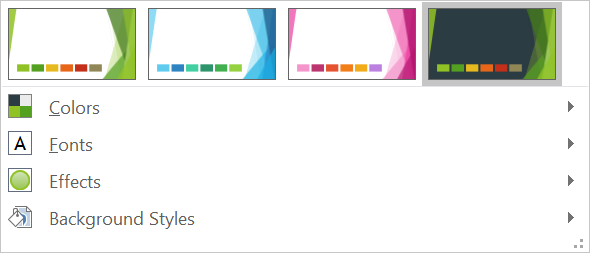
下面的章节展示了最常见的主题工作流:检查主题、修改颜色和字体、复制或应用主题、更新背景和效果样式,以及在继承和覆盖解析后读取有效值。
检查主题
MasterTheme 对象公开了主题的 color_scheme、font_scheme 和 format_scheme 属性。在更改之前检查这些集合尤其有用,因为来自外部来源的演示文稿的样式条目数量和内容可能各不相同。
以下示例读取主要主题属性并报告主题中存储了多少背景、填充、线条和效果样式:
import aspose.slides as slides

with slides.Presentation("input.pptx") as presentation:
    theme = presentation.master_theme
    print(f"Theme name: {theme.name}")
    print(f"Accent 1: {theme.color_scheme.accent1.color}")
    print(f"Major Latin font: {theme.font_scheme.major.latin_font.font_name}")
    print(f"Minor Latin font: {theme.font_scheme.minor.latin_font.font_name}")
    print(f"Background fill styles: {len(theme.format_scheme.background_fill_styles)}")
    print(f"Fill styles: {len(theme.format_scheme.fill_styles)}")
    print(f"Line styles: {len(theme.format_scheme.line_styles)}")
    print(f"Effect styles: {len(theme.format_scheme.effect_styles)}")
如果文件使用了多个母版,不要假设每个幻灯片拥有相同的实际主题。检查与幻灯片关联的母版,并在布局或幻灯片可能存在覆盖时使用本文后面展示的实际主题工作流。
更改主题颜色
支持主题的填充、线条和文本可以引用 SchemeColor 枚举中的逻辑颜色。当你在主题的 ColorScheme 中更改相应条目时,所有仍然引用该主题颜色的对象都会解析为新值。直接使用 RGB 颜色的对象不会受到主题颜色更新的影响。
以下端到端示例创建一个使用 ACCENT4 的形状,将主题的 accent4 颜色改为红色,保存演示文稿,重新打开并打印实际填充颜色:
import aspose.pydrawing as draw
import aspose.slides as slides

with slides.Presentation() as presentation:
    slide = presentation.slides[0]
    shape = slide.shapes.add_auto_shape(slides.ShapeType.RECTANGLE, 10, 10, 100, 100)
    shape.fill_format.fill_type = slides.FillType.SOLID
    shape.fill_format.solid_fill_color.scheme_color = slides.SchemeColor.ACCENT4
    presentation.master_theme.color_scheme.accent4.color = draw.Color.red
    presentation.save("theme-color.pptx", slides.export.SaveFormat.PPTX)

with slides.Presentation("theme-color.pptx") as saved_presentation:
    saved_slide = saved_presentation.slides[0]
    saved_shape = saved_slide.shapes[0]
    effective_fill = saved_shape.fill_format.get_effective()
    print(f"Effective fill color: {effective_fill.solid_fill_color}")
因为矩形仍然链接到 ACCENT4,主题更改后其可见颜色会变为红色。如果在形状上用直接颜色替换了方案颜色,随后对 accent4 的更改将不再影响该填充。
使用附加调色板中的颜色
PowerPoint 通过对主题颜色进行颜色转换来生成更亮和更暗的变体。Aspose.Slides 通过 ColorTransformOperation 枚举公开这些转换。
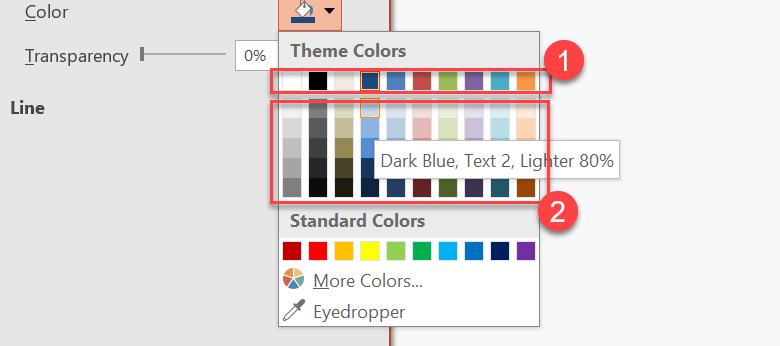
1 - 主主题颜色。
2 - 从主主题颜色生成的更亮和更暗变体。
以下示例基于 ACCENT4 创建六个矩形,对其中五个应用亮度转换,并保存结果:
import aspose.slides as slides

with slides.Presentation() as presentation:
    slide = presentation.slides[0]
    shape1 = slide.shapes.add_auto_shape(slides.ShapeType.RECTANGLE, 10, 10, 50, 50)
    shape1.fill_format.fill_type = slides.FillType.SOLID
    shape1.fill_format.solid_fill_color.scheme_color = slides.SchemeColor.ACCENT4
    shape2 = slide.shapes.add_auto_shape(slides.ShapeType.RECTANGLE, 10, 70, 50, 50)
    shape2.fill_format.fill_type = slides.FillType.SOLID
    shape2.fill_format.solid_fill_color.scheme_color = slides.SchemeColor.ACCENT4
    shape2.fill_format.solid_fill_color.color_transform.add(slides.ColorTransformOperation.MULTIPLY_LUMINANCE, 0.2)
    shape2.fill_format.solid_fill_color.color_transform.add(slides.ColorTransformOperation.ADD_LUMINANCE, 0.8)
    shape3 = slide.shapes.add_auto_shape(slides.ShapeType.RECTANGLE, 10, 130, 50, 50)
    shape3.fill_format.fill_type = slides.FillType.SOLID
    shape3.fill_format.solid_fill_color.scheme_color = slides.SchemeColor.ACCENT4
    shape3.fill_format.solid_fill_color.color_transform.add(slides.ColorTransformOperation.MULTIPLY_LUMINANCE, 0.4)
    shape3.fill_format.solid_fill_color.color_transform.add(slides.ColorTransformOperation.ADD_LUMINANCE, 0.6)
    shape4 = slide.shapes.add_auto_shape(slides.ShapeType.RECTANGLE, 10, 190, 50, 50)
    shape4.fill_format.fill_type = slides.FillType.SOLID
    shape4.fill_format.solid_fill_color.scheme_color = slides.SchemeColor.ACCENT4
    shape4.fill_format.solid_fill_color.color_transform.add(slides.ColorTransformOperation.MULTIPLY_LUMINANCE, 0.6)
    shape4.fill_format.solid_fill_color.color_transform.add(slides.ColorTransformOperation.ADD_LUMINANCE, 0.4)
    shape5 = slide.shapes.add_auto_shape(slides.ShapeType.RECTANGLE, 10, 250, 50, 50)
    shape5.fill_format.fill_type = slides.FillType.SOLID
    shape5.fill_format.solid_fill_color.scheme_color = slides.SchemeColor.ACCENT4
    shape5.fill_format.solid_fill_color.color_transform.add(slides.ColorTransformOperation.MULTIPLY_LUMINANCE, 0.75)
    shape6 = slide.shapes.add_auto_shape(slides.ShapeType.RECTANGLE, 10, 310, 50, 50)
    shape6.fill_format.fill_type = slides.FillType.SOLID
    shape6.fill_format.solid_fill_color.scheme_color = slides.SchemeColor.ACCENT4
    shape6.fill_format.solid_fill_color.color_transform.add(slides.ColorTransformOperation.MULTIPLY_LUMINANCE, 0.5)
    presentation.save("theme-color-palette.pptx", slides.export.SaveFormat.PPTX)
这些变体仍然基于主题颜色。如果随后 accent4 发生变化,转换后的颜色会根据新的 accent4 值重新计算。
将 SchemeColor 值映射到 ColorScheme 槽位
SchemeColor 枚举使用 TEXT1、BACKGROUND1、TEXT2、BACKGROUND2,而 ColorScheme 将相同的主题槽位公开为 dark1、light1、dark2、light2。映射是固定的:
TEXT1=dark1BACKGROUND1=light1TEXT2=dark2BACKGROUND2=light2
这些是同一主题槽位的别名;它们不是会动态相互转换的值。
更改主题字体
主题字体方案包含标题的主要字体集和正文的次要字体集。FontScheme.major 和 FontScheme.minor 属性公开这些集合。
PowerPoint 兼容的主题字体标识符可用于文本格式化:
+mn-lt- 正文字体 Latin(次要 Latin 字体)+mj-lt- 标题字体 Latin(主要 Latin 字体)+mn-ea- 正文字体 East Asian(次要 East Asian 字体)+mj-ea- 标题字体 East Asian(主要 East Asian 字体)
以下示例创建一个使用主要 Latin 主题字体的标题和一个使用次要 Latin 主题字体的正文行。随后更改主题字体并保存结果:
import aspose.slides as slides

with slides.Presentation() as presentation:
    slide = presentation.slides[0]
    heading = slide.shapes.add_auto_shape(slides.ShapeType.RECTANGLE, 40, 40, 500, 60)
    heading.text_frame.text = "Theme heading"
    heading.text_frame.paragraphs[0].portions[0].portion_format.latin_font = slides.FontData("+mj-lt")
    body = slide.shapes.add_auto_shape(slides.ShapeType.RECTANGLE, 40, 120, 500, 60)
    body.text_frame.text = "Theme body text"
    body.text_frame.paragraphs[0].portions[0].portion_format.latin_font = slides.FontData("+mn-lt")
    presentation.master_theme.font_scheme.major.latin_font = slides.FontData("Aptos Display")
    presentation.master_theme.font_scheme.minor.latin_font = slides.FontData("Arial")
    presentation.save("theme-fonts.pptx", slides.export.SaveFormat.PPTX)
标题遵循主要字体,正文遵循次要字体。使用显式字体名称而非主题标识符的文本在主题字体方案更改时不会自动切换。
主要和次要字体集合还可以包含针对特定书写系统(如西里尔、阿拉伯、日文、格鲁吉亚和 Thaana)的字体映射。要检查、添加、替换或删除这些映射,请参阅 脚本特定主题字体。
提示
有关演示文稿字体的更多信息,请参阅 PowerPoint 字体。复制或应用主题
以下工作流解决不同的主题相关问题。
将外部主题应用于母版依赖的幻灯片
当你拥有 PowerPoint 主题文件(.thmx)并希望重新样式化所有依赖特定母版的幻灯片时,请使用 IMasterSlide.apply_external_theme_to_depending_slides。从 Presentation.masters 集合中选择母版(该集合实现了 MasterSlideCollection),并将主题文件路径传给该方法。
该方法执行以下操作:
- 基于所选母版创建一个新母版幻灯片。
- 将外部主题应用到新母版。
- 将先前依赖所选母版的所有幻灯片指派给新母版。
- 返回新创建的 IMasterSlide。
以下示例将外部主题应用于依赖第一个母版的幻灯片并保存演示文稿:
import aspose.slides as slides

with slides.Presentation("presentation.pptx") as presentation:
    selected_master = presentation.masters[0]
    themed_master = selected_master.apply_external_theme_to_depending_slides("corporate-theme.thmx")

    print(f"Created master: {themed_master.name}")
    presentation.save("presentation-with-external-theme.pptx", slides.export.SaveFormat.PPTX)
无效、损坏或不受支持的主题可能导致 PptxException 或其格式相关子类。请验证用户提供的路径,处理文件系统访问失败,并仅在主题成功应用后保存演示文稿。
仅重新指派依赖所选母版的幻灯片。与其他母版关联的幻灯片保留其现有母版和主题。支持主题的颜色、字体、填充、线条、背景和效果会根据外部主题进行解析。直接指定的颜色、字体、填充和其他显式格式可能保持不变。布局级和幻灯片级覆盖也可能优先于从新母版继承的值。
主题可能引用运行时环境中不存在的字体。为确保一致的渲染和导出,请安装所需字体、通过 自定义字体源 提供,或配置 字体替代。
这是一个直接的母版级工作流:方法接受 .thmx 文件路径,不需要手动创建幻灯片级或布局级主题覆盖。
在多母版演示文稿中应用不同的外部主题
当事先不知道相关母版时,可通过 Slide.layout_slide 和 LayoutSlide.master_slide 从代表性幻灯片获取母版。在应用任何主题之前保存原始母版引用,因为每次调用都会在演示文稿中创建另一个母版。
以下示例使用两个章节的幻灯片定位它们的母版,并对每组应用不同的外部主题:
import aspose.slides as slides

with slides.Presentation("multi-master-presentation.pptx") as presentation:
    if len(presentation.slides) < 5:
        print("The presentation does not contain the expected representative slides.")
    else:
        first_group_master = presentation.slides[0].layout_slide.master_slide
        second_group_master = presentation.slides[4].layout_slide.master_slide

        if first_group_master.slide_id == second_group_master.slide_id:
            print("The representative slides use the same master.")
        else:
            first_themed_master = first_group_master.apply_external_theme_to_depending_slides("blue-theme.thmx")
            second_themed_master = second_group_master.apply_external_theme_to_depending_slides("green-theme.thmx")

            print(f"First themed master: {first_themed_master.name}")
            print(f"Second themed master: {second_themed_master.name}")
            presentation.save("multi-master-with-external-themes.pptx", slides.export.SaveFormat.PPTX)
第一次调用仅影响依赖 first_group_master 的幻灯片,第二次调用仅影响依赖 second_group_master 的幻灯片。属于其他母版的幻灯片不会被重新样式化。
在移动幻灯片时保留源主题
如果希望将幻灯片移动到另一个演示文稿并保留其原始设计,请使用 MasterSlideCollection.add_clone 将源母版克隆到目标演示文稿,然后使用 SlideCollection.add_clone 将幻灯片连同克隆的母版一起克隆。这样可以将母版、其布局以及关联的主题一起携带。
import aspose.slides as slides

with slides.Presentation("source-theme.pptx") as source:
    with slides.Presentation("target.pptx") as target:
        source_slide = source.slides[0]
        source_master = source_slide.layout_slide.master_slide
        cloned_master = target.masters.add_clone(source_master)
        target.slides.add_clone(source_slide, cloned_master, True)
        target.save("theme-preserved.pptx", slides.export.SaveFormat.PPTX)
当源幻灯片必须在目标中保持相同外观时,这是首选工作流。仅将内容克隆到不相关的目标母版上可能会更改受主题驱动的颜色、字体、背景和效果。
将主题值应用于现有幻灯片
如果目标幻灯片必须保持其当前母版和布局,可从源主题初始化幻灯片级覆盖。使用 OverrideTheme.init_color_scheme_from、OverrideTheme.init_font_scheme_from 和 OverrideTheme.init_format_scheme_from 将三大主题组件复制到覆盖中。
import aspose.slides as slides

with slides.Presentation("source-theme.pptx") as source:
    with slides.Presentation("target.pptx") as target:
        target_slide = target.slides[0]
        override_theme = target_slide.theme_manager.override_theme
        override_theme.init_color_scheme_from(source.master_theme.color_scheme)
        override_theme.init_font_scheme_from(source.master_theme.font_scheme)
        override_theme.init_format_scheme_from(source.master_theme.format_scheme)
        target.save("theme-applied-to-slide.pptx", slides.export.SaveFormat.PPTX)
这会更改该幻灯片使用的主题,而不会影响其他幻灯片继承的主题。要删除本地覆盖并恢复继承值,请调用 OverrideTheme.clear。
将主题覆盖应用于布局
布局级覆盖适用于使用该布局的所有幻灯片,除非特定幻灯片有自己的覆盖。可以通过布局的 LayoutSlideThemeManager 使用相同的初始化方法:
import aspose.slides as slides

with slides.Presentation("source-theme.pptx") as source:
    with slides.Presentation("target.pptx") as target:
        target_slide = target.slides[0]
        override_theme = target_slide.layout_slide.theme_manager.override_theme
        override_theme.init_color_scheme_from(source.master_theme.color_scheme)
        override_theme.init_font_scheme_from(source.master_theme.font_scheme)
        override_theme.init_format_scheme_from(source.master_theme.format_scheme)
        target.save("theme-applied-to-layout.pptx", slides.export.SaveFormat.PPTX)
当许多布局和幻灯片应共享相同的基础设计时,使用母版或演示文稿级主题;当某个布局族需要不同样式时使用布局覆盖;只有真正的例外才使用幻灯片覆盖。过度的幻灯片级覆盖会使以后全局主题更改的预测变得困难。
更新主题背景样式
主题的背景填充存储在 FormatScheme.background_fill_styles 中。PowerPoint 的 UI 可以呈现比此集合实际存储的填充定义更多的背景选项,因为 UI 可以将主题填充与主题颜色和其他样式引用组合使用。
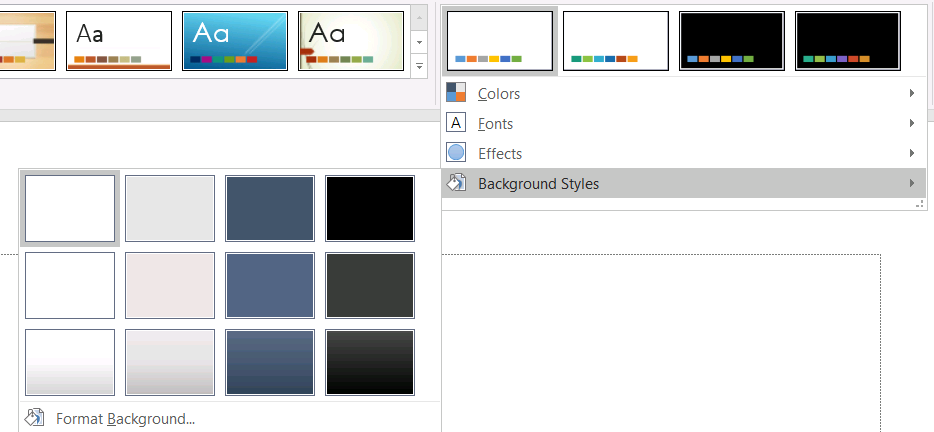
在使用背景样式之前,请检查存储的集合以及当前的 Background.style_index。style_index 为 0 表示没有主题填充;正值表示主题背景样式引用。这不同于直接对 Python 集合进行索引时 [0] 表示第一项。不要假设每个演示文稿都有相同数量的背景填充样式。
以下示例报告可用的背景填充计数,将主题化的背景引用分配给第一个母版,并保存演示文稿:
import aspose.slides as slides

with slides.Presentation("input.pptx") as presentation:
    background_styles = presentation.master_theme.format_scheme.background_fill_styles
    print(f"Background fill styles: {len(background_styles)}")
    if len(background_styles) == 0:
        raise RuntimeError("The presentation theme does not contain background fill styles.")
    master_slide = presentation.masters[0]
    master_slide.background.type = slides.BackgroundType.THEMED
    master_slide.background.style_index = 1
    presentation.save("theme-background.pptx", slides.export.SaveFormat.PPTX)
可见结果取决于母版引用的主题条目以及布局或幻灯片级的任何背景覆盖。如果幻灯片使用了自己的背景,仅更改母版背景可能不会影响该幻灯片。需要知道继承后最终背景时,请使用 Background.get_effective。
警告
不要将style_index 当作零基集合索引。此外,避免硬编码某个文件的样式编号并假设在另一个文件中呈现相同外观;主题样式定义是针对特定演示文稿的。
提示
有关直接背景格式化和背景继承的详细信息,请参阅 演示文稿背景。更新主题效果
主题格式方案包含独立的 FormatScheme.fill_styles、FormatScheme.line_styles 和 FormatScheme.effect_styles 集合。典型的 Office 主题通常包含三个主要样式条目,视觉上对应于细微、适中和强烈的格式化,但代码应检查每个集合,而不是假设固定数量。
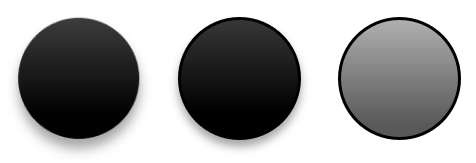
在 Python 中访问这些集合时,集合索引是零基的:[0] 是第一条存储的样式,[2] 是第三条。形状的样式引用索引是另一概念,通过 IShapeStyle 暴露。修改主题样式会影响引用该主题样式的形状;直接格式化的形状可能保持不变。
以下示例检查所需的样式条目是否存在,修改第一条线条样式,修改第三条填充样式,在第三条效果样式中启用外部阴影,并保存结果:
import aspose.pydrawing as draw
import aspose.slides as slides

with slides.Presentation("Subtle_Moderate_Intense.pptx") as presentation:
    format_scheme = presentation.master_theme.format_scheme
    if len(format_scheme.line_styles) < 1 or len(format_scheme.fill_styles) < 3 or len(format_scheme.effect_styles) < 3:
        raise RuntimeError("The theme does not contain the style entries required by this example.")
    format_scheme.line_styles[0].fill_format.fill_type = slides.FillType.SOLID
    format_scheme.line_styles[0].fill_format.solid_fill_color.color = draw.Color.red
    format_scheme.fill_styles[2].fill_type = slides.FillType.SOLID
    format_scheme.fill_styles[2].solid_fill_color.color = draw.Color.forest_green
    format_scheme.effect_styles[2].effect_format.enable_outer_shadow_effect()
    format_scheme.effect_styles[2].effect_format.outer_shadow_effect.distance = 10
    presentation.save("theme-effects.pptx", slides.export.SaveFormat.PPTX)
对于引用这些槽位的形状,第一条主题线条样式会变为红色,第三条主题填充样式会变为实心森林绿,第三条效果样式会获得距离为 10 点的外部阴影。具体视觉效果仍取决于每个形状引用的样式槽位以及是否有直接格式覆盖主题。

确定实际实心填充是否使用主题颜色
填充可以直接存储在对象上,也可以继承自段落、布局、母版、主题样式或其他格式层级。调用 FillFormat.get_effective 可将该层级解析为不可变的 IFillFormatEffectiveData。首先检查 IFillFormatEffectiveData.fill_type。仅当其为 FillType.SOLID 时才读取实心填充属性。
对于实心填充,IFillFormatEffectiveData.solid_fill_color 返回在继承、主题查找和颜色转换后渲染的最终 RGB 值。IFillFormatEffectiveData.solid_fill_scheme_color 返回对应的逻辑 SchemeColor 槽位,如 TEXT1 或 ACCENT6。SchemeColor.NOT_DEFINED 表示实际实心填充并非基于方案颜色。在只使用主题颜色或直接 RGB 颜色的工作流中,这个值标识直接 RGB 填充。
不要仅凭本地 IColorFormat.scheme_color 值来分类填充。例如,文本段落可能没有本地定义的方案颜色,其本地值为 NOT_DEFINED,但其实际填充继承自主题颜色并解析为 TEXT1 或 ACCENT6。相反,solid_fill_scheme_color 告诉你是哪一个逻辑主题槽位生成了实际颜色,但并不能说明该槽位来源于对象、段落、布局、母版或其他层级。
以下示例加载演示文稿,审计形状填充和文本段落填充,打印每个最终 RGB 值及关联的方案颜色,并标记不会随主题颜色变化的实心填充:
import aspose.slides as slides


def audit_fill(object_name, local_fill):
    effective_fill = local_fill.get_effective()

    if effective_fill.fill_type != slides.FillType.SOLID:
        print(f"{object_name}: fill type = {effective_fill.fill_type}; not a solid fill.")
        return

    rgb = effective_fill.solid_fill_color
    effective_scheme_color = effective_fill.solid_fill_scheme_color
    local_scheme_color = local_fill.solid_fill_color.scheme_color

    print(f"{object_name}: RGB = #{rgb.r:02X}{rgb.g:02X}{rgb.b:02X}")
    print(f"{object_name}: local scheme = {local_scheme_color}, effective scheme = {effective_scheme_color}")

    if effective_scheme_color == slides.SchemeColor.NOT_DEFINED:
        print(f"{object_name}: direct RGB or another non-scheme fill; audit as theme-independent.")
    else:
        print(f"{object_name}: theme-dependent through {effective_scheme_color}.")


with slides.Presentation("input.pptx") as presentation:
    for slide_index, slide in enumerate(presentation.slides):
        for shape_index, shape in enumerate(slide.shapes):
            shape_name = f"Slide {slide_index + 1}, shape {shape_index + 1}"
            audit_fill(shape_name, shape.fill_format)

            if isinstance(shape, slides.AutoShape):
                for paragraph_index, paragraph in enumerate(shape.text_frame.paragraphs):
                    for portion_index, portion in enumerate(paragraph.portions):
                        portion_name = f"{shape_name}, paragraph {paragraph_index + 1}, portion {portion_index + 1}"
                        audit_fill(portion_name, portion.portion_format.fill_format)
NOT_DEFINED 分支提供了一个审计列表,列出在主题颜色槽位更改时不会响应的实心填充。请在演示文稿必须遵循新品牌调色板时检查这些对象。报告的 RGB 值仍显示当前外观,而方案值解释了该外观是否与主题关联。
有效格式对象是快照。更改演示文稿主题、主题覆盖或任何继承的格式后,需再次调用 get_effective 并读取新的 IFillFormatEffectiveData 对象后再进行比较或报告颜色。
读取实际主题值
原始主题对象告诉你在特定层级定义了什么。实际值告诉你幻灯片或形状在继承和本地覆盖解析后实际使用了什么。对于幻灯片,调用 BaseOverrideThemeManager.create_theme_effective。对于背景,使用 Background.get_effective,对于填充,使用 FillFormat.get_effective。
以下示例读取幻灯片的实际主题、背景和第一形状填充:
import aspose.slides as slides

with slides.Presentation("input.pptx") as presentation:
    slide = presentation.slides[0]
    effective_theme = slide.theme_manager.create_theme_effective()
    effective_background = slide.background.get_effective()
    print(f"Effective major Latin font: {effective_theme.font_scheme.major.latin_font.font_name}")
    print(f"Effective minor Latin font: {effective_theme.font_scheme.minor.latin_font.font_name}")
    print(f"Effective background fill type: {effective_background.fill_format.fill_type}")
    if len(slide.shapes) > 0:
        effective_fill = slide.shapes[0].fill_format.get_effective()
        print(f"First shape effective fill type: {effective_fill.fill_type}")
        if effective_fill.fill_type == slides.FillType.SOLID:
            print(f"First shape effective fill color: {effective_fill.solid_fill_color}")
使用实际数据进行渲染诊断、验证和比较。如果仅检查 Presentation.master_theme,可能会错过更改最终外观的母版、布局、幻灯片或形状覆盖。
常见问题
应用外部主题会影响演示文稿中的每一张幻灯片吗?
不会。IMasterSlide.apply_external_theme_to_depending_slides 只重新指派依赖所选母版的幻灯片。使用其他母版的幻灯片保留其现有主题。
我可以在不更改母版的情况下将主题应用于单张幻灯片吗?
可以。使用幻灯片的 SlideThemeManager 并初始化其覆盖主题。更改仅局限于该幻灯片,其他幻灯片继续继承各自的主题。
将主题从一个演示文稿迁移到另一个的最安全方法是什么?
在移动幻灯片并保留其源外观时,使用 MasterSlideCollection.add_clone 将源母版克隆到目标演示文稿,然后使用 SlideCollection.add_clone 将幻灯片连同该母版一起克隆。这会保持母版、布局和主题一起。
如何查看继承和覆盖后的实际值?
对幻灯片或布局主题使用 BaseOverrideThemeManager.create_theme_effective,对格式对象(如背景和填充)使用对应的实际数据方法,如 Background.get_effective 和 FillFormat.get_effective。这些 API 返回在继承和覆盖应用后解析的值。