
Gestire le caselle di testo nelle presentazioni con PHP
Introduzione
In Aspose.Slides per PHP via Java, il testo della diapositiva è memorizzato nei frame di testo che appartengono alle forme. La classe AutoShape rappresenta la forma più comune contenente testo e espone il suo testo tramite il metodo AutoShape::getTextFrame.
Note
Ogni forma automatica deriva da Shape, ma non tutte le forme sono forme automatiche o supportano un frame di testo. Quando si elabora una presentazione esistente, utilizzarejava_instanceof per verificare che una forma sia una AutoShape prima di accedere al suo testo.
Creare una casella di testo su una diapositiva
Per creare una casella di testo, aggiungere una forma automatica a una diapositiva, aggiungere testo al suo frame di testo e salvare la presentazione. Il seguente esempio crea una casella di testo rettangolare:
use aspose\slides\Presentation;
use aspose\slides\SaveFormat;
use aspose\slides\ShapeType;

$presentation = new Presentation();
try {
    $slide = $presentation->getSlides()->get_Item(0);
    $textBox = $slide->getShapes()->addAutoShape(ShapeType::Rectangle, 150, 75, 300, 50);
    $textBox->addTextFrame("Aspose TextBox");

    $presentation->save("TextBox.pptx", SaveFormat::Pptx);
} finally {
    $presentation->dispose();
}
Le coordinate e le dimensioni passate a ShapeCollection::addAutoShape sono misurate in punti. AutoShape::addTextFrame inizializza il frame di testo con il testo fornito.
Verificare se una forma è una casella di testo
Utilizzare il metodo AutoShape::isTextBox per determinare se una forma automatica è considerata una casella di testo. Questo è utile quando una presentazione contiene sia forme automatiche con testo sia forme puramente grafiche.
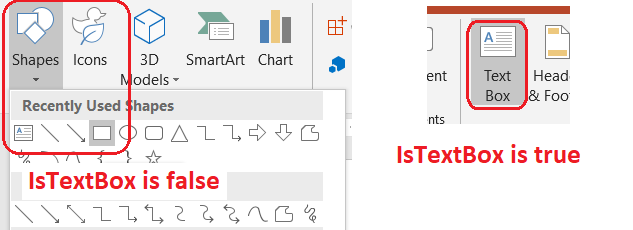
Il seguente esempio ispeziona ogni forma automatica in una presentazione:
use aspose\slides\Presentation;
use aspose\slides\ShapeType;

$presentation = new Presentation();
try {
    $slide = $presentation->getSlides()->get_Item(0);
    $textBox = $slide->getShapes()->addAutoShape(ShapeType::Rectangle, 10, 10, 120, 40);
    $textBox->addTextFrame("Text box");
    $slide->getShapes()->addAutoShape(ShapeType::Ellipse, 150, 10, 40, 40);

    $autoShapeClass = new JavaClass("com.aspose.slides.AutoShape");
    for ($slideIndex = 0; $slideIndex < java_values($presentation->getSlides()->size()); $slideIndex++) {
        $currentSlide = $presentation->getSlides()->get_Item($slideIndex);
        for ($shapeIndex = 0; $shapeIndex < java_values($currentSlide->getShapes()->size()); $shapeIndex++) {
            $shape = $currentSlide->getShapes()->get_Item($shapeIndex);
            if (java_instanceof($shape, $autoShapeClass)) {
                echo (java_is_true($shape->isTextBox()) ? "The shape is a text box." : "The shape is not a text box.") . PHP_EOL;
            }
        }
    }
} finally {
    $presentation->dispose();
}
Una forma automatica appena aggiunta non è considerata una casella di testo finché non contiene testo non vuoto. È possibile fornire quel testo tramite AutoShape::addTextFrame o TextFrame::setText. Aggiungere o assegnare una stringa vuota fa sì che AutoShape::isTextBox restituisca false:
use aspose\slides\Presentation;
use aspose\slides\ShapeType;

$presentation = new Presentation();
try {
    $slide = $presentation->getSlides()->get_Item(0);

    $shape1 = $slide->getShapes()->addAutoShape(ShapeType::Rectangle, 10, 10, 100, 40);
    $shape1->addTextFrame("Shape 1");
    echo (java_is_true($shape1->isTextBox()) ? "true" : "false") . PHP_EOL;

    $shape2 = $slide->getShapes()->addAutoShape(ShapeType::Rectangle, 10, 70, 100, 40);
    $shape2->getTextFrame()->setText("Shape 2");
    echo (java_is_true($shape2->isTextBox()) ? "true" : "false") . PHP_EOL;

    $shape3 = $slide->getShapes()->addAutoShape(ShapeType::Rectangle, 10, 130, 100, 40);
    $shape3->addTextFrame("");
    echo (java_is_true($shape3->isTextBox()) ? "true" : "false") . PHP_EOL;

    $shape4 = $slide->getShapes()->addAutoShape(ShapeType::Rectangle, 10, 190, 100, 40);
    $shape4->getTextFrame()->setText("");
    echo (java_is_true($shape4->isTextBox()) ? "true" : "false") . PHP_EOL;
} finally {
    $presentation->dispose();
}
Le prime due chiamate stampano true; le ultime due stampano false.
Trovare la forma che possiede un frame di testo
Un codice generico di elaborazione del testo può ricevere un TextFrame senza sapere quale oggetto della presentazione lo contiene. Utilizzare il metodo in sola lettura TextFrame::getParentShape per tornare alla Shape proprietaria.
Per un frame di testo posseduto da una forma automatica o da un’altra forma contenente testo, TextFrame::getParentShape restituisce il proprietario e TextFrame::getParentCell restituisce null. Verificare il valore restituito con java_is_null prima di accedervi. Per identificare sia i proprietari di forma sia di cella di tabella, incluse le forme associate ai nodi SmartArt, vedere Search and Replace Text.
Aggiungere colonne a una casella di testo
Il metodo TextFrameFormat::setColumnCount divide il frame di testo in colonne, mentre TextFrameFormat::setColumnSpacing imposta lo spazio tra le colonne in punti. Entrambe le impostazioni appartengono a TextFrameFormat e possono essere modificate attraverso il frame di testo di una casella di testo esistente. Il testo si adatta tra le colonne all’interno della stessa forma; non continua in un’altra forma.
Il seguente esempio crea una casella di testo a tre colonne con 10 punti tra le colonne, salva la presentazione e legge le impostazioni memorizzate dal file di output:
use aspose\slides\Presentation;
use aspose\slides\SaveFormat;
use aspose\slides\ShapeType;

$presentation = new Presentation();
try {
    $slide = $presentation->getSlides()->get_Item(0);
    $textBox = $slide->getShapes()->addAutoShape(ShapeType::Rectangle, 100, 100, 300, 200);
    $textBox->addTextFrame("This text is distributed automatically across all columns in the text box.");

    $textFrameFormat = $textBox->getTextFrame()->getTextFrameFormat();
    $textFrameFormat->setColumnCount(3);
    $textFrameFormat->setColumnSpacing(10);

    $presentation->save("TextBoxColumns.pptx", SaveFormat::Pptx);

    $savedPresentation = new Presentation("TextBoxColumns.pptx");
    try {
        $savedTextBox = $savedPresentation->getSlides()->get_Item(0)->getShapes()->get_Item(0);
        $savedFormat = $savedTextBox->getTextFrame()->getTextFrameFormat();
        echo "Columns: " . java_values($savedFormat->getColumnCount()) . "; spacing: " . java_values($savedFormat->getColumnSpacing()) . " points" . PHP_EOL;
    } finally {
        $savedPresentation->dispose();
    }
} finally {
    $presentation->dispose();
}
Estrarre testo da colonne individuali
Utilizzare TextFrame::splitTextByColumns per recuperare il testo assegnato a ciascuna colonna visiva in un frame di testo esistente. Il metodo restituisce una stringa per ogni colonna, nell’ordine di lettura basato sulle colonne. Un frame di testo a colonna singola produce un array con un elemento, e una colonna vuota è rappresentata da una stringa vuota. Le stringhe contengono solo testo semplice; la formattazione a livello di porzione non è conservata.
Questo è utile quando è necessario:
- Estrarre il testo mantenendo il suo ordine di lettura basato sulle colonne.
- Indicizzare o confrontare il contenuto di diapositive a più colonne.
- Esportare ogni colonna in un file separato, campo di database o altra destinazione.
- Ispezionare come il testo viene ridistribuito dopo aver modificato il conteggio delle colonne con TextFrameFormat::setColumnCount, la spaziatura con TextFrameFormat::setColumnSpacing, il font o la dimensione del frame di testo.
Il metodo riporta il testo distribuito all’interno del corrente TextFrame; non fa scorrere automaticamente il testo tra forme o caselle di testo separate. La distribuzione delle colonne può dipendere dai font disponibili e da altre impostazioni di layout del testo, quindi assicurarsi che i font richiesti siano disponibili quando è importante ottenere risultati coerenti.
Il seguente esempio carica una presentazione, trova la prima forma automatica a più colonne con un frame di testo, legge il conteggio delle colonne configurato e scrive il testo di ogni colonna in un file separato. Le forme che non forniscono un frame di testo vengono ignorate.
use aspose\slides\Presentation;

$presentation = new Presentation("MultiColumnText.pptx");
try {
    $textBox = null;
    $autoShapeClass = new JavaClass("com.aspose.slides.AutoShape");
    $shapes = $presentation->getSlides()->get_Item(0)->getShapes();
    for ($shapeIndex = 0; $shapeIndex < java_values($shapes->size()); $shapeIndex++) {
        $shape = $shapes->get_Item($shapeIndex);
        if (java_instanceof($shape, $autoShapeClass)) {
            $textFrame = $shape->getTextFrame();
            if (!java_is_null($textFrame)) {
                $columnCount = java_values($textFrame->getTextFrameFormat()->getColumnCount());
                if ($columnCount > 1) {
                    $textBox = $shape;
                    break;
                }
            }
        }
    }

    if ($textBox === null) {
        echo "No multi-column text frame was found." . PHP_EOL;
    } else {
        $textFrame = $textBox->getTextFrame();
        $configuredColumnCount = java_values($textFrame->getTextFrameFormat()->getColumnCount());
        $columnTexts = java_values($textFrame->splitTextByColumns());

        echo "Configured columns: " . $configuredColumnCount . PHP_EOL;

        foreach ($columnTexts as $columnIndex => $columnText) {
            $columnNumber = $columnIndex + 1;
            echo "Column " . $columnNumber . ": " . $columnText . PHP_EOL;
            $outputPath = "Column-" . $columnNumber . ".txt";
            $bytesWritten = file_put_contents($outputPath, $columnText);
            if ($bytesWritten === false) {
                echo "Could not write column " . $columnNumber . " to " . $outputPath . PHP_EOL;
            }
        }
    }
} finally {
    $presentation->dispose();
}
Aggiornare il testo
Per aggiornare il testo in tutta la presentazione, iterare le diapositive e le forme, selezionare le forme automatiche e poi modificare le loro porzioni di testo. Lavorare a livello di porzione consente di cambiare sia il testo che la formattazione dei caratteri.
Il seguente esempio sostituisce ogni occorrenza di years con months nel testo delle forme automatiche e rende ogni porzione interessata in grassetto:
use aspose\slides\NullableBool;
use aspose\slides\Presentation;
use aspose\slides\SaveFormat;

$presentation = new Presentation("Text.pptx");
try {
    $autoShapeClass = new JavaClass("com.aspose.slides.AutoShape");
    for ($slideIndex = 0; $slideIndex < java_values($presentation->getSlides()->size()); $slideIndex++) {
        $slide = $presentation->getSlides()->get_Item($slideIndex);
        for ($shapeIndex = 0; $shapeIndex < java_values($slide->getShapes()->size()); $shapeIndex++) {
            $shape = $slide->getShapes()->get_Item($shapeIndex);
            if (!java_instanceof($shape, $autoShapeClass)) {
                continue;
            }

            $textFrame = $shape->getTextFrame();
            if (java_is_null($textFrame)) {
                continue;
            }

            for ($paragraphIndex = 0; $paragraphIndex < java_values($textFrame->getParagraphs()->getCount()); $paragraphIndex++) {
                $paragraph = $textFrame->getParagraphs()->get_Item($paragraphIndex);
                for ($portionIndex = 0; $portionIndex < java_values($paragraph->getPortions()->getCount()); $portionIndex++) {
                    $portion = $paragraph->getPortions()->get_Item($portionIndex);
                    $text = java_values($portion->getText());
                    if ($text !== null && strpos($text, "years") !== false) {
                        $updatedText = str_replace("years", "months", $text);
                        $portion->setText($updatedText);
                        $portion->getPortionFormat()->setFontBold(NullableBool::True);
                    }
                }
            }
        }
    }

    $presentation->save("TextChanged.pptx", SaveFormat::Pptx);
} finally {
    $presentation->dispose();
}
Questo attraversamento aggiorna il testo solo nelle forme automatiche. Il testo memorizzato in tabelle, grafici, SmartArt o forme raggruppate richiede l’attraversamento delle proprie collezioni di quegli oggetti.
Aggiungere una casella di testo con un collegamento ipertestuale
Un collegamento ipertestuale può essere assegnato a una specifica porzione di testo, così solo quel testo agisce come link cliccabile. Utilizzare HyperlinkManager::setExternalHyperlinkClick per associare la porzione a un URL esterno.
Il seguente esempio crea testo collegato e lo salva in una presentazione:
use aspose\slides\Presentation;
use aspose\slides\SaveFormat;
use aspose\slides\ShapeType;

$presentation = new Presentation();
try {
    $slide = $presentation->getSlides()->get_Item(0);
    $textBox = $slide->getShapes()->addAutoShape(ShapeType::Rectangle, 150, 150, 200, 50);
    $textBox->addTextFrame("Aspose.Slides");

    $textPortion = $textBox->getTextFrame()->getParagraphs()->get_Item(0)->getPortions()->get_Item(0);
    $textPortion->getPortionFormat()->getHyperlinkManager()->setExternalHyperlinkClick("https://www.aspose.com/");

    $presentation->save("Hyperlink.pptx", SaveFormat::Pptx);
} finally {
    $presentation->dispose();
}
FAQ
Qual è la differenza tra una casella di testo e un segnaposto di testo su una diapositiva master o di layout?
Un placeholder può ereditare la sua posizione e formattazione da una master slide o da una layout slide. Una casella di testo normale è una forma indipendente sulla diapositiva dove è stata creata e non acquisisce il comportamento di segnaposto quando il layout cambia.
Come posso sostituire il testo senza modificare il testo in grafici, tabelle o SmartArt?
Limitare l’attraversamento agli oggetti AutoShape, come mostrato nell’esempio Aggiornare il testo. Grafici, tabelle e SmartArt memorizzano il testo nei loro modelli di oggetti, quindi non vengono modificati da quel ciclo.