
PHP を使用してプレゼンテーションのテキスト ボックスを管理する
概要
Aspose.Slides for PHP via Java では、スライドのテキストはシェイプに属するテキストフレームに格納されます。AutoShape クラスは最も一般的なテキストを保持するシェイプを表し、そのテキストは AutoShape::getTextFrame メソッドを通じて取得できます。
Note
すべての AutoShape は Shape から派生しますが、すべての Shape が AutoShape であるわけでもテキストフレームをサポートしているわけでもありません。既存のプレゼンテーションを処理する際は、テキストにアクセスする前にjava_instanceof を使用してシェイプが AutoShape であるかどうかを確認してください。
スライドにテキスト ボックスを作成する
テキスト ボックスを作成するには、スライドに AutoShape を追加し、そのテキストフレームにテキストを設定してプレゼンテーションを保存します。次の例は長方形のテキスト ボックスを作成します。
use aspose\slides\Presentation;
use aspose\slides\SaveFormat;
use aspose\slides\ShapeType;

$presentation = new Presentation();
try {
    $slide = $presentation->getSlides()->get_Item(0);
    $textBox = $slide->getShapes()->addAutoShape(ShapeType::Rectangle, 150, 75, 300, 50);
    $textBox->addTextFrame("Aspose TextBox");

    $presentation->save("TextBox.pptx", SaveFormat::Pptx);
} finally {
    $presentation->dispose();
}
ShapeCollection::addAutoShape に渡す座標とサイズはポイント単位で測定されます。AutoShape::addTextFrame は指定されたテキストでテキストフレームを初期化します。
テキスト ボックス シェイプかどうかを確認する
AutoShape::isTextBox メソッドを使用して、AutoShape がテキスト ボックスとして扱われるかどうかを判定できます。これは、プレゼンテーションにテキストを保持するシェイプと純粋なグラフィック シェイプの両方が含まれる場合に便利です。
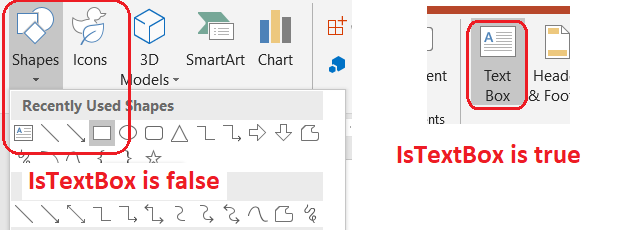
次の例はプレゼンテーション内のすべての AutoShape を調査します。
use aspose\slides\Presentation;
use aspose\slides\ShapeType;

$presentation = new Presentation();
try {
    $slide = $presentation->getSlides()->get_Item(0);
    $textBox = $slide->getShapes()->addAutoShape(ShapeType::Rectangle, 10, 10, 120, 40);
    $textBox->addTextFrame("Text box");
    $slide->getShapes()->addAutoShape(ShapeType::Ellipse, 150, 10, 40, 40);

    $autoShapeClass = new JavaClass("com.aspose.slides.AutoShape");
    for ($slideIndex = 0; $slideIndex < java_values($presentation->getSlides()->size()); $slideIndex++) {
        $currentSlide = $presentation->getSlides()->get_Item($slideIndex);
        for ($shapeIndex = 0; $shapeIndex < java_values($currentSlide->getShapes()->size()); $shapeIndex++) {
            $shape = $currentSlide->getShapes()->get_Item($shapeIndex);
            if (java_instanceof($shape, $autoShapeClass)) {
                echo (java_is_true($shape->isTextBox()) ? "The shape is a text box." : "The shape is not a text box.") . PHP_EOL;
            }
        }
    }
} finally {
    $presentation->dispose();
}
新しく追加した AutoShape は、空でないテキストが含まれるまでテキスト ボックスと見なされません。テキストは AutoShape::addTextFrame または TextFrame::setText で設定できます。空文字列を設定すると AutoShape::isTextBox は false を返します。
use aspose\slides\Presentation;
use aspose\slides\ShapeType;

$presentation = new Presentation();
try {
    $slide = $presentation->getSlides()->get_Item(0);

    $shape1 = $slide->getShapes()->addAutoShape(ShapeType::Rectangle, 10, 10, 100, 40);
    $shape1->addTextFrame("Shape 1");
    echo (java_is_true($shape1->isTextBox()) ? "true" : "false") . PHP_EOL;

    $shape2 = $slide->getShapes()->addAutoShape(ShapeType::Rectangle, 10, 70, 100, 40);
    $shape2->getTextFrame()->setText("Shape 2");
    echo (java_is_true($shape2->isTextBox()) ? "true" : "false") . PHP_EOL;

    $shape3 = $slide->getShapes()->addAutoShape(ShapeType::Rectangle, 10, 130, 100, 40);
    $shape3->addTextFrame("");
    echo (java_is_true($shape3->isTextBox()) ? "true" : "false") . PHP_EOL;

    $shape4 = $slide->getShapes()->addAutoShape(ShapeType::Rectangle, 10, 190, 100, 40);
    $shape4->getTextFrame()->setText("");
    echo (java_is_true($shape4->isTextBox()) ? "true" : "false") . PHP_EOL;
} finally {
    $presentation->dispose();
}
最初の 2 回の呼び出しは true を、残りの 2 回は false を出力します。
テキスト フレームを所有するシェイプを見つける
汎用的なテキスト処理コードは、TextFrame を受け取ってもそれがどのプレゼンテーション オブジェクトに属しているか分からないことがあります。TextFrame::getParentShape(読み取り専用)メソッドを使用して、所有シェイプ Shape に遡ります。
AutoShape や他のテキストを保持するシェイプが所有するテキストフレームの場合、TextFrame::getParentShape は所有者シェイプを返し、TextFrame::getParentCell は null を返します。java_is_null で戻り値を確認してから使用してください。シェイプとテーブル セルの所有者を両方特定したい場合や、SmartArt ノードに関連付けられたシェイプを含める場合は、Search and Replace Text を参照してください。
テキスト ボックスに列を追加する
TextFrameFormat::setColumnCount メソッドはテキストフレームを列に分割し、TextFrameFormat::setColumnSpacing は列間の間隔(ポイント単位)を設定します。これらの設定は TextFrameFormat に属し、既存のテキスト ボックスのテキストフレームから変更できます。テキストは同一シェイプ内で列間を再配置しますが、別のシェイプに自動的に流れることはありません。
次の例は、列間に 10 ポイントの間隔を持つ 3 列テキスト ボックスを作成し、プレゼンテーションを保存した後、出力ファイルから設定を読み取ります。
use aspose\slides\Presentation;
use aspose\slides\SaveFormat;
use aspose\slides\ShapeType;

$presentation = new Presentation();
try {
    $slide = $presentation->getSlides()->get_Item(0);
    $textBox = $slide->getShapes()->addAutoShape(ShapeType::Rectangle, 100, 100, 300, 200);
    $textBox->addTextFrame("This text is distributed automatically across all columns in the text box.");

    $textFrameFormat = $textBox->getTextFrame()->getTextFrameFormat();
    $textFrameFormat->setColumnCount(3);
    $textFrameFormat->setColumnSpacing(10);

    $presentation->save("TextBoxColumns.pptx", SaveFormat::Pptx);

    $savedPresentation = new Presentation("TextBoxColumns.pptx");
    try {
        $savedTextBox = $savedPresentation->getSlides()->get_Item(0)->getShapes()->get_Item(0);
        $savedFormat = $savedTextBox->getTextFrame()->getTextFrameFormat();
        echo "Columns: " . java_values($savedFormat->getColumnCount()) . "; spacing: " . java_values($savedFormat->getColumnSpacing()) . " points" . PHP_EOL;
    } finally {
        $savedPresentation->dispose();
    }
} finally {
    $presentation->dispose();
}
個々の列からテキストを抽出する
TextFrame::splitTextByColumns を使用すると、既存のテキストフレーム内の各視覚的列に割り当てられたテキストを取得できます。このメソッドは列ごとに 1 つの文字列を返し、列ベースの読み取り順に並びます。1 列テキストフレームは要素が 1 つの配列を返し、空の列は空文字列で表されます。返される文字列はプレーンテキストのみで、部分レベルの書式設定は保持されません。
この機能は次のようなシナリオで便利です。
- 列ベースの読み取り順を保ったままテキストを抽出したい。
- マルチ列スライドの内容をインデックス化または比較したい。
- 各列を別々のファイル、データベース フィールド、またはその他の宛先にエクスポートしたい。
- TextFrameFormat::setColumnCount、TextFrameFormat::setColumnSpacing、フォント、テキストフレームのサイズを変更した際に、テキストがどのように再配布されるかを確認したい。
このメソッドは現在の TextFrame 内に配布されたテキストを報告するだけで、別々のシェイプやテキスト ボックス間で自動的にテキストを流すことはありません。列の分布は利用可能なフォントや他のテキスト配置設定に依存するため、結果の一貫性が重要な場合は必要なフォントが利用可能であることを確認してください。
次の例はプレゼンテーションを読み込み、テキストフレームを持つ最初のマルチ列 AutoShape を見つけ、その列数を取得し、各列のテキストを別々のファイルに書き出します。テキストフレームを提供しないシェイプはスキップされます。
use aspose\slides\Presentation;

$presentation = new Presentation("MultiColumnText.pptx");
try {
    $textBox = null;
    $autoShapeClass = new JavaClass("com.aspose.slides.AutoShape");
    $shapes = $presentation->getSlides()->get_Item(0)->getShapes();
    for ($shapeIndex = 0; $shapeIndex < java_values($shapes->size()); $shapeIndex++) {
        $shape = $shapes->get_Item($shapeIndex);
        if (java_instanceof($shape, $autoShapeClass)) {
            $textFrame = $shape->getTextFrame();
            if (!java_is_null($textFrame)) {
                $columnCount = java_values($textFrame->getTextFrameFormat()->getColumnCount());
                if ($columnCount > 1) {
                    $textBox = $shape;
                    break;
                }
            }
        }
    }

    if ($textBox === null) {
        echo "No multi-column text frame was found." . PHP_EOL;
    } else {
        $textFrame = $textBox->getTextFrame();
        $configuredColumnCount = java_values($textFrame->getTextFrameFormat()->getColumnCount());
        $columnTexts = java_values($textFrame->splitTextByColumns());

        echo "Configured columns: " . $configuredColumnCount . PHP_EOL;

        foreach ($columnTexts as $columnIndex => $columnText) {
            $columnNumber = $columnIndex + 1;
            echo "Column " . $columnNumber . ": " . $columnText . PHP_EOL;
            $outputPath = "Column-" . $columnNumber . ".txt";
            $bytesWritten = file_put_contents($outputPath, $columnText);
            if ($bytesWritten === false) {
                echo "Could not write column " . $columnNumber . " to " . $outputPath . PHP_EOL;
            }
        }
    }
} finally {
    $presentation->dispose();
}
テキストを更新する
プレゼンテーション全体のテキストを更新するには、スライドとシェイプを走査し、AutoShape を選択してテキスト部分を編集します。部分レベルで操作することで、テキストと文字書式の両方を変更できます。
次の例は、AutoShape のテキスト内のすべての years を months に置換し、影響を受けた部分を太字にします。
use aspose\slides\NullableBool;
use aspose\slides\Presentation;
use aspose\slides\SaveFormat;

$presentation = new Presentation("Text.pptx");
try {
    $autoShapeClass = new JavaClass("com.aspose.slides.AutoShape");
    for ($slideIndex = 0; $slideIndex < java_values($presentation->getSlides()->size()); $slideIndex++) {
        $slide = $presentation->getSlides()->get_Item($slideIndex);
        for ($shapeIndex = 0; $shapeIndex < java_values($slide->getShapes()->size()); $shapeIndex++) {
            $shape = $slide->getShapes()->get_Item($shapeIndex);
            if (!java_instanceof($shape, $autoShapeClass)) {
                continue;
            }

            $textFrame = $shape->getTextFrame();
            if (java_is_null($textFrame)) {
                continue;
            }

            for ($paragraphIndex = 0; $paragraphIndex < java_values($textFrame->getParagraphs()->getCount()); $paragraphIndex++) {
                $paragraph = $textFrame->getParagraphs()->get_Item($paragraphIndex);
                for ($portionIndex = 0; $portionIndex < java_values($paragraph->getPortions()->getCount()); $portionIndex++) {
                    $portion = $paragraph->getPortions()->get_Item($portionIndex);
                    $text = java_values($portion->getText());
                    if ($text !== null && strpos($text, "years") !== false) {
                        $updatedText = str_replace("years", "months", $text);
                        $portion->setText($updatedText);
                        $portion->getPortionFormat()->setFontBold(NullableBool::True);
                    }
                }
            }
        }
    }

    $presentation->save("TextChanged.pptx", SaveFormat::Pptx);
} finally {
    $presentation->dispose();
}
この走査は AutoShape のみでテキストを更新します。テーブル、チャート、SmartArt、グループ化シェイプに格納されたテキストを変更するには、それらオブジェクト固有のコレクションを走査する必要があります。
ハイパーリンク付きテキスト ボックスを追加する
ハイパーリンクは特定のテキスト部分に割り当てられるため、その部分だけがクリック可能なリンクになります。HyperlinkManager::setExternalHyperlinkClick を使用して、対象部分に外部 URL を関連付けます。
次の例はリンク付きテキストを作成し、プレゼンテーションに保存します。
use aspose\slides\Presentation;
use aspose\slides\SaveFormat;
use aspose\slides\ShapeType;

$presentation = new Presentation();
try {
    $slide = $presentation->getSlides()->get_Item(0);
    $textBox = $slide->getShapes()->addAutoShape(ShapeType::Rectangle, 150, 150, 200, 50);
    $textBox->addTextFrame("Aspose.Slides");

    $textPortion = $textBox->getTextFrame()->getParagraphs()->get_Item(0)->getPortions()->get_Item(0);
    $textPortion->getPortionFormat()->getHyperlinkManager()->setExternalHyperlinkClick("https://www.aspose.com/");

    $presentation->save("Hyperlink.pptx", SaveFormat::Pptx);
} finally {
    $presentation->dispose();
}
FAQ
テキスト ボックスとマスタースライドまたはレイアウト スライドのプレースホルダーの違いは何ですか?
プレースホルダー([/slides/ja/php-java/manage-placeholder/])は master slide または layout slide から位置と書式を継承できます。通常のテキスト ボックスは作成されたスライド上の独立したシェイプであり、レイアウトが変更されてもプレースホルダー動作を取得しません。
チャート、テーブル、SmartArt のテキストを変更せずにテキストだけを置換するにはどうすればよいですか?
Update Text の例に示すように、走査を AutoShape オブジェクトに限定してください。チャート、テーブル、SmartArt はそれぞれ独自のオブジェクト モデルにテキストを保持しているため、このループでは変更されません。