
Gestire i paragrafi di testo PowerPoint in PHP
Panoramica
Aspose.Slides per PHP tramite Java rappresenta il testo come una gerarchia di fotogrammi di testo, paragrafi e porzioni:
- TextFrame rappresenta il contenitore di testo in una forma e consente l’accesso alla sua raccolta di paragrafi.
- Paragraph rappresenta un paragrafo in un fotogramma di testo e fornisce l’accesso alle sue porzioni e alla formattazione a livello di paragrafo.
- Portion rappresenta un run di testo all’interno di un paragrafo. Ogni porzione può avere il proprio testo e la formattazione a livello di carattere.
Un paragrafo può quindi contenere testo con diversi caratteri, colori, dimensioni e altra formattazione utilizzando più porzioni.
Creare e Formattare i Paragrafi
Creare Paragrafi con più Porzioni
I passaggi seguenti creano un fotogramma di testo con tre paragrafi, ognuno contenente tre porzioni:
- Creare un’istanza della classe Presentation.
- Accedere alla diapositiva desiderata tramite il suo indice.
- Aggiungere una AutoShape rettangolare alla diapositiva.
- Accedere al TextFrame della forma.
- Utilizzare il paragrafo predefinito e aggiungere altri due oggetti Paragraph al fotogramma di testo.
- Aggiungere sufficienti oggetti Portion per ciascun paragrafo in modo che contenga tre porzioni. Il paragrafo predefinito contiene già una porzione vuota.
- Impostare il testo di ciascuna porzione.
- Applicare la formattazione a livello di carattere tramite Portion::getPortionFormat.
- Salvare la presentazione modificata.
Questo esempio PHP implementa i passaggi:
use aspose\slides\FillType;
use aspose\slides\NullableBool;
use aspose\slides\Paragraph;
use aspose\slides\Portion;
use aspose\slides\Presentation;
use aspose\slides\SaveFormat;
use aspose\slides\ShapeType;

$presentation = new Presentation();
try {
    $slide = $presentation->getSlides()->get_Item(0);
    $shape = $slide->getShapes()->addAutoShape(ShapeType::Rectangle, 50, 150, 300, 150);
    $textFrame = $shape->getTextFrame();

    $firstParagraph = $textFrame->getParagraphs()->get_Item(0);
    $firstParagraph->getPortions()->add(new Portion());
    $firstParagraph->getPortions()->add(new Portion());

    $secondParagraph = new Paragraph();
    $secondParagraph->getPortions()->add(new Portion());
    $secondParagraph->getPortions()->add(new Portion());
    $secondParagraph->getPortions()->add(new Portion());
    $textFrame->getParagraphs()->add($secondParagraph);

    $thirdParagraph = new Paragraph();
    $thirdParagraph->getPortions()->add(new Portion());
    $thirdParagraph->getPortions()->add(new Portion());
    $thirdParagraph->getPortions()->add(new Portion());
    $textFrame->getParagraphs()->add($thirdParagraph);

    $paragraphCount = java_values($textFrame->getParagraphs()->getCount());
    for ($paragraphIndex = 0; $paragraphIndex < $paragraphCount; $paragraphIndex++) {
        $paragraph = $textFrame->getParagraphs()->get_Item($paragraphIndex);
        $portionCount = java_values($paragraph->getPortions()->getCount());
        for ($portionIndex = 0; $portionIndex < $portionCount; $portionIndex++) {
            $portion = $paragraph->getPortions()->get_Item($portionIndex);
            $portion->setText("Portion " . ($paragraphIndex + 1) . "." . ($portionIndex + 1));

            if ($portionIndex == 0) {
                $portion->getPortionFormat()->getFillFormat()->setFillType(FillType::Solid);
                $portion->getPortionFormat()->getFillFormat()->getSolidFillColor()->setColor(java("java.awt.Color")->RED);
                $portion->getPortionFormat()->setFontBold(NullableBool::True);
                $portion->getPortionFormat()->setFontHeight(15);
            } else if ($portionIndex == 1) {
                $portion->getPortionFormat()->getFillFormat()->setFillType(FillType::Solid);
                $portion->getPortionFormat()->getFillFormat()->getSolidFillColor()->setColor(java("java.awt.Color")->BLUE);
                $portion->getPortionFormat()->setFontItalic(NullableBool::True);
                $portion->getPortionFormat()->setFontHeight(18);
            }
        }
    }

    $presentation->save("paragraphs_with_portions.pptx", SaveFormat::Pptx);
} finally {
    $presentation->dispose();
}
Creare Elenchi Puntati e Numerati
Creare un Elenco Puntato o Numerato
I punti elenco e la numerazione rendono più facile la lettura degli elementi correlati. In Aspose.Slides, le impostazioni dell’elenco sono definite tramite BulletFormat.
- Creare un’istanza della classe Presentation.
- Accedere alla diapositiva desiderata tramite il suo indice.
- Aggiungere una AutoShape alla diapositiva selezionata.
- Accedere al TextFrame della forma.
- Rimuovere il paragrafo predefinito dal fotogramma di testo.
- Creare un Paragraph per un punto simbolo.
- Impostare BulletFormat::setType su BulletType::Symbol e specificare il carattere del punto.
- Impostare il testo del paragrafo, l’indentazione, il colore del punto e l’altezza del punto.
- Aggiungere il paragrafo al fotogramma di testo.
- Creare un secondo paragrafo e impostare BulletFormat::setType su BulletType::Numbered.
- Configurare lo stile del punto numerato e aggiungere il paragrafo al fotogramma di testo.
- Salvare la presentazione.
Questo esempio PHP crea un punto simbolo e un punto numerato:
use aspose\slides\BulletType;
use aspose\slides\ColorType;
use aspose\slides\NullableBool;
use aspose\slides\NumberedBulletStyle;
use aspose\slides\Paragraph;
use aspose\slides\Presentation;
use aspose\slides\SaveFormat;
use aspose\slides\ShapeType;

$presentation = new Presentation();
try {
    $slide = $presentation->getSlides()->get_Item(0);
    $shape = $slide->getShapes()->addAutoShape(ShapeType::Rectangle, 200, 200, 400, 200);
    $textFrame = $shape->getTextFrame();
    $textFrame->getParagraphs()->clear();

    $symbolParagraph = new Paragraph();
    $symbolParagraph->setText("Welcome to Aspose.Slides");
    $symbolParagraph->getParagraphFormat()->getBullet()->setType(BulletType::Symbol);
    $symbolParagraph->getParagraphFormat()->getBullet()->setChar("•");
    $symbolParagraph->getParagraphFormat()->setIndent(25);
    $symbolParagraph->getParagraphFormat()->getBullet()->getColor()->setColorType(ColorType::RGB);
    $symbolParagraph->getParagraphFormat()->getBullet()->getColor()->setColor(java("java.awt.Color")->BLACK);
    $symbolParagraph->getParagraphFormat()->getBullet()->setBulletHardColor(NullableBool::True);
    $symbolParagraph->getParagraphFormat()->getBullet()->setHeight(100);
    $textFrame->getParagraphs()->add($symbolParagraph);

    $numberedParagraph = new Paragraph();
    $numberedParagraph->setText("This is a numbered item");
    $numberedParagraph->getParagraphFormat()->getBullet()->setType(BulletType::Numbered);
    $numberedParagraph->getParagraphFormat()->getBullet()->setNumberedBulletStyle(NumberedBulletStyle::BulletCircleNumWDBlackPlain);
    $numberedParagraph->getParagraphFormat()->setIndent(25);
    $numberedParagraph->getParagraphFormat()->getBullet()->getColor()->setColorType(ColorType::RGB);
    $numberedParagraph->getParagraphFormat()->getBullet()->getColor()->setColor(java("java.awt.Color")->BLACK);
    $numberedParagraph->getParagraphFormat()->getBullet()->setBulletHardColor(NullableBool::True);
    $numberedParagraph->getParagraphFormat()->getBullet()->setHeight(100);
    $textFrame->getParagraphs()->add($numberedParagraph);

    $presentation->save("bulleted_and_numbered_list.pptx", SaveFormat::Pptx);
} finally {
    $presentation->dispose();
}
Usare Punti Immagine
I punti immagine consentono di utilizzare un’immagine personalizzata al posto di un simbolo o di un numero.
- Creare un’istanza della classe Presentation.
- Accedere alla diapositiva desiderata tramite il suo indice.
- Aggiungere una AutoShape e accedere al suo TextFrame.
- Rimuovere il paragrafo predefinito dal fotogramma di testo.
- Caricare l’immagine del punto e aggiungerla alla collezione di immagini della presentazione come un PPImage.
- Creare un Paragraph e impostare il suo testo.
- Impostare BulletFormat::setType su BulletType::Picture.
- Assegnare l’immagine tramite BulletFormat::getPicture e impostare l’altezza del punto.
- Aggiungere il paragrafo al fotogramma di testo.
- Salvare la presentazione modificata.
Questo esempio PHP crea un punto immagine:
use aspose\slides\BulletType;
use aspose\slides\Images;
use aspose\slides\Paragraph;
use aspose\slides\Presentation;
use aspose\slides\SaveFormat;
use aspose\slides\ShapeType;

$presentation = new Presentation();
try {
    $slide = $presentation->getSlides()->get_Item(0);

    $bulletImage = Images::fromFile("bullets.png");
    try {
        $presentationImage = $presentation->getImages()->addImage($bulletImage);
    } finally {
        $bulletImage->dispose();
    }

    $shape = $slide->getShapes()->addAutoShape(ShapeType::Rectangle, 200, 200, 400, 200);
    $textFrame = $shape->getTextFrame();
    $textFrame->getParagraphs()->clear();

    $paragraph = new Paragraph();
    $paragraph->setText("Welcome to Aspose.Slides");
    $paragraph->getParagraphFormat()->getBullet()->setType(BulletType::Picture);
    $paragraph->getParagraphFormat()->getBullet()->getPicture()->setImage($presentationImage);
    $paragraph->getParagraphFormat()->getBullet()->setHeight(100);
    $textFrame->getParagraphs()->add($paragraph);

    $presentation->save("picture_bullet.pptx", SaveFormat::Pptx);
    $presentation->save("picture_bullet.ppt", SaveFormat::Ppt);
} finally {
    $presentation->dispose();
}
Creare un Elenco Multilivello
Impostare ParagraphFormat::setDepth per posizionare i paragrafi a diversi livelli di un elenco. Il livello superiore ha una profondità di 0.
- Creare una Presentation e accedere a una diapositiva.
- Aggiungere una AutoShape e cancellare il paragrafo predefinito dal suo fotogramma di testo.
- Creare quattro paragrafi e configurare i simboli dei loro punti.
- Imprimare i loro valori ParagraphFormat::setDepth a
0,1,2e3. - Aggiungere i paragrafi al fotogramma di testo e salvare la presentazione.
Questo esempio PHP crea un elenco puntato a quattro livelli:
use aspose\slides\BulletType;
use aspose\slides\FillType;
use aspose\slides\Paragraph;
use aspose\slides\Presentation;
use aspose\slides\SaveFormat;
use aspose\slides\ShapeType;

$presentation = new Presentation();
try {
    $slide = $presentation->getSlides()->get_Item(0);
    $shape = $slide->getShapes()->addAutoShape(ShapeType::Rectangle, 200, 200, 400, 200);
    $textFrame = $shape->getTextFrame();
    $textFrame->getParagraphs()->clear();

    $firstParagraph = new Paragraph();
    $firstParagraph->setText("Content");
    $firstParagraph->getParagraphFormat()->getBullet()->setType(BulletType::Symbol);
    $firstParagraph->getParagraphFormat()->getBullet()->setChar("•");
    $firstParagraph->getParagraphFormat()->getDefaultPortionFormat()->getFillFormat()->setFillType(FillType::Solid);
    $firstParagraph->getParagraphFormat()->getDefaultPortionFormat()->getFillFormat()->getSolidFillColor()->setColor(java("java.awt.Color")->BLACK);
    $firstParagraph->getParagraphFormat()->setDepth(0);

    $secondParagraph = new Paragraph();
    $secondParagraph->setText("Second level");
    $secondParagraph->getParagraphFormat()->getBullet()->setType(BulletType::Symbol);
    $secondParagraph->getParagraphFormat()->getBullet()->setChar('-');
    $secondParagraph->getParagraphFormat()->getDefaultPortionFormat()->getFillFormat()->setFillType(FillType::Solid);
    $secondParagraph->getParagraphFormat()->getDefaultPortionFormat()->getFillFormat()->getSolidFillColor()->setColor(java("java.awt.Color")->BLACK);
    $secondParagraph->getParagraphFormat()->setDepth(1);

    $thirdParagraph = new Paragraph();
    $thirdParagraph->setText("Third level");
    $thirdParagraph->getParagraphFormat()->getBullet()->setType(BulletType::Symbol);
    $thirdParagraph->getParagraphFormat()->getBullet()->setChar("•");
    $thirdParagraph->getParagraphFormat()->getDefaultPortionFormat()->getFillFormat()->setFillType(FillType::Solid);
    $thirdParagraph->getParagraphFormat()->getDefaultPortionFormat()->getFillFormat()->getSolidFillColor()->setColor(java("java.awt.Color")->BLACK);
    $thirdParagraph->getParagraphFormat()->setDepth(2);

    $fourthParagraph = new Paragraph();
    $fourthParagraph->setText("Fourth level");
    $fourthParagraph->getParagraphFormat()->getBullet()->setType(BulletType::Symbol);
    $fourthParagraph->getParagraphFormat()->getBullet()->setChar('-');
    $fourthParagraph->getParagraphFormat()->getDefaultPortionFormat()->getFillFormat()->setFillType(FillType::Solid);
    $fourthParagraph->getParagraphFormat()->getDefaultPortionFormat()->getFillFormat()->getSolidFillColor()->setColor(java("java.awt.Color")->BLACK);
    $fourthParagraph->getParagraphFormat()->setDepth(3);

    $textFrame->getParagraphs()->add($firstParagraph);
    $textFrame->getParagraphs()->add($secondParagraph);
    $textFrame->getParagraphs()->add($thirdParagraph);
    $textFrame->getParagraphs()->add($fourthParagraph);

    $presentation->save("multilevel_list.pptx", SaveFormat::Pptx);
} finally {
    $presentation->dispose();
}
Iniziare gli Elementi Numerati dell’Elenco con Valori Personalizzati
Utilizzare BulletFormat::setNumberedBulletStartWith per impostare il numero iniziale visualizzato per un paragrafo numerato.
- Creare una Presentation e aggiungere una AutoShape a una diapositiva.
- Cancellare il paragrafo predefinito dal fotogramma di testo della forma.
- Creare tre paragrafi numerati.
- Impostare BulletFormat::setNumberedBulletStartWith a
2,3e7per i rispettivi paragrafi. - Aggiungere i paragrafi al fotogramma di testo e salvare la presentazione.
Questo esempio PHP assegna un numero iniziale personalizzato a ciascun paragrafo:
use aspose\slides\BulletType;
use aspose\slides\Paragraph;
use aspose\slides\Presentation;
use aspose\slides\SaveFormat;
use aspose\slides\ShapeType;

$presentation = new Presentation();
try {
    $shape = $presentation->getSlides()->get_Item(0)->getShapes()->addAutoShape(ShapeType::Rectangle, 200, 200, 400, 200);
    $textFrame = $shape->getTextFrame();
    $textFrame->getParagraphs()->clear();

    $firstParagraph = new Paragraph();
    $firstParagraph->setText("Start at 2");
    $firstParagraph->getParagraphFormat()->getBullet()->setType(BulletType::Numbered);
    $firstParagraph->getParagraphFormat()->getBullet()->setNumberedBulletStartWith(2);
    $textFrame->getParagraphs()->add($firstParagraph);

    $secondParagraph = new Paragraph();
    $secondParagraph->setText("Start at 3");
    $secondParagraph->getParagraphFormat()->getBullet()->setType(BulletType::Numbered);
    $secondParagraph->getParagraphFormat()->getBullet()->setNumberedBulletStartWith(3);
    $textFrame->getParagraphs()->add($secondParagraph);

    $thirdParagraph = new Paragraph();
    $thirdParagraph->setText("Start at 7");
    $thirdParagraph->getParagraphFormat()->getBullet()->setType(BulletType::Numbered);
    $thirdParagraph->getParagraphFormat()->getBullet()->setNumberedBulletStartWith(7);
    $textFrame->getParagraphs()->add($thirdParagraph);

    $presentation->save("custom_numbered_list.pptx", SaveFormat::Pptx);
} finally {
    $presentation->dispose();
}
Controllare il Layout del Paragrafo e le Proprietà di Fine
Impostare un Rientro della Prima Riga
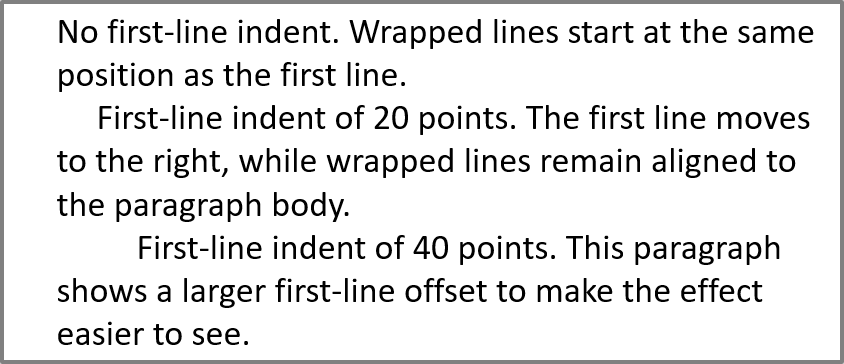
Utilizzare ParagraphFormat::setIndent per controllare il rientro della prima riga di un paragrafo. Questo metodo sposta solo la prima riga rispetto al margine sinistro del paragrafo. Un valore positivo sposta la prima riga a destra, mentre le righe rimanenti rimangono allineate al corpo del paragrafo.
Utilizzare ParagraphFormat::setMarginLeft quando è necessario spostare l’intero paragrafo. Utilizzare ParagraphFormat::setIndent quando è necessario spostare solo la prima riga.
L’esempio seguente crea diversi paragrafi e applica valori diversi di ParagraphFormat::setIndent per dimostrare come il rientro della prima riga influisce sul layout del paragrafo.
- Creare un’istanza della classe Presentation.
- Accedere alla diapositiva target.
- Aggiungere una AutoShape rettangolare alla diapositiva.
- Accedere al TextFrame della forma e rimuovere il paragrafo predefinito.
- Creare diversi paragrafi e impostare valori diversi di ParagraphFormat::setIndent per ognuno di essi.
- Aggiungere i paragrafi al fotogramma di testo.
- Salvare la presentazione modificata.
Questo codice PHP mostra come impostare un rientro del paragrafo:
use aspose\slides\FillType;
use aspose\slides\Paragraph;
use aspose\slides\Presentation;
use aspose\slides\SaveFormat;
use aspose\slides\ShapeType;
use aspose\slides\TextAutofitType;

$presentation = new Presentation();
try {
    $slide = $presentation->getSlides()->get_Item(0);

    $shape = $slide->getShapes()->addAutoShape(ShapeType::Rectangle, 50, 50, 420, 220);
    $shape->getFillFormat()->setFillType(FillType::NoFill);
    $shape->getLineFormat()->getFillFormat()->setFillType(FillType::Solid);
    $shape->getLineFormat()->getFillFormat()->getSolidFillColor()->setColor(java("java.awt.Color")->GRAY);

    $textFrame = $shape->getTextFrame();
    $textFrame->getTextFrameFormat()->setAutofitType(TextAutofitType::Shape);
    $textFrame->getParagraphs()->clear();

    $firstParagraph = new Paragraph();
    $firstParagraph->setText("No first-line indent. Wrapped lines start at the same position as the first line.");
    $firstParagraph->getParagraphFormat()->getDefaultPortionFormat()->getFillFormat()->setFillType(FillType::Solid);
    $firstParagraph->getParagraphFormat()->getDefaultPortionFormat()->getFillFormat()->getSolidFillColor()->setColor(java("java.awt.Color")->BLACK);
    $firstParagraph->getParagraphFormat()->setMarginLeft(20.0);
    $firstParagraph->getParagraphFormat()->setIndent(0.0);

    $secondParagraph = new Paragraph();
    $secondParagraph->setText("First-line indent of 20 points. The first line moves to the right, while wrapped lines remain aligned to the paragraph body.");
    $secondParagraph->getParagraphFormat()->getDefaultPortionFormat()->getFillFormat()->setFillType(FillType::Solid);
    $secondParagraph->getParagraphFormat()->getDefaultPortionFormat()->getFillFormat()->getSolidFillColor()->setColor(java("java.awt.Color")->BLACK);
    $secondParagraph->getParagraphFormat()->setMarginLeft(20.0);
    $secondParagraph->getParagraphFormat()->setIndent(20.0);

    $thirdParagraph = new Paragraph();
    $thirdParagraph->setText("First-line indent of 40 points. This paragraph shows a larger first-line offset to make the effect easier to see.");
    $thirdParagraph->getParagraphFormat()->getDefaultPortionFormat()->getFillFormat()->setFillType(FillType::Solid);
    $thirdParagraph->getParagraphFormat()->getDefaultPortionFormat()->getFillFormat()->getSolidFillColor()->setColor(java("java.awt.Color")->BLACK);
    $thirdParagraph->getParagraphFormat()->setMarginLeft(20.0);
    $thirdParagraph->getParagraphFormat()->setIndent(40.0);

    $textFrame->getParagraphs()->add($firstParagraph);
    $textFrame->getParagraphs()->add($secondParagraph);
    $textFrame->getParagraphs()->add($thirdParagraph);

    $presentation->save("paragraph_indent.pptx", SaveFormat::Pptx);
} finally {
    $presentation->dispose();
}
Il risultato:
Impostare un Rientro Sospeso
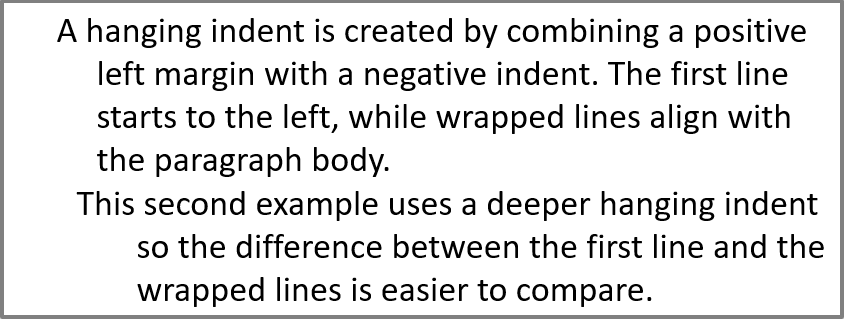
Un rientro sospeso è un layout di paragrafo in cui la prima riga inizia a sinistra delle righe rimanenti. In Aspose.Slides, è possibile creare questo effetto con ParagraphFormat::setIndent. Passare un valore negativo per spostare la prima riga a sinistra rispetto al corpo del paragrafo.
Nella pratica, ParagraphFormat::setMarginLeft definisce la posizione sinistra del corpo del paragrafo, e ParagraphFormat::setIndent definisce la posizione della prima riga rispetto a quel margine. Per creare un rientro sospeso, passare un valore positivo a setMarginLeft e un valore negativo a setIndent.
Questa formattazione è utile per bibliografie, riferimenti, voci di glossario e altri paragrafi in cui le linee a capo devono allinearsi sotto il corpo del paragrafo piuttosto che sotto il primo carattere della prima riga.
- Creare un’istanza della classe Presentation.
- Accedere alla diapositiva target.
- Aggiungere una AutoShape rettangolare alla diapositiva.
- Accedere al TextFrame della forma e rimuovere il paragrafo predefinito.
- Creare paragrafi e passare un valore positivo a ParagraphFormat::setMarginLeft per ciascun paragrafo.
- Passare un valore negativo a ParagraphFormat::setIndent per creare l’effetto di rientro sospeso.
- Aggiungere i paragrafi al fotogramma di testo.
- Salvare la presentazione modificata.
Questo codice PHP mostra come impostare un rientro sospeso per un paragrafo:
use aspose\slides\FillType;
use aspose\slides\Paragraph;
use aspose\slides\Presentation;
use aspose\slides\SaveFormat;
use aspose\slides\ShapeType;
use aspose\slides\TextAutofitType;

$presentation = new Presentation();
try {
    $slide = $presentation->getSlides()->get_Item(0);

    $shape = $slide->getShapes()->addAutoShape(ShapeType::Rectangle, 50, 50, 420, 220);
    $shape->getFillFormat()->setFillType(FillType::NoFill);
    $shape->getLineFormat()->getFillFormat()->setFillType(FillType::Solid);
    $shape->getLineFormat()->getFillFormat()->getSolidFillColor()->setColor(java("java.awt.Color")->GRAY);

    $textFrame = $shape->getTextFrame();
    $textFrame->getTextFrameFormat()->setAutofitType(TextAutofitType::Shape);
    $textFrame->getParagraphs()->clear();

    $firstParagraph = new Paragraph();
    $firstParagraph->setText("A hanging indent is created by combining a positive left margin with a negative indent. The first line starts to the left, while wrapped lines align with the paragraph body.");
    $firstParagraph->getParagraphFormat()->getDefaultPortionFormat()->getFillFormat()->setFillType(FillType::Solid);
    $firstParagraph->getParagraphFormat()->getDefaultPortionFormat()->getFillFormat()->getSolidFillColor()->setColor(java("java.awt.Color")->BLACK);
    $firstParagraph->getParagraphFormat()->setMarginLeft(40.0);
    $firstParagraph->getParagraphFormat()->setIndent(-20.0);

    $secondParagraph = new Paragraph();
    $secondParagraph->setText("This second example uses a deeper hanging indent so the difference between the first line and the wrapped lines is easier to compare.");
    $secondParagraph->getParagraphFormat()->getDefaultPortionFormat()->getFillFormat()->setFillType(FillType::Solid);
    $secondParagraph->getParagraphFormat()->getDefaultPortionFormat()->getFillFormat()->getSolidFillColor()->setColor(java("java.awt.Color")->BLACK);
    $secondParagraph->getParagraphFormat()->setMarginLeft(60.0);
    $secondParagraph->getParagraphFormat()->setIndent(-30.0);

    $textFrame->getParagraphs()->add($firstParagraph);
    $textFrame->getParagraphs()->add($secondParagraph);

    $presentation->save("hanging_indent.pptx", SaveFormat::Pptx);
} finally {
    $presentation->dispose();
}
Il risultato:
Impostare le Proprietà di Fine Esecuzione del Paragrafo
Paragraph::setEndParagraphPortionFormat controlla la formattazione del segno di fine del paragrafo. Il seguente esempio PHP assegna una dimensione del carattere e un font latino al segno di fine del secondo paragrafo:
- Caricare una Presentation e accedere a una diapositiva.
- Aggiungere una AutoShape e cancellare il suo paragrafo predefinito.
- Creare due paragrafi e aggiungere porzioni di testo a ciascuno.
- Creare un PortionFormat per il segno di fine del secondo paragrafo.
- Impostare BasePortionFormat::setFontHeight e BasePortionFormat::setLatinFont.
- Assegnare il formato con Paragraph::setEndParagraphPortionFormat e salvare la presentazione.
use aspose\slides\FontData;
use aspose\slides\Paragraph;
use aspose\slides\Portion;
use aspose\slides\PortionFormat;
use aspose\slides\Presentation;
use aspose\slides\SaveFormat;
use aspose\slides\ShapeType;

$presentation = new Presentation("Test.pptx");
try {
    $slide = $presentation->getSlides()->get_Item(0);
    $shape = $slide->getShapes()->addAutoShape(ShapeType::Rectangle, 10, 10, 200, 250);
    $textFrame = $shape->getTextFrame();
    $textFrame->getParagraphs()->clear();

    $firstParagraph = new Paragraph();
    $firstParagraph->getPortions()->add(new Portion("Sample text"));

    $secondParagraph = new Paragraph();
    $secondParagraph->getPortions()->add(new Portion("Sample text 2"));

    $endParagraphFormat = new PortionFormat();
    $endParagraphFormat->setFontHeight(48);
    $endParagraphFormat->setLatinFont(new FontData("Times New Roman"));
    $secondParagraph->setEndParagraphPortionFormat($endParagraphFormat);

    $textFrame->getParagraphs()->add($firstParagraph);
    $textFrame->getParagraphs()->add($secondParagraph);

    $presentation->save("end_paragraph_format.pptx", SaveFormat::Pptx);
} finally {
    $presentation->dispose();
}
Contare le Linee Renderizzate
Per le regole di paragrafo che influenzano l’interruzione automatica e la punteggiatura alla fine delle linee, vedere Controllo Interruzione Linea e Controllo Punteggiatura Sospesa.
Utilizzare Paragraph::getLinesCount per contare le linee occupate da un paragrafo dopo il layout del testo, includendo l’interruzione automatica. Questo è utile quando si verifica la lunghezza del testo e il layout nei modelli di presentazione.
Un paragrafo è un elemento in TextFrame::getParagraphs e può occupare diverse linee renderizzate. Un’interruzione di riga esplicita all’interno di un paragrafo forza una nuova riga senza creare un altro paragrafo. L’interruzione automatica crea linee in base alla larghezza disponibile senza inserire interruzioni di riga esplicite nel testo. Pertanto, contare i paragrafi o i caratteri di interruzione di riga non fornisce il conteggio delle linee renderizzate.
L’esempio seguente crea una forma di testo, conta le sue linee, restringe la forma e poi sostituisce il testo con una stringa più corta. L’interruzione è abilitata e l’adattamento automatico è disabilitato così che la larghezza della forma controlla l’interruzione senza ridurre automaticamente il testo o ridimensionare la forma. Le dimensioni della forma sono in punti. Infine, l’esempio aggiunge un altro paragrafo e somma i conteggi delle linee nel fotogramma di testo.
use aspose\slides\NullableBool;
use aspose\slides\Paragraph;
use aspose\slides\Presentation;
use aspose\slides\ShapeType;
use aspose\slides\TextAutofitType;

$presentation = new Presentation();
try {
    $slide = $presentation->getSlides()->get_Item(0);

    $shape = $slide->getShapes()->addAutoShape(ShapeType::Rectangle, 50, 50, 400, 200);
    $textFrame = $shape->getTextFrame();
    $textFrame->getTextFrameFormat()->setWrapText(NullableBool::True);
    $textFrame->getTextFrameFormat()->setAutofitType(TextAutofitType::None);

    $paragraph = $textFrame->getParagraphs()->get_Item(0);
    $paragraph->getParagraphFormat()->getDefaultPortionFormat()->setFontHeight(20);
    $paragraph->setText("This text demonstrates how automatic wrapping changes the number of rendered lines.");
    echo "Original width: " . java_values($paragraph->getLinesCount()) . PHP_EOL;

    $shape->setWidth(150);
    echo "Narrower shape: " . java_values($paragraph->getLinesCount()) . PHP_EOL;

    $paragraph->setText("Short text.");
    echo "Shorter text: " . java_values($paragraph->getLinesCount()) . PHP_EOL;

    $secondParagraph = new Paragraph();
    $secondParagraph->setText("Another paragraph.");
    $secondParagraph->getParagraphFormat()->getDefaultPortionFormat()->setFontHeight(20);
    $textFrame->getParagraphs()->add($secondParagraph);

    $totalLineCount = 0;
    for ($i = 0; $i < java_values($textFrame->getParagraphs()->getCount()); $i++) {
        $currentParagraph = $textFrame->getParagraphs()->get_Item($i);
        $totalLineCount += java_values($currentParagraph->getLinesCount());
    }
    echo "Total lines in the text frame: " . $totalLineCount . PHP_EOL;
} finally {
    $presentation->dispose();
}
Con questo testo e queste dimensioni, restringere la forma aumenta il conteggio delle linee, mentre sostituire il testo con la stringa corta lo riduce. I conteggi esatti possono variare in base alla disponibilità e sostituzione dei font, alla dimensione del carattere, ai margini, all’indentazione, all’interruzione e alle impostazioni di adattamento automatico. Utilizzare i font e le impostazioni di layout destinati all’ambiente target quando si verifica un modello.
Il solo conteggio delle linee non determina se il testo supera il contenitore. Anche l’altezza disponibile, le altezze delle linee, la spaziatura dei paragrafi e delle linee, e il comportamento dell’adattamento automatico sono importanti; anche una singola linea può superare la larghezza disponibile quando l’interruzione è disabilitata.
Importare ed Esportare il Contenuto dei Paragrafi
Importare Testo HTML nei Paragrafi
Utilizzare ParagraphCollection::addFromHtml per convertire il markup HTML in paragrafi e porzioni in un fotogramma di testo.
- Creare un’istanza della classe Presentation.
- Accedere a una diapositiva e aggiungere una AutoShape.
- Accedere al TextFrame della forma e cancellare il paragrafo predefinito.
- Leggere il file HTML sorgente.
- Passare la stringa HTML a ParagraphCollection::addFromHtml.
- Salvare la presentazione modificata.
Questo esempio PHP importa HTML in un fotogramma di testo:
use aspose\slides\FillType;
use aspose\slides\Presentation;
use aspose\slides\SaveFormat;
use aspose\slides\ShapeType;

$presentation = new Presentation();
try {
    $slide = $presentation->getSlides()->get_Item(0);
    $shapeWidth = java_values($presentation->getSlideSize()->getSize()->getWidth()) - 20;
    $shapeHeight = java_values($presentation->getSlideSize()->getSize()->getHeight()) - 20;
    $shape = $slide->getShapes()->addAutoShape(ShapeType::Rectangle, 10, 10, $shapeWidth, $shapeHeight);
    $shape->getFillFormat()->setFillType(FillType::NoFill);
    $shape->getTextFrame()->getParagraphs()->clear();

    $html = file_get_contents("file.html");
    if ($html !== false) {
        $shape->getTextFrame()->getParagraphs()->addFromHtml($html);
        $presentation->save("html_text.pptx", SaveFormat::Pptx);
    } else {
        echo "The HTML file could not be read.";
    }
} finally {
    $presentation->dispose();
}
Esportare il Testo del Paragrafo in HTML
Utilizzare ParagraphCollection::exportToHtml per esportare un intervallo selezionato di paragrafi come HTML.
- Creare un’istanza della classe Presentation e caricare la presentazione desiderata.
- Accedere alla diapositiva e trovare la AutoShape che contiene il testo.
- Accedere al TextFrame della forma.
- Chiamare ParagraphCollection::exportToHtml con l’indice del paragrafo iniziale e il numero di paragrafi da esportare.
- Scrivere la stringa HTML restituita in un file.
Questo esempio PHP esporta tutti i paragrafi dalla prima forma di testo:
use aspose\slides\Presentation;

$presentation = new Presentation("ExportingHTMLText.pptx");
try {
    $shape = $presentation->getSlides()->get_Item(0)->getShapes()->get_Item(0);

    if (java_instanceof($shape, new JavaClass("com.aspose.slides.AutoShape"))) {
        $textFrame = $shape->getTextFrame();
        if (!java_is_null($textFrame)) {
            $paragraphs = $textFrame->getParagraphs();
            $html = $paragraphs->exportToHtml(0, $paragraphs->getCount(), null);
            if (file_put_contents("paragraphs.html", $html) === false) {
                echo "The HTML file could not be written.";
            }
        } else {
            echo "The first shape does not contain a text frame.";
        }
    } else {
        echo "The first shape is not a text shape.";
    }
} finally {
    $presentation->dispose();
}
Renderizzare un Paragrafo come Immagine
Paragraph::getImage renderizza direttamente un singolo paragrafo e restituisce un IImage. Salvare il risultato in un file o stream con IImage::save. Non è necessario renderizzare la forma contenente o ritagliare manualmente un bitmap.
Paragraph::getImage può restituire null se il paragrafo non può essere trovato nella sua collezione padre, non ha limiti di rendering validi, o non può essere renderizzato. Controllare il risultato prima di salvarlo e liberare l’immagine restituita dopo l’uso.
Renderizzare un Paragrafo alla Scala Predefinita
Supponiamo di avere un file di presentazione chiamato sample.pptx con una diapositiva, dove la prima forma è una casella di testo contenente tre paragrafi.
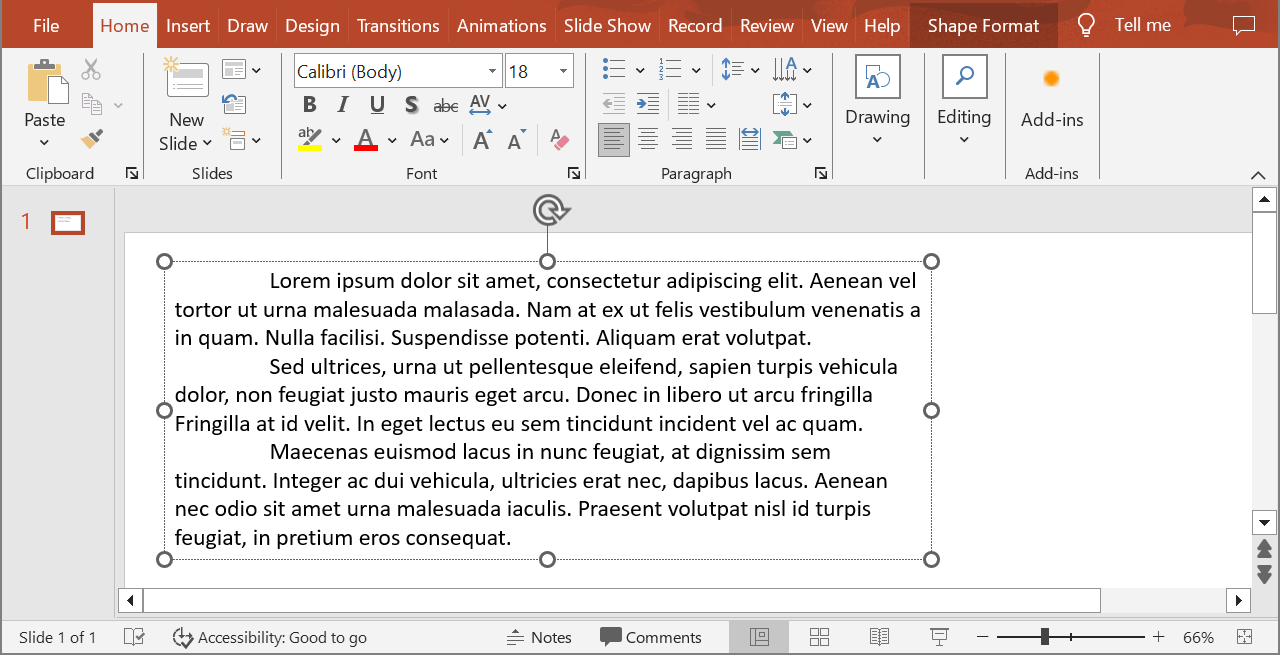
L’esempio PHP seguente renderizza il secondo paragrafo in una forma di testo normale alla scala predefinita e salva l’immagine restituita in formato PNG. Il blocco finally garantisce che l’immagine venga liberata correttamente.
use aspose\slides\ImageFormat;
use aspose\slides\Presentation;

$presentation = new Presentation("sample.pptx");
try {
    $shape = $presentation->getSlides()->get_Item(0)->getShapes()->get_Item(0);

    if (java_instanceof($shape, new JavaClass("com.aspose.slides.AutoShape"))) {
        $textFrame = $shape->getTextFrame();
        if (!java_is_null($textFrame) && java_values($textFrame->getParagraphs()->getCount()) > 1) {
            $paragraph = $textFrame->getParagraphs()->get_Item(1);
            $paragraphImage = $paragraph->getImage();

            if (!java_is_null($paragraphImage)) {
                try {
                    $paragraphImage->save("paragraph.png", ImageFormat::Png);
                } finally {
                    $paragraphImage->dispose();
                }
            } else {
                echo "The paragraph could not be rendered.";
            }
        } else {
            echo "The expected paragraph was not found.";
        }
    } else {
        echo "The first shape is not a text shape.";
    }
} finally {
    $presentation->dispose();
}
Il risultato:

Renderizzare un Paragrafo in una Cella di Tabella con Scalatura
Utilizzare la overload di Paragraph::getImage che accetta i parametri $scaleX e $scaleY per impostare i fattori di scala orizzontale e verticale. L’esempio PHP seguente crea una tabella, renderizza il paragrafo nella sua prima cella al doppio della larghezza e altezza predefinite, e salva il risultato come immagine PNG.
use aspose\slides\ImageFormat;
use aspose\slides\Presentation;

$scaleX = 2;
$scaleY = 2;

$presentation = new Presentation();
try {
    $slide = $presentation->getSlides()->get_Item(0);
    $table = $slide->getShapes()->addTable(50, 50, array(300), array(80));
    $paragraph = $table->get_Item(0, 0)->getTextFrame()->getParagraphs()->get_Item(0);
    $paragraph->setText("Text in a table cell");

    $paragraphImage = $paragraph->getImage($scaleX, $scaleY);
    if (!java_is_null($paragraphImage)) {
        try {
            $paragraphImage->save("table_paragraph.png", ImageFormat::Png);
        } finally {
            $paragraphImage->dispose();
        }
    } else {
        echo "The paragraph could not be rendered.";
    }
} finally {
    $presentation->dispose();
}
Un fattore di scala di 1 mantiene quell’asse alla sua dimensione pixel predefinita. Per esempio, 2 per entrambi i fattori produce un’immagine la cui larghezza e altezza sono circa il doppio delle dimensioni predefinite, risultando in quattro volte più pixel. Fattori più grandi generalmente producono testo più nitido per lo zoom o output ad alta risoluzione, ma aumentano anche l’uso di memoria e la dimensione del file. Fattori inferiori a 1 producono immagini più piccole con meno dettagli. Utilizzare fattori uguali per preservare il rapporto d’aspetto del paragrafo; fattori diversi orizzontali e verticali allungano l’output in modo indipendente.
Renderizzare un’intera forma con Shape::getImage resta utile quando l’output deve includere il riempimento, il bordo o altro contesto visivo della forma. Per un’immagine solo del paragrafo, utilizzare Paragraph::getImage.
FAQ
Posso disabilitare completamente l’interruzione di riga all’interno di un fotogramma di testo?
Sì. Impostare TextFrameFormat::setWrapText per disabilitare l’interruzione in modo che le linee non si interrompano ai bordi del fotogramma di testo.
Come posso ottenere le coordinate esatte sullo slide di un paragrafo specifico?
Utilizzare Paragraph::getRect per recuperare il rettangolo di delimitazione del paragrafo. Portion::getRect fornisce i limiti di una singola porzione.
Dove è controllato l’allineamento del paragrafo (sinistra, destra, centrato o giustificato)?
ParagraphFormat::setAlignment è un’impostazione a livello di paragrafo e si applica all’intero paragrafo indipendentemente dalla formattazione delle singole porzioni.
Per allineare verticalmente le porzioni di diverse dimensioni di carattere all’interno di ciascuna riga, vedere Allineare i Font all’interno di una Linea.
Posso impostare la lingua di correzione per una parte di un paragrafo?
Sì. Impostare BasePortionFormat::setLanguageId per le singole porzioni, così un paragrafo può contenere testo in più lingue.