
프레젠테이션에서 PHP를 사용한 텍스트 상자 관리
소개
Aspose.Slides for PHP via Java에서 슬라이드 텍스트는 도형에 속한 텍스트 프레임에 저장됩니다. AutoShape 클래스는 가장 일반적인 텍스트를 포함하는 도형을 나타내며, 텍스트는 AutoShape::getTextFrame 메서드를 통해 노출됩니다.
Note
모든 자동 도형은 Shape에서 파생되지만, 모든 도형이 자동 도형이거나 텍스트 프레임을 지원하는 것은 아닙니다. 기존 프레젠테이션을 처리할 때는java_instanceof를 사용하여 도형이 AutoShape인지 확인한 후 텍스트에 접근하세요.
슬라이드에 텍스트 상자 만들기
텍스트 상자를 만들려면 슬라이드에 자동 도형을 추가하고, 해당 텍스트 프레임에 텍스트를 넣은 뒤 프레젠테이션을 저장합니다. 다음 예제는 사각형 텍스트 상자를 생성합니다:
use aspose\slides\Presentation;
use aspose\slides\SaveFormat;
use aspose\slides\ShapeType;

$presentation = new Presentation();
try {
    $slide = $presentation->getSlides()->get_Item(0);
    $textBox = $slide->getShapes()->addAutoShape(ShapeType::Rectangle, 150, 75, 300, 50);
    $textBox->addTextFrame("Aspose TextBox");

    $presentation->save("TextBox.pptx", SaveFormat::Pptx);
} finally {
    $presentation->dispose();
}
ShapeCollection::addAutoShape에 전달되는 좌표와 크기는 포인트 단위입니다. AutoShape::addTextFrame은 제공된 텍스트로 텍스트 프레임을 초기화합니다.
텍스트 상자 도형 확인
AutoShape::isTextBox 메서드를 사용하여 자동 도형이 텍스트 상자로 취급되는지 확인할 수 있습니다. 이는 프레젠테이션에 텍스트를 포함하는 자동 도형과 순수 그래픽 자동 도형이 모두 포함된 경우에 유용합니다.
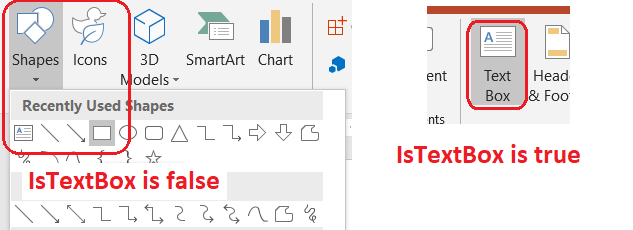
다음 예제는 프레젠테이션의 모든 자동 도형을 검사합니다:
use aspose\slides\Presentation;
use aspose\slides\ShapeType;

$presentation = new Presentation();
try {
    $slide = $presentation->getSlides()->get_Item(0);
    $textBox = $slide->getShapes()->addAutoShape(ShapeType::Rectangle, 10, 10, 120, 40);
    $textBox->addTextFrame("Text box");
    $slide->getShapes()->addAutoShape(ShapeType::Ellipse, 150, 10, 40, 40);

    $autoShapeClass = new JavaClass("com.aspose.slides.AutoShape");
    for ($slideIndex = 0; $slideIndex < java_values($presentation->getSlides()->size()); $slideIndex++) {
        $currentSlide = $presentation->getSlides()->get_Item($slideIndex);
        for ($shapeIndex = 0; $shapeIndex < java_values($currentSlide->getShapes()->size()); $shapeIndex++) {
            $shape = $currentSlide->getShapes()->get_Item($shapeIndex);
            if (java_instanceof($shape, $autoShapeClass)) {
                echo (java_is_true($shape->isTextBox()) ? "The shape is a text box." : "The shape is not a text box.") . PHP_EOL;
            }
        }
    }
} finally {
    $presentation->dispose();
}
새로 추가된 자동 도형은 비어 있지 않은 텍스트를 포함하기 전까지 텍스트 상자로 간주되지 않습니다. 텍스트는 AutoShape::addTextFrame이나 TextFrame::setText를 통해 제공할 수 있습니다. 빈 문자열을 추가하거나 할당하면 AutoShape::isTextBox은 false를 반환합니다:
use aspose\slides\Presentation;
use aspose\slides\ShapeType;

$presentation = new Presentation();
try {
    $slide = $presentation->getSlides()->get_Item(0);

    $shape1 = $slide->getShapes()->addAutoShape(ShapeType::Rectangle, 10, 10, 100, 40);
    $shape1->addTextFrame("Shape 1");
    echo (java_is_true($shape1->isTextBox()) ? "true" : "false") . PHP_EOL;

    $shape2 = $slide->getShapes()->addAutoShape(ShapeType::Rectangle, 10, 70, 100, 40);
    $shape2->getTextFrame()->setText("Shape 2");
    echo (java_is_true($shape2->isTextBox()) ? "true" : "false") . PHP_EOL;

    $shape3 = $slide->getShapes()->addAutoShape(ShapeType::Rectangle, 10, 130, 100, 40);
    $shape3->addTextFrame("");
    echo (java_is_true($shape3->isTextBox()) ? "true" : "false") . PHP_EOL;

    $shape4 = $slide->getShapes()->addAutoShape(ShapeType::Rectangle, 10, 190, 100, 40);
    $shape4->getTextFrame()->setText("");
    echo (java_is_true($shape4->isTextBox()) ? "true" : "false") . PHP_EOL;
} finally {
    $presentation->dispose();
}
첫 두 호출은 true를 출력하고, 마지막 두 호출은 false를 출력합니다.
텍스트 프레임을 소유하는 도형 찾기
일반 텍스트 처리 코드는 TextFrame을 받지만, 해당 프레임을 포함하는 프레젠테이션 객체를 모를 수 있습니다. 읽기 전용 TextFrame::getParentShape 메서드를 사용해 소유 Shape으로 이동하세요.
자동 도형이나 다른 텍스트 도형이 소유하는 텍스트 프레임의 경우, TextFrame::getParentShape은 소유자를 반환하고 TextFrame::getParentCell은 null을 반환합니다. 접근하기 전에 java_is_null로 반환값을 확인하세요. 도형과 표 셀 소유자를 모두 식별하고 SmartArt 노드와 연결된 도형을 포함하려면 Search and Replace Text를 참조하세요.
텍스트 상자에 열 추가
TextFrameFormat::setColumnCount 메서드는 텍스트 프레임을 여러 열로 나누고, TextFrameFormat::setColumnSpacing 메서드는 열 사이의 간격을 포인트 단위로 설정합니다. 두 설정은 TextFrameFormat에 속하며 기존 텍스트 상자의 텍스트 프레임을 통해 변경할 수 있습니다. 텍스트는 동일한 도형 내에서 열 사이에 흐르며, 다른 도형으로 이어지지 않습니다.
다음 예제는 10포인트 간격으로 세 개의 열을 가진 텍스트 상자를 만들고, 프레젠테이션을 저장한 뒤 출력 파일에서 저장된 설정을 다시 읽어옵니다:
use aspose\slides\Presentation;
use aspose\slides\SaveFormat;
use aspose\slides\ShapeType;

$presentation = new Presentation();
try {
    $slide = $presentation->getSlides()->get_Item(0);
    $textBox = $slide->getShapes()->addAutoShape(ShapeType::Rectangle, 100, 100, 300, 200);
    $textBox->addTextFrame("This text is distributed automatically across all columns in the text box.");

    $textFrameFormat = $textBox->getTextFrame()->getTextFrameFormat();
    $textFrameFormat->setColumnCount(3);
    $textFrameFormat->setColumnSpacing(10);

    $presentation->save("TextBoxColumns.pptx", SaveFormat::Pptx);

    $savedPresentation = new Presentation("TextBoxColumns.pptx");
    try {
        $savedTextBox = $savedPresentation->getSlides()->get_Item(0)->getShapes()->get_Item(0);
        $savedFormat = $savedTextBox->getTextFrame()->getTextFrameFormat();
        echo "Columns: " . java_values($savedFormat->getColumnCount()) . "; spacing: " . java_values($savedFormat->getColumnSpacing()) . " points" . PHP_EOL;
    } finally {
        $savedPresentation->dispose();
    }
} finally {
    $presentation->dispose();
}
개별 열에서 텍스트 추출
TextFrame::splitTextByColumns를 사용하면 기존 텍스트 프레임에서 각 시각적 열에 할당된 텍스트를 얻을 수 있습니다. 이 메서드는 열 기반 읽기 순서대로 각 열에 대한 문자열을 반환합니다. 단일 열 텍스트 프레임은 요소가 하나인 배열을 반환하고, 빈 열은 빈 문자열로 표시됩니다. 반환된 문자열은 순수 텍스트만 포함하며, 구간 수준 서식은 보존되지 않습니다.
이 기능은 다음과 같은 경우에 유용합니다:
- 열 기반 읽기 순서를 유지하면서 텍스트를 추출해야 할 때.
- 다중 열 슬라이드의 내용을 색인하거나 비교할 때.
- 각 열을 별도 파일, 데이터베이스 필드 또는 다른 대상에 내보낼 때.
- TextFrameFormat::setColumnCount, TextFrameFormat::setColumnSpacing, 글꼴 또는 텍스트‑프레임 크기를 변경한 후 텍스트가 어떻게 재배치되는지 검사할 때.
이 메서드는 현재 TextFrame에 배포된 텍스트만 보고하며, 별도 도형이나 텍스트 상자 간에 텍스트를 자동으로 흐르게 하지는 않습니다. 열 배포는 사용 가능한 글꼴 및 기타 텍스트 레이아웃 설정에 따라 달라질 수 있으므로, 일관된 결과가 중요한 경우 필요한 글꼴이 존재하는지 확인하세요.
다음 예제는 프레젠테이션을 로드하고, 텍스트 프레임이 있는 첫 번째 다중 열 자동 도형을 찾아, 구성된 열 수를 읽은 뒤 각 열의 텍스트를 별도 파일에 기록합니다. 텍스트 프레임을 제공하지 않는 도형은 건너뜁니다:
use aspose\slides\Presentation;

$presentation = new Presentation("MultiColumnText.pptx");
try {
    $textBox = null;
    $autoShapeClass = new JavaClass("com.aspose.slides.AutoShape");
    $shapes = $presentation->getSlides()->get_Item(0)->getShapes();
    for ($shapeIndex = 0; $shapeIndex < java_values($shapes->size()); $shapeIndex++) {
        $shape = $shapes->get_Item($shapeIndex);
        if (java_instanceof($shape, $autoShapeClass)) {
            $textFrame = $shape->getTextFrame();
            if (!java_is_null($textFrame)) {
                $columnCount = java_values($textFrame->getTextFrameFormat()->getColumnCount());
                if ($columnCount > 1) {
                    $textBox = $shape;
                    break;
                }
            }
        }
    }

    if ($textBox === null) {
        echo "No multi-column text frame was found." . PHP_EOL;
    } else {
        $textFrame = $textBox->getTextFrame();
        $configuredColumnCount = java_values($textFrame->getTextFrameFormat()->getColumnCount());
        $columnTexts = java_values($textFrame->splitTextByColumns());

        echo "Configured columns: " . $configuredColumnCount . PHP_EOL;

        foreach ($columnTexts as $columnIndex => $columnText) {
            $columnNumber = $columnIndex + 1;
            echo "Column " . $columnNumber . ": " . $columnText . PHP_EOL;
            $outputPath = "Column-" . $columnNumber . ".txt";
            $bytesWritten = file_put_contents($outputPath, $columnText);
            if ($bytesWritten === false) {
                echo "Could not write column " . $columnNumber . " to " . $outputPath . PHP_EOL;
            }
        }
    }
} finally {
    $presentation->dispose();
}
텍스트 업데이트
프레젠테이션 전체의 텍스트를 업데이트하려면 슬라이드와 도형을 순회하면서 자동 도형을 선택하고 텍스트 구간을 편집합니다. 구간 수준에서 작업하면 텍스트와 문자 서식을 동시에 변경할 수 있습니다.
다음 예제는 자동 도형 텍스트에서 years를 months로 교체하고, 영향을 받은 각 구간을 굵게 만듭니다:
use aspose\slides\NullableBool;
use aspose\slides\Presentation;
use aspose\slides\SaveFormat;

$presentation = new Presentation("Text.pptx");
try {
    $autoShapeClass = new JavaClass("com.aspose.slides.AutoShape");
    for ($slideIndex = 0; $slideIndex < java_values($presentation->getSlides()->size()); $slideIndex++) {
        $slide = $presentation->getSlides()->get_Item($slideIndex);
        for ($shapeIndex = 0; $shapeIndex < java_values($slide->getShapes()->size()); $shapeIndex++) {
            $shape = $slide->getShapes()->get_Item($shapeIndex);
            if (!java_instanceof($shape, $autoShapeClass)) {
                continue;
            }

            $textFrame = $shape->getTextFrame();
            if (java_is_null($textFrame)) {
                continue;
            }

            for ($paragraphIndex = 0; $paragraphIndex < java_values($textFrame->getParagraphs()->getCount()); $paragraphIndex++) {
                $paragraph = $textFrame->getParagraphs()->get_Item($paragraphIndex);
                for ($portionIndex = 0; $portionIndex < java_values($paragraph->getPortions()->getCount()); $portionIndex++) {
                    $portion = $paragraph->getPortions()->get_Item($portionIndex);
                    $text = java_values($portion->getText());
                    if ($text !== null && strpos($text, "years") !== false) {
                        $updatedText = str_replace("years", "months", $text);
                        $portion->setText($updatedText);
                        $portion->getPortionFormat()->setFontBold(NullableBool::True);
                    }
                }
            }
        }
    }

    $presentation->save("TextChanged.pptx", SaveFormat::Pptx);
} finally {
    $presentation->dispose();
}
이 순회는 자동 도형에만 텍스트를 업데이트합니다. 표, 차트, SmartArt 또는 그룹화된 도형에 저장된 텍스트는 해당 객체 컬렉션을 별도로 순회해야 합니다.
하이퍼링크가 포함된 텍스트 상자 추가
하이퍼링크는 특정 텍스트 구간에 할당할 수 있어 해당 텍스트만 클릭 가능한 링크가 됩니다. HyperlinkManager::setExternalHyperlinkClick를 사용해 구간을 외부 URL과 연결하세요.
다음 예제는 링크가 포함된 텍스트를 만들고 프레젠테이션에 저장합니다:
use aspose\slides\Presentation;
use aspose\slides\SaveFormat;
use aspose\slides\ShapeType;

$presentation = new Presentation();
try {
    $slide = $presentation->getSlides()->get_Item(0);
    $textBox = $slide->getShapes()->addAutoShape(ShapeType::Rectangle, 150, 150, 200, 50);
    $textBox->addTextFrame("Aspose.Slides");

    $textPortion = $textBox->getTextFrame()->getParagraphs()->get_Item(0)->getPortions()->get_Item(0);
    $textPortion->getPortionFormat()->getHyperlinkManager()->setExternalHyperlinkClick("https://www.aspose.com/");

    $presentation->save("Hyperlink.pptx", SaveFormat::Pptx);
} finally {
    $presentation->dispose();
}
FAQ
텍스트 상자와 마스터 또는 레이아웃 슬라이드의 텍스트 자리표시자 사이의 차이점은 무엇인가요?
placeholder는 master slide 또는 layout slide에서 위치와 서식을 상속받을 수 있습니다. 일반 텍스트 상자는 생성된 슬라이드에 독립적인 도형이며, 레이아웃이 변경되어도 자리표시자 동작을 얻지 못합니다.
차트, 표 또는 SmartArt의 텍스트를 변경하지 않고 텍스트만 교체하려면 어떻게 해야 하나요?
Update Text 예제와 같이 AutoShape 객체만 순회하도록 범위를 제한하십시오. 차트, 표 및 SmartArt는 자체 객체 모델에 텍스트를 저장하므로 해당 루프에서는 수정되지 않습니다.