
Android에서 PowerPoint 도형 서식 지정
소개
PowerPoint에서 슬라이드에 도형을 추가할 수 있습니다. 도형은 선으로 구성되므로 외곽선을 수정하거나 효과를 적용하여 서식을 지정할 수 있습니다. 또한 도형 내부가 채워지는 방식을 제어하는 설정을 지정하여 도형을 서식 지정할 수 있습니다.
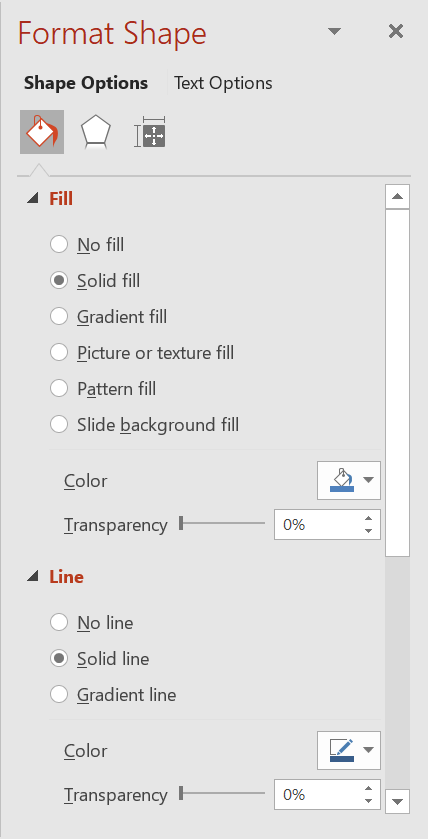
Aspose.Slides for Android via Java는 PowerPoint에서 제공되는 동일한 옵션을 사용하여 도형을 서식 지정할 수 있는 인터페이스와 메서드를 제공합니다.
선 서식 지정
Aspose.Slides를 사용하면 도형에 사용자 지정 선 스타일을 지정할 수 있습니다. 절차는 다음과 같습니다:
- Presentation 클래스의 인스턴스를 생성합니다.
- 인덱스로 슬라이드에 대한 참조를 가져옵니다.
- 슬라이드에 IAutoShape를 추가합니다.
- 도형의 line style을 설정합니다.
- 선 너비를 설정합니다.
- 선의 dash style을 설정합니다.
- 도형의 선 색을 설정합니다.
- 수정된 프레젠테이션을 PPTX 파일로 저장합니다.
다음 코드는 사각형 AutoShape을 서식 지정하는 방법을 보여줍니다:
import com.aspose.slides.*;
import java.awt.Color;

// 프레젠테이션 파일을 나타내는 Presentation 클래스를 인스턴스화합니다.
Presentation presentation = new Presentation();
try {
    // 첫 번째 슬라이드를 가져옵니다.
    ISlide slide = presentation.getSlides().get_Item(0);

    // Rectangle 유형의 자동 도형을 추가합니다.
    IAutoShape shape = slide.getShapes().addAutoShape(ShapeType.Rectangle, 50, 150, 150, 75);

    // 사각형 도형의 채우기를 제거하여 선만 보이게 합니다.
    shape.getFillFormat().setFillType(FillType.NoFill);

    // 사각형 선에 서식을 적용합니다.
    shape.getLineFormat().setStyle(LineStyle.ThickThin);
    shape.getLineFormat().setWidth(7);
    shape.getLineFormat().setDashStyle(LineDashStyle.Dash);

    // 사각형 선의 색상을 설정합니다.
    shape.getLineFormat().getFillFormat().setFillType(FillType.Solid);
    shape.getLineFormat().getFillFormat().getSolidFillColor().setColor(Color.BLUE);

    // PPTX 파일을 디스크에 저장합니다.
    presentation.save("formatted_lines.pptx", SaveFormat.Pptx);
} finally {
    presentation.dispose();
}
결과:

도형 선에 스케치 효과 적용
스케치 효과는 도형 선을 손으로 그린 것처럼 보이게 합니다. IShape.getLineFormat을 사용해 선 설정에 접근하고, ILineFormat.getSketchFormat을 통해 스케치 설정에 접근한 다음, ISketchFormat.setSketchType을 사용해 LineSketchType 열거형에서 값을 선택합니다.
다음 Java 코드는 LineSketchType.Curved 효과를 적용하고, 명시적으로 할당된 값을 읽으며, LineSketchType.None으로 효과를 제거하는 방법을 보여줍니다:
import com.aspose.slides.*;

Presentation presentation = new Presentation();
try {
    ISlide slide = presentation.getSlides().get_Item(0);
    IAutoShape shape = slide.getShapes().addAutoShape(ShapeType.Rectangle, 50, 50, 200, 100);

    // 도형의 라인 형식과 스케치 형식에 접근합니다.
    ISketchFormat sketchFormat = shape.getLineFormat().getSketchFormat();

    // 스케치 효과를 적용합니다.
    sketchFormat.setSketchType(LineSketchType.Curved);

    // 도형에 직접 할당된 스케치 효과를 읽습니다.
    int explicitSketchType = sketchFormat.getSketchType();
    System.out.println("Explicit sketch type: " + explicitSketchType);

    // 스케치 효과를 제거합니다.
    sketchFormat.setSketchType(LineSketchType.None);
} finally {
    presentation.dispose();
}
ISketchFormat.getSketchType이 반환하는 값은 도형에 직접 할당된 설정을 나타냅니다. 선 서식이 테마, 마스터 슬라이드 또는 레이아웃 슬라이드에서 상속될 수 있는 경우, ILineFormat.getEffective을 사용하고, ILineFormatEffectiveData.getSketchFormat에 접근한 뒤, ISketchFormatEffectiveData.getSketchType를 읽습니다. 실제 값은 상속이 해결된 후 실제 적용되는 서식을 반영합니다:
import com.aspose.slides.*;

Presentation presentation = new Presentation("presentation.pptx");
try {
    IShape shape = presentation.getSlides().get_Item(0).getShapes().get_Item(0);
    ILineFormat lineFormat = shape.getLineFormat();

    int explicitSketchType = lineFormat.getSketchFormat().getSketchType();
    ILineFormatEffectiveData effectiveLineFormat = lineFormat.getEffective();
    int effectiveSketchType = effectiveLineFormat.getSketchFormat().getSketchType();

    System.out.println("Explicit sketch type: " + explicitSketchType);
    System.out.println("Effective sketch type: " + effectiveSketchType);
} finally {
    presentation.dispose();
}
조인 스타일 서식 지정
다음은 세 가지 조인 유형 옵션입니다:
- Round
- Miter
- Bevel
기본적으로 PowerPoint는 두 선을 각도에서(예: 도형 모서리) 결합할 때 Round 설정을 사용합니다. 그러나 날카로운 각을 가진 도형을 그리는 경우 Miter 옵션을 선호할 수 있습니다.
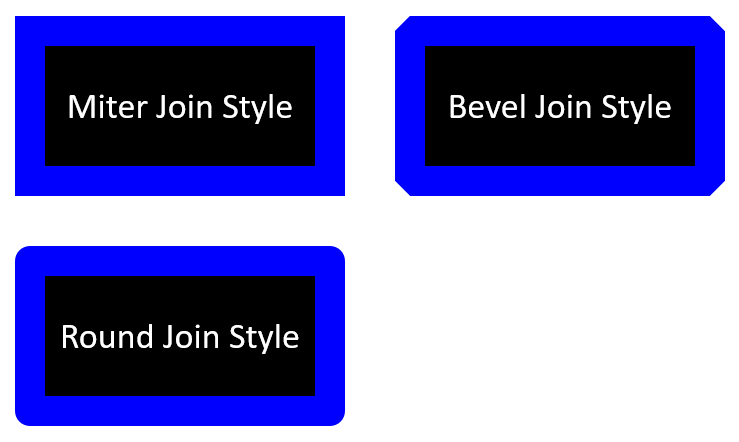
다음 Java 코드는 위 이미지와 같이 Miter, Bevel, Round 조인 유형 설정을 사용하여 세 개의 사각형을 만든 방법을 보여줍니다:
import com.aspose.slides.*;
import java.awt.Color;

// 프레젠테이션 파일을 나타내는 Presentation 클래스를 인스턴스화합니다.
Presentation presentation = new Presentation();
try {
    // 첫 번째 슬라이드를 가져옵니다.
    ISlide slide = presentation.getSlides().get_Item(0);

    // Rectangle 유형의 자동 도형 세 개를 추가합니다.
    IAutoShape shape1 = slide.getShapes().addAutoShape(ShapeType.Rectangle, 20, 20, 150, 75);
    IAutoShape shape2 = slide.getShapes().addAutoShape(ShapeType.Rectangle, 210, 20, 150, 75);
    IAutoShape shape3 = slide.getShapes().addAutoShape(ShapeType.Rectangle, 20, 135, 150, 75);

    // 각 사각형 도형의 채우기 색을 설정합니다.
    shape1.getFillFormat().setFillType(FillType.Solid);
    shape1.getFillFormat().getSolidFillColor().setColor(Color.BLACK);
    shape2.getFillFormat().setFillType(FillType.Solid);
    shape2.getFillFormat().getSolidFillColor().setColor(Color.BLACK);
    shape3.getFillFormat().setFillType(FillType.Solid);
    shape3.getFillFormat().getSolidFillColor().setColor(Color.BLACK);

    // 선 너비를 설정합니다.
    shape1.getLineFormat().setWidth(15);
    shape2.getLineFormat().setWidth(15);
    shape3.getLineFormat().setWidth(15);

    // 각 사각형 선의 색을 설정합니다.
    shape1.getLineFormat().getFillFormat().setFillType(FillType.Solid);
    shape1.getLineFormat().getFillFormat().getSolidFillColor().setColor(Color.BLUE);
    shape2.getLineFormat().getFillFormat().setFillType(FillType.Solid);
    shape2.getLineFormat().getFillFormat().getSolidFillColor().setColor(Color.BLUE);
    shape3.getLineFormat().getFillFormat().setFillType(FillType.Solid);
    shape3.getLineFormat().getFillFormat().getSolidFillColor().setColor(Color.BLUE);

    // 조인 스타일을 설정합니다.
    shape1.getLineFormat().setJoinStyle(LineJoinStyle.Miter);
    shape2.getLineFormat().setJoinStyle(LineJoinStyle.Bevel);
    shape3.getLineFormat().setJoinStyle(LineJoinStyle.Round);

    // 각 사각형에 텍스트를 추가합니다.
    shape1.getTextFrame().setText("Miter Join Style");
    shape2.getTextFrame().setText("Bevel Join Style");
    shape3.getTextFrame().setText("Round Join Style");

    // PPTX 파일을 디스크에 저장합니다.
    presentation.save("join_styles.pptx", SaveFormat.Pptx);
} finally {
    presentation.dispose();
}
그라디언트 채우기
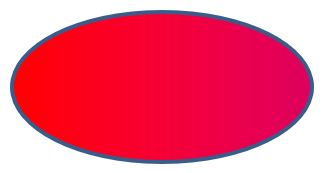
PowerPoint에서 그라디언트 채우기는 도형에 연속적인 색상 혼합을 적용할 수 있는 서식 옵션입니다. 예를 들어 두 개 이상의 색상을 사용해 하나가 서서히 다른 색으로 변하도록 적용할 수 있습니다.
Aspose.Slides를 사용하여 도형에 그라디언트 채우기를 적용하는 방법은 다음과 같습니다:
- Presentation 클래스의 인스턴스를 생성합니다.
- 인덱스로 슬라이드에 대한 참조를 가져옵니다.
- 슬라이드에 IAutoShape를 추가합니다.
- 도형의 FillType을
Gradient로 설정합니다. - IGradientFormat 인터페이스가 노출하는 그라디언트 스톱 컬렉션의
add메서드를 사용해 정의된 위치와 함께 원하는 두 색상을 추가합니다. - 수정된 프레젠테이션을 PPTX 파일로 저장합니다.
다음 Java 코드는 타원에 그라디언트 채우기 효과를 적용하는 방법을 보여줍니다:
import com.aspose.slides.*;

// 프레젠테이션 파일을 나타내는 Presentation 클래스를 인스턴스화합니다.
Presentation presentation = new Presentation();
try {
    // 첫 번째 슬라이드를 가져옵니다.
    ISlide slide = presentation.getSlides().get_Item(0);

    // Ellipse 유형의 자동 도형을 추가합니다.
    IAutoShape shape = slide.getShapes().addAutoShape(ShapeType.Ellipse, 50, 50, 150, 75);

    // 타원에 그라디언트 서식을 적용합니다.
    shape.getFillFormat().setFillType(FillType.Gradient);
    shape.getFillFormat().getGradientFormat().setGradientShape(GradientShape.Linear);

    // 그라디언트 방향을 설정합니다.
    shape.getFillFormat().getGradientFormat().setGradientDirection(GradientDirection.FromCorner2);

    // 두 개의 그라디언트 스톱을 추가합니다.
    shape.getFillFormat().getGradientFormat().getGradientStops().addPresetColor((float)1.0, PresetColor.Purple);
    shape.getFillFormat().getGradientFormat().getGradientStops().addPresetColor((float)0, PresetColor.Red);

    // PPTX 파일을 디스크에 저장합니다.
    presentation.save("gradient_fill.pptx", SaveFormat.Pptx);
} finally {
    presentation.dispose();
}
결과:
패턴 채우기
PowerPoint에서 패턴 채우기는 두 색상 디자인(점, 줄무늬, 교차선, 체크 등)을 도형에 적용할 수 있는 서식 옵션입니다. 패턴의 전경색과 배경색을 사용자 정의 색으로 선택할 수 있습니다.
Aspose.Slides는 프레젠테이션의 시각적 매력을 높이기 위해 도형에 적용할 수 있는 45개 이상의 미리 정의된 패턴 스타일을 제공합니다. 미리 정의된 패턴을 선택한 후에도 정확히 사용할 색상을 지정할 수 있습니다.
Aspose.Slides를 사용하여 도형에 패턴 채우기를 적용하는 방법은 다음과 같습니다:
- Presentation 클래스의 인스턴스를 생성합니다.
- 인덱스로 슬라이드에 대한 참조를 가져옵니다.
- 슬라이드에 IAutoShape를 추가합니다.
- 도형의 FillType을
Pattern으로 설정합니다. - 미리 정의된 옵션 중에서 패턴 스타일을 선택합니다.
- 패턴의 Background Color를 설정합니다.
- 패턴의 Foreground Color를 설정합니다.
- 수정된 프레젠테이션을 PPTX 파일로 저장합니다.
다음 Java 코드는 사각형에 패턴 채우기를 적용하는 방법을 보여줍니다:
import com.aspose.slides.*;
import java.awt.Color;

// 프레젠테이션 파일을 나타내는 Presentation 클래스를 인스턴스화합니다.
Presentation presentation = new Presentation();
try {
    // 첫 번째 슬라이드를 가져옵니다.
    ISlide slide = presentation.getSlides().get_Item(0);

    // Rectangle 유형의 자동 도형을 추가합니다.
    IAutoShape shape = slide.getShapes().addAutoShape(ShapeType.Rectangle, 50, 50, 150, 75);

    // 채우기 유형을 Pattern으로 설정합니다.
    shape.getFillFormat().setFillType(FillType.Pattern);

    // 패턴 스타일을 설정합니다.
    shape.getFillFormat().getPatternFormat().setPatternStyle(PatternStyle.Trellis);

    // 패턴 배경색과 전경색을 설정합니다.
    shape.getFillFormat().getPatternFormat().getBackColor().setColor(Color.LIGHT_GRAY);
    shape.getFillFormat().getPatternFormat().getForeColor().setColor(Color.YELLOW);

    // PPTX 파일을 디스크에 저장합니다.
    presentation.save("pattern_fill.pptx", SaveFormat.Pptx);
} finally {
    presentation.dispose();
}
결과:
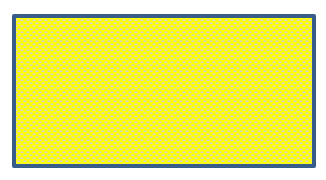
그림 채우기
PowerPoint에서 그림 채우기는 이미지 파일을 도형 내부에 삽입하여 도형의 배경으로 사용하는 서식 옵션입니다.
Aspose.Slides를 사용하여 도형에 그림 채우기를 적용하는 방법은 다음과 같습니다:
- Presentation 클래스의 인스턴스를 생성합니다.
- 인덱스로 슬라이드에 대한 참조를 가져옵니다.
- 슬라이드에 IAutoShape를 추가합니다.
- 도형의 FillType을
Picture로 설정합니다. - 그림 채우기 모드를
Tile(또는 원하는 다른 모드)으로 설정합니다. - 사용하려는 이미지에서 IPPImage 객체를 생성합니다.
- 이미지를
ISlidesPicture.setImage메서드에 전달합니다. - 수정된 프레젠테이션을 PPTX 파일로 저장합니다.
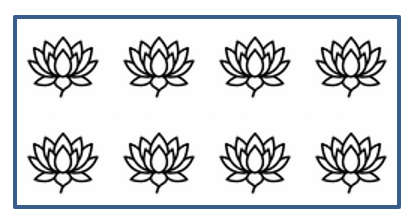
다음은 “lotus.png” 파일을 사용한 예시입니다:

다음 Java 코드는 그림을 사용해 도형을 채우는 방법을 보여줍니다:
import com.aspose.slides.*;

// 프레젠테이션 파일을 나타내는 Presentation 클래스를 인스턴스화합니다.
Presentation presentation = new Presentation();
try {
    // 첫 번째 슬라이드를 가져옵니다.
    ISlide slide = presentation.getSlides().get_Item(0);

    // Rectangle 유형의 자동 도형을 추가합니다.
    IAutoShape shape = slide.getShapes().addAutoShape(ShapeType.Rectangle, 50, 50, 255, 130);

    // 채우기 유형을 Picture으로 설정합니다.
    shape.getFillFormat().setFillType(FillType.Picture);

    // 그림 채우기 모드를 설정합니다.
    shape.getFillFormat().getPictureFillFormat().setPictureFillMode(PictureFillMode.Tile);

    // 이미지를 로드하고 프레젠테이션 리소스에 추가합니다.
    IImage image = Images.fromFile("lotus.png");
    IPPImage picture = presentation.getImages().addImage(image);
    image.dispose();

    // 그림을 설정합니다.
    shape.getFillFormat().getPictureFillFormat().getPicture().setImage(picture);

    // PPTX 파일을 디스크에 저장합니다.
    presentation.save("picture_fill.pptx", SaveFormat.Pptx);
} finally {
    presentation.dispose();
}
결과:
텍스로 타일 그림 사용
타일형 그림을 텍스처로 설정하고 타일링 동작을 사용자 정의하려면 IPictureFillFormat 인터페이스와 PictureFillFormat 클래스의 다음 메서드를 사용할 수 있습니다:
- setPictureFillMode: 그림 채우기 모드를
Tile또는Stretch로 설정합니다. - setTileAlignment: 도형 내에서 타일의 정렬을 지정합니다.
- setTileFlip: 타일을 수평, 수직 또는 모두 뒤집을지 제어합니다.
- setTileOffsetX: 도형 원점으로부터 타일의 수평 오프셋(포인트)을 설정합니다.
- setTileOffsetY: 도형 원점으로부터 타일의 수직 오프셋(포인트)을 설정합니다.
- setTileScaleX: 타일의 수평 스케일을 백분율로 정의합니다.
- setTileScaleY: 타일의 수직 스케일을 백분율로 정의합니다.
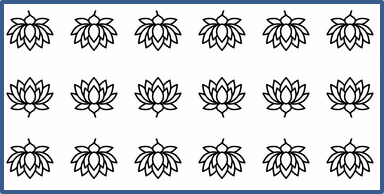
다음 코드 샘플은 타일 그림 채우기가 적용된 사각형 도형을 추가하고 타일 옵션을 구성하는 방법을 보여줍니다:
import com.aspose.slides.*;

// 프레젠테이션 파일을 나타내는 Presentation 클래스를 인스턴스화합니다.
Presentation presentation = new Presentation();
try {
    // 첫 번째 슬라이드를 가져옵니다.
    ISlide firstSlide = presentation.getSlides().get_Item(0);

    // 사각형 자동 도형을 추가합니다.
    IAutoShape shape = firstSlide.getShapes().addAutoShape(ShapeType.Rectangle, 50, 50, 190, 95);

    // 도형의 채우기 유형을 Picture로 설정합니다.
    shape.getFillFormat().setFillType(FillType.Picture);

    // 이미지를 로드하고 프레젠테이션 리소스에 추가합니다.
    IImage sourceImage = Images.fromFile("lotus.png");
    IPPImage presentationImage = presentation.getImages().addImage(sourceImage);
    sourceImage.dispose();

    // 이미지를 도형에 할당합니다.
    IPictureFillFormat pictureFillFormat = shape.getFillFormat().getPictureFillFormat();
    pictureFillFormat.getPicture().setImage(presentationImage);

    // 그림 채우기 모드와 타일링 속성을 구성합니다.
    pictureFillFormat.setPictureFillMode(PictureFillMode.Tile);
    pictureFillFormat.setTileOffsetX(-32);
    pictureFillFormat.setTileOffsetY(-32);
    pictureFillFormat.setTileScaleX(50);
    pictureFillFormat.setTileScaleY(50);
    pictureFillFormat.setTileAlignment(RectangleAlignment.BottomRight);
    pictureFillFormat.setTileFlip(TileFlip.FlipBoth);

    // PPTX 파일을 디스크에 저장합니다.
    presentation.save("tile.pptx", SaveFormat.Pptx);
} finally {
    presentation.dispose();
}
결과:
단색 채우기
PowerPoint에서 단색 채우기는 도형을 단일, 균일한 색상으로 채우는 서식 옵션입니다. 이 배경 색은 그라디언트, 텍스처 또는 패턴 없이 단순히 적용됩니다.
Aspose.Slides를 사용하여 도형에 단색 채우기를 적용하려면 다음 단계를 따르십시오:
- Presentation 클래스의 인스턴스를 생성합니다.
- 인덱스로 슬라이드에 대한 참조를 가져옵니다.
- 슬라이드에 IAutoShape를 추가합니다.
- 도형의 FillType을
Solid로 설정합니다. - 원하는 채우기 색을 도형에 할당합니다.
- 수정된 프레젠테이션을 PPTX 파일로 저장합니다.
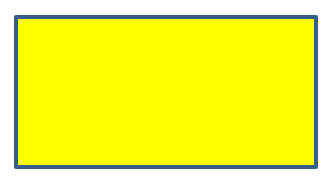
다음 Java 코드는 PowerPoint 슬라이드의 사각형에 단색 채우기를 적용하는 방법을 보여줍니다:
import com.aspose.slides.*;
import java.awt.Color;

// 프레젠테이션 파일을 나타내는 Presentation 클래스를 인스턴스화합니다.
Presentation presentation = new Presentation();
try {
    // 첫 번째 슬라이드를 가져옵니다.
    ISlide slide = presentation.getSlides().get_Item(0);

    // Rectangle 유형의 자동 도형을 추가합니다.
    IAutoShape shape = slide.getShapes().addAutoShape(ShapeType.Rectangle, 50, 50, 150, 75);

    // 채우기 유형을 Solid로 설정합니다.
    shape.getFillFormat().setFillType(FillType.Solid);

    // 채우기 색을 설정합니다.
    shape.getFillFormat().getSolidFillColor().setColor(Color.YELLOW);

    // PPTX 파일을 디스크에 저장합니다.
    presentation.save("solid_color_fill.pptx", SaveFormat.Pptx);
} finally {
    presentation.dispose();
}
결과:
투명도 설정
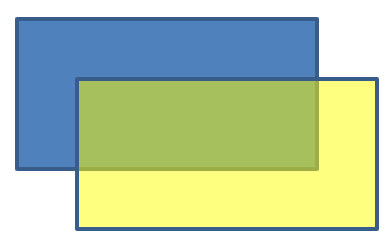
PowerPoint에서 도형에 단색, 그라디언트, 그림 또는 텍스처 채우기를 적용할 때 채우기의 불투명도를 제어하기 위해 투명도 수준을 설정할 수 있습니다. 투명도 값이 높을수록 도형이 더 투명해져 배경이나 하위 객체가 부분적으로 보이게 됩니다.
Aspose.Slides는 채우기에 사용되는 색상의 알파 값을 조정하여 투명도 수준을 설정할 수 있게 합니다. 방법은 다음과 같습니다:
- Presentation 클래스의 인스턴스를 생성합니다.
- 인덱스로 슬라이드에 대한 참조를 가져옵니다.
- 슬라이드에 IAutoShape를 추가합니다.
- FillType을
Solid로 설정합니다. Color를 사용해 투명도가 포함된 색을 정의합니다(alpha구성 요소가 투명도를 제어합니다).- 프레젠테이션을 저장합니다.
다음 Java 코드는 사각형에 투명 채우기 색을 적용하는 방법을 보여줍니다:
import com.aspose.slides.*;
import java.awt.Color;

// 프레젠테이션 파일을 나타내는 Presentation 클래스를 인스턴스화합니다.
Presentation presentation = new Presentation();
try {
    // 첫 번째 슬라이드를 가져옵니다.
    ISlide slide = presentation.getSlides().get_Item(0);

    // 실체 사각형 자동 도형을 추가합니다.
    IAutoShape solidShape = slide.getShapes().addAutoShape(ShapeType.Rectangle, 50, 50, 150, 75);

    // 실체 도형 위에 투명 사각형 자동 도형을 추가합니다.
    IAutoShape transparentShape = slide.getShapes().addAutoShape(ShapeType.Rectangle, 80, 80, 150, 75);
    transparentShape.getFillFormat().setFillType(FillType.Solid);
    transparentShape.getFillFormat().getSolidFillColor().setColor(new Color(255, 255, 0, 204));

    // PPTX 파일을 디스크에 저장합니다.
    presentation.save("shape_transparency.pptx", SaveFormat.Pptx);
} finally {
    presentation.dispose();
}
결과:
도형 회전
Aspose.Slides를 사용하면 PowerPoint 프레젠테이션에서 도형을 회전할 수 있습니다. 이는 특정 정렬이나 디자인 요구 사항이 있는 시각 요소를 배치할 때 유용합니다.
슬라이드에서 도형을 회전하려면 다음 단계를 따르십시오:
- Presentation 클래스의 인스턴스를 생성합니다.
- 인덱스로 슬라이드에 대한 참조를 가져옵니다.
- 슬라이드에 IAutoShape를 추가합니다.
- 도형의 회전 속성을 원하는 각도로 설정합니다.
- 프레젠테이션을 저장합니다.
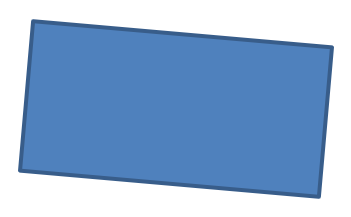
다음 Java 코드는 도형을 5도 회전시키는 예시를 보여줍니다:
import com.aspose.slides.*;

// 프레젠테이션 파일을 나타내는 Presentation 클래스를 인스턴스화합니다.
Presentation presentation = new Presentation();
try {
    // 첫 번째 슬라이드를 가져옵니다.
    ISlide slide = presentation.getSlides().get_Item(0);

    // Rectangle 유형의 자동 도형을 추가합니다.
    IAutoShape shape = slide.getShapes().addAutoShape(ShapeType.Rectangle, 50, 50, 150, 75);

    // 도형을 5도 회전시킵니다.
    shape.setRotation(5);

    // PPTX 파일을 디스크에 저장합니다.
    presentation.save("shape_rotation.pptx", SaveFormat.Pptx);
} finally {
    presentation.dispose();
}
결과:
3D 베벨 효과 추가
Aspose.Slides를 사용하면 도형의 ThreeDFormat 속성을 구성하여 3D 베벨 효과를 적용할 수 있습니다.
도형에 3D 베벨 효과를 추가하려면 다음 단계를 따르십시오:
- Presentation 클래스를 인스턴스화합니다.
- 인덱스로 슬라이드에 대한 참조를 가져옵니다.
- 슬라이드에 IAutoShape를 추가합니다.
- 도형의 ThreeDFormat을 구성하여 베벨 설정을 정의합니다.
- 프레젠테이션을 저장합니다.
다음 Java 코드는 도형에 3D 베벨 효과를 적용하는 방법을 보여줍니다:
import com.aspose.slides.*;
import java.awt.Color;

// Presentation 클래스의 인스턴스를 생성합니다.
Presentation presentation = new Presentation();
try {
    ISlide slide = presentation.getSlides().get_Item(0);

    // 슬라이드에 도형을 추가합니다.
    IAutoShape shape = slide.getShapes().addAutoShape(ShapeType.Ellipse, 50, 50, 100, 100);
    shape.getFillFormat().setFillType(FillType.Solid);
    shape.getFillFormat().getSolidFillColor().setColor(Color.GREEN);
    shape.getLineFormat().getFillFormat().setFillType(FillType.Solid);
    shape.getLineFormat().getFillFormat().getSolidFillColor().setColor(Color.ORANGE);
    shape.getLineFormat().setWidth(2.0);

    // 도형의 ThreeDFormat 속성을 설정합니다.
    shape.getThreeDFormat().setDepth(4);
    shape.getThreeDFormat().getBevelTop().setBevelType(BevelPresetType.Circle);
    shape.getThreeDFormat().getBevelTop().setHeight(6);
    shape.getThreeDFormat().getBevelTop().setWidth(6);
    shape.getThreeDFormat().getCamera().setCameraType(CameraPresetType.OrthographicFront);
    shape.getThreeDFormat().getLightRig().setLightType(LightRigPresetType.ThreePt);
    shape.getThreeDFormat().getLightRig().setDirection(LightingDirection.Top);

    // 프레젠테이션을 PPTX 파일로 저장합니다.
    presentation.save("3D_bevel_effect.pptx", SaveFormat.Pptx);
} finally {
    presentation.dispose();
}
결과:

3D 회전 효과 추가
Aspose.Slides를 사용하면 도형의 ThreeDFormat 속성을 구성하여 3D 회전 효과를 적용할 수 있습니다.
도형에 3D 회전을 적용하려면:
- Presentation 클래스의 인스턴스를 생성합니다.
- 인덱스로 슬라이드에 대한 참조를 가져옵니다.
- 슬라이드에 IAutoShape를 추가합니다.
- setCameraType와 setLightType를 사용해 3D 회전을 정의합니다.
- 프레젠테이션을 저장합니다.
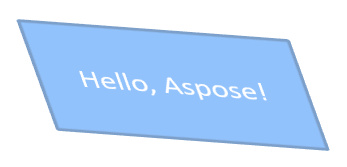
다음 Java 코드는 도형에 3D 회전 효과를 적용하는 예시를 보여줍니다:
import com.aspose.slides.*;

// Presentation 클래스의 인스턴스를 생성합니다.
Presentation presentation = new Presentation();
try {
    ISlide slide = presentation.getSlides().get_Item(0);

    IAutoShape autoShape = slide.getShapes().addAutoShape(ShapeType.Rectangle, 50, 50, 150, 75);
    autoShape.getTextFrame().setText("Hello, Aspose!");

    autoShape.getThreeDFormat().setDepth(6);
    autoShape.getThreeDFormat().getCamera().setRotation(40, 35, 20);
    autoShape.getThreeDFormat().getCamera().setCameraType(CameraPresetType.IsometricLeftUp);
    autoShape.getThreeDFormat().getLightRig().setLightType(LightRigPresetType.Balanced);

    // 프레젠테이션을 PPTX 파일로 저장합니다.
    presentation.save("3D_rotation_effect.pptx", SaveFormat.Pptx);
} finally {
    presentation.dispose();
}
결과:
도형에 대한 흑백 렌더링 제어
IShape.setBlackWhiteMode 메서드는 프레젠테이션이 흑백 모드로 보이거나 처리될 때 개별 도형이 어떻게 렌더링되는지를 지정합니다. 이 메서드 자체가 흑백 표시를 활성화하는 것은 아니며, 정상 색상 모드에서 도형의 채우기, 선 또는 기타 서식을 변경하지도 않습니다.
BlackWhiteMode 클래스의 값을 사용해 원하는 동작을 선택합니다. 예를 들어 Automatic은 렌더링 애플리케이션이 변환을 선택하도록 하고, Gray와 LightGray는 회색을 사용하며, BlackWhite는 흑백만 사용합니다. Black과 White는 단일 색상을 강제하고, Color는 정상 색상을 유지하며, Hidden은 흑백 모드에서 도형을 제외합니다. NotDefined는 도형 수준 모드가 지정되지 않았음을 의미합니다.
다음 Java 코드는 컬러 도형을 만들고 흑백 표시 모드에서 회색으로 보이게 합니다:
import com.aspose.slides.*;
import android.graphics.Color;

Presentation presentation = new Presentation();
try {
    ISlide slide = presentation.getSlides().get_Item(0);

    IAutoShape shape = slide.getShapes().addAutoShape(ShapeType.Rectangle, 50, 50, 200, 100);
    shape.getFillFormat().setFillType(FillType.Solid);
    shape.getFillFormat().getSolidFillColor().setColor(Color.rgb(255, 165, 0));

    // 색상 모드에서는 주황색 채우기를 유지하고, 흑백 모드에서는 도형을 회색으로 렌더링합니다.
    shape.setBlackWhiteMode(BlackWhiteMode.Gray);

    presentation.save("shape_black_white_mode.pptx", SaveFormat.Pptx);
} finally {
    presentation.dispose();
}
정상 색상 모드에서는 사각형이 주황색 채우기를 유지합니다. 흑백 표시 워크플로우에서는 모드가 Gray로 설정되어 있기 때문에 회색으로 렌더링됩니다. 이를 통해 전체 컬러 슬라이드를 유지하면서 인쇄, 미리 보기 또는 흑백 표시 설정을 따르는 다른 워크플로에 대해 별도 외관을 정의할 수 있습니다.
서식 재설정
다음 Java 코드는 슬라이드의 서식을 재설정하고 LayoutSlide에 있는 모든 자리 표시자 도형의 위치, 크기 및 서식을 기본값으로 되돌리는 방법을 보여줍니다:
import com.aspose.slides.*;

Presentation presentation = new Presentation("sample.pptx");
try {
    for (ISlide slide : presentation.getSlides()) {
        // 레이아웃에 자리 표시자가 있는 슬라이드의 각 도형을 재설정합니다.
        slide.reset();
    }
    presentation.save("reset_formatting.pptx", SaveFormat.Pptx);
} finally {
    presentation.dispose();
}
FAQ
도형 서식이 최종 프레젠테이션 파일 크기에 영향을 줍니까?
거의 영향을 주지 않습니다. 삽입된 이미지와 미디어가 파일 용량의 대부분을 차지하고, 색상, 효과, 그라디언트와 같은 도형 매개변수는 메타데이터로 저장되어 사실상 추가 용량이 거의 없습니다.
같은 서식을 가진 도형을 찾아 그룹화하려면 어떻게 해야 하나요?
각 도형의 핵심 서식 속성(채우기, 선, 효과 설정)을 비교합니다. 모든 해당 값이 일치하면 스타일이 동일하다고 판단하고 논리적으로 그룹화하면 이후 스타일 관리가 쉬워집니다.
사용자 정의 도형 스타일 세트를 별도 파일에 저장해 다른 프레젠테이션에서 재사용할 수 있나요?
예. 원하는 스타일이 적용된 샘플 도형을 템플릿 슬라이드나 .POTX 템플릿 파일에 저장합니다. 새 프레젠테이션을 만들 때 템플릿을 열어 필요한 스타일의 도형을 복제하고 원하는 위치에 서식을 다시 적용하면 됩니다.