
Định dạng Hình dạng PowerPoint trên Android
Giới thiệu
Trong PowerPoint, bạn có thể thêm các hình dạng vào các slide. Vì các hình dạng được tạo thành từ các đường thẳng, bạn có thể định dạng chúng bằng cách chỉnh sửa hoặc áp dụng hiệu ứng cho viền của chúng. Ngoài ra, bạn có thể định dạng các hình dạng bằng cách chỉ định các thiết lập kiểm soát cách bên trong được tô màu.
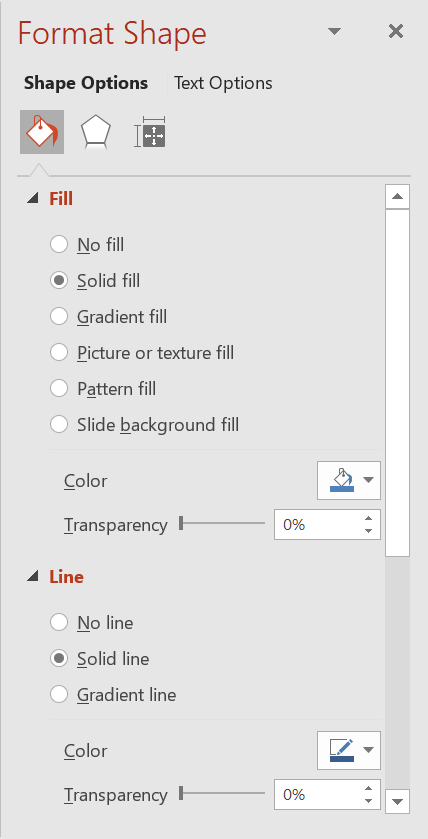
Aspose.Slides for Android via Java cung cấp các giao diện và phương thức cho phép bạn định dạng các hình dạng bằng các tùy chọn có sẵn trong PowerPoint.
Định dạng Đường viền
Sử dụng Aspose.Slides, bạn có thể chỉ định kiểu đường viền tùy chỉnh cho một hình dạng. Các bước sau mô tả quy trình:
- Tạo một thể hiện của lớp Presentation.
- Lấy tham chiếu tới một slide theo chỉ số của nó.
- Thêm một IAutoShape vào slide.
- Đặt line style cho hình dạng.
- Đặt độ rộng của đường viền.
- Đặt dash style của đường viền.
- Đặt màu đường viền cho hình dạng.
- Lưu bản trình chiếu đã chỉnh sửa dưới dạng tệp PPTX.
Mã sau minh họa cách định dạng một AutoShape hình chữ nhật:
import com.aspose.slides.*;
import java.awt.Color;

// Khởi tạo lớp Presentation đại diện cho một tệp bản trình chiếu.
Presentation presentation = new Presentation();
try {
    // Lấy slide đầu tiên.
    ISlide slide = presentation.getSlides().get_Item(0);

    // Thêm một auto shape loại Rectangle.
    IAutoShape shape = slide.getShapes().addAutoShape(ShapeType.Rectangle, 50, 150, 150, 75);

    // Xóa fill khỏi hình chữ nhật để chỉ còn các đường viền hiển thị.
    shape.getFillFormat().setFillType(FillType.NoFill);

    // Áp dụng định dạng cho các đường viền của hình chữ nhật.
    shape.getLineFormat().setStyle(LineStyle.ThickThin);
    shape.getLineFormat().setWidth(7);
    shape.getLineFormat().setDashStyle(LineDashStyle.Dash);

    // Đặt màu cho đường viền của hình chữ nhật.
    shape.getLineFormat().getFillFormat().setFillType(FillType.Solid);
    shape.getLineFormat().getFillFormat().getSolidFillColor().setColor(Color.BLUE);

    // Lưu tệp PPTX vào đĩa.
    presentation.save("formatted_lines.pptx", SaveFormat.Pptx);
} finally {
    presentation.dispose();
}
Kết quả:

Áp dụng Hiệu ứng Phác thảo cho Đường viền Hình dạng
Một hiệu ứng phác thảo làm cho đường viền của hình dạng trông như được vẽ tay. Sử dụng IShape.getLineFormat để truy cập các thiết lập đường viền, ILineFormat.getSketchFormat để truy cập các thiết lập phác thảo, và ISketchFormat.setSketchType để chọn một giá trị từ enum LineSketchType.
Mã Java sau cho thấy cách áp dụng hiệu ứng LineSketchType.Curved, đọc giá trị đã gán một cách rõ ràng, và xóa hiệu ứng bằng LineSketchType.None:
import com.aspose.slides.*;

Presentation presentation = new Presentation();
try {
    ISlide slide = presentation.getSlides().get_Item(0);
    IAutoShape shape = slide.getShapes().addAutoShape(ShapeType.Rectangle, 50, 50, 200, 100);

    // Truy cập định dạng đường viền của hình và định dạng phác thảo của nó.
    ISketchFormat sketchFormat = shape.getLineFormat().getSketchFormat();

    // Áp dụng hiệu ứng phác thảo.
    sketchFormat.setSketchType(LineSketchType.Curved);

    // Đọc hiệu ứng phác thảo được gán trực tiếp cho hình dạng.
    int explicitSketchType = sketchFormat.getSketchType();
    System.out.println("Explicit sketch type: " + explicitSketchType);

    // Xóa hiệu ứng phác thảo.
    sketchFormat.setSketchType(LineSketchType.None);
} finally {
    presentation.dispose();
}
Giá trị trả về bởi ISketchFormat.getSketchType đại diện cho thiết lập được gán trực tiếp cho hình dạng. Nếu định dạng đường viền có thể được kế thừa từ theme, master slide hoặc layout slide, hãy sử dụng ILineFormat.getEffective, truy cập ILineFormatEffectiveData.getSketchFormat, và đọc ISketchFormatEffectiveData.getSketchType. Giá trị effective phản ánh định dạng thực sự được áp dụng sau khi kế thừa được giải quyết:
import com.aspose.slides.*;

Presentation presentation = new Presentation("presentation.pptx");
try {
    IShape shape = presentation.getSlides().get_Item(0).getShapes().get_Item(0);
    ILineFormat lineFormat = shape.getLineFormat();

    int explicitSketchType = lineFormat.getSketchFormat().getSketchType();
    ILineFormatEffectiveData effectiveLineFormat = lineFormat.getEffective();
    int effectiveSketchType = effectiveLineFormat.getSketchFormat().getSketchType();

    System.out.println("Explicit sketch type: " + explicitSketchType);
    System.out.println("Effective sketch type: " + effectiveSketchType);
} finally {
    presentation.dispose();
}
Định dạng Kiểu Nối
Ba tùy chọn kiểu nối:
- Round
- Miter
- Bevel
Mặc định, khi PowerPoint nối hai đường ở một góc (như ở góc của hình dạng), nó dùng thiết lập Round. Tuy nhiên, nếu bạn vẽ một hình dạng có các góc nhọn, bạn có thể muốn sử dụng tùy chọn Miter.
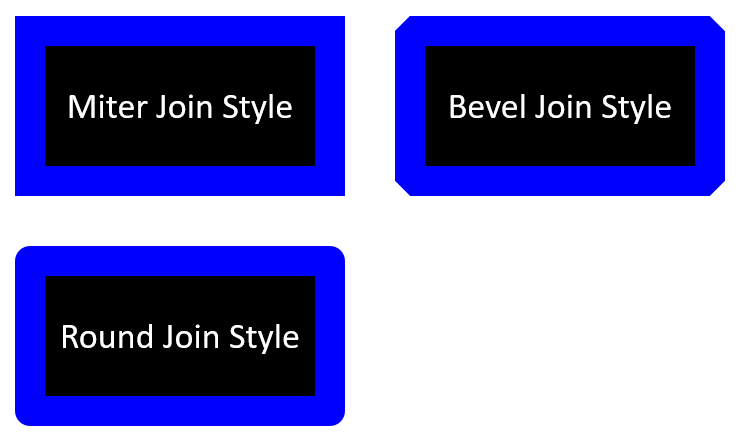
Mã Java sau minh họa cách ba hình chữ nhật (như trong ảnh trên) được tạo bằng các thiết lập kiểu nối Miter, Bevel và Round:
import com.aspose.slides.*;
import java.awt.Color;

// Khởi tạo lớp Presentation đại diện cho một tệp bản trình chiếu.
Presentation presentation = new Presentation();
try {
    // Lấy slide đầu tiên.
    ISlide slide = presentation.getSlides().get_Item(0);

    // Thêm ba auto shape loại Rectangle.
    IAutoShape shape1 = slide.getShapes().addAutoShape(ShapeType.Rectangle, 20, 20, 150, 75);
    IAutoShape shape2 = slide.getShapes().addAutoShape(ShapeType.Rectangle, 210, 20, 150, 75);
    IAutoShape shape3 = slide.getShapes().addAutoShape(ShapeType.Rectangle, 20, 135, 150, 75);

    // Đặt màu fill cho mỗi hình chữ nhật.
    shape1.getFillFormat().setFillType(FillType.Solid);
    shape1.getFillFormat().getSolidFillColor().setColor(Color.BLACK);
    shape2.getFillFormat().setFillType(FillType.Solid);
    shape2.getFillFormat().getSolidFillColor().setColor(Color.BLACK);
    shape3.getFillFormat().setFillType(FillType.Solid);
    shape3.getFillFormat().getSolidFillColor().setColor(Color.BLACK);

    // Đặt độ rộng đường viền.
    shape1.getLineFormat().setWidth(15);
    shape2.getLineFormat().setWidth(15);
    shape3.getLineFormat().setWidth(15);

    // Đặt màu cho đường viền của mỗi hình chữ nhật.
    shape1.getLineFormat().getFillFormat().setFillType(FillType.Solid);
    shape1.getLineFormat().getFillFormat().getSolidFillColor().setColor(Color.BLUE);
    shape2.getLineFormat().getFillFormat().setFillType(FillType.Solid);
    shape2.getLineFormat().getFillFormat().getSolidFillColor().setColor(Color.BLUE);
    shape3.getLineFormat().getFillFormat().setFillType(FillType.Solid);
    shape3.getLineFormat().getFillFormat().getSolidFillColor().setColor(Color.BLUE);

    // Đặt kiểu nối.
    shape1.getLineFormat().setJoinStyle(LineJoinStyle.Miter);
    shape2.getLineFormat().setJoinStyle(LineJoinStyle.Bevel);
    shape3.getLineFormat().setJoinStyle(LineJoinStyle.Round);

    // Thêm văn bản vào mỗi hình chữ nhật.
    shape1.getTextFrame().setText("Miter Join Style");
    shape2.getTextFrame().setText("Bevel Join Style");
    shape3.getTextFrame().setText("Round Join Style");

    // Lưu tệp PPTX vào đĩa.
    presentation.save("join_styles.pptx", SaveFormat.Pptx);
} finally {
    presentation.dispose();
}
Đổ Bộ Gradient
Trong PowerPoint, Đổ Bộ Gradient là một tùy chọn định dạng cho phép bạn áp dụng một dải màu liên tục vào một hình dạng. Ví dụ, bạn có thể áp dụng hai hoặc nhiều màu sao cho một màu dần dần chuyển sang màu khác.
Cách áp dụng gradient fill cho một hình dạng bằng Aspose.Slides:
- Tạo một thể hiện của lớp Presentation.
- Lấy tham chiếu tới một slide theo chỉ số của nó.
- Thêm một IAutoShape vào slide.
- Đặt FillType của hình dạng thành
Gradient. - Thêm hai màu ưa thích của bạn với vị trí đã xác định bằng các phương thức
addcủa bộ sưu tập gradient stop được cung cấp bởi giao diện IGradientFormat. - Lưu bản trình chiếu đã chỉnh sửa dưới dạng tệp PPTX.
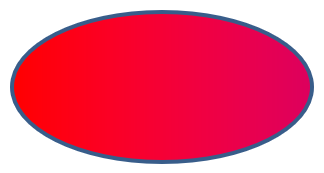
Mã Java sau minh họa cách áp dụng hiệu ứng gradient fill cho một hình ellipse:
import com.aspose.slides.*;

// Khởi tạo lớp Presentation đại diện cho một tệp bản trình chiếu.
Presentation presentation = new Presentation();
try {
    // Lấy slide đầu tiên.
    ISlide slide = presentation.getSlides().get_Item(0);

    // Thêm một auto shape loại Ellipse.
    IAutoShape shape = slide.getShapes().addAutoShape(ShapeType.Ellipse, 50, 50, 150, 75);

    // Áp dụng định dạng gradient cho hình ellipse.
    shape.getFillFormat().setFillType(FillType.Gradient);
    shape.getFillFormat().getGradientFormat().setGradientShape(GradientShape.Linear);

    // Đặt hướng của gradient.
    shape.getFillFormat().getGradientFormat().setGradientDirection(GradientDirection.FromCorner2);

    // Thêm hai điểm dừng gradient.
    shape.getFillFormat().getGradientFormat().getGradientStops().addPresetColor((float)1.0, PresetColor.Purple);
    shape.getFillFormat().getGradientFormat().getGradientStops().addPresetColor((float)0, PresetColor.Red);

    // Lưu tệp PPTX vào đĩa.
    presentation.save("gradient_fill.pptx", SaveFormat.Pptx);
} finally {
    presentation.dispose();
}
Kết quả:
Đổ Bốu Mẫu (Pattern Fill)
Trong PowerPoint, Pattern Fill là một tùy chọn định dạng cho phép bạn áp dụng một thiết kế hai màu—như chấm, sọc, chéo hay ca rô—cho một hình dạng. Bạn có thể chọn màu tùy chỉnh cho màu nền và màu tiền nền của mẫu.
Aspose.Slides cung cấp hơn 45 kiểu mẫu được định sẵn mà bạn có thể áp dụng cho các hình dạng để tăng tính thẩm mỹ cho bài thuyết trình. Ngay cả sau khi chọn một mẫu đã định sẵn, bạn vẫn có thể chỉ định màu chính xác mà mẫu sẽ sử dụng.
Cách áp dụng pattern fill cho một hình dạng bằng Aspose.Slides:
- Tạo một thể hiện của lớp Presentation.
- Lấy tham chiếu tới một slide theo chỉ số của nó.
- Thêm một IAutoShape vào slide.
- Đặt FillType của hình dạng thành
Pattern. - Chọn một kiểu mẫu từ các tùy chọn đã định sẵn.
- Đặt Background Color của mẫu.
- Đặt Foreground Color của mẫu.
- Lưu bản trình chiếu đã chỉnh sửa dưới dạng tệp PPTX.
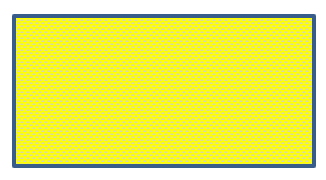
Mã Java sau minh họa cách áp dụng pattern fill cho một hình chữ nhật:
import com.aspose.slides.*;
import java.awt.Color;

// Khởi tạo lớp Presentation đại diện cho một tệp bản trình chiếu.
Presentation presentation = new Presentation();
try {
    // Lấy slide đầu tiên.
    ISlide slide = presentation.getSlides().get_Item(0);

    // Thêm một auto shape loại Rectangle.
    IAutoShape shape = slide.getShapes().addAutoShape(ShapeType.Rectangle, 50, 50, 150, 75);

    // Đặt kiểu fill thành Pattern.
    shape.getFillFormat().setFillType(FillType.Pattern);

    // Đặt kiểu mẫu.
    shape.getFillFormat().getPatternFormat().setPatternStyle(PatternStyle.Trellis);

    // Đặt màu nền và màu tiền nền của mẫu.
    shape.getFillFormat().getPatternFormat().getBackColor().setColor(Color.LIGHT_GRAY);
    shape.getFillFormat().getPatternFormat().getForeColor().setColor(Color.YELLOW);

    // Lưu tệp PPTX vào đĩa.
    presentation.save("pattern_fill.pptx", SaveFormat.Pptx);
} finally {
    presentation.dispose();
}
Kết quả:
Đổ Bốu Hình Ảnh (Picture Fill)
Trong PowerPoint, Picture Fill là một tùy chọn định dạng cho phép bạn chèn một hình ảnh vào bên trong một hình dạng—hiệu quả như việc sử dụng hình ảnh làm nền cho hình dạng.
Cách sử dụng Aspose.Slides để áp dụng picture fill cho một hình dạng:
- Tạo một thể hiện của lớp Presentation.
- Lấy tham chiếu tới một slide theo chỉ số của nó.
- Thêm một IAutoShape vào slide.
- Đặt FillType của hình dạng thành
Picture. - Đặt chế độ picture fill thành
Tile(hoặc chế độ khác bạn muốn). - Tạo một đối tượng IPPImage từ hình ảnh bạn muốn sử dụng.
- Truyền hình ảnh vào phương thức
ISlidesPicture.setImage. - Lưu bản trình chiếu đã chỉnh sửa dưới dạng tệp PPTX.
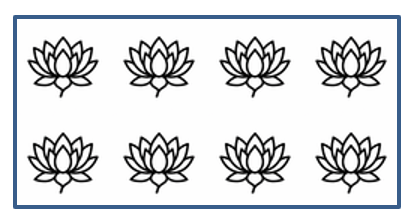
Giả sử chúng ta có một tệp “lotus.png” với hình ảnh sau:

Mã Java sau minh họa cách lấp đầy một hình dạng bằng hình ảnh:
import com.aspose.slides.*;

// Khởi tạo lớp Presentation đại diện cho một tệp bản trình chiếu.
Presentation presentation = new Presentation();
try {
    // Lấy slide đầu tiên.
    ISlide slide = presentation.getSlides().get_Item(0);

    // Thêm một auto shape loại Rectangle.
    IAutoShape shape = slide.getShapes().addAutoShape(ShapeType.Rectangle, 50, 50, 255, 130);

    // Đặt kiểu fill thành Picture.
    shape.getFillFormat().setFillType(FillType.Picture);

    // Đặt chế độ picture fill.
    shape.getFillFormat().getPictureFillFormat().setPictureFillMode(PictureFillMode.Tile);

    // Tải một hình ảnh và thêm nó vào tài nguyên của bản trình chiếu.
    IImage image = Images.fromFile("lotus.png");
    IPPImage picture = presentation.getImages().addImage(image);
    image.dispose();

    // Đặt hình ảnh.
    shape.getFillFormat().getPictureFillFormat().getPicture().setImage(picture);

    // Lưu tệp PPTX vào đĩa.
    presentation.save("picture_fill.pptx", SaveFormat.Pptx);
} finally {
    presentation.dispose();
}
Kết quả:
Tile Picture As Texture
Nếu bạn muốn đặt một hình ảnh lặp lại làm texture và tùy chỉnh hành vi lặp, bạn có thể sử dụng các phương thức sau của giao diện IPictureFillFormat và lớp PictureFillFormat:
- setPictureFillMode: Đặt chế độ picture fill—
TilehoặcStretch. - setTileAlignment: Xác định căn chỉnh của các tile trong hình dạng.
- setTileFlip: Kiểm soát việc lật tile ngang, dọc hoặc cả hai.
- setTileOffsetX: Đặt độ lệch ngang của tile (theo point) từ gốc của hình dạng.
- setTileOffsetY: Đặt độ lệch dọc của tile (theo point) từ gốc của hình dạng.
- setTileScaleX: Xác định tỉ lệ ngang của tile dưới dạng phần trăm.
- setTileScaleY: Xác định tỉ lệ dọc của tile dưới dạng phần trăm.
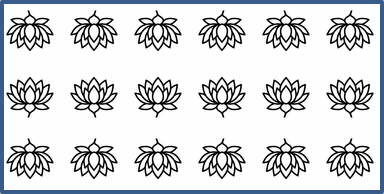
Mã mẫu sau cho thấy cách thêm một hình chữ nhật với picture fill dạng tile và cấu hình các tùy chọn tile:
import com.aspose.slides.*;

// Khởi tạo lớp Presentation đại diện cho một tệp bản trình chiếu.
Presentation presentation = new Presentation();
try {
    // Lấy slide đầu tiên.
    ISlide firstSlide = presentation.getSlides().get_Item(0);

    // Thêm một auto shape hình chữ nhật.
    IAutoShape shape = firstSlide.getShapes().addAutoShape(ShapeType.Rectangle, 50, 50, 190, 95);

    // Đặt kiểu fill của hình dạng thành Picture.
    shape.getFillFormat().setFillType(FillType.Picture);

    // Tải hình ảnh và thêm nó vào tài nguyên của bản trình chiếu.
    IImage sourceImage = Images.fromFile("lotus.png");
    IPPImage presentationImage = presentation.getImages().addImage(sourceImage);
    sourceImage.dispose();

    // Gán hình ảnh cho hình dạng.
    IPictureFillFormat pictureFillFormat = shape.getFillFormat().getPictureFillFormat();
    pictureFillFormat.getPicture().setImage(presentationImage);

    // Cấu hình chế độ picture fill và các thuộc tính lặp.
    pictureFillFormat.setPictureFillMode(PictureFillMode.Tile);
    pictureFillFormat.setTileOffsetX(-32);
    pictureFillFormat.setTileOffsetY(-32);
    pictureFillFormat.setTileScaleX(50);
    pictureFillFormat.setTileScaleY(50);
    pictureFillFormat.setTileAlignment(RectangleAlignment.BottomRight);
    pictureFillFormat.setTileFlip(TileFlip.FlipBoth);

    // Lưu tệp PPTX vào đĩa.
    presentation.save("tile.pptx", SaveFormat.Pptx);
} finally {
    presentation.dispose();
}
Kết quả:
Đổ Bốu Màu Đơn (Solid Color Fill)
Trong PowerPoint, Solid Color Fill là một tùy chọn định dạng làm đầy một hình dạng bằng một màu duy nhất, đồng nhất. Nền màu này được áp dụng mà không có gradient, texture hay pattern nào.
Để áp dụng solid color fill cho một hình dạng bằng Aspose.Slides, thực hiện các bước sau:
- Tạo một thể hiện của lớp Presentation.
- Lấy tham chiếu tới một slide theo chỉ số của nó.
- Thêm một IAutoShape vào slide.
- Đặt FillType của hình dạng thành
Solid. - Gán màu fill ưa thích của bạn cho hình dạng.
- Lưu bản trình chiếu đã chỉnh sửa dưới dạng tệp PPTX.
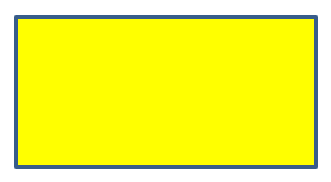
Mã Java sau minh họa cách áp dụng solid color fill cho một hình chữ nhật trong slide PowerPoint:
import com.aspose.slides.*;
import java.awt.Color;

// Khởi tạo lớp Presentation đại diện cho một tệp bản trình chiếu.
Presentation presentation = new Presentation();
try {
    // Lấy slide đầu tiên.
    ISlide slide = presentation.getSlides().get_Item(0);

    // Thêm một auto shape loại Rectangle.
    IAutoShape shape = slide.getShapes().addAutoShape(ShapeType.Rectangle, 50, 50, 150, 75);

    // Đặt kiểu fill thành Solid.
    shape.getFillFormat().setFillType(FillType.Solid);

    // Đặt màu fill.
    shape.getFillFormat().getSolidFillColor().setColor(Color.YELLOW);

    // Lưu tệp PPTX vào đĩa.
    presentation.save("solid_color_fill.pptx", SaveFormat.Pptx);
} finally {
    presentation.dispose();
}
Kết quả:
Đặt Độ Trong Suốt (Transparency)
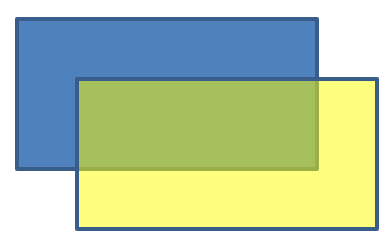
Trong PowerPoint, khi bạn áp dụng solid color, gradient, picture hoặc texture fill cho các hình dạng, bạn cũng có thể đặt mức độ trong suốt để kiểm soát độ mờ của fill. Giá trị trong suốt cao hơn làm cho hình dạng trở nên trong suốt hơn, cho phép nền hoặc các đối tượng phía sau hiển thị một phần.
Aspose.Slides cho phép bạn đặt mức độ trong suốt bằng cách điều chỉnh giá trị alpha trong màu được dùng cho fill. Cách thực hiện:
- Tạo một thể hiện của lớp Presentation.
- Lấy tham chiếu tới một slide theo chỉ số của nó.
- Thêm một IAutoShape vào slide.
- Đặt FillType thành
Solid. - Sử dụng
Colorđể định nghĩa một màu có độ trong suốt (thành phầnalphađiều khiển độ trong suốt). - Lưu bản trình chiếu.
Mã Java sau minh họa cách áp dụng màu fill trong suốt cho một hình chữ nhật:
import com.aspose.slides.*;
import java.awt.Color;

// Khởi tạo lớp Presentation đại diện cho một tệp bản trình chiếu.
Presentation presentation = new Presentation();
try {
    // Lấy slide đầu tiên.
    ISlide slide = presentation.getSlides().get_Item(0);

    // Thêm một auto shape hình chữ nhật rắn.
    IAutoShape solidShape = slide.getShapes().addAutoShape(ShapeType.Rectangle, 50, 50, 150, 75);

    // Thêm một auto shape hình chữ nhật trong suốt lên trên hình dạng rắn.
    IAutoShape transparentShape = slide.getShapes().addAutoShape(ShapeType.Rectangle, 80, 80, 150, 75);
    transparentShape.getFillFormat().setFillType(FillType.Solid);
    transparentShape.getFillFormat().getSolidFillColor().setColor(new Color(255, 255, 0, 204));

    // Lưu tệp PPTX vào đĩa.
    presentation.save("shape_transparency.pptx", SaveFormat.Pptx);
} finally {
    presentation.dispose();
}
Kết quả:
Xoay Hình dạng
Aspose.Slides cho phép bạn xoay các hình dạng trong bản trình chiếu PowerPoint. Điều này hữu ích khi định vị các yếu tố hình ảnh với yêu cầu căn chỉnh hoặc thiết kế cụ thể.
Để xoay một hình dạng trên slide, thực hiện các bước sau:
- Tạo một thể hiện của lớp Presentation.
- Lấy tham chiếu tới một slide theo chỉ số của nó.
- Thêm một IAutoShape vào slide.
- Đặt thuộc tính xoay của hình dạng thành góc mong muốn.
- Lưu bản trình chiếu.
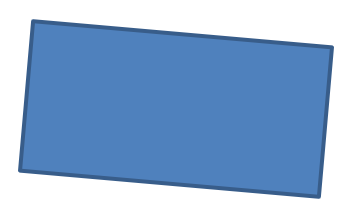
Mã Java sau minh họa cách xoay một hình dạng 5 độ:
import com.aspose.slides.*;

// Khởi tạo lớp Presentation đại diện cho một tệp bản trình chiếu.
Presentation presentation = new Presentation();
try {
    // Lấy slide đầu tiên.
    ISlide slide = presentation.getSlides().get_Item(0);

    // Thêm một auto shape loại Rectangle.
    IAutoShape shape = slide.getShapes().addAutoShape(ShapeType.Rectangle, 50, 50, 150, 75);

    // Xoay hình dạng 5 độ.
    shape.setRotation(5);

    // Lưu tệp PPTX vào đĩa.
    presentation.save("shape_rotation.pptx", SaveFormat.Pptx);
} finally {
    presentation.dispose();
}
Kết quả:
Thêm Hiệu ứng Đè 3D (3D Bevel Effects)
Aspose.Slides cho phép bạn áp dụng hiệu ứng đè 3D cho các hình dạng bằng cách cấu hình các thuộc tính ThreeDFormat.
Để thêm hiệu ứng đè 3D cho một hình dạng, thực hiện các bước sau:
- Tạo một thể hiện của lớp Presentation.
- Lấy tham chiếu tới một slide theo chỉ số của nó.
- Thêm một IAutoShape vào slide.
- Cấu hình ThreeDFormat của hình dạng để định nghĩa các thiết lập bevel.
- Lưu bản trình chiếu.
Mã Java sau cho thấy cách áp dụng hiệu ứng đè 3D cho một hình dạng:
import com.aspose.slides.*;
import java.awt.Color;

// Tạo một thể hiện của lớp Presentation.
Presentation presentation = new Presentation();
try {
    ISlide slide = presentation.getSlides().get_Item(0);

    // Thêm một hình dạng vào slide.
    IAutoShape shape = slide.getShapes().addAutoShape(ShapeType.Ellipse, 50, 50, 100, 100);
    shape.getFillFormat().setFillType(FillType.Solid);
    shape.getFillFormat().getSolidFillColor().setColor(Color.GREEN);
    shape.getLineFormat().getFillFormat().setFillType(FillType.Solid);
    shape.getLineFormat().getFillFormat().getSolidFillColor().setColor(Color.ORANGE);
    shape.getLineFormat().setWidth(2.0);

    // Đặt các thuộc tính ThreeDFormat cho hình dạng.
    shape.getThreeDFormat().setDepth(4);
    shape.getThreeDFormat().getBevelTop().setBevelType(BevelPresetType.Circle);
    shape.getThreeDFormat().getBevelTop().setHeight(6);
    shape.getThreeDFormat().getBevelTop().setWidth(6);
    shape.getThreeDFormat().getCamera().setCameraType(CameraPresetType.OrthographicFront);
    shape.getThreeDFormat().getLightRig().setLightType(LightRigPresetType.ThreePt);
    shape.getThreeDFormat().getLightRig().setDirection(LightingDirection.Top);

    // Lưu bản trình chiếu dưới dạng tệp PPTX.
    presentation.save("3D_bevel_effect.pptx", SaveFormat.Pptx);
} finally {
    presentation.dispose();
}
Kết quả:

Thêm Hiệu ứng Xoay 3D (3D Rotation Effects)
Aspose.Slides cho phép bạn áp dụng hiệu ứng xoay 3D cho các hình dạng bằng cách cấu hình các thuộc tính ThreeDFormat.
Để áp dụng xoay 3D cho một hình dạng:
- Tạo một thể hiện của lớp Presentation.
- Lấy tham chiếu tới một slide theo chỉ số của nó.
- Thêm một IAutoShape vào slide.
- Sử dụng setCameraType và setLightType để định nghĩa xoay 3D.
- Lưu bản trình chiếu.
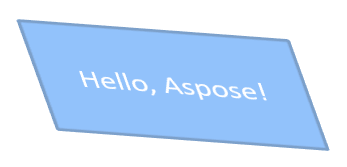
Mã Java sau minh họa cách áp dụng hiệu ứng xoay 3D cho một hình dạng:
import com.aspose.slides.*;

// Tạo một thể hiện của lớp Presentation.
Presentation presentation = new Presentation();
try {
    ISlide slide = presentation.getSlides().get_Item(0);

    IAutoShape autoShape = slide.getShapes().addAutoShape(ShapeType.Rectangle, 50, 50, 150, 75);
    autoShape.getTextFrame().setText("Hello, Aspose!");

    autoShape.getThreeDFormat().setDepth(6);
    autoShape.getThreeDFormat().getCamera().setRotation(40, 35, 20);
    autoShape.getThreeDFormat().getCamera().setCameraType(CameraPresetType.IsometricLeftUp);
    autoShape.getThreeDFormat().getLightRig().setLightType(LightRigPresetType.Balanced);

    // Lưu bản trình chiếu dưới dạng tệp PPTX.
    presentation.save("3D_rotation_effect.pptx", SaveFormat.Pptx);
} finally {
    presentation.dispose();
}
Kết quả:
Kiểm soát Hiển thị Đen‑Trắng cho Hình dạng
Phương thức IShape.setBlackWhiteMode chỉ định cách một hình dạng riêng lẻ được hiển thị khi bản trình chiếu được xem hoặc xử lý ở chế độ đen‑trắng. Nó không kích hoạt chế độ hiển thị đen‑trắng tự động và không thay đổi fill, line hay các định dạng khác trong chế độ màu bình thường.
Sử dụng một giá trị từ lớp BlackWhiteMode để chọn hành vi mong muốn. Ví dụ, Automatic để ứng dụng quyết định chuyển đổi, Gray và LightGray dùng màu xám, BlackWhite chỉ dùng đen và trắng, Black và White ép buộc một màu duy nhất, Color bảo tồn màu bình thường, và Hidden ẩn hình dạng trong chế độ đen‑trắng. NotDefined có nghĩa là không có chế độ ở mức hình dạng được gán.
Mã Java sau tạo một hình dạng màu và làm cho nó hiển thị màu xám trong chế độ hiển thị đen‑trắng:
import com.aspose.slides.*;
import android.graphics.Color;

Presentation presentation = new Presentation();
try {
    ISlide slide = presentation.getSlides().get_Item(0);

    IAutoShape shape = slide.getShapes().addAutoShape(ShapeType.Rectangle, 50, 50, 200, 100);
    shape.getFillFormat().setFillType(FillType.Solid);
    shape.getFillFormat().getSolidFillColor().setColor(Color.rgb(255, 165, 0));

    // Giữ màu orange trong chế độ màu, nhưng hiển thị hình dạng với màu xám trong chế độ đen-trắng.
    shape.setBlackWhiteMode(BlackWhiteMode.Gray);

    presentation.save("shape_black_white_mode.pptx", SaveFormat.Pptx);
} finally {
    presentation.dispose();
}
Trong chế độ màu bình thường, hình chữ nhật giữ nguyên màu nền cam. Khi chuyển sang quy trình hiển thị đen‑trắng, nó dùng màu xám vì chế độ được đặt thành Gray. Điều này cho phép bạn giữ slide đầy màu trong khi định nghĩa một dạng hiển thị riêng biệt cho việc in ấn, xem trước hoặc các quy trình khác tôn trọng cài đặt hiển thị đen‑trắng của bản trình chiếu.
Đặt Lại Định dạng (Reset Formatting)
Mã Java sau cho thấy cách đặt lại định dạng của một slide và khôi phục vị trí, kích thước và định dạng của tất cả các hình dạng có placeholder trên LayoutSlide về thiết lập mặc định:
import com.aspose.slides.*;

Presentation presentation = new Presentation("sample.pptx");
try {
    for (ISlide slide : presentation.getSlides()) {
        // Đặt lại mỗi hình dạng trên slide có placeholder trong layout.
        slide.reset();
    }
    presentation.save("reset_formatting.pptx", SaveFormat.Pptx);
} finally {
    presentation.dispose();
}
Câu hỏi thường gặp (FAQ)
Định dạng hình dạng có ảnh hưởng đến kích thước cuối cùng của file bản trình chiếu không?
Chỉ ảnh hưởng rất ít. Các hình ảnh và phương tiện nhúng chiếm phần lớn dung lượng file, trong khi các tham số của hình dạng như màu, hiệu ứng và gradient được lưu dưới dạng metadata và gần như không làm tăng kích thước.
Làm sao để phát hiện các hình dạng trên một slide có cùng định dạng để có thể nhóm chúng lại?
So sánh các thuộc tính định dạng chính của mỗi hình dạng—các thiết lập fill, line và effect. Nếu tất cả các giá trị tương ứng khớp nhau, coi chúng có cùng style và nhóm chúng lại, giúp việc quản lý style sau này dễ dàng hơn.
Có thể lưu một tập hợp các style hình dạng tùy chỉnh vào một file riêng để tái sử dụng trong các bản trình chiếu khác không?
Có. Lưu các hình mẫu với style mong muốn trong một slide mẫu hoặc trong file template .POTX. Khi tạo bản trình chiếu mới, mở template, sao chép các hình đã style và áp dụng lại định dạng ở những nơi cần thiết.