
จัดการการซูมการนำเสนอใน Java
บทนำ
Zoom ใน PowerPoint ช่วยให้คุณกระโดดไปยังและกลับมาจากสไลด์, ส่วน, และส่วนต่าง ๆ ของการนำเสนอได้ เมื่อคุณกำลังพรีเซนต์ ความสามารถในการนำทางอย่างรวดเร็วผ่านเนื้อหาอาจเป็นประโยชน์อย่างมาก
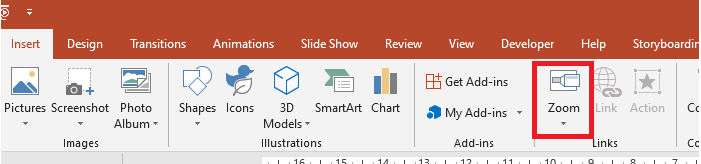
- เพื่อสรุปการนำเสนอทั้งหมดในสไลด์เดียว, ให้ใช้ Summary Zoom.
- เพื่อแสดงสไลด์ที่เลือกเท่านั้น, ให้ใช้ Slide Zoom.
- เพื่อแสดงส่วนเดียวเท่านั้น, ให้ใช้ Section Zoom.
ซูมสไลด์
ซูมสไลด์สามารถทำให้การนำเสนอของคุณมีความพลวัตมากขึ้น ทำให้คุณนำทางระหว่างสไลด์ได้อย่างอิสระในลำดับใดก็ได้โดยไม่ขัดจังหวะการไหลของการนำเสนอ ซูมสไลด์เหมาะสำหรับการนำเสนอสั้นที่ไม่มีหลายส่วน แต่คุณยังสามารถใช้ในสถานการณ์การนำเสนออื่น ๆ ได้เช่นกัน
ซูมสไลด์ช่วยให้คุณเจาะลึกข้อมูลหลายชิ้นขณะที่รู้สึกเหมือนอยู่บนผืนผ้าใบเดียว
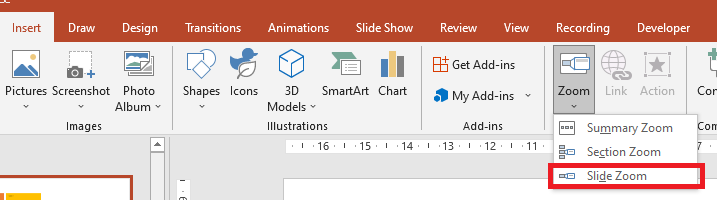
สำหรับอ็อบเจ็กต์ซูมสไลด์, Aspose.Slides มี enumeration ZoomImageType, interface IZoomFrame และเมธอดบางส่วนภายใต้ interface IShapeCollection
สร้างกรอบการซูม
คุณสามารถเพิ่มกรอบการซูมบนสไลด์ได้ตามขั้นตอนนี้:
- สร้างอินสแตนซ์ของคลาส Presentation
- สร้างสไลด์ใหม่ที่คุณต้องการเชื่อมโยงกับกรอบการซูม
- เพิ่มข้อความระบุตัวและพื้นหลังให้กับสไลด์ที่สร้าง
- เพิ่มกรอบการซูม (ซึ่งบรรจุการอ้างอิงถึงสไลด์ที่สร้าง) ไปยังสไลด์แรก
- เขียนการนำเสนอที่แก้ไขแล้วเป็นไฟล์ PPTX
Presentation pres = new Presentation();
try {
    //เพิ่มสไลด์ใหม่ไปยังการนำเสนอ
    ISlide slide2 = pres.getSlides().addEmptySlide(pres.getSlides().get_Item(0).getLayoutSlide());
    ISlide slide3 = pres.getSlides().addEmptySlide(pres.getSlides().get_Item(0).getLayoutSlide());

    // สร้างพื้นหลังสำหรับสไลด์ที่สอง
    slide2.getBackground().setType(BackgroundType.OwnBackground);
    slide2.getBackground().getFillFormat().setFillType(FillType.Solid);
    slide2.getBackground().getFillFormat().getSolidFillColor().setColor(Color.cyan);

    // สร้างกล่องข้อความสำหรับสไลด์ที่สอง
    IAutoShape autoshape = slide2.getShapes().addAutoShape(ShapeType.Rectangle, 100, 200, 500, 200);
    autoshape.getTextFrame().setText("Second Slide");

    // สร้างพื้นหลังสำหรับสไลด์ที่สาม
    slide3.getBackground().setType(BackgroundType.OwnBackground);
    slide3.getBackground().getFillFormat().setFillType(FillType.Solid);
    slide3.getBackground().getFillFormat().getSolidFillColor().setColor(Color.darkGray);

    // สร้างกล่องข้อความสำหรับสไลด์ที่สาม
    autoshape = slide3.getShapes().addAutoShape(ShapeType.Rectangle, 100, 200, 500, 200);
    autoshape.getTextFrame().setText("Trird Slide");

    //เพิ่มอ็อบเจ็กต์ ZoomFrame
    pres.getSlides().get_Item(0).getShapes().addZoomFrame(20, 20, 250, 200, slide2);
    pres.getSlides().get_Item(0).getShapes().addZoomFrame(200, 250, 250, 200, slide3);

    // บันทึกการนำเสนอ
    pres.save("presentation.pptx", SaveFormat.Pptx);
} finally {
    if (pres != null) pres.dispose();
}
สร้างกรอบการซูมด้วยรูปภาพแบบกำหนดเอง
ด้วย Aspose.Slides for Java, คุณสามารถสร้างกรอบการซูมพร้อมรูปภาพตัวอย่างสไลด์ที่แตกต่างได้ตามขั้นตอนนี้:
- สร้างอินสแตนซ์ของคลาส Presentation
- สร้างสไลด์ใหม่ที่คุณต้องการเชื่อมโยงกับกรอบการซูม
- เพิ่มข้อความระบุตัวและพื้นหลังให้กับสไลด์
- สร้างอ็อบเจ็กต์ IPPImage โดยเพิ่มรูปภาพลงในคอลเลกชัน Images ที่เชื่อมกับอ็อบเจ็กต์ Presentation เพื่อใช้เติมกรอบ
- เพิ่มกรอบการซูม (ซึ่งบรรจุการอ้างอิงถึงสไลด์ที่สร้าง) ไปยังสไลด์แรก
- เขียนการนำเสนอที่แก้ไขแล้วเป็นไฟล์ PPTX
Presentation pres = new Presentation();
try {
    //เพิ่มสไลด์ใหม่ไปยังการนำเสนอ
    ISlide slide = pres.getSlides().addEmptySlide(pres.getSlides().get_Item(0).getLayoutSlide());

    // สร้างพื้นหลังสำหรับสไลด์ที่สอง
    slide.getBackground().setType(BackgroundType.OwnBackground);
    slide.getBackground().getFillFormat().setFillType(FillType.Solid);
    slide.getBackground().getFillFormat().getSolidFillColor().setColor(Color.cyan);

    // สร้างกล่องข้อความสำหรับสไลด์ที่สาม
    IAutoShape autoshape = slide.getShapes().addAutoShape(ShapeType.Rectangle, 100, 200, 500, 200);
    autoshape.getTextFrame().setText("Second Slide");

    // สร้างภาพใหม่สำหรับอ็อบเจ็กต์ซูม
    IPPImage picture;
        IImage image = Images.fromFile("image.png");
        try {
            picture = pres.getImages().addImage(image);
        } finally {
            if (image != null) image.dispose();
        }
    //เพิ่มอ็อบเจ็กต์ ZoomFrame
    pres.getSlides().get_Item(0).getShapes().addZoomFrame(20, 20, 300, 200, slide, picture);

    // บันทึกการนำเสนอ
    pres.save("presentation.pptx", SaveFormat.Pptx);
} catch(IOException e) {
} finally {
    if (pres != null) pres.dispose();
}
จัดรูปแบบกรอบการซูม
ในส่วนก่อนหน้า เราได้แสดงวิธีสร้างกรอบการซูมแบบง่าย ๆ การสร้างกรอบการซูมที่ซับซ้อนยิ่งขึ้นต้องปรับการจัดรูปแบบของกรอบแบบง่าย มีตัวเลือกการจัดรูปแบบหลายอย่างที่คุณสามารถนำไปใช้กับกรอบการซูมได้
คุณสามารถควบคุมการจัดรูปแบบของกรอบการซูมบนสไลด์ได้ตามขั้นตอนนี้:
- สร้างอินสแตนซ์ของคลาส Presentation
- สร้างสไลด์ใหม่ที่คุณต้องการเชื่อมโยงกับกรอบการซูม
- เพิ่มข้อความระบุตัวและพื้นหลังให้กับสไลด์ที่สร้าง
- เพิ่มกรอบการซูม (ซึ่งบรรจุการอ้างอิงถึงสไลด์ที่สร้าง) ไปยังสไลด์แรก
- สร้างอ็อบเจ็กต์ IPPImage โดยเพิ่มรูปภาพลงในคอลเลกชัน Images ที่เชื่อมกับอ็อบเจ็กต์ Presentation เพื่อใช้เติมกรอบ
- ตั้งค่ารูปภาพแบบกำหนดเองสำหรับกรอบการซูมแรก
- เปลี่ยนรูปแบบเส้นของกรอบการซูมที่สอง
- ลบพื้นหลังจากรูปภาพของกรอบการซูมที่สอง
- เขียนการนำเสนอที่แก้ไขแล้วเป็นไฟล์ PPTX
Presentation pres = new Presentation();
try {
    //เพิ่มสไลด์ใหม่ไปยังการนำเสนอ
    ISlide slide2 = pres.getSlides().addEmptySlide(pres.getSlides().get_Item(0).getLayoutSlide());
    ISlide slide3 = pres.getSlides().addEmptySlide(pres.getSlides().get_Item(0).getLayoutSlide());

    // สร้างพื้นหลังสำหรับสไลด์ที่สอง
    slide2.getBackground().setType(BackgroundType.OwnBackground);
    slide2.getBackground().getFillFormat().setFillType(FillType.Solid);
    slide2.getBackground().getFillFormat().getSolidFillColor().setColor(Color.cyan);

    // สร้างกล่องข้อความสำหรับสไลด์ที่สอง
    IAutoShape autoshape = slide2.getShapes().addAutoShape(ShapeType.Rectangle, 100, 200, 500, 200);
    autoshape.getTextFrame().setText("Second Slide");

    // สร้างพื้นหลังสำหรับสไลด์ที่สาม
    slide3.getBackground().setType(BackgroundType.OwnBackground);
    slide3.getBackground().getFillFormat().setFillType(FillType.Solid);
    slide3.getBackground().getFillFormat().getSolidFillColor().setColor(Color.darkGray);

    // สร้างกล่องข้อความสำหรับสไลด์ที่สาม
    autoshape = slide3.getShapes().addAutoShape(ShapeType.Rectangle, 100, 200, 500, 200);
    autoshape.getTextFrame().setText("Trird Slide");

    //เพิ่มอ็อบเจ็กต์ ZoomFrame
    IZoomFrame zoomFrame1 = pres.getSlides().get_Item(0).getShapes().addZoomFrame(20, 20, 250, 200, slide2);
    IZoomFrame zoomFrame2 = pres.getSlides().get_Item(0).getShapes().addZoomFrame(200, 250, 250, 200, slide3);

    // สร้างภาพใหม่สำหรับอ็อบเจ็กต์ซูม
    IPPImage picture;
        IImage image = Images.fromFile("image.png");
        try {
            picture = pres.getImages().addImage(image);
        } finally {
            if (image != null) image.dispose();
        }
    // ตั้งค่าภาพแบบกำหนดเองสำหรับอ็อบเจ็กต์ zoomFrame1
    zoomFrame1.setImage(picture);

    // ตั้งค่ารูปแบบกรอบซูมสำหรับอ็อบเจ็กต์ zoomFrame2
    zoomFrame2.getLineFormat().setWidth(5);
    zoomFrame2.getLineFormat().getFillFormat().setFillType(FillType.Solid);
    zoomFrame2.getLineFormat().getFillFormat().getSolidFillColor().setColor(Color.pink);
    zoomFrame2.getLineFormat().setDashStyle(LineDashStyle.DashDot);

    // การตั้งค่าสำหรับไม่แสดงพื้นหลังสำหรับอ็อบเจ็กต์ zoomFrame2
    zoomFrame2.setShowBackground(false);

    // บันทึกการนำเสนอ
    pres.save("presentation.pptx", SaveFormat.Pptx);
} catch(IOException e) {
} finally {
    if (pres != null) pres.dispose();
}
ซูมส่วน
ซูมส่วนเป็นลิงก์ไปยังส่วนในการนำเสนอของคุณ คุณสามารถใช้ซูมส่วนเพื่อกลับไปยังส่วนที่ต้องการเน้น หรือใช้เพื่อแสดงความเชื่อมโยงของส่วนต่าง ๆ ในการนำเสนอของคุณ
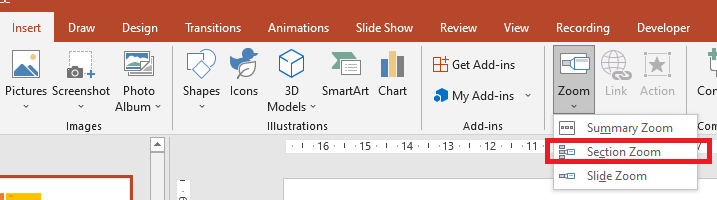
สำหรับอ็อบเจ็กต์ซูมส่วน, Aspose.Slides มี interface ISectionZoomFrame และเมธอดบางส่วนภายใต้ interface IShapeCollection
สร้างกรอบซูมส่วน
คุณสามารถเพิ่มกรอบซูมส่วนไปยังสไลด์ได้ตามขั้นตอนนี้:
- สร้างอินสแตนซ์ของคลาส Presentation
- สร้างสไลด์ใหม่
- เพิ่มพื้นหลังระบุตัวให้กับสไลด์ที่สร้าง
- สร้างส่วนใหม่ที่คุณต้องการเชื่อมโยงกับกรอบการซูม
- เพิ่มกรอบซูมส่วน (ซึ่งบรรจุการอ้างอิงถึงส่วนที่สร้าง) ไปยังสไลด์แรก
- เขียนการนำเสนอที่แก้ไขแล้วเป็นไฟล์ PPTX
Presentation pres = new Presentation();
try {
    //เพิ่มสไลด์ใหม่ไปยังการนำเสนอ
    ISlide slide = pres.getSlides().addEmptySlide(pres.getSlides().get_Item(0).getLayoutSlide());
    slide.getBackground().getFillFormat().setFillType(FillType.Solid);
    slide.getBackground().getFillFormat().getSolidFillColor().setColor(Color.yellow);
    slide.getBackground().setType(BackgroundType.OwnBackground);

    // เพิ่มส่วนใหม่ไปยังการนำเสนอ
    pres.getSections().addSection("Section 1", slide);

    // เพิ่มอ็อบเจ็กต์ SectionZoomFrame
    ISectionZoomFrame sectionZoomFrame = pres.getSlides().get_Item(0).getShapes().addSectionZoomFrame(20, 20, 300, 200, pres.getSections().get_Item(1));

    // บันทึกการนำเสนอ
    pres.save("presentation.pptx", SaveFormat.Pptx);
} finally {
    if (pres != null) pres.dispose();
}
สร้างกรอบซูมส่วนด้วยรูปภาพแบบกำหนดเอง
โดยใช้ Aspose.Slides for Java, คุณสามารถสร้างกรอบซูมส่วนพร้อมรูปภาพตัวอย่างสไลด์ที่แตกต่างได้ตามขั้นตอนนี้:
- สร้างอินสแตนซ์ของคลาส Presentation
- สร้างสไลด์ใหม่
- เพิ่มพื้นหลังระบุตัวให้กับสไลด์ที่สร้าง
- สร้างส่วนใหม่ที่คุณต้องการเชื่อมโยงกับกรอบการซูม
- สร้างอ็อบเจ็กต์ IPPImage โดยเพิ่มรูปภาพลงในคอลเลกชัน Images ที่เชื่อมกับอ็อบเจ็กต์ Presentation เพื่อใช้เติมกรอบ
- เพิ่มกรอบซูมส่วน (ซึ่งบรรจุการอ้างอิงถึงส่วนที่สร้าง) ไปยังสไลด์แรก
- เขียนการนำเสนอที่แก้ไขแล้วเป็นไฟล์ PPTX
Presentation pres = new Presentation();
try {
    //เพิ่มสไลด์ใหม่ไปยังการนำเสนอ
    ISlide slide = pres.getSlides().addEmptySlide(pres.getSlides().get_Item(0).getLayoutSlide());
    slide.getBackground().getFillFormat().setFillType(FillType.Solid);
    slide.getBackground().getFillFormat().getSolidFillColor().setColor(Color.yellow);
    slide.getBackground().setType(BackgroundType.OwnBackground);

    // เพิ่มส่วนใหม่ไปยังการนำเสนอ
    pres.getSections().addSection("Section 1", slide);

    // สร้างภาพใหม่สำหรับอ็อบเจ็กต์ซูม
    IPPImage picture;
    IImage image = Images.fromFile("image.png");
    try {
        picture = pres.getImages().addImage(image);
    } finally {
        if (image != null) image.dispose();
    }

    // เพิ่มอ็อบเจ็กต์ SectionZoomFrame
    ISectionZoomFrame sectionZoomFrame = pres.getSlides().get_Item(0).getShapes().addSectionZoomFrame(20, 20, 300, 200, pres.getSections().get_Item(1), picture);

    // บันทึกการนำเสนอ
    pres.save("presentation.pptx", SaveFormat.Pptx);
} catch(IOException e) {
} finally {
    if (pres != null) pres.dispose();
}
จัดรูปแบบกรอบซูมส่วน
เพื่อสร้างกรอบซูมส่วนที่ซับซ้อนยิ่งขึ้น คุณต้องปรับการจัดรูปแบบของกรอบแบบง่าย มีตัวเลือกการจัดรูปแบบหลายอย่างที่คุณสามารถนำไปใช้กับกรอบซูมส่วนได้
คุณสามารถควบคุมการจัดรูปแบบของกรอบซูมส่วนบนสไลด์ได้ตามขั้นตอนนี้:
- สร้างอินสแตนซ์ของคลาส Presentation
- สร้างสไลด์ใหม่
- เพิ่มพื้นหลังระบุตัวให้กับสไลด์ที่สร้าง
- สร้างส่วนใหม่ที่คุณต้องการเชื่อมโยงกับกรอบการซูม
- เพิ่มกรอบซูมส่วน (ซึ่งบรรจุการอ้างอิงถึงส่วนที่สร้าง) ไปยังสไลด์แรก
- ปรับขนาดและตำแหน่งของอ็อบเจ็กต์ซูมส่วนที่สร้าง
- สร้างอ็อบเจ็กต์ IPPImage โดยเพิ่มรูปภาพลงในคอลเลกชัน Images ที่เชื่อมกับอ็อบเจ็กต์ Presentation เพื่อใช้เติมกรอบ
- ตั้งค่ารูปภาพแบบกำหนดเองสำหรับกรอบซูมส่วนที่สร้าง
- ตั้งค่าความสามารถ return to the original slide from the linked section
- ลบพื้นหลังจากรูปภาพของกรอบซูมส่วน
- เปลี่ยนรูปแบบเส้นของกรอบซูมที่สอง
- เปลี่ยนระยะเวลาในการเปลี่ยนภาพ
- เขียนการนำเสนอที่แก้ไขแล้วเป็นไฟล์ PPTX
Presentation pres = new Presentation();
try {
    //เพิ่มสไลด์ใหม่ไปยังการนำเสนอ
    ISlide slide = pres.getSlides().addEmptySlide(pres.getSlides().get_Item(0).getLayoutSlide());
    slide.getBackground().getFillFormat().setFillType(FillType.Solid);
    slide.getBackground().getFillFormat().getSolidFillColor().setColor(Color.yellow);
    slide.getBackground().setType(BackgroundType.OwnBackground);

    // เพิ่มส่วนใหม่ไปยังการนำเสนอ
    pres.getSections().addSection("Section 1", slide);

    // เพิ่มอ็อบเจ็กต์ SectionZoomFrame
    ISectionZoomFrame sectionZoomFrame = pres.getSlides().get_Item(0).getShapes().addSectionZoomFrame(20, 20, 300, 200, pres.getSections().get_Item(1));

    // การจัดรูปแบบสำหรับ SectionZoomFrame
    sectionZoomFrame.setX(100);
    sectionZoomFrame.setY(300);
    sectionZoomFrame.setWidth(100);
    sectionZoomFrame.setHeight(75);

    IPPImage picture;
    IImage image = Images.fromFile("image.png");
    try {
         picture = pres.getImages().addImage(image);
     } finally {
        if (image != null) image.dispose();
     }
    sectionZoomFrame.setImage(picture);

    sectionZoomFrame.setReturnToParent(true);
    sectionZoomFrame.setShowBackground(false);

    sectionZoomFrame.getLineFormat().getFillFormat().setFillType(FillType.Solid);
    sectionZoomFrame.getLineFormat().getFillFormat().getSolidFillColor().setColor(Color.gray);
    sectionZoomFrame.getLineFormat().setDashStyle(LineDashStyle.DashDot);
    sectionZoomFrame.getLineFormat().setWidth(2.5f);

    sectionZoomFrame.setTransitionDuration(1.5f);

    // บันทึกการนำเสนอ
    pres.save("presentation.pptx", SaveFormat.Pptx);
} catch(IOException e) {
} finally {
    if (pres != null) pres.dispose();
}
ซูมสรุป
ซูมสรุปเป็นเหมือนหน้าแลนดิ้งที่แสดงส่วนต่าง ๆ ของการนำเสนอของคุณพร้อมกันทั้งหมด เมื่อคุณพรีเซนต์ คุณสามารถใช้ซูมเพื่อขยับจากที่หนึ่งไปยังอีกที่หนึ่งในลำดับใดก็ได้ตามต้องการ คุณสามารถสร้างสรรค์ การข้ามหน้า หรือกลับมาดูส่วนต่าง ๆ ของสไลด์โชว์โดยไม่ขัดจังหวะการไหลของการนำเสนอ
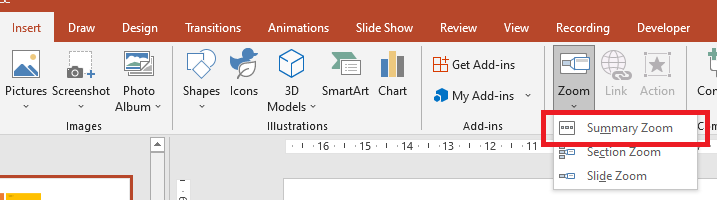
สำหรับอ็อบเจ็กต์ซูมสรุป, Aspose.Slides มี interface ISummaryZoomFrame, ISummaryZoomSection และ ISummaryZoomSectionCollection รวมถึงเมธอดบางส่วนภายใต้ interface IShapeCollection
สร้างซูมสรุป
คุณสามารถเพิ่มกรอบซูมสรุปไปยังสไลด์ได้ตามขั้นตอนนี้:
- สร้างอินสแตนซ์ของคลาส Presentation
- สร้างสไลด์ใหม่พร้อมพื้นหลังระบุตัวและส่วนใหม่สำหรับสไลด์ที่สร้าง
- เพิ่มกรอบซูมสรุปไปยังสไลด์แรก
- เขียนการนำเสนอที่แก้ไขแล้วเป็นไฟล์ PPTX
Presentation pres = new Presentation();
try {
    //เพิ่มสไลด์ใหม่ไปยังการนำเสนอ
    ISlide slide = pres.getSlides().addEmptySlide(pres.getSlides().get_Item(0).getLayoutSlide());
    slide.getBackground().getFillFormat().setFillType(FillType.Solid);
    slide.getBackground().getFillFormat().getSolidFillColor().setColor(Color.gray);
    slide.getBackground().setType(BackgroundType.OwnBackground);

    // เพิ่มส่วนใหม่ไปยังการนำเสนอ
    pres.getSections().addSection("Section 1", slide);

    //เพิ่มสไลด์ใหม่ไปยังการนำเสนอ
    slide = pres.getSlides().addEmptySlide(pres.getSlides().get_Item(0).getLayoutSlide());
    slide.getBackground().getFillFormat().setFillType(FillType.Solid);
    slide.getBackground().getFillFormat().getSolidFillColor().setColor(Color.cyan);
    slide.getBackground().setType(BackgroundType.OwnBackground);

    // เพิ่มส่วนใหม่ไปยังการนำเสนอ
    pres.getSections().addSection("Section 2", slide);

    //เพิ่มสไลด์ใหม่ไปยังการนำเสนอ
    slide = pres.getSlides().addEmptySlide(pres.getSlides().get_Item(0).getLayoutSlide());
    slide.getBackground().getFillFormat().setFillType(FillType.Solid);
    slide.getBackground().getFillFormat().getSolidFillColor().setColor(Color.magenta);
    slide.getBackground().setType(BackgroundType.OwnBackground);

    // เพิ่มส่วนใหม่ไปยังการนำเสนอ
    pres.getSections().addSection("Section 3", slide);

    //เพิ่มสไลด์ใหม่ไปยังการนำเสนอ
    slide = pres.getSlides().addEmptySlide(pres.getSlides().get_Item(0).getLayoutSlide());
    slide.getBackground().getFillFormat().setFillType(FillType.Solid);
    slide.getBackground().getFillFormat().getSolidFillColor().setColor(Color.green);
    slide.getBackground().setType(BackgroundType.OwnBackground);

    // เพิ่มส่วนใหม่ไปยังการนำเสนอ
    pres.getSections().addSection("Section 4", slide);

    // เพิ่มอ็อบเจ็กต์ SummaryZoomFrame
    ISummaryZoomFrame summaryZoomFrame = pres.getSlides().get_Item(0).getShapes().addSummaryZoomFrame(150, 50, 300, 200);

    // บันทึกการนำเสนอ
    pres.save("presentation.pptx", SaveFormat.Pptx);
} finally {
    if (pres != null) pres.dispose();
}
เพิ่มและลบส่วนซูมสรุป
ทุกส่วนในกรอบซูมสรุปจะถูกแทนด้วยอ็อบเจ็กต์ ISummaryZoomSection ซึ่งเก็บอยู่ในอ็อบเจ็กต์ ISummaryZoomSectionCollection คุณสามารถเพิ่มหรือเอาออกอ็อบเจ็กต์ส่วนซูมสรุปผ่าน interface ISummaryZoomSectionCollection ได้ตามขั้นตอนนี้:
- สร้างอินสแตนซ์ของคลาส Presentation
- สร้างสไลด์ใหม่พร้อมพื้นหลังระบุตัวและส่วนใหม่สำหรับสไลด์ที่สร้าง
- เพิ่มกรอบซูมสรุปลงในสไลด์แรก
- เพิ่มสไลด์และส่วนใหม่ไปยังการนำเสนอ
- เพิ่มส่วนที่สร้างลงในกรอบซูมสรุป
- ลบส่วนแรกออกจากกรอบซูมสรุป
- เขียนการนำเสนอที่แก้ไขแล้วเป็นไฟล์ PPTX
Presentation pres = new Presentation();
try {
    //เพิ่มสไลด์ใหม่ไปยังการนำเสนอ
    ISlide slide = pres.getSlides().addEmptySlide(pres.getSlides().get_Item(0).getLayoutSlide());
    slide.getBackground().getFillFormat().setFillType(FillType.Solid);
    slide.getBackground().getFillFormat().getSolidFillColor().setColor(Color.gray);
    slide.getBackground().setType(BackgroundType.OwnBackground);

    // เพิ่มส่วนใหม่ไปยังการนำเสนอ
    pres.getSections().addSection("Section 1", slide);

    //เพิ่มสไลด์ใหม่ไปยังการนำเสนอ
    slide = pres.getSlides().addEmptySlide(pres.getSlides().get_Item(0).getLayoutSlide());
    slide.getBackground().getFillFormat().setFillType(FillType.Solid);
    slide.getBackground().getFillFormat().getSolidFillColor().setColor(Color.cyan);
    slide.getBackground().setType(BackgroundType.OwnBackground);

    // เพิ่มส่วนใหม่ไปยังการนำเสนอ
    pres.getSections().addSection("Section 2", slide);

    // เพิ่มอ็อบเจ็กต์ SummaryZoomFrame
    ISummaryZoomFrame summaryZoomFrame = pres.getSlides().get_Item(0).getShapes().addSummaryZoomFrame(150, 50, 300, 200);

    //เพิ่มสไลด์ใหม่ไปยังการนำเสนอ
    slide = pres.getSlides().addEmptySlide(pres.getSlides().get_Item(0).getLayoutSlide());
    slide.getBackground().getFillFormat().setFillType(FillType.Solid);
    slide.getBackground().getFillFormat().getSolidFillColor().setColor(Color.magenta);
    slide.getBackground().setType(BackgroundType.OwnBackground);

    // เพิ่มส่วนใหม่ไปยังการนำเสนอ
    ISection section3 = pres.getSections().addSection("Section 3", slide);

    // เพิ่มส่วนเข้าไปใน Summary Zoom
    summaryZoomFrame.getSummaryZoomCollection().addSummaryZoomSection(section3);

    // ลบส่วนออกจาก Summary Zoom
    summaryZoomFrame.getSummaryZoomCollection().removeSummaryZoomSection(pres.getSections().get_Item(1));

    // บันทึกการนำเสนอ
    pres.save("presentation.pptx", SaveFormat.Pptx);
} finally {
    if (pres != null) pres.dispose();
}
จัดรูปแบบส่วนซูมสรุป
เพื่อสร้างอ็อบเจ็กต์ส่วนซูมสรุปที่ซับซ้อนยิ่งขึ้น คุณต้องปรับการจัดรูปแบบของกรอบแบบง่าย มีตัวเลือกการจัดรูปแบบหลายอย่างที่คุณสามารถนำไปใช้กับอ็อบเจ็กต์ส่วนซูมสรุปได้
คุณสามารถควบคุมการจัดรูปแบบของอ็อบเจ็กต์ส่วนซูมสรุปในกรอบซูมสรุปได้ตามขั้นตอนนี้:
- สร้างอินสแตนซ์ของคลาส Presentation
- สร้างสไลด์ใหม่พร้อมพื้นหลังระบุตัวและส่วนใหม่สำหรับสไลด์ที่สร้าง
- เพิ่มกรอบซูมสรุปไปยังสไลด์แรก
- ดึงอ็อบเจ็กต์ส่วนซูมสรุปจาก
ISummaryZoomSectionCollectionสำหรับอ็อบเจ็กต์แรก - สร้างอ็อบเจ็กต์ IPPImage โดยเพิ่มรูปภาพลงในคอลเลกชัน images ที่เชื่อมกับอ็อบเจ็กต์ Presentation เพื่อใช้เติมกรอบ
- ตั้งค่ารูปภาพแบบกำหนดเองสำหรับอ็อบเจ็กต์ส่วนซูมที่สร้าง
- ตั้งค่าความสามารถ return to the original slide from the linked section
- เปลี่ยนรูปแบบเส้นของกรอบซูมที่สอง
- เปลี่ยนระยะเวลาในการเปลี่ยนภาพ
- เขียนการนำเสนอที่แก้ไขแล้วเป็นไฟล์ PPTX
Presentation pres = new Presentation();
try {
    //เพิ่มสไลด์ใหม่ไปยังการนำเสนอ
    ISlide slide = pres.getSlides().addEmptySlide(pres.getSlides().get_Item(0).getLayoutSlide());
    slide.getBackground().getFillFormat().setFillType(FillType.Solid);
    slide.getBackground().getFillFormat().getSolidFillColor().setColor(Color.gray);
    slide.getBackground().setType(BackgroundType.OwnBackground);

    // เพิ่มส่วนใหม่ไปยังการนำเสนอ
    pres.getSections().addSection("Section 1", slide);

    //เพิ่มสไลด์ใหม่ไปยังการนำเสนอ
    slide = pres.getSlides().addEmptySlide(pres.getSlides().get_Item(0).getLayoutSlide());
    slide.getBackground().getFillFormat().setFillType(FillType.Solid);
    slide.getBackground().getFillFormat().getSolidFillColor().setColor(Color.cyan);
    slide.getBackground().setType(BackgroundType.OwnBackground);

    // เพิ่มส่วนใหม่ไปยังการนำเสนอ
    pres.getSections().addSection("Section 2", slide);

    // เพิ่มอ็อบเจ็กต์ SummaryZoomFrame
    ISummaryZoomFrame summaryZoomFrame = pres.getSlides().get_Item(0).getShapes().addSummaryZoomFrame(150, 50, 300, 200);

    // ดึงอ็อบเจ็กต์ SummaryZoomSection ตัวแรก
    ISummaryZoomSection summarySection = summaryZoomFrame.getSummaryZoomCollection().get_Item(0);

    // การจัดรูปแบบสำหรับอ็อบเจ็กต์ SummaryZoomSection
    IPPImage picture;
    IImage image = Images.fromFile("image.png");
    try {
    picture = pres.getImages().addImage(picture);
    } finally {
          if (image != null) image.dispose();
    }
    summarySection.setImage(picture);

    summarySection.setReturnToParent(false);

    summarySection.getLineFormat().getFillFormat().setFillType(FillType.Solid);
    summarySection.getLineFormat().getFillFormat().getSolidFillColor().setColor(Color.black);
    summarySection.getLineFormat().setDashStyle(LineDashStyle.DashDot);
    summarySection.getLineFormat().setWidth(1.5f);

    summarySection.setTransitionDuration(1.5f);

    // บันทึกการนำเสนอ
    pres.save("presentation.pptx", SaveFormat.Pptx);
} catch(IOException e) {
} finally {
    if (pres != null) pres.dispose();
}
คำถามที่พบบ่อย
ฉันสามารถควบคุมการกลับไปยังสไลด์ “แม่” หลังจากแสดงเป้าหมายได้หรือไม่?
ใช่. Zoom frame หรือ section มีพฤติกรรม ReturnToParent ซึ่งเมื่อเปิดใช้งานจะพาผู้ชมกลับไปยังสไลด์ต้นทางหลังจากเข้าชมเนื้อหาเป้าหมาย
ฉันสามารถปรับ “ความเร็ว” หรือระยะเวลาในการเปลี่ยนซูมได้หรือไม่?
ใช่. ซูมสนับสนุนการตั้งค่า TransitionDuration เพื่อให้คุณควบคุมระยะเวลาการทำแอนิเมชันการกระโดด
มีข้อจำกัดเกี่ยวกับจำนวนอ็อบเจ็กต์ซูมที่การนำเสนอสามารถบรรจุได้หรือไม่?
ไม่มีข้อจำกัดแบบ API ที่กำหนดไว้ในเอกสาร ข้อจำกัดเชิงปฏิบัติจะขึ้นอยู่กับความซับซ้อนของการนำเสนอโดยรวมและประสิทธิภาพของผู้ชม คุณสามารถเพิ่มกรอบซูมได้หลายอัน แต่ควรคำนึงถึงขนาดไฟล์และเวลาเรนเดอร์.