
在 Python via Java 中管理簡報縮放
簡介
PowerPoint 中的縮放功能讓您可以在簡報的特定投影片、節與區段之間來回跳轉。當您在演示時,快速在內容之間導覽的能力可能非常有用。
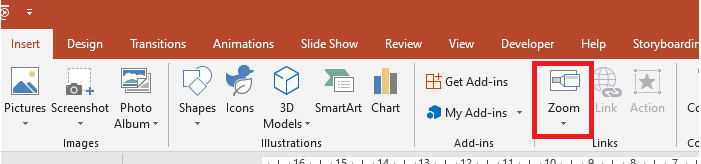
投影片縮放
投影片縮放可以讓您的簡報更具活力,讓您可以自由選擇任意順序在投影片之間導航,而不會中斷簡報的流程。投影片縮放非常適合沒有太多節的簡短簡報,但您仍可在不同的簡報情境中使用它們。
投影片縮放協助您深入多個資訊片段,同時感覺仍位於單一畫布上。
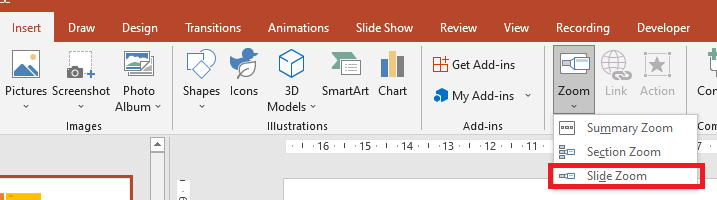
對於投影片縮放物件,Aspose.Slides 提供 ZoomImageType 列舉、ZoomFrame 類別,以及 ShapeCollection 類別中的一些方法。
建立縮放框格
您可以使用以下方式在投影片上加入縮放框格:
- 建立 Presentation 類別的實例。
- 建立您打算連結縮放框格的新投影片。
- 為建立的投影片加入辨識文字與背景。
- 將縮放框格(含所建立投影片的參考)加入第一張投影片。
- 將修改後的簡報寫入為 PPTX 檔案。
以下 Python 程式碼示範如何在投影片上建立縮放框格:
import jpype
import asposeslides

if not jpype.isJVMStarted():
    jpype.startJVM()

from asposeslides.api import BackgroundType, FillType, Presentation, SaveFormat, ShapeType
from java.awt import Color

presentation = Presentation()
try:
    # 新增投影片至簡報
    second_slide = presentation.getSlides().addEmptySlide(presentation.getSlides().get_Item(0).getLayoutSlide())
    third_slide = presentation.getSlides().addEmptySlide(presentation.getSlides().get_Item(0).getLayoutSlide())

    #  為第二張投影片建立背景
    second_slide.getBackground().setType(BackgroundType.OwnBackground)
    second_slide.getBackground().getFillFormat().setFillType(FillType.Solid)
    second_slide.getBackground().getFillFormat().getSolidFillColor().setColor(Color.cyan)

    #  為第二張投影片建立文字方塊
    auto_shape = second_slide.getShapes().addAutoShape(ShapeType.Rectangle, 100, 200, 500, 200)
    auto_shape.getTextFrame().setText("Second Slide")

    #  為第三張投影片建立背景
    third_slide.getBackground().setType(BackgroundType.OwnBackground)
    third_slide.getBackground().getFillFormat().setFillType(FillType.Solid)
    third_slide.getBackground().getFillFormat().getSolidFillColor().setColor(Color.darkGray)

    #  為第三張投影片建立文字方塊
    auto_shape = third_slide.getShapes().addAutoShape(ShapeType.Rectangle, 100, 200, 500, 200)
    auto_shape.getTextFrame().setText("Third Slide")

    # 新增 ZoomFrame 物件
    presentation.getSlides().get_Item(0).getShapes().addZoomFrame(20, 20, 250, 200, second_slide)
    presentation.getSlides().get_Item(0).getShapes().addZoomFrame(200, 250, 250, 200, third_slide)

    #  儲存簡報
    presentation.save("presentation.pptx", SaveFormat.Pptx)
finally:
    presentation.dispose()
使用自訂影像建立縮放框格
使用 Aspose.Slides for Python via Java,您可以透過以下方式建立使用不同投影片預覽影像的縮放框格:
- 建立 Presentation 類別的實例。
- 建立您打算連結縮放框格的新投影片。
- 為該投影片加入辨識文字與背景。
- 透過將影像加入與 Presentation 物件相關聯的影像集合,建立 PPImage 物件,以填充框格。
- 將縮放框格(含所建立投影片的參考)加入第一張投影片。
- 將修改後的簡報寫入為 PPTX 檔案。
以下 Python 程式碼示範如何使用不同影像建立縮放框格:
import jpype
import asposeslides

if not jpype.isJVMStarted():
    jpype.startJVM()

from asposeslides.api import BackgroundType, FillType, Images, Presentation, SaveFormat, ShapeType
from java.awt import Color

presentation = Presentation()
try:
    # 新增投影片至簡報
    slide = presentation.getSlides().addEmptySlide(presentation.getSlides().get_Item(0).getLayoutSlide())

    #  為第二張投影片建立背景
    slide.getBackground().setType(BackgroundType.OwnBackground)
    slide.getBackground().getFillFormat().setFillType(FillType.Solid)
    slide.getBackground().getFillFormat().getSolidFillColor().setColor(Color.cyan)

    #  為第二張投影片建立文字方塊
    auto_shape = slide.getShapes().addAutoShape(ShapeType.Rectangle, 100, 200, 500, 200)
    auto_shape.getTextFrame().setText("Second Slide")

    #  為縮放物件建立新影像
    image = Images.fromFile("image.png")
    try:
        picture = presentation.getImages().addImage(image)
    finally:
        image.dispose()

    # 新增 ZoomFrame 物件
    presentation.getSlides().get_Item(0).getShapes().addZoomFrame(20, 20, 300, 200, slide, picture)

    #  儲存簡報
    presentation.save("presentation.pptx", SaveFormat.Pptx)
finally:
    presentation.dispose()
格式化縮放框格
在前面的章節中,我們示範了如何建立簡單的縮放框格。若要建立更複雜的縮放框格,您必須變更簡單框格的格式。您可以對縮放框格套用多種格式化選項。
您可以使用以下方式在投影片上控制縮放框格的格式:
- 建立 Presentation 類別的實例。
- 建立您打算連結縮放框格的新投影片。
- 為建立的投影片加入辨識文字與背景。
- 將縮放框格(含所建立投影片的參考)加入第一張投影片。
- 透過將影像加入與 Presentation 物件相關聯的影像集合,建立 PPImage 物件,以填充框格。
- 為第一個縮放框格物件設定自訂影像。
- 變更第二個縮放框格物件的線條格式。
- 移除第二個縮放框格物件影像的背景。
- 將修改後的簡報寫入為 PPTX 檔案。
以下 Python 程式碼示範如何在投影片上變更縮放框格的格式:
import jpype
import asposeslides

if not jpype.isJVMStarted():
    jpype.startJVM()

from asposeslides.api import BackgroundType, FillType, Images, LineDashStyle, Presentation, SaveFormat, ShapeType
from java.awt import Color

presentation = Presentation()
try:
    # 新增投影片至簡報
    second_slide = presentation.getSlides().addEmptySlide(presentation.getSlides().get_Item(0).getLayoutSlide())
    third_slide = presentation.getSlides().addEmptySlide(presentation.getSlides().get_Item(0).getLayoutSlide())

    #  為第二張投影片建立背景
    second_slide.getBackground().setType(BackgroundType.OwnBackground)
    second_slide.getBackground().getFillFormat().setFillType(FillType.Solid)
    second_slide.getBackground().getFillFormat().getSolidFillColor().setColor(Color.cyan)

    #  為第二張投影片建立文字方塊
    auto_shape = second_slide.getShapes().addAutoShape(ShapeType.Rectangle, 100, 200, 500, 200)
    auto_shape.getTextFrame().setText("Second Slide")

    #  為第三張投影片建立背景
    third_slide.getBackground().setType(BackgroundType.OwnBackground)
    third_slide.getBackground().getFillFormat().setFillType(FillType.Solid)
    third_slide.getBackground().getFillFormat().getSolidFillColor().setColor(Color.darkGray)

    #  為第三張投影片建立文字方塊
    auto_shape = third_slide.getShapes().addAutoShape(ShapeType.Rectangle, 100, 200, 500, 200)
    auto_shape.getTextFrame().setText("Third Slide")

    # 新增 ZoomFrame 物件
    first_zoom_frame = presentation.getSlides().get_Item(0).getShapes().addZoomFrame(20, 20, 250, 200, second_slide)
    second_zoom_frame = presentation.getSlides().get_Item(0).getShapes().addZoomFrame(200, 250, 250, 200, third_slide)

    #  為縮放物件建立新影像
    image = Images.fromFile("image.png")
    try:
        picture = presentation.getImages().addImage(image)
    finally:
        image.dispose()

    #  為 first_zoom_frame 物件設定自訂影像
    first_zoom_frame.setZoomImage(picture)

    #  為 second_zoom_frame 物件設定縮放框格格式
    second_zoom_frame.getLineFormat().setWidth(5)
    second_zoom_frame.getLineFormat().getFillFormat().setFillType(FillType.Solid)
    second_zoom_frame.getLineFormat().getFillFormat().getSolidFillColor().setColor(Color.pink)
    second_zoom_frame.getLineFormat().setDashStyle(LineDashStyle.DashDot)

    #  設定不顯示 second_zoom_frame 物件的背景
    second_zoom_frame.setShowBackground(False)

    #  儲存簡報
    presentation.save("presentation.pptx", SaveFormat.Pptx)
finally:
    presentation.dispose()
節縮放
節縮放是指向簡報中某個節的連結。您可以使用節縮放返回您想特別強調的節,或用來突顯簡報中各部分之間的關聯。
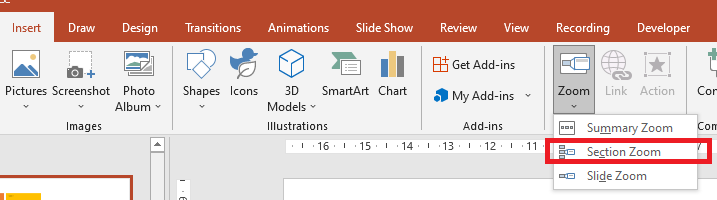
對於節縮放物件,Aspose.Slides 提供 SectionZoomFrame 類別,以及 ShapeCollection 類別中的一些方法。
建立節縮放框格
您可以使用以下方式在投影片上加入節縮放框格:
- 建立 Presentation 類別的實例。
- 建立新投影片。
- 為建立的投影片加入顯眼的背景。
- 建立您打算連結縮放框格的新節。
- 將節縮放框格(含所建立節的參考)加入第一張投影片。
- 將修改後的簡報寫入為 PPTX 檔案。
以下 Python 程式碼示範如何在投影片上建立節縮放框格:
import jpype
import asposeslides

if not jpype.isJVMStarted():
    jpype.startJVM()

from asposeslides.api import BackgroundType, FillType, Presentation, SaveFormat
from java.awt import Color

presentation = Presentation()
try:
    # 新增投影片至簡報
    slide = presentation.getSlides().addEmptySlide(presentation.getSlides().get_Item(0).getLayoutSlide())
    slide.getBackground().getFillFormat().setFillType(FillType.Solid)
    slide.getBackground().getFillFormat().getSolidFillColor().setColor(Color.yellow)
    slide.getBackground().setType(BackgroundType.OwnBackground)

    #  新增節至簡報
    presentation.getSections().addSection("Section 1", slide)

    #  新增 SectionZoomFrame 物件
    section_zoom_frame = presentation.getSlides().get_Item(0).getShapes().addSectionZoomFrame(20, 20, 300, 200, presentation.getSections().get_Item(1))

    #  儲存簡報
    presentation.save("presentation.pptx", SaveFormat.Pptx)
finally:
    presentation.dispose()
使用自訂影像建立節縮放框格
使用 Aspose.Slides for Python via Java,您可以透過以下方式建立使用不同投影片預覽影像的節縮放框格:
- 建立 Presentation 類別的實例。
- 建立新投影片。
- 為建立的投影片加入顯眼的背景。
- 建立您打算連結縮放框格的新節。
- 透過將影像加入與 Presentation 物件相關聯的影像集合,建立 PPImage 物件,以填充框格。
- 將節縮放框格(含所建立節的參考)加入第一張投影片。
- 將修改後的簡報寫入為 PPTX 檔案。
以下 Python 程式碼示範如何使用不同影像建立節縮放框格:
import jpype
import asposeslides

if not jpype.isJVMStarted():
    jpype.startJVM()

from asposeslides.api import BackgroundType, FillType, Images, Presentation, SaveFormat
from java.awt import Color

presentation = Presentation()
try:
    # 新增投影片至簡報
    slide = presentation.getSlides().addEmptySlide(presentation.getSlides().get_Item(0).getLayoutSlide())
    slide.getBackground().getFillFormat().setFillType(FillType.Solid)
    slide.getBackground().getFillFormat().getSolidFillColor().setColor(Color.yellow)
    slide.getBackground().setType(BackgroundType.OwnBackground)

    #  新增節至簡報
    presentation.getSections().addSection("Section 1", slide)

    #  為縮放物件建立新影像
    image = Images.fromFile("image.png")
    try:
        picture = presentation.getImages().addImage(image)
    finally:
        image.dispose()

    #  新增 SectionZoomFrame 物件
    section_zoom_frame = presentation.getSlides().get_Item(0).getShapes().addSectionZoomFrame(20, 20, 300, 200, presentation.getSections().get_Item(1), picture)

    #  儲存簡報
    presentation.save("presentation.pptx", SaveFormat.Pptx)
finally:
    presentation.dispose()
格式化節縮放框格
若要建立更複雜的節縮放框格,您必須變更簡單框格的格式。您可以對節縮放框格套用多種格式化選項。
您可以使用以下方式在投影片上控制節縮放框格的格式:
- 建立 Presentation 類別的實例。
- 建立新投影片。
- 為建立的投影片加入顯眼的背景。
- 建立您打算連結縮放框格的新節。
- 將節縮放框格(含所建立節的參考)加入第一張投影片。
- 變更已建立節縮放物件的大小與位置。
- 透過將影像加入與 Presentation 物件相關聯的影像集合,建立 PPImage 物件,以填充框格。
- 為已建立的節縮放框格物件設定自訂影像。
- 設定從連結的節返回原始投影片的功能。
- 移除節縮放框格物件影像的背景。
- 變更節縮放框格物件的線條格式。
- 變更過渡持續時間。
- 將修改後的簡報寫入為 PPTX 檔案。
以下 Python 程式碼示範如何變更節縮放框格的格式:
import jpype
import asposeslides

if not jpype.isJVMStarted():
    jpype.startJVM()

from asposeslides.api import BackgroundType, FillType, Images, LineDashStyle, Presentation, SaveFormat
from java.awt import Color

presentation = Presentation()
try:
    # 新增投影片至簡報
    slide = presentation.getSlides().addEmptySlide(presentation.getSlides().get_Item(0).getLayoutSlide())
    slide.getBackground().getFillFormat().setFillType(FillType.Solid)
    slide.getBackground().getFillFormat().getSolidFillColor().setColor(Color.yellow)
    slide.getBackground().setType(BackgroundType.OwnBackground)

    #  新增節至簡報
    presentation.getSections().addSection("Section 1", slide)

    #  新增 SectionZoomFrame 物件
    section_zoom_frame = presentation.getSlides().get_Item(0).getShapes().addSectionZoomFrame(20, 20, 300, 200, presentation.getSections().get_Item(1))

    #  SectionZoomFrame 的格式設定
    section_zoom_frame.setX(100)
    section_zoom_frame.setY(300)
    section_zoom_frame.setWidth(100)
    section_zoom_frame.setHeight(75)

    image = Images.fromFile("image.png")
    try:
        picture = presentation.getImages().addImage(image)
    finally:
        image.dispose()
    section_zoom_frame.setZoomImage(picture)

    section_zoom_frame.setReturnToParent(True)
    section_zoom_frame.setShowBackground(False)

    section_zoom_frame.getLineFormat().getFillFormat().setFillType(FillType.Solid)
    section_zoom_frame.getLineFormat().getFillFormat().getSolidFillColor().setColor(Color.gray)
    section_zoom_frame.getLineFormat().setDashStyle(LineDashStyle.DashDot)
    section_zoom_frame.getLineFormat().setWidth(2.5)

    section_zoom_frame.setTransitionDuration(1.5)

    #  儲存簡報
    presentation.save("presentation.pptx", SaveFormat.Pptx)
finally:
    presentation.dispose()
概覽縮放
概覽縮放就像一個著陸頁,會一次顯示簡報的所有部分。當您在演示時,可以使用縮放在簡報的任意位置之間跳轉,順序隨心所欲。您可以發揮創意,跳過或重新檢視投影片秀的某些片段,而不會中斷簡報的流程。
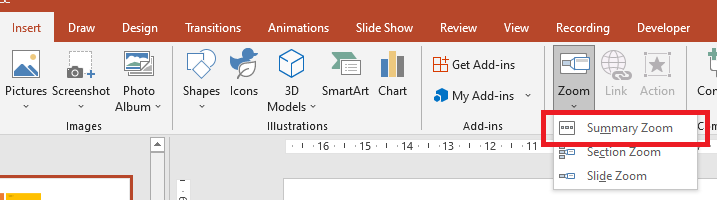
對於概覽縮放物件,Aspose.Slides 提供 SummaryZoomFrame、SummaryZoomSection、SummaryZoomSectionCollection 類別,以及 ShapeCollection 類別中的一些方法。
建立概覽縮放
您可以使用以下方式在投影片上加入概覽縮放框格:
- 建立 Presentation 類別的實例。
- 為建立的投影片建立顯眼的背景與新節。
- 將概覽縮放框格加入第一張投影片。
- 將修改後的簡報寫入為 PPTX 檔案。
以下 Python 程式碼示範如何在投影片上建立概覽縮放框格:
import jpype
import asposeslides

if not jpype.isJVMStarted():
    jpype.startJVM()

from asposeslides.api import BackgroundType, FillType, Presentation, SaveFormat
from java.awt import Color

presentation = Presentation()
try:
    # 新增投影片至簡報
    slide = presentation.getSlides().addEmptySlide(presentation.getSlides().get_Item(0).getLayoutSlide())
    slide.getBackground().getFillFormat().setFillType(FillType.Solid)
    slide.getBackground().getFillFormat().getSolidFillColor().setColor(Color.gray)
    slide.getBackground().setType(BackgroundType.OwnBackground)

    #  新增節至簡報
    presentation.getSections().addSection("Section 1", slide)

    # 新增投影片至簡報
    slide = presentation.getSlides().addEmptySlide(presentation.getSlides().get_Item(0).getLayoutSlide())
    slide.getBackground().getFillFormat().setFillType(FillType.Solid)
    slide.getBackground().getFillFormat().getSolidFillColor().setColor(Color.cyan)
    slide.getBackground().setType(BackgroundType.OwnBackground)

    #  新增節至簡報
    presentation.getSections().addSection("Section 2", slide)

    # 新增投影片至簡報
    slide = presentation.getSlides().addEmptySlide(presentation.getSlides().get_Item(0).getLayoutSlide())
    slide.getBackground().getFillFormat().setFillType(FillType.Solid)
    slide.getBackground().getFillFormat().getSolidFillColor().setColor(Color.magenta)
    slide.getBackground().setType(BackgroundType.OwnBackground)

    #  新增節至簡報
    presentation.getSections().addSection("Section 3", slide)

    # 新增投影片至簡報
    slide = presentation.getSlides().addEmptySlide(presentation.getSlides().get_Item(0).getLayoutSlide())
    slide.getBackground().getFillFormat().setFillType(FillType.Solid)
    slide.getBackground().getFillFormat().getSolidFillColor().setColor(Color.green)
    slide.getBackground().setType(BackgroundType.OwnBackground)

    #  新增節至簡報
    presentation.getSections().addSection("Section 4", slide)

    #  新增 SummaryZoomFrame 物件
    summary_zoom_frame = presentation.getSlides().get_Item(0).getShapes().addSummaryZoomFrame(150, 50, 300, 200)

    #  儲存簡報
    presentation.save("presentation.pptx", SaveFormat.Pptx)
finally:
    presentation.dispose()
新增與移除概覽縮放節
概覽縮放框格中的所有節皆以 SummaryZoomSection 物件表示,這些物件儲存在 SummaryZoomSectionCollection 物件中。您可以透過 SummaryZoomSectionCollection 類別加入或移除概覽縮放節物件,方式如下:
- 建立 Presentation 類別的實例。
- 為建立的投影片建立顯眼的背景與新節。
- 在第一張投影片加入概覽縮放框格。
- 為簡報新增投影片與節。
- 將新建立的節加入概覽縮放框格。
- 從概覽縮放框格中移除第一個節。
- 將修改後的簡報寫入為 PPTX 檔案。
以下 Python 程式碼示範如何在概覽縮放框格中新增與移除節:
import jpype
import asposeslides

if not jpype.isJVMStarted():
    jpype.startJVM()

from asposeslides.api import BackgroundType, FillType, Presentation, SaveFormat
from java.awt import Color

presentation = Presentation()
try:
    # 新增投影片至簡報
    slide = presentation.getSlides().addEmptySlide(presentation.getSlides().get_Item(0).getLayoutSlide())
    slide.getBackground().getFillFormat().setFillType(FillType.Solid)
    slide.getBackground().getFillFormat().getSolidFillColor().setColor(Color.gray)
    slide.getBackground().setType(BackgroundType.OwnBackground)

    #  新增節至簡報
    presentation.getSections().addSection("Section 1", slide)

    # 新增投影片至簡報
    slide = presentation.getSlides().addEmptySlide(presentation.getSlides().get_Item(0).getLayoutSlide())
    slide.getBackground().getFillFormat().setFillType(FillType.Solid)
    slide.getBackground().getFillFormat().getSolidFillColor().setColor(Color.cyan)
    slide.getBackground().setType(BackgroundType.OwnBackground)

    #  新增節至簡報
    presentation.getSections().addSection("Section 2", slide)

    #  新增 SummaryZoomFrame 物件
    summary_zoom_frame = presentation.getSlides().get_Item(0).getShapes().addSummaryZoomFrame(150, 50, 300, 200)

    # 新增投影片至簡報
    slide = presentation.getSlides().addEmptySlide(presentation.getSlides().get_Item(0).getLayoutSlide())
    slide.getBackground().getFillFormat().setFillType(FillType.Solid)
    slide.getBackground().getFillFormat().getSolidFillColor().setColor(Color.magenta)
    slide.getBackground().setType(BackgroundType.OwnBackground)

    #  新增節至簡報
    third_section = presentation.getSections().addSection("Section 3", slide)

    #  為 Summary Zoom 新增節
    summary_zoom_frame.getSummaryZoomCollection().addSummaryZoomSection(third_section)

    #  從 Summary Zoom 移除節
    summary_zoom_frame.getSummaryZoomCollection().removeSummaryZoomSection(presentation.getSections().get_Item(1))

    #  儲存簡報
    presentation.save("presentation.pptx", SaveFormat.Pptx)
finally:
    presentation.dispose()
格式化概覽縮放節
若要建立更複雜的概覽縮放節物件,您必須變更簡單框格的格式。您可以對概覽縮放節物件套用多種格式化選項。
您可以使用以下方式在概覽縮放框格中控制概覽縮放節物件的格式:
- 建立 Presentation 類別的實例。
- 為建立的投影片建立顯眼的背景與新節。
- 將概覽縮放框格加入第一張投影片。
- 從 SummaryZoomSectionCollection 取得第一個概覽縮放節物件。
- 透過將影像加入與 Presentation 物件相關聯的影像集合,建立 PPImage 物件,以填充框格。
- 為概覽縮放節物件設定自訂影像。
- 設定從連結的節返回原始投影片的功能。
- 變更概覽縮放節物件的線條格式。
- 變更過渡持續時間。
- 將修改後的簡報寫入為 PPTX 檔案。
以下 Python 程式碼示範如何變更概覽縮放節物件的格式:
import jpype
import asposeslides

if not jpype.isJVMStarted():
    jpype.startJVM()

from asposeslides.api import BackgroundType, FillType, Images, LineDashStyle, Presentation, SaveFormat
from java.awt import Color

presentation = Presentation()
try:
    # 新增投影片至簡報
    slide = presentation.getSlides().addEmptySlide(presentation.getSlides().get_Item(0).getLayoutSlide())
    slide.getBackground().getFillFormat().setFillType(FillType.Solid)
    slide.getBackground().getFillFormat().getSolidFillColor().setColor(Color.gray)
    slide.getBackground().setType(BackgroundType.OwnBackground)

    #  新增節至簡報
    presentation.getSections().addSection("Section 1", slide)

    # 新增投影片至簡報
    slide = presentation.getSlides().addEmptySlide(presentation.getSlides().get_Item(0).getLayoutSlide())
    slide.getBackground().getFillFormat().setFillType(FillType.Solid)
    slide.getBackground().getFillFormat().getSolidFillColor().setColor(Color.cyan)
    slide.getBackground().setType(BackgroundType.OwnBackground)

    #  新增節至簡報
    presentation.getSections().addSection("Section 2", slide)

    #  新增 SummaryZoomFrame 物件
    summary_zoom_frame = presentation.getSlides().get_Item(0).getShapes().addSummaryZoomFrame(150, 50, 300, 200)

    #  取得第一個 SummaryZoomSection 物件
    summary_section = summary_zoom_frame.getSummaryZoomCollection().get_Item(0)

    #  SummaryZoomSection 物件的格式設定
    image = Images.fromFile("image.png")
    try:
        picture = presentation.getImages().addImage(image)
    finally:
        image.dispose()
    summary_section.setZoomImage(picture)

    summary_section.setReturnToParent(False)

    summary_section.getLineFormat().getFillFormat().setFillType(FillType.Solid)
    summary_section.getLineFormat().getFillFormat().getSolidFillColor().setColor(Color.black)
    summary_section.getLineFormat().setDashStyle(LineDashStyle.DashDot)
    summary_section.getLineFormat().setWidth(1.5)

    summary_section.setTransitionDuration(1.5)

    #  儲存簡報
    presentation.save("presentation.pptx", SaveFormat.Pptx)
finally:
    presentation.dispose()
常見問題
顯示目標後,我可以控制是否返回「父」投影片嗎?
可以。ZoomFrame 或 SectionZoomFrame 支援透過 setReturnToParent 讓觀眾在造訪目標內容後返回原始投影片。
我可以調整縮放過渡的「速度」或持續時間嗎?
可以。縮放支援使用 setTransitionDuration 設定過渡持續時間,讓您控制跳轉動畫的長度。
簡報中可以包含多少個縮放物件有限制嗎?
目前文件未列出硬性 API 限制。實際限制取決於簡報的整體複雜度與觀眾的效能。您可以新增許多縮放框格,但仍需考量檔案大小與渲染時間。