
Python via Java でプレゼンテーションズームを管理する
イントロダクション
PowerPoint のズーム機能を使用すると、プレゼンテーションの特定のスライド、セクション、領域間を行き来できます。プレゼンテーション中に、コンテンツを素早くナビゲートできるこの機能は非常に便利です。
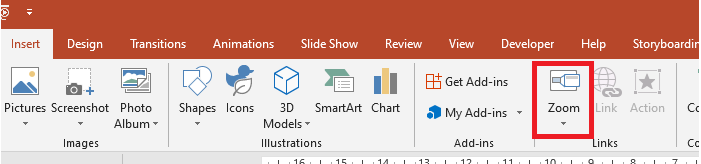
- プレゼンテーション全体を 1 枚のスライドに要約するには、Summary Zoom を使用します。
- 選択したスライドのみを表示するには、Slide Zoom を使用します。
- 単一のセクションのみを表示するには、Section Zoom を使用します。
スライドズーム
スライドズームを使用すると、プレゼンテーションの流れを中断せずに任意の順序でスライド間を自由に移動でき、プレゼンテーションをよりダイナミックにできます。スライドズームは、セクションが少ない短いプレゼンテーションに最適ですが、さまざまなシナリオで使用できます。
スライドズームは、単一のキャンバス上にいるような感覚で複数の情報にドリルダウンできるようにします。
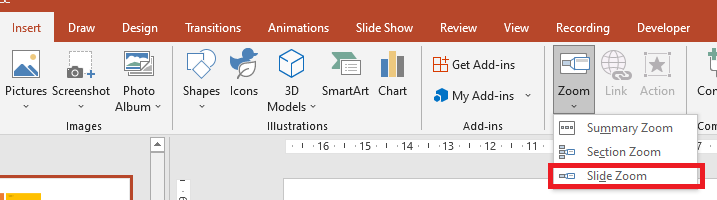
スライドズーム オブジェクトについては、Aspose.Slides が ZoomImageType 列挙型、ZoomFrame クラス、および ShapeCollection クラスのいくつかのメソッドを提供しています。
ズームフレームの作成
ズームフレームをスライドに追加する手順は次のとおりです。
- 【Presentation】クラスのインスタンスを作成します。
- ズームフレームをリンクしたい新しいスライドを作成します。
- 作成したスライドに識別用テキストと背景を追加します。
- 最初のスライドにズームフレーム(作成したスライドへの参照を含む)を追加します。
- 変更したプレゼンテーションを書き出して PPTX ファイルに保存します。
import jpype
import asposeslides

if not jpype.isJVMStarted():
    jpype.startJVM()

from asposeslides.api import BackgroundType, FillType, Presentation, SaveFormat, ShapeType
from java.awt import Color

presentation = Presentation()
try:
    # プレゼンテーションに新しいスライドを追加します
    second_slide = presentation.getSlides().addEmptySlide(presentation.getSlides().get_Item(0).getLayoutSlide())
    third_slide = presentation.getSlides().addEmptySlide(presentation.getSlides().get_Item(0).getLayoutSlide())

    #  2 番目のスライドの背景を作成します
    second_slide.getBackground().setType(BackgroundType.OwnBackground)
    second_slide.getBackground().getFillFormat().setFillType(FillType.Solid)
    second_slide.getBackground().getFillFormat().getSolidFillColor().setColor(Color.cyan)

    #  2 番目のスライド用のテキストボックスを作成します
    auto_shape = second_slide.getShapes().addAutoShape(ShapeType.Rectangle, 100, 200, 500, 200)
    auto_shape.getTextFrame().setText("Second Slide")

    #  3 番目のスライドの背景を作成します
    third_slide.getBackground().setType(BackgroundType.OwnBackground)
    third_slide.getBackground().getFillFormat().setFillType(FillType.Solid)
    third_slide.getBackground().getFillFormat().getSolidFillColor().setColor(Color.darkGray)

    #  3 番目のスライド用のテキストボックスを作成します
    auto_shape = third_slide.getShapes().addAutoShape(ShapeType.Rectangle, 100, 200, 500, 200)
    auto_shape.getTextFrame().setText("Third Slide")

    # ZoomFrame オブジェクトを追加します
    presentation.getSlides().get_Item(0).getShapes().addZoomFrame(20, 20, 250, 200, second_slide)
    presentation.getSlides().get_Item(0).getShapes().addZoomFrame(200, 250, 250, 200, third_slide)

    #  プレゼンテーションを保存します
    presentation.save("presentation.pptx", SaveFormat.Pptx)
finally:
    presentation.dispose()
カスタム画像付きズームフレームの作成
Aspose.Slides for Python via Java を使用すると、異なるスライドプレビュー画像を持つズームフレームを次のように作成できます。
- 【Presentation】クラスのインスタンスを作成します。
- ズームフレームをリンクしたい新しいスライドを作成します。
- スライドに識別用テキストと背景を追加します。
- 【Presentation】オブジェクトに関連付けられた画像コレクションに画像を追加して、PPImage オブジェクトを作成し、フレームの塗りつぶしに使用します。
- 最初のスライドにズームフレーム(作成したスライドへの参照を含む)を追加します。
- 変更したプレゼンテーションを書き出して PPTX ファイルに保存します。
import jpype
import asposeslides

if not jpype.isJVMStarted():
    jpype.startJVM()

from asposeslides.api import BackgroundType, FillType, Images, Presentation, SaveFormat, ShapeType
from java.awt import Color

presentation = Presentation()
try:
    # プレゼンテーションに新しいスライドを追加します
    slide = presentation.getSlides().addEmptySlide(presentation.getSlides().get_Item(0).getLayoutSlide())

    #  2 番目のスライドの背景を作成します
    slide.getBackground().setType(BackgroundType.OwnBackground)
    slide.getBackground().getFillFormat().setFillType(FillType.Solid)
    slide.getBackground().getFillFormat().getSolidFillColor().setColor(Color.cyan)

    #  2 番目のスライド用のテキストボックスを作成します
    auto_shape = slide.getShapes().addAutoShape(ShapeType.Rectangle, 100, 200, 500, 200)
    auto_shape.getTextFrame().setText("Second Slide")

    #  ズームオブジェクト用の新しい画像を作成します
    image = Images.fromFile("image.png")
    try:
        picture = presentation.getImages().addImage(image)
    finally:
        image.dispose()

    # ZoomFrame オブジェクトを追加します
    presentation.getSlides().get_Item(0).getShapes().addZoomFrame(20, 20, 300, 200, slide, picture)

    #  プレゼンテーションを保存します
    presentation.save("presentation.pptx", SaveFormat.Pptx)
finally:
    presentation.dispose()
ズームフレームの書式設定
前のセクションでは、シンプルなズームフレームの作成方法を示しました。より複雑なズームフレームを作成するには、シンプルなフレームの書式設定を変更する必要があります。ズームフレームに適用できる書式設定オプションは複数あります。
ズームフレームの書式設定を行う手順は次のとおりです。
- 【Presentation】クラスのインスタンスを作成します。
- ズームフレームをリンクしたい新しいスライドを作成します。
- 作成したスライドに識別用テキストと背景を追加します。
- 最初のスライドにズームフレーム(作成したスライドへの参照を含む)を追加します。
- 【Presentation】オブジェクトに関連付けられた画像コレクションに画像を追加して、[PPImage] オブジェクトを作成し、フレームの塗りつぶしに使用します。
- 最初のズームフレームオブジェクトにカスタム画像を設定します。
- 2 番目のズームフレームオブジェクトの線の書式を変更します。
- 2 番目のズームフレームオブジェクトの画像から背景を削除します。
- 変更したプレゼンテーションを書き出して PPTX ファイルに保存します。
import jpype
import asposeslides

if not jpype.isJVMStarted():
    jpype.startJVM()

from asposeslides.api import BackgroundType, FillType, Images, LineDashStyle, Presentation, SaveFormat, ShapeType
from java.awt import Color

presentation = Presentation()
try:
    # プレゼンテーションに新しいスライドを追加します
    second_slide = presentation.getSlides().addEmptySlide(presentation.getSlides().get_Item(0).getLayoutSlide())
    third_slide = presentation.getSlides().addEmptySlide(presentation.getSlides().get_Item(0).getLayoutSlide())

    #  2 番目のスライドの背景を作成します
    second_slide.getBackground().setType(BackgroundType.OwnBackground)
    second_slide.getBackground().getFillFormat().setFillType(FillType.Solid)
    second_slide.getBackground().getFillFormat().getSolidFillColor().setColor(Color.cyan)

    #  2 番目のスライド用のテキストボックスを作成します
    auto_shape = second_slide.getShapes().addAutoShape(ShapeType.Rectangle, 100, 200, 500, 200)
    auto_shape.getTextFrame().setText("Second Slide")

    #  3 番目のスライドの背景を作成します
    third_slide.getBackground().setType(BackgroundType.OwnBackground)
    third_slide.getBackground().getFillFormat().setFillType(FillType.Solid)
    third_slide.getBackground().getFillFormat().getSolidFillColor().setColor(Color.darkGray)

    #  3 番目のスライド用のテキストボックスを作成します
    auto_shape = third_slide.getShapes().addAutoShape(ShapeType.Rectangle, 100, 200, 500, 200)
    auto_shape.getTextFrame().setText("Third Slide")

    # ZoomFrame オブジェクトを追加します
    first_zoom_frame = presentation.getSlides().get_Item(0).getShapes().addZoomFrame(20, 20, 250, 200, second_slide)
    second_zoom_frame = presentation.getSlides().get_Item(0).getShapes().addZoomFrame(200, 250, 250, 200, third_slide)

    #  ズームオブジェクト用の新しい画像を作成します
    image = Images.fromFile("image.png")
    try:
        picture = presentation.getImages().addImage(image)
    finally:
        image.dispose()

    #  first_zoom_frame オブジェクトにカスタム画像を設定します
    first_zoom_frame.setZoomImage(picture)

    #  second_zoom_frame オブジェクトのズームフレーム書式を設定します
    second_zoom_frame.getLineFormat().setWidth(5)
    second_zoom_frame.getLineFormat().getFillFormat().setFillType(FillType.Solid)
    second_zoom_frame.getLineFormat().getFillFormat().getSolidFillColor().setColor(Color.pink)
    second_zoom_frame.getLineFormat().setDashStyle(LineDashStyle.DashDot)

    #  second_zoom_frame オブジェクトの背景を表示しない設定
    second_zoom_frame.setShowBackground(False)

    #  プレゼンテーションを保存します
    presentation.save("presentation.pptx", SaveFormat.Pptx)
finally:
    presentation.dispose()
セクションズーム
セクションズームは、プレゼンテーション内のセクションへのリンクです。強調したいセクションへ戻るためや、プレゼンテーションの各部品がどのように結びつくかを示すために使用できます。
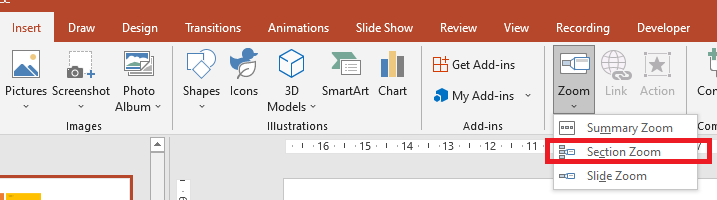
セクションズーム オブジェクトについては、Aspose.Slides が SectionZoomFrame クラスと、ShapeCollection クラスのいくつかのメソッドを提供しています。
セクションズームフレームの作成
セクションズームフレームをスライドに追加する手順は次のとおりです。
- 【Presentation】クラスのインスタンスを作成します。
- 新しいスライドを作成します。
- 作成したスライドに特徴的な背景を追加します。
- ズームフレームをリンクしたい新しいセクションを作成します。
- 最初のスライドにセクションズームフレーム(作成したセクションへの参照を含む)を追加します。
- 変更したプレゼンテーションを書き出して PPTX ファイルに保存します。
import jpype
import asposeslides

if not jpype.isJVMStarted():
    jpype.startJVM()

from asposeslides.api import BackgroundType, FillType, Presentation, SaveFormat
from java.awt import Color

presentation = Presentation()
try:
    # プレゼンテーションに新しいスライドを追加します
    slide = presentation.getSlides().addEmptySlide(presentation.getSlides().get_Item(0).getLayoutSlide())
    slide.getBackground().getFillFormat().setFillType(FillType.Solid)
    slide.getBackground().getFillFormat().getSolidFillColor().setColor(Color.yellow)
    slide.getBackground().setType(BackgroundType.OwnBackground)

    #  新しいセクションをプレゼンテーションに追加します
    presentation.getSections().addSection("Section 1", slide)

    #  セクションズームフレームオブジェクトを追加します
    section_zoom_frame = presentation.getSlides().get_Item(0).getShapes().addSectionZoomFrame(20, 20, 300, 200, presentation.getSections().get_Item(1))

    #  プレゼンテーションを保存します
    presentation.save("presentation.pptx", SaveFormat.Pptx)
finally:
    presentation.dispose()
カスタム画像付きセクションズームフレームの作成
Aspose.Slides for Python via Java を使用すると、異なるスライドプレビュー画像を持つセクションズームフレームを次のように作成できます。
- 【Presentation】クラスのインスタンスを作成します。
- 新しいスライドを作成します。
- 作成したスライドに特徴的な背景を追加します。
- ズームフレームをリンクしたい新しいセクションを作成します。
- 【Presentation】オブジェクトに関連付けられた画像コレションに画像を追加して、[PPImage] オブジェクトを作成し、フレームの塗りつぶしに使用します。
- 最初のスライドにセクションズームフレーム(作成したセクションへの参照を含む)を追加します。
- 変更したプレゼンテーションを書き出して PPTX ファイルに保存します。
import jpype
import asposeslides

if not jpype.isJVMStarted():
    jpype.startJVM()

from asposeslides.api import BackgroundType, FillType, Images, Presentation, SaveFormat
from java.awt import Color

presentation = Presentation()
try:
    # プレゼンテーションに新しいスライドを追加します
    slide = presentation.getSlides().addEmptySlide(presentation.getSlides().get_Item(0).getLayoutSlide())
    slide.getBackground().getFillFormat().setFillType(FillType.Solid)
    slide.getBackground().getFillFormat().getSolidFillColor().setColor(Color.yellow)
    slide.getBackground().setType(BackgroundType.OwnBackground)

    #  プレゼンテーションに新しいセクションを追加します
    presentation.getSections().addSection("Section 1", slide)

    #  ズームオブジェクト用の新しい画像を作成します
    image = Images.fromFile("image.png")
    try:
        picture = presentation.getImages().addImage(image)
    finally:
        image.dispose()

    #  SectionZoomFrame オブジェクトを追加します
    section_zoom_frame = presentation.getSlides().get_Item(0).getShapes().addSectionZoomFrame(20, 20, 300, 200, presentation.getSections().get_Item(1), picture)

    #  プレゼンテーションを保存します
    presentation.save("presentation.pptx", SaveFormat.Pptx)
finally:
    presentation.dispose()
セクションズームフレームの書式設定
より複雑なセクションズームフレームを作成するには、シンプルなフレームの書式設定を変更する必要があります。セクションズームフレームに適用できる書式設定オプションは複数あります。
セクションズームフレームの書式設定を行う手順は次のとおりです。
- 【Presentation】クラスのインスタンスを作成します。
- 新しいスライドを作成します。
- 作成したスライドに特徴的な背景を追加します。
- ズームフレームをリンクしたい新しいセクションを作成します。
- 最初のスライドにセクションズームフレーム(作成したセクションへの参照を含む)を追加します。
- 作成したセクションズームオブジェクトのサイズと位置を変更します。
- 【Presentation】オブジェクトに関連付けられた画像コレクションに画像を追加して、[PPImage] オブジェクトを作成し、フレームの塗りつぶしに使用します。
- 作成したセクションズームフレームオブジェクトにカスタム画像を設定します。
- リンクされたセクションから元のスライドに戻る機能を設定します。
- セクションズームフレームオブジェクトの画像から背景を削除します。
- セクションズームフレームオブジェクトの線の書式を変更します。
- トランジションの時間を変更します。
- 変更したプレゼンテーションを書き出して PPTX ファイルに保存します。
import jpype
import asposeslides

if not jpype.isJVMStarted():
    jpype.startJVM()

from asposeslides.api import BackgroundType, FillType, Images, LineDashStyle, Presentation, SaveFormat
from java.awt import Color

presentation = Presentation()
try:
    # プレゼンテーションに新しいスライドを追加します
    slide = presentation.getSlides().addEmptySlide(presentation.getSlides().get_Item(0).getLayoutSlide())
    slide.getBackground().getFillFormat().setFillType(FillType.Solid)
    slide.getBackground().getFillFormat().getSolidFillColor().setColor(Color.yellow)
    slide.getBackground().setType(BackgroundType.OwnBackground)

    #  プレゼンテーションに新しいセクションを追加します
    presentation.getSections().addSection("Section 1", slide)

    #  SectionZoomFrame オブジェクトを追加します
    section_zoom_frame = presentation.getSlides().get_Item(0).getShapes().addSectionZoomFrame(20, 20, 300, 200, presentation.getSections().get_Item(1))

    #  SectionZoomFrame の書式設定
    section_zoom_frame.setX(100)
    section_zoom_frame.setY(300)
    section_zoom_frame.setWidth(100)
    section_zoom_frame.setHeight(75)

    image = Images.fromFile("image.png")
    try:
        picture = presentation.getImages().addImage(image)
    finally:
        image.dispose()
    section_zoom_frame.setZoomImage(picture)

    section_zoom_frame.setReturnToParent(True)
    section_zoom_frame.setShowBackground(False)

    section_zoom_frame.getLineFormat().getFillFormat().setFillType(FillType.Solid)
    section_zoom_frame.getLineFormat().getFillFormat().getSolidFillColor().setColor(Color.gray)
    section_zoom_frame.getLineFormat().setDashStyle(LineDashStyle.DashDot)
    section_zoom_frame.getLineFormat().setWidth(2.5)

    section_zoom_frame.setTransitionDuration(1.5)

    #  プレゼンテーションを保存します
    presentation.save("presentation.pptx", SaveFormat.Pptx)
finally:
    presentation.dispose()
サマリーズーム
サマリーズームは、プレゼンテーションのすべての要素を一度に表示するランディングページのようなものです。プレゼンテーション中に、好きな順序で任意の場所へジャンプしたり、スキップしたり、再訪したりでき、流れを中断せずにスライドショーを操作できます。
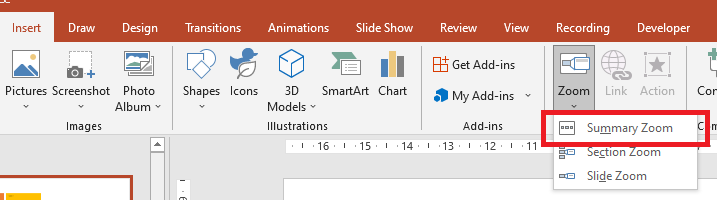
サマリーズーム オブジェクトについては、Aspose.Slides が SummaryZoomFrame、SummaryZoomSection、SummaryZoomSectionCollection クラスと、ShapeCollection クラスのいくつかのメソッドを提供しています。
サマリーズームの作成
サマリーズームフレームをスライドに追加する手順は次のとおりです。
- 【Presentation】クラスのインスタンスを作成します。
- 作成したスライドに特徴的な背景と新しいセクションを設定して新しいスライドを作成します。
- 最初のスライドにサマリーズームフレームを追加します。
- 変更したプレゼンテーションを書き出して PPTX ファイルに保存します。
import jpype
import asposeslides

if not jpype.isJVMStarted():
    jpype.startJVM()

from asposeslides.api import BackgroundType, FillType, Presentation, SaveFormat
from java.awt import Color

presentation = Presentation()
try:
    # プレゼンテーションに新しいスライドを追加します
    slide = presentation.getSlides().addEmptySlide(presentation.getSlides().get_Item(0).getLayoutSlide())
    slide.getBackground().getFillFormat().setFillType(FillType.Solid)
    slide.getBackground().getFillFormat().getSolidFillColor().setColor(Color.gray)
    slide.getBackground().setType(BackgroundType.OwnBackground)

    #  プレゼンテーションに新しいセクションを追加します
    presentation.getSections().addSection("Section 1", slide)

    # プレゼンテーションに新しいスライドを追加します
    slide = presentation.getSlides().addEmptySlide(presentation.getSlides().get_Item(0).getLayoutSlide())
    slide.getBackground().getFillFormat().setFillType(FillType.Solid)
    slide.getBackground().getFillFormat().getSolidFillColor().setColor(Color.cyan)
    slide.getBackground().setType(BackgroundType.OwnBackground)

    #  プレゼンテーションに新しいセクションを追加します
    presentation.getSections().addSection("Section 2", slide)

    # プレゼンテーションに新しいスライドを追加します
    slide = presentation.getSlides().addEmptySlide(presentation.getSlides().get_Item(0).getLayoutSlide())
    slide.getBackground().getFillFormat().setFillType(FillType.Solid)
    slide.getBackground().getFillFormat().getSolidFillColor().setColor(Color.magenta)
    slide.getBackground().setType(BackgroundType.OwnBackground)

    #  プレゼンテーションに新しいセクションを追加します
    presentation.getSections().addSection("Section 3", slide)

    # プレゼンテーションに新しいスライドを追加します
    slide = presentation.getSlides().addEmptySlide(presentation.getSlides().get_Item(0).getLayoutSlide())
    slide.getBackground().getFillFormat().setFillType(FillType.Solid)
    slide.getBackground().getFillFormat().getSolidFillColor().setColor(Color.green)
    slide.getBackground().setType(BackgroundType.OwnBackground)

    #  プレゼンテーションに新しいセクションを追加します
    presentation.getSections().addSection("Section 4", slide)

    #  SummaryZoomFrame オブジェクトを追加します
    summary_zoom_frame = presentation.getSlides().get_Item(0).getShapes().addSummaryZoomFrame(150, 50, 300, 200)

    #  プレゼンテーションを保存します
    presentation.save("presentation.pptx", SaveFormat.Pptx)
finally:
    presentation.dispose()
サマリーズームセクションの追加と削除
サマリーズームフレーム内のすべてのセクションは [SummaryZoomSection] オブジェクトで表され、[SummaryZoomSectionCollection] に格納されます。これらのオブジェクトは [SummaryZoomSectionCollection] クラスを通じて追加または削除できます。
- 【Presentation】クラスのインスタンスを作成します。
- 作成したスライドに特徴的な背景と新しいセクションを設定して新しいスライドを作成します。
- 最初のスライドにサマリーズームフレームを追加します。
- プレゼンテーションに新しいスライドとセクションを追加します。
- 作成したセクションをサマリーズームフレームに追加します。
- サマリーズームフレームから最初のセクションを削除します。
- 変更したプレゼンテーションを書き出して PPTX ファイルに保存します。
import jpapi
import asposeslides

if not jpype.isJVMStarted():
    jpype.startJVM()

from asposeslides.api import BackgroundType, FillType, Presentation, SaveFormat
from java.awt import Color

presentation = Presentation()
try:
    # プレゼンテーションに新しいスライドを追加します
    slide = presentation.getSlides().addEmptySlide(presentation.getSlides().get_Item(0).getLayoutSlide())
    slide.getBackground().getFillFormat().setFillType(FillType.Solid)
    slide.getBackground().getFillFormat().getSolidFillColor().setColor(Color.gray)
    slide.getBackground().setType(BackgroundType.OwnBackground)

    #  プレゼンテーションに新しいセクションを追加します
    presentation.getSections().addSection("Section 1", slide)

    # プレゼンテーションに新しいスライドを追加します
    slide = presentation.getSlides().addEmptySlide(presentation.getSlides().get_Item(0).getLayoutSlide())
    slide.getBackground().getFillFormat().setFillType(FillType.Solid)
    slide.getBackground().getFillFormat().getSolidFillColor().setColor(Color.cyan)
    slide.getBackground().setType(BackgroundType.OwnBackground)

    #  プレゼンテーションに新しいセクションを追加します
    presentation.getSections().addSection("Section 2", slide)

    #  SummaryZoomFrame オブジェクトを追加します
    summary_zoom_frame = presentation.getSlides().get_Item(0).getShapes().addSummaryZoomFrame(150, 50, 300, 200)

    # プレゼンテーションに新しいスライドを追加します
    slide = presentation.getSlides().addEmptySlide(presentation.getSlides().get_Item(0).getLayoutSlide())
    slide.getBackground().getFillFormat().setFillType(FillType.Solid)
    slide.getBackground().getFillFormat().getSolidFillColor().setColor(Color.magenta)
    slide.getBackground().setType(BackgroundType.OwnBackground)

    #  プレゼンテーションに新しいセクションを追加します
    third_section = presentation.getSections().addSection("Section 3", slide)

    #  Summary Zoom にセクションを追加します
    summary_zoom_frame.getSummaryZoomCollection().addSummaryZoomSection(third_section)

    #  Summary Zoom からセクションを削除します
    summary_zoom_frame.getSummaryZoomCollection().removeSummaryZoomSection(presentation.getSections().get_Item(1))

    #  プレゼンテーションを保存します
    presentation.save("presentation.pptx", SaveFormat.Pptx)
finally:
    presentation.dispose()
サマリーズームセクションの書式設定
より複雑なサマリーズームセクションオブジェクトを作成するには、シンプルなフレームの書式設定を変更する必要があります。サマリーズームセクションオブジェクトに適用できる書式設定オプションは複数あります。
サマリーズームフレーム内のサマリーズームセクションオブジェクトの書式設定を行う手順は次のとおりです。
- 【Presentation】クラスのインスタンスを作成します。
- 作成したスライドに特徴的な背景と新しいセクションを設定して新しいスライドを作成します。
- 最初のスライドにサマリーズームフレームを追加します。
- [SummaryZoomSectionCollection] から最初のサマリーズームセクションオブジェクトを取得します。
- 【Presentation】オブジェクトに関連付けられた画像コレクションに画像を追加して、[PPImage] オブジェクトを作成し、フレームの塗りつぶしに使用します。
- サマリーズームセクションオブジェクトにカスタム画像を設定します。
- リンクされたセクションから元のスライドに戻る機能を設定します。
- サマリーズームセクションオブジェクトの線の書式を変更します。
- トランジションの時間を変更します。
- 変更したプレゼンテーションを書き出して PPTX ファイルに保存します。
import jpype
import asposeslides

if not jpype.isJVMStarted():
    jpype.startJVM()

from asposeslides.api import BackgroundType, FillType, Images, LineDashStyle, Presentation, SaveFormat
from java.awt import Color

presentation = Presentation()
try:
    # プレゼンテーションに新しいスライドを追加します
    slide = presentation.getSlides().addEmptySlide(presentation.getSlides().get_Item(0).getLayoutSlide())
    slide.getBackground().getFillFormat().setFillType(FillType.Solid)
    slide.getBackground().getFillFormat().getSolidFillColor().setColor(Color.gray)
    slide.getBackground().setType(BackgroundType.OwnBackground)

    #  プレゼンテーションに新しいセクションを追加します
    presentation.getSections().addSection("Section 1", slide)

    # プレゼンテーションに新しいスライドを追加します
    slide = presentation.getSlides().addEmptySlide(presentation.getSlides().get_Item(0).getLayoutSlide())
    slide.getBackground().getFillFormat().setFillType(FillType.Solid)
    slide.getBackground().getFillFormat().getSolidFillColor().setColor(Color.cyan)
    slide.getBackground().setType(BackgroundType.OwnBackground)

    #  プレゼンテーションに新しいセクションを追加します
    presentation.getSections().addSection("Section 2", slide)

    #  SummaryZoomFrame オブジェクトを追加します
    summary_zoom_frame = presentation.getSlides().get_Item(0).getShapes().addSummaryZoomFrame(150, 5, 300, 200)

    #  最初の SummaryZoomSection オブジェクトを取得します
    summary_section = summary_zoom_frame.getSummaryZoomCollection().get_Item(0)

    #  SummaryZoomSection オブジェクトの書式設定
    image = Images.fromFile("image.png")
    try:
        picture = presentation.getImages().addImage(image)
    finally:
        image.dispose()
    summary_section.setZoomImage(picture)

    summary_section.setReturnToParent(False)

    summary_section.getLineFormat().getFillFormat().setFillType(FillType.Solid)
    summary_section.getLineFormat().getFillFormat().getSolidFillColor().setColor(Color.black)
    summary_section.getLineFormat().setDashStyle(LineDashStyle.DashDot)
    summary_section.getLineFormat().setWidth(1.5)

    summary_section.setTransitionDuration(1.5)

    #  プレゼンテーションを保存します
    presentation.save("presentation.pptx", SaveFormat.Pptx)
finally:
    presentation.dispose()
FAQ
対象を表示した後、元の(親)スライドに戻ることを制御できますか?
はい。ZoomFrame または SectionZoomFrame は、setReturnToParent によって元のスライドに戻る機能をサポートしており、有効にすると視聴者は対象コンテンツの表示後に元のスライドに戻ります。
ズームトランジションの「速度」や期間を調整できますか?
はい。Zoom は setTransitionDuration でトランジション時間を設定できるため、ジャンプアニメーションの長さを制御できます。
プレゼンテーションに含められるズームオブジェクトの数に制限はありますか?
公式に文書化されたハードな API 制限はありません。実際の制限はプレゼンテーション全体の複雑さやビューアのパフォーマンスに依存します。多数のズームフレームを追加できますが、ファイルサイズやレンダリング時間を考慮してください。