
จัดการการซูมของการนำเสนอใน Python ผ่าน Java
บทนำ
Zooms ใน PowerPoint ช่วยให้คุณกระ跳ไปยังสไลด์ ส่วนต่าง ๆ และส่วนของการนำเสนอได้อย่างรวดเร็ว เมื่อคุณกำลังนำเสนอ ความสามารถในการนำทางอย่างรวดเร็วนี้อาจเป็นประโยชน์อย่างมาก
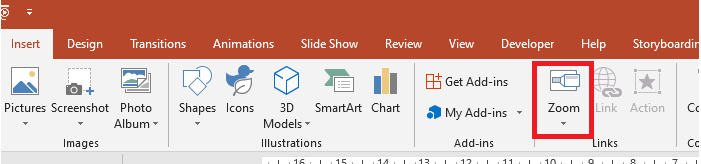
- เพื่อสรุปการนำเสนอทั้งหมดในสไลด์เดียว ให้ใช้ Summary Zoom.
- เพื่อแสดงเฉพาะสไลด์ที่เลือก ให้ใช้ Slide Zoom.
- เพื่อแสดงเฉพาะส่วนเดียว ให้ใช้ Section Zoom.
Slide Zoom
สไลด์ซูมสามารถทำให้การนำเสนอของคุณมีความไดนามิกมากขึ้น โดยให้คุณนำทางระหว่างสไลด์ได้อย่างอิสระในลำดับที่ต้องการโดยไม่ทำให้การนำเสนอหยุดชะงัก สไลด์ซูมเหมาะกับการนำเสนอสั้น ๆ ที่ไม่มีหลายส่วน แต่คุณก็ยังสามารถใช้ได้ในสถานการณ์การนำเสนอที่แตกต่างกัน
สไลด์ซูมช่วยให้คุณเจาะลึกข้อมูลหลายส่วนในขณะที่รู้สึกเหมือนอยู่บนผืนผ้าเดียว
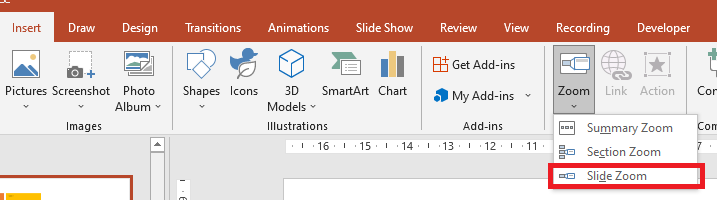
สำหรับวัตถุสไลด์ซูม Aspose.Slides มี enumeration ZoomImageType, คลาส ZoomFrame และบางเมธอดในคลาส ShapeCollection
สร้างเฟรมซูม
คุณสามารถเพิ่มเฟรมซูมบนสไลด์ได้ดังนี้
- สร้างอินสแตนซ์ของคลาส Presentation.
- สร้างสไลด์ใหม่ที่คุณต้องการเชื่อมโยงกับเฟรมซูม
- เพิ่มข้อความระบุตัวตนและพื้นหลังให้กับสไลด์ที่สร้าง
- เพิ่มเฟรมซูม (ซึ่งอ้างอิงสไลด์ที่สร้าง) ไปยังสไลด์แรก
- บันทึกการนำเสนอที่แก้ไขเป็นไฟล์ PPTX
โค้ด Python นี้แสดงวิธีสร้างเฟรมซูมบนสไลด์:
import jpype
import asposeslides

if not jpype.isJVMStarted():
    jpype.startJVM()

from asposeslides.api import BackgroundType, FillType, Presentation, SaveFormat, ShapeType
from java.awt import Color

presentation = Presentation()
try:
    # เพิ่มสไลด์ใหม่ลงในงานนำเสนอ
    second_slide = presentation.getSlides().addEmptySlide(presentation.getSlides().get_Item(0).getLayoutSlide())
    third_slide = presentation.getSlides().addEmptySlide(presentation.getSlides().get_Item(0).getLayoutSlide())

    #  สร้างพื้นหลังสำหรับสไลด์ที่สอง
    second_slide.getBackground().setType(BackgroundType.OwnBackground)
    second_slide.getBackground().getFillFormat().setFillType(FillType.Solid)
    second_slide.getBackground().getFillFormat().getSolidFillColor().setColor(Color.cyan)

    #  สร้างกล่องข้อความสำหรับสไลด์ที่สอง
    auto_shape = second_slide.getShapes().addAutoShape(ShapeType.Rectangle, 100, 200, 500, 200)
    auto_shape.getTextFrame().setText("Second Slide")

    #  สร้างพื้นหลังสำหรับสไลด์ที่สาม
    third_slide.getBackground().setType(BackgroundType.OwnBackground)
    third_slide.getBackground().getFillFormat().setFillType(FillType.Solid)
    third_slide.getBackground().getFillFormat().getSolidFillColor().setColor(Color.darkGray)

    #  สร้างกล่องข้อความสำหรับสไลด์ที่สาม
    auto_shape = third_slide.getShapes().addAutoShape(ShapeType.Rectangle, 100, 200, 500, 200)
    auto_shape.getTextFrame().setText("Third Slide")

    # เพิ่มอ็อบเจกต์ ZoomFrame
    presentation.getSlides().get_Item(0).getShapes().addZoomFrame(20, 20, 250, 200, second_slide)
    presentation.getSlides().get_Item(0).getShapes().addZoomFrame(200, 250, 250, 200, third_slide)

    #  บันทึกงานนำเสนอ
    presentation.save("presentation.pptx", SaveFormat.Pptx)
finally:
    presentation.dispose()
สร้างเฟรมซูมด้วยรูปภาพที่กำหนดเอง
ด้วย Aspose.Slides for Python via Java คุณสามารถสร้างเฟรมซูมที่มีภาพตัวอย่างสไลด์ต่างออกไปได้ดังนี้
- สร้างอินสแตนซ์ของคลาส Presentation.
- สร้างสไลด์ใหม่ที่คุณต้องการเชื่อมโยงกับเฟรมซูม
- เพิ่มข้อความระบุตัวตนและพื้นหลังให้กับสไลด์
- สร้างออบเจ็กต์ PPImage โดยเพิ่มรูปภาพเข้าไปในคอลเลกชัน images ที่เชื่อมกับออบเจ็กต์ Presentation เพื่อใช้เติมเฟรม
- เพิ่มเฟรมซูม (ซึ่งอ้างอิงสไลด์ที่สร้าง) ไปยังสไลด์แรก
- บันทึกการนำเสนอที่แก้ไขเป็นไฟล์ PPTX
โค้ด Python นี้แสดงวิธีสร้างเฟรมซูมที่มีรูปภาพต่างออกไป:
import jpype
import asposeslides

if not jpype.isJVMStarted():
    jpype.startJVM()

from asposeslides.api import BackgroundType, FillType, Images, Presentation, SaveFormat, ShapeType
from java.awt import Color

presentation = Presentation()
try:
    # เพิ่มสไลด์ใหม่ลงในงานนำเสนอ
    slide = presentation.getSlides().addEmptySlide(presentation.getSlides().get_Item(0).getLayoutSlide())

    #  สร้างพื้นหลังสำหรับสไลด์ที่สอง
    slide.getBackground().setType(BackgroundType.OwnBackground)
    slide.getBackground().getFillFormat().setFillType(FillType.Solid)
    slide.getBackground().getFillFormat().getSolidFillColor().setColor(Color.cyan)

    #  สร้างกล่องข้อความสำหรับสไลด์ที่สอง
    auto_shape = slide.getShapes().addAutoShape(ShapeType.Rectangle, 100, 200, 500, 200)
    auto_shape.getTextFrame().setText("Second Slide")

    #  สร้างภาพใหม่สำหรับอ็อบเจกต์ซูม
    image = Images.fromFile("image.png")
    try:
        picture = presentation.getImages().addImage(image)
    finally:
        image.dispose()

    # เพิ่มอ็อบเจกต์ ZoomFrame
    presentation.getSlides().get_Item(0).getShapes().addZoomFrame(20, 20, 300, 200, slide, picture)

    #  บันทึกงานนำเสนอ
    presentation.save("presentation.pptx", SaveFormat.Pptx)
finally:
    presentation.dispose()
จัดรูปแบบเฟรมซูม
ในส่วนก่อนหน้า เราได้แสดงวิธีสร้างเฟรมซูมแบบง่าย ๆ เพื่อสร้างเฟรมซูมที่ซับซ้อนมากขึ้น คุณต้องปรับเปลี่ยนการจัดรูปแบบของเฟรมง่าย ๆ มีหลายตัวเลือกในการจัดรูปแบบเฟรมซูมที่คุณสามารถใช้ได้
คุณสามารถควบคุมการจัดรูปแบบของเฟรมซูมบนสไลด์ได้ดังนี้
- สร้างอินสแตนซ์ของคลาส Presentation.
- สร้างสไลด์ใหม่ที่คุณต้องการเชื่อมโยงกับเฟรมซูม
- เพิ่มข้อความระบุตัวตนและพื้นหลังให้กับสไลด์ที่สร้าง
- เพิ่มเฟรมซูม (ซึ่งอ้างอิงสไลด์ที่สร้าง) ไปยังสไลด์แรก
- สร้างออบเจ็กต์ PPImage โดยเพิ่มรูปภาพเข้าไปในคอลเลกชัน images ที่เชื่อมกับออบเจ็กต์ Presentation เพื่อใช้เติมเฟรม
- ตั้งค่ารูปภาพที่กำหนดเองสำหรับออบเจ็กต์เฟรมซูมแรก
- เปลี่ยนรูปแบบเส้นสำหรับออบเจ็กต์เฟรมซูมที่สอง
- ลบพื้นหลังจากภาพของออบเจ็กต์เฟรมซูมที่สอง
- บันทึกการนำเสนอที่แก้ไขเป็นไฟล์ PPTX
โค้ด Python นี้แสดงวิธีเปลี่ยนการจัดรูปแบบของเฟรมซูมบนสไลด์:
import jpype
import asposeslides

if not jpype.isJVMStarted():
    jpype.startJVM()

from asposeslides.api import BackgroundType, FillType, Images, LineDashStyle, Presentation, SaveFormat, ShapeType
from java.awt import Color

presentation = Presentation()
try:
    # เพิ่มสไลด์ใหม่ลงในงานนำเสนอ
    second_slide = presentation.getSlides().addEmptySlide(presentation.getSlides().get_Item(0).getLayoutSlide())
    third_slide = presentation.getSlides().addEmptySlide(presentation.getSlides().get_Item(0).getLayoutSlide())

    #  สร้างพื้นหลังสำหรับสไลด์ที่สอง
    second_slide.getBackground().setType(BackgroundType.OwnBackground)
    second_slide.getBackground().getFillFormat().setFillType(FillType.Solid)
    second_slide.getBackground().getFillFormat().getSolidFillColor().setColor(Color.cyan)

    #  สร้างกล่องข้อความสำหรับสไลด์ที่สอง
    auto_shape = second_slide.getShapes().addAutoShape(ShapeType.Rectangle, 100, 200, 500, 200)
    auto_shape.getTextFrame().setText("Second Slide")

    #  สร้างพื้นหลังสำหรับสไลด์ที่สาม
    third_slide.getBackground().setType(BackgroundType.OwnBackground)
    third_slide.getBackground().getFillFormat().setFillType(FillType.Solid)
    third_slide.getBackground().getFillFormat().getSolidFillColor().setColor(Color.darkGray)

    #  สร้างกล bboxข้อความสำหรับสไลด์ที่สาม
    auto_shape = third_slide.getShapes().addAutoShape(ShapeType.Rectangle, 100, 200, 500, 200)
    auto_shape.getTextFrame().setText("Third Slide")

    # เพิ่มอ็อบเจกต์ ZoomFrame objects
    first_zoom_frame = presentation.getSlides().get_Item(0).getShapes().addZoomFrame(20, 20, 250, 200, second_slide)
    second_zoom_frame = presentation.getSlides().get_Item(0).getShapes().addZoomFrame(200, 250, 250, 200, third_slide)

    #  สร้างภาพใหม่สำหรับอ็อบเจกต์ซูม
    image = Images.fromFile("image.png")
    try:
        picture = presentation.getImages().addImage(image)
    finally:
        image.dispose()

    #  ตั้งค่าภาพกำหนดเองสำหรับอ็อบเจกต์ first_zoom_frame object
    first_zoom_frame.setZoomImage(picture)

    #  ตั้งค่ารูปแบบเฟรมซูมสำหรับอ็อบเจกต์ second_zoom_frame object
    second_zoom_frame.getLineFormat().setWidth(5)
    second_zoom_frame.getLineFormat().getFillFormat().setFillType(FillType.Solid)
    second_zoom_frame.getLineFormat().getFillFormat().getSolidFillColor().setColor(Color.pink)
    second_zoom_frame.getLineFormat().setDashStyle(LineDashStyle.DashDot)

    #  ตั้งค่าสำหรับไม่แสดงพื้นหลังของอ็อบเจกต์ second_zoom_frame object
    second_zoom_frame.setShowBackground(False)

    #  บันทึกงานนำเสนอ
    presentation.save("presentation.pptx", SaveFormat.Pptx)
finally:
    presentation.dispose()
Section Zoom
Section Zoom คือลิงก์ไปยังส่วนหนึ่งของการนำเสนอ คุณสามารถใช้ Section Zoom เพื่อกลับไปยังส่วนที่ต้องการเน้นย้ำ หรือใช้เพื่อแสดงให้เห็นว่าชิ้นส่วนต่าง ๆ ของการนำเสนอเชื่อมต่อกันอย่างไร
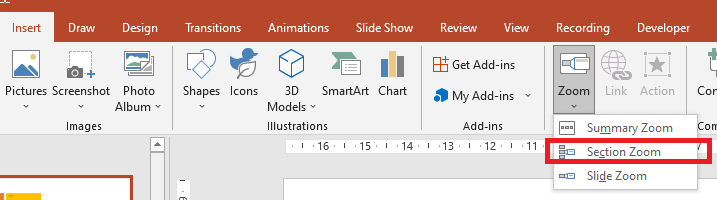
สำหรับวัตถุ Section Zoom Aspose.Slides มีคลาส SectionZoomFrame และบางเมธอดในคลาส ShapeCollection
สร้างเฟรม Section Zoom
คุณสามารถเพิ่มเฟรม Section Zoom ไปยังสไลด์ได้ดังนี้
- สร้างอินสแตนซ์ของคลาส Presentation.
- สร้างสไลด์ใหม่
- เพิ่มพื้นหลังที่โดดเด่นให้กับสไลด์ที่สร้าง
- สร้างส่วนใหม่ที่คุณต้องการเชื่อมโยงกับเฟรมซูม
- เพิ่มเฟรม Section Zoom (ซึ่งอ้างอิงส่วนที่สร้าง) ไปยังสไลด์แรก
- บันทึกการนำเสนอที่แก้ไขเป็นไฟล์ PPTX
โค้ด Python นี้แสดงวิธีสร้างเฟรมซูมบนสไลด์:
import jpype
import asposeslides

if not jpype.isJVMStarted():
    jpype.startJVM()

from asposeslides.api import BackgroundType, FillType, Presentation, SaveFormat
from java.awt import Color

presentation = Presentation()
try:
    # เพิ่มสไลด์ใหม่ลงในงานนำเสนอ
    slide = presentation.getSlides().addEmptySlide(presentation.getSlides().get_Item(0).getLayoutSlide())
    slide.getBackground().getFillFormat().setFillType(FillType.Solid)
    slide.getBackground().getFillFormat().getSolidFillColor().setColor(Color.yellow)
    slide.getBackground().setType(BackgroundType.OwnBackground)

    #  เพิ่ม Section ใหม่ลงในงานนำเสนอ
    presentation.getSections().addSection("Section 1", slide)

    #  เพิ่มอ็อบเจ็กต์ SectionZoomFrame
    section_zoom_frame = presentation.getSlides().get_Item(0).getShapes().addSectionZoomFrame(20, 20, 300, 200, presentation.getSections().get_Item(1))

    #  บันทึกงานนำเสนอ
    presentation.save("presentation.pptx", SaveFormat.Pptx)
finally:
    presentation.dispose()
สร้างเฟรม Section Zoom ด้วยรูปภาพที่กำหนดเอง
ด้วย Aspose.Slides for Python via Java คุณสามารถสร้างเฟรม Section Zoom ที่มีภาพตัวอย่างสไลด์ต่างออกไปได้ดังนี้
- สร้างอินสแตนซ์ของคลาส Presentation.
- สร้างสไลด์ใหม่
- เพิ่มพื้นหลังที่โดดเด่นให้กับสไลด์ที่สร้าง
- สร้างส่วนใหม่ที่คุณต้องการเชื่อมโยงกับเฟรมซูม
- สร้างออบเจ็กต์ PPImage โดยเพิ่มรูปภาพเข้าไปในคอลเลกชัน images ที่เชื่อมกับออบเจ็กต์ Presentation เพื่อใช้เติมเฟรม
- เพิ่มเฟรม Section Zoom (ซึ่งอ้างอิงส่วนที่สร้าง) ไปยังสไลด์แรก
- บันทึกการนำเสนอที่แก้ไขเป็นไฟล์ PPTX
โค้ด Python นี้แสดงวิธีสร้างเฟรมซูมที่มีรูปภาพต่างออกไป:
import jpype
import asposeslides

if not jpype.isJVMStarted():
    jpype.startJVM()

from asposeslides.api import BackgroundType, FillType, Images, Presentation, SaveFormat
from java.awt import Color

presentation = Presentation()
try:
    # เพิ่มสไลด์ใหม่ลงในงานนำเสนอ
    slide = presentation.getSlides().addEmptySlide(presentation.getSlides().get_Item(0).getLayoutSlide())
    slide.getBackground().getFillFormat().setFillType(FillType.Solid)
    slide.getBackground().getFillFormat().getSolidFillColor().setColor(Color.yellow)
    slide.getBackground().setType(BackgroundType.OwnBackground)

    #  เพิ่ม Section ใหม่ลงในงานนำเสนอ
    presentation.getSections().addSection("Section 1", slide)

    #  สร้างภาพใหม่สำหรับอ็อบเจกต์ซูม
    image = Images.fromFile("image.png")
    try:
        picture = presentation.getImages().addImage(image)
    finally:
        image.dispose()

    #  เพิ่มอ็อบเจ็กต์ SectionZoomFrame
    section_zoom_frame = presentation.getSlides().get_Item(0).getShapes().addSectionZoomFrame(20, 20, 300, 200, presentation.getSections().get_Item(1), picture)

    #  บันทึกงานนำเสนอ
    presentation.save("presentation.pptx", SaveFormat.Pptx)
finally:
    presentation.dispose()
จัดรูปแบบเฟรม Section Zoom
เพื่อสร้างเฟรม Section Zoom ที่ซับซ้อนมากขึ้น คุณต้องปรับการจัดรูปแบบของเฟรมง่าย ๆ มีหลายตัวเลือกในการจัดรูปแบบเฟรม Section Zoom ที่คุณสามารถใช้ได้
คุณสามารถควบคุมการจัดรูปแบบของเฟรม Section Zoom บนสไลด์ได้ดังนี้
- สร้างอินสแตนซ์ของคลาส Presentation.
- สร้างสไลด์ใหม่
- เพิ่มพื้นหลังที่โดดเด่นให้กับสไลด์ที่สร้าง
- สร้างส่วนใหม่ที่คุณต้องการเชื่อมโยงกับเฟรมซูม
- เพิ่มเฟรม Section Zoom (ซึ่งอ้างอิงส่วนที่สร้าง) ไปยังสไลด์แรก
- เปลี่ยนขนาดและตำแหน่งของออบเจ็กต์ Section Zoom ที่สร้าง
- สร้างออบเจ็กต์ PPImage โดยเพิ่มรูปภาพเข้าไปในคอลเลกชัน images ที่เชื่อมกับออบเจ็กต์ Presentation เพื่อใช้เติมเฟรม
- ตั้งค่ารูปภาพที่กำหนดเองสำหรับออบเจ็กต์ Section Zoom ที่สร้าง
- ตั้งค่าความสามารถ กลับไปยังสไลด์เดิมจากส่วนที่เชื่อมโยง
- ลบพื้นหลังจากภาพของออบเจ็กต์ Section Zoom
- เปลี่ยนรูปแบบเส้นสำหรับออบเจ็กต์ Section Zoom
- เปลี่ยนระยะเวลาการเปลี่ยนฉาก
- บันทึกการนำเสนอที่แก้ไขเป็นไฟล์ PPTX
โค้ด Python นี้แสดงวิธีเปลี่ยนการจัดรูปแบบของเฟรม Section Zoom:
import jpype
import asposeslides

if not jpype.isJVMStarted():
    jpype.startJVM()

from asposeslides.api import BackgroundType, FillType, Images, LineDashStyle, Presentation, SaveFormat
from java.awt import Color

presentation = Presentation()
try:
    # เพิ่มสไลด์ใหม่ลงในงานนำเสนอ
    slide = presentation.getSlides().addEmptySlide(presentation.getSlides().get_Item(0).getLayoutSlide())
    slide.getBackground().getFillFormat().setFillType(FillType.Solid)
    slide.getBackground().getFillFormat().getSolidFillColor().setColor(Color.yellow)
    slide.getBackground().setType(BackgroundType.OwnBackground)

    #  เพิ่ม Section ใหม่ลงในงานนำเสนอ
    presentation.getSections().addSection("Section 1", slide)

    #  เพิ่มอ็อบเจ็กต์ SectionZoomFrame
    section_zoom_frame = presentation.getSlides().get_Item(0).getShapes().addSectionZoomFrame(20, 20, 300, 200, presentation.getSections().get_Item(1))

    #  การจัดรูปแบบสำหรับ SectionZoomFrame
    section_zoom_frame.setX(100)
    section_zoom_frame.setY(300)
    section_zoom_frame.setWidth(100)
    section_zoom_frame.setHeight(75)

    image = Images.fromFile("image.png")
    try:
        picture = presentation.getImages().addImage(image)
    finally:
        image.dispose()
    section_zoom_frame.setZoomImage(picture)

    section_zoom_frame.setReturnToParent(True)
    section_zoom_frame.setShowBackground(False)

    section_zoom_frame.getLineFormat().getFillFormat().setFillType(FillType.Solid)
    section_zoom_frame.getLineFormat().getFillFormat().getSolidFillColor().setColor(Color.gray)
    section_zoom_frame.getLineFormat().setDashStyle(LineDashStyle.DashDot)
    section_zoom_frame.getLineFormat().setWidth(2.5)

    section_zoom_frame.setTransitionDuration(1.5)

    #  บันทึกงานนำเสนอ
    presentation.save("presentation.pptx", SaveFormat.Pptx)
finally:
    presentation.dispose()
Summary Zoom
Summary Zoom คือหน้าแสดงผลที่รวมชิ้นส่วนทั้งหมดของการนำเสนอไว้ในครั้งเดียว เมื่อคุณนำเสนอ คุณสามารถใช้ซูมเพื่อไปจากตำแหน่งหนึ่งไปยังอีกตำแหน่งหนึ่งตามลำดับที่ต้องการ คุณสามารถสร้างสรรค์ข้ามไปข้ามมา หรือกลับมาดูส่วนต่าง ๆ ของสไลด์โชว์โดยไม่ขัดจังหวะการนำเสนอ
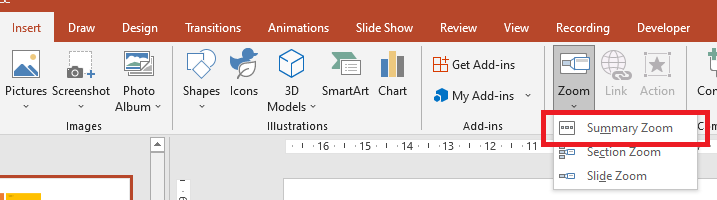
สำหรับวัตถุ Summary Zoom Aspose.Slides มีคลาส SummaryZoomFrame, SummaryZoomSection, และ SummaryZoomSectionCollection พร้อมบางเมธอดในคลาส ShapeCollection
สร้าง Summary Zoom
คุณสามารถเพิ่มเฟรม Summary Zoom ไปยังสไลด์ได้ดังนี้
- สร้างอินสแตนซ์ของคลาส Presentation.
- สร้างสไลด์ใหม่พร้อมพื้นหลังที่โดดเด่นและส่วนใหม่สำหรับสไลด์ที่สร้าง
- เพิ่มเฟรม Summary Zoom ไปยังสไลด์แรก
- บันทึกการนำเสนอที่แก้ไขเป็นไฟล์ PPTX
โค้ด Python นี้แสดงวิธีสร้างเฟรม Summary Zoom บนสไลด์:
import jpype
import asposeslides

if not jpype.isJVMStarted():
    jpype.startJVM()

from asposeslides.api import BackgroundType, FillType, Presentation, SaveFormat
from java.awt import Color

presentation = Presentation()
try:
    # เพิ่มสไลด์ใหม่ลงในงานนำเสนอ
    slide = presentation.getSlides().addEmptySlide(presentation.getSlides().get_Item(0).getLayoutSlide())
    slide.getBackground().getFillFormat().setFillType(FillType.Solid)
    slide.getBackground().getFillFormat().getSolidFillColor().setColor(Color.gray)
    slide.getBackground().setType(BackgroundType.OwnBackground)

    #  เพิ่ม Section ใหม่ลงในงานนำเสนอ
    presentation.getSections().addSection("Section 1", slide)

    # เพิ่มสไลด์ใหม่ลงในงานนำเสนอ
    slide = presentation.getSlides().addEmptySlide(presentation.getSlides().get_Item(0).getLayoutSlide())
    slide.getBackground().getFillFormat().setFillType(FillType.Solid)
    slide.getBackground().getFillFormat().getSolidFillColor().setColor(Color.cyan)
    slide.getBackground().setType(BackgroundType.OwnBackground)

    #  เพิ่ม Section ใหม่ลงในงานนำเสนอ
    presentation.getSections().addSection("Section 2", slide)

    # เพิ่มสไลด์ใหม่ลงในงานนำเสนอ
    slide = presentation.getSlides().addEmptySlide(presentation.getSlides().get_Item(0).getLayoutSlide())
    slide.getBackground().getFillFormat().setFillType(FillType.Solid)
    slide.getBackground().getFillFormat().getSolidFillColor().setColor(Color.magenta)
    slide.getBackground().setType(BackgroundType.OwnBackground)

    #  เพิ่ม Section ใหม่ลงในงานนำเสนอ
    presentation.getSections().addSection("Section 3", slide)

    # เพิ่มสไลด์ใหม่ลงในงานนำเสนอ
    slide = presentation.getSlides().addEmptySlide(presentation.getSlides().get_Item(0).getLayoutSlide())
    slide.getBackground().getFillFormat().setFillType(FillType.Solid)
    slide.getBackground().getFillFormat().getSolidFillColor().setColor(Color.green)
    slide.getBackground().setType(BackgroundType.OwnBackground)

    #  เพิ่ม Section ใหม่ลงในงานนำเสนอ
    presentation.getSections().addSection("Section 4", slide)

    #  เพิ่มอ็อบเจ็กต์ SummaryZoomFrame
    summary_zoom_frame = presentation.getSlides().get_Item(0).getShapes().addSummaryZoomFrame(150, 50, 300, 200)

    #  บันทึกงานนำเสนอ
    presentation.save("presentation.pptx", SaveFormat.Pptx)
finally:
    presentation.dispose()
เพิ่มและลบส่วน Summary Zoom
ทุกส่วนในเฟรม Summary Zoom แสดงด้วยออบเจ็กต์ SummaryZoomSection ซึ่งจัดเก็บในออบเจ็กต์ SummaryZoomSectionCollection คุณสามารถเพิ่มหรือเอาออบเจ็กต์ส่วน Summary Zoom ออกได้ผ่านคลาส SummaryZoomSectionCollection ดังนี้
- สร้างอินสแตนซ์ของคลาส Presentation.
- สร้างสไลด์ใหม่พร้อมพื้นหลังที่โดดเด่นและส่วนใหม่สำหรับสไลด์ที่สร้าง
- เพิ่มเฟรม Summary Zoom ลงในสไลด์แรก
- เพิ่มสไลด์และส่วนใหม่เข้าไปในการนำเสนอ
- เพิ่มส่วนที่สร้างลงในเฟรม Summary Zoom
- เอาส่วนแรกออกจากเฟรม Summary Zoom
- บันทึกการนำเสนอที่แก้ไขเป็นไฟล์ PPTX
โค้ด Python นี้แสดงวิธีเพิ่มและลบส่วนในเฟรม Summary Zoom:
import jpype
import asposeslides

if not jpype.isJVMStarted():
    jpype.startJVM()

from asposeslides.api import BackgroundType, FillType, Presentation, SaveFormat
from java.awt import Color

presentation = Presentation()
try:
    # เพิ่มสไลด์ใหม่ลงในงานนำเสนอ
    slide = presentation.getSlides().addEmptySlide(presentation.getSlides().get_Item(0).getLayoutSlide())
    slide.getBackground().getFillFormat().setFillType(FillType.Solid)
    slide.getBackground().getFillFormat().getSolidFillColor().setColor(Color.gray)
    slide.getBackground().setType(BackgroundType.OwnBackground)

    #  เพิ่ม Section ใหม่ลงในงานนำเสนอ
    presentation.getSections().addSection("Section 1", slide)

    # เพิ่มสไลด์ใหม่ลงในงานนำเสนอ
    slide = presentation.getSlides().addEmptySlide(presentation.getSlides().get_Item(0).getLayoutSlide())
    slide.getBackground().getFillFormat().setFillType(FillType.Solid)
    slide.getBackground().getFillFormat().getSolidFillColor().setColor(Color.cyan)
    slide.getBackground().setType(BackgroundType.OwnBackground)

    #  เพิ่ม Section ใหม่ลงในงานนำเสนอ
    presentation.getSections().addSection("Section 2", slide)

    #  เพิ่มอ็อบเจ็กต์ SummaryZoomFrame
    summary_zoom_frame = presentation.getSlides().get_Item(0).getShapes().addSummaryZoomFrame(150, 50, 300, 200)

    # เพิ่มสไลด์ใหม่ลงในงานนำเสนอ
    slide = presentation.getSlides().addEmptySlide(presentation.getSlides().get_Item(0).getLayoutSlide())
    slide.getBackground().getFillFormat().setFillType(FillType.Solid)
    slide.getBackground().getFillFormat().getSolidFillColor().setColor(Color.magenta)
    slide.getBackground().setType(BackgroundType.OwnBackground)

    #  เพิ่ม Section ใหม่ลงในงานนำเสนอ
    third_section = presentation.getSections().addSection("Section 3", slide)

    #  เพิ่ม Section ไปยัง Summary Zoom
    summary_zoom_frame.getSummaryZoomCollection().addSummaryZoomSection(third_section)

    #  ลบ Section จาก Summary Zoom
    summary_zoom_frame.getSummaryZoomCollection().removeSummaryZoomSection(presentation.getSections().get_Item(1))

    #  บันทึกงานนำเสนอ
    presentation.save("presentation.pptx", SaveFormat.Pptx)
finally:
    presentation.dispose()
จัดรูปแบบส่วน Summary Zoom
เพื่อสร้างออบเจ็กต์ส่วน Summary Zoom ที่ซับซ้อนขึ้น คุณต้องปรับการจัดรูปแบบของเฟรมง่าย ๆ มีหลายตัวเลือกในการจัดรูปแบบออบเจ็กต์ส่วน Summary Zoom ที่คุณสามารถใช้ได้
คุณสามารถควบคุมการจัดรูปแบบของออบเจ็กต์ส่วน Summary Zoom ในเฟรม Summary Zoom ได้ดังนี้
- สร้างอินสแตนซ์ของคลาส Presentation.
- สร้างสไลด์ใหม่พร้อมพื้นหลังที่โดดเด่นและส่วนใหม่สำหรับสไลด์ที่สร้าง
- เพิ่มเฟรม Summary Zoom ไปยังสไลด์แรก
- ดึงออบเจ็กต์ Summary Zoom Section แรกจาก SummaryZoomSectionCollection.
- สร้างออบเจ็กต์ PPImage โดยเพิ่มรูปภาพเข้าไปในคอลเลกชัน images ที่เชื่อมกับออบเจ็กต์ Presentation เพื่อใช้เติมเฟรม
- ตั้งค่ารูปภาพที่กำหนดเองสำหรับออบเจ็กต์ Summary Zoom Section
- ตั้งค่าความสามารถ กลับไปยังสไลด์เดิมจากส่วนที่เชื่อมโยง
- เปลี่ยนรูปแบบเส้นสำหรับออบเจ็กต์ Summary Zoom Section
- เปลี่ยนระยะเวลาการเปลี่ยนฉาก
- บันทึกการนำเสนอที่แก้ไขเป็นไฟล์ PPTX
โค้ด Python นี้แสดงวิธีเปลี่ยนการจัดรูปแบบของออบเจ็กต์ Summary Zoom Section:
import jpype
import asposeslides

if not jpype.isJVMStarted():
    jpype.startJVM()

from asposeslides.api import BackgroundType, FillType, Images, LineDashStyle, Presentation, SaveFormat
from java.awt import Color

presentation = Presentation()
try:
    # Adds a new slide to the presentation
    slide = presentation.getSlides().addEmptySlide(presentation.getSlides().get_Item(0).getLayoutSlide())
    slide.getBackground().getFillFormat().setFillType(FillType.Solid)
    slide.getBackground().getFillFormat().getSolidFillColor().setColor(Color.gray)
    slide.getBackground().setType(BackgroundType.OwnBackground)

    #  Adds a new section to the presentation
    presentation.getSections().addSection("Section 1", slide)

    # Adds a new slide to the presentation
    slide = presentation.getSlides().addEmptySlide(presentation.getSlides().get_Item(0).getLayoutSlide())
    slide.getBackground().getFillFormat().setFillType(FillType.Solid)
    slide.getBackground().getFillFormat().getSolidFillColor().setColor(Color.cyan)
    slide.getBackground().setType(BackgroundType.OwnBackground)

    #  Adds a new section to the presentation
    presentation.getSections().addSection("Section 2", slide)

    #  Adds a SummaryZoomFrame object
    summary_zoom_frame = presentation.getSlides().get_Item(0).getShapes().addSummaryZoomFrame(150, 50, 300, 200)

    #  Gets the first SummaryZoomSection object
    summary_section = summary_zoom_frame.getSummaryZoomCollection().get_Item(0)

    #  Formatting for SummaryZoomSection object
    image = Images.fromFile("image.png")
    try:
        picture = presentation.getImages().addImage(image)
    finally:
        image.dispose()
    summary_section.setZoomImage(picture)

    summary_section.setReturnToParent(False)

    summary_section.getLineFormat().getFillFormat().setFillType(FillType.Solid)
    summary_section.getLineFormat().getFillFormat().getSolidFillColor().setColor(Color.black)
    summary_section.getLineFormat().setDashStyle(LineDashStyle.DashDot)
    summary_section.getLineFormat().setWidth(1.5)

    summary_section.setTransitionDuration(1.5)

    #  Saves the presentation
    presentation.save("presentation.pptx", SaveFormat.Pptx)
finally:
    presentation.dispose()
FAQ
ฉันสามารถควบคุมการกลับไปยังสไลด์ ‘แม่’ หลังแสดงเป้าหมายได้หรือไม่?
ได้ ZoomFrame หรือ SectionZoomFrame รองรับการกลับไปยังสไลด์ต้นทางผ่าน setReturnToParent ซึ่งจะส่งผู้ชมกลับหลังจากเยี่ยมชมเนื้อหาเป้าหมายเมื่อเปิดใช้งาน
ฉันสามารถปรับ ‘ความเร็ว’ หรือระยะเวลาการเปลี่ยนฉากของ Zoom ได้หรือไม่?
ได้ Zoom รองรับการตั้งค่าระยะเวลาเปลี่ยนฉากด้วย setTransitionDuration เพื่อคุณสามารถควบคุมช่วงเวลาที่แอนิเมชันกระโดดใช้
มีขีดจำกัดจำนวนวัตถุ Zoom ที่การนำเสนอสามารถมีได้หรือไม่?
ไม่มีขีดจำกัด API ที่ระบุในเอกสาร ขีดจำกัดเชิงปฏิบัติขึ้นอยู่กับความซับซ้อนของการนำเสนอทั้งหมดและประสิทธิภาพของผู้ชม คุณสามารถเพิ่มเฟรม Zoom จำนวนมากได้ แต่ควรคำนึงถึงขนาดไฟล์และเวลาการเรนเดอร์