Analyzing your prompt, please hold on...
An error occurred while retrieving the results. Please refresh the page and try again.
Each element of a table can be applied with different formatting. For example, table formatting will be applied to the entire table, row formatting to only particular rows, cell formatting to only certain cells.
Aspose.Words provides a rich API to retrieve and apply formatting to a table. You can use the Table, RowFormat, and CellFormat nodes to set the formatting.
In this article, we will talk about how to apply formatting to different table nodes and what table formatting settings Aspose.Words supports.
In this section, we will look at applying formatting to various table nodes.
To apply formatting to a table, you can use the properties available on the corresponding Table node using the Table, PreferredWidth, and TableCollection classes.
The pictures below show a representation of the Table formatting features in Microsoft Word and their corresponding properties in Aspose.Words.
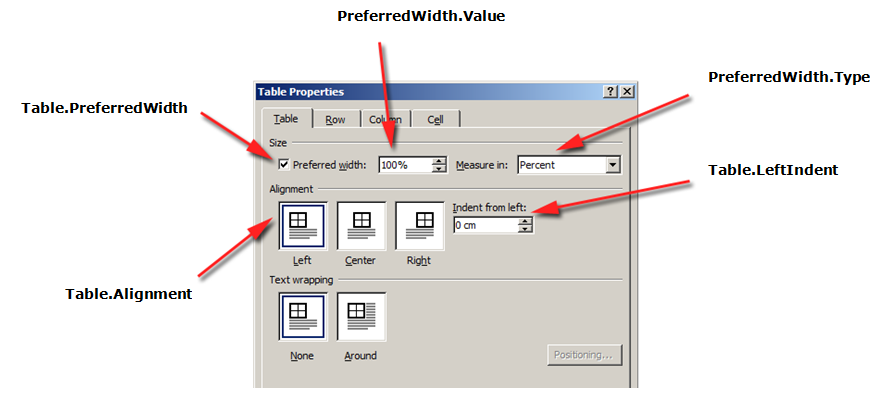
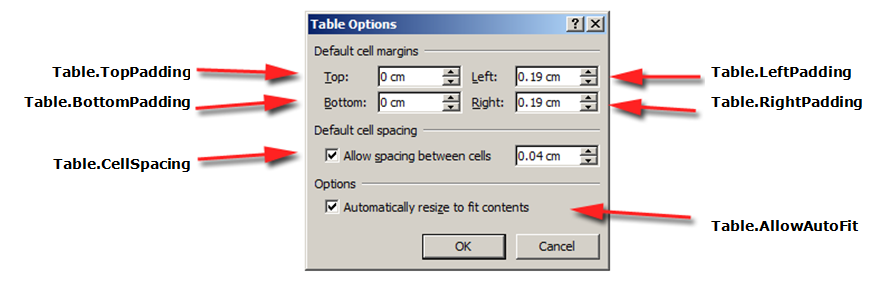
The following code example shows how to apply an outline border to a table:
| // For complete examples and data files, please go to https://github.com/aspose-words/Aspose.Words-for-C.git. | |
| auto doc = MakeObject<Document>(MyDir + u"Tables.docx"); | |
| auto table = System::ExplicitCast<Table>(doc->GetChild(NodeType::Table, 0, true)); | |
| // Align the table to the center of the page. | |
| table->set_Alignment(TableAlignment::Center); | |
| // Clear any existing borders from the table. | |
| table->ClearBorders(); | |
| // Set a green border around the table but not inside. | |
| table->SetBorder(BorderType::Left, LineStyle::Single, 1.5, System::Drawing::Color::get_Green(), true); | |
| table->SetBorder(BorderType::Right, LineStyle::Single, 1.5, System::Drawing::Color::get_Green(), true); | |
| table->SetBorder(BorderType::Top, LineStyle::Single, 1.5, System::Drawing::Color::get_Green(), true); | |
| table->SetBorder(BorderType::Bottom, LineStyle::Single, 1.5, System::Drawing::Color::get_Green(), true); | |
| // Fill the cells with a light green solid color. | |
| table->SetShading(TextureIndex::TextureSolid, System::Drawing::Color::get_LightGreen(), System::Drawing::Color::Empty); | |
| doc->Save(ArtifactsDir + u"WorkingWithTableStylesAndFormatting.ApplyOutlineBorder.docx"); |
The following code example shows how to build a table with all borders enabled (grid):
| // For complete examples and data files, please go to https://github.com/aspose-words/Aspose.Words-for-C.git. | |
| auto doc = MakeObject<Document>(MyDir + u"Tables.docx"); | |
| auto table = System::ExplicitCast<Table>(doc->GetChild(NodeType::Table, 0, true)); | |
| // Clear any existing borders from the table. | |
| table->ClearBorders(); | |
| // Set a green border around and inside the table. | |
| table->SetBorders(LineStyle::Single, 1.5, System::Drawing::Color::get_Green()); | |
| doc->Save(ArtifactsDir + u"WorkingWithTableStylesAndFormatting.BuildTableWithBorders.docx"); |
Row-level formatting can be controlled using the Row, RowFormat, and RowCollection classes.
The pictures below show a representation of the Row formatting features in Microsoft Word and their corresponding properties in Aspose.Words.
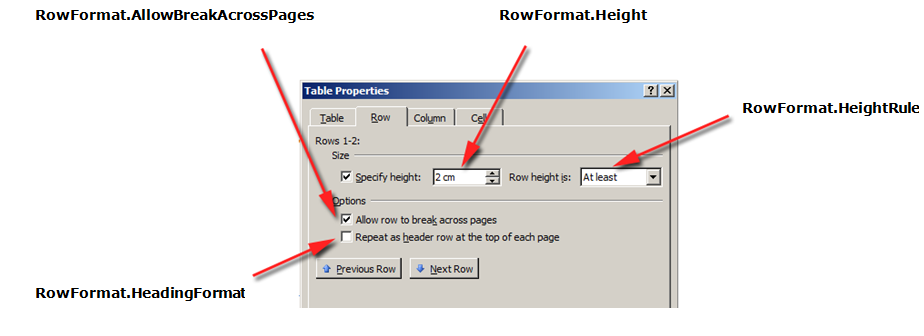
The following code example shows how to modify the table row formatting:
| // For complete examples and data files, please go to https://github.com/aspose-words/Aspose.Words-for-C.git. | |
| auto doc = MakeObject<Document>(MyDir + u"Tables.docx"); | |
| auto table = System::ExplicitCast<Table>(doc->GetChild(NodeType::Table, 0, true)); | |
| // Retrieve the first row in the table. | |
| SharedPtr<Row> firstRow = table->get_FirstRow(); | |
| firstRow->get_RowFormat()->get_Borders()->set_LineStyle(LineStyle::None); | |
| firstRow->get_RowFormat()->set_HeightRule(HeightRule::Auto); | |
| firstRow->get_RowFormat()->set_AllowBreakAcrossPages(true); |
Cell-level formatting is controlled by the Cell, CellFormat, and CellCollection classes.
Note that a Cell can only be a child node of a Row. At the same time, there must be at least one Paragraph in the Cell so that formatting can be applied to it.
In addition to the Paragraph, you can also insert a Table into a Cell.
The pictures below show a representation of the Cell formatting features in Microsoft Word and their corresponding properties in Aspose.Words.

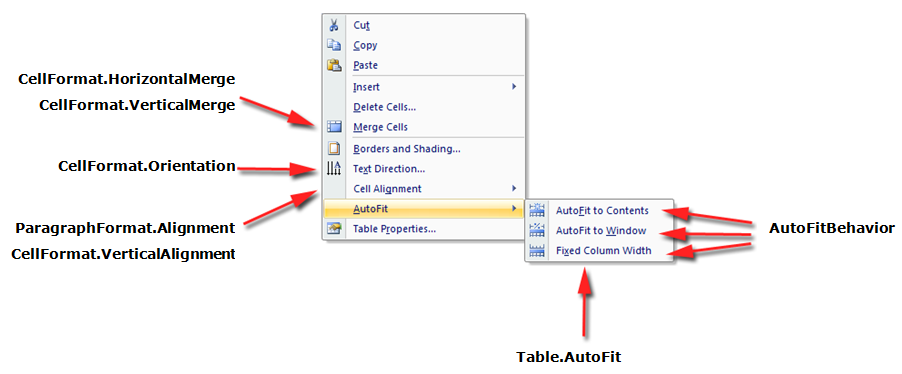
The following code example shows how to modify the formatting of a table cell:
| // For complete examples and data files, please go to https://github.com/aspose-words/Aspose.Words-for-C.git. | |
| auto doc = MakeObject<Document>(MyDir + u"Tables.docx"); | |
| auto table = System::ExplicitCast<Table>(doc->GetChild(NodeType::Table, 0, true)); | |
| SharedPtr<Cell> firstCell = table->get_FirstRow()->get_FirstCell(); | |
| firstCell->get_CellFormat()->set_Width(30); | |
| firstCell->get_CellFormat()->set_Orientation(TextOrientation::Downward); | |
| firstCell->get_CellFormat()->get_Shading()->set_ForegroundPatternColor(System::Drawing::Color::get_LightGreen()); |
The following code example shows how to set the amount of space (in points) to add to the left/top/right/bottom of the contents of the cell:
| // For complete examples and data files, please go to https://github.com/aspose-words/Aspose.Words-for-C.git. | |
| auto doc = MakeObject<Document>(); | |
| auto builder = MakeObject<DocumentBuilder>(doc); | |
| builder->StartTable(); | |
| builder->InsertCell(); | |
| // Sets the amount of space (in points) to add to the left/top/right/bottom of the cell's contents. | |
| builder->get_CellFormat()->SetPaddings(30, 50, 30, 50); | |
| builder->Writeln(u"I'm a wonderful formatted cell."); | |
| builder->EndRow(); | |
| builder->EndTable(); | |
| doc->Save(ArtifactsDir + u"WorkingWithTableStylesAndFormatting.CellPadding.docx"); |
The simplest way to set the row height is to use the DocumentBuilder. Using the appropriate RowFormat properties, you can set the default height setting or apply a different height for each row in the table.
In Aspose.Words, table row height is controlled by:
At the same time, a different height can be set for each row – this allows you to widely control the table settings.
The following code example shows how to create a table that contains a single cell and apply row formatting:
| // For complete examples and data files, please go to https://github.com/aspose-words/Aspose.Words-for-C.git. | |
| auto doc = MakeObject<Document>(); | |
| auto builder = MakeObject<DocumentBuilder>(doc); | |
| SharedPtr<Table> table = builder->StartTable(); | |
| builder->InsertCell(); | |
| SharedPtr<RowFormat> rowFormat = builder->get_RowFormat(); | |
| rowFormat->set_Height(100); | |
| rowFormat->set_HeightRule(HeightRule::Exactly); | |
| // These formatting properties are set on the table and are applied to all rows in the table. | |
| table->set_LeftPadding(30); | |
| table->set_RightPadding(30); | |
| table->set_TopPadding(30); | |
| table->set_BottomPadding(30); | |
| builder->Writeln(u"I'm a wonderful formatted row."); | |
| builder->EndRow(); | |
| builder->EndTable(); | |
| doc->Save(ArtifactsDir + u"WorkingWithTableStylesAndFormatting.ApplyRowFormatting.docx"); |
A table in a Microsoft Word document provides several different ways to resize the table and individual cells. These properties allow considerable control over the appearance and behavior of the table, so that Aspose.Words supports the behavior of tables, as in Microsoft Word.
It is important to know that table elements present several different properties that can affect how the widths of the overall table, as well as individual cells, is calculated:
This article details how the various table width calculation properties work and how to get full control over table width calculation. This is especially useful to know in such cases where the table layout does not appear as expected.
In most cases, the preferred cell is recommended than the table width. The preferred cell width is more in line with the DOCX format specification as well as the Aspose.Words model.
The cell width is actually a calculated value for the DOCX format. The actual cell width can depend on many things. For example, changing the page margins or the preferred table width can affect the actual cell width.
The preferred cell width is a cell property that is stored in the document. It does not depend on anything and does not change when you change the table or other properties of the cell.
The desired width of a table or individual cells is defined through the preferred width property, which is the size that an element strives to fit. That is, the preferred width can be specified for the entire table or for individual cells. In some situations it may not be possible to fit this width exactly, but the actual width will be close to this value in most cases.
The appropriate preferred width type and value are set using the methods of the PreferredWidth class:
The pictures below show a representation of the preferred width setting features in Microsoft Word and their corresponding properties in Aspose.Words.
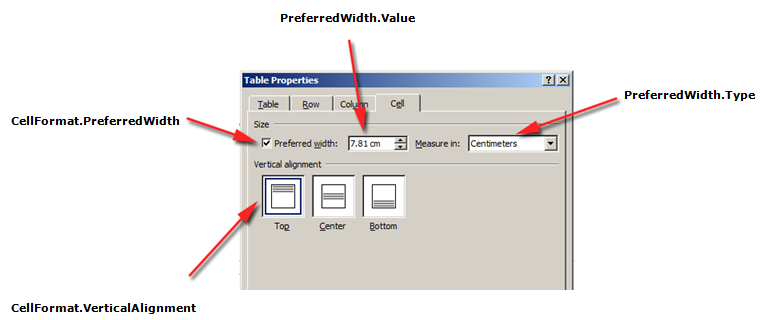
An example of how these options are applied to a real table in a document can be seen in the picture below.

In Aspose.Words, table and cell widths are set using the Table.PreferredWidth property and the CellFormat.PreferredWidth property, with options available in the PreferredWidthType enumeration:
Using the Table.PreferredWidth property will adjust its preferred width relative to its container: page, text column, or outer table cell if it is a nested table.
The following code example shows how to set the table to auto-fit to 50% of the page width:
| // For complete examples and data files, please go to https://github.com/aspose-words/Aspose.Words-for-C.git. | |
| auto doc = MakeObject<Document>(); | |
| auto builder = MakeObject<DocumentBuilder>(doc); | |
| // Insert a table with a width that takes up half the page width. | |
| SharedPtr<Table> table = builder->StartTable(); | |
| builder->InsertCell(); | |
| table->set_PreferredWidth(PreferredWidth::FromPercent(50)); | |
| builder->Writeln(u"Cell #1"); | |
| builder->InsertCell(); | |
| builder->Writeln(u"Cell #2"); | |
| builder->InsertCell(); | |
| builder->Writeln(u"Cell #3"); | |
| doc->Save(ArtifactsDir + u"WorkingWithTables.AutoFitToPageWidth.docx"); |
Using the CellFormat.PreferredWidth property on a given cell will adjust its preferred width.
The following code example shows how to set the different preferred width settings:
| // For complete examples and data files, please go to https://github.com/aspose-words/Aspose.Words-for-C.git. | |
| auto doc = MakeObject<Document>(); | |
| auto builder = MakeObject<DocumentBuilder>(doc); | |
| // Insert a table row made up of three cells which have different preferred widths. | |
| builder->StartTable(); | |
| // Insert an absolute sized cell. | |
| builder->InsertCell(); | |
| builder->get_CellFormat()->set_PreferredWidth(PreferredWidth::FromPoints(40)); | |
| builder->get_CellFormat()->get_Shading()->set_BackgroundPatternColor(System::Drawing::Color::get_LightYellow()); | |
| builder->Writeln(u"Cell at 40 points width"); | |
| // Insert a relative (percent) sized cell. | |
| builder->InsertCell(); | |
| builder->get_CellFormat()->set_PreferredWidth(PreferredWidth::FromPercent(20)); | |
| builder->get_CellFormat()->get_Shading()->set_BackgroundPatternColor(System::Drawing::Color::get_LightBlue()); | |
| builder->Writeln(u"Cell at 20% width"); | |
| // Insert a auto sized cell. | |
| builder->InsertCell(); | |
| builder->get_CellFormat()->set_PreferredWidth(PreferredWidth::Auto()); | |
| builder->get_CellFormat()->get_Shading()->set_BackgroundPatternColor(System::Drawing::Color::get_LightGreen()); | |
| builder->Writeln(u"Cell automatically sized. The size of this cell is calculated from the table preferred width."); | |
| builder->Writeln(u"In this case the cell will fill up the rest of the available space."); | |
| doc->Save(ArtifactsDir + u"WorkingWithTables.PreferredWidthSettings.docx"); |
You can use the Type and Value properties to find the preferred width details of the desired table or cell.
The following code example shows how to retrieve the preferred width type of a table cell:
| // For complete examples and data files, please go to https://github.com/aspose-words/Aspose.Words-for-C.git. | |
| auto doc = MakeObject<Document>(MyDir + u"Tables.docx"); | |
| auto table = System::ExplicitCast<Table>(doc->GetChild(NodeType::Table, 0, true)); | |
| table->set_AllowAutoFit(true); | |
| SharedPtr<Cell> firstCell = table->get_FirstRow()->get_FirstCell(); | |
| PreferredWidthType type = firstCell->get_CellFormat()->get_PreferredWidth()->get_Type(); | |
| double value = firstCell->get_CellFormat()->get_PreferredWidth()->get_Value(); |
The AllowAutoFit property allows cells in a table to grow and shrink according to a selected criterion. For example, you can use the AutoFit to Window option to fit the table to the width of the page, and the AutoFit to Content option to allow each cell to grow or shrink according to its content.
By default, Aspose.Words inserts a new table using AutoFit to Window. The table will be sized according to the available page width. To resize a table, you can call the AutoFit method. This method accepts an AutoFitBehavior enumeration that specifies what type of autofit is applied to the table.
It is important to know that the autofit method is actually a shortcut that applies different properties to the table at the same time. These are properties that actually give the table the observed behavior. We will discuss these properties for each autofit option.
The following code example shows how to set a table to shrink or grow each cell according to its contents:
| // For complete examples and data files, please go to https://github.com/aspose-words/Aspose.Words-for-C.git. | |
| table->set_AllowAutoFit(true); |
When autofitting to a window is applied to a table, the following operations are actually performed behind the scenes:
The following code example shows how to autofit a table to the page width:
| // For complete examples and data files, please go to https://github.com/aspose-words/Aspose.Words-for-C.git. | |
| auto doc = MakeObject<Document>(MyDir + u"Tables.docx"); | |
| auto table = System::ExplicitCast<Table>(doc->GetChild(NodeType::Table, 0, true)); | |
| // Autofit the first table to the page width. | |
| table->AutoFit(AutoFitBehavior::AutoFitToWindow); | |
| doc->Save(ArtifactsDir + u"WorkingWithTables.AutoFitTableToWindow.docx"); |
When the table is autofitted the content, the following steps are actually performed behind the scenes:
The Table.AllowAutoFit property is enabled to automatically resize each cell according to its content
The preferred table width is removed from Table.PreferredWidth, CellFormat.PreferredWidth is removed for each table cell
Column widths are recalculated for the current table content – the end result is a table where the column widths and the width of the entire table are automatically resized to best fit the content as the user edits the text
The following code example shows how to autofit a table to its content:
| // For complete examples and data files, please go to https://github.com/aspose-words/Aspose.Words-for-C.git. | |
| auto doc = MakeObject<Document>(MyDir + u"Tables.docx"); | |
| auto table = System::ExplicitCast<Table>(doc->GetChild(NodeType::Table, 0, true)); | |
| table->AutoFit(AutoFitBehavior::AutoFitToContents); | |
| doc->Save(ArtifactsDir + u"WorkingWithTables.AutoFitTableToContents.docx"); |
If a table has autofit disabled and fixed column widths are used instead, the following steps are performed:
The following code example shows how to disable autofit and enable fixed width for the specified table:
| // For complete examples and data files, please go to https://github.com/aspose-words/Aspose.Words-for-C.git. | |
| auto doc = MakeObject<Document>(MyDir + u"Tables.docx"); | |
| auto table = System::ExplicitCast<Table>(doc->GetChild(NodeType::Table, 0, true)); | |
| // Disable autofitting on this table. | |
| table->AutoFit(AutoFitBehavior::FixedColumnWidths); | |
| doc->Save(ArtifactsDir + u"WorkingWithTables.AutoFitTableToFixedColumnWidths.docx"); |
Aspose.Words allows users to define the width of a table or cell through multiple objects, including CellFormat – its Width property is mostly left over from previous versions, however, it is still useful for simplifying setting the cell width.
It is important to know that the CellFormat.Width property works differently depending on which of the other width properties already exist in the table.
Aspose.Words uses the following order for calculating cell widths:
| Order | Property | Description |
|---|---|---|
| 1 | AllowAutoFit is determined | If AutoFit is enabled: - the table may grow past the preferred width to accommodate the content – it usually does not shrink below the preferred width - any change to the CellFormat.Width value is ignored and the cell will fit to its contents instead |
| 2 | PreferredWidthType with a value of Points or Percent | CellFormat.Width is ignored |
| 3 | PreferredWidthType with a value of Auto | The value from CellFormat.Width is copied and becomes the cell’s preferred width (in points) |
You can get or set any additional space between table cells similar to the “Сell spacing” option in Microsoft Word. This can be done using the AllowCellSpacing property.
An example of how these options are applied to a real table in a document can be seen in the picture below.
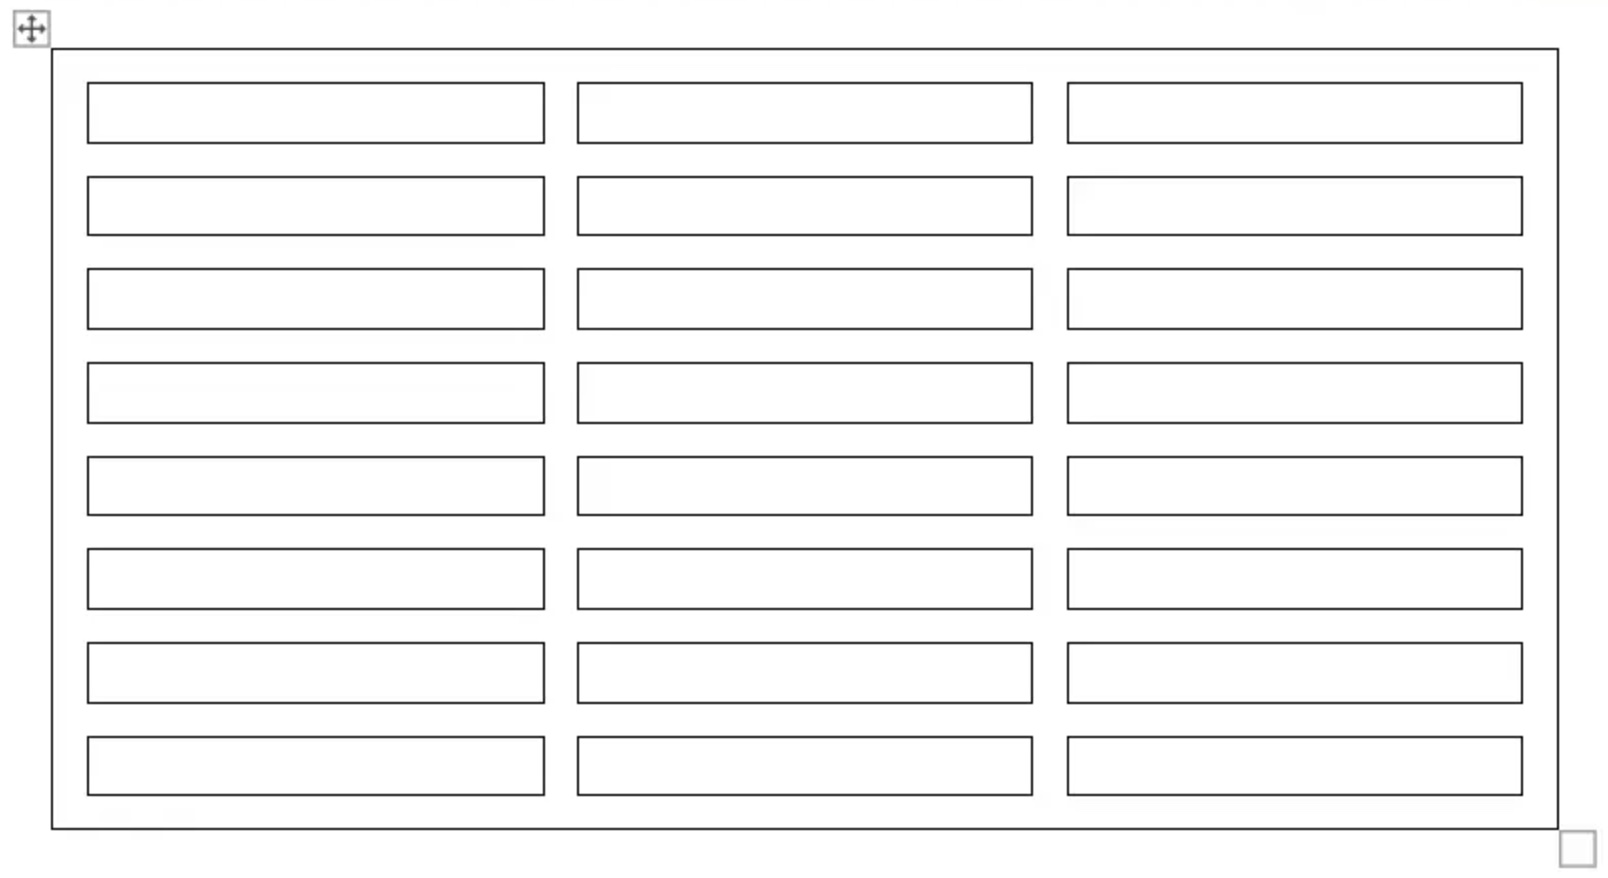
The following code example shows how to set the spacing between cells:
| // For complete examples and data files, please go to https://github.com/aspose-words/Aspose.Words-for-C.git. | |
| auto doc = MakeObject<Document>(MyDir + u"Tables.docx"); | |
| auto table = System::ExplicitCast<Table>(doc->GetChild(NodeType::Table, 0, true)); | |
| table->set_AllowCellSpacing(true); | |
| table->set_CellSpacing(2); | |
| doc->Save(ArtifactsDir + u"WorkingWithTableStylesAndFormatting.AllowCellSpacing.docx"); |
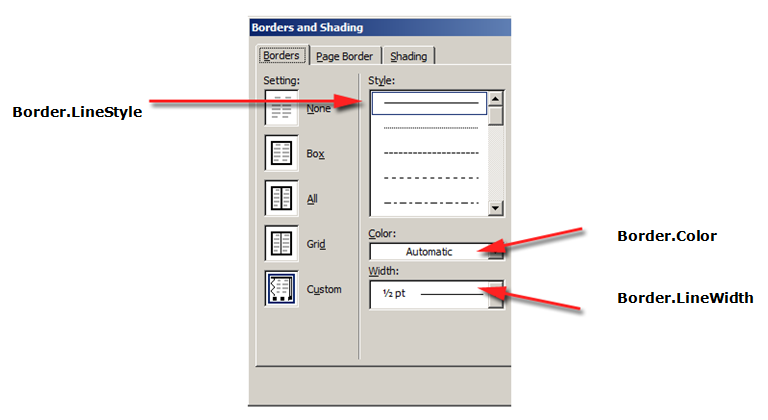
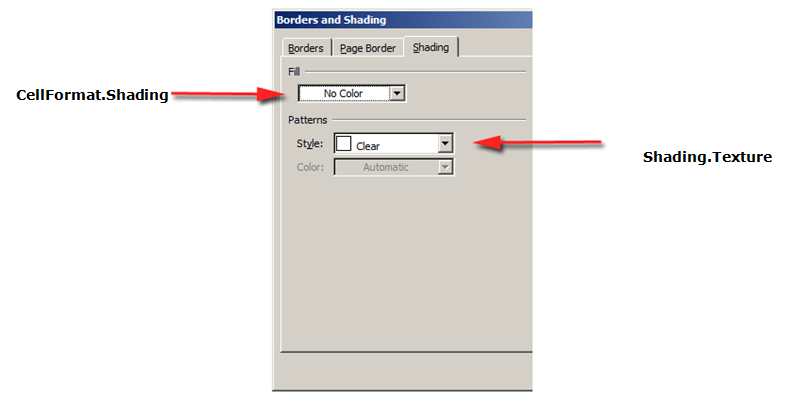
Borders and shading can be applied either to the entire table using Table.SetBorder, Table.SetBorders and Table.SetShading, or only to specific cells using CellFormat.Borders and CellFormat.Shading. Additionally, row borders can be set using RowFormat.Borders, however shading cannot be applied in this way.
The pictures below show the border and shadow settings in Microsoft Word and their corresponding properties in Aspose.Words.
The following code example shows how to format a table and cell with different borders and shadings:
| // For complete examples and data files, please go to https://github.com/aspose-words/Aspose.Words-for-C.git. | |
| auto doc = MakeObject<Document>(); | |
| auto builder = MakeObject<DocumentBuilder>(doc); | |
| SharedPtr<Table> table = builder->StartTable(); | |
| builder->InsertCell(); | |
| // Set the borders for the entire table. | |
| table->SetBorders(LineStyle::Single, 2.0, System::Drawing::Color::get_Black()); | |
| // Set the cell shading for this cell. | |
| builder->get_CellFormat()->get_Shading()->set_BackgroundPatternColor(System::Drawing::Color::get_Red()); | |
| builder->Writeln(u"Cell #1"); | |
| builder->InsertCell(); | |
| // Specify a different cell shading for the second cell. | |
| builder->get_CellFormat()->get_Shading()->set_BackgroundPatternColor(System::Drawing::Color::get_Green()); | |
| builder->Writeln(u"Cell #2"); | |
| builder->EndRow(); | |
| // Clear the cell formatting from previous operations. | |
| builder->get_CellFormat()->ClearFormatting(); | |
| builder->InsertCell(); | |
| // Create larger borders for the first cell of this row. This will be different | |
| // compared to the borders set for the table. | |
| builder->get_CellFormat()->get_Borders()->get_Left()->set_LineWidth(4.0); | |
| builder->get_CellFormat()->get_Borders()->get_Right()->set_LineWidth(4.0); | |
| builder->get_CellFormat()->get_Borders()->get_Top()->set_LineWidth(4.0); | |
| builder->get_CellFormat()->get_Borders()->get_Bottom()->set_LineWidth(4.0); | |
| builder->Writeln(u"Cell #3"); | |
| builder->InsertCell(); | |
| builder->get_CellFormat()->ClearFormatting(); | |
| builder->Writeln(u"Cell #4"); | |
| doc->Save(ArtifactsDir + u"WorkingWithTableStylesAndFormatting.FormatTableAndCellWithDifferentBorders.docx"); |
Analyzing your prompt, please hold on...
An error occurred while retrieving the results. Please refresh the page and try again.