
Python でプレゼンテーションのテキストボックスを管理する
導入
Aspose.Slides for Python via .NET では、スライドのテキストはシェイプに属するテキストフレームに格納されます。AutoShape クラスは最も一般的なテキストを保持するシェイプを表し、そのテキストは AutoShape.text_frame プロパティで取得できます。
Note
すべての AutoShape は Shape を継承しますが、すべてのシェイプが AutoShape であるわけでもテキストフレームをサポートしているわけでもありません。既存のプレゼンテーションを処理する際は、テキストにアクセスする前にisinstance(shape, slides.AutoShape) を使用してシェイプのタイプを確認してください。
スライド上にテキストボックスを作成する
テキストボックスを作成するには、スライドに AutoShape を追加し、そのテキストフレームにテキストを設定してプレゼンテーションを保存します。以下の例は長方形のテキストボックスを作成します。
import aspose.slides as slides

with slides.Presentation() as presentation:
    slide = presentation.slides[0]
    text_box = slide.shapes.add_auto_shape(slides.ShapeType.RECTANGLE, 150, 75, 300, 50)
    text_box.add_text_frame("Aspose TextBox")

    presentation.save("TextBox.pptx", slides.export.SaveFormat.PPTX)
座標とサイズは ShapeCollection.add_auto_shape にポイント単位で渡されます。AutoShape.add_text_frame は指定されたテキストでテキストフレームを初期化します。
テキストボックスシェイプかどうかの確認
テキストボックスとして扱われるかどうかは、AutoShape.is_text_box プロパティで判断できます。プレゼンテーションにテキストを保持する AutoShape と純粋にグラフィックだけの AutoShape が混在している場合に便利です。
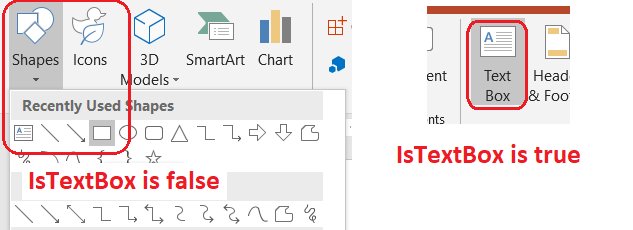
以下の例はプレゼンテーション内のすべての AutoShape を検査します。
import aspose.slides as slides

with slides.Presentation() as presentation:
    slide = presentation.slides[0]
    text_box = slide.shapes.add_auto_shape(slides.ShapeType.RECTANGLE, 10, 10, 120, 40)
    text_box.add_text_frame("Text box")
    slide.shapes.add_auto_shape(slides.ShapeType.ELLIPSE, 150, 10, 40, 40)

    for current_slide in presentation.slides:
        for shape in current_slide.shapes:
            if isinstance(shape, slides.AutoShape):
                print("The shape is a text box." if shape.is_text_box else "The shape is not a text box.")
新しく追加された AutoShape は、空でないテキストが含まれるまでテキストボックスとはみなされません。そのテキストは AutoShape.add_text_frame または TextFrame.text で設定できます。空文字列を追加または代入すると、is_text_box は False のままです。
import aspose.slides as slides

with slides.Presentation() as presentation:
    slide = presentation.slides[0]

    shape1 = slide.shapes.add_auto_shape(slides.ShapeType.RECTANGLE, 10, 10, 100, 40)
    shape1.add_text_frame("Shape 1")
    print(shape1.is_text_box)

    shape2 = slide.shapes.add_auto_shape(slides.ShapeType.RECTANGLE, 10, 70, 100, 40)
    shape2.text_frame.text = "Shape 2"
    print(shape2.is_text_box)

    shape3 = slide.shapes.add_auto_shape(slides.ShapeType.RECTANGLE, 10, 130, 100, 40)
    shape3.add_text_frame("")
    print(shape3.is_text_box)

    shape4 = slide.shapes.add_auto_shape(slides.ShapeType.RECTANGLE, 10, 190, 100, 40)
    shape4.text_frame.text = ""
    print(shape4.is_text_box)
最初の 2 回の呼び出しは True を出力し、後の 2 回は False を出力します。
テキストフレームを所有するシェイプを見つける
汎用的なテキスト処理コードは、どのプレゼンテーションオブジェクトが所有しているか分からないまま TextFrame を受け取ることがあります。読み取り専用の TextFrame.parent_shape プロパティを使って、所有する Shape に遡ることができます。
AutoShape や他のテキストを保持するシェイプが所有するテキストフレームの場合、parent_shape に所有者が格納され、TextFrame.parent_cell は None です。アクセスする前に取得した値を確認してください。シェイプとテーブルセルの所有者(SmartArt ノードに関連付けられたシェイプを含む)を特定するには、Search and Replace Text を参照してください。
テキストボックスに列を追加する
TextFrameFormat.column_count プロパティはテキストフレームを列に分割し、TextFrameFormat.column_spacing は列間の間隔をポイントで設定します。これらはどちらも TextFrameFormat に属し、既存のテキストボックスのテキストフレームを介して変更できます。テキストは同一シェイプ内の列間で再配置され、別のシェイプへは続きません。
以下の例は、列間 10 ポイントの 3 列テキストボックスを作成し、プレゼンテーションを保存し、出力ファイルから設定を読み戻します。
import aspose.slides as slides

with slides.Presentation() as presentation:
    slide = presentation.slides[0]
    text_box = slide.shapes.add_auto_shape(slides.ShapeType.RECTANGLE, 100, 100, 300, 200)
    text_box.add_text_frame("This text is distributed automatically across all columns in the text box.")

    text_frame_format = text_box.text_frame.text_frame_format
    text_frame_format.column_count = 3
    text_frame_format.column_spacing = 10

    presentation.save("TextBoxColumns.pptx", slides.export.SaveFormat.PPTX)

with slides.Presentation("TextBoxColumns.pptx") as saved_presentation:
    saved_text_box = saved_presentation.slides[0].shapes[0]
    if isinstance(saved_text_box, slides.AutoShape):
        saved_format = saved_text_box.text_frame.text_frame_format
        print(f"Columns: {saved_format.column_count}; spacing: {saved_format.column_spacing} points")
個々の列からテキストを抽出する
既存のテキストフレーム内の各ビジュアル列に割り当てられたテキストを取得するには、TextFrame.split_text_by_columns を使用します。このメソッドは列ごとに 1 つの文字列を、列の読み順で返します。単一列のテキストフレームは要素が 1 つのリストを生成し、空の列は空文字列で表されます。返される文字列はプレーンテキストのみで、部分レベルの書式は保持されません。
これは次のような場合に便利です:
- 列ベースの読み順を保ったままテキストを抽出する。
- マルチ列スライドの内容をインデックス化または比較する。
- 各列を別々のファイル、データベースフィールド、またはその他の宛先にエクスポートする。
- フォントやテキストフレームのサイズ、TextFrameFormat.column_count、TextFrameFormat.column_spacing を変更した後、テキストがどのように再配置されるかを調査する。
このメソッドは現在の TextFrame 内に配分されたテキストを報告します。別々のシェイプやテキストボックス間で自動的にテキストが流れることはありません。列の配分は利用可能なフォントやその他のテキストレイアウト設定に依存するため、一貫した結果が必要な場合は必要なフォントが利用可能であることを確認してください。
以下の例はプレゼンテーションを読み込み、テキストフレームを持つ最初のマルチ列 AutoShape を見つけ、設定された列数を取得し、各列のテキストを別々のファイルに書き出します。テキストフレームを持たないシェイプはスキップされます。
import aspose.slides as slides

with slides.Presentation("MultiColumnText.pptx") as presentation:
    text_box = None
    for shape in presentation.slides[0].shapes:
        if isinstance(shape, slides.AutoShape) and shape.text_frame is not None:
            column_count = shape.text_frame.text_frame_format.column_count
            if column_count > 1:
                text_box = shape
                break

    if text_box is None:
        print("No multi-column text frame was found.")
    else:
        text_frame = text_box.text_frame
        configured_column_count = text_frame.text_frame_format.column_count
        column_texts = text_frame.split_text_by_columns()

        print(f"Configured columns: {configured_column_count}")

        for column_number, column_text in enumerate(column_texts, start=1):
            print(f"Column {column_number}: {column_text}")
            with open(f"Column-{column_number}.txt", "w", encoding="utf-8") as column_file:
                column_file.write(column_text)
テキストの更新
プレゼンテーション全体のテキストを更新するには、スライドとシェイプを順に走査し、AutoShape を選択してテキストの部分を編集します。部分レベルで作業することで、テキストと文字書式の両方を変更できます。
以下の例は、AutoShape のテキスト内の years をすべて months に置換し、対象となった部分を太字にします。
import aspose.slides as slides

with slides.Presentation("Text.pptx") as presentation:
    for slide in presentation.slides:
        for shape in slide.shapes:
            if not isinstance(shape, slides.AutoShape) or shape.text_frame is None:
                continue

            for paragraph in shape.text_frame.paragraphs:
                for portion in paragraph.portions:
                    if "years" in portion.text:
                        portion.text = portion.text.replace("years", "months")
                        portion.portion_format.font_bold = slides.NullableBool.TRUE

    presentation.save("TextChanged.pptx", slides.export.SaveFormat.PPTX)
この走査は AutoShape のテキストのみを更新します。テーブル、チャート、SmartArt、またはグループ化されたシェイプに格納されたテキストは、それらオブジェクトのコレクションを走査する必要があります。
ハイパーリンク付きテキストボックスの追加
ハイパーリンクは特定のテキスト部分に割り当てることができ、その部分だけがクリック可能なリンクになります。HyperlinkManager.set_external_hyperlink_click を使用して、部分と外部 URL を関連付けます。
以下の例はリンク付きテキストを作成し、プレゼンテーションに保存します。
import aspose.slides as slides

with slides.Presentation() as presentation:
    slide = presentation.slides[0]
    text_box = slide.shapes.add_auto_shape(slides.ShapeType.RECTANGLE, 150, 150, 200, 50)
    text_box.add_text_frame("Aspose.Slides")

    text_portion = text_box.text_frame.paragraphs[0].portions[0]
    text_portion.portion_format.hyperlink_manager.set_external_hyperlink_click("https://www.aspose.com/")

    presentation.save("Hyperlink.pptx", slides.export.SaveFormat.PPTX)
FAQ
テキストボックスとマスターまたはレイアウトスライド上のテキストプレースホルダーの違いは何ですか?
placeholder は、master slide または layout slide から位置と書式を継承できます。通常のテキストボックスは作成されたスライド上の独立したシェイプであり、レイアウトが変更されてもプレースホルダーの動作を取得しません。
チャート、テーブル、または SmartArt のテキストを変更せずにテキストを置換するにはどうすればよいですか?
Update Text の例のように、走査を AutoShape のインスタンスに限定してください。チャート、テーブル、SmartArt はそれぞれ独自のオブジェクトモデルにテキストを保持しているため、そのループでは変更されません。