
จัดการกล่องข้อความในงานนำเสนอด้วย Python
Introduction
ใน Aspose.Slides for Python ผ่าน .NET, ข้อความบนสไลด์จะถูกเก็บใน text frame ที่เป็นส่วนหนึ่งของ shape. คลาส AutoShape แสดงถึง shape ที่มีข้อความบ่อยที่สุดและเปิดเผยข้อความของมันผ่านคุณสมบัติ AutoShape.text_frame.
Note
ทุก auto shape สืบทอดมาจาก Shape, แต่ไม่ใช่ทุก shape เป็น auto shape หรือรองรับ text frame. เมื่อประมวลผลงานนำเสนอที่มีอยู่, ใช้isinstance(shape, slides.AutoShape) เพื่อตรวจสอบชนิดของ shape ก่อนเข้าถึงข้อความของมัน.
สร้าง Text Box บนสไลด์
เพื่อสร้าง text box, ให้เพิ่ม auto shape ลงในสไลด์, เพิ่มข้อความใน text frame ของมัน, และบันทึกงานนำเสนอ. ตัวอย่างต่อไปนี้สร้าง text box ในรูปสี่เหลี่ยม:
import aspose.slides as slides

with slides.Presentation() as presentation:
    slide = presentation.slides[0]
    text_box = slide.shapes.add_auto_shape(slides.ShapeType.RECTANGLE, 150, 75, 300, 50)
    text_box.add_text_frame("Aspose TextBox")

    presentation.save("TextBox.pptx", slides.export.SaveFormat.PPTX)
พิกัดและขนาดที่ส่งไปยัง ShapeCollection.add_auto_shape วัดเป็นจุด. AutoShape.add_text_frame จะเริ่มต้น text frame ด้วยข้อความที่ระบุ.
ตรวจสอบ Shape ที่เป็น Text Box
ใช้คุณสมบัติ AutoShape.is_text_box เพื่อตรวจสอบว่า auto shape ถูกถือเป็น text box หรือไม่. สิ่งนี้เป็นประโยชน์เมื่องานนำเสนอมีทั้ง auto shape ที่มีข้อความและที่เป็นกราฟิกเท่านั้น.
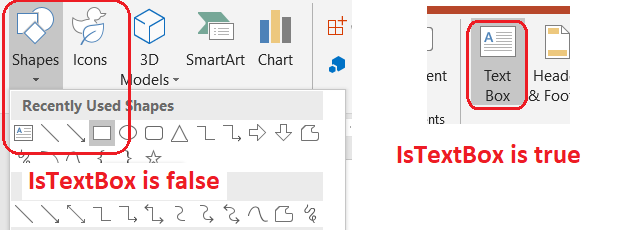
ตัวอย่างต่อไปนี้ตรวจสอบทุก auto shape ในงานนำเสนอ:
import aspose.slides as slides

with slides.Presentation() as presentation:
    slide = presentation.slides[0]
    text_box = slide.shapes.add_auto_shape(slides.ShapeType.RECTANGLE, 10, 10, 120, 40)
    text_box.add_text_frame("Text box")
    slide.shapes.add_auto_shape(slides.ShapeType.ELLIPSE, 150, 10, 40, 40)

    for current_slide in presentation.slides:
        for shape in current_slide.shapes:
            if isinstance(shape, slides.AutoShape):
                print("The shape is a text box." if shape.is_text_box else "The shape is not a text box.")
Auto shape ที่เพิ่มใหม่จะไม่ถือเป็น text box จนกว่าจะมีข้อความที่ไม่ว่าง. คุณสามารถระบุข้อความนั้นผ่าน AutoShape.add_text_frame หรือ TextFrame.text. การเพิ่มหรือกำหนดสตริงว่างทำให้ is_text_box มีค่า False:
import aspose.slides as slides

with slides.Presentation() as presentation:
    slide = presentation.slides[0]

    shape1 = slide.shapes.add_auto_shape(slides.ShapeType.RECTANGLE, 10, 10, 100, 40)
    shape1.add_text_frame("Shape 1")
    print(shape1.is_text_box)

    shape2 = slide.shapes.add_auto_shape(slides.ShapeType.RECTANGLE, 10, 70, 100, 40)
    shape2.text_frame.text = "Shape 2"
    print(shape2.is_text_box)

    shape3 = slide.shapes.add_auto_shape(slides.ShapeType.RECTANGLE, 10, 130, 100, 40)
    shape3.add_text_frame("")
    print(shape3.is_text_box)

    shape4 = slide.shapes.add_auto_shape(slides.ShapeType.RECTANGLE, 10, 190, 100, 40)
    shape4.text_frame.text = ""
    print(shape4.is_text_box)
สองเรียกแรกพิมพ์ True; สองเรียกสุดท้ายพิมพ์ False.
ค้นหา Shape ที่เป็นเจ้าของ Text Frame
โค้ดประมวลผลข้อความทั่วไปอาจได้รับ TextFrame โดยไม่รู้ว่าอ็อบเจ็กต์งานนำเสนอใดเป็นเจ้าของ. ใช้คุณสมบัติอ่านอย่างเดียว TextFrame.parent_shape เพื่อนำทางกลับไปยัง Shape ที่เป็นเจ้าของ.
สำหรับ text frame ที่เป็นของ auto shape หรือ shape ที่มีข้อความอื่น, parent_shape จะมีเจ้าของและ TextFrame.parent_cell จะเป็น None. ควรตรวจสอบค่าที่คืนมาก่อนเข้าถึง. เพื่อระบุเจ้าของทั้ง shape และเซลล์ตาราง, รวมถึง shape ที่เชื่อมกับโหนด SmartArt, ดูที่ Search and Replace Text.
เพิ่มคอลัมน์ให้กับ Text Box
คุณสมบัติ TextFrameFormat.column_count จะแบ่ง text frame เป็นคอลัมน์, ส่วน TextFrameFormat.column_spacing กำหนดช่องว่างระหว่างคอลัมน์เป็นจุด. ทั้งสองการตั้งค่านี้เป็นของ TextFrameFormat และสามารถเปลี่ยนได้ผ่าน text frame ของ text box ที่มีอยู่. ข้อความจะไหลใหม่ระหว่างคอลัมน์ภายใน shape เดียว; ไม่ต่อเนื่องไปยัง shape อื่น.
ตัวอย่างต่อไปนี้สร้าง text box ที่มีสามคอลัมน์โดยมีระยะห่าง 10 จุดระหว่างคอลัมน์, บันทึกงานนำเสนอ, และอ่านค่าการตั้งค่าที่จัดเก็บจากไฟล์ผลลัพธ์:
import aspose.slides as slides

with slides.Presentation() as presentation:
    slide = presentation.slides[0]
    text_box = slide.shapes.add_auto_shape(slides.ShapeType.RECTANGLE, 100, 100, 300, 200)
    text_box.add_text_frame("This text is distributed automatically across all columns in the text box.")

    text_frame_format = text_box.text_frame.text_frame_format
    text_frame_format.column_count = 3
    text_frame_format.column_spacing = 10

    presentation.save("TextBoxColumns.pptx", slides.export.SaveFormat.PPTX)

with slides.Presentation("TextBoxColumns.pptx") as saved_presentation:
    saved_text_box = saved_presentation.slides[0].shapes[0]
    if isinstance(saved_text_box, slides.AutoShape):
        saved_format = saved_text_box.text_frame.text_frame_format
        print(f"Columns: {saved_format.column_count}; spacing: {saved_format.column_spacing} points")
สกัดข้อความจากแต่ละคอลัมน์
ใช้ TextFrame.split_text_by_columns เพื่อดึงข้อความที่กำหนดให้แต่ละคอลัมน์ที่มองเห็นได้ใน text frame ที่มีอยู่. วิธีนี้จะคืนสตริงหนึ่งรายการต่อแต่ละคอลัมน์, ตามลำดับการอ่านตามคอลัมน์. text frame ที่มีหนึ่งคอลัมน์จะให้รายการที่มีหนึ่งสมาชิก, และคอลัมน์ที่ว่างจะเป็นสตริงว่าง. สตริงเหล่านี้มีเฉพาะข้อความธรรมดา; การฟอร์แมตระดับส่วนจะไม่ถูกเก็บไว้.
เป็นประโยชน์เมื่อคุณต้องการ:
- สกัดข้อความพร้อมรักษาลำดับการอ่านตามคอลัมน์
- ทำดัชนีหรือเปรียบเทียบเนื้อหาของสไลด์หลายคอลัมน์
- ส่งออกแต่ละคอลัมน์ไปยังไฟล์แยก, ฟิลด์ฐานข้อมูล, หรือปลายทางอื่น
- ตรวจสอบว่าข้อความถูกจัดสรรใหม่อย่างไรหลังจากเปลี่ยน TextFrameFormat.column_count, TextFrameFormat.column_spacing, แบบอักษร, หรือขนาดของ text-frame
วิธีนี้รายงานข้อความที่กระจายภายใน TextFrame ปัจจุบัน; มันจะไม่ไหลข้อความโดยอัตโนมัติระหว่าง shape หรือ text box แยกกัน. การจัดคอลัมน์อาจขึ้นอยู่กับแบบอักษรที่มีและการตั้งค่าเลย์เอาต์ข้อความอื่น, ดังนั้นควรตรวจสอบว่าแบบอักษรที่ต้องการพร้อมใช้งานเมื่อต้องการผลลัพธ์ที่สอดคล้อง.
ตัวอย่างต่อไปนี้โหลดงานนำเสนอ, ค้นหา auto shape ที่มีหลายคอลัมน์และมี text frame เป็นอันแรก, อ่านค่าการตั้งค่าจำนวนคอลัมน์, และเขียนข้อความจากแต่ละคอลัมน์ไปยังไฟล์แยก. Shape ที่ไม่มี text frame จะถูกละเว้น.
import aspose.slides as slides

with slides.Presentation("MultiColumnText.pptx") as presentation:
    text_box = None
    for shape in presentation.slides[0].shapes:
        if isinstance(shape, slides.AutoShape) and shape.text_frame is not None:
            column_count = shape.text_frame.text_frame_format.column_count
            if column_count > 1:
                text_box = shape
                break

    if text_box is None:
        print("No multi-column text frame was found.")
    else:
        text_frame = text_box.text_frame
        configured_column_count = text_frame.text_frame_format.column_count
        column_texts = text_frame.split_text_by_columns()

        print(f"Configured columns: {configured_column_count}")

        for column_number, column_text in enumerate(column_texts, start=1):
            print(f"Column {column_number}: {column_text}")
            with open(f"Column-{column_number}.txt", "w", encoding="utf-8") as column_file:
                column_file.write(column_text)
อัปเดตข้อความ
เพื่ออัปเดตข้อความทั่วทั้งงานนำเสนอ, ให้วนรอบสไลด์และ shape, เลือก auto shape, แล้วแก้ไขส่วนข้อความของมัน. การทำงานในระดับส่วนช่วยให้คุณเปลี่ยนทั้งข้อความและการฟอร์แมตอักษร.
ตัวอย่างต่อไปนี้แทนที่ทุก occurrence ของ years ด้วย months ในข้อความของ auto-shape และทำให้แต่ละส่วนที่ได้รับผลกระทบเป็นตัวหนา:
import aspose.slides as slides

with slides.Presentation("Text.pptx") as presentation:
    for slide in presentation.slides:
        for shape in slide.shapes:
            if not isinstance(shape, slides.AutoShape) or shape.text_frame is None:
                continue

            for paragraph in shape.text_frame.paragraphs:
                for portion in paragraph.portions:
                    if "years" in portion.text:
                        portion.text = portion.text.replace("years", "months")
                        portion.portion_format.font_bold = slides.NullableBool.TRUE

    presentation.save("TextChanged.pptx", slides.export.SaveFormat.PPTX)
การวนรอบนี้อัปเดตข้อความเฉพาะใน auto shapes. ข้อความที่เก็บอยู่ในตาราง, ชาร์ต, SmartArt, หรือ shape ที่จัดกลุ่มต้องการการวนรอบในคอลเลกชันของอ็อบเจ็กต์เหล่านั้น.
เพิ่ม Text Box พร้อมลิงก์
ลิงก์สามารถกำหนดให้กับส่วนข้อความเฉพาะ, ดังนั้นเฉพาะข้อความนั้นจะทำหน้าที่เป็นลิงก์ที่คลิกได้. ใช้ HyperlinkManager.set_external_hyperlink_click เพื่อเชื่อมส่วนนั้นกับ URL ภายนอก.
ตัวอย่างต่อไปนี้สร้างข้อความที่มีลิงก์และบันทึกลงในงานนำเสนอ:
import aspose.slides as slides

with slides.Presentation() as presentation:
    slide = presentation.slides[0]
    text_box = slide.shapes.add_auto_shape(slides.ShapeType.RECTANGLE, 150, 150, 200, 50)
    text_box.add_text_frame("Aspose.Slides")

    text_portion = text_box.text_frame.paragraphs[0].portions[0]
    text_portion.portion_format.hyperlink_manager.set_external_hyperlink_click("https://www.aspose.com/")

    presentation.save("Hyperlink.pptx", slides.export.SaveFormat.PPTX)
FAQ
ข้อความ Text Box กับ Placeholder บนสไลด์แม่หรือเลย์เอาต์ต่างกันอย่างไร?
placeholder สามารถสืบทอดตำแหน่งและการจัดรูปแบบจาก master slide หรือ layout slide. Text box ปกติเป็น shape ที่เป็นอิสระบนสไลด์ที่สร้างขึ้นและจะไม่รับพฤติกรรม placeholder เมื่อเลย์เอาต์เปลี่ยนแปลง.
ฉันจะทำอย่างไรเพื่อแทนที่ข้อความโดยไม่เปลี่ยนแปลงข้อความในชาร์ต, ตาราง, หรือ SmartArt?
จำกัดการวนรอบให้กับอินสแตนซ์ของ AutoShape เท่านั้น, ตามที่แสดงในตัวอย่างอัปเดตข้อความ. ชาร์ต, ตาราง, และ SmartArt เก็บข้อความในโมเดลอ็อบเจ็กต์ของตนเอง, ดังนั้นจึงไม่ถูกแก้ไขโดยลูปนั้น.