
C++를 사용하여 프레젠테이션에서 텍스트 상자 관리
소개
Aspose.Slides for C++에서 슬라이드 텍스트는 도형에 속하는 텍스트 프레임에 저장됩니다. IAutoShape 인터페이스는 가장 일반적인 텍스트가 포함된 도형을 나타내며, 해당 텍스트를 IAutoShape::get_TextFrame 메서드를 통해 노출합니다.
Note
모든 자동 도형은 IShape을 구현하지만, 모든 도형이 자동 도형이거나 텍스트 프레임을 지원하는 것은 아닙니다. 기존 프레젠테이션을 처리할 때, 텍스트에 접근하기 전에 도형이 IAutoShape을 구현하는지 확인하십시오.슬라이드에 텍스트 상자 만들기
텍스트 상자를 만들려면 슬라이드에 자동 도형을 추가하고, 해당 도형의 텍스트 프레임에 텍스트를 추가한 다음 프레젠테이션을 저장합니다. 다음 예제는 직사각형 텍스트 상자를 생성합니다:
#include <DOM/IAutoShape.h>
#include <DOM/IShapeCollection.h>
#include <DOM/ISlide.h>
#include <DOM/Presentation.h>
#include <DOM/ShapeType.h>
#include <Export/SaveFormat.h>
#include <system/shared_ptr.h>

using namespace Aspose::Slides;
using namespace Aspose::Slides::Export;
using namespace System;

auto presentation = MakeObject<Presentation>();
auto slide = presentation->get_Slide(0);
auto textBox = slide->get_Shapes()->AddAutoShape(ShapeType::Rectangle, 150, 75, 300, 50);
textBox->AddTextFrame(u"Aspose TextBox");

presentation->Save(u"TextBox.pptx", SaveFormat::Pptx);
IShapeCollection::AddAutoShape에 전달되는 좌표와 크기는 포인트 단위로 측정됩니다. IAutoShape::AddTextFrame은 제공된 텍스트로 텍스트 프레임을 초기화합니다.
텍스트 상자 도형 확인
IAutoShape::get_IsTextBox 메서드를 사용하여 자동 도형이 텍스트 상자로 처리되는지 판단합니다. 프레젠테이션에 텍스트가 포함된 도형과 순수 그래픽 자동 도형이 모두 포함된 경우에 유용합니다.
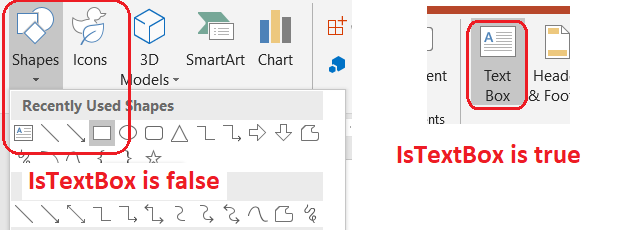
다음 예제는 프레젠테이션의 모든 자동 도형을 검사합니다:
#include <DOM/IAutoShape.h>
#include <DOM/IShapeCollection.h>
#include <DOM/ISlide.h>
#include <DOM/ISlideCollection.h>
#include <DOM/Presentation.h>
#include <DOM/ShapeType.h>
#include <system/console.h>
#include <system/enumerator_adapter.h>
#include <system/object_ext.h>
#include <system/shared_ptr.h>

using namespace Aspose::Slides;
using namespace System;

auto presentation = MakeObject<Presentation>();
auto slide = presentation->get_Slide(0);
auto textBox = slide->get_Shapes()->AddAutoShape(ShapeType::Rectangle, 10, 10, 120, 40);
textBox->AddTextFrame(u"Text box");
slide->get_Shapes()->AddAutoShape(ShapeType::Ellipse, 150, 10, 40, 40);

for (const auto& currentSlide : IterateOver(presentation->get_Slides()))
{
    for (const auto& shape : IterateOver(currentSlide->get_Shapes()))
    {
        auto autoShape = AsCast<IAutoShape>(shape);
        if (autoShape != nullptr)
        {
            Console::WriteLine(autoShape->get_IsTextBox() ? u"The shape is a text box." : u"The shape is not a text box.");
        }
    }
}
새로 추가된 자동 도형은 비어 있지 않은 텍스트를 포함하기 전까지 텍스트 상자로 간주되지 않습니다. 해당 텍스트는 IAutoShape::AddTextFrame 또는 ITextFrame::set_Text를 통해 제공할 수 있습니다. 빈 문자열을 추가하거나 할당하면 IAutoShape::get_IsTextBox가 false를 반환합니다:
#include <DOM/IAutoShape.h>
#include <DOM/IShapeCollection.h>
#include <DOM/ISlide.h>
#include <DOM/ITextFrame.h>
#include <DOM/Presentation.h>
#include <DOM/ShapeType.h>
#include <system/console.h>
#include <system/shared_ptr.h>

using namespace Aspose::Slides;
using namespace System;

auto presentation = MakeObject<Presentation>();
auto slide = presentation->get_Slide(0);

auto shape1 = slide->get_Shapes()->AddAutoShape(ShapeType::Rectangle, 10, 10, 100, 40);
shape1->AddTextFrame(u"Shape 1");
Console::WriteLine(shape1->get_IsTextBox());

auto shape2 = slide->get_Shapes()->AddAutoShape(ShapeType::Rectangle, 10, 70, 100, 40);
shape2->get_TextFrame()->set_Text(u"Shape 2");
Console::WriteLine(shape2->get_IsTextBox());

auto shape3 = slide->get_Shapes()->AddAutoShape(ShapeType::Rectangle, 10, 130, 100, 40);
shape3->AddTextFrame(u"");
Console::WriteLine(shape3->get_IsTextBox());

auto shape4 = slide->get_Shapes()->AddAutoShape(ShapeType::Rectangle, 10, 190, 100, 40);
shape4->get_TextFrame()->set_Text(u"");
Console::WriteLine(shape4->get_IsTextBox());
첫 번째와 두 번째 검사는 true를 반환하고, 마지막 두 검사는 false를 반환합니다.
텍스트 프레임을 소유하는 도형 찾기
일반 텍스트 처리 코드는 어느 프레젠테이션 객체에 포함되어 있는지 모르는 ITextFrame을 받을 수 있습니다. ITextFrame::get_ParentShape 메서드를 사용하여 소유 도형인 IShape으로 돌아갈 수 있습니다.
자동 도형이나 다른 텍스트가 포함된 도형이 소유하는 텍스트 프레임의 경우, ITextFrame::get_ParentShape은 소유자를 반환하고 ITextFrame::get_ParentCell은 nullptr를 반환합니다. 두 메서드 모두 읽기 전용 탐색을 제공하므로, 접근하기 전에 반환값이 nullptr인지 확인하십시오. SmartArt 노드와 연결된 도형을 포함한 도형 및 표 셀 소유자를 식별하려면 Search and Replace Text를 참조하십시오.
텍스트 상자에 열 추가
ITextFrameFormat::set_ColumnCount 메서드는 텍스트 프레임을 열로 나누고, ITextFrameFormat::set_ColumnSpacing 메서드는 열 사이의 간격을 포인트 단위로 설정합니다. 두 메서드는 ITextFrameFormat에 속하며 기존 텍스트 상자의 텍스트 프레임을 통해 호출할 수 있습니다. 텍스트는 동일한 도형 내에서 열 사이에 재배치되며 다른 도형으로 흐르지는 않습니다.
다음 예제는 열 간격 10포인트인 3열 텍스트 상자를 생성하고 프레젠테이션을 저장한 뒤 출력 파일에서 저장된 설정을 다시 읽어옵니다:
#include <DOM/IAutoShape.h>
#include <DOM/IShapeCollection.h>
#include <DOM/ISlide.h>
#include <DOM/ITextFrame.h>
#include <DOM/ITextFrameFormat.h>
#include <DOM/Presentation.h>
#include <DOM/ShapeType.h>
#include <Export/SaveFormat.h>
#include <system/console.h>
#include <system/object_ext.h>
#include <system/shared_ptr.h>

using namespace Aspose::Slides;
using namespace Aspose::Slides::Export;
using namespace System;

auto presentation = MakeObject<Presentation>();
auto slide = presentation->get_Slide(0);
auto textBox = slide->get_Shapes()->AddAutoShape(ShapeType::Rectangle, 100, 100, 300, 200);
textBox->AddTextFrame(u"This text is distributed automatically across all columns in the text box.");

auto textFrameFormat = textBox->get_TextFrame()->get_TextFrameFormat();
textFrameFormat->set_ColumnCount(3);
textFrameFormat->set_ColumnSpacing(10);

presentation->Save(u"TextBoxColumns.pptx", SaveFormat::Pptx);

auto savedPresentation = MakeObject<Presentation>(u"TextBoxColumns.pptx");
auto savedTextBox = ExplicitCast<IAutoShape>(savedPresentation->get_Slide(0)->get_Shape(0));
auto savedFormat = savedTextBox->get_TextFrame()->get_TextFrameFormat();
Console::WriteLine(u"Columns: {0}; spacing: {1} points", savedFormat->get_ColumnCount(), savedFormat->get_ColumnSpacing());
개별 열에서 텍스트 추출
ITextFrame::SplitTextByColumns를 사용하여 기존 텍스트 프레임에서 각 시각적 열에 할당된 텍스트를 가져올 수 있습니다. 이 메서드는 열 기반 읽기 순서에 따라 각 열마다 하나의 문자열을 반환합니다. 단일 열 텍스트 프레임은 요소가 하나인 배열을 반환하고, 빈 열은 빈 문자열로 표시됩니다. 반환되는 문자열에는 순수 텍스트만 포함되며, 부분 수준 서식은 보존되지 않습니다.
다음과 같은 경우에 유용합니다:
- 열 기반 읽기 순서를 유지하면서 텍스트를 추출해야 할 때.
- 다중 열 슬라이드의 내용을 인덱싱하거나 비교할 때.
- 각 열을 별도의 파일, 데이터베이스 필드 또는 다른 대상으로 내보낼 때.
- ITextFrameFormat::set_ColumnCount 또는 ITextFrameFormat::set_ColumnSpacing으로 열 개수 또는 간격을 설정하거나 글꼴이나 텍스트 프레임 크기를 변경한 후 텍스트가 어떻게 재배치되는지 검사할 때.
이 메서드는 현재 ITextFrame에 배포된 텍스트를 보고할 뿐이며, 별도의 도형이나 텍스트 상자 간에 자동으로 텍스트가 흐르지는 않습니다. 열 배포는 사용 가능한 글꼴 및 기타 텍스트 레이아웃 설정에 따라 달라질 수 있으므로, 일관된 결과가 중요할 때는 필요한 글꼴이 확보되어 있는지 확인하십시오.
다음 예제는 프레젠테이션을 로드하고, 첫 번째 슬라이드에서 텍스트 프레임을 가진 첫 번째 다중 열 자동 도형을 찾아 구성된 열 개수를 읽은 뒤 각 열의 텍스트를 별도의 파일에 기록합니다. 텍스트 프레임을 제공하지 않는 도형은 건너뜁니다.
#include <DOM/IAutoShape.h>
#include <DOM/IShapeCollection.h>
#include <DOM/ISlide.h>
#include <DOM/ITextFrame.h>
#include <DOM/ITextFrameFormat.h>
#include <DOM/Presentation.h>
#include <system/array.h>
#include <system/console.h>
#include <system/enumerator_adapter.h>
#include <system/io/file.h>
#include <system/object_ext.h>
#include <system/shared_ptr.h>
#include <system/string.h>

using namespace Aspose::Slides;
using namespace System;
using namespace System::IO;

auto presentation = MakeObject<Presentation>(u"MultiColumnText.pptx");

SharedPtr<IAutoShape> textBox = nullptr;
for (const auto& shape : IterateOver(presentation->get_Slide(0)->get_Shapes()))
{
    auto autoShape = AsCast<IAutoShape>(shape);
    if (autoShape != nullptr && autoShape->get_TextFrame() != nullptr)
    {
        auto columnCount = autoShape->get_TextFrame()->get_TextFrameFormat()->get_ColumnCount();
        if (columnCount > 1)
        {
            textBox = autoShape;
            break;
        }
    }
}

if (textBox == nullptr)
{
    Console::WriteLine(u"No multi-column text frame was found.");
}
else
{
    auto textFrame = textBox->get_TextFrame();
    auto configuredColumnCount = textFrame->get_TextFrameFormat()->get_ColumnCount();
    auto columnTexts = textFrame->SplitTextByColumns();

    Console::WriteLine(u"Configured columns: {0}", configuredColumnCount);

    for (auto columnIndex = 0; columnIndex < columnTexts->get_Length(); columnIndex++)
    {
        auto columnNumber = columnIndex + 1;
        auto columnText = columnTexts->idx_get(columnIndex);
        Console::WriteLine(u"Column {0}: {1}", columnNumber, columnText);
        auto fileName = String::Format(u"Column-{0}.txt", columnNumber);
        File::WriteAllText(fileName, columnText);
    }
}
텍스트 업데이트
프레젠테이션 전체의 텍스트를 업데이트하려면 슬라이드와 도형을 순회하면서 자동 도형을 선택하고 해당 도형의 텍스트 부분을 편집합니다. 부분 수준에서 작업하면 텍스트와 문자 서식을 동시에 변경할 수 있습니다.
다음 예제는 각 자동 도형 텍스트 부분에서 years를 months로 교체하고, 영향을 받은 모든 부분을 굵게 만듭니다:
#include <DOM/IAutoShape.h>
#include <DOM/IParagraph.h>
#include <DOM/IParagraphCollection.h>
#include <DOM/IPortion.h>
#include <DOM/IPortionCollection.h>
#include <DOM/IPortionFormat.h>
#include <DOM/IShapeCollection.h>
#include <DOM/ISlide.h>
#include <DOM/ISlideCollection.h>
#include <DOM/ITextFrame.h>
#include <DOM/NullableBool.h>
#include <DOM/Presentation.h>
#include <Export/SaveFormat.h>
#include <system/enumerator_adapter.h>
#include <system/object_ext.h>
#include <system/shared_ptr.h>
#include <system/string.h>

using namespace Aspose::Slides;
using namespace Aspose::Slides::Export;
using namespace System;

auto presentation = MakeObject<Presentation>(u"Text.pptx");

for (const auto& slide : IterateOver(presentation->get_Slides()))
{
    for (const auto& shape : IterateOver(slide->get_Shapes()))
    {
        auto autoShape = AsCast<IAutoShape>(shape);
        if (autoShape == nullptr || autoShape->get_TextFrame() == nullptr)
        {
            continue;
        }

        for (const auto& paragraph : IterateOver(autoShape->get_TextFrame()->get_Paragraphs()))
        {
            for (const auto& portion : IterateOver(paragraph->get_Portions()))
            {
                auto text = portion->get_Text();
                if (!String::IsNullOrEmpty(text) && text.Contains(u"years"))
                {
                    portion->set_Text(text.Replace(u"years", u"months"));
                    portion->get_PortionFormat()->set_FontBold(NullableBool::True);
                }
            }
        }
    }
}

presentation->Save(u"TextChanged.pptx", SaveFormat::Pptx);
이 순회는 자동 도형의 텍스트만 업데이트합니다. 표, 차트, SmartArt 또는 그룹화된 도형에 저장된 텍스트는 해당 객체의 컬렉션을 별도로 순회해야 수정됩니다.
하이퍼링크가 있는 텍스트 상자 추가
하이퍼링크는 특정 텍스트 부분에 할당할 수 있으므로 해당 텍스트만 클릭 가능한 링크로 동작합니다. IHyperlinkManager::SetExternalHyperlinkClick를 사용하여 해당 부분을 외부 URL에 연결합니다.
다음 예제는 하이퍼링크가 포함된 텍스트를 생성하고 프레젠테이션에 저장합니다:
#include <DOM/IAutoShape.h>
#include <DOM/IHyperlinkManager.h>
#include <DOM/IParagraph.h>
#include <DOM/IPortion.h>
#include <DOM/IPortionFormat.h>
#include <DOM/IShapeCollection.h>
#include <DOM/ISlide.h>
#include <DOM/ITextFrame.h>
#include <DOM/Presentation.h>
#include <DOM/ShapeType.h>
#include <Export/SaveFormat.h>
#include <system/shared_ptr.h>

using namespace Aspose::Slides;
using namespace Aspose::Slides::Export;
using namespace System;

auto presentation = MakeObject<Presentation>();
auto slide = presentation->get_Slide(0);
auto textBox = slide->get_Shapes()->AddAutoShape(ShapeType::Rectangle, 150, 150, 200, 50);
textBox->AddTextFrame(u"Aspose.Slides");

auto textPortion = textBox->get_TextFrame()->get_Paragraph(0)->get_Portion(0);
textPortion->get_PortionFormat()->get_HyperlinkManager()->SetExternalHyperlinkClick(u"https://www.aspose.com/");

presentation->Save(u"Hyperlink.pptx", SaveFormat::Pptx);
FAQ
텍스트 상자와 마스터 혹은 레이아웃 슬라이드의 텍스트 자리표시자 사이의 차이점은 무엇인가요?
placeholder는 master slide 또는 layout slide에서 위치와 서식을 상속받을 수 있습니다. 일반 텍스트 상자는 생성된 슬라이드에 독립적인 도형이며 레이아웃이 변경되어도 자리표시자 동작을 획득하지 않습니다.
차트, 표 또는 SmartArt의 텍스트를 변경하지 않고 텍스트만 교체하려면 어떻게 해야 하나요?
Update Text 예제와 같이 IAutoShape을 구현하는 도형만 순회하도록 제한하십시오. 차트, 표 및 SmartArt는 자체 객체 모델에 텍스트를 저장하므로 해당 루프에서는 수정되지 않습니다.