
จัดการกล่องข้อความในงานนำเสนอโดยใช้ C++
บทนำ
ใน Aspose.Slides สำหรับ C++ ข้อความสไลด์จะถูกเก็บในกรอบข้อความที่เป็นส่วนของรูปร่าง ส่วนต่อประสาน [IAutoShape] แสดงถึงรูปแบบที่นิยมที่สุดที่มีข้อความ และเปิดเผยข้อความของมันผ่านเมธอด [IAutoShape::get_TextFrame]。
หมายเหตุ
รูปร่างอัตโนมัติทุกตัวจะทำตาม [IShape] แต่ไม่ใช่ทุกรูปร่างเป็นรูปร่างอัตโนมัติหรือรองรับกรอบข้อความ เมื่อประมวลผลงานนำเสนอที่มีอยู่แล้ว ให้ตรวจสอบว่ารูปร่างทำตาม [IAutoShape] ก่อนเข้าถึงข้อความของมัน。สร้างกล่องข้อความบนสไลด์
เพื่อสร้างกล่องข้อความ ให้เพิ่มรูปร่างอัตโนมัติลงในสไลด์ เพิ่มข้อความลงในกรอบข้อความของมัน แล้วบันทึกงานนำเสนอ ตัวอย่างต่อไปนี้สร้างกล่องข้อความสี่เหลี่ยม:
#include <DOM/IAutoShape.h>
#include <DOM/IShapeCollection.h>
#include <DOM/ISlide.h>
#include <DOM/Presentation.h>
#include <DOM/ShapeType.h>
#include <Export/SaveFormat.h>
#include <system/shared_ptr.h>

using namespace Aspose::Slides;
using namespace Aspose::Slides::Export;
using namespace System;

auto presentation = MakeObject<Presentation>();
auto slide = presentation->get_Slide(0);
auto textBox = slide->get_Shapes()->AddAutoShape(ShapeType::Rectangle, 150, 75, 300, 50);
textBox->AddTextFrame(u"Aspose TextBox");

presentation->Save(u"TextBox.pptx", SaveFormat::Pptx);
พิกัดและขนาดที่ส่งให้ [IShapeCollection::AddAutoShape] ถูกวัดเป็นจุด [IAutoShape::AddTextFrame] จะเริ่มต้นกรอบข้อความด้วยข้อความที่ระบุ
ตรวจสอบรูปแบบกล่องข้อความ
ใช้เมธอด [IAutoShape::get_IsTextBox] เพื่อตรวจสอบว่ารูปร่างอัตโนมัติถูกพิจารณาเป็นกล่องข้อความหรือไม่ ซึ่งมีประโยชน์เมื่องานนำเสนอมีทั้งรูปร่างที่มีข้อความและรูปร่างกราฟิกอย่างเดียว
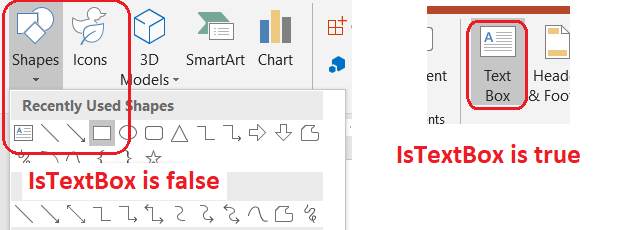
ตัวอย่างต่อไปนี้ตรวจสอบรูปร่างอัตโนมัติทุกตัวในงานนำเสนอ:
#include <DOM/IAutoShape.h>
#include <DOM/IShapeCollection.h>
#include <DOM/ISlide.h>
#include <DOM/ISlideCollection.h>
#include <DOM/Presentation.h>
#include <DOM/ShapeType.h>
#include <system/console.h>
#include <system/enumerator_adapter.h>
#include <system/object_ext.h>
#include <system/shared_ptr.h>

using namespace Aspose::Slides;
using namespace System;

auto presentation = MakeObject<Presentation>();
auto slide = presentation->get_Slide(0);
auto textBox = slide->get_Shapes()->AddAutoShape(ShapeType::Rectangle, 10, 10, 120, 40);
textBox->AddTextFrame(u"Text box");
slide->get_Shapes()->AddAutoShape(ShapeType::Ellipse, 150, 10, 40, 40);

for (const auto& currentSlide : IterateOver(presentation->get_Slides()))
{
    for (const auto& shape : IterateOver(currentSlide->get_Shapes()))
    {
        auto autoShape = AsCast<IAutoShape>(shape);
        if (autoShape != nullptr)
        {
            Console::WriteLine(autoShape->get_IsTextBox() ? u"The shape is a text box." : u"The shape is not a text box.");
        }
    }
}
รูปร่างอัตโนมัติที่เพิ่งเพิ่มจะไม่ถือเป็นกล่องข้อความจนกว่าจะมีข้อความไม่ว่างเปล่า คุณสามารถใส่ข้อความนั้นผ่าน [IAutoShape::AddTextFrame] หรือ [ITextFrame::set_Text] การเพิ่มหรือกำหนดสตริงว่างทำให้ [IAutoShape::get_IsTextBox] คืนค่า false:
#include <DOM/IAutoShape.h>
#include <DOM/IShapeCollection.h>
#include <DOM/ISlide.h>
#include <DOM/ITextFrame.h>
#include <DOM/Presentation.h>
#include <DOM/ShapeType.h>
#include <system/console.h>
#include <system/shared_ptr.h>

using namespace Aspose::Slides;
using namespace System;

auto presentation = MakeObject<Presentation>();
auto slide = presentation->get_Slide(0);

auto shape1 = slide->get_Shapes()->AddAutoShape(ShapeType::Rectangle, 10, 10, 100, 40);
shape1->AddTextFrame(u"Shape 1");
Console::WriteLine(shape1->get_IsTextBox());

auto shape2 = slide->get_Shapes()->AddAutoShape(ShapeType::Rectangle, 10, 70, 100, 40);
shape2->get_TextFrame()->set_Text(u"Shape 2");
Console::WriteLine(shape2->get_IsTextBox());

auto shape3 = slide->get_Shapes()->AddAutoShape(ShapeType::Rectangle, 10, 130, 100, 40);
shape3->AddTextFrame(u"");
Console::WriteLine(shape3->get_IsTextBox());

auto shape4 = slide->get_Shapes()->AddAutoShape(ShapeType::Rectangle, 10, 190, 100, 40);
shape4->get_TextFrame()->set_Text(u"");
Console::WriteLine(shape4->get_IsTextBox());
สองการตรวจสอบแรกคืนค่า true ส่วนสองการตรวจสอบสุดท้ายคืนค่า false
ค้นหารูปร่างที่เป็นเจ้าของกรอบข้อความ
โค้ดประมวลผลข้อความทั่วไปอาจได้รับ [ITextFrame] โดยไม่ทราบว่ามีวัตถุงานนำเสนอใดเป็นเจ้าของ ใช้เมธอด [ITextFrame::get_ParentShape] เพื่อนำทางกลับไปยัง [IShape] ที่เป็นเจ้าของ
สำหรับกรอบข้อความที่เป็นของรูปร่างอัตโนมัติหรือรูปร่างที่มีข้อความอื่น ๆ [ITextFrame::get_ParentShape] จะคืนค่าเจ้าของและ [ITextFrame::get_ParentCell] จะคืนค่า nullptr เมธอดทั้งสองให้การนำทางแบบอ่านอย่างเดียว ตรวจสอบค่าที่คืนว่าเป็น nullptr ก่อนเข้าถึง เพื่อระบุเจ้าของทั้งรูปร่างและเซลล์ของตารางรวมถึงรูปร่างที่เชื่อมกับโหนด SmartArt โปรดดู ค้นหาและแทนที่ข้อความ
เพิ่มคอลัมน์ให้กับกล่องข้อความ
เมธอด [ITextFrameFormat::set_ColumnCount] จะแบ่งกรอบข้อความเป็นคอลัมน์ ในขณะที่ [ITextFrameFormat::set_ColumnSpacing] ตั้งค่าความห่างระหว่างคอลัมน์เป็นจุด เมธอดทั้งสองเป็นสมาชิกของ [ITextFrameFormat] และสามารถเรียกใช้ผ่านกรอบข้อความของกล่องข้อความที่มีอยู่แล้ว ข้อความจะไหลใหม่ระหว่างคอลัมน์ภายในรูปร่างเดียวกัน; จะไม่ต่อเนื่องไปยังรูปร่างอื่น
ตัวอย่างต่อไปนี้สร้างกล่องข้อความสามคอลัมน์โดยเว้นระยะ 10 จุดระหว่างคอลัมน์ บันทึกงานนำเสนอและอ่านการตั้งค่าที่เก็บไว้จากไฟล์ผลลัพธ์:
#include <DOM/IAutoShape.h>
#include <DOM/IShapeCollection.h>
#include <DOM/ISlide.h>
#include <DOM/ITextFrame.h>
#include <DOM/ITextFrameFormat.h>
#include <DOM/Presentation.h>
#include <DOM/ShapeType.h>
#include <Export/SaveFormat.h>
#include <system/console.h>
#include <system/object_ext.h>
#include <system/shared_ptr.h>

using namespace Aspose::Slides;
using namespace Aspose::Slides::Export;
using namespace System;

auto presentation = MakeObject<Presentation>();
auto slide = presentation->get_Slide(0);
auto textBox = slide->get_Shapes()->AddAutoShape(ShapeType::Rectangle, 100, 100, 300, 200);
textBox->AddTextFrame(u"This text is distributed automatically across all columns in the text box.");

auto textFrameFormat = textBox->get_TextFrame()->get_TextFrameFormat();
textFrameFormat->set_ColumnCount(3);
textFrameFormat->set_ColumnSpacing(10);

presentation->Save(u"TextBoxColumns.pptx", SaveFormat::Pptx);

auto savedPresentation = MakeObject<Presentation>(u"TextBoxColumns.pptx");
auto savedTextBox = ExplicitCast<IAutoShape>(savedPresentation->get_Slide(0)->get_Shape(0));
auto savedFormat = savedTextBox->get_TextFrame()->get_TextFrameFormat();
Console::WriteLine(u"Columns: {0}; spacing: {1} points", savedFormat->get_ColumnCount(), savedFormat->get_ColumnSpacing());
ดึงข้อความจากคอลัมน์แต่ละคอลัมน์
ใช้ [ITextFrame::SplitTextByColumns] เพื่อดึงข้อความที่กำหนดให้แต่ละคอลัมน์ที่มองเห็นได้ในกรอบข้อความที่มีอยู่ เมธอดจะคืนสตริงหนึ่งค่าให้แต่ละคอลัมน์ ตามลำดับการอ่านแบบคอลัมน์ กรอบข้อความแบบคอลัมน์เดียวจะให้แอเรย์ที่มีหนึ่งองค์ประกอบ และคอลัมน์ว่างจะเป็นสตริงว่าง สตริงที่คืนมีเฉพาะข้อความธรรมดา; การจัดรูปแบบระดับส่วนจะไม่ถูกรักษา
นี่เป็นประโยชน์เมื่อคุณต้องการ:
- ดึงข้อความพร้อมคงลำดับการอ่านแบบคอลัมน์
- ทำดัชนีหรือเปรียบเทียบเนื้อหาของสไลด์หลายคอลัมน์
- ส่งออกแต่ละคอลัมน์ไปยังไฟล์แยก, ฟิลด์ฐานข้อมูลหรือปลายทางอื่น
- ตรวจสอบว่าข้อความถูกกระจายใหม่อย่างไรหลังจากตั้งค่าจำนวนคอลัมน์ด้วย [ITextFrameFormat::set_ColumnCount] หรือการเว้นระยะด้วย [ITextFrameFormat::set_ColumnSpacing] หรือเปลี่ยนฟอนท์หรือขนาดกรอบข้อความ
เมธอดจะรายงานข้อความที่กระจายอยู่ใน [ITextFrame] ปัจจุบัน; จะไม่ไหลอัตโนมัติระหว่างรูปร่างหรือกล่องข้อความแยกต่างหาก การกระจายคอลัมน์อาจขึ้นกับฟอนท์ที่มีอยู่และการตั้งค่าการจัดเลย์เอาต์ของข้อความอื่น ๆ ดังนั้นควรตรวจสอบว่าฟอนท์ที่ต้องการพร้อมใช้งานเมื่อผลลัพธ์ที่สม่ำเสมอสำคัญ
ตัวอย่างต่อไปนี้โหลดงานนำเสนอ, ค้นหารูปร่างอัตโนมัติหลายคอลัมน์ตัวแรกที่มีกรอบข้อความบนสไลด์แรก, อ่านจำนวนคอลัมน์ที่ตั้งค่าไว้, และเขียนข้อความจากทุกคอลัมน์ลงในไฟล์แยก รูปร่างที่ไม่มีกรอบข้อความจะถูกข้าม:
#include <DOM/IAutoShape.h>
#include <DOM/IShapeCollection.h>
#include <DOM/ISlide.h>
#include <DOM/ITextFrame.h>
#include <DOM/ITextFrameFormat.h>
#include <DOM/Presentation.h>
#include <system/array.h>
#include <system/console.h>
#include <system/enumerator_adapter.h>
#include <system/io/file.h>
#include <system/object_ext.h>
#include <system/shared_ptr.h>
#include <system/string.h>

using namespace Aspose::Slides;
using namespace System;
using namespace System::IO;

auto presentation = MakeObject<Presentation>(u"MultiColumnText.pptx");

SharedPtr<IAutoShape> textBox = nullptr;
for (const auto& shape : IterateOver(presentation->get_Slide(0)->get_Shapes()))
{
    auto autoShape = AsCast<IAutoShape>(shape);
    if (autoShape != nullptr && autoShape->get_TextFrame() != nullptr)
    {
        auto columnCount = autoShape->get_TextFrame()->get_TextFrameFormat()->get_ColumnCount();
        if (columnCount > 1)
        {
            textBox = autoShape;
            break;
        }
    }
}

if (textBox == nullptr)
{
    Console::WriteLine(u"No multi-column text frame was found.");
}
else
{
    auto textFrame = textBox->get_TextFrame();
    auto configuredColumnCount = textFrame->get_TextFrameFormat()->get_ColumnCount();
    auto columnTexts = textFrame->SplitTextByColumns();

    Console::WriteLine(u"Configured columns: {0}", configuredColumnCount);

    for (auto columnIndex = 0; columnIndex < columnTexts->get_Length(); columnIndex++)
    {
        auto columnNumber = columnIndex + 1;
        auto columnText = columnTexts->idx_get(columnIndex);
        Console::WriteLine(u"Column {0}: {1}", columnNumber, columnText);
        auto fileName = String::Format(u"Column-{0}.txt", columnNumber);
        File::WriteAllText(fileName, columnText);
    }
}
อัปเดตข้อความ
เพื่ออัปเดตข้อความทั่วทั้งงานนำเสนอ ให้วนลูปผ่านสไลด์และรูปร่าง, เลือกรูปร่างอัตโนมัติ, แล้วแก้ไขส่วนข้อความของมัน การทำงานในระดับส่วนช่วยให้คุณเปลี่ยนข้อความและการจัดรูปแบบตัวอักษรได้พร้อมกัน
ตัวอย่างต่อไปนี้แทนที่ทุกการปรากฏของ years ด้วย months ในส่วนข้อความของรูปร่างอัตโนมัติแต่ละส่วนและทำให้ส่วนที่ได้รับผลกระทบเป็นตัวหนา:
#include <DOM/IAutoShape.h>
#include <DOM/IParagraph.h>
#include <DOM/IParagraphCollection.h>
#include <DOM/IPortion.h>
#include <DOM/IPortionCollection.h>
#include <DOM/IPortionFormat.h>
#include <DOM/IShapeCollection.h>
#include <DOM/ISlide.h>
#include <DOM/ISlideCollection.h>
#include <DOM/ITextFrame.h>
#include <DOM/NullableBool.h>
#include <DOM/Presentation.h>
#include <Export/SaveFormat.h>
#include <system/enumerator_adapter.h>
#include <system/object_ext.h>
#include <system/shared_ptr.h>
#include <system/string.h>

using namespace Aspose::Slides;
using namespace Aspose::Slides::Export;
using namespace System;

auto presentation = MakeObject<Presentation>(u"Text.pptx");

for (const auto& slide : IterateOver(presentation->get_Slides()))
{
    for (const auto& shape : IterateOver(slide->get_Shapes()))
    {
        auto autoShape = AsCast<IAutoShape>(shape);
        if (autoShape == nullptr || autoShape->get_TextFrame() == nullptr)
        {
            continue;
        }

        for (const auto& paragraph : IterateOver(autoShape->get_TextFrame()->get_Paragraphs()))
        {
            for (const auto& portion : IterateOver(paragraph->get_Portions()))
            {
                auto text = portion->get_Text();
                if (!String::IsNullOrEmpty(text) && text.Contains(u"years"))
                {
                    portion->set_Text(text.Replace(u"years", u"months"));
                    portion->get_PortionFormat()->set_FontBold(NullableBool::True);
                }
            }
        }
    }
}

presentation->Save(u"TextChanged.pptx", SaveFormat::Pptx);
เพิ่มกล่องข้อความพร้อมไฮเปอร์ลิงก์
ไฮเปอร์ลิงก์สามารถกำหนดให้กับส่วนข้อความเฉพาะได้ ดังนั้นข้อความส่วนนั้นเท่านั้นจะทำหน้าที่เป็นลิงก์ที่คลิกได้ ใช้ [IHyperlinkManager::SetExternalHyperlinkClick] เพื่อเชื่อมส่วนนั้นกับ URL ภายนอก
ตัวอย่างต่อไปนี้สร้างข้อความเชื่อมโยงและบันทึกลงในงานนำเสนอ:
#include <DOM/IAutoShape.h>
#include <DOM/IHyperlinkManager.h>
#include <DOM/IParagraph.h>
#include <DOM/IPortion.h>
#include <DOM/IPortionFormat.h>
#include <DOM/IShapeCollection.h>
#include <DOM/ISlide.h>
#include <DOM/ITextFrame.h>
#include <DOM/Presentation.h>
#include <DOM/ShapeType.h>
#include <Export/SaveFormat.h>
#include <system/shared_ptr.h>

using namespace Aspose::Slides;
using namespace Aspose::Slides::Export;
using namespace System;

auto presentation = MakeObject<Presentation>();
auto slide = presentation->get_Slide(0);
auto textBox = slide->get_Shapes()->AddAutoShape(ShapeType::Rectangle, 150, 150, 200, 50);
textBox->AddTextFrame(u"Aspose.Slides");

auto textPortion = textBox->get_TextFrame()->get_Paragraph(0)->get_Portion(0);
textPortion->get_PortionFormat()->get_HyperlinkManager()->SetExternalHyperlinkClick(u"https://www.aspose.com/");

presentation->Save(u"Hyperlink.pptx", SaveFormat::Pptx);
คำถามที่พบบ่อย
ความแตกต่างระหว่างกล่องข้อความกับตำแหน่งตัวอักษรบนสไลด์มาสเตอร์หรือเลเอาต์คืออะไร?
ตำแหน่งตัวอักษร สามารถสืบทอดตำแหน่งและการจัดรูปแบบจาก สไลด์แม่ หรือ สไลด์เค้าโครง กล่องข้อความทั่วไปเป็นรูปร่างอิสระบนสไลด์ที่สร้างขึ้นและจะไม่รับพฤติกรรมตำแหน่งตัวอักษรเมื่อเลเอาต์เปลี่ยนแปลง
ฉันจะแทนที่ข้อความโดยไม่กระทบข้อความในแผนภูมิ, ตาราง หรือ SmartArt อย่างไร?
จำกัดการวนลูปให้กับรูปร่างที่ทำตาม [IAutoShape] ตามตัวอย่างในส่วนอัปเดตข้อความ แผนภูมิ, ตารางและ SmartArt เก็บข้อความในโมเดลวัตถุของตนเอง ดังนั้นจึงไม่ถูกแก้ไขโดยลูปนั้น