
JavaScript를 사용하여 프레젠테이션에서 글머리 기호 및 번호 매기기 목록 관리
개요
Aspose.Slides for Node.js via Java를 사용하면 PowerPoint 및 OpenDocument 프레젠테이션에서 글머리 기호 및 번호 매기기 목록을 만들고 형식화할 수 있습니다. 목록 항목은 단락이며 해당 단락의 글머리 기호 설정은 단락 서식을 통해 제어됩니다.
Paragraph 클래스를 사용하여 단락 수준 목록 설정에 액세스합니다. 주요 진입점은 Paragraph.getParagraphFormat().getBullet()이며, 이는 BulletFormat 객체를 반환합니다. 이 객체를 사용하여 글머리 기호 유형, 기호, 그림, 색상, 크기, 번호 매기기 스타일 및 시작 번호를 설정할 수 있습니다.
이 문서에서는 다음을 수행하는 방법을 보여줍니다:
- 사용자 지정 기호로 글머리 기호 목록 만들기
- 그림 글머리 기호 만들기
- 단락 깊이를 설정하여 다단계 목록 만들기
- 번호 매기기 목록 만들기
- 기존 프레젠테이션에서 목록 형식 검사 및 변경
글머리 기호 목록 만들기
글머리 기호 목록을 만들려면 Paragraph 객체를 TextFrame에 추가하고 BulletFormat.setType을 BulletType.Symbol으로 설정합니다. 그런 다음 BulletFormat.setChar, BulletFormat.getColor, BulletFormat.setHeight를 설정하여 글머리 기호 모양을 제어할 수 있습니다.
다음 JavaScript 코드는 슬라이드에서 글머리 기호 목록을 만드는 방법을 보여줍니다:
function createParagraph(text, bulletColor) {
    const paragraph = new aspose.slides.Paragraph();
    const paragraphFormat = paragraph.getParagraphFormat();
    const bulletFormat = paragraphFormat.getBullet();

    bulletFormat.setType(java.newByte(aspose.slides.BulletType.Symbol));
    bulletFormat.setChar(java.newChar("*"));
    paragraphFormat.setIndent(15);
    bulletFormat.setBulletHardColor(java.newByte(aspose.slides.NullableBool.True));
    bulletFormat.getColor().setColor(bulletColor);
    bulletFormat.setHeight(100);
    paragraph.setText(text);

    return paragraph;
}

const presentation = new aspose.slides.Presentation();
try {
    const slide = presentation.getSlides().get_Item(0);
    const autoShape = slide.getShapes().addAutoShape(aspose.slides.ShapeType.Rectangle, 20, 20, 200, 50);

    const textFrame = autoShape.getTextFrame();
    textFrame.getParagraphs().clear();

    const bulletColor = java.newInstanceSync("java.awt.Color", 205, 92, 92);

    const paragraph1 = createParagraph("The first paragraph", bulletColor);
    textFrame.getParagraphs().add(paragraph1);

    const paragraph2 = createParagraph("The second paragraph", bulletColor);
    textFrame.getParagraphs().add(paragraph2);

    presentation.save("symbol_bullets.pptx", aspose.slides.SaveFormat.Pptx);
} finally {
    presentation.dispose();
}
결과:

번호 매기기 목록 만들기
항목 순서가 중요한 경우 번호 매기기 목록을 사용합니다. BulletFormat.setType을 BulletType.Numbered으로 설정합니다. BulletFormat.setNumberedBulletStyle로 번호 매기기 형식을 선택하거나 목록을 1이 아닌 다른 값에서 시작하도록 하려면 BulletFormat.setNumberedBulletStartWith를 설정합니다.
다음 JavaScript 코드는 슬라이드에서 번호 매기기 목록을 만드는 방법을 보여줍니다:
const presentation = new aspose.slides.Presentation();
try {
    const slide = presentation.getSlides().get_Item(0);
    const autoShape = slide.getShapes().addAutoShape(aspose.slides.ShapeType.Rectangle, 20, 20, 90, 80);

    const textFrame = autoShape.getTextFrame();
    textFrame.getParagraphs().clear();

    const paragraph1 = new aspose.slides.Paragraph();
    paragraph1.getParagraphFormat().getBullet().setType(java.newByte(aspose.slides.BulletType.Numbered));
    paragraph1.setText("Apple");
    textFrame.getParagraphs().add(paragraph1);

    const paragraph2 = new aspose.slides.Paragraph();
    paragraph2.getParagraphFormat().getBullet().setType(java.newByte(aspose.slides.BulletType.Numbered));
    paragraph2.setText("Orange");
    textFrame.getParagraphs().add(paragraph2);

    const paragraph3 = new aspose.slides.Paragraph();
    paragraph3.getParagraphFormat().getBullet().setType(java.newByte(aspose.slides.BulletType.Numbered));
    paragraph3.setText("Banana");
    textFrame.getParagraphs().add(paragraph3);

    presentation.save("numbered_bullets.pptx", aspose.slides.SaveFormat.Pptx);
} finally {
    presentation.dispose();
}
결과:
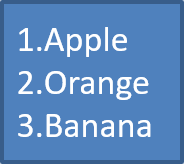
그림 글머리 기호 만들기
Aspose.Slides를 사용하면 일반 글머리 기호 기호를 이미지로 교체할 수 있습니다. 그림 글머리 기호는 작은 크기에서도 읽을 수 있는 간단한 이미지, 예를 들어 아이콘이나 작은 투명 PNG 파일에 가장 적합합니다.
가능하면 일반 글머리 기호를 이미지로 교체할 경우 투명 배경을 가진 간단한 그래픽을 선택하는 것이 좋습니다. 이러한 이미지는 사용자 지정 글머리 기호 기호로 잘 작동합니다.
이미지는 매우 작은 크기로 축소되므로, 목록의 글머리 기호로 사용할 때도 선명하고 시각적으로 효과적인 이미지를 선택하는 것이 좋습니다.
그림 글머리 기호를 만들려면 Presentation.getImages().addImage를 사용하여 Presentation에 이미지를 추가하고 반환된 PPImage 객체를 BulletFormat.getPicture().setImage에 할당합니다. 이미지를 할당하기 전에 BulletFormat.setType을 BulletType.Picture으로 설정합니다.
예를 들어 “image.png"가 있다고 가정합니다:

다음 JavaScript 코드는 슬라이드에서 그림 글머리 기호를 만드는 방법을 보여줍니다:
function createParagraph(text, image) {
    const paragraph = new aspose.slides.Paragraph();
    const paragraphFormat = paragraph.getParagraphFormat();
    const bulletFormat = paragraphFormat.getBullet();

    bulletFormat.setType(java.newByte(aspose.slides.BulletType.Picture));
    bulletFormat.getPicture().setImage(image);
    paragraphFormat.setIndent(15);
    bulletFormat.setHeight(100);
    paragraph.setText(text);

    return paragraph;
}

const presentation = new aspose.slides.Presentation();
let image = null;
try {
    const slide = presentation.getSlides().get_Item(0);
    const autoShape = slide.getShapes().addAutoShape(aspose.slides.ShapeType.Rectangle, 20, 20, 200, 50);

    const textFrame = autoShape.getTextFrame();
    textFrame.getParagraphs().clear();

    image = aspose.slides.Images.fromFile("image.png");
    const bulletImage = presentation.getImages().addImage(image);

    const paragraph1 = createParagraph("The first paragraph", bulletImage);
    textFrame.getParagraphs().add(paragraph1);

    const paragraph2 = createParagraph("The second paragraph", bulletImage);
    textFrame.getParagraphs().add(paragraph2);

    presentation.save("picture_bullets.pptx", aspose.slides.SaveFormat.Pptx);
} finally {
    if (image !== null) {
        image.dispose();
    }
    presentation.dispose();
}
결과:

다단계 목록 만들기
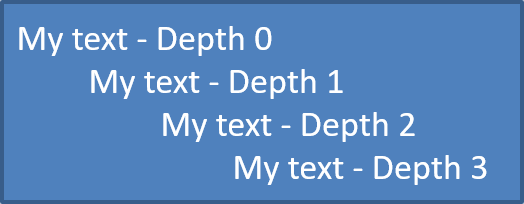
ParagraphFormat.setDepth를 사용하여 목록 항목을 서로 다른 수준에 배치합니다. 수준 0은 최상위 수준이며, 수준 1은 그 아래에 중첩됩니다.
다음 JavaScript 코드는 다단계 글머리 기호 목록을 만드는 방법을 보여줍니다:
const presentation = new aspose.slides.Presentation();
try {
    const slide = presentation.getSlides().get_Item(0);
    const autoShape = slide.getShapes().addAutoShape(aspose.slides.ShapeType.Rectangle, 20, 20, 260, 110);

    const textFrame = autoShape.getTextFrame();
    textFrame.getParagraphs().clear();

    const paragraph1 = new aspose.slides.Paragraph();
    paragraph1.getParagraphFormat().setDepth(java.newShort(0));
    paragraph1.setText("My text - Depth 0");
    textFrame.getParagraphs().add(paragraph1);

    const paragraph2 = new aspose.slides.Paragraph();
    paragraph2.getParagraphFormat().setDepth(java.newShort(1));
    paragraph2.setText("My text - Depth 1");
    textFrame.getParagraphs().add(paragraph2);

    const paragraph3 = new aspose.slides.Paragraph();
    paragraph3.getParagraphFormat().setDepth(java.newShort(2));
    paragraph3.setText("My text - Depth 2");
    textFrame.getParagraphs().add(paragraph3);

    const paragraph4 = new aspose.slides.Paragraph();
    paragraph4.getParagraphFormat().setDepth(java.newShort(3));
    paragraph4.setText("My text - Depth 3");
    textFrame.getParagraphs().add(paragraph4);

    presentation.save("multilevel_bullets.pptx", aspose.slides.SaveFormat.Pptx);
} finally {
    presentation.dispose();
}
결과:
기존 목록 변경
기존 프레젠테이션에서 목록 형식을 변경하려면 대상 단락에 액세스하고 해당 ParagraphFormat.getBullet 설정을 업데이트합니다. 목록을 만들 때 사용한 동일한 속성을 사용하여 PPT, PPTX 또는 ODP 파일에서 로드한 목록을 검사하거나 수정할 수 있습니다.
다음 JavaScript 코드는 텍스트 프레임의 첫 번째 단락을 번호 매기기 목록 스타일로 변경합니다:
const presentation = new aspose.slides.Presentation("input.pptx");
try {
    const slide = presentation.getSlides().get_Item(0);
    const autoShape = slide.getShapes().get_Item(0);
    const paragraph = autoShape.getTextFrame().getParagraphs().get_Item(0);

    const paragraphFormat = paragraph.getParagraphFormat();
    const bulletFormat = paragraphFormat.getBullet();

    bulletFormat.setType(java.newByte(aspose.slides.BulletType.Numbered));
    bulletFormat.setNumberedBulletStyle(java.newByte(aspose.slides.NumberedBulletStyle.BulletRomanUCPeriod));
    bulletFormat.setNumberedBulletStartWith(java.newShort(1));
    paragraphFormat.setMarginLeft(30);
    paragraphFormat.setIndent(-20);

    presentation.save("updated_list.pptx", aspose.slides.SaveFormat.Pptx);
} finally {
    presentation.dispose();
}
FAQ
글머리 기호 및 번호 매기기 목록을 PDF나 이미지로 내보낼 수 있나요?
예. Aspose.Slides는 대상 형식이 해당 텍스트 레이아웃 및 글머리 기호 기능을 지원하는 경우 목록 형식을 보존합니다.
기존 프레젠테이션에서 목록을 편집할 수 있나요?
예. 프레젠테이션을 로드하고 대상 단락에 액세스한 다음 ParagraphFormat.getBullet 설정을 검사하거나 업데이트하고 프레젠테이션을 저장하면 됩니다.
목록에 비라틴 문자 텍스트를 포함할 수 있나요?
예. 목록 항목 텍스트는 Unicode 문자를 포함할 수 있으므로 다국어 프레젠테이션에서도 목록을 만들 수 있습니다. 프레젠테이션에서 사용되는 글꼴이 필요한 문자를 지원하는지 확인하십시오.