
Buat Efek 3D dalam Presentasi Menggunakan C++
Gambaran Umum
Aspose.Slides for C++ dapat membuat, mengedit, mempertahankan, dan merender pemformatan 3D gaya PowerPoint untuk bentuk dan teks. Artikel ini mencakup efek 3D seperti rotasi, ekstrusi, bevel, pencahayaan, material, isian gradien atau gambar, dan teks 3D.
Catatan
Artikel ini membahas efek pemformatan 3D pada bentuk dan teks PowerPoint. Artikel ini tidak membahas penyisipan atau pengeditan file model 3D mandiri. Saat Anda mengekspor slide ke gambar, PDF, atau HTML, Aspose.Slides merender efek 3D tersebut ke output 2D yang diekspor.Konsep Pemformatan 3D
Gunakan metode IShape::get_ThreeDFormat untuk menerapkan pemformatan 3D pada sebuah bentuk. Metode ini mengembalikan IThreeDFormat, yang mengendalikan adegan 3D untuk bentuk tersebut.
Untuk teks, gunakan metode ITextFrameFormat::get_ThreeDFormat. Ini menerapkan pemformatan 3D pada bingkai teks, bukan pada tubuh bentuk.
Metode paling penting adalah:
| Metode | Apa yang dikendalikan | Kapan menggunakannya |
|---|---|---|
| get_Camera | Titik pandang, tipe kamera preset, rotasi, zoom, dan perspektif. | Memutar objek dalam ruang 3D atau mencocokkan preset rotasi 3D PowerPoint. |
| get_LightRig | Preset cahaya, arah, dan rotasi cahaya. | Mengubah cara sorotan dan bayangan muncul pada permukaan 3D. |
| set_Material | Material permukaan, seperti datar, matte, plastik, atau logam. | Membuat geometri yang sama terlihat lebih datar, lebih lembut, mengkilap, atau logam. |
| set_ExtrusionHeight | Seberapa jauh bentuk memperluas ke belakang dari wajah depannya. | Mengubah bentuk datar menjadi objek 3D yang terlihat tebal. |
| get_ExtrusionColor | Warna sisi yang diekstrusi. | Membuat kedalaman terlihat atau menyelaraskan warna sisi dengan isian depan. |
| set_Depth | Kedalaman 3D tambahan yang digunakan oleh pemformatan 3D PowerPoint. | Menyesuaikan kedalaman untuk bentuk atau teks, terutama bersama pengaturan bevel dan material. |
| get_BevelTop dan get_BevelBottom | Tepi yang terangkat atau bulat pada wajah depan dan belakang. | Menambahkan tepi yang lembut atau dibentuk alih-alih wajah datar yang tajam. |
| get_ContourColor dan set_ContourWidth | Garis luar di sekitar objek 3D. | Menekankan batas objek dalam output yang dirender. |
Buat Bentuk 3D
Sebuah bentuk biasanya membutuhkan empat jenis pengaturan sebelum terlihat secara meyakinkan sebagai 3D:
- Pengaturan kamera, karena tampilan depan default dapat menyembunyikan ekstrusi.
- Pengaturan cahaya, karena pencahayaan membuat wajah dan sisi dapat terlihat.
- Pengaturan material, karena permukaan memengaruhi cara cahaya dirender.
- Pengaturan ekstrusi atau kedalaman, karena bentuk datar memerlukan ketebalan.
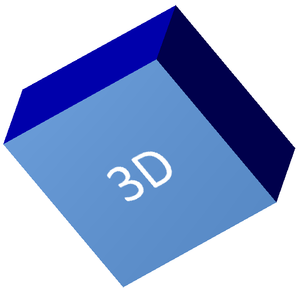
Contoh berikut membuat sebuah persegi panjang, menambahkan teks ke wajah depannya, dan menerapkan pemformatan 3D. Nilai rotasi kamera dalam derajat, dan tinggi ekstrusi 100 poin. Contoh ini merender slide ke gambar PNG dengan ukuran dua kali dimensi default dan menyimpan presentasi sebagai PPTX.
#include <DOM/CameraPresetType.h>
#include <DOM/FillType.h>
#include <DOM/IAutoShape.h>
#include <DOM/ICamera.h>
#include <DOM/IColorFormat.h>
#include <DOM/IFillFormat.h>
#include <DOM/ILightRig.h>
#include <DOM/IParagraph.h>
#include <DOM/IParagraphFormat.h>
#include <DOM/IPortionFormat.h>
#include <DOM/IShapeCollection.h>
#include <DOM/ISlide.h>
#include <DOM/ITextFrame.h>
#include <DOM/IThreeDFormat.h>
#include <DOM/LightRigPresetType.h>
#include <DOM/LightingDirection.h>
#include <DOM/MaterialPresetType.h>
#include <DOM/Presentation.h>
#include <DOM/ShapeType.h>
#include <Export/SaveFormat.h>
#include <IImage.h>
#include <drawing/color.h>

using namespace Aspose::Slides;
using namespace Aspose::Slides::Export;
using namespace System::Drawing;

const auto imageScale = 2.0f;

auto presentation = System::MakeObject<Presentation>();
auto slide = presentation->get_Slide(0);

auto shape = slide->get_Shapes()->AddAutoShape(ShapeType::Rectangle, 200.0f, 150.0f, 200.0f, 200.0f);

shape->get_TextFrame()->set_Text(u"3D");
shape->get_TextFrame()->get_Paragraph(0)->get_ParagraphFormat()->get_DefaultPortionFormat()->set_FontHeight(64.0f);

auto frontColor = Color::get_CornflowerBlue();
shape->get_FillFormat()->set_FillType(FillType::Solid);
shape->get_FillFormat()->get_SolidFillColor()->set_Color(frontColor);

auto extrusionColor = Color::get_Blue();
shape->get_ThreeDFormat()->get_Camera()->set_CameraType(CameraPresetType::OrthographicFront);
shape->get_ThreeDFormat()->get_Camera()->SetRotation(20.0f, 30.0f, 40.0f);
shape->get_ThreeDFormat()->get_LightRig()->set_LightType(LightRigPresetType::Flat);
shape->get_ThreeDFormat()->get_LightRig()->set_Direction(LightingDirection::Top);
shape->get_ThreeDFormat()->set_Material(MaterialPresetType::Flat);
shape->get_ThreeDFormat()->set_ExtrusionHeight(100.0);
shape->get_ThreeDFormat()->get_ExtrusionColor()->set_Color(extrusionColor);

auto thumbnail = slide->GetImage(imageScale, imageScale);
thumbnail->Save(u"shape_3d.png");
thumbnail->Dispose();

presentation->Save(u"shape_3d.pptx", SaveFormat::Pptx);
presentation->Dispose();
Gambar slide yang dirender memperlihatkan persegi panjang sebagai balok 3D yang tebal:
Putar Bentuk dengan Kamera
Di PowerPoint, rotasi 3D dikonfigurasi melalui panel Rotasi 3-D. Nilai rotasi X, Y, dan Z sesuai dengan rotasi yang Anda atur melalui API kamera.
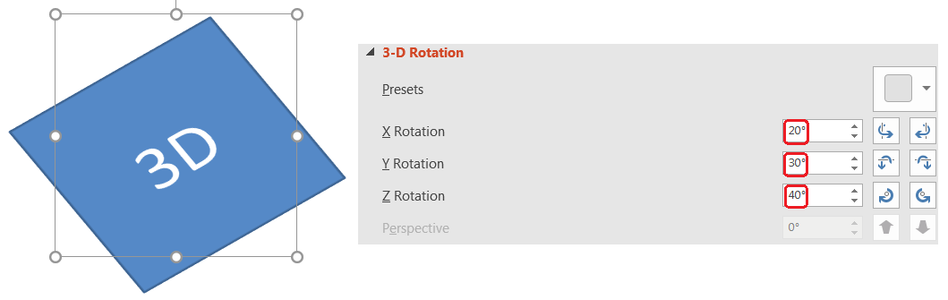
Di Aspose.Slides, akses kamera melalui IThreeDFormat::get_Camera. Contoh ini membuat sebuah persegi panjang, memilih tampilan depan ortografik, dan mengatur rotasi X, Y, dan Z menjadi 20, 30, dan 40 derajat masing-masing. Contoh ini mengonfigurasi bentuk di memori tanpa menyimpan file:
#include <DOM/CameraPresetType.h>
#include <DOM/IAutoShape.h>
#include <DOM/ICamera.h>
#include <DOM/IShapeCollection.h>
#include <DOM/ISlide.h>
#include <DOM/IThreeDFormat.h>
#include <DOM/Presentation.h>
#include <DOM/ShapeType.h>

using namespace Aspose::Slides;

auto presentation = System::MakeObject<Presentation>();
auto slide = presentation->get_Slide(0);

auto shape = slide->get_Shapes()->AddAutoShape(ShapeType::Rectangle, 200.0f, 150.0f, 200.0f, 200.0f);

shape->get_ThreeDFormat()->get_Camera()->set_CameraType(CameraPresetType::OrthographicFront);
shape->get_ThreeDFormat()->get_Camera()->SetRotation(20.0f, 30.0f, 40.0f);

presentation->Dispose();
Gunakan kamera ketika Anda perlu mengubah cara pemirsa melihat objek. Ini tidak mengubah geometri bentuk 2D pada slide. Ini mengubah titik pandang 3D yang digunakan oleh PowerPoint dan oleh Aspose.Slides saat merender.
Tambahkan Ekstrusi dan Kedalaman
Ekstrusi membuat bentuk tampak tebal dengan memperluasnya di belakang wajah depan. Di PowerPoint, kontrol kedalaman mengatur ketebalan yang terlihat, dan kontrol warna mengatur warna sisi.
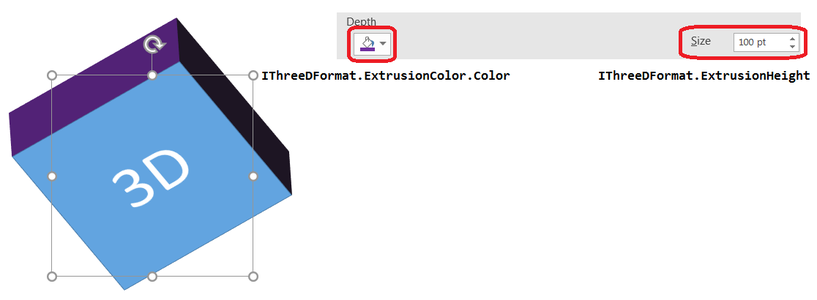
Atur IThreeDFormat::set_ExtrusionHeight untuk ketebalan dan IThreeDFormat::get_ExtrusionColor untuk warna sisi. Contoh ini memberikan persegi panjang ekstrusi 100 poin dengan sisi ungu dan memutar kamera untuk memperlihatkan ketebalannya. Contoh ini mengonfigurasi bentuk di memori tanpa menyimpan file:
#include <DOM/CameraPresetType.h>
#include <DOM/ILightRig.h>
#include <DOM/LightRigPresetType.h>
#include <DOM/LightingDirection.h>
#include <DOM/MaterialPresetType.h>
#include <DOM/IAutoShape.h>
#include <DOM/ICamera.h>
#include <DOM/IColorFormat.h>
#include <DOM/IShapeCollection.h>
#include <DOM/ISlide.h>
#include <DOM/IThreeDFormat.h>
#include <DOM/Presentation.h>
#include <DOM/ShapeType.h>
#include <drawing/color.h>

using namespace Aspose::Slides;
using namespace System::Drawing;

auto presentation = System::MakeObject<Presentation>();
auto slide = presentation->get_Slide(0);

auto shape = slide->get_Shapes()->AddAutoShape(ShapeType::Rectangle, 200.0f, 150.0f, 200.0f, 200.0f);

shape->get_ThreeDFormat()->get_Camera()->set_CameraType(CameraPresetType::OrthographicFront);
shape->get_ThreeDFormat()->get_Camera()->SetRotation(20.0f, 30.0f, 40.0f);
shape->get_ThreeDFormat()->get_LightRig()->set_LightType(LightRigPresetType::Flat);
shape->get_ThreeDFormat()->get_LightRig()->set_Direction(LightingDirection::Top);
shape->get_ThreeDFormat()->set_Material(MaterialPresetType::Flat);
shape->get_ThreeDFormat()->set_ExtrusionHeight(100.0);

auto extrusionColor = Color::get_Purple();
shape->get_ThreeDFormat()->get_ExtrusionColor()->set_Color(extrusionColor);

presentation->Dispose();
Metode IThreeDFormat::set_Depth mengatur kedalaman bentuk 3D. Metode set_ExtrusionHeight mengendalikan tinggi efek ekstrusi, seperti yang ditunjukkan dalam contoh ini.
Gunakan Isian Gradien atau Gambar dengan Efek 3D
Pemformatan 3D bersifat independen dari isian bentuk. Anda dapat menerapkan warna solid, gradien, pola, atau isian gambar pada wajah depan dan tetap menggunakan kamera, cahaya, material, serta pengaturan ekstrusi yang sama.
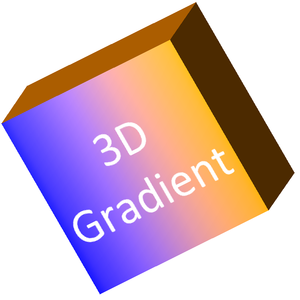
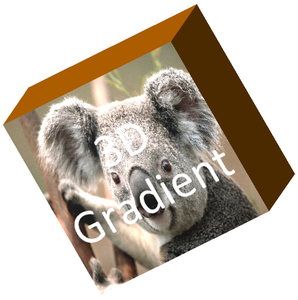
Contoh ini menerapkan gradien biru-ke-oranye pada wajah depan dan warna oranye gelap pada ekstrusi 150 poin. Henti gradien pada 0 dan 100 menandai awal dan akhir gradien. Nilai rotasi kamera dalam derajat. Slide dirender ke gambar PNG dengan ukuran dua kali dimensi default:
#include <DOM/CameraPresetType.h>
#include <DOM/FillType.h>
#include <DOM/IAutoShape.h>
#include <DOM/ICamera.h>
#include <DOM/IColorFormat.h>
#include <DOM/IFillFormat.h>
#include <DOM/IGradientFormat.h>
#include <DOM/IGradientStopCollection.h>
#include <DOM/ILightRig.h>
#include <DOM/IParagraph.h>
#include <DOM/IParagraphFormat.h>
#include <DOM/IPortionFormat.h>
#include <DOM/IShapeCollection.h>
#include <DOM/ISlide.h>
#include <DOM/ITextFrame.h>
#include <DOM/IThreeDFormat.h>
#include <DOM/LightRigPresetType.h>
#include <DOM/LightingDirection.h>
#include <DOM/MaterialPresetType.h>
#include <DOM/Presentation.h>
#include <DOM/ShapeType.h>
#include <IImage.h>
#include <drawing/color.h>

using namespace Aspose::Slides;
using namespace System::Drawing;

const auto imageScale = 2.0f;

auto presentation = System::MakeObject<Presentation>();
auto slide = presentation->get_Slide(0);

auto shape = slide->get_Shapes()->AddAutoShape(ShapeType::Rectangle, 200.0f, 150.0f, 250.0f, 250.0f);
shape->get_TextFrame()->set_Text(u"3D Gradient");
shape->get_TextFrame()->get_Paragraph(0)->get_ParagraphFormat()->get_DefaultPortionFormat()->set_FontHeight(64.0f);

auto firstGradientColor = Color::get_Blue();
auto secondGradientColor = Color::get_Orange();
shape->get_FillFormat()->set_FillType(FillType::Gradient);
shape->get_FillFormat()->get_GradientFormat()->get_GradientStops()->Add(0.0f, firstGradientColor);
shape->get_FillFormat()->get_GradientFormat()->get_GradientStops()->Add(100.0f, secondGradientColor);

auto extrusionColor = Color::get_DarkOrange();
shape->get_ThreeDFormat()->get_Camera()->set_CameraType(CameraPresetType::OrthographicFront);
shape->get_ThreeDFormat()->get_Camera()->SetRotation(10.0f, 20.0f, 30.0f);
shape->get_ThreeDFormat()->get_LightRig()->set_LightType(LightRigPresetType::Flat);
shape->get_ThreeDFormat()->get_LightRig()->set_Direction(LightingDirection::Top);
shape->get_ThreeDFormat()->set_Material(MaterialPresetType::Flat);
shape->get_ThreeDFormat()->set_ExtrusionHeight(150.0);
shape->get_ThreeDFormat()->get_ExtrusionColor()->set_Color(extrusionColor);

auto thumbnail = slide->GetImage(imageScale, imageScale);
thumbnail->Save(u"gradient_3d.png");
thumbnail->Dispose();

presentation->Dispose();
Output yang dirender mempertahankan gradien pada wajah depan dan merender ekstrusi secara terpisah:
Untuk menggunakan isian gambar, tambahkan gambar ke presentasi dan tetapkan ke isian bentuk. Contoh ini memerlukan file yang sudah ada bernama “image.jpg” di direktori kerja. Gambar tersebut diregangkan untuk mengisi persegi panjang, menerapkan ekstrusi 150 poin, dan mengatur rotasi kamera dalam derajat. Contoh ini mengonfigurasi bentuk di memori tanpa menyimpan atau merender file:
#include <DOM/CameraPresetType.h>
#include <DOM/ILightRig.h>
#include <DOM/LightRigPresetType.h>
#include <DOM/LightingDirection.h>
#include <DOM/MaterialPresetType.h>
#include <DOM/FillType.h>
#include <DOM/IAutoShape.h>
#include <DOM/ICamera.h>
#include <DOM/IColorFormat.h>
#include <DOM/IFillFormat.h>
#include <DOM/IImageCollection.h>
#include <DOM/IPictureFillFormat.h>
#include <DOM/IShapeCollection.h>
#include <DOM/ISlide.h>
#include <DOM/ISlidesPicture.h>
#include <DOM/IThreeDFormat.h>
#include <DOM/PictureFillMode.h>
#include <DOM/Presentation.h>
#include <DOM/ShapeType.h>
#include <drawing/color.h>
#include <system/io/file.h>

using namespace Aspose::Slides;
using namespace System::Drawing;
using namespace System::IO;

auto presentation = System::MakeObject<Presentation>();
auto slide = presentation->get_Slide(0);

auto shape = slide->get_Shapes()->AddAutoShape(ShapeType::Rectangle, 200.0f, 150.0f, 250.0f, 250.0f);

auto imageData = File::ReadAllBytes(u"image.jpg");
auto image = presentation->get_Images()->AddImage(imageData);

shape->get_FillFormat()->set_FillType(FillType::Picture);
shape->get_FillFormat()->get_PictureFillFormat()->get_Picture()->set_Image(image);
shape->get_FillFormat()->get_PictureFillFormat()->set_PictureFillMode(PictureFillMode::Stretch);

auto extrusionColor = Color::get_DarkOrange();
shape->get_ThreeDFormat()->get_Camera()->set_CameraType(CameraPresetType::OrthographicFront);
shape->get_ThreeDFormat()->get_Camera()->SetRotation(10.0f, 20.0f, 30.0f);
shape->get_ThreeDFormat()->get_LightRig()->set_LightType(LightRigPresetType::Flat);
shape->get_ThreeDFormat()->get_LightRig()->set_Direction(LightingDirection::Top);
shape->get_ThreeDFormat()->set_Material(MaterialPresetType::Flat);
shape->get_ThreeDFormat()->set_ExtrusionHeight(150.0);
shape->get_ThreeDFormat()->get_ExtrusionColor()->set_Color(extrusionColor);

presentation->Dispose();
Gambar dirender pada wajah depan, sementara ekstrusi dirender sebagai permukaan sisi 3D:
Terapkan Pemformatan 3D pada Teks
Pemformatan 3D pada bentuk memengaruhi tubuh bentuk. Pemformatan 3D pada teks memengaruhi bingkai teks. Ini berguna untuk efek mirip WordArt di mana huruf‑hurufnya sendiri memerlukan ekstrusi, material, pencahayaan, dan pengaturan kamera.
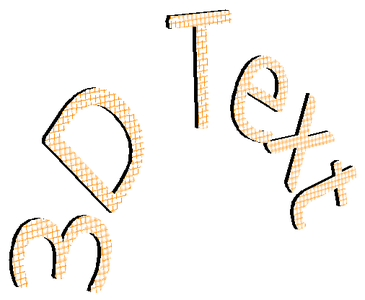
Contoh berikut membuat teks dengan pola kisi oranye‑putih, menerapkan lengkungan ke atas, dan mengonfigurasi pengaturan 3D melalui ITextFrameFormat::get_ThreeDFormat. Tinggi ekstrusi dan kedalaman dalam poin, dan rotasi cahaya dalam derajat. Isian bentuk dan garis tepi disembunyikan sehingga hanya teks yang terlihat. Contoh ini merender gambar PNG dengan ukuran dua kali dimensi slide default dan menyimpan presentasi sebagai PPTX:
#include <DOM/CameraPresetType.h>
#include <DOM/FillType.h>
#include <DOM/IAutoShape.h>
#include <DOM/ICamera.h>
#include <DOM/IColorFormat.h>
#include <DOM/IFillFormat.h>
#include <DOM/ILightRig.h>
#include <DOM/ILineFillFormat.h>
#include <DOM/ILineFormat.h>
#include <DOM/IParagraph.h>
#include <DOM/IParagraphFormat.h>
#include <DOM/IPatternFormat.h>
#include <DOM/IPortion.h>
#include <DOM/IPortionFormat.h>
#include <DOM/IShapeCollection.h>
#include <DOM/ISlide.h>
#include <DOM/ITextFrame.h>
#include <DOM/ITextFrameFormat.h>
#include <DOM/IThreeDFormat.h>
#include <DOM/LightRigPresetType.h>
#include <DOM/LightingDirection.h>
#include <DOM/MaterialPresetType.h>
#include <DOM/PatternStyle.h>
#include <DOM/Presentation.h>
#include <DOM/ShapeType.h>
#include <DOM/TextShapeType.h>
#include <Export/SaveFormat.h>
#include <IImage.h>
#include <drawing/color.h>

using namespace Aspose::Slides;
using namespace Aspose::Slides::Export;
using namespace System::Drawing;

const auto imageScale = 2.0f;

auto presentation = System::MakeObject<Presentation>();
auto slide = presentation->get_Slide(0);

auto shape = slide->get_Shapes()->AddAutoShape(ShapeType::Rectangle, 200.0f, 150.0f, 250.0f, 250.0f);

shape->get_FillFormat()->set_FillType(FillType::NoFill);
shape->get_LineFormat()->get_FillFormat()->set_FillType(FillType::NoFill);
shape->get_TextFrame()->set_Text(u"3D Text");

auto portion = shape->get_TextFrame()->get_Paragraph(0)->get_Portion(0);
portion->get_PortionFormat()->get_FillFormat()->set_FillType(FillType::Pattern);

auto foregroundColor = Color::get_DarkOrange();
auto backgroundColor = Color::get_White();
portion->get_PortionFormat()->get_FillFormat()->get_PatternFormat()->get_ForeColor()->set_Color(foregroundColor);
portion->get_PortionFormat()->get_FillFormat()->get_PatternFormat()->get_BackColor()->set_Color(backgroundColor);
portion->get_PortionFormat()->get_FillFormat()->get_PatternFormat()->set_PatternStyle(PatternStyle::LargeGrid);

shape->get_TextFrame()->get_Paragraph(0)->get_ParagraphFormat()->get_DefaultPortionFormat()->set_FontHeight(128.0f);

auto textFrameFormat = shape->get_TextFrame()->get_TextFrameFormat();
textFrameFormat->set_Transform(TextShapeType::ArchUp);
textFrameFormat->get_ThreeDFormat()->set_ExtrusionHeight(3.5);
textFrameFormat->get_ThreeDFormat()->set_Depth(3.0);
textFrameFormat->get_ThreeDFormat()->set_Material(MaterialPresetType::Plastic);
textFrameFormat->get_ThreeDFormat()->get_LightRig()->set_Direction(LightingDirection::Top);
textFrameFormat->get_ThreeDFormat()->get_LightRig()->set_LightType(LightRigPresetType::Balanced);
textFrameFormat->get_ThreeDFormat()->get_LightRig()->SetRotation(0.0f, 0.0f, 40.0f);
textFrameFormat->get_ThreeDFormat()->get_Camera()->set_CameraType(CameraPresetType::PerspectiveContrastingRightFacing);

auto thumbnail = slide->GetImage(imageScale, imageScale);
thumbnail->Save(u"text_3d.png");
thumbnail->Dispose();

presentation->Save(u"text_3d.pptx", SaveFormat::Pptx);
presentation->Dispose();
Teks dirender sebagai huruf 3D melengkung dan diekstrusi:
Jaga Teks Tetap Datar pada Bentuk 3D
Untuk menjaga teks tetap dapat dibaca sambil mempertahankan penampilan 3D bentuk, panggil ITextFrameFormat::set_KeepTextFlat melalui ITextFrame::get_TextFrameFormat. Ketika nilai true, teks berada di luar adegan 3D. Ketika false, teks berpartisipasi dalam adegan dan mengikuti orientasi 3D.
Pengaturan ini tidak menghapus pemformatan 3D bentuk: kamera, pencahayaan, material, dan ekstrusi tetap dikonfigurasi melalui IShape::get_ThreeDFormat. Ini juga berbeda dari rotasi biasa. IShape::set_Rotation memutar bentuk dalam bidang slide, sementara ITextFrameFormat::set_RotationAngle mengendalikan rotasi kustom teks dalam kotak pembatasnya. Menjaga teks di luar adegan 3D tidak mereset kedua sudut tersebut.
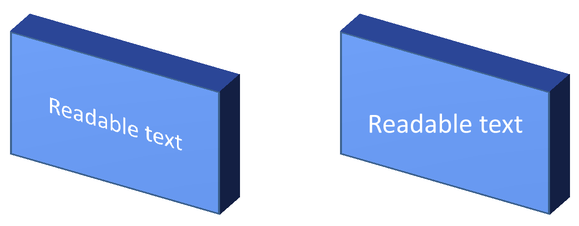
Contoh mandiri berikut membuat persegi panjang biru dengan teks dan menggandakannya di samping yang asli. Kedua bentuk memiliki pemformatan 3D yang sama; hanya pengaturan teks yang berbeda: false di kiri dan true di kanan. Sudut kamera dalam derajat, dan tinggi ekstrusi 40 poin. Contoh ini menyimpan presentasi sebagai PPTX dan merender slide perbandingan ke PNG dengan ukuran dua kali dimensi default.
#include <DOM/ITextFrameFormat.h>
#include <DOM/TextAlignment.h>
#include <DOM/TextAnchorType.h>
#include <DOM/CameraPresetType.h>
#include <DOM/FillType.h>
#include <DOM/IAutoShape.h>
#include <DOM/ICamera.h>
#include <DOM/IColorFormat.h>
#include <DOM/IFillFormat.h>
#include <DOM/ILightRig.h>
#include <DOM/IParagraph.h>
#include <DOM/IParagraphFormat.h>
#include <DOM/IPortionFormat.h>
#include <DOM/IShapeCollection.h>
#include <DOM/ISlide.h>
#include <DOM/ITextFrame.h>
#include <DOM/IThreeDFormat.h>
#include <DOM/LightRigPresetType.h>
#include <DOM/LightingDirection.h>
#include <DOM/MaterialPresetType.h>
#include <DOM/Presentation.h>
#include <DOM/ShapeType.h>
#include <Export/SaveFormat.h>
#include <IImage.h>
#include <drawing/color.h>

using namespace Aspose::Slides;
using namespace Aspose::Slides::Export;
using namespace System::Drawing;

auto presentation = System::MakeObject<Presentation>();
auto slide = presentation->get_Slide(0);

auto shape = slide->get_Shapes()->AddAutoShape(ShapeType::Rectangle, 70.0f, 160.0f, 240.0f, 140.0f);

shape->get_TextFrame()->set_Text(u"Readable text");
shape->get_TextFrame()->get_Paragraph(0)->get_ParagraphFormat()->get_DefaultPortionFormat()->set_FontHeight(28.0f);
shape->get_TextFrame()->get_Paragraph(0)->get_ParagraphFormat()->set_Alignment(TextAlignment::Center);
shape->get_TextFrame()->get_TextFrameFormat()->set_AnchoringType(TextAnchorType::Center);
shape->get_FillFormat()->set_FillType(FillType::Solid);
shape->get_FillFormat()->get_SolidFillColor()->set_Color(Color::get_CornflowerBlue());

shape->get_ThreeDFormat()->get_Camera()->set_CameraType(CameraPresetType::OrthographicFront);
shape->get_ThreeDFormat()->get_Camera()->SetRotation(30.0f, 30.0f, 0.0f);
shape->get_ThreeDFormat()->get_LightRig()->set_LightType(LightRigPresetType::Flat);
shape->get_ThreeDFormat()->get_LightRig()->set_Direction(LightingDirection::Top);
shape->get_ThreeDFormat()->set_Material(MaterialPresetType::Flat);
shape->get_ThreeDFormat()->set_ExtrusionHeight(40.0);
shape->get_ThreeDFormat()->get_ExtrusionColor()->set_Color(Color::get_RoyalBlue());
shape->get_TextFrame()->get_TextFrameFormat()->set_KeepTextFlat(false);

auto clonedShape = slide->get_Shapes()->AddClone(shape, 400.0f, 160.0f);
auto flatTextShape = System::ExplicitCast<IAutoShape>(clonedShape);
flatTextShape->get_TextFrame()->get_TextFrameFormat()->set_KeepTextFlat(true);

presentation->Save(u"keep_text_flat.pptx", SaveFormat::Pptx);
auto image = slide->GetImage(2.0f, 2.0f);
image->Save(u"keep_text_flat.png");
image->Dispose();
presentation->Dispose();
Di kiri, teks mengikuti orientasi 3D. Di kanan, teks tetap datar dan lebih mudah dibaca. Kedua persegi panjang mempertahankan ekstrusi terlihat dan orientasi 3D yang sama.
Perilaku Ekspor dan Rendering
Aspose.Slides mempertahankan pemformatan 3D saat menyimpan ke format PowerPoint seperti PPTX. Saat merender atau mengekspor ke format tata letak tetap, adegan 3D dirasterisasi atau digambar ke output sebagai hasil 2D. Ini berlaku saat Anda merender slide ke PNG, mengekspor ke PDF, mengekspor ke HTML, atau menghasilkan frame untuk konversi video.
Perhatikan poin-poin berikut:
- Gambar dan PDF yang diekspor tidak interaktif. Objek tidak dapat diputar oleh pemirsa setelah diekspor.
- Penampilan akhir tergantung pada kombinasi kamera, rig cahaya, material, ekstrusi, isian, dan skala slide.
- Jika Anda perlu memeriksa nilai pemformatan yang diwariskan atau berbasis tema, baca properti bentuk efektif.
- Beberapa format output tidak dapat menyimpan pemformatan 3D PowerPoint yang dapat diedit. Pada format tersebut, hasil visual dirender alih‑alih dipertahankan sebagai pengaturan 3D yang dapat diedit.
FAQ
Apakah Aspose.Slides dapat membuat presentasi 3D interaktif?
Aspose.Slides membuat dan merender efek 3D PowerPoint untuk bentuk dan teks. Ia tidak membuat gambar, PDF, atau halaman HTML yang interaktif sebagai adegan 3D yang dapat diputar oleh pemirsa. Pada PPTX, pemformatan 3D tetap dapat diedit di PowerPoint bila formatnya mendukungnya.
Apa perbedaan antara model 3D dan efek 3D?
Model 3D adalah objek 3D terpisah yang disisipkan ke dalam presentasi. Efek 3D adalah pemformatan yang diterapkan pada bentuk atau teks PowerPoint biasa, seperti rotasi, ekstrusi, bevel, pencahayaan, dan material. Artikel ini membahas efek 3D.
Pengaturan apa yang diperlukan agar bentuk 3D terlihat?
Setidaknya, atur rotasi kamera dan ekstrusi atau kedalaman. Praktiknya, tambahkan juga rig cahaya dan material agar wajah yang dirender memiliki sorotan dan bayangan yang jelas.
Apakah saya dapat menerapkan efek 3D pada bentuk dan teks sekaligus?
Ya. Gunakan IShape::get_ThreeDFormat untuk tubuh bentuk dan ITextFrameFormat::get_ThreeDFormat untuk teks.
Apakah efek 3D akan muncul saat mengekspor ke gambar, PDF, HTML, atau frame video?
Ya. Aspose.Slides merender efek 3D saat menghasilkan gambar slide, output PDF, output HTML, dan frame yang digunakan untuk konversi video. Output yang diekspor berisi tampilan yang dirender, bukan objek 3D yang dapat diedit.
Bisakah saya membaca nilai 3D akhir setelah pewarisan dan pengaturan tema diterapkan?
Ya. Gunakan API pemformatan efektif yang dijelaskan dalam Properti Bentuk Efektif untuk membaca kamera, rig cahaya, bevel, dan nilai 3D terkait yang akhir.