
Tạo hiệu ứng 3D trong bài thuyết trình sử dụng C++
Tổng quan
Aspose.Slides cho C++ có thể tạo, chỉnh sửa, giữ lại và hiển thị định dạng 3D kiểu PowerPoint cho các hình dạng và văn bản. Bài viết này đề cập đến các hiệu ứng 3D như quay, ép nổi, viền chốt, chiếu sáng, vật liệu, nền gradient hoặc hình ảnh, và văn bản 3D.
Note
Bài viết này nói về các hiệu ứng định dạng 3D trên các hình dạng và văn bản trong PowerPoint. Nó không liên quan đến việc chèn hoặc chỉnh sửa các tệp mô hình 3D độc lập. Khi bạn xuất một slide ra hình ảnh, PDF hoặc HTML, Aspose.Slides sẽ render các hiệu ứng 3D đó vào kết quả 2D đã xuất.Các khái niệm Định dạng 3D
Sử dụng phương thức IShape::get_ThreeDFormat để áp dụng định dạng 3D cho một hình dạng. Phương thức này trả về IThreeDFormat, đối tượng kiểm soát cảnh 3D cho hình dạng đó.
Đối với văn bản, sử dụng phương thức ITextFrameFormat::get_ThreeDFormat. Phương thức này áp dụng định dạng 3D cho khung văn bản thay vì phần thân hình dạng.
Các phương thức quan trọng nhất là:
| Phương thức | Những gì nó điều khiển | Khi nào sử dụng |
|---|---|---|
| get_Camera | Góc nhìn, loại máy ảnh được cài sẵn, quay, thu phóng và phối cảnh. | Xoay đối tượng trong không gian 3D hoặc khớp với một cài đặt quay 3D của PowerPoint. |
| get_LightRig | Cài đặt ánh sáng, hướng và quay ánh sáng. | Thay đổi cách các vùng sáng và bóng xuất hiện trên bề mặt 3D. |
| set_Material | Vật liệu bề mặt, chẳng hạn như phẳng, mờ, nhựa hoặc kim loại. | Làm cho cùng một hình học trông phẳng hơn, mềm hơn, bóng hoặc kim loại. |
| set_ExtrusionHeight | Khoảng cách mà hình dạng kéo dài ra phía sau mặt trước. | Biến một hình dạng phẳng thành một đối tượng 3D dày mắt thấy. |
| get_ExtrusionColor | Màu của các mặt bên được ép. | Làm cho độ sâu hiển thị hoặc phối hợp màu mặt bên với màu nền phía trước. |
| set_Depth | Độ sâu 3D bổ sung được PowerPoint sử dụng cho định dạng 3D. | Tinh chỉnh độ sâu cho hình dạng hoặc văn bản, đặc biệt khi kết hợp với cài đặt viền chốt và vật liệu. |
| get_BevelTop và get_BevelBottom | Các cạnh được nâng hoặc bo tròn trên mặt trước và mặt sau. | Thêm cạnh mềm hoặc được tạo khuôn thay vì mặt phẳng sắc nét. |
| get_ContourColor và set_ContourWidth | Đường viền quanh đối tượng 3D. | Nhấn mạnh ranh giới đối tượng trong kết quả render. |
Tạo một Hình 3D
Một hình dạng thường cần bốn loại cài đặt trước khi trông thật 3D:
- Cài đặt máy ảnh, vì góc nhìn mặt trước mặc định có thể ẩn phần ép nổi.
- Cài đặt ánh sáng, vì ánh sáng giúp các mặt và các bên có thể nhìn thấy.
- Cài đặt vật liệu, vì bề mặt ảnh hưởng đến cách ánh sáng được render.
- Cài đặt ép nổi hoặc độ sâu, vì một hình dạng phẳng cần độ dày.
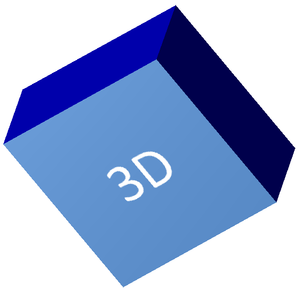
Ví dụ sau tạo một hình chữ nhật, thêm văn bản vào mặt trước và áp dụng định dạng 3D. Các giá trị quay máy ảnh được tính bằng độ, và chiều cao ép nổi là 100 điểm. Ví dụ này render slide thành ảnh PNG với kích thước gấp đôi mặc định và lưu bài thuyết trình dưới dạng PPTX.
#include <DOM/CameraPresetType.h>
#include <DOM/FillType.h>
#include <DOM/IAutoShape.h>
#include <DOM/ICamera.h>
#include <DOM/IColorFormat.h>
#include <DOM/IFillFormat.h>
#include <DOM/ILightRig.h>
#include <DOM/IParagraph.h>
#include <DOM/IParagraphFormat.h>
#include <DOM/IPortionFormat.h>
#include <DOM/IShapeCollection.h>
#include <DOM/ISlide.h>
#include <DOM/ITextFrame.h>
#include <DOM/IThreeDFormat.h>
#include <DOM/LightRigPresetType.h>
#include <DOM/LightingDirection.h>
#include <DOM/MaterialPresetType.h>
#include <DOM/Presentation.h>
#include <DOM/ShapeType.h>
#include <Export/SaveFormat.h>
#include <IImage.h>
#include <drawing/color.h>

using namespace Aspose::Slides;
using namespace Aspose::Slides::Export;
using namespace System::Drawing;

const auto imageScale = 2.0f;

auto presentation = System::MakeObject<Presentation>();
auto slide = presentation->get_Slide(0);

auto shape = slide->get_Shapes()->AddAutoShape(ShapeType::Rectangle, 200.0f, 150.0f, 200.0f, 200.0f);

shape->get_TextFrame()->set_Text(u"3D");
shape->get_TextFrame()->get_Paragraph(0)->get_ParagraphFormat()->get_DefaultPortionFormat()->set_FontHeight(64.0f);

auto frontColor = Color::get_CornflowerBlue();
shape->get_FillFormat()->set_FillType(FillType::Solid);
shape->get_FillFormat()->get_SolidFillColor()->set_Color(frontColor);

auto extrusionColor = Color::get_Blue();
shape->get_ThreeDFormat()->get_Camera()->set_CameraType(CameraPresetType::OrthographicFront);
shape->get_ThreeDFormat()->get_Camera()->SetRotation(20.0f, 30.0f, 40.0f);
shape->get_ThreeDFormat()->get_LightRig()->set_LightType(LightRigPresetType::Flat);
shape->get_ThreeDFormat()->get_LightRig()->set_Direction(LightingDirection::Top);
shape->get_ThreeDFormat()->set_Material(MaterialPresetType::Flat);
shape->get_ThreeDFormat()->set_ExtrusionHeight(100.0);
shape->get_ThreeDFormat()->get_ExtrusionColor()->set_Color(extrusionColor);

auto thumbnail = slide->GetImage(imageScale, imageScale);
thumbnail->Save(u"shape_3d.png");
thumbnail->Dispose();

presentation->Save(u"shape_3d.pptx", SaveFormat::Pptx);
presentation->Dispose();
Hình ảnh slide đã render hiển thị hình chữ nhật như một khối 3D dày:
Xoay một Hình bằng Máy ảnh
Trong PowerPoint, phép quay 3D được cấu hình từ bảng 3-D Rotation. Các giá trị quay X, Y và Z tương ứng với việc quay bạn thiết lập qua API máy ảnh.
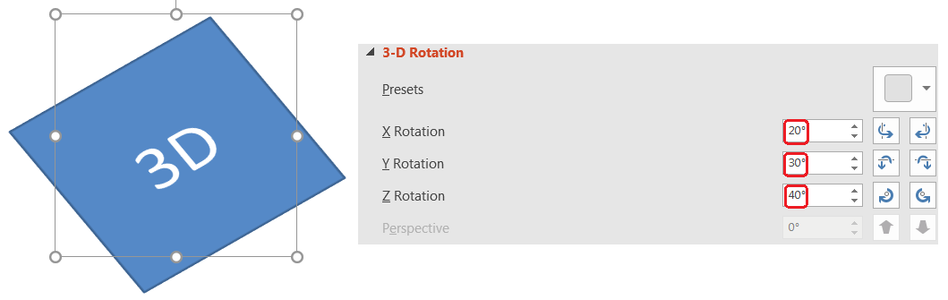
Trong Aspose.Slides, truy cập máy ảnh qua IThreeDFormat::get_Camera. Ví dụ này tạo một hình chữ nhật, chọn góc nhìn mặt trước trực giao, và đặt các góc quay X, Y, Z thành 20, 30 và 40 độ tương ứng. Nó cấu hình hình dạng trong bộ nhớ mà không lưu file:
#include <DOM/CameraPresetType.h>
#include <DOM/IAutoShape.h>
#include <DOM/ICamera.h>
#include <DOM/IShapeCollection.h>
#include <DOM/ISlide.h>
#include <DOM/IThreeDFormat.h>
#include <DOM/Presentation.h>
#include <DOM/ShapeType.h>

using namespace Aspose::Slides;

auto presentation = System::MakeObject<Presentation>();
auto slide = presentation->get_Slide(0);

auto shape = slide->get_Shapes()->AddAutoShape(ShapeType::Rectangle, 200.0f, 150.0f, 200.0f, 200.0f);

shape->get_ThreeDFormat()->get_Camera()->set_CameraType(CameraPresetType::OrthographicFront);
shape->get_ThreeDFormat()->get_Camera()->SetRotation(20.0f, 30.0f, 40.0f);

presentation->Dispose();
Sử dụng máy ảnh khi bạn cần thay đổi cách người xem nhìn đối tượng. Nó không thay đổi hình học 2D của hình trên slide. Nó thay đổi góc nhìn 3D được PowerPoint và Aspose.Slides sử dụng khi render.
Thêm Ép nổi và Độ sâu
Ép nổi làm cho hình dạng trông dày hơn bằng cách kéo nó ra phía sau mặt trước. Trong PowerPoint, điều khiển độ sâu đặt độ dày hiển thị này, và điều khiển màu đặt màu cho các mặt bên.
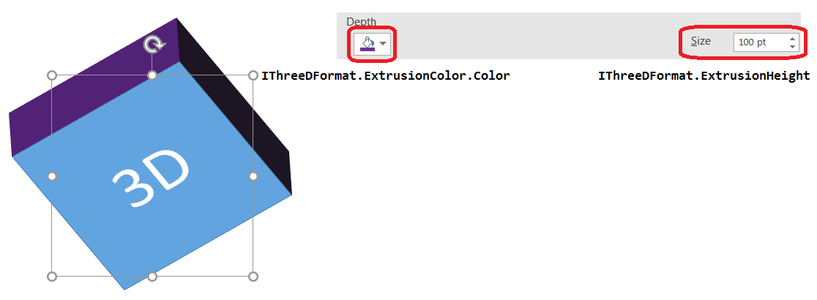
Đặt IThreeDFormat::set_ExtrusionHeight cho độ dày và IThreeDFormat::get_ExtrusionColor cho màu mặt bên. Ví dụ này cho một hình chữ nhật ép nổi 100 điểm với các mặt bên màu tím và xoay máy ảnh để hiển thị độ dày. Nó cấu hình hình dạng trong bộ nhớ mà không lưu file:
#include <DOM/CameraPresetType.h>
#include <DOM/ILightRig.h>
#include <DOM/LightRigPresetType.h>
#include <DOM/LightingDirection.h>
#include <DOM/MaterialPresetType.h>
#include <DOM/IAutoShape.h>
#include <DOM/ICamera.h>
#include <DOM/IColorFormat.h>
#include <DOM/IShapeCollection.h>
#include <DOM/ISlide.h>
#include <DOM/IThreeDFormat.h>
#include <DOM/Presentation.h>
#include <DOM/ShapeType.h>
#include <drawing/color.h>

using namespace Aspose::Slides;
using namespace System::Drawing;

auto presentation = System::MakeObject<Presentation>();
auto slide = presentation->get_Slide(0);

auto shape = slide->get_Shapes()->AddAutoShape(ShapeType::Rectangle, 200.0f, 150.0f, 200.0f, 200.0f);

shape->get_ThreeDFormat()->get_Camera()->set_CameraType(CameraPresetType::OrthographicFront);
shape->get_ThreeDFormat()->get_Camera()->SetRotation(20.0f, 30.0f, 40.0f);
shape->get_ThreeDFormat()->get_LightRig()->set_LightType(LightRigPresetType::Flat);
shape->get_ThreeDFormat()->get_LightRig()->set_Direction(LightingDirection::Top);
shape->get_ThreeDFormat()->set_Material(MaterialPresetType::Flat);
shape->get_ThreeDFormat()->set_ExtrusionHeight(100.0);

auto extrusionColor = Color::get_Purple();
shape->get_ThreeDFormat()->get_ExtrusionColor()->set_Color(extrusionColor);

presentation->Dispose();
Phương thức IThreeDFormat::set_Depth đặt độ sâu cho một hình 3D. Phương thức set_ExtrusionHeight điều khiển chiều cao của hiệu ứng ép nổi, như trong ví dụ này.
Sử dụng Đổ Gradient hoặc Hình ảnh với Hiệu ứng 3D
Định dạng 3D độc lập với việc đổ màu cho hình dạng. Bạn có thể áp dụng màu đơn, gradient, hoa văn hoặc hình ảnh cho mặt trước và vẫn sử dụng cùng các cài đặt máy ảnh, ánh sáng, vật liệu và ép nổi.
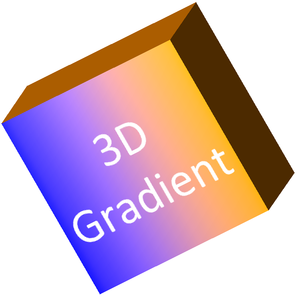
Ví dụ này áp dụng gradient xanh‑đến‑cam cho mặt trước và màu cam tối cho phần ép nổi 150 điểm. Các điểm dừng gradient ở 0 và 100 đánh dấu đầu và cuối gradient. Các giá trị quay máy ảnh được tính bằng độ. Slide được render thành ảnh PNG với kích thước gấp đôi mặc định:
#include <DOM/CameraPresetType.h>
#include <DOM/FillType.h>
#include <DOM/IAutoShape.h>
#include <DOM/ICamera.h>
#include <DOM/IColorFormat.h>
#include <DOM/IFillFormat.h>
#include <DOM/IGradientFormat.h>
#include <DOM/IGradientStopCollection.h>
#include <DOM/ILightRig.h>
#include <DOM/IParagraph.h>
#include <DOM/IParagraphFormat.h>
#include <DOM/IPortionFormat.h>
#include <DOM/IShapeCollection.h>
#include <DOM/ISlide.h>
#include <DOM/ITextFrame.h>
#include <DOM/IThreeDFormat.h>
#include <DOM/LightRigPresetType.h>
#include <DOM/LightingDirection.h>
#include <DOM/MaterialPresetType.h>
#include <DOM/Presentation.h>
#include <DOM/ShapeType.h>
#include <IImage.h>
#include <drawing/color.h>

using namespace Aspose::Slides;
using namespace System::Drawing;

const auto imageScale = 2.0f;

auto presentation = System::MakeObject<Presentation>();
auto slide = presentation->get_Slide(0);

auto shape = slide->get_Shapes()->AddAutoShape(ShapeType::Rectangle, 200.0f, 150.0f, 250.0f, 250.0f);
shape->get_TextFrame()->set_Text(u"3D Gradient");
shape->get_TextFrame()->get_Paragraph(0)->get_ParagraphFormat()->get_DefaultPortionFormat()->set_FontHeight(64.0f);

auto firstGradientColor = Color::get_Blue();
auto secondGradientColor = Color::get_Orange();
shape->get_FillFormat()->set_FillType(FillType::Gradient);
shape->get_FillFormat()->get_GradientFormat()->get_GradientStops()->Add(0.0f, firstGradientColor);
shape->get_FillFormat()->get_GradientFormat()->get_GradientStops()->Add(100.0f, secondGradientColor);

auto extrusionColor = Color::get_DarkOrange();
shape->get_ThreeDFormat()->get_Camera()->set_CameraType(CameraPresetType::OrthographicFront);
shape->get_ThreeDFormat()->get_Camera()->SetRotation(10.0f, 20.0f, 30.0f);
shape->get_ThreeDFormat()->get_LightRig()->set_LightType(LightRigPresetType::Flat);
shape->get_ThreeDFormat()->get_LightRig()->set_Direction(LightingDirection::Top);
shape->get_ThreeDFormat()->set_Material(MaterialPresetType::Flat);
shape->get_ThreeDFormat()->set_ExtrusionHeight(150.0);
shape->get_ThreeDFormat()->get_ExtrusionColor()->set_Color(extrusionColor);

auto thumbnail = slide->GetImage(imageScale, imageScale);
thumbnail->Save(u"gradient_3d.png");
thumbnail->Dispose();

presentation->Dispose();
Hình chữ nhật 3D được render với nền gradient xanh đến cam và ép nổi màu cam:
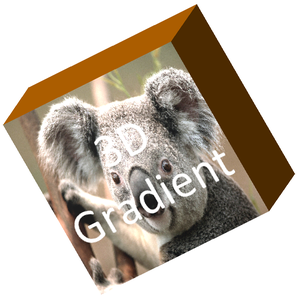
Để sử dụng nền hình ảnh thay thế, thêm hình ảnh vào bài thuyết trình và gán nó cho màu nền hình. Ví dụ này yêu cầu một tệp tồn tại có tên “image.jpg” trong thư mục làm việc. Nó kéo giãn hình ảnh để lấp đầy hình chữ nhật, áp dụng ép nổi 150 điểm và đặt quay máy ảnh bằng độ. Nó cấu hình hình dạng trong bộ nhớ mà không lưu hoặc render tệp:
#include <DOM/CameraPresetType.h>
#include <DOM/ILightRig.h>
#include <DOM/LightRigPresetType.h>
#include <DOM/LightingDirection.h>
#include <DOM/MaterialPresetType.h>
#include <DOM/FillType.h>
#include <DOM/IAutoShape.h>
#include <DOM/ICamera.h>
#include <DOM/IColorFormat.h>
#include <DOM/IFillFormat.h>
#include <DOM/IImageCollection.h>
#include <DOM/IPictureFillFormat.h>
#include <DOM/IShapeCollection.h>
#include <DOM/ISlide.h>
#include <DOM/ISlidesPicture.h>
#include <DOM/IThreeDFormat.h>
#include <DOM/PictureFillMode.h>
#include <DOM/Presentation.h>
#include <DOM/ShapeType.h>
#include <drawing/color.h>
#include <system/io/file.h>

using namespace Aspose::Slides;
using namespace System::Drawing;
using namespace System::IO;

auto presentation = System::MakeObject<Presentation>();
auto slide = presentation->get_Slide(0);

auto shape = slide->get_Shapes()->AddAutoShape(ShapeType::Rectangle, 200.0f, 150.0f, 250.0f, 250.0f);

auto imageData = File::ReadAllBytes(u"image.jpg");
auto image = presentation->get_Images()->AddImage(imageData);

shape->get_FillFormat()->set_FillType(FillType::Picture);
shape->get_FillFormat()->get_PictureFillFormat()->get_Picture()->set_Image(image);
shape->get_FillFormat()->get_PictureFillFormat()->set_PictureFillMode(PictureFillMode::Stretch);

auto extrusionColor = Color::get_DarkOrange();
shape->get_ThreeDFormat()->get_Camera()->set_CameraType(CameraPresetType::OrthographicFront);
shape->get_ThreeDFormat()->get_Camera()->SetRotation(10.0f, 20.0f, 30.0f);
shape->get_ThreeDFormat()->get_LightRig()->set_LightType(LightRigPresetType::Flat);
shape->get_ThreeDFormat()->get_LightRig()->set_Direction(LightingDirection::Top);
shape->get_ThreeDFormat()->set_Material(MaterialPresetType::Flat);
shape->get_ThreeDFormat()->set_ExtrusionHeight(150.0);
shape->get_ThreeDFormat()->get_ExtrusionColor()->set_Color(extrusionColor);

presentation->Dispose();
Hình ảnh được render trên mặt trước, trong khi ép nổi được render như bề mặt bên 3D:
Áp dụng Định dạng 3D cho Văn bản
Định dạng 3D cho hình ảnh ảnh hưởng tới phần thân hình. Định dạng 3D cho văn bản ảnh hưởng tới khung văn bản. Điều này hữu ích cho các hiệu ứng kiểu WordArt nơi các ký tự cần ép nổi, vật liệu, chiếu sáng và cài đặt máy ảnh.
Ví dụ sau tạo văn bản với họa tiết lưới cam‑trắng, áp dụng vòng cung lên trên và cấu hình cài đặt 3D qua ITextFrameFormat::get_ThreeDFormat. Chiều cao ép nổi và độ sâu được tính bằng điểm, và góc quay ánh sáng tính bằng độ. Màu nền và viền của hình được ẩn để chỉ văn bản hiển thị. Ví dụ này render ảnh PNG với kích thước gấp đôi slide mặc định và lưu bài thuyết trình dưới dạng PPTX:
#include <DOM/CameraPresetType.h>
#include <DOM/FillType.h>
#include <DOM/IAutoShape.h>
#include <DOM/ICamera.h>
#include <DOM/IColorFormat.h>
#include <DOM/IFillFormat.h>
#include <DOM/ILightRig.h>
#include <DOM/ILineFillFormat.h>
#include <DOM/ILineFormat.h>
#include <DOM/IParagraph.h>
#include <DOM/IParagraphFormat.h>
#include <DOM/IPatternFormat.h>
#include <DOM/IPortion.h>
#include <DOM/IPortionFormat.h>
#include <DOM/IShapeCollection.h>
#include <DOM/ISlide.h>
#include <DOM/ITextFrame.h>
#include <DOM/ITextFrameFormat.h>
#include <DOM/IThreeDFormat.h>
#include <DOM/LightRigPresetType.h>
#include <DOM/LightingDirection.h>
#include <DOM/MaterialPresetType.h>
#include <DOM/PatternStyle.h>
#include <DOM/Presentation.h>
#include <DOM/ShapeType.h>
#include <DOM/TextShapeType.h>
#include <Export/SaveFormat.h>
#include <IImage.h>
#include <drawing/color.h>

using namespace Aspose::Slides;
using namespace Aspose::Slides::Export;
using namespace System::Drawing;

const auto imageScale = 2.0f;

auto presentation = System::MakeObject<Presentation>();
auto slide = presentation->get_Slide(0);

auto shape = slide->get_Shapes()->AddAutoShape(ShapeType::Rectangle, 200.0f, 150.0f, 250.0f, 250.0f);

shape->get_FillFormat()->set_FillType(FillType::NoFill);
shape->get_LineFormat()->get_FillFormat()->set_FillType(FillType::NoFill);
shape->get_TextFrame()->set_Text(u"3D Text");

auto portion = shape->get_TextFrame()->get_Paragraph(0)->get_Portion(0);
portion->get_PortionFormat()->get_FillFormat()->set_FillType(FillType::Pattern);

auto foregroundColor = Color::get_DarkOrange();
auto backgroundColor = Color::get_White();
portion->get_PortionFormat()->get_FillFormat()->get_PatternFormat()->get_ForeColor()->set_Color(foregroundColor);
portion->get_PortionFormat()->get_FillFormat()->get_PatternFormat()->get_BackColor()->set_Color(backgroundColor);
portion->get_PortionFormat()->get_FillFormat()->get_PatternFormat()->set_PatternStyle(PatternStyle::LargeGrid);

shape->get_TextFrame()->get_Paragraph(0)->get_ParagraphFormat()->get_DefaultPortionFormat()->set_FontHeight(128.0f);

auto textFrameFormat = shape->get_TextFrame()->get_TextFrameFormat();
textFrameFormat->set_Transform(TextShapeType::ArchUp);
textFrameFormat->get_ThreeDFormat()->set_ExtrusionHeight(3.5);
textFrameFormat->get_ThreeDFormat()->set_Depth(3.0);
textFrameFormat->get_ThreeDFormat()->set_Material(MaterialPresetType::Plastic);
textFrameFormat->get_ThreeDFormat()->get_LightRig()->set_Direction(LightingDirection::Top);
textFrameFormat->get_ThreeDFormat()->get_LightRig()->set_LightType(LightRigPresetType::Balanced);
textFrameFormat->get_ThreeDFormat()->get_LightRig()->SetRotation(0.0f, 0.0f, 40.0f);
textFrameFormat->get_ThreeDFormat()->get_Camera()->set_CameraType(CameraPresetType::PerspectiveContrastingRightFacing);

auto thumbnail = slide->GetImage(imageScale, imageScale);
thumbnail->Save(u"text_3d.png");
thumbnail->Dispose();

presentation->Save(u"text_3d.pptx", SaveFormat::Pptx);
presentation->Dispose();
Văn bản được render dưới dạng chữ 3D cong, ép nổi:

Giữ Văn bản Phẳng trên Hình 3D
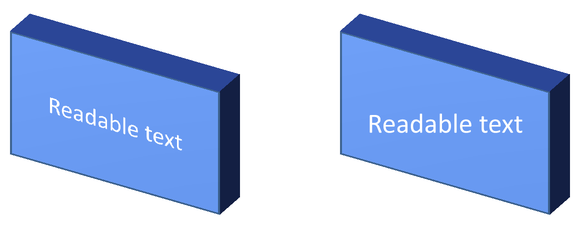
Để giữ văn bản đọc được trong khi vẫn bảo toàn diện mạo 3D của hình, gọi ITextFrameFormat::set_KeepTextFlat qua ITextFrame::get_TextFrameFormat. Khi giá trị là true, văn bản không tham gia vào cảnh 3D. Khi là false, văn bản sẽ tham gia vào cảnh và tuân theo hướng 3D.
Cài đặt này không loại bỏ định dạng 3D của hình: máy ảnh, ánh sáng, vật liệu và ép nổi vẫn được cấu hình qua IShape::get_ThreeDFormat. Nó cũng khác với việc quay thông thường. IShape::set_Rotation quay hình trong mặt phẳng slide, trong khi ITextFrameFormat::set_RotationAngle kiểm soát góc quay tùy chỉnh của văn bản trong khung. Giữ văn bản ra khỏi cảnh 3D không đặt lại bất kỳ góc nào trong hai trường hợp trên.
Ví dụ tự chứa sau tạo một hình chữ nhật xanh với văn bản và sao chép nó bên cạnh hình gốc. Cả hai hình đều có cùng định dạng 3D; chỉ cài đặt văn bản khác nhau: false ở bên trái và true ở bên phải. Góc máy ảnh tính bằng độ, và chiều cao ép nổi là 40 điểm. Ví dụ lưu bài thuyết trình dưới dạng PPTX và render slide so sánh sang PNG với kích thước gấp đôi mặc định.
#include <DOM/ITextFrameFormat.h>
#include <DOM/TextAlignment.h>
#include <DOM/TextAnchorType.h>
#include <DOM/CameraPresetType.h>
#include <DOM/FillType.h>
#include <DOM/IAutoShape.h>
#include <DOM/ICamera.h>
#include <DOM/IColorFormat.h>
#include <DOM/IFillFormat.h>
#include <DOM/ILightRig.h>
#include <DOM/IParagraph.h>
#include <DOM/IParagraphFormat.h>
#include <DOM/IPortionFormat.h>
#include <DOM/IShapeCollection.h>
#include <DOM/ISlide.h>
#include <DOM/ITextFrame.h>
#include <DOM/IThreeDFormat.h>
#include <DOM/LightRigPresetType.h>
#include <DOM/LightingDirection.h>
#include <DOM/MaterialPresetType.h>
#include <DOM/Presentation.h>
#include <DOM/ShapeType.h>
#include <Export/SaveFormat.h>
#include <IImage.h>
#include <drawing/color.h>

using namespace Aspose::Slides;
using namespace Aspose::Slides::Export;
using namespace System::Drawing;

auto presentation = System::MakeObject<Presentation>();
auto slide = presentation->get_Slide(0);

auto shape = slide->get_Shapes()->AddAutoShape(ShapeType::Rectangle, 70.0f, 160.0f, 240.0f, 140.0f);

shape->get_TextFrame()->set_Text(u"Readable text");
shape->get_TextFrame()->get_Paragraph(0)->get_ParagraphFormat()->get_DefaultPortionFormat()->set_FontHeight(28.0f);
shape->get_TextFrame()->get_Paragraph(0)->get_ParagraphFormat()->set_Alignment(TextAlignment::Center);
shape->get_TextFrame()->get_TextFrameFormat()->set_AnchoringType(TextAnchorType::Center);
shape->get_FillFormat()->set_FillType(FillType::Solid);
shape->get_FillFormat()->get_SolidFillColor()->set_Color(Color::get_CornflowerBlue());

shape->get_ThreeDFormat()->get_Camera()->set_CameraType(CameraPresetType::OrthographicFront);
shape->get_ThreeDFormat()->get_Camera()->SetRotation(30.0f, 30.0f, 0.0f);
shape->get_ThreeDFormat()->get_LightRig()->set_LightType(LightRigPresetType::Flat);
shape->get_ThreeDFormat()->get_LightRig()->set_Direction(LightingDirection::Top);
shape->get_ThreeDFormat()->set_Material(MaterialPresetType::Flat);
shape->get_ThreeDFormat()->set_ExtrusionHeight(40.0);
shape->get_ThreeDFormat()->get_ExtrusionColor()->set_Color(Color::get_RoyalBlue());
shape->get_TextFrame()->get_TextFrameFormat()->set_KeepTextFlat(false);

auto clonedShape = slide->get_Shapes()->AddClone(shape, 400.0f, 160.0f);
auto flatTextShape = System::ExplicitCast<IAutoShape>(clonedShape);
flatTextShape->get_TextFrame()->get_TextFrameFormat()->set_KeepTextFlat(true);

presentation->Save(u"keep_text_flat.pptx", SaveFormat::Pptx);
auto image = slide->GetImage(2.0f, 2.0f);
image->Save(u"keep_text_flat.png");
image->Dispose();
presentation->Dispose();
Hai hình chữ nhật 3D cạnh nhau: KeepTextFlat là false ở phía bên trái và true ở phía bên phải:
Hành vi Xuất và Render
Aspose.Slides giữ định dạng 3D khi lưu sang các định dạng PowerPoint như PPTX. Khi render hoặc xuất sang các định dạng bố cục cố định, cảnh 3D sẽ được raster hoá hoặc vẽ vào đầu ra dưới dạng kết quả 2D. Điều này áp dụng khi bạn render slide sang PNG, xuất sang PDF, xuất sang HTML, hoặc tạo khung cho chuyển đổi video.
Hãy nhớ các điểm sau:
- Hình ảnh và PDF đã xuất không tương tác. Đối tượng không thể được người xem quay sau khi xuất.
- Kết quả cuối cùng phụ thuộc vào sự kết hợp của máy ảnh, bộ ánh sáng, vật liệu, ép nổi, màu nền và tỉ lệ slide.
- Nếu bạn cần kiểm tra các giá trị định dạng kế thừa hoặc dựa trên giao diện, hãy đọc effective shape properties.
- Một số định dạng đầu ra không thể lưu định dạng 3D PowerPoint có thể chỉnh sửa. Trong các định dạng đó, kết quả trực quan được render thay vì được giữ dưới dạng cài đặt 3D có thể chỉnh sửa.
Câu hỏi thường gặp
Aspose.Slides có thể tạo bài thuyết trình 3D tương tác không?
Aspose.Slides tạo và render các hiệu ứng 3D PowerPoint cho hình và văn bản. Nó không làm cho các hình ảnh, PDF hoặc trang HTML xuất ra trở thành các cảnh 3D tương tác mà người xem có thể quay. Trong PPTX, định dạng 3D vẫn có thể chỉnh sửa trong PowerPoint khi định dạng hỗ trợ.
Sự khác biệt giữa mô hình 3D và hiệu ứng 3D là gì?
Mô hình 3D là một đối tượng 3D riêng biệt được chèn vào bài thuyết trình. Hiệu ứng 3D là định dạng áp dụng cho một hình PowerPoint thông thường hoặc văn bản, như quay, ép nổi, viền chốt, chiếu sáng và vật liệu. Bài viết này chỉ đề cập đến hiệu ứng 3D.
Cài đặt nào cần thiết cho một hình 3D có thể nhìn thấy?
Ít nhất, đặt quay máy ảnh và một trong hai: ép nổi hoặc độ sâu. Thực tế, cũng nên đặt bộ ánh sáng và vật liệu để các mặt được render có điểm nhấn và bóng rõ ràng.
Tôi có thể áp dụng hiệu ứng 3D cho cả hình và văn bản không?
Có. Sử dụng IShape::get_ThreeDFormat cho phần thân hình và ITextFrameFormat::get_ThreeDFormat cho văn bản.
Hiệu ứng 3D có xuất hiện khi xuất sang hình ảnh, PDF, HTML hoặc khung video không?
Có. Aspose.Slides render hiệu ứng 3D khi tạo ảnh slide, PDF, HTML và khung dùng cho chuyển đổi video. Đầu ra xuất ra chứa ngoại hình đã render, không phải một đối tượng 3D có thể chỉnh sửa.
Tôi có thể đọc các giá trị 3D cuối cùng sau khi áp dụng kế thừa và cài đặt giao diện không?
Có. Sử dụng các API định dạng hiệu quả được mô tả trong Shape Effective Properties để đọc các giá trị máy ảnh, bộ ánh sáng, viền chốt và các giá trị 3D liên quan cuối cùng.