
ایجاد افکتهای 3D در ارائهها با استفاده از C++
نمای کلی
Aspose.Slides for C++ میتواند قالببندی سهبعدی به سبک PowerPoint را برای اشکال و متن ایجاد، ویرایش، حفظ و رندر کند. این مقاله به اثرات سهبعدی مانند چرخش، برونآمد، لبهدار کردن، نورپردازی، ماده، پرکنندههای گرادیان یا تصویر، و متن سهبعدی میپردازد.
Note
این مقاله دربارهٔ اثرات قالببندی سهبعدی روی اشکال و متنهای PowerPoint است. دربارهٔ وارد کردن یا ویرایش فایلهای مدل سهبعدی مستقل نیست. هنگام صادر کردن یک اسلاید به تصویر، PDF یا HTML، Aspose.Slides این اثرات سهبعدی را به خروجی دوبعدی صادر شده رندر میکند.مفاهیم قالببندی سهبعدی
برای اعمال قالببندی سهبعدی به یک شکل از روش IShape::get_ThreeDFormat استفاده کنید. این روش یک شیء IThreeDFormat را برمیگرداند که صحنهٔ سهبعدی آن شکل را کنترل میکند.
برای متن، از روش ITextFrameFormat::get_ThreeDFormat استفاده کنید. این روش قالببندی سهبعدی را به قاب متن اعمال میکند نه به بدنهٔ شکل.
متدهای مهم عبارتند از:
| متد | چه چیزی را کنترل میکند | زمان استفاده |
|---|---|---|
| get_Camera | نقطهٔ دید، نوع پیشتنظیم دوربین، چرخش، زوم و پرسپکتیو | شیء را در فضای سهبعدی بچرخانید یا با پیشتنظیم چرخش سهبعدی PowerPoint مطابقت دهید |
| get_LightRig | پیشتنظیم نور، جهت و چرخش نور | تغییر نحوهٔ نمایش برجستگیها و سایهها بر سطح سهبعدی |
| set_Material | مادهٔ سطح، مانند صاف، مات، پلاستیک یا فلز | ظاهر همان هندسه را صافتر، نرمتر، براق یا فلزی کنید |
| set_ExtrusionHeight | چگونگی گسترش شکل به سمت عقب از سطح جلویی | یک شکل صاف را به یک جسم سهبعدی واضحاً ضخیم تبدیل کنید |
| get_ExtrusionColor | رنگ طرفهای برونآمدی | عمق را قابل مشاهده کنید یا رنگ طرف را با پرکنندهٔ جلویی هماهنگ کنید |
| set_Depth | عمق سهبعدی اضافهای که توسط قالببندی سهبعدی PowerPoint استفاده میشود | عمق را برای اشکال یا متن دقیق تنظیم کنید، بهخصوص همراه با تنظیمات لب و ماده |
| get_BevelTop و get_BevelBottom | لبههای بالا یا خمیده روی سطح جلویی و پشتی | یک لبهٔ نرم یا قالبدار بهجای سطح صاف و تیز اضافه کنید |
| get_ContourColor و set_ContourWidth | خط مرزی اطراف شیء سهبعدی | مرز شیء را در خروجی رندر شده برجسته کنید |
ایجاد یک شکل سهبعدی
یک شکل معمولاً به چهار نوع تنظیم نیاز دارد تا بهنظر برسد که بهصورت واقعی سهبعدی است:
- تنظیمات دوربین، زیرا نما پیشفرض جلویی ممکن است برونآمد را مخفی کند.
- تنظیمات نور، زیرا نورپردازی باعث واضح شدن سطوح و طرفها میشود.
- تنظیمات ماده، زیرا سطح نحوهٔ رندر نور را تحت تأثیر قرار میدهد.
- تنظیمات برونآمد یا عمق، زیرا یک شکل صاف به ضخامت نیاز دارد.
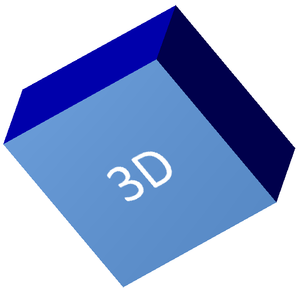
مثال زیر یک مستطیل ایجاد میکند، متنی به سطح جلویی آن اضافه میکند و قالببندی سهبعدی را اعمال مینماید. مقادیر چرخش دوربین بر حسب درجه هستند و ارتفاع برونآمد ۱۰۰ پوینت است. این مثال اسلاید را به تصویر PNG با دو برابر ابعاد پیشفرض رندر کرده و ارائه را به صورت PPTX ذخیره میکند.
#include <DOM/CameraPresetType.h>
#include <DOM/FillType.h>
#include <DOM/IAutoShape.h>
#include <DOM/ICamera.h>
#include <DOM/IColorFormat.h>
#include <DOM/IFillFormat.h>
#include <DOM/ILightRig.h>
#include <DOM/IParagraph.h>
#include <DOM/IParagraphFormat.h>
#include <DOM/IPortionFormat.h>
#include <DOM/IShapeCollection.h>
#include <DOM/ISlide.h>
#include <DOM/ITextFrame.h>
#include <DOM/IThreeDFormat.h>
#include <DOM/LightRigPresetType.h>
#include <DOM/LightingDirection.h>
#include <DOM/MaterialPresetType.h>
#include <DOM/Presentation.h>
#include <DOM/ShapeType.h>
#include <Export/SaveFormat.h>
#include <IImage.h>
#include <drawing/color.h>

using namespace Aspose::Slides;
using namespace Aspose::Slides::Export;
using namespace System::Drawing;

const auto imageScale = 2.0f;

auto presentation = System::MakeObject<Presentation>();
auto slide = presentation->get_Slide(0);

auto shape = slide->get_Shapes()->AddAutoShape(ShapeType::Rectangle, 200.0f, 150.0f, 200.0f, 200.0f);

shape->get_TextFrame()->set_Text(u"3D");
shape->get_TextFrame()->get_Paragraph(0)->get_ParagraphFormat()->get_DefaultPortionFormat()->set_FontHeight(64.0f);

auto frontColor = Color::get_CornflowerBlue();
shape->get_FillFormat()->set_FillType(FillType::Solid);
shape->get_FillFormat()->get_SolidFillColor()->set_Color(frontColor);

auto extrusionColor = Color::get_Blue();
shape->get_ThreeDFormat()->get_Camera()->set_CameraType(CameraPresetType::OrthographicFront);
shape->get_ThreeDFormat()->get_Camera()->SetRotation(20.0f, 30.0f, 40.0f);
shape->get_ThreeDFormat()->get_LightRig()->set_LightType(LightRigPresetType::Flat);
shape->get_ThreeDFormat()->get_LightRig()->set_Direction(LightingDirection::Top);
shape->get_ThreeDFormat()->set_Material(MaterialPresetType::Flat);
shape->get_ThreeDFormat()->set_ExtrusionHeight(100.0);
shape->get_ThreeDFormat()->get_ExtrusionColor()->set_Color(extrusionColor);

auto thumbnail = slide->GetImage(imageScale, imageScale);
thumbnail->Save(u"shape_3d.png");
thumbnail->Dispose();

presentation->Save(u"shape_3d.pptx", SaveFormat::Pptx);
presentation->Dispose();
تصویر رندر شدهٔ اسلاید مستطیل را بهصورت یک بلوک ضخیم سهبعدی نشان میدهد:
چرخاندن شکل با دوربین
در PowerPoint، چرخش سهبعدی از پنل 3-D Rotation تنظیم میشود. مقادیر چرخش X، Y و Z با چرخشی که از طریق API دوربین تنظیم میکنید، مطابقت دارد.
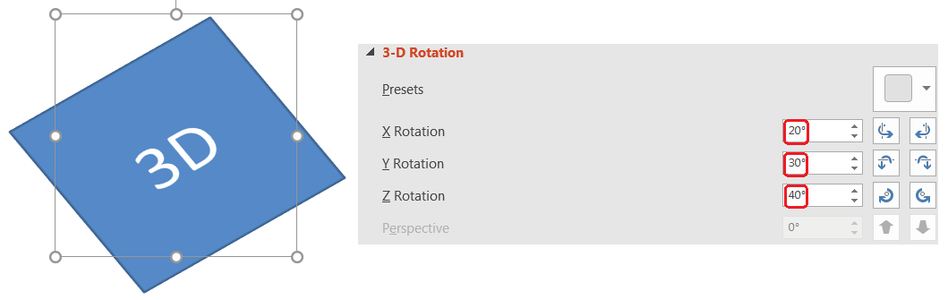
در Aspose.Slides، به دوربین از طریق IThreeDFormat::get_Camera دسترسی پیدا کنید. این مثال یک مستطیل ایجاد میکند، نمای جلویی اورتوگرافیک را انتخاب میکند و چرخشهای X، Y و Z آن را به ترتیب 20، 30 و 40 درجه تنظیم میکند. این مثال شکل را در حافظه پیکربندی میکند بدون اینکه فایلی ذخیره شود:
#include <DOM/CameraPresetType.h>
#include <DOM/IAutoShape.h>
#include <DOM/ICamera.h>
#include <DOM/IShapeCollection.h>
#include <DOM/ISlide.h>
#include <DOM/IThreeDFormat.h>
#include <DOM/Presentation.h>
#include <DOM/ShapeType.h>

using namespace Aspose::Slides;

auto presentation = System::MakeObject<Presentation>();
auto slide = presentation->get_Slide(0);

auto shape = slide->get_Shapes()->AddAutoShape(ShapeType::Rectangle, 200.0f, 150.0f, 200.0f, 200.0f);

shape->get_ThreeDFormat()->get_Camera()->set_CameraType(CameraPresetType::OrthographicFront);
shape->get_ThreeDFormat()->get_Camera()->SetRotation(20.0f, 30.0f, 40.0f);

presentation->Dispose();
از دوربین زمانی استفاده کنید که نیاز به تغییر نحوهٔ دیدن شیء توسط بیننده دارید. این تنظیمات هندسهٔ دوبعدی شکل روی اسلاید را تغییر نمیدهد، بلکه نقطهٔ دید سهبعدی مورد استفاده PowerPoint و Aspose.Slides را هنگام رندر تغییر میدهد.
اضافه کردن برونآمد و عمق
برونآمد باعث میشود شکل با گسترش به پشت سطح جلویی ضخیم بهنظر برسد. در PowerPoint، کنترل عمق این ضخامت قابل مشاهده را تنظیم میکند و کنترل رنگ رنگ طرفها را تنظیم میکند.
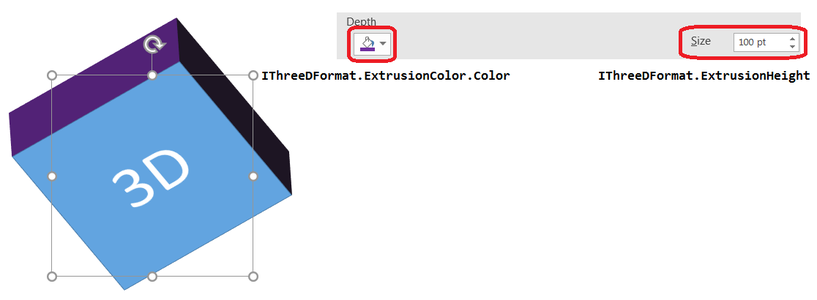
ارتفاع برونآمد را با IThreeDFormat::set_ExtrusionHeight برای ضخامت و رنگ طرفها را با IThreeDFormat::get_ExtrusionColor تنظیم کنید. این مثال به مستطیل برونآمد ۱۰۰ پوینتی با طرفهای بنفش میدهد و دوربین را میچرخاند تا ضخامت آن را نشان دهد. این مثال شکل را در حافظه پیکربندی میکند بدون اینکه فایلی ذخیره شود:
#include <DOM/CameraPresetType.h>
#include <DOM/ILightRig.h>
#include <DOM/LightRigPresetType.h>
#include <DOM/LightingDirection.h>
#include <DOM/MaterialPresetType.h>
#include <DOM/IAutoShape.h>
#include <DOM/ICamera.h>
#include <DOM/IColorFormat.h>
#include <DOM/IShapeCollection.h>
#include <DOM/ISlide.h>
#include <DOM/IThreeDFormat.h>
#include <DOM/Presentation.h>
#include <DOM/ShapeType.h>
#include <drawing/color.h>

using namespace Aspose::Slides;
using namespace System::Drawing;

auto presentation = System::MakeObject<Presentation>();
auto slide = presentation->get_Slide(0);

auto shape = slide->get_Shapes()->AddAutoShape(ShapeType::Rectangle, 200.0f, 150.0f, 200.0f, 200.0f);

shape->get_ThreeDFormat()->get_Camera()->set_CameraType(CameraPresetType::OrthographicFront);
shape->get_ThreeDFormat()->get_Camera()->SetRotation(20.0f, 30.0f, 40.0f);
shape->get_ThreeDFormat()->get_LightRig()->set_LightType(LightRigPresetType::Flat);
shape->get_ThreeDFormat()->get_LightRig()->set_Direction(LightingDirection::Top);
shape->get_ThreeDFormat()->set_Material(MaterialPresetType::Flat);
shape->get_ThreeDFormat()->set_ExtrusionHeight(100.0);

auto extrusionColor = Color::get_Purple();
shape->get_ThreeDFormat()->get_ExtrusionColor()->set_Color(extrusionColor);

presentation->Dispose();
متد IThreeDFormat::set_Depth عمق یک شکل سهبعدی را تنظیم میکند. متد set_ExtrusionHeight ارتفاع اثر برونآمد را کنترل میکند، همانطور که در این مثال نشان داده شده است.
استفاده از پرکنندههای گرادیان یا تصویر با اثرات سهبعدی
قالببندی سهبعدی مستقل از پرکنندهٔ شکل است. میتوانید رنگ ثابت، گرادیان، الگو یا پرکنندهٔ تصویر را به سطح جلویی اعمال کنید و همچنان از همان تنظیمات دوربین، نور، ماده و برونآمد استفاده کنید.
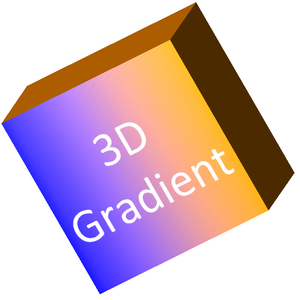
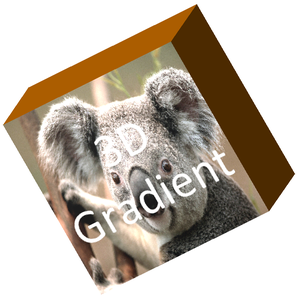
این مثال گرادیان آبی‑به‑نارنجی را به سطح جلویی و رنگ نارنجی تیره را به برونآمد ۱۵۰ پوینتی اعمال میکند. نقاط توقف گرادیان در 0 و 100 شروع و پایان گرادیان را نشان میدهند. مقادیر چرخش دوربین بر حسب درجه هستند. اسلاید به تصویر PNG با دو برابر ابعاد پیشفرض رندر میشود:
#include <DOM/CameraPresetType.h>
#include <DOM/FillType.h>
#include <DOM/IAutoShape.h>
#include <DOM/ICamera.h>
#include <DOM/IColorFormat.h>
#include <DOM/IFillFormat.h>
#include <DOM/IGradientFormat.h>
#include <DOM/IGradientStopCollection.h>
#include <DOM/ILightRig.h>
#include <DOM/IParagraph.h>
#include <DOM/IParagraphFormat.h>
#include <DOM/IPortionFormat.h>
#include <DOM/IShapeCollection.h>
#include <DOM/ISlide.h>
#include <DOM/ITextFrame.h>
#include <DOM/IThreeDFormat.h>
#include <DOM/LightRigPresetType.h>
#include <DOM/LightingDirection.h>
#include <DOM/MaterialPresetType.h>
#include <DOM/Presentation.h>
#include <DOM/ShapeType.h>
#include <IImage.h>
#include <drawing/color.h>

using namespace Aspose::Slides;
using namespace System::Drawing;

const auto imageScale = 2.0f;

auto presentation = System::MakeObject<Presentation>();
auto slide = presentation->get_Slide(0);

auto shape = slide->get_Shapes()->AddAutoShape(ShapeType::Rectangle, 200.0f, 150.0f, 250.0f, 250.0f);
shape->get_TextFrame()->set_Text(u"3D Gradient");
shape->get_TextFrame()->get_Paragraph(0)->get_ParagraphFormat()->get_DefaultPortionFormat()->set_FontHeight(64.0f);

auto firstGradientColor = Color::get_Blue();
auto secondGradientColor = Color::get_Orange();
shape->get_FillFormat()->set_FillType(FillType::Gradient);
shape->get_FillFormat()->get_GradientFormat()->get_GradientStops()->Add(0.0f, firstGradientColor);
shape->get_FillFormat()->get_GradientFormat()->get_GradientStops()->Add(100.0f, secondGradientColor);

auto extrusionColor = Color::get_DarkOrange();
shape->get_ThreeDFormat()->get_Camera()->set_CameraType(CameraPresetType::OrthographicFront);
shape->get_ThreeDFormat()->get_Camera()->SetRotation(10.0f, 20.0f, 30.0f);
shape->get_ThreeDFormat()->get_LightRig()->set_LightType(LightRigPresetType::Flat);
shape->get_ThreeDFormat()->get_LightRig()->set_Direction(LightingDirection::Top);
shape->get_ThreeDFormat()->set_Material(MaterialPresetType::Flat);
shape->get_ThreeDFormat()->set_ExtrusionHeight(150.0);
shape->get_ThreeDFormat()->get_ExtrusionColor()->set_Color(extrusionColor);

auto thumbnail = slide->GetImage(imageScale, imageScale);
thumbnail->Save(u"gradient_3d.png");
thumbnail->Dispose();

presentation->Dispose();
برای استفاده از پرکنندهٔ تصویر، تصویر را به ارائه اضافه کنید و به پرکنندهٔ شکل اختصاص دهید. این مثال به فایلی به نام “image.jpg” در پوشهٔ کاری نیاز دارد. تصویر را بهطوری کش میدهد که مستطیل را پر کند، برونآمد ۱۵۰ پوینتی اعمال میکند و چرخش دوربین را بر حسب درجه تنظیم میکند. این مثال شکل را در حافظه پیکربندی میکند بدون ذخیره یا رندر کردن فایل:
#include <DOM/CameraPresetType.h>
#include <DOM/ILightRig.h>
#include <DOM/LightRigPresetType.h>
#include <DOM/LightingDirection.h>
#include <DOM/MaterialPresetType.h>
#include <DOM/FillType.h>
#include <DOM/IAutoShape.h>
#include <DOM/ICamera.h>
#include <DOM/IColorFormat.h>
#include <DOM/IFillFormat.h>
#include <DOM/IImageCollection.h>
#include <DOM/IPictureFillFormat.h>
#include <DOM/IShapeCollection.h>
#include <DOM/ISlide.h>
#include <DOM/ISlidesPicture.h>
#include <DOM/IThreeDFormat.h>
#include <DOM/PictureFillMode.h>
#include <DOM/Presentation.h>
#include <DOM/ShapeType.h>
#include <drawing/color.h>
#include <system/io/file.h>

using namespace Aspose::Slides;
using namespace System::Drawing;
using namespace System::IO;

auto presentation = System::MakeObject<Presentation>();
auto slide = presentation->get_Slide(0);

auto shape = slide->get_Shapes()->AddAutoShape(ShapeType::Rectangle, 200.0f, 150.0f, 250.0f, 250.0f);

auto imageData = File::ReadAllBytes(u"image.jpg");
auto image = presentation->get_Images()->AddImage(imageData);

shape->get_FillFormat()->set_FillType(FillType::Picture);
shape->get_FillFormat()->get_PictureFillFormat()->get_Picture()->set_Image(image);
shape->get_FillFormat()->get_PictureFillFormat()->set_PictureFillMode(PictureFillMode::Stretch);

auto extrusionColor = Color::get_DarkOrange();
shape->get_ThreeDFormat()->get_Camera()->set_CameraType(CameraPresetType::OrthographicFront);
shape->get_ThreeDFormat()->get_Camera()->SetRotation(10.0f, 20.0f, 30.0f);
shape->get_ThreeDFormat()->get_LightRig()->set_LightType(LightRigPresetType::Flat);
shape->get_ThreeDFormat()->get_LightRig()->set_Direction(LightingDirection::Top);
shape->get_ThreeDFormat()->set_Material(MaterialPresetType::Flat);
shape->get_ThreeDFormat()->set_ExtrusionHeight(150.0);
shape->get_ThreeDFormat()->get_ExtrusionColor()->set_Color(extrusionColor);

presentation->Dispose();
اعمال قالببندی سهبعدی به متن
قالببندی سهبعدی شکل بر بدنهٔ شکل اثر میگذارد. قالببندی سهبعدی متن بر قاب متن اثر میگذارد. این برای اثرات شبیه WordArt مفید است که حروف خود نیاز به برونآمد، ماده، نورپردازی و تنظیمات دوربین دارند.
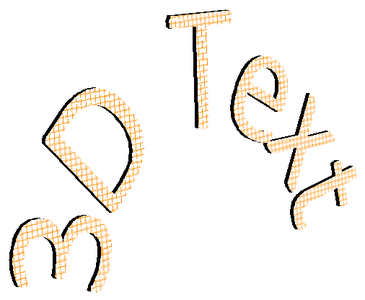
مثال زیر متنی با الگوی مشبک نارنجی‑و‑سفید ایجاد میکند، یک قوس بالایی اعمال میکند و تنظیمات سهبعدی را از طریق ITextFrameFormat::get_ThreeDFormat پیکربندی میکند. ارتفاع و عمق برونآمد بر حسب پوینت هستند و چرخش نور بر حسب درجه. پرکننده و خط دور شکل مخفی هستند تا فقط متن قابل مشاهده باشد. این مثال تصویر PNG را با دو برابر ابعاد پیشفرض اسلاید رندر کرده و ارائه را به صورت PPTX ذخیره میکند:
#include <DOM/CameraPresetType.h>
#include <DOM/FillType.h>
#include <DOM/IAutoShape.h>
#include <DOM/ICamera.h>
#include <DOM/IColorFormat.h>
#include <DOM/IFillFormat.h>
#include <DOM/ILightRig.h>
#include <DOM/ILineFillFormat.h>
#include <DOM/ILineFormat.h>
#include <DOM/IParagraph.h>
#include <DOM/IParagraphFormat.h>
#include <DOM/IPatternFormat.h>
#include <DOM/IPortion.h>
#include <DOM/IPortionFormat.h>
#include <DOM/IShapeCollection.h>
#include <DOM/ISlide.h>
#include <DOM/ITextFrame.h>
#include <DOM/ITextFrameFormat.h>
#include <DOM/IThreeDFormat.h>
#include <DOM/LightRigPresetType.h>
#include <DOM/LightingDirection.h>
#include <DOM/MaterialPresetType.h>
#include <DOM/PatternStyle.h>
#include <DOM/Presentation.h>
#include <DOM/ShapeType.h>
#include <DOM/TextShapeType.h>
#include <Export/SaveFormat.h>
#include <IImage.h>
#include <drawing/color.h>

using namespace Aspose::Slides;
using namespace Aspose::Slides::Export;
using namespace System::Drawing;

const auto imageScale = 2.0f;

auto presentation = System::MakeObject<Presentation>();
auto slide = presentation->get_Slide(0);

auto shape = slide->get_Shapes()->AddAutoShape(ShapeType::Rectangle, 200.0f, 150.0f, 250.0f, 250.0f);

shape->get_FillFormat()->set_FillType(FillType::NoFill);
shape->get_LineFormat()->get_FillFormat()->set_FillType(FillType::NoFill);
shape->get_TextFrame()->set_Text(u"3D Text");

auto portion = shape->get_TextFrame()->get_Paragraph(0)->get_Portion(0);
portion->get_PortionFormat()->get_FillFormat()->set_FillType(FillType::Pattern);

auto foregroundColor = Color::get_DarkOrange();
auto backgroundColor = Color::get_White();
portion->get_PortionFormat()->get_FillFormat()->get_PatternFormat()->get_ForeColor()->set_Color(foregroundColor);
portion->get_PortionFormat()->get_FillFormat()->get_PatternFormat()->get_BackColor()->set_Color(backgroundColor);
portion->get_PortionFormat()->get_FillFormat()->get_PatternFormat()->set_PatternStyle(PatternStyle::LargeGrid);

shape->get_TextFrame()->get_Paragraph(0)->get_ParagraphFormat()->get_DefaultPortionFormat()->set_FontHeight(128.0f);

auto textFrameFormat = shape->get_TextFrame()->get_TextFrameFormat();
textFrameFormat->set_Transform(TextShapeType::ArchUp);
textFrameFormat->get_ThreeDFormat()->set_ExtrusionHeight(3.5);
textFrameFormat->get_ThreeDFormat()->set_Depth(3.0);
textFrameFormat->get_ThreeDFormat()->set_Material(MaterialPresetType::Plastic);
textFrameFormat->get_ThreeDFormat()->get_LightRig()->set_Direction(LightingDirection::Top);
textFrameFormat->get_ThreeDFormat()->get_LightRig()->set_LightType(LightRigPresetType::Balanced);
textFrameFormat->get_ThreeDFormat()->get_LightRig()->SetRotation(0.0f, 0.0f, 40.0f);
textFrameFormat->get_ThreeDFormat()->get_Camera()->set_CameraType(CameraPresetType::PerspectiveContrastingRightFacing);

auto thumbnail = slide->GetImage(imageScale, imageScale);
thumbnail->Save(u"text_3d.png");
thumbnail->Dispose();

presentation->Save(u"text_3d.pptx", SaveFormat::Pptx);
presentation->Dispose();
متن را در یک شکل سهبعدی صاف نگه دارید
برای نگه داشتن متن قابل خواندن در حالی که ظاهر سهبعدی شکل حفظ میشود، از ITextFrameFormat::set_KeepTextFlat از طریق ITextFrame::get_TextFrameFormat استفاده کنید. وقتی مقدار true باشد، متن خارج از صحنهٔ سهبعدی میماند. وقتی false باشد، متن در صحنه شرکت میکند و جهت سهبعدی آن را دنبال میکند.
این تنظیم قالببندی سهبعدی شکل را حذف نمیکند: دوربین، نورپردازی، ماده و برونآمد آن همچنان از طریق IShape::get_ThreeDFormat پیکربندی شدهاند. همچنین متفاوت از چرخش معمولی است. متد IShape::set_Rotation شکل را در صفحهٔ اسلاید میچرخاند، در حالی که ITextFrameFormat::set_RotationAngle چرخش سفارشی متن را داخل کادر مرزبندیاش کنترل میکند. نگه داشتن متن خارج از صحنهٔ سهبعدی هیچیک از این زوایا را ریست نمیکند.
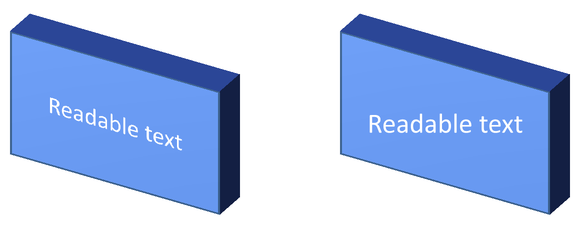
مثال زیر یک مستطیل آبی با متن ایجاد میکند و آن را در کنار اصلی کپی میسازد. هر دو شکل همان قالببندی سهبعدی را دارند؛ تنها تنظیم متن متفاوت است: false در سمت چپ و true در سمت راست. زوایای دوربین بر حسب درجه هستند و ارتفاع برونآمد 40 پوینت است. مثال ارائه را به صورت PPTX ذخیره کرده و اسلاید مقایسهای را به PNG با دو برابر ابعاد پیشفرض رندر میکند:
#include <DOM/ITextFrameFormat.h>
#include <DOM/TextAlignment.h>
#include <DOM/TextAnchorType.h>
#include <DOM/CameraPresetType.h>
#include <DOM/FillType.h>
#include <DOM/IAutoShape.h>
#include <DOM/ICamera.h>
#include <DOM/IColorFormat.h>
#include <DOM/IFillFormat.h>
#include <DOM/ILightRig.h>
#include <DOM/IParagraph.h>
#include <DOM/IParagraphFormat.h>
#include <DOM/IPortionFormat.h>
#include <DOM/IShapeCollection.h>
#include <DOM/ISlide.h>
#include <DOM/ITextFrame.h>
#include <DOM/IThreeDFormat.h>
#include <DOM/LightRigPresetType.h>
#include <DOM/LightingDirection.h>
#include <DOM/MaterialPresetType.h>
#include <DOM/Presentation.h>
#include <DOM/ShapeType.h>
#include <Export/SaveFormat.h>
#include <IImage.h>
#include <drawing/color.h>

using namespace Aspose::Slides;
using namespace Aspose::Slides::Export;
using namespace System::Drawing;

auto presentation = System::MakeObject<Presentation>();
auto slide = presentation->get_Slide(0);

auto shape = slide->get_Shapes()->AddAutoShape(ShapeType::Rectangle, 70.0f, 160.0f, 240.0f, 140.0f);

shape->get_TextFrame()->set_Text(u"Readable text");
shape->get_TextFrame()->get_Paragraph(0)->get_ParagraphFormat()->get_DefaultPortionFormat()->set_FontHeight(28.0f);
shape->get_TextFrame()->get_Paragraph(0)->get_ParagraphFormat()->set_Alignment(TextAlignment::Center);
shape->get_TextFrame()->get_TextFrameFormat()->set_AnchoringType(TextAnchorType::Center);
shape->get_FillFormat()->set_FillType(FillType::Solid);
shape->get_FillFormat()->get_SolidFillColor()->set_Color(Color::get_CornflowerBlue());

shape->get_ThreeDFormat()->get_Camera()->set_CameraType(CameraPresetType::OrthographicFront);
shape->get_ThreeDFormat()->get_Camera()->SetRotation(30.0f, 30.0f, 0.0f);
shape->get_ThreeDFormat()->get_LightRig()->set_LightType(LightRigPresetType::Flat);
shape->get_ThreeDFormat()->get_LightRig()->set_Direction(LightingDirection::Top);
shape->get_ThreeDFormat()->set_Material(MaterialPresetType::Flat);
shape->get_ThreeDFormat()->set_ExtrusionHeight(40.0);
shape->get_ThreeDFormat()->get_ExtrusionColor()->set_Color(Color::get_RoyalBlue());
shape->get_TextFrame()->get_TextFrameFormat()->set_KeepTextFlat(false);

auto clonedShape = slide->get_Shapes()->AddClone(shape, 400.0f, 160.0f);
auto flatTextShape = System::ExplicitCast<IAutoShape>(clonedShape);
flatTextShape->get_TextFrame()->get_TextFrameFormat()->set_KeepTextFlat(true);

presentation->Save(u"keep_text_flat.pptx", SaveFormat::Pptx);
auto image = slide->GetImage(2.0f, 2.0f);
image->Save(u"keep_text_flat.png");
image->Dispose();
presentation->Dispose();
در سمت چپ، متن جهت سهبعدی را دنبال میکند. در سمت راست، متن صاف میماند و خواندن آن آسانتر است. هر دو مستطیل همان برونآمد قابل مشاهده و جهت سهبعدی را حفظ میکنند.
رفتار صادرات و رندرینگ
Aspose.Slides قالببندی سهبعدی را هنگام ذخیره به قالبهای PowerPoint مانند PPTX حفظ میکند. هنگام رندر یا صادرات به قالبهای ثابت‑طرح، صحنهٔ سهبعدی بهصورت رستر یا تصویر در خروجی دوبعدی کشیده میشود. این هنگام رندر اسلایدها به PNG، صادرات به PDF، صادرات به HTML، یا تولید فریمها برای تبدیل به ویدیو اعمال میشود.
- تصاویر و PDFهای صادر شده تعاملی نیستند. پس از صادرات، کاربر نمیتواند شیء را بچرخاند.
- ظاهر نهایی به ترکیب دوربین، لایتریگ، ماده، برونآمد، پرکننده و مقیاسبندی اسلاید بستگی دارد.
- اگر نیاز به بررسی مقادیر قالببندی به ارثبرده یا مبتنی بر تم دارید، ویژگیهای مؤثر شکل را بخوانید.
- برخی از قالبهای خروجی نمیتوانند قالببندی سهبعدی قابل ویرایش PowerPoint را ذخیره کنند. در آن قالبها، نتیجهٔ بصری رندر میشود نه اینکه بهصورت تنظیمات سهبعدی قابل ویرایش حفظ شود.
پرسشهای متداول
آیا Aspose.Slides میتواند ارائههای سهبعدی تعاملی ایجاد کند؟
Aspose.Slides اثرات سهبعدی PowerPoint را برای اشکال و متن ایجاد و رندر میکند. این کتابخانه تصاویر، PDFها یا صفحات HTML صادر شده را به صحنههای سهبعدی تعاملی که کاربر بتواند بچرخاند، تبدیل نمیکند. در قالب PPTX، قالببندی سهبعدی در PowerPoint ویرایشپذیر میماند اگر فرمت آن را پشتیبانی کند.
تفاوت بین یک مدل سهبعدی و یک اثر سهبعدی چیست؟
یک مدل سهبعدی شیء مستقل است که بهصورت فایل جداگانه به ارائه اضافه میشود. یک اثر سهبعدی قالببندیای است که بر روی یک شکل یا متن معمولی PowerPoint اعمال میشود، مانند چرخش، برونآمد، لبه، نورپردازی و ماده. این مقاله به اثرات سهبعدی میپردازد.
کدام تنظیمات برای یک شکل سهبعدی قابل مشاهده لازم است؟
حداقل باید یک چرخش دوربین و یا برونآمد یا عمق تنظیم شود. در عمل، تنظیم لایتریگ و ماده نیز مهم است تا سطوح رندر شده نکات برجسته و سایه واضح‑دستی داشته باشند.
آیا میتوانم اثرات سهبعدی را هم به اشکال و هم به متن اعمال کنم؟
بله. از IShape::get_ThreeDFormat برای بدنهٔ شکل و از ITextFrameFormat::get_ThreeDFormat برای متن استفاده کنید.
آیا اثرات سهبعدی هنگام صادرات به تصویر، PDF، HTML یا فریمهای ویدیو ظاهر میشوند؟
بله. Aspose.Slides اثرات سهبعدی را هنگام تولید تصاویر اسلاید، خروجی PDF، خروجی HTML و فریمهای استفادهشده برای تبدیل به ویدیو رندر میکند. خروجی صادر شده شامل ظاهر رندر شده است، نه یک شیء سهبعدی قابل ویرایش.
آیا میتوانم مقادیر نهایی سهبعدی را پس از اعمال ارثبری و تنظیمات تم بخوانم؟
بله. از APIهای قالببندی مؤثر که در ویژگیهای مؤثر شکل توضیح داده شدهاند، برای خواندن دوربین نهایی، لایتریگ، لبه و سایر مقادیر سهبعدی استفاده کنید.