
PHP에서 PowerPoint 텍스트 단락 관리
개요
Aspose.Slides for PHP via Java은 텍스트를 텍스트 프레임, 단락 및 부분의 계층 구조로 나타냅니다:
- TextFrame 은(는) 도형의 텍스트 컨테이너를 나타내며 해당 단락 컬렉션에 접근할 수 있게 합니다.
- Paragraph 은(는) 텍스트 프레임의 하나의 단락을 나타내며 부분과 단락 수준 서식에 접근할 수 있게 합니다.
- Portion 은(는) 단락 내의 텍스트 실행을 나타냅니다. 각 부분은 자체 텍스트와 문자 수준 서식을 가질 수 있습니다.
따라서 단락은 여러 부분을 사용하여 서로 다른 글꼴, 색상, 크기 및 기타 서식을 가진 텍스트를 포함할 수 있습니다.
단락 만들기 및 서식 지정
여러 부분을 가진 단락 만들기
다음 단계는 텍스트 프레임에 세 개의 단락을 만들고, 각 단락에 세 개의 부분을 포함합니다:
- Presentation 클래스의 인스턴스를 생성합니다.
- 인덱스를 사용하여 해당 슬라이드에 접근합니다.
- 슬라이드에 사각형 AutoShape를 추가합니다.
- 도형의 TextFrame에 접근합니다.
- 기본 단락을 사용하고 텍스트 프레임에 두 개의 Paragraph 객체를 추가합니다.
- 각 단락이 세 개의 부분을 포함하도록 충분한 Portion 객체를 추가합니다. 기본 단락에는 이미 빈 부분 하나가 포함되어 있습니다.
- 각 부분의 텍스트를 설정합니다.
- Portion::getPortionFormat을 통해 문자 수준 서식을 적용합니다.
- 수정된 프레젠테이션을 저장합니다.
다음 PHP 예제는 이 단계를 구현합니다:
use aspose\slides\FillType;
use aspose\slides\NullableBool;
use aspose\slides\Paragraph;
use aspose\slides\Portion;
use aspose\slides\Presentation;
use aspose\slides\SaveFormat;
use aspose\slides\ShapeType;

$presentation = new Presentation();
try {
    $slide = $presentation->getSlides()->get_Item(0);
    $shape = $slide->getShapes()->addAutoShape(ShapeType::Rectangle, 50, 150, 300, 150);
    $textFrame = $shape->getTextFrame();

    $firstParagraph = $textFrame->getParagraphs()->get_Item(0);
    $firstParagraph->getPortions()->add(new Portion());
    $firstParagraph->getPortions()->add(new Portion());

    $secondParagraph = new Paragraph();
    $secondParagraph->getPortions()->add(new Portion());
    $secondParagraph->getPortions()->add(new Portion());
    $secondParagraph->getPortions()->add(new Portion());
    $textFrame->getParagraphs()->add($secondParagraph);

    $thirdParagraph = new Paragraph();
    $thirdParagraph->getPortions()->add(new Portion());
    $thirdParagraph->getPortions()->add(new Portion());
    $thirdParagraph->getPortions()->add(new Portion());
    $textFrame->getParagraphs()->add($thirdParagraph);

    $paragraphCount = java_values($textFrame->getParagraphs()->getCount());
    for ($paragraphIndex = 0; $paragraphIndex < $paragraphCount; $paragraphIndex++) {
        $paragraph = $textFrame->getParagraphs()->get_Item($paragraphIndex);
        $portionCount = java_values($paragraph->getPortions()->getCount());
        for ($portionIndex = 0; $portionIndex < $portionCount; $portionIndex++) {
            $portion = $paragraph->getPortions()->get_Item($portionIndex);
            $portion->setText("Portion " . ($paragraphIndex + 1) . "." . ($portionIndex + 1));

            if ($portionIndex == 0) {
                $portion->getPortionFormat()->getFillFormat()->setFillType(FillType::Solid);
                $portion->getPortionFormat()->getFillFormat()->getSolidFillColor()->setColor(java("java.awt.Color")->RED);
                $portion->getPortionFormat()->setFontBold(NullableBool::True);
                $portion->getPortionFormat()->setFontHeight(15);
            } else if ($portionIndex == 1) {
                $portion->getPortionFormat()->getFillFormat()->setFillType(FillType::Solid);
                $portion->getPortionFormat()->getFillFormat()->getSolidFillColor()->setColor(java("java.awt.Color")->BLUE);
                $portion->getPortionFormat()->setFontItalic(NullableBool::True);
                $portion->getPortionFormat()->setFontHeight(18);
            }
        }
    }

    $presentation->save("paragraphs_with_portions.pptx", SaveFormat::Pptx);
} finally {
    $presentation->dispose();
}
글머리표 및 번호 매기기 목록 만들기
글머리표 또는 번호 매기기 목록 만들기
글머리표와 번호 매기기는 관련 항목을 더 쉽게 스캔할 수 있게 합니다. Aspose.Slides에서는 리스트 설정을 BulletFormat을 통해 정의합니다.
- Presentation 클래스의 인스턴스를 생성합니다.
- 인덱스를 사용하여 해당 슬라이드에 접근합니다.
- 선택한 슬라이드에 AutoShape를 추가합니다.
- 도형의 TextFrame에 접근합니다.
- 텍스트 프레임에서 기본 단락을 제거합니다.
- 기호 글머리표용 Paragraph을 생성합니다.
- BulletFormat::setType을 BulletType::Symbol으로 설정하고 글머리 기호 문자를 지정합니다.
- 단락 텍스트, 들여쓰기, 글머리 색 및 글머리 높이를 설정합니다.
- 단락을 텍스트 프레임에 추가합니다.
- 두 번째 단락을 생성하고 BulletFormat::setType을 BulletType::Numbered으로 설정합니다.
- 번호 매기기 글머리 스타일을 구성하고 단락을 텍스트 프레임에 추가합니다.
- 프레젠테이션을 저장합니다.
다음 PHP 예제는 기호 글머리표와 번호 매기기 글머리표를 생성합니다:
use aspose\slides\BulletType;
use aspose\slides\ColorType;
use aspose\slides\NullableBool;
use aspose\slides\NumberedBulletStyle;
use aspose\slides\Paragraph;
use aspose\slides\Presentation;
use aspose\slides\SaveFormat;
use aspose\slides\ShapeType;

$presentation = new Presentation();
try {
    $slide = $presentation->getSlides()->get_Item(0);
    $shape = $slide->getShapes()->addAutoShape(ShapeType::Rectangle, 200, 200, 400, 200);
    $textFrame = $shape->getTextFrame();
    $textFrame->getParagraphs()->clear();

    $symbolParagraph = new Paragraph();
    $symbolParagraph->setText("Welcome to Aspose.Slides");
    $symbolParagraph->getParagraphFormat()->getBullet()->setType(BulletType::Symbol);
    $symbolParagraph->getParagraphFormat()->getBullet()->setChar("•");
    $symbolParagraph->getParagraphFormat()->setIndent(25);
    $symbolParagraph->getParagraphFormat()->getBullet()->getColor()->setColorType(ColorType::RGB);
    $symbolParagraph->getParagraphFormat()->getBullet()->getColor()->setColor(java("java.awt.Color")->BLACK);
    $symbolParagraph->getParagraphFormat()->getBullet()->setBulletHardColor(NullableBool::True);
    $symbolParagraph->getParagraphFormat()->getBullet()->setHeight(100);
    $textFrame->getParagraphs()->add($symbolParagraph);

    $numberedParagraph = new Paragraph();
    $numberedParagraph->setText("This is a numbered item");
    $numberedParagraph->getParagraphFormat()->getBullet()->setType(BulletType::Numbered);
    $numberedParagraph->getParagraphFormat()->getBullet()->setNumberedBulletStyle(NumberedBulletStyle::BulletCircleNumWDBlackPlain);
    $numberedParagraph->getParagraphFormat()->setIndent(25);
    $numberedParagraph->getParagraphFormat()->getBullet()->getColor()->setColorType(ColorType::RGB);
    $numberedParagraph->getParagraphFormat()->getBullet()->getColor()->setColor(java("java.awt.Color")->BLACK);
    $numberedParagraph->getParagraphFormat()->getBullet()->setBulletHardColor(NullableBool::True);
    $numberedParagraph->getParagraphFormat()->getBullet()->setHeight(100);
    $textFrame->getParagraphs()->add($numberedParagraph);

    $presentation->save("bulleted_and_numbered_list.pptx", SaveFormat::Pptx);
} finally {
    $presentation->dispose();
}
그림 글머리표 사용
그림 글머리표를 사용하면 기호나 숫자 대신 사용자 정의 이미지를 사용할 수 있습니다.
- Presentation 클래스의 인스턴스를 생성합니다.
- 인덱스를 사용하여 해당 슬라이드에 접근합니다.
- AutoShape를 추가하고 해당 TextFrame에 접근합니다.
- 텍스트 프레임에서 기본 단락을 제거합니다.
- 글머리 이미지 를 로드하고 프레젠테이션의 이미지 컬렉션에 PPImage으로 추가합니다.
- Paragraph을 생성하고 텍스트를 설정합니다.
- BulletFormat::setType을 BulletType::Picture으로 설정합니다.
- BulletFormat::getPicture을 통해 이미지를 지정하고 글머리 높이를 설정합니다.
- 단락을 텍스트 프레임에 추가합니다.
- 수정된 프레젠테이션을 저장합니다.
다음 PHP 예제는 그림 글머리표를 생성합니다:
use aspose\slides\BulletType;
use aspose\slides\Images;
use aspose\slides\Paragraph;
use aspose\slides\Presentation;
use aspose\slides\SaveFormat;
use aspose\slides\ShapeType;

$presentation = new Presentation();
try {
    $slide = $presentation->getSlides()->get_Item(0);

    $bulletImage = Images::fromFile("bullets.png");
    try {
        $presentationImage = $presentation->getImages()->addImage($bulletImage);
    } finally {
        $bulletImage->dispose();
    }

    $shape = $slide->getShapes()->addAutoShape(ShapeType::Rectangle, 200, 200, 400, 200);
    $textFrame = $shape->getTextFrame();
    $textFrame->getParagraphs()->clear();

    $paragraph = new Paragraph();
    $paragraph->setText("Welcome to Aspose.Slides");
    $paragraph->getParagraphFormat()->getBullet()->setType(BulletType::Picture);
    $paragraph->getParagraphFormat()->getBullet()->getPicture()->setImage($presentationImage);
    $paragraph->getParagraphFormat()->getBullet()->setHeight(100);
    $textFrame->getParagraphs()->add($paragraph);

    $presentation->save("picture_bullet.pptx", SaveFormat::Pptx);
    $presentation->save("picture_bullet.ppt", SaveFormat::Ppt);
} finally {
    $presentation->dispose();
}
다단계 목록 만들기
ParagraphFormat::setDepth을 설정하여 목록의 다른 수준에 단락을 배치합니다. 최상위 수준은 0 깊이를 가집니다.
- Presentation을 생성하고 슬라이드에 접근합니다.
- AutoShape를 추가하고 해당 텍스트 프레임에서 기본 단락을 제거합니다.
- 네 개의 단락을 만들고 글머리 기호를 구성합니다.
- 각 단락의 ParagraphFormat::setDepth 값을
0,1,2,3으로 설정합니다. - 단락을 텍스트 프레임에 추가하고 프레젠테이션을 저장합니다.
다음 PHP 예제는 네 단계 글머리 목록을 생성합니다:
use aspose\slides\BulletType;
use aspose\slides\FillType;
use aspose\slides\Paragraph;
use aspose\slides\Presentation;
use aspose\slides\SaveFormat;
use aspose\slides\ShapeType;

$presentation = new Presentation();
try {
    $slide = $presentation->getSlides()->get_Item(0);
    $shape = $slide->getShapes()->addAutoShape(ShapeType::Rectangle, 200, 200, 400, 200);
    $textFrame = $shape->getTextFrame();
    $textFrame->getParagraphs()->clear();

    $firstParagraph = new Paragraph();
    $firstParagraph->setText("Content");
    $firstParagraph->getParagraphFormat()->getBullet()->setType(BulletType::Symbol);
    $firstParagraph->getParagraphFormat()->getBullet()->setChar("•");
    $firstParagraph->getParagraphFormat()->getDefaultPortionFormat()->getFillFormat()->setFillType(FillType::Solid);
    $firstParagraph->getParagraphFormat()->getDefaultPortionFormat()->getFillFormat()->getSolidFillColor()->setColor(java("java.awt.Color")->BLACK);
    $firstParagraph->getParagraphFormat()->setDepth(0);

    $secondParagraph = new Paragraph();
    $secondParagraph->setText("Second level");
    $secondParagraph->getParagraphFormat()->getBullet()->setType(BulletType::Symbol);
    $secondParagraph->getParagraphFormat()->getBullet()->setChar('-');
    $secondParagraph->getParagraphFormat()->getDefaultPortionFormat()->getFillFormat()->setFillType(FillType::Solid);
    $secondParagraph->getParagraphFormat()->getDefaultPortionFormat()->getFillFormat()->getSolidFillColor()->setColor(java("java.awt.Color")->BLACK);
    $secondParagraph->getParagraphFormat()->setDepth(1);

    $thirdParagraph = new Paragraph();
    $thirdParagraph->setText("Third level");
    $thirdParagraph->getParagraphFormat()->getBullet()->setType(BulletType::Symbol);
    $thirdParagraph->getParagraphFormat()->getBullet()->setChar("•");
    $thirdParagraph->getParagraphFormat()->getDefaultPortionFormat()->getFillFormat()->setFillType(FillType::Solid);
    $thirdParagraph->getParagraphFormat()->getDefaultPortionFormat()->getFillFormat()->getSolidFillColor()->setColor(java("java.awt.Color")->BLACK);
    $thirdParagraph->getParagraphFormat()->setDepth(2);

    $fourthParagraph = new Paragraph();
    $fourthParagraph->setText("Fourth level");
    $fourthParagraph->getParagraphFormat()->getBullet()->setType(BulletType::Symbol);
    $fourthParagraph->getParagraphFormat()->getBullet()->setChar('-');
    $fourthParagraph->getParagraphFormat()->getDefaultPortionFormat()->getFillFormat()->setFillType(FillType::Solid);
    $fourthParagraph->getParagraphFormat()->getDefaultPortionFormat()->getFillFormat()->getSolidFillColor()->setColor(java("java.awt.Color")->BLACK);
    $fourthParagraph->getParagraphFormat()->setDepth(3);

    $textFrame->getParagraphs()->add($firstParagraph);
    $textFrame->getParagraphs()->add($secondParagraph);
    $textFrame->getParagraphs()->add($thirdParagraph);
    $textFrame->getParagraphs()->add($fourthParagraph);

    $presentation->save("multilevel_list.pptx", SaveFormat::Pptx);
} finally {
    $presentation->dispose();
}
번호 매기기 항목을 사용자 정의 값으로 시작
BulletFormat::setNumberedBulletStartWith을 사용하여 번호 매기기 단락에 표시되는 시작 번호를 설정합니다.
- Presentation을 생성하고 슬라이드에 AutoShape를 추가합니다.
- 도형의 텍스트 프레임에서 기본 단락을 제거합니다.
- 세 개의 번호 매기기 단락을 생성합니다.
- 해당 단락에 대해 BulletFormat::setNumberedBulletStartWith을 각각
2,3,7로 설정합니다. - 단락을 텍스트 프레임에 추가하고 프레젠테이션을 저장합니다.
다음 PHP 예제는 각 단락에 사용자 정의 시작 번호를 할당합니다:
use aspose\slides\BulletType;
use aspose\slides\Paragraph;
use aspose\slides\Presentation;
use aspose\slides\SaveFormat;
use aspose\slides\ShapeType;

$presentation = new Presentation();
try {
    $shape = $presentation->getSlides()->get_Item(0)->getShapes()->addAutoShape(ShapeType::Rectangle, 200, 200, 400, 200);
    $textFrame = $shape->getTextFrame();
    $textFrame->getParagraphs()->clear();

    $firstParagraph = new Paragraph();
    $firstParagraph->setText("Start at 2");
    $firstParagraph->getParagraphFormat()->getBullet()->setType(BulletType::Numbered);
    $firstParagraph->getParagraphFormat()->getBullet()->setNumberedBulletStartWith(2);
    $textFrame->getParagraphs()->add($firstParagraph);

    $secondParagraph = new Paragraph();
    $secondParagraph->setText("Start at 3");
    $secondParagraph->getParagraphFormat()->getBullet()->setType(BulletType::Numbered);
    $secondParagraph->getParagraphFormat()->getBullet()->setNumberedBulletStartWith(3);
    $textFrame->getParagraphs()->add($secondParagraph);

    $thirdParagraph = new Paragraph();
    $thirdParagraph->setText("Start at 7");
    $thirdParagraph->getParagraphFormat()->getBullet()->setType(BulletType::Numbered);
    $thirdParagraph->getParagraphFormat()->getBullet()->setNumberedBulletStartWith(7);
    $textFrame->getParagraphs()->add($thirdParagraph);

    $presentation->save("custom_numbered_list.pptx", SaveFormat::Pptx);
} finally {
    $presentation->dispose();
}
단락 레이아웃 및 종료 속성 제어
첫 줄 들여쓰기 설정
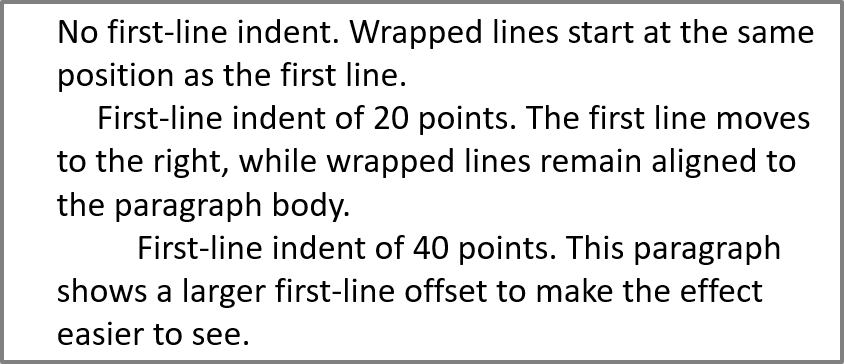
ParagraphFormat::setIndent을 사용하여 단락의 첫 줄 들여쓰기를 제어합니다. 이 메서드는 단락의 왼쪽 여백에 상대적으로 첫 줄만 이동합니다. 양수값은 첫 줄을 오른쪽으로 이동시키고, 나머지 줄은 본문에 맞게 정렬됩니다.
전체 단락을 이동해야 할 경우에는 ParagraphFormat::setMarginLeft을 사용하고, 첫 줄만 이동하려면 ParagraphFormat::setIndent을 사용합니다.
다음 예제는 여러 단락을 만들고 서로 다른 ParagraphFormat::setIndent 값을 적용하여 첫 줄 들여쓰기가 단락 레이아웃에 미치는 영향을 보여줍니다.
- Presentation 클래스의 인스턴스를 생성합니다.
- 대상 슬라이드에 접근합니다.
- 슬라이드에 사각형 AutoShape를 추가합니다.
- 도형의 TextFrame에 접근하고 기본 단락을 제거합니다.
- 여러 단락을 만들고 각각 다른 ParagraphFormat::setIndent 값을 설정합니다.
- 단락을 텍스트 프레임에 추가합니다.
- 수정된 프레젠테이션을 저장합니다.
다음 PHP 코드는 단락 들여쓰기를 설정하는 방법을 보여줍니다:
use aspose\slides\FillType;
use aspose\slides\Paragraph;
use aspose\slides\Presentation;
use aspose\slides\SaveFormat;
use aspose\slides\ShapeType;
use aspose\slides\TextAutofitType;

$presentation = new Presentation();
try {
    $slide = $presentation->getSlides()->get_Item(0);

    $shape = $slide->getShapes()->addAutoShape(ShapeType::Rectangle, 50, 50, 420, 220);
    $shape->getFillFormat()->setFillType(FillType::NoFill);
    $shape->getLineFormat()->getFillFormat()->setFillType(FillType::Solid);
    $shape->getLineFormat()->getFillFormat()->getSolidFillColor()->setColor(java("java.awt.Color")->GRAY);

    $textFrame = $shape->getTextFrame();
    $textFrame->getTextFrameFormat()->setAutofitType(TextAutofitType::Shape);
    $textFrame->getParagraphs()->clear();

    $firstParagraph = new Paragraph();
    $firstParagraph->setText("No first-line indent. Wrapped lines start at the same position as the first line.");
    $firstParagraph->getParagraphFormat()->getDefaultPortionFormat()->getFillFormat()->setFillType(FillType::Solid);
    $firstParagraph->getParagraphFormat()->getDefaultPortionFormat()->getFillFormat()->getSolidFillColor()->setColor(java("java.awt.Color")->BLACK);
    $firstParagraph->getParagraphFormat()->setMarginLeft(20.0);
    $firstParagraph->getParagraphFormat()->setIndent(0.0);

    $secondParagraph = new Paragraph();
    $secondParagraph->setText("First-line indent of 20 points. The first line moves to the right, while wrapped lines remain aligned to the paragraph body.");
    $secondParagraph->getParagraphFormat()->getDefaultPortionFormat()->getFillFormat()->setFillType(FillType::Solid);
    $secondParagraph->getParagraphFormat()->getDefaultPortionFormat()->getFillFormat()->getSolidFillColor()->setColor(java("java.awt.Color")->BLACK);
    $secondParagraph->getParagraphFormat()->setMarginLeft(20.0);
    $secondParagraph->getParagraphFormat()->setIndent(20.0);

    $thirdParagraph = new Paragraph();
    $thirdParagraph->setText("First-line indent of 40 points. This paragraph shows a larger first-line offset to make the effect easier to see.");
    $thirdParagraph->getParagraphFormat()->getDefaultPortionFormat()->getFillFormat()->setFillType(FillType::Solid);
    $thirdParagraph->getParagraphFormat()->getDefaultPortionFormat()->getFillFormat()->getSolidFillColor()->setColor(java("java.awt.Color")->BLACK);
    $thirdParagraph->getParagraphFormat()->setMarginLeft(20.0);
    $thirdParagraph->getParagraphFormat()->setIndent(40.0);

    $textFrame->getParagraphs()->add($firstParagraph);
    $textFrame->getParagraphs()->add($secondParagraph);
    $textFrame->getParagraphs()->add($thirdParagraph);

    $presentation->save("paragraph_indent.pptx", SaveFormat::Pptx);
} finally {
    $presentation->dispose();
}
결과:
내어쓰기 설정
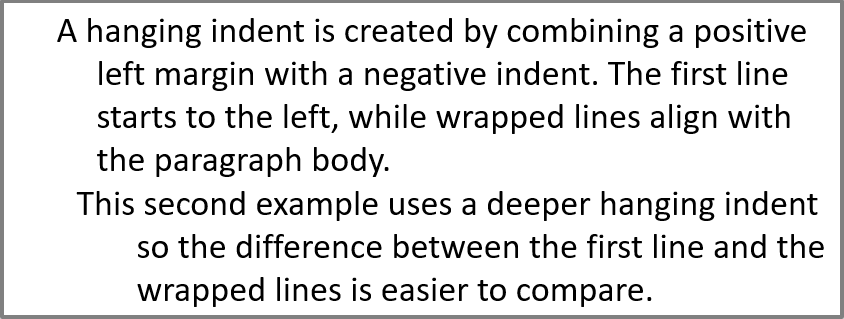
내어쓰기는 첫 줄이 나머지 줄보다 왼쪽에 시작되는 단락 레이아웃입니다. Aspose.Slides에서는 ParagraphFormat::setIndent에 음수 값을 전달하여 첫 줄을 본문보다 왼쪽으로 이동시켜 구현합니다.
실제로는 ParagraphFormat::setMarginLeft이 단락 본문의 왼쪽 위치를 정의하고, ParagraphFormat::setIndent이 해당 여백에 대한 첫 줄 위치를 정의합니다. 내어쓰기를 만들려면 setMarginLeft에 양수 값을 주고 setIndent에 음수 값을 전달합니다.
이 서식은 서지, 참고문헌, 용어집 항목 및 줄 바꿈이 단락 본문 아래에 맞춰져야 하는 기타 단락에 유용합니다.
- Presentation 클래스의 인스턴스를 생성합니다.
- 대상 슬라이드에 접근합니다.
- 슬라이드에 사각형 AutoShape를 추가합니다.
- 도형의 TextFrame에 접근하고 기본 단락을 제거합니다.
- 각 단락에 대해 ParagraphFormat::setMarginLeft에 양수 값을 전달하여 단락을 생성합니다.
- ParagraphFormat::setIndent에 음수 값을 전달하여 내어쓰기 효과를 만듭니다.
- 단락을 텍스트 프레임에 추가합니다.
- 수정된 프레젠테이션을 저장합니다.
다음 PHP 코드는 단락에 내어쓰기를 설정하는 방법을 보여줍니다:
use aspose\slides\FillType;
use aspose\slides\Paragraph;
use aspose\slides\Presentation;
use aspose\slides\SaveFormat;
use aspose\slides\ShapeType;
use aspose\slides\TextAutofitType;

$presentation = new Presentation();
try {
    $slide = $presentation->getSlides()->get_Item(0);

    $shape = $slide->getShapes()->addAutoShape(ShapeType::Rectangle, 50, 50, 420, 220);
    $shape->getFillFormat()->setFillType(FillType::NoFill);
    $shape->getLineFormat()->getFillFormat()->setFillType(FillType::Solid);
    $shape->getLineFormat()->getFillFormat()->getSolidFillColor()->setColor(java("java.awt.Color")->GRAY);

    $textFrame = $shape->getTextFrame();
    $textFrame->getTextFrameFormat()->setAutofitType(TextAutofitType::Shape);
    $textFrame->getParagraphs()->clear();

    $firstParagraph = new Paragraph();
    $firstParagraph->setText("A hanging indent is created by combining a positive left margin with a negative indent. The first line starts to the left, while wrapped lines align with the paragraph body.");
    $firstParagraph->getParagraphFormat()->getDefaultPortionFormat()->getFillFormat()->setFillType(FillType::Solid);
    $firstParagraph->getParagraphFormat()->getDefaultPortionFormat()->getFillFormat()->getSolidFillColor()->setColor(java("java.awt.Color")->BLACK);
    $firstParagraph->getParagraphFormat()->setMarginLeft(40.0);
    $firstParagraph->getParagraphFormat()->setIndent(-20.0);

    $secondParagraph = new Paragraph();
    $secondParagraph->setText("This second example uses a deeper hanging indent so the difference between the first line and the wrapped lines is easier to compare.");
    $secondParagraph->getParagraphFormat()->getDefaultPortionFormat()->getFillFormat()->setFillType(FillType::Solid);
    $secondParagraph->getParagraphFormat()->getDefaultPortionFormat()->getFillFormat()->getSolidFillColor()->setColor(java("java.awt.Color")->BLACK);
    $secondParagraph->getParagraphFormat()->setMarginLeft(60.0);
    $secondParagraph->getParagraphFormat()->setIndent(-30.0);

    $textFrame->getParagraphs()->add($firstParagraph);
    $textFrame->getParagraphs()->add($secondParagraph);

    $presentation->save("hanging_indent.pptx", SaveFormat::Pptx);
} finally {
    $presentation->dispose();
}
결과:
종단 단락 실행 속성 설정
Paragraph::setEndParagraphPortionFormat은 단락 종료 표시의 서식을 제어합니다. 다음 PHP 예제는 두 번째 단락의 종료 표시에 글꼴 크기와 라틴 글꼴을 지정합니다:
- Presentation을 로드하고 슬라이드에 접근합니다.
- AutoShape를 추가하고 기본 단락을 삭제합니다.
- 두 개의 단락을 만들고 텍스트 부분을 추가합니다.
- 두 번째 단락의 종료 표시용 PortionFormat을 생성합니다.
- BasePortionFormat::setFontHeight 및 BasePortionFormat::setLatinFont을 설정합니다.
- Paragraph::setEndParagraphPortionFormat으로 포맷을 할당하고 프레젠테이션을 저장합니다.
use aspose\slides\FontData;
use aspose\slides\Paragraph;
use aspose\slides\Portion;
use aspose\slides\PortionFormat;
use aspose\slides\Presentation;
use aspose\slides\SaveFormat;
use aspose\slides\ShapeType;

$presentation = new Presentation("Test.pptx");
try {
    $slide = $presentation->getSlides()->get_Item(0);
    $shape = $slide->getShapes()->addAutoShape(ShapeType::Rectangle, 10, 10, 200, 250);
    $textFrame = $shape->getTextFrame();
    $textFrame->getParagraphs()->clear();

    $firstParagraph = new Paragraph();
    $firstParagraph->getPortions()->add(new Portion("Sample text"));

    $secondParagraph = new Paragraph();
    $secondParagraph->getPortions()->add(new Portion("Sample text 2"));

    $endParagraphFormat = new PortionFormat();
    $endParagraphFormat->setFontHeight(48);
    $endParagraphFormat->setLatinFont(new FontData("Times New Roman"));
    $secondParagraph->setEndParagraphPortionFormat($endParagraphFormat);

    $textFrame->getParagraphs()->add($firstParagraph);
    $textFrame->getParagraphs()->add($secondParagraph);

    $presentation->save("end_paragraph_format.pptx", SaveFormat::Pptx);
} finally {
    $presentation->dispose();
}
렌더링된 라인 수 계산
줄 바꿈 및 라인 끝 구두점에 영향을 주는 단락 규칙은 Control Line Breaking 및 Control Hanging Punctuation 를 참조하십시오.
Paragraph::getLinesCount을 사용하면 텍스트 레이아웃 후 단락이 차지하는 라인 수를 계산할 수 있습니다. 이는 프레젠테이션 템플릿에서 텍스트 길이와 레이아웃을 확인할 때 유용합니다.
단락은 TextFrame::getParagraphs의 항목이며 여러 렌더링 라인을 차지할 수 있습니다. 명시적인 줄 바꿈은 새 라인을 강제로 시작하지만 새 단락을 만들지는 않습니다. 자동 줄 바꿈은 텍스트에 명시적인 줄 바꿈 문자를 삽입하지 않고 가용 너비에 따라 라인을 생성합니다. 따라서 단락 수나 줄 바꿈 문자 수를 세는 것이 렌더링된 라인 수와 동일하지 않습니다.
다음 예제는 텍스트 도형을 만들고 라인 수를 계산한 뒤 도형을 좁히고 텍스트를 짧은 문자열로 교체합니다. 줄 바꿈이 활성화되고 자동 맞춤이 비활성화되어 도형 너비가 줄 바꿈을 제어하도록 합니다. 도형 크기는 포인트 단위입니다. 마지막으로 예제는 또 다른 단락을 추가하고 텍스트 프레임 전체의 라인 수를 합산합니다.
use aspose\slides\NullableBool;
use aspose\slides\Paragraph;
use aspose\slides\Presentation;
use aspose\slides\ShapeType;
use aspose\slides\TextAutofitType;

$presentation = new Presentation();
try {
    $slide = $presentation->getSlides()->get_Item(0);

    $shape = $slide->getShapes()->addAutoShape(ShapeType::Rectangle, 50, 50, 400, 200);
    $textFrame = $shape->getTextFrame();
    $textFrame->getTextFrameFormat()->setWrapText(NullableBool::True);
    $textFrame->getTextFrameFormat()->setAutofitType(TextAutofitType::None);

    $paragraph = $textFrame->getParagraphs()->get_Item(0);
    $paragraph->getParagraphFormat()->getDefaultPortionFormat()->setFontHeight(20);
    $paragraph->setText("This text demonstrates how automatic wrapping changes the number of rendered lines.");
    echo "Original width: " . java_values($paragraph->getLinesCount()) . PHP_EOL;

    $shape->setWidth(150);
    echo "Narrower shape: " . java_values($paragraph->getLinesCount()) . PHP_EOL;

    $paragraph->setText("Short text.");
    echo "Shorter text: " . java_values($paragraph->getLinesCount()) . PHP_EOL;

    $secondParagraph = new Paragraph();
    $secondParagraph->setText("Another paragraph.");
    $secondParagraph->getParagraphFormat()->getDefaultPortionFormat()->setFontHeight(20);
    $textFrame->getParagraphs()->add($secondParagraph);

    $totalLineCount = 0;
    for ($i = 0; $i < java_values($textFrame->getParagraphs()->getCount()); $i++) {
        $currentParagraph = $textFrame->getParagraphs()->get_Item($i);
        $totalLineCount += java_values($currentParagraph->getLinesCount());
    }
    echo "Total lines in the text frame: " . $totalLineCount . PHP_EOL;
} finally {
    $presentation->dispose();
}
이 텍스트와 크기로 도형을 좁히면 라인 수가 증가하고, 짧은 문자열로 교체하면 라인 수가 감소합니다. 정확한 수치는 글꼴 가용성 및 대체, 글꼴 크기, 여백, 들여쓰기, 줄 바꿈 및 자동 맞춤 설정에 따라 달라질 수 있습니다. 템플릿을 확인할 때 목표 환경에 사용할 글꼴 및 레이아웃 설정을 사용하십시오.
라인 수만으로 텍스트가 컨테이너를 초과했는지 판단할 수 없습니다. 사용 가능한 높이, 라인 높이, 단락 및 라인 간격, 자동 맞춤 동작도 영향을 미칩니다; 줄 바꿈이 비활성화된 경우 단일 라인도 가용 너비를 초과할 수 있습니다.
단락 내용 가져오기 및 내보내기
HTML 텍스트를 단락으로 가져오기
ParagraphCollection::addFromHtml을 사용하면 HTML 마크업을 텍스트 프레임의 단락 및 부분으로 변환할 수 있습니다.
- Presentation 클래스의 인스턴스를 생성합니다.
- 슬라이드에 AutoShape를 추가합니다.
- 도형의 TextFrame에 접근하고 기본 단락을 삭제합니다.
- 원본 HTML 파일을 읽습니다.
- HTML 문자열을 ParagraphCollection::addFromHtml에 전달합니다.
- 수정된 프레젠테이션을 저장합니다.
다음 PHP 예제는 텍스트 프레임에 HTML을 가져옵니다:
use aspose\slides\FillType;
use aspose\slides\Presentation;
use aspose\slides\SaveFormat;
use aspose\slides\ShapeType;

$presentation = new Presentation();
try {
    $slide = $presentation->getSlides()->get_Item(0);
    $shapeWidth = java_values($presentation->getSlideSize()->getSize()->getWidth()) - 20;
    $shapeHeight = java_values($presentation->getSlideSize()->getSize()->getHeight()) - 20;
    $shape = $slide->getShapes()->addAutoShape(ShapeType::Rectangle, 10, 10, $shapeWidth, $shapeHeight);
    $shape->getFillFormat()->setFillType(FillType::NoFill);
    $shape->getTextFrame()->getParagraphs()->clear();

    $html = file_get_contents("file.html");
    if ($html !== false) {
        $shape->getTextFrame()->getParagraphs()->addFromHtml($html);
        $presentation->save("html_text.pptx", SaveFormat::Pptx);
    } else {
        echo "The HTML file could not be read.";
    }
} finally {
    $presentation->dispose();
}
단락 텍스트를 HTML로 내보내기
ParagraphCollection::exportToHtml을 사용하면 선택한 단락 범위를 HTML로 내보낼 수 있습니다.
- Presentation 클래스의 인스턴스를 생성하고 원하는 프레젠테이션을 로드합니다.
- 슬라이드에 접근하고 텍스트가 포함된 AutoShape를 찾습니다.
- 도형의 TextFrame에 접근합니다.
- 시작 단락 인덱스와 내보낼 단락 수를 지정하여 ParagraphCollection::exportToHtml을 호출합니다.
- 반환된 HTML 문자열을 파일에 씁니다.
다음 PHP 예제는 첫 번째 텍스트 도형의 모든 단락을 내보냅니다:
use aspose\slides\Presentation;

$presentation = new Presentation("ExportingHTMLText.pptx");
try {
    $shape = $presentation->getSlides()->get_Item(0)->getShapes()->get_Item(0);

    if (java_instanceof($shape, new JavaClass("com.aspose.slides.AutoShape"))) {
        $textFrame = $shape->getTextFrame();
        if (!java_is_null($textFrame)) {
            $paragraphs = $textFrame->getParagraphs();
            $html = $paragraphs->exportToHtml(0, $paragraphs->getCount(), null);
            if (file_put_contents("paragraphs.html", $html) === false) {
                echo "The HTML file could not be written.";
            }
        } else {
            echo "The first shape does not contain a text frame.";
        }
    } else {
        echo "The first shape is not a text shape.";
    }
} finally {
    $presentation->dispose();
}
단락을 이미지로 렌더링
Paragraph::getImage은 개별 단락을 직접 렌더링하고 IImage를 반환합니다. 반환된 이미지를 IImage::save으로 파일이나 스트림에 저장할 수 있습니다. 포함된 도형을 렌더링하거나 비트맵을 수동으로 자를 필요가 없습니다.
Paragraph::getImage은 단락을 부모 컬렉션에서 찾을 수 없거나 유효한 렌더링 경계가 없거나 렌더링할 수 없는 경우 null을 반환할 수 있습니다. 저장하기 전에 결과를 확인하고 사용 후 반환된 이미지를 해제하십시오.
기본 배율로 단락 렌더링
sample.pptx 라는 프레젠테이션 파일에 슬라이드가 하나 있고, 첫 번째 도형이 세 개의 단락을 포함한 텍스트 상자라고 가정합니다.
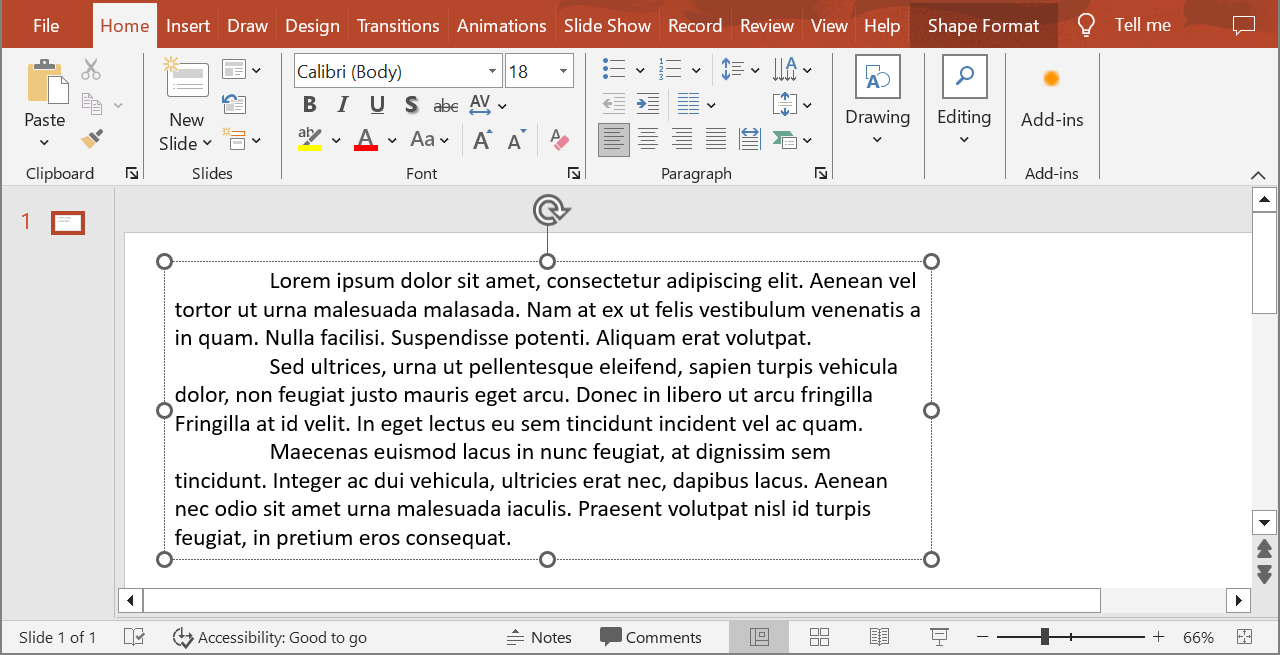
다음 PHP 예제는 두 번째 단락을 일반 텍스트 도형에서 기본 배율로 렌더링하고 PNG 형식으로 저장합니다. finally 블록은 이미지가 올바르게 해제되도록 보장합니다.
use aspose\slides\ImageFormat;
use aspose\slides\Presentation;

$presentation = new Presentation("sample.pptx");
try {
    $shape = $presentation->getSlides()->get_Item(0)->getShapes()->get_Item(0);

    if (java_instanceof($shape, new JavaClass("com.aspose.slides.AutoShape"))) {
        $textFrame = $shape->getTextFrame();
        if (!java_is_null($textFrame) && java_values($textFrame->getParagraphs()->getCount()) > 1) {
            $paragraph = $textFrame->getParagraphs()->get_Item(1);
            $paragraphImage = $paragraph->getImage();

            if (!java_is_null($paragraphImage)) {
                try {
                    $paragraphImage->save("paragraph.png", ImageFormat::Png);
                } finally {
                    $paragraphImage->dispose();
                }
            } else {
                echo "The paragraph could not be rendered.";
            }
        } else {
            echo "The expected paragraph was not found.";
        }
    } else {
        echo "The first shape is not a text shape.";
    }
} finally {
    $presentation->dispose();
}
결과:

표 셀에서 스케일링을 적용해 단락 렌더링
$scaleX 및 $scaleY 매개변수를 받아 가로와 세로 배율을 설정하는 Paragraph::getImage 오버로드를 사용합니다. 다음 PHP 예제는 표를 만들고 첫 번째 셀에서 단락을 기본 너비와 높이의 두 배로 렌더링한 뒤 PNG 이미지로 저장합니다.
use aspose\slides\ImageFormat;
use aspose\slides\Presentation;

$scaleX = 2;
$scaleY = 2;

$presentation = new Presentation();
try {
    $slide = $presentation->getSlides()->get_Item(0);
    $table = $slide->getShapes()->addTable(50, 50, array(300), array(80));
    $paragraph = $table->get_Item(0, 0)->getTextFrame()->getParagraphs()->get_Item(0);
    $paragraph->setText("Text in a table cell");

    $paragraphImage = $paragraph->getImage($scaleX, $scaleY);
    if (!java_is_null($paragraphImage)) {
        try {
            $paragraphImage->save("table_paragraph.png", ImageFormat::Png);
        } finally {
            $paragraphImage->dispose();
        }
    } else {
        echo "The paragraph could not be rendered.";
    }
} finally {
    $presentation->dispose();
}
배율 1 은 해당 축을 기본 픽셀 크기로 유지합니다. 예를 들어 두 축 모두 2 로 설정하면 이미지의 너비와 높이가 대략 두 배가 되어 픽셀 수가 네 배가 됩니다. 큰 배율은 확대하거나 고해상도 출력 시 텍스트를 더 선명하게 만들지만 메모리 사용량과 파일 크기도 증가합니다. 1 이하의 배율은 상세도가 낮은 작은 이미지를 생성합니다. 가로와 세로 배율을 동일하게 설정하면 단락의 종횡비를 유지할 수 있으며, 서로 다른 배율을 사용하면 출력이 각각 늘어납니다.
Shape::getImage를 사용해 전체 도형을 렌더링하는 것은 도형의 채우기, 테두리 또는 기타 시각적 컨텍스트가 포함돼야 할 때 여전히 유용합니다. 단락 전용 이미지는 Paragraph::getImage를 사용하십시오.
FAQ
텍스트 프레임 내부에서 줄 바꿈을 완전히 비활성화할 수 있나요?
예. TextFrameFormat::setWrapText을 설정하면 줄 바꿈이 비활성화되어 라인이 텍스트 프레임 가장자리를 넘어 끊기지 않습니다.
특정 단락의 슬라이드 상 정확한 경계 사각형을 얻으려면 어떻게 해야 하나요?
Paragraph::getRect을 사용하면 단락의 경계 사각형을 가져올 수 있습니다. Portion::getRect은 개별 부분의 경계를 제공합니다.
단락 정렬(왼쪽, 오른쪽, 가운데, 양쪽 맞춤)은 어디서 제어하나요?
ParagraphFormat::setAlignment은 단락 수준 설정으로, 개별 부분 서식과 무관하게 전체 단락에 적용됩니다.
각 라인 내에서 서로 다른 글꼴 크기의 부분을 수직 정렬하려면 Align Fonts Within a Line를 참조하십시오.
단락의 일부에 맞춤법 검사 언어를 설정할 수 있나요?
예. BasePortionFormat::setLanguageId을 개별 부분에 설정하면 하나의 단락에 여러 언어 텍스트를 포함시킬 수 있습니다.