
จัดการย่อหน้าข้อความ PowerPoint ใน PHP
ภาพรวม
Aspose.Slides for PHP via Java แสดงข้อความเป็นโครงสร้างลำดับขั้นของ text frame, paragraph และ portion:
- TextFrame แทนที่คอนเทนเนอร์ข้อความในรูปร่างและให้การเข้าถึงคอลเลกชันของ paragraph.
- Paragraph แทนที่ย่อหน้าเดียวใน text frame และให้การเข้าถึง portion และการจัดรูปแบบระดับ paragraph.
- Portion แทนที่ชุดข้อความภายใน paragraph. แต่ละ portion สามารถมีข้อความและการจัดรูปแบบระดับตัวอักษรของตนเองได้.
ดังนั้น ย่อหน้าจึงสามารถมีข้อความที่มีฟอนต์ สี ขนาด และการจัดรูปแบบอื่น ๆ ที่แตกต่างกันโดยใช้หลาย portion.
สร้างและจัดรูปแบบ Paragraphs
สร้าง Paragraphs ด้วยหลาย Portion
ขั้นตอนต่อไปนี้สร้าง text frame ที่มีสาม paragraph โดยแต่ละ paragraph มีสาม portion:
- สร้างอินสแตนซ์ของคลาส Presentation.
- เข้าถึงสไลด์ที่เกี่ยวข้องโดยใช้ดัชนีของมัน.
- เพิ่ม AutoShape แบบสี่เหลี่ยมผืนผ้าไปยังสไลด์.
- เข้าถึง TextFrame ของรูปร่าง.
- ใช้ paragraph เริ่มต้นและเพิ่มอ็อบเจกต์ Paragraph อีกสองอันไปยัง text frame.
- เพิ่มอ็อบเจกต์ Portion จำนวนเพียงพอให้แต่ละ paragraph มีสาม portion. paragraph เริ่มต้นมี portion ว่างหนึ่งอันแล้ว.
- ตั้งค่าข้อความของแต่ละ portion.
- ใช้การจัดรูปแบบระดับอักขระผ่าน Portion::getPortionFormat.
- บันทึก presentation ที่แก้ไขแล้ว.
ตัวอย่าง PHP นี้แสดงขั้นตอนเหล่านั้น:
use aspose\slides\FillType;
use aspose\slides\NullableBool;
use aspose\slides\Paragraph;
use aspose\slides\Portion;
use aspose\slides\Presentation;
use aspose\slides\SaveFormat;
use aspose\slides\ShapeType;

$presentation = new Presentation();
try {
    $slide = $presentation->getSlides()->get_Item(0);
    $shape = $slide->getShapes()->addAutoShape(ShapeType::Rectangle, 50, 150, 300, 150);
    $textFrame = $shape->getTextFrame();

    $firstParagraph = $textFrame->getParagraphs()->get_Item(0);
    $firstParagraph->getPortions()->add(new Portion());
    $firstParagraph->getPortions()->add(new Portion());

    $secondParagraph = new Paragraph();
    $secondParagraph->getPortions()->add(new Portion());
    $secondParagraph->getPortions()->add(new Portion());
    $secondParagraph->getPortions()->add(new Portion());
    $textFrame->getParagraphs()->add($secondParagraph);

    $thirdParagraph = new Paragraph();
    $thirdParagraph->getPortions()->add(new Portion());
    $thirdParagraph->getPortions()->add(new Portion());
    $thirdParagraph->getPortions()->add(new Portion());
    $textFrame->getParagraphs()->add($thirdParagraph);

    $paragraphCount = java_values($textFrame->getParagraphs()->getCount());
    for ($paragraphIndex = 0; $paragraphIndex < $paragraphCount; $paragraphIndex++) {
        $paragraph = $textFrame->getParagraphs()->get_Item($paragraphIndex);
        $portionCount = java_values($paragraph->getPortions()->getCount());
        for ($portionIndex = 0; $portionIndex < $portionCount; $portionIndex++) {
            $portion = $paragraph->getPortions()->get_Item($portionIndex);
            $portion->setText("Portion " . ($paragraphIndex + 1) . "." . ($portionIndex + 1));

            if ($portionIndex == 0) {
                $portion->getPortionFormat()->getFillFormat()->setFillType(FillType::Solid);
                $portion->getPortionFormat()->getFillFormat()->getSolidFillColor()->setColor(java("java.awt.Color")->RED);
                $portion->getPortionFormat()->setFontBold(NullableBool::True);
                $portion->getPortionFormat()->setFontHeight(15);
            } else if ($portionIndex == 1) {
                $portion->getPortionFormat()->getFillFormat()->setFillType(FillType::Solid);
                $portion->getPortionFormat()->getFillFormat()->getSolidFillColor()->setColor(java("java.awt.Color")->BLUE);
                $portion->getPortionFormat()->setFontItalic(NullableBool::True);
                $portion->getPortionFormat()->setFontHeight(18);
            }
        }
    }

    $presentation->save("paragraphs_with_portions.pptx", SaveFormat::Pptx);
} finally {
    $presentation->dispose();
}
สร้างรายการแบบ Bulleted และ Numbered
สร้างรายการ Bulleted หรือ Numbered
การใช้หัวข้อย่อย (bullets) และการนับเลขทำให้รายการที่เกี่ยวข้องอ่านง่ายขึ้น ใน Aspose.Slides การตั้งค่ารายการถูกกำหนดผ่าน BulletFormat.
- สร้างอินสแตนซ์ของคลาส Presentation.
- เข้าถึงสไลด์ที่เกี่ยวข้องโดยใช้ดัชนีของมัน.
- เพิ่ม AutoShape ไปยังสไลด์ที่เลือก.
- เข้าถึง TextFrame ของรูปร่าง.
- ลบ paragraph เริ่มต้นออกจาก text frame.
- สร้าง Paragraph สำหรับ bullet แบบสัญลักษณ์.
- ตั้งค่า BulletFormat::setType เป็น BulletType::Symbol และระบุอักขระของ bullet.
- ตั้งข้อความของ paragraph, ระยะเยื้อง, สีของ bullet, และความสูงของ bullet.
- เพิ่ม paragraph ไปยัง text frame.
- สร้าง paragraph ที่สองและตั้งค่า BulletFormat::setType เป็น BulletType::Numbered.
- กำหนดสไตล์ของ numbered bullet และเพิ่ม paragraph ไปยัง text frame.
- บันทึก presentation.
ตัวอย่าง PHP นี้สร้าง bullet แบบสัญลักษณ์และ bullet แบบนับเลข:
use aspose\slides\BulletType;
use aspose\slides\ColorType;
use aspose\slides\NullableBool;
use aspose\slides\NumberedBulletStyle;
use aspose\slides\Paragraph;
use aspose\slides\Presentation;
use aspose\slides\SaveFormat;
use aspose\slides\ShapeType;

$presentation = new Presentation();
try {
    $slide = $presentation->getSlides()->get_Item(0);
    $shape = $slide->getShapes()->addAutoShape(ShapeType::Rectangle, 200, 200, 400, 200);
    $textFrame = $shape->getTextFrame();
    $textFrame->getParagraphs()->clear();

    $symbolParagraph = new Paragraph();
    $symbolParagraph->setText("Welcome to Aspose.Slides");
    $symbolParagraph->getParagraphFormat()->getBullet()->setType(BulletType::Symbol);
    $symbolParagraph->getParagraphFormat()->getBullet()->setChar("•");
    $symbolParagraph->getParagraphFormat()->setIndent(25);
    $symbolParagraph->getParagraphFormat()->getBullet()->getColor()->setColorType(ColorType::RGB);
    $symbolParagraph->getParagraphFormat()->getBullet()->getColor()->setColor(java("java.awt.Color")->BLACK);
    $symbolParagraph->getParagraphFormat()->getBullet()->setBulletHardColor(NullableBool::True);
    $symbolParagraph->getParagraphFormat()->getBullet()->setHeight(100);
    $textFrame->getParagraphs()->add($symbolParagraph);

    $numberedParagraph = new Paragraph();
    $numberedParagraph->setText("This is a numbered item");
    $numberedParagraph->getParagraphFormat()->getBullet()->setType(BulletType::Numbered);
    $numberedParagraph->getParagraphFormat()->getBullet()->setNumberedBulletStyle(NumberedBulletStyle::BulletCircleNumWDBlackPlain);
    $numberedParagraph->getParagraphFormat()->setIndent(25);
    $numberedParagraph->getParagraphFormat()->getBullet()->getColor()->setColorType(ColorType::RGB);
    $numberedParagraph->getParagraphFormat()->getBullet()->getColor()->setColor(java("java.awt.Color")->BLACK);
    $numberedParagraph->getParagraphFormat()->getBullet()->setBulletHardColor(NullableBool::True);
    $numberedParagraph->getParagraphFormat()->getBullet()->setHeight(100);
    $textFrame->getParagraphs()->add($numberedParagraph);

    $presentation->save("bulleted_and_numbered_list.pptx", SaveFormat::Pptx);
} finally {
    $presentation->dispose();
}
ใช้ Picture Bullets
Picture bullets ให้คุณใช้รูปภาพกำหนดเองแทนสัญลักษณ์หรือเลข.
- สร้างอินสแตนซ์ของคลาส Presentation.
- เข้าถึงสไลด์ที่เกี่ยวข้องโดยใช้ดัชนีของมัน.
- เพิ่ม AutoShape และเข้าถึง TextFrame ของมัน.
- ลบ paragraph เริ่มต้นออกจาก text frame.
- โหลดรูปภาพ bullet และเพิ่มลงในคอลเลกชันรูปภาพของ presentation เป็น PPImage.
- สร้าง Paragraph และตั้งข้อความของมัน.
- ตั้งค่า BulletFormat::setType เป็น BulletType::Picture.
- กำหนดรูปภาพผ่าน BulletFormat::getPicture และตั้งความสูงของ bullet.
- เพิ่ม paragraph ไปยัง text frame.
- บันทึก presentation ที่แก้ไขแล้ว.
ตัวอย่าง PHP นี้สร้าง picture bullet:
use aspose\slides\BulletType;
use aspose\slides\Images;
use aspose\slides\Paragraph;
use aspose\slides\Presentation;
use aspose\slides\SaveFormat;
use aspose\slides\ShapeType;

$presentation = new Presentation();
try {
    $slide = $presentation->getSlides()->get_Item(0);

    $bulletImage = Images::fromFile("bullets.png");
    try {
        $presentationImage = $presentation->getImages()->addImage($bulletImage);
    } finally {
        $bulletImage->dispose();
    }

    $shape = $slide->getShapes()->addAutoShape(ShapeType::Rectangle, 200, 200, 400, 200);
    $textFrame = $shape->getTextFrame();
    $textFrame->getParagraphs()->clear();

    $paragraph = new Paragraph();
    $paragraph->setText("Welcome to Aspose.Slides");
    $paragraph->getParagraphFormat()->getBullet()->setType(BulletType::Picture);
    $paragraph->getParagraphFormat()->getBullet()->getPicture()->setImage($presentationImage);
    $paragraph->getParagraphFormat()->getBullet()->setHeight(100);
    $textFrame->getParagraphs()->add($paragraph);

    $presentation->save("picture_bullet.pptx", SaveFormat::Pptx);
    $presentation->save("picture_bullet.ppt", SaveFormat::Ppt);
} finally {
    $presentation->dispose();
}
สร้างรายการหลายระดับ
ตั้งค่า ParagraphFormat::setDepth เพื่อวาง paragraph ที่ระดับต่าง ๆ ของรายการ. ระดับบนสุดมี depth เป็น 0.
- สร้าง Presentation และเข้าถึงสไลด์.
- เพิ่ม AutoShape และลบ paragraph เริ่มต้นออกจาก text frame ของมัน.
- สร้างสี่ paragraph และกำหนดสัญลักษณ์ bullet ของพวกมัน.
- ตั้งค่า ParagraphFormat::setDepth ของพวกมันเป็น
0,1,2, และ3. - เพิ่ม paragraph ลงใน text frame และบันทึก presentation.
ตัวอย่าง PHP นี้สร้างรายการ bullet สี่ระดับ:
use aspose\slides\BulletType;
use aspose\slides\FillType;
use aspose\slides\Paragraph;
use aspose\slides\Presentation;
use aspose\slides\SaveFormat;
use aspose\slides\ShapeType;

$presentation = new Presentation();
try {
    $slide = $presentation->getSlides()->get_Item(0);
    $shape = $slide->getShapes()->addAutoShape(ShapeType::Rectangle, 200, 200, 400, 200);
    $textFrame = $shape->getTextFrame();
    $textFrame->getParagraphs()->clear();

    $firstParagraph = new Paragraph();
    $firstParagraph->setText("Content");
    $firstParagraph->getParagraphFormat()->getBullet()->setType(BulletType::Symbol);
    $firstParagraph->getParagraphFormat()->getBullet()->setChar("•");
    $firstParagraph->getParagraphFormat()->getDefaultPortionFormat()->getFillFormat()->setFillType(FillType::Solid);
    $firstParagraph->getParagraphFormat()->getDefaultPortionFormat()->getFillFormat()->getSolidFillColor()->setColor(java("java.awt.Color")->BLACK);
    $firstParagraph->getParagraphFormat()->setDepth(0);

    $secondParagraph = new Paragraph();
    $secondParagraph->setText("Second level");
    $secondParagraph->getParagraphFormat()->getBullet()->setType(BulletType::Symbol);
    $secondParagraph->getParagraphFormat()->getBullet()->setChar('-');
    $secondParagraph->getParagraphFormat()->getDefaultPortionFormat()->getFillFormat()->setFillType(FillType::Solid);
    $secondParagraph->getParagraphFormat()->getDefaultPortionFormat()->getFillFormat()->getSolidFillColor()->setColor(java("java.awt.Color")->BLACK);
    $secondParagraph->getParagraphFormat()->setDepth(1);

    $thirdParagraph = new Paragraph();
    $thirdParagraph->setText("Third level");
    $thirdParagraph->getParagraphFormat()->getBullet()->setType(BulletType::Symbol);
    $thirdParagraph->getParagraphFormat()->getBullet()->setChar("•");
    $thirdParagraph->getParagraphFormat()->getDefaultPortionFormat()->getFillFormat()->setFillType(FillType::Solid);
    $thirdParagraph->getParagraphFormat()->getDefaultPortionFormat()->getFillFormat()->getSolidFillColor()->setColor(java("java.awt.Color")->BLACK);
    $thirdParagraph->getParagraphFormat()->setDepth(2);

    $fourthParagraph = new Paragraph();
    $fourthParagraph->setText("Fourth level");
    $fourthParagraph->getParagraphFormat()->getBullet()->setType(BulletType::Symbol);
    $fourthParagraph->getParagraphFormat()->getBullet()->setChar('-');
    $fourthParagraph->getParagraphFormat()->getDefaultPortionFormat()->getFillFormat()->setFillType(FillType::Solid);
    $fourthParagraph->getParagraphFormat()->getDefaultPortionFormat()->getFillFormat()->getSolidFillColor()->setColor(java("java.awt.Color")->BLACK);
    $fourthParagraph->getParagraphFormat()->setDepth(3);

    $textFrame->getParagraphs()->add($firstParagraph);
    $textFrame->getParagraphs()->add($secondParagraph);
    $textFrame->getParagraphs()->add($thirdParagraph);
    $textFrame->getParagraphs()->add($fourthParagraph);

    $presentation->save("multilevel_list.pptx", SaveFormat::Pptx);
} finally {
    $presentation->dispose();
}
เริ่มหมายเลขรายการ Numbered ที่ค่าที่กำหนดเอง
ใช้ BulletFormat::setNumberedBulletStartWith เพื่อตั้งค่าตัวเลขเริ่มต้นที่แสดงสำหรับ paragraph ที่เป็น numbered.
- สร้าง Presentation และเพิ่ม AutoShape ไปยังสไลด์.
- ลบ paragraph เริ่มต้นออกจาก text frame ของรูปร่าง.
- สร้างสาม paragraph ที่เป็น numbered.
- ตั้งค่า BulletFormat::setNumberedBulletStartWith เป็น
2,3, และ7สำหรับ paragraph ที่สอดคล้องกัน. - เพิ่ม paragraph ลงใน text frame และบันทึก presentation.
ตัวอย่าง PHP นี้กำหนดหมายเลขเริ่มต้นที่กำหนดเองให้กับแต่ละ paragraph:
use aspose\slides\BulletType;
use aspose\slides\Paragraph;
use aspose\slides\Presentation;
use aspose\slides\SaveFormat;
use aspose\slides\ShapeType;

$presentation = new Presentation();
try {
    $shape = $presentation->getSlides()->get_Item(0)->getShapes()->addAutoShape(ShapeType::Rectangle, 200, 200, 400, 200);
    $textFrame = $shape->getTextFrame();
    $textFrame->getParagraphs()->clear();

    $firstParagraph = new Paragraph();
    $firstParagraph->setText("Start at 2");
    $firstParagraph->getParagraphFormat()->getBullet()->setType(BulletType::Numbered);
    $firstParagraph->getParagraphFormat()->getBullet()->setNumberedBulletStartWith(2);
    $textFrame->getParagraphs()->add($firstParagraph);

    $secondParagraph = new Paragraph();
    $secondParagraph->setText("Start at 3");
    $secondParagraph->getParagraphFormat()->getBullet()->setType(BulletType::Numbered);
    $secondParagraph->getParagraphFormat()->getBullet()->setNumberedBulletStartWith(3);
    $textFrame->getParagraphs()->add($secondParagraph);

    $thirdParagraph = new Paragraph();
    $thirdParagraph->setText("Start at 7");
    $thirdParagraph->getParagraphFormat()->getBullet()->setType(BulletType::Numbered);
    $thirdParagraph->getParagraphFormat()->getBullet()->setNumberedBulletStartWith(7);
    $textFrame->getParagraphs()->add($thirdParagraph);

    $presentation->save("custom_numbered_list.pptx", SaveFormat::Pptx);
} finally {
    $presentation->dispose();
}
ควบคุมการจัดวาง Paragraph และคุณสมบัติ End
ตั้ง Indent ของบรรทัดแรก
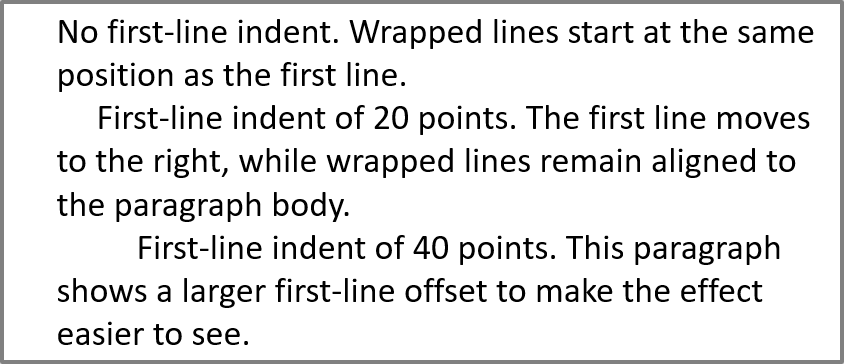
ใช้ ParagraphFormat::setIndent เพื่อควบคุมการเยื้องบรรทัดแรกของ paragraph. วิธีนี้จะเลื่อนบรรทัดแรกเท่านั้นสัมพันธ์กับระยะขอบซ้ายของ paragraph. ค่าเป็นบวกจะเลื่อนบรรทัดแรกไปทางขวา, ส่วนบรรทัดที่เหลือจะอยู่ตรงกับเนื้อหา paragraph.
ใช้ ParagraphFormat::setMarginLeft เมื่อคุณต้องการเลื่อนทั้ง paragraph. ใช้ ParagraphFormat::setIndent เมื่อคุณต้องการเลื่อนเฉพาะบรรทัดแรก.
ตัวอย่างด้านล่างสร้างหลาย paragraph และกำหนดค่า ParagraphFormat::setIndent ที่แตกต่างกันเพื่อแสดงว่าการเยื้องบรรทัดแรกส่งผลต่อการจัดวาง paragraph อย่างไร.
- สร้างอินสแตนซ์ของคลาส Presentation.
- เข้าถึงสไลด์เป้าหมาย.
- เพิ่ม AutoShape แบบสี่เหลี่ยมผืนผ้าไปยังสไลด์.
- เข้าถึง TextFrame ของรูปร่างและลบ paragraph เริ่มต้น.
- สร้างหลาย paragraph และตั้งค่าต่าง ๆ ของ ParagraphFormat::setIndent สำหรับพวกมัน.
- เพิ่ม paragraph ลงใน text frame.
- บันทึก presentation ที่แก้ไขแล้ว.
โค้ด PHP นี้แสดงวิธีตั้งค่า Indent ของ paragraph:
use aspose\slides\FillType;
use aspose\slides\Paragraph;
use aspose\slides\Presentation;
use aspose\slides\SaveFormat;
use aspose\slides\ShapeType;
use aspose\slides\TextAutofitType;

$presentation = new Presentation();
try {
    $slide = $presentation->getSlides()->get_Item(0);

    $shape = $slide->getShapes()->addAutoShape(ShapeType::Rectangle, 50, 50, 420, 220);
    $shape->getFillFormat()->setFillType(FillType::NoFill);
    $shape->getLineFormat()->getFillFormat()->setFillType(FillType::Solid);
    $shape->getLineFormat()->getFillFormat()->getSolidFillColor()->setColor(java("java.awt.Color")->GRAY);

    $textFrame = $shape->getTextFrame();
    $textFrame->getTextFrameFormat()->setAutofitType(TextAutofitType::Shape);
    $textFrame->getParagraphs()->clear();

    $firstParagraph = new Paragraph();
    $firstParagraph->setText("No first-line indent. Wrapped lines start at the same position as the first line.");
    $firstParagraph->getParagraphFormat()->getDefaultPortionFormat()->getFillFormat()->setFillType(FillType::Solid);
    $firstParagraph->getParagraphFormat()->getDefaultPortionFormat()->getFillFormat()->getSolidFillColor()->setColor(java("java.awt.Color")->BLACK);
    $firstParagraph->getParagraphFormat()->setMarginLeft(20.0);
    $firstParagraph->getParagraphFormat()->setIndent(0.0);

    $secondParagraph = new Paragraph();
    $secondParagraph->setText("First-line indent of 20 points. The first line moves to the right, while wrapped lines remain aligned to the paragraph body.");
    $secondParagraph->getParagraphFormat()->getDefaultPortionFormat()->getFillFormat()->setFillType(FillType::Solid);
    $secondParagraph->getParagraphFormat()->getDefaultPortionFormat()->getFillFormat()->getSolidFillColor()->setColor(java("java.awt.Color")->BLACK);
    $secondParagraph->getParagraphFormat()->setMarginLeft(20.0);
    $secondParagraph->getParagraphFormat()->setIndent(20.0);

    $thirdParagraph = new Paragraph();
    $thirdParagraph->setText("First-line indent of 40 points. This paragraph shows a larger first-line offset to make the effect easier to see.");
    $thirdParagraph->getParagraphFormat()->getDefaultPortionFormat()->getFillFormat()->setFillType(FillType::Solid);
    $thirdParagraph->getParagraphFormat()->getDefaultPortionFormat()->getFillFormat()->getSolidFillColor()->setColor(java("java.awt.Color")->BLACK);
    $thirdParagraph->getParagraphFormat()->setMarginLeft(20.0);
    $thirdParagraph->getParagraphFormat()->setIndent(40.0);

    $textFrame->getParagraphs()->add($firstParagraph);
    $textFrame->getParagraphs()->add($secondParagraph);
    $textFrame->getParagraphs()->add($thirdParagraph);

    $presentation->save("paragraph_indent.pptx", SaveFormat::Pptx);
} finally {
    $presentation->dispose();
}
ผลลัพธ์:
ตั้ง Hanging Indent
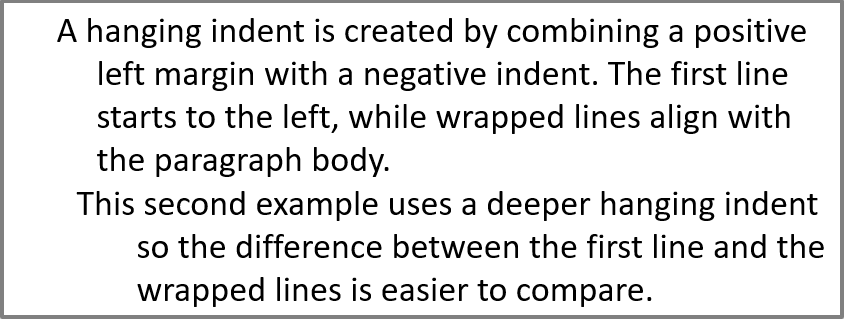
Hanging indent คือการจัดวาง paragraph ที่บรรทัดแรกเริ่มทางซ้ายของบรรทัดที่เหลือ. ใน Aspose.Slides คุณสร้างเอฟเฟกต์นี้ด้วย ParagraphFormat::setIndent. ส่งค่าลบเพื่อเลื่อนบรรทัดแรกไปทางซ้ายสัมพันธ์กับเนื้อหา paragraph.
โดยปฏิบัติ, ParagraphFormat::setMarginLeft กำหนดตำแหน่งซ้ายของเนื้อหา paragraph, และ ParagraphFormat::setIndent กำหนดตำแหน่งของบรรทัดแรกสัมพันธ์กับขอบซ้ายนั้น. เพื่อสร้าง hanging indent, ส่งค่าบวกให้ setMarginLeft และค่าลบให้ setIndent.
การจัดรูปแบบนี้เป็นประโยชน์สำหรับบรรณานุกรม, การอ้างอิง, รายการอภิธานศัพท์, และ paragraph อื่น ๆ ที่บรรทัดที่ต่อเนื่องต้องจัดแนวใต้เนื้อหา paragraph แทนที่จะอยู่ใต้ตัวอักษรแรกของบรรทัดแรก.
- สร้างอินสแตนซ์ของคลาส Presentation.
- เข้าถึงสไลด์เป้าหมาย.
- เพิ่ม AutoShape แบบสี่เหลี่ยมผืนผ้าไปยังสไลด์.
- เข้าถึง TextFrame ของรูปร่างและลบ paragraph เริ่มต้น.
- สร้าง paragraph และส่งค่าบวกให้ ParagraphFormat::setMarginLeft สำหรับแต่ละ paragraph.
- ส่งค่าลบให้ ParagraphFormat::setIndent เพื่อสร้างเอฟเฟกต์ hanging indent.
- เพิ่ม paragraph ลงใน text frame.
- บันทึก presentation ที่แก้ไขแล้ว.
โค้ด PHP นี้แสดงวิธีตั้งค่า hanging indent ให้กับ paragraph:
use aspose\slides\FillType;
use aspose\slides\Paragraph;
use aspose\slides\Presentation;
use aspose\slides\SaveFormat;
use aspose\slides\ShapeType;
use aspose\slides\TextAutofitType;

$presentation = new Presentation();
try {
    $slide = $presentation->getSlides()->get_Item(0);

    $shape = $slide->getShapes()->addAutoShape(ShapeType::Rectangle, 50, 50, 420, 220);
    $shape->getFillFormat()->setFillType(FillType::NoFill);
    $shape->getLineFormat()->getFillFormat()->setFillType(FillType::Solid);
    $shape->getLineFormat()->getFillFormat()->getSolidFillColor()->setColor(java("java.awt.Color")->GRAY);

    $textFrame = $shape->getTextFrame();
    $textFrame->getTextFrameFormat()->setAutofitType(TextAutofitType::Shape);
    $textFrame->getParagraphs()->clear();

    $firstParagraph = new Paragraph();
    $firstParagraph->setText("A hanging indent is created by combining a positive left margin with a negative indent. The first line starts to the left, while wrapped lines align with the paragraph body.");
    $firstParagraph->getParagraphFormat()->getDefaultPortionFormat()->getFillFormat()->setFillType(FillType::Solid);
    $firstParagraph->getParagraphFormat()->getDefaultPortionFormat()->getFillFormat()->getSolidFillColor()->setColor(java("java.awt.Color")->BLACK);
    $firstParagraph->getParagraphFormat()->setMarginLeft(40.0);
    $firstParagraph->getParagraphFormat()->setIndent(-20.0);

    $secondParagraph = new Paragraph();
    $secondParagraph->setText("This second example uses a deeper hanging indent so the difference between the first line and the wrapped lines is easier to compare.");
    $secondParagraph->getParagraphFormat()->getDefaultPortionFormat()->getFillFormat()->setFillType(FillType::Solid);
    $secondParagraph->getParagraphFormat()->getDefaultPortionFormat()->getFillFormat()->getSolidFillColor()->setColor(java("java.awt.Color")->BLACK);
    $secondParagraph->getParagraphFormat()->setMarginLeft(60.0);
    $secondParagraph->getParagraphFormat()->setIndent(-30.0);

    $textFrame->getParagraphs()->add($firstParagraph);
    $textFrame->getParagraphs()->add($secondParagraph);

    $presentation->save("hanging_indent.pptx", SaveFormat::Pptx);
} finally {
    $presentation->dispose();
}
ผลลัพธ์:
ตั้งคุณสมบัติ End Paragraph Run
Paragraph::setEndParagraphPortionFormat ควบคุมการจัดรูปแบบของสัญลักษณ์สิ้นสุด paragraph. ตัวอย่าง PHP ต่อไปนี้กำหนดขนาดฟอนต์และฟอนต์ Latin ให้กับสัญลักษณ์สิ้นสุดของ paragraph ที่สอง:
- โหลด Presentation และเข้าถึงสไลด์.
- เพิ่ม AutoShape และลบ paragraph เริ่มต้นของมัน.
- สร้างสอง paragraph และเพิ่ม portion ของข้อความลงในพวกมัน.
- สร้าง PortionFormat สำหรับสัญลักษณ์สิ้นสุดของ paragraph ที่สอง.
- ตั้งค่า BasePortionFormat::setFontHeight และ BasePortionFormat::setLatinFont.
- กำหนดรูปแบบด้วย Paragraph::setEndParagraphPortionFormat และบันทึก presentation.
use aspose\slides\FontData;
use aspose\slides\Paragraph;
use aspose\slides\Portion;
use aspose\slides\PortionFormat;
use aspose\slides\Presentation;
use aspose\slides\SaveFormat;
use aspose\slides\ShapeType;

$presentation = new Presentation("Test.pptx");
try {
    $slide = $presentation->getSlides()->get_Item(0);
    $shape = $slide->getShapes()->addAutoShape(ShapeType::Rectangle, 10, 10, 200, 250);
    $textFrame = $shape->getTextFrame();
    $textFrame->getParagraphs()->clear();

    $firstParagraph = new Paragraph();
    $firstParagraph->getPortions()->add(new Portion("Sample text"));

    $secondParagraph = new Paragraph();
    $secondParagraph->getPortions()->add(new Portion("Sample text 2"));

    $endParagraphFormat = new PortionFormat();
    $endParagraphFormat->setFontHeight(48);
    $endParagraphFormat->setLatinFont(new FontData("Times New Roman"));
    $secondParagraph->setEndParagraphPortionFormat($endParagraphFormat);

    $textFrame->getParagraphs()->add($firstParagraph);
    $textFrame->getParagraphs()->add($secondParagraph);

    $presentation->save("end_paragraph_format.pptx", SaveFormat::Pptx);
} finally {
    $presentation->dispose();
}
นับจำนวนบรรทัดที่เรนเดอร์
สำหรับกฎของ paragraph ที่ส่งผลต่อการห่ออัตโนมัติและการวางเครื่องหมายวรรคตอนที่จบบรรทัด, ดูที่ ควบคุมการตัดบรรทัด และ ควบคุมการเว้นวรรคแบบ Hanging.
ใช้ Paragraph::getLinesCount เพื่อนับจำนวนบรรทัดที่ paragraph ใช้หลังจากการจัดวางข้อความ, รวมถึงการห่ออัตโนมัติ. สิ่งนี้มีประโยชน์เมื่อทำการตรวจสอบความยาวข้อความและการจัดวางในแม่แบบงานนำเสนอ.
Paragraph เป็นรายการหนึ่งใน TextFrame::getParagraphs และสามารถใช้หลายบรรทัดที่เรนเดอร์ได้. การขึ้นบรรทัดใหม่อย่างชัดเจนภายใน paragraph จะบังคับให้สร้างบรรทัดใหม่โดยไม่ต้องสร้าง paragraph เพิ่ม. การห่ออัตโนมัติสร้างบรรทัดตามความกว้างที่มีอยู่โดยไม่แทรกการขึ้นบรรทัดใหม่ลงในข้อความ. ดังนั้นการนับ paragraph หรืออักขระขึ้นบรรทัดใหม่จึงไม่ให้จำนวนบรรทัดที่เรนเดอร์ที่แท้จริง.
ตัวอย่างต่อไปนี้สร้างรูปข้อความ, นับบรรทัดของมัน, ลดความกว้างของรูป, แล้วแทนที่ข้อความด้วยสตริงสั้นกว่า. การห่อเปิดใช้งานและ autofit ปิดไว้เพื่อให้ความกว้างของรูปควบคุมการห่อโดยไม่มีการย่อข้อความหรือปรับขนาดรูปอัตโนมัติ. ขนาดของรูปวัดเป็น point. สุดท้ายตัวอย่างเพิ่ม paragraph เพิ่มเติมและรวมจำนวนบรรทัดทั้งหมดใน text frame.
use aspose\slides\NullableBool;
use aspose\slides\Paragraph;
use aspose\slides\Presentation;
use aspose\slides\ShapeType;
use aspose\slides\TextAutofitType;

$presentation = new Presentation();
try {
    $slide = $presentation->getSlides()->get_Item(0);

    $shape = $slide->getShapes()->addAutoShape(ShapeType::Rectangle, 50, 50, 400, 200);
    $textFrame = $shape->getTextFrame();
    $textFrame->getTextFrameFormat()->setWrapText(NullableBool::True);
    $textFrame->getTextFrameFormat()->setAutofitType(TextAutofitType::None);

    $paragraph = $textFrame->getParagraphs()->get_Item(0);
    $paragraph->getParagraphFormat()->getDefaultPortionFormat()->setFontHeight(20);
    $paragraph->setText("This text demonstrates how automatic wrapping changes the number of rendered lines.");
    echo "Original width: " . java_values($paragraph->getLinesCount()) . PHP_EOL;

    $shape->setWidth(150);
    echo "Narrower shape: " . java_values($paragraph->getLinesCount()) . PHP_EOL;

    $paragraph->setText("Short text.");
    echo "Shorter text: " . java_values($paragraph->getLinesCount()) . PHP_EOL;

    $secondParagraph = new Paragraph();
    $secondParagraph->setText("Another paragraph.");
    $secondParagraph->getParagraphFormat()->getDefaultPortionFormat()->setFontHeight(20);
    $textFrame->getParagraphs()->add($secondParagraph);

    $totalLineCount = 0;
    for ($i = 0; $i < java_values($textFrame->getParagraphs()->getCount()); $i++) {
        $currentParagraph = $textFrame->getParagraphs()->get_Item($i);
        $totalLineCount += java_values($currentParagraph->getLinesCount());
    }
    echo "Total lines in the text frame: " . $totalLineCount . PHP_EOL;
} finally {
    $presentation->dispose();
}
ด้วยข้อความและขนาดเหล่านี้, การลดความกว้างของรูปทำให้จำนวนบรรทัดเพิ่มขึ้น, ในขณะที่การแทนที่ข้อความด้วยสตริงสั้นทำให้จำนวนบรรทัดลดลง. จำนวนที่แน่นอนอาจแตกต่างตามฟอนต์ที่มีอยู่และการแทนที่, ขนาดฟอนต์, ระยะขอบ, การเยื้อง, การห่อ, และการตั้งค่า autofit. ควรใช้ฟอนต์และการตั้งค่าการจัดวางที่ตั้งใจสำหรับสภาพแวดล้อมเป้าหมายเมื่อทำการตรวจสอบแม่แบบ.
จำนวนบรรทัดเพียงอย่างเดียวไม่เป็นตัวกำหนดว่าข้อความจะล้นจากคอนเทนเนอร์หรือไม่. ความสูงที่มีอยู่, ความสูงของบรรทัด, ระยะห่างระหว่าง paragraph และบรรทัด, และพฤติกรรม autofit ก็สำคัญเช่นกัน; แม้แต่บรรทัดเดียวก็อาจเกินความกว้างที่มีอยู่เมื่อปิดการห่อ.
นำเข้าและส่งออกเนื้อหา Paragraph
นำเข้า HTML Text ไปยัง Paragraphs
ใช้ ParagraphCollection::addFromHtml เพื่อแปลง markup HTML ให้เป็น paragraph และ portion ใน text frame.
- สร้างอินสแตนซ์ของคลาส Presentation.
- เข้าถึงสไลด์และเพิ่ม AutoShape.
- เข้าถึง TextFrame ของรูปร่างและลบ paragraph เริ่มต้น.
- อ่านไฟล์ HTML ต้นฉบับ.
- ส่งสตริง HTML ไปยัง ParagraphCollection::addFromHtml.
- บันทึก presentation ที่แก้ไขแล้ว.
ตัวอย่าง PHP นี้นำเข้า HTML ไปยัง text frame:
use aspose\slides\FillType;
use aspose\slides\Presentation;
use aspose\slides\SaveFormat;
use aspose\slides\ShapeType;

$presentation = new Presentation();
try {
    $slide = $presentation->getSlides()->get_Item(0);
    $shapeWidth = java_values($presentation->getSlideSize()->getSize()->getWidth()) - 20;
    $shapeHeight = java_values($presentation->getSlideSize()->getSize()->getHeight()) - 20;
    $shape = $slide->getShapes()->addAutoShape(ShapeType::Rectangle, 10, 10, $shapeWidth, $shapeHeight);
    $shape->getFillFormat()->setFillType(FillType::NoFill);
    $shape->getTextFrame()->getParagraphs()->clear();

    $html = file_get_contents("file.html");
    if ($html !== false) {
        $shape->getTextFrame()->getParagraphs()->addFromHtml($html);
        $presentation->save("html_text.pptx", SaveFormat::Pptx);
    } else {
        echo "The HTML file could not be read.";
    }
} finally {
    $presentation->dispose();
}
ส่งออกข้อความ Paragraph เป็น HTML
ใช้ ParagraphCollection::exportToHtml เพื่อส่งออกรายการ paragraph ที่เลือกเป็น HTML.
- สร้างอินสแตนซ์ของคลาส Presentation และโหลด presentation ที่ต้องการ.
- เข้าถึงสไลด์และค้นหา AutoShape ที่มีข้อความ.
- เข้าถึง TextFrame ของรูปร่าง.
- เรียก ParagraphCollection::exportToHtml พร้อมกับดัชนี paragraph เริ่มต้นและจำนวน paragraph ที่ต้องการส่งออก.
- เขียนสตริง HTML ที่คืนกลับเป็นไฟล์.
ตัวอย่าง PHP นี้ส่งออกทุก paragraph จาก shape ข้อความแรก:
use aspose\slides\Presentation;

$presentation = new Presentation("ExportingHTMLText.pptx");
try {
    $shape = $presentation->getSlides()->get_Item(0)->getShapes()->get_Item(0);

    if (java_instanceof($shape, new JavaClass("com.aspose.slides.AutoShape"))) {
        $textFrame = $shape->getTextFrame();
        if (!java_is_null($textFrame)) {
            $paragraphs = $textFrame->getParagraphs();
            $html = $paragraphs->exportToHtml(0, $paragraphs->getCount(), null);
            if (file_put_contents("paragraphs.html", $html) === false) {
                echo "The HTML file could not be written.";
            }
        } else {
            echo "The first shape does not contain a text frame.";
        }
    } else {
        echo "The first shape is not a text shape.";
    }
} finally {
    $presentation->dispose();
}
เรนเดอร์ Paragraph เป็นภาพ
Paragraph::getImage เรนเดอร์ paragraph แยกเป็นภาพโดยตรงและคืนค่า IImage. บันทึกผลลัพธ์เป็นไฟล์หรือสตรีมด้วย IImage::save. คุณไม่จำเป็นต้องเรนเดอร์ shape ที่บรรจุหรือครอปบิตแมพด้วยตนเอง.
Paragraph::getImage สามารถคืนค่า null หากไม่พบ paragraph ในคอลเลกชันแม่, ไม่มีขอบเขตการเรนเดอร์ที่ถูกต้อง, หรือไม่สามารถเรนเดอร์ได้. ตรวจสอบผลก่อนบันทึกและทำลายภาพที่คืนค่าหลังใช้งาน.
เรนเดอร์ Paragraph ที่สเกลค่าเริ่มต้น
สมมติว่าเรามีไฟล์ presentation ชื่อ sample.pptx ที่มีสไลด์หนึ่ง, โดยรูปแรกเป็นกล่องข้อความที่มีสาม paragraph.
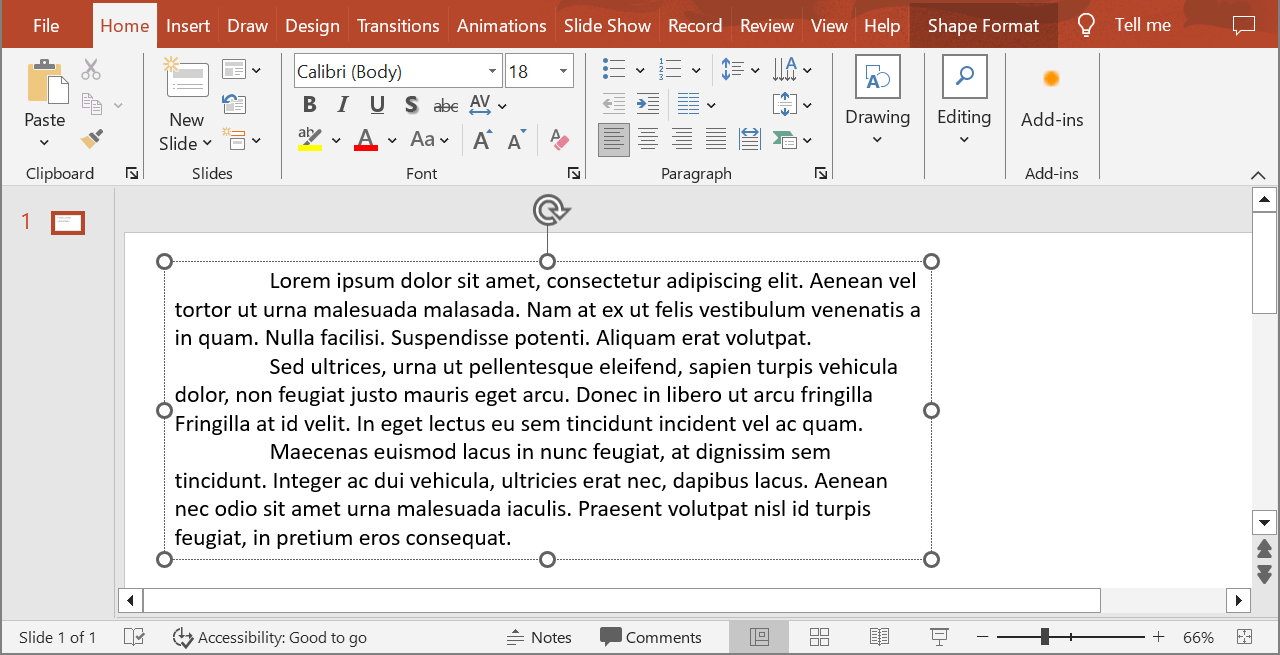
ตัวอย่าง PHP ต่อไปนี้เรนเดอร์ paragraph ที่สองในรูปข้อความปกติที่สเกลค่าเริ่มต้นและบันทึกภาพที่ได้ในรูปแบบ PNG. บล็อก finally ทำให้แน่ใจว่าภาพถูกทำลายในขั้นตอนสุดท้ายอย่างถูกต้อง.
use aspose\slides\ImageFormat;
use aspose\slides\Presentation;

$presentation = new Presentation("sample.pptx");
try {
    $shape = $presentation->getSlides()->get_Item(0)->getShapes()->get_Item(0);

    if (java_instanceof($shape, new JavaClass("com.aspose.slides.AutoShape"))) {
        $textFrame = $shape->getTextFrame();
        if (!java_is_null($textFrame) && java_values($textFrame->getParagraphs()->getCount()) > 1) {
            $paragraph = $textFrame->getParagraphs()->get_Item(1);
            $paragraphImage = $paragraph->getImage();

            if (!java_is_null($paragraphImage)) {
                try {
                    $paragraphImage->save("paragraph.png", ImageFormat::Png);
                } finally {
                    $paragraphImage->dispose();
                }
            } else {
                echo "The paragraph could not be rendered.";
            }
        } else {
            echo "The expected paragraph was not found.";
        }
    } else {
        echo "The first shape is not a text shape.";
    }
} finally {
    $presentation->dispose();
}

เรนเดอร์ Paragraph ในเซลล์ตารางพร้อมการสเกล
ใช้ Paragraph::getImage overload ที่รับพารามิเตอร์ $scaleX และ $scaleY เพื่อกำหนดอัตราส่วนการสเกลแนวนอนและแนวตั้ง. ตัวอย่าง PHP นี้สร้างตาราง, เรนเดอร์ paragraph ในเซลล์แรกที่กว้างและสูงเป็นสองเท่าของค่าเริ่มต้น, แล้วบันทึกผลเป็นภาพ PNG.
use aspose\slides\ImageFormat;
use aspose\slides\Presentation;

$scaleX = 2;
$scaleY = 2;

$presentation = new Presentation();
try {
    $slide = $presentation->getSlides()->get_Item(0);
    $table = $slide->getShapes()->addTable(50, 50, array(300), array(80));
    $paragraph = $table->get_Item(0, 0)->getTextFrame()->getParagraphs()->get_Item(0);
    $paragraph->setText("Text in a table cell");

    $paragraphImage = $paragraph->getImage($scaleX, $scaleY);
    if (!java_is_null($paragraphImage)) {
        try {
            $paragraphImage->save("table_paragraph.png", ImageFormat::Png);
        } finally {
            $paragraphImage->dispose();
        }
    } else {
        echo "The paragraph could not be rendered.";
    }
} finally {
    $presentation->dispose();
}
ค่าอัตราส่วน 1 จะคงขนาดพิกเซลเริ่มต้นของแกนนั้นไว้. ตัวอย่างเช่น 2 สำหรับทั้งสองค่า จะสร้างภาพที่ความกว้างและความสูงประมาณสองเท่าของมิติเริ่มต้น, ทำให้มีพิกเซลสี่เท่ามากขึ้น. ค่าที่สูงกว่ามักให้ข้อความคมชัดขึ้นสำหรับการซูมหรือเอาต์พุตความละเอียดสูง, แต่ก็เพิ่มการใช้หน่วยความจำและขนาดไฟล์. ค่าต่ำกว่า 1 จะทำให้ภาพเล็กลงและรายละเอียดน้อยลง. ใช้ค่าเท่ากันเพื่อคงอัตราส่วนภาพของ paragraph; ค่าแนวนอนและแนวตั้งที่ต่างกันจะยืดเอาต์พุตแยกกัน.
การเรนเดอร์รูปทั้งหมดด้วย Shape::getImage ยังมีประโยชน์เมื่อต้องการรวมการเติมสี, เส้นขอบ, หรือบริบทภาพอื่นของ shape. สำหรับภาพเฉพาะ paragraph ให้ใช้ Paragraph::getImage.
คำถามที่พบบ่อย
ฉันสามารถปิดการห่อข้อความใน text frame อย่างสมบูรณ์ได้หรือไม่?
ใช่. ตั้งค่า TextFrameFormat::setWrapText เพื่อปิดการห่อข้อความ เพื่อให้บรรทัดไม่ตัดที่ขอบของ text frame.
ฉันจะได้ขอบเขตที่แน่นอนบนสไลด์ของ paragraph เฉพาะได้อย่างไร?
ใช้ Paragraph::getRect เพื่อดึงสี่เหลี่ยมขอบเขตของ paragraph. Portion::getRect ให้ขอบเขตของ portion ที่เป็นเอกเทศ.
การจัดแนว paragraph (ซ้าย, ขวา, กลาง, หรือเต็มหน้ากระดาษ) ถูกควบคุมที่ไหน?
ParagraphFormat::setAlignment เป็นการตั้งค่าระดับ paragraph และส่งผลต่อทั้ง paragraph โดยไม่คำนึงถึงการจัดรูปแบบของ portion แต่ละอัน. เพื่อจัดแนวฟอนต์ในแนวตั้งของ portion ที่มีขนาดฟอนต์ต่างกันในแต่ละบรรทัด, ดูที่ จัดแนวฟอนต์ภายในบรรทัด.
ฉันสามารถตั้งค่าภาษา proofing สำหรับส่วนของ paragraph ได้หรือไม่?
ใช่. ตั้งค่า BasePortionFormat::setLanguageId สำหรับ portion แต่ละอัน, เพื่อให้ paragraph หนึ่งสามารถมีข้อความในหลายภาษาได้.