
Zarządzanie akapitami tekstu PowerPoint w PHP
Przegląd
Aspose.Slides for PHP via Java reprezentuje tekst jako hierarchię ramek tekstowych, akapitów i fragmentów:
- TextFrame reprezentuje kontener tekstu w kształcie i zapewnia dostęp do jego kolekcji akapitów.
- Paragraph reprezentuje pojedynczy akapit w ramce tekstowej oraz zapewnia dostęp do jego fragmentów i formatowania na poziomie akapitu.
- Portion reprezentuje fragment tekstu w akapicie. Każdy fragment może mieć własny tekst i formatowanie na poziomie znaków.
W konsekwencji akapit może zawierać tekst o różnych czcionkach, kolorach, rozmiarach i innych właściwościach formatowania, wykorzystując wiele fragmentów.
Tworzenie i formatowanie akapitów
Tworzenie akapitów z wieloma fragmentami
Poniższe kroki tworzą ramkę tekstową z trzema akapitami, z których każdy zawiera trzy fragmenty:
- Utwórz instancję klasy Presentation.
- Uzyskaj dostęp do odpowiedniego slajdu przez jego indeks.
- Dodaj prostokątną AutoShape do slajdu.
- Uzyskaj dostęp do TextFrame kształtu.
- Skorzystaj z domyślnego akapitu i dodaj dwa kolejne obiekty Paragraph do ramki tekstowej.
- Dodaj wystarczającą liczbę obiektów Portion dla każdego akapitu, aby zawierały po trzy fragmenty. Domyślny akapit już posiada jeden pusty fragment.
- Ustaw tekst dla każdego fragmentu.
- Zastosuj formatowanie na poziomie znaków za pomocą Portion::getPortionFormat.
- Zapisz zmodyfikowaną prezentację.
Poniższy przykład w PHP implementuje powyższe kroki:
use aspose\slides\FillType;
use aspose\slides\NullableBool;
use aspose\slides\Paragraph;
use aspose\slides\Portion;
use aspose\slides\Presentation;
use aspose\slides\SaveFormat;
use aspose\slides\ShapeType;

$presentation = new Presentation();
try {
    $slide = $presentation->getSlides()->get_Item(0);
    $shape = $slide->getShapes()->addAutoShape(ShapeType::Rectangle, 50, 150, 300, 150);
    $textFrame = $shape->getTextFrame();

    $firstParagraph = $textFrame->getParagraphs()->get_Item(0);
    $firstParagraph->getPortions()->add(new Portion());
    $firstParagraph->getPortions()->add(new Portion());

    $secondParagraph = new Paragraph();
    $secondParagraph->getPortions()->add(new Portion());
    $secondParagraph->getPortions()->add(new Portion());
    $secondParagraph->getPortions()->add(new Portion());
    $textFrame->getParagraphs()->add($secondParagraph);

    $thirdParagraph = new Paragraph();
    $thirdParagraph->getPortions()->add(new Portion());
    $thirdParagraph->getPortions()->add(new Portion());
    $thirdParagraph->getPortions()->add(new Portion());
    $textFrame->getParagraphs()->add($thirdParagraph);

    $paragraphCount = java_values($textFrame->getParagraphs()->getCount());
    for ($paragraphIndex = 0; $paragraphIndex < $paragraphCount; $paragraphIndex++) {
        $paragraph = $textFrame->getParagraphs()->get_Item($paragraphIndex);
        $portionCount = java_values($paragraph->getPortions()->getCount());
        for ($portionIndex = 0; $portionIndex < $portionCount; $portionIndex++) {
            $portion = $paragraph->getPortions()->get_Item($portionIndex);
            $portion->setText("Portion " . ($paragraphIndex + 1) . "." . ($portionIndex + 1));

            if ($portionIndex == 0) {
                $portion->getPortionFormat()->getFillFormat()->setFillType(FillType::Solid);
                $portion->getPortionFormat()->getFillFormat()->getSolidFillColor()->setColor(java("java.awt.Color")->RED);
                $portion->getPortionFormat()->setFontBold(NullableBool::True);
                $portion->getPortionFormat()->setFontHeight(15);
            } else if ($portionIndex == 1) {
                $portion->getPortionFormat()->getFillFormat()->setFillType(FillType::Solid);
                $portion->getPortionFormat()->getFillFormat()->getSolidFillColor()->setColor(java("java.awt.Color")->BLUE);
                $portion->getPortionFormat()->setFontItalic(NullableBool::True);
                $portion->getPortionFormat()->setFontHeight(18);
            }
        }
    }

    $presentation->save("paragraphs_with_portions.pptx", SaveFormat::Pptx);
} finally {
    $presentation->dispose();
}
Tworzenie list wypunktowanych i numerowanych
Tworzenie listy wypunktowanej lub numerowanej
Wypunktowanie i numeracja ułatwiają przeglądanie powiązanych elementów. W Aspose.Slides ustawienia list definiowane są za pomocą BulletFormat.
- Utwórz instancję klasy Presentation.
- Uzyskaj dostęp do odpowiedniego slajdu przez jego indeks.
- Dodaj AutoShape do wybranego slajdu.
- Uzyskaj dostęp do TextFrame kształtu.
- Usuń domyślny akapit z ramki tekstowej.
- Utwórz Paragraph dla symbolu wypunktowania.
- Ustaw BulletFormat::setType na BulletType::Symbol i podaj znak wypunktowania.
- Ustaw tekst akapitu, wcięcie, kolor wypunktowania oraz wysokość wypunktowania.
- Dodaj akapit do ramki tekstowej.
- Utwórz drugi akapit i ustaw BulletFormat::setType na BulletType::Numbered.
- Skonfiguruj styl numerowanego wypunktowania i dodaj akapit do ramki tekstowej.
- Zapisz prezentację.
Poniższy przykład w PHP tworzy symbol wypunktowania i numerowane wypunktowanie:
use aspose\slides\BulletType;
use aspose\slides\ColorType;
use aspose\slides\NullableBool;
use aspose\slides\NumberedBulletStyle;
use aspose\slides\Paragraph;
use aspose\slides\Presentation;
use aspose\slides\SaveFormat;
use aspose\slides\ShapeType;

$presentation = new Presentation();
try {
    $slide = $presentation->getSlides()->get_Item(0);
    $shape = $slide->getShapes()->addAutoShape(ShapeType::Rectangle, 200, 200, 400, 200);
    $textFrame = $shape->getTextFrame();
    $textFrame->getParagraphs()->clear();

    $symbolParagraph = new Paragraph();
    $symbolParagraph->setText("Welcome to Aspose.Slides");
    $symbolParagraph->getParagraphFormat()->getBullet()->setType(BulletType::Symbol);
    $symbolParagraph->getParagraphFormat()->getBullet()->setChar("•");
    $symbolParagraph->getParagraphFormat()->setIndent(25);
    $symbolParagraph->getParagraphFormat()->getBullet()->getColor()->setColorType(ColorType::RGB);
    $symbolParagraph->getParagraphFormat()->getBullet()->getColor()->setColor(java("java.awt.Color")->BLACK);
    $symbolParagraph->getParagraphFormat()->getBullet()->setBulletHardColor(NullableBool::True);
    $symbolParagraph->getParagraphFormat()->getBullet()->setHeight(100);
    $textFrame->getParagraphs()->add($symbolParagraph);

    $numberedParagraph = new Paragraph();
    $numberedParagraph->setText("This is a numbered item");
    $numberedParagraph->getParagraphFormat()->getBullet()->setType(BulletType::Numbered);
    $numberedParagraph->getParagraphFormat()->getBullet()->setNumberedBulletStyle(NumberedBulletStyle::BulletCircleNumWDBlackPlain);
    $numberedParagraph->getParagraphFormat()->setIndent(25);
    $numberedParagraph->getParagraphFormat()->getBullet()->getColor()->setColorType(ColorType::RGB);
    $numberedParagraph->getParagraphFormat()->getBullet()->getColor()->setColor(java("java.awt.Color")->BLACK);
    $numberedParagraph->getParagraphFormat()->getBullet()->setBulletHardColor(NullableBool::True);
    $numberedParagraph->getParagraphFormat()->getBullet()->setHeight(100);
    $textFrame->getParagraphs()->add($numberedParagraph);

    $presentation->save("bulleted_and_numbered_list.pptx", SaveFormat::Pptx);
} finally {
    $presentation->dispose();
}
Użycie wypunktowania obrazkowego
Wypunktowanie obrazkowe pozwala użyć własnego obrazu zamiast symbolu lub liczby.
- Utwórz instancję klasy Presentation.
- Uzyskaj dostęp do odpowiedniego slajdu przez jego indeks.
- Dodaj AutoShape i uzyskaj dostęp do jego TextFrame.
- Usuń domyślny akapit z ramki tekstowej.
- Załaduj obraz wypunktowania i dodaj go do kolekcji obrazów prezentacji jako PPImage.
- Utwórz Paragraph i ustaw jego tekst.
- Ustaw BulletFormat::setType na BulletType::Picture.
- Przypisz obraz przez BulletFormat::getPicture i ustaw wysokość wypunktowania.
- Dodaj akapit do ramki tekstowej.
- Zapisz zmodyfikowaną prezentację.
Poniższy przykład w PHP tworzy wypunktowanie obrazkowe:
use aspose\slides\BulletType;
use aspose\slides\Images;
use aspose\slides\Paragraph;
use aspose\slides\Presentation;
use aspose\slides\SaveFormat;
use aspose\slides\ShapeType;

$presentation = new Presentation();
try {
    $slide = $presentation->getSlides()->get_Item(0);

    $bulletImage = Images::fromFile("bullets.png");
    try {
        $presentationImage = $presentation->getImages()->addImage($bulletImage);
    } finally {
        $bulletImage->dispose();
    }

    $shape = $slide->getShapes()->addAutoShape(ShapeType::Rectangle, 200, 200, 400, 200);
    $textFrame = $shape->getTextFrame();
    $textFrame->getParagraphs()->clear();

    $paragraph = new Paragraph();
    $paragraph->setText("Welcome to Aspose.Slides");
    $paragraph->getParagraphFormat()->getBullet()->setType(BulletType::Picture);
    $paragraph->getParagraphFormat()->getBullet()->getPicture()->setImage($presentationImage);
    $paragraph->getParagraphFormat()->getBullet()->setHeight(100);
    $textFrame->getParagraphs()->add($paragraph);

    $presentation->save("picture_bullet.pptx", SaveFormat::Pptx);
    $presentation->save("picture_bullet.ppt", SaveFormat::Ppt);
} finally {
    $presentation->dispose();
}
Tworzenie listy wielopoziomowej
Ustaw ParagraphFormat::setDepth aby umieścić akapity na różnych poziomach listy. Najwyższy poziom ma głębokość 0.
- Utwórz Presentation i uzyskaj dostęp do slajdu.
- Dodaj AutoShape i usuń domyślny akapit z jego ramki tekstowej.
- Utwórz cztery akapity i skonfiguruj ich symbole wypunktowania.
- Ustaw ich wartości ParagraphFormat::setDepth na
0,1,2i3. - Dodaj akapity do ramki tekstowej i zapisz prezentację.
Poniższy przykład w PHP tworzy listę wypunktowaną czteropoziomową:
use aspose\slides\BulletType;
use aspose\slides\FillType;
use aspose\slides\Paragraph;
use aspose\slides\Presentation;
use aspose\slides\SaveFormat;
use aspose\slides\ShapeType;

$presentation = new Presentation();
try {
    $slide = $presentation->getSlides()->get_Item(0);
    $shape = $slide->getShapes()->addAutoShape(ShapeType::Rectangle, 200, 200, 400, 200);
    $textFrame = $shape->getTextFrame();
    $textFrame->getParagraphs()->clear();

    $firstParagraph = new Paragraph();
    $firstParagraph->setText("Content");
    $firstParagraph->getParagraphFormat()->getBullet()->setType(BulletType::Symbol);
    $firstParagraph->getParagraphFormat()->getBullet()->setChar("•");
    $firstParagraph->getParagraphFormat()->getDefaultPortionFormat()->getFillFormat()->setFillType(FillType::Solid);
    $firstParagraph->getParagraphFormat()->getDefaultPortionFormat()->getFillFormat()->getSolidFillColor()->setColor(java("java.awt.Color")->BLACK);
    $firstParagraph->getParagraphFormat()->setDepth(0);

    $secondParagraph = new Paragraph();
    $secondParagraph->setText("Second level");
    $secondParagraph->getParagraphFormat()->getBullet()->setType(BulletType::Symbol);
    $secondParagraph->getParagraphFormat()->getBullet()->setChar('-');
    $secondParagraph->getParagraphFormat()->getDefaultPortionFormat()->getFillFormat()->setFillType(FillType::Solid);
    $secondParagraph->getParagraphFormat()->getDefaultPortionFormat()->getFillFormat()->getSolidFillColor()->setColor(java("java.awt.Color")->BLACK);
    $secondParagraph->getParagraphFormat()->setDepth(1);

    $thirdParagraph = new Paragraph();
    $thirdParagraph->setText("Third level");
    $thirdParagraph->getParagraphFormat()->getBullet()->setType(BulletType::Symbol);
    $thirdParagraph->getParagraphFormat()->getBullet()->setChar("•");
    $thirdParagraph->getParagraphFormat()->getDefaultPortionFormat()->getFillFormat()->setFillType(FillType::Solid);
    $thirdParagraph->getParagraphFormat()->getDefaultPortionFormat()->getFillFormat()->getSolidFillColor()->setColor(java("java.awt.Color")->BLACK);
    $thirdParagraph->getParagraphFormat()->setDepth(2);

    $fourthParagraph = new Paragraph();
    $fourthParagraph->setText("Fourth level");
    $fourthParagraph->getParagraphFormat()->getBullet()->setType(BulletType::Symbol);
    $fourthParagraph->getParagraphFormat()->getBullet()->setChar('-');
    $fourthParagraph->getParagraphFormat()->getDefaultPortionFormat()->getFillFormat()->setFillType(FillType::Solid);
    $fourthParagraph->getParagraphFormat()->getDefaultPortionFormat()->getFillFormat()->getSolidFillColor()->setColor(java("java.awt.Color")->BLACK);
    $fourthParagraph->getParagraphFormat()->setDepth(3);

    $textFrame->getParagraphs()->add($firstParagraph);
    $textFrame->getParagraphs()->add($secondParagraph);
    $textFrame->getParagraphs()->add($thirdParagraph);
    $textFrame->getParagraphs()->add($fourthParagraph);

    $presentation->save("multilevel_list.pptx", SaveFormat::Pptx);
} finally {
    $presentation->dispose();
}
Rozpoczęcie numerowanej listy od niestandardowych wartości
Użyj BulletFormat::setNumberedBulletStartWith aby określić początkową liczbę wyświetlaną dla numerowanego akapitu.
- Utwórz Presentation i dodaj AutoShape do slajdu.
- Usuń domyślny akapit z ramki tekstowej kształtu.
- Utwórz trzy numerowane akapity.
- Ustaw BulletFormat::setNumberedBulletStartWith na
2,3i7dla kolejnych akapitów. - Dodaj akapity do ramki tekstowej i zapisz prezentację.
Poniższy przykład w PHP przypisuje niestandardowy numer początkowy każdemu akapitowi:
use aspose\slides\BulletType;
use aspose\slides\Paragraph;
use aspose\slides\Presentation;
use aspose\slides\SaveFormat;
use aspose\slides\ShapeType;

$presentation = new Presentation();
try {
    $shape = $presentation->getSlides()->get_Item(0)->getShapes()->addAutoShape(ShapeType::Rectangle, 200, 200, 400, 200);
    $textFrame = $shape->getTextFrame();
    $textFrame->getParagraphs()->clear();

    $firstParagraph = new Paragraph();
    $firstParagraph->setText("Start at 2");
    $firstParagraph->getParagraphFormat()->getBullet()->setType(BulletType::Numbered);
    $firstParagraph->getParagraphFormat()->getBullet()->setNumberedBulletStartWith(2);
    $textFrame->getParagraphs()->add($firstParagraph);

    $secondParagraph = new Paragraph();
    $secondParagraph->setText("Start at 3");
    $secondParagraph->getParagraphFormat()->getBullet()->setType(BulletType::Numbered);
    $secondParagraph->getParagraphFormat()->getBullet()->setNumberedBulletStartWith(3);
    $textFrame->getParagraphs()->add($secondParagraph);

    $thirdParagraph = new Paragraph();
    $thirdParagraph->setText("Start at 7");
    $thirdParagraph->getParagraphFormat()->getBullet()->setType(BulletType::Numbered);
    $thirdParagraph->getParagraphFormat()->getBullet()->setNumberedBulletStartWith(7);
    $textFrame->getParagraphs()->add($thirdParagraph);

    $presentation->save("custom_numbered_list.pptx", SaveFormat::Pptx);
} finally {
    $presentation->dispose();
}
Kontrola układu akapitu i właściwości końcowych
Ustawienie wcięcia pierwszej linii
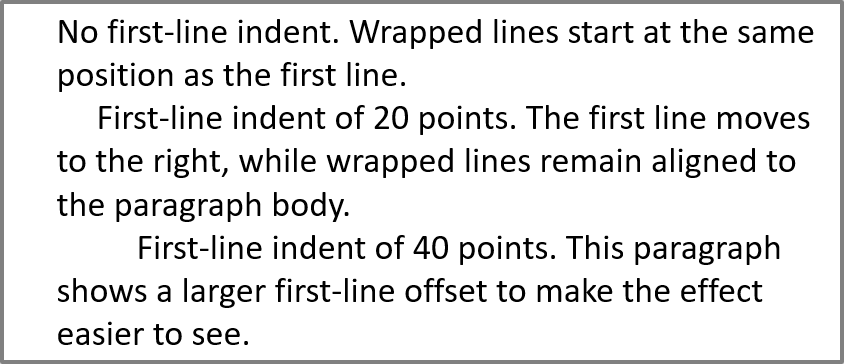
Użyj ParagraphFormat::setIndent aby kontrolować wcięcie pierwszej linii akapitu. Metoda ta przesuwa wyłącznie pierwszą linię względem lewego marginesu akapitu. Dodatnia wartość przesuwa pierwszą linię w prawo, natomiast pozostałe linie pozostają wyrównane do treści akapitu.
Użyj ParagraphFormat::setMarginLeft gdy potrzebujesz przesunąć cały akapit. Użyj ParagraphFormat::setIndent gdy chcesz przesunąć tylko pierwszą linię.
Poniższy przykład tworzy kilka akapitów i stosuje różne wartości ParagraphFormat::setIndent aby pokazać, jak wcięcie pierwszej linii wpływa na układ akapitu.
- Utwórz instancję klasy Presentation.
- Uzyskaj dostęp do docelowego slajdu.
- Dodaj prostokątną AutoShape do slajdu.
- Uzyskaj dostęp do TextFrame kształtu i usuń domyślny akapit.
- Utwórz kilka akapitów i ustaw różne wartości ParagraphFormat::setIndent dla nich.
- Dodaj akapity do ramki tekstowej.
- Zapisz zmodyfikowaną prezentację.
Ten kod w PHP pokazuje, jak ustawić wcięcie akapitu:
use aspose\slides\FillType;
use aspose\slides\Paragraph;
use aspose\slides\Presentation;
use aspose\slides\SaveFormat;
use aspose\slides\ShapeType;
use aspose\slides\TextAutofitType;

$presentation = new Presentation();
try {
    $slide = $presentation->getSlides()->get_Item(0);

    $shape = $slide->getShapes()->addAutoShape(ShapeType::Rectangle, 50, 50, 420, 220);
    $shape->getFillFormat()->setFillType(FillType::NoFill);
    $shape->getLineFormat()->getFillFormat()->setFillType(FillType::Solid);
    $shape->getLineFormat()->getFillFormat()->getSolidFillColor()->setColor(java("java.awt.Color")->GRAY);

    $textFrame = $shape->getTextFrame();
    $textFrame->getTextFrameFormat()->setAutofitType(TextAutofitType::Shape);
    $textFrame->getParagraphs()->clear();

    $firstParagraph = new Paragraph();
    $firstParagraph->setText("No first-line indent. Wrapped lines start at the same position as the first line.");
    $firstParagraph->getParagraphFormat()->getDefaultPortionFormat()->getFillFormat()->setFillType(FillType::Solid);
    $firstParagraph->getParagraphFormat()->getDefaultPortionFormat()->getFillFormat()->getSolidFillColor()->setColor(java("java.awt.Color")->BLACK);
    $firstParagraph->getParagraphFormat()->setMarginLeft(20.0);
    $firstParagraph->getParagraphFormat()->setIndent(0.0);

    $secondParagraph = new Paragraph();
    $secondParagraph->setText("First-line indent of 20 points. The first line moves to the right, while wrapped lines remain aligned to the paragraph body.");
    $secondParagraph->getParagraphFormat()->getDefaultPortionFormat()->getFillFormat()->setFillType(FillType::Solid);
    $secondParagraph->getParagraphFormat()->getDefaultPortionFormat()->getFillFormat()->getSolidFillColor()->setColor(java("java.awt.Color")->BLACK);
    $secondParagraph->getParagraphFormat()->setMarginLeft(20.0);
    $secondParagraph->getParagraphFormat()->setIndent(20.0);

    $thirdParagraph = new Paragraph();
    $thirdParagraph->setText("First-line indent of 40 points. This paragraph shows a larger first-line offset to make the effect easier to see.");
    $thirdParagraph->getParagraphFormat()->getDefaultPortionFormat()->getFillFormat()->setFillType(FillType::Solid);
    $thirdParagraph->getParagraphFormat()->getDefaultPortionFormat()->getFillFormat()->getSolidFillColor()->setColor(java("java.awt.Color")->BLACK);
    $thirdParagraph->getParagraphFormat()->setMarginLeft(20.0);
    $thirdParagraph->getParagraphFormat()->setIndent(40.0);

    $textFrame->getParagraphs()->add($firstParagraph);
    $textFrame->getParagraphs()->add($secondParagraph);
    $textFrame->getParagraphs()->add($thirdParagraph);

    $presentation->save("paragraph_indent.pptx", SaveFormat::Pptx);
} finally {
    $presentation->dispose();
}
Wynik:
Ustawienie wcięcia wiszącego
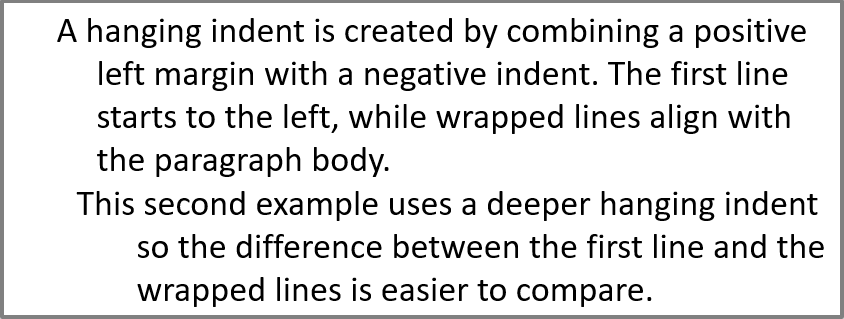
Wcięcie wiszące to układ akapitu, w którym pierwsza linia zaczyna się bardziej po lewej niż pozostałe linie. W Aspose.Slides efekt ten uzyskuje się przy pomocy ParagraphFormat::setIndent. Przekaż wartość ujemną, aby przesunąć pierwszą linię w lewo względem treści akapitu.
W praktyce ParagraphFormat::setMarginLeft definiuje lewą pozycję treści akapitu, a ParagraphFormat::setIndent określa pozycję pierwszej linii względem tego marginesu. Aby uzyskać wcięcie wiszące, podaj dodatnią wartość do setMarginLeft i ujemną do setIndent.
Takie formatowanie jest przydatne w bibliografiach, odnośnikach, hasłach słownika i innych akapitach, w których zawijane linie muszą wyrównywać się pod treścią akapitu, a nie pod pierwszym znakiem pierwszej linii.
- Utwórz instancję klasy Presentation.
- Uzyskaj dostęp do docelowego slajdu.
- Dodaj prostokątną AutoShape do slajdu.
- Uzyskaj dostęp do TextFrame kształtu i usuń domyślny akapit.
- Utwórz akapity i podaj dodatnią wartość do ParagraphFormat::setMarginLeft dla każdego akapitu.
- Podaj ujemną wartość do ParagraphFormat::setIndent aby uzyskać efekt wcięcia wiszącego.
- Dodaj akapity do ramki tekstowej.
- Zapisz zmodyfikowaną prezentację.
Ten kod w PHP pokazuje, jak ustawić wcięcie wiszące dla akapitu:
use aspose\slides\FillType;
use aspose\slides\Paragraph;
use aspose\slides\Presentation;
use aspose\slides\SaveFormat;
use aspose\slides\ShapeType;
use aspose\slides\TextAutofitType;

$presentation = new Presentation();
try {
    $slide = $presentation->getSlides()->get_Item(0);

    $shape = $slide->getShapes()->addAutoShape(ShapeType::Rectangle, 50, 50, 420, 220);
    $shape->getFillFormat()->setFillType(FillType::NoFill);
    $shape->getLineFormat()->getFillFormat()->setFillType(FillType::Solid);
    $shape->getLineFormat()->getFillFormat()->getSolidFillColor()->setColor(java("java.awt.Color")->GRAY);

    $textFrame = $shape->getTextFrame();
    $textFrame->getTextFrameFormat()->setAutofitType(TextAutofitType::Shape);
    $textFrame->getParagraphs()->clear();

    $firstParagraph = new Paragraph();
    $firstParagraph->setText("A hanging indent is created by combining a positive left margin with a negative indent. The first line starts to the left, while wrapped lines align with the paragraph body.");
    $firstParagraph->getParagraphFormat()->getDefaultPortionFormat()->getFillFormat()->setFillType(FillType::Solid);
    $firstParagraph->getParagraphFormat()->getDefaultPortionFormat()->getFillFormat()->getSolidFillColor()->setColor(java("java.awt.Color")->BLACK);
    $firstParagraph->getParagraphFormat()->setMarginLeft(40.0);
    $firstParagraph->getParagraphFormat()->setIndent(-20.0);

    $secondParagraph = new Paragraph();
    $secondParagraph->setText("This second example uses a deeper hanging indent so the difference between the first line and the wrapped lines is easier to compare.");
    $secondParagraph->getParagraphFormat()->getDefaultPortionFormat()->getFillFormat()->setFillType(FillType::Solid);
    $secondParagraph->getParagraphFormat()->getDefaultPortionFormat()->getFillFormat()->getSolidFillColor()->setColor(java("java.awt.Color")->BLACK);
    $secondParagraph->getParagraphFormat()->setMarginLeft(60.0);
    $secondParagraph->getParagraphFormat()->setIndent(-30.0);

    $textFrame->getParagraphs()->add($firstParagraph);
    $textFrame->getParagraphs()->add($secondParagraph);

    $presentation->save("hanging_indent.pptx", SaveFormat::Pptx);
} finally {
    $presentation->dispose();
}
Wynik:
Ustawienie właściwości końcowych akapitu
Paragraph::setEndParagraphPortionFormat kontroluje formatowanie znaku końcowego akapitu. Poniższy przykład w PHP przypisuje rozmiar czcionki i czcionkę łacińską do znaku końcowego drugiego akapitu:
- Załaduj Presentation i uzyskaj dostęp do slajdu.
- Dodaj AutoShape i usuń jego domyślny akapit.
- Utwórz dwa akapity i dodaj do nich fragmenty tekstu.
- Utwórz PortionFormat dla znaku końcowego drugiego akapitu.
- Ustaw BasePortionFormat::setFontHeight oraz BasePortionFormat::setLatinFont.
- Przypisz format przy pomocy Paragraph::setEndParagraphPortionFormat i zapisz prezentację.
use aspose\slides\FontData;
use aspose\slides\Paragraph;
use aspose\slides\Portion;
use aspose\slides\PortionFormat;
use aspose\slides\Presentation;
use aspose\slides\SaveFormat;
use aspose\slides\ShapeType;

$presentation = new Presentation("Test.pptx");
try {
    $slide = $presentation->getSlides()->get_Item(0);
    $shape = $slide->getShapes()->addAutoShape(ShapeType::Rectangle, 10, 10, 200, 250);
    $textFrame = $shape->getTextFrame();
    $textFrame->getParagraphs()->clear();

    $firstParagraph = new Paragraph();
    $firstParagraph->getPortions()->add(new Portion("Sample text"));

    $secondParagraph = new Paragraph();
    $secondParagraph->getPortions()->add(new Portion("Sample text 2"));

    $endParagraphFormat = new PortionFormat();
    $endParagraphFormat->setFontHeight(48);
    $endParagraphFormat->setLatinFont(new FontData("Times New Roman"));
    $secondParagraph->setEndParagraphPortionFormat($endParagraphFormat);

    $textFrame->getParagraphs()->add($firstParagraph);
    $textFrame->getParagraphs()->add($secondParagraph);

    $presentation->save("end_paragraph_format.pptx", SaveFormat::Pptx);
} finally {
    $presentation->dispose();
}
Zliczanie wyrenderowanych linii
W odniesieniu do reguł akapitu wpływających na automatyczne zawijanie i interpunkcję na końcu linii, zobacz Control Line Breaking oraz Control Hanging Punctuation.
Użyj Paragraph::getLinesCount aby policzyć liczbę linii zajmowanych przez akapit po rozmieszczeniu tekstu, włączając automatyczne zawijanie. Przydatne przy sprawdzaniu długości tekstu i układu w szablonach prezentacji.
Akapit jest jednym elementem w TextFrame::getParagraphs, może zajmować kilka wyrenderowanych linii. Jawny podział linii wewnątrz akapitu wymusza nową linię bez tworzenia nowego akapitu. Automatyczne zawijanie tworzy linie w oparciu o dostępną szerokość, nie wstawiając jawnych znaków podziału do tekstu. Dlatego liczenie akapitów lub znaków podziału nie daje liczby wyrenderowanych linii.
Poniższy przykład tworzy kształt tekstowy, zlicza jego linie, zwęża kształt, a następnie zamienia tekst na krótszy ciąg. Zawijanie jest włączone, a dopasowanie automatyczne wyłączone, tak aby szerokość kształtu kontrolowała zawijanie bez automatycznego zmniejszania tekstu lub zmiany rozmiaru kształtu. Wymiary kształtu podane są w punktach. Na końcu przykład dodaje kolejny akapit i sumuje liczbę linii w całej ramce tekstowej.
use aspose\slides\NullableBool;
use aspose\slides\Paragraph;
use aspose\slides\Presentation;
use aspose\slides\ShapeType;
use aspose\slides\TextAutofitType;

$presentation = new Presentation();
try {
    $slide = $presentation->getSlides()->get_Item(0);

    $shape = $slide->getShapes()->addAutoShape(ShapeType::Rectangle, 50, 50, 400, 200);
    $textFrame = $shape->getTextFrame();
    $textFrame->getTextFrameFormat()->setWrapText(NullableBool::True);
    $textFrame->getTextFrameFormat()->setAutofitType(TextAutofitType::None);

    $paragraph = $textFrame->getParagraphs()->get_Item(0);
    $paragraph->getParagraphFormat()->getDefaultPortionFormat()->setFontHeight(20);
    $paragraph->setText("This text demonstrates how automatic wrapping changes the number of rendered lines.");
    echo "Original width: " . java_values($paragraph->getLinesCount()) . PHP_EOL;

    $shape->setWidth(150);
    echo "Narrower shape: " . java_values($paragraph->getLinesCount()) . PHP_EOL;

    $paragraph->setText("Short text.");
    echo "Shorter text: " . java_values($paragraph->getLinesCount()) . PHP_EOL;

    $secondParagraph = new Paragraph();
    $secondParagraph->setText("Another paragraph.");
    $secondParagraph->getParagraphFormat()->getDefaultPortionFormat()->setFontHeight(20);
    $textFrame->getParagraphs()->add($secondParagraph);

    $totalLineCount = 0;
    for ($i = 0; $i < java_values($textFrame->getParagraphs()->getCount()); $i++) {
        $currentParagraph = $textFrame->getParagraphs()->get_Item($i);
        $totalLineCount += java_values($currentParagraph->getLinesCount());
    }
    echo "Total lines in the text frame: " . $totalLineCount . PHP_EOL;
} finally {
    $presentation->dispose();
}
Przy podanym tekście i wymiarach, zwężenie kształtu zwiększa liczbę linii, natomiast zamiana tekstu na krótki ciąg ją zmniejsza. Dokładne liczby mogą się różnić w zależności od dostępnych czcionek i ich substytucji, rozmiaru czcionki, marginesów, wcięć, zawijania i ustawień dopasowania. Używaj czcionek i ustawień układu przeznaczonych dla środowiska docelowego podczas sprawdzania szablonu.
Sama liczba linii nie określa, czy tekst przekracza swój kontener. Ważna jest dostępna wysokość, wysokości linii, odstępy między akapitami i liniami oraz zachowanie dopasowania; nawet pojedyncza linia może przekroczyć dostępną szerokość, gdy zawijanie jest wyłączone.
Import i eksport zawartości akapitu
Import tekstu HTML do akapitów
Użyj ParagraphCollection::addFromHtml aby skonwertować znacznik HTML na akapity i fragmenty w ramce tekstowej.
- Utwórz instancję klasy Presentation.
- Uzyskaj dostęp do slajdu i dodaj AutoShape.
- Uzyskaj dostęp do TextFrame kształtu i usuń jego domyślny akapit.
- Odczytaj źródłowy plik HTML.
- Przekaż łańcuch HTML do ParagraphCollection::addFromHtml.
- Zapisz zmodyfikowaną prezentację.
Ten przykład w PHP importuje HTML do ramki tekstowej:
use aspose\slides\FillType;
use aspose\slides\Presentation;
use aspose\slides\SaveFormat;
use aspose\slides\ShapeType;

$presentation = new Presentation();
try {
    $slide = $presentation->getSlides()->get_Item(0);
    $shapeWidth = java_values($presentation->getSlideSize()->getSize()->getWidth()) - 20;
    $shapeHeight = java_values($presentation->getSlideSize()->getSize()->getHeight()) - 20;
    $shape = $slide->getShapes()->addAutoShape(ShapeType::Rectangle, 10, 10, $shapeWidth, $shapeHeight);
    $shape->getFillFormat()->setFillType(FillType::NoFill);
    $shape->getTextFrame()->getParagraphs()->clear();

    $html = file_get_contents("file.html");
    if ($html !== false) {
        $shape->getTextFrame()->getParagraphs()->addFromHtml($html);
        $presentation->save("html_text.pptx", SaveFormat::Pptx);
    } else {
        echo "The HTML file could not be read.";
    }
} finally {
    $presentation->dispose();
}
Eksport tekstu akapitu do HTML
Użyj ParagraphCollection::exportToHtml aby wyeksportować wybrany zakres akapitów jako HTML.
- Utwórz instancję klasy Presentation i załaduj żądaną prezentację.
- Uzyskaj dostęp do slajdu i znajdź AutoShape zawierający tekst.
- Uzyskaj dostęp do TextFrame kształtu.
- Wywołaj ParagraphCollection::exportToHtml podając indeks początkowego akapitu i liczbę akapitów do eksportu.
- Zapisz zwrócony łańcuch HTML do pliku.
Ten przykład w PHP eksportuje wszystkie akapity z pierwszego kształtu tekstowego:
use aspose\slides\Presentation;

$presentation = new Presentation("ExportingHTMLText.pptx");
try {
    $shape = $presentation->getSlides()->get_Item(0)->getShapes()->get_Item(0);

    if (java_instanceof($shape, new JavaClass("com.aspose.slides.AutoShape"))) {
        $textFrame = $shape->getTextFrame();
        if (!java_is_null($textFrame)) {
            $paragraphs = $textFrame->getParagraphs();
            $html = $paragraphs->exportToHtml(0, $paragraphs->getCount(), null);
            if (file_put_contents("paragraphs.html", $html) === false) {
                echo "The HTML file could not be written.";
            }
        } else {
            echo "The first shape does not contain a text frame.";
        }
    } else {
        echo "The first shape is not a text shape.";
    }
} finally {
    $presentation->dispose();
}
Renderowanie akapitu jako obrazu
Paragraph::getImage renderuje pojedynczy akapit bezpośrednio i zwraca IImage. Zapisz wynik do pliku lub strumienia przy pomocy IImage::save. Nie musisz renderować całego kształtu ani ręcznie przycinać bitmapy.
Paragraph::getImage może zwrócić null, jeśli akapitu nie można odnaleźć w jego kolekcji nadrzędnej, nie ma prawidłowych granic renderowania lub nie może zostać wyrenderowany. Sprawdź wynik przed zapisem i zwolnij zwrócony obraz po użyciu.
Renderowanie akapitu w domyślnej skali
Załóżmy, że mamy plik prezentacji o nazwie sample.pptx z jednym slajdem, na którym pierwszy kształt jest polem tekstowym zawierającym trzy akapity.
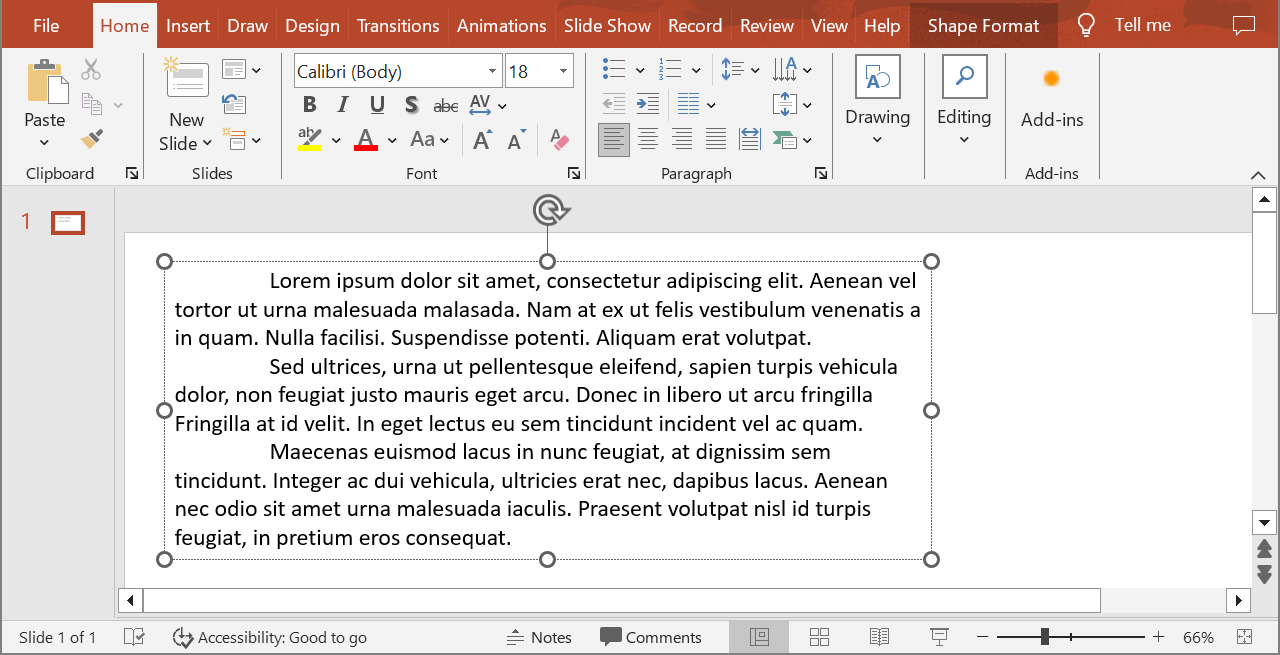
Poniższy przykład w PHP renderuje drugi akapit w zwykłym polu tekstowym w domyślnej skali i zapisuje zwrócony obraz w formacie PNG. Blok finally zapewnia prawidłowe zwolnienie obrazu.
use aspose\slides\ImageFormat;
use aspose\slides\Presentation;

$presentation = new Presentation("sample.pptx");
try {
    $shape = $presentation->getSlides()->get_Item(0)->getShapes()->get_Item(0);

    if (java_instanceof($shape, new JavaClass("com.aspose.slides.AutoShape"))) {
        $textFrame = $shape->getTextFrame();
        if (!java_is_null($textFrame) && java_values($textFrame->getParagraphs()->getCount()) > 1) {
            $paragraph = $textFrame->getParagraphs()->get_Item(1);
            $paragraphImage = $paragraph->getImage();

            if (!java_is_null($paragraphImage)) {
                try {
                    $paragraphImage->save("paragraph.png", ImageFormat::Png);
                } finally {
                    $paragraphImage->dispose();
                }
            } else {
                echo "The paragraph could not be rendered.";
            }
        } else {
            echo "The expected paragraph was not found.";
        }
    } else {
        echo "The first shape is not a text shape.";
    }
} finally {
    $presentation->dispose();
}
Wynik:

Renderowanie akapitu w komórce tabeli ze skalowaniem
Użyj przeciążenia Paragraph::getImage przyjmującego parametry $scaleX i $scaleY, aby ustawić czynniki skali poziomej i pionowej. Poniższy przykład w PHP tworzy tabelę, renderuje akapit w jej pierwszej komórce przy dwukrotnym zwiększeniu domyślnej szerokości i wysokości, a wynik zapisuje jako obraz PNG.
use aspose\slides\ImageFormat;
use aspose\slides\Presentation;

$scaleX = 2;
$scaleY = 2;

$presentation = new Presentation();
try {
    $slide = $presentation->getSlides()->get_Item(0);
    $table = $slide->getShapes()->addTable(50, 50, array(300), array(80));
    $paragraph = $table->get_Item(0, 0)->getTextFrame()->getParagraphs()->get_Item(0);
    $paragraph->setText("Text in a table cell");

    $paragraphImage = $paragraph->getImage($scaleX, $scaleY);
    if (!java_is_null($paragraphImage)) {
        try {
            $paragraphImage->save("table_paragraph.png", ImageFormat::Png);
        } finally {
            $paragraphImage->dispose();
        }
    } else {
        echo "The paragraph could not be rendered.";
    }
} finally {
    $presentation->dispose();
}
Czynnik skali 1 pozostawia dany wymiar w domyślnym rozmiarze pikseli. Na przykład 2 dla obu czynników tworzy obraz, którego szerokość i wysokość są w przybliżeniu dwukrotne względem domyślnych wymiarów, co daje czterokrotną liczbę pikseli. Większe czynniki zwykle dają ostrzejszy tekst przy powiększaniu lub wyjściu o wysokiej rozdzielczości, ale zwiększają zużycie pamięci i rozmiar pliku. Czynniki poniżej 1 tworzą mniejsze obrazy z mniejszą szczegółowością. Używaj równych czynników, aby zachować proporcje akapitu; różne czynniki poziome i pionowe rozciągają wynik niezależnie.
Renderowanie całego kształtu przy użyciu Shape::getImage pozostaje przydatne, gdy wyjściowy obraz musi zawierać wypełnienie, obramowanie lub inny kontekst wizualny kształtu. Dla obrazu zawierającego wyłącznie akapit, użyj Paragraph::getImage.
FAQ
Czy mogę całkowicie wyłączyć zawijanie linii w ramce tekstowej?
Tak. Ustaw TextFrameFormat::setWrapText aby wyłączyć zawijanie, dzięki czemu linie nie będą łamane przy krawędziach ramki tekstowej.
Jak uzyskać dokładne granice na slajdzie dla konkretnego akapitu?
Użyj Paragraph::getRect aby pobrać prostokąt ograniczający akapit. Portion::getRect podaje granice pojedynczego fragmentu.
Gdzie kontrolowane jest wyrównanie akapitu (lewe, prawe, wyśrodkowane lub wyjustowane)?
ParagraphFormat::setAlignment jest ustawieniem na poziomie akapitu i ma zastosowanie do całego akapitu, niezależnie od formatowania poszczególnych fragmentów.
Aby pionowo wyrównać fragmenty o różnych rozmiarach czcionki w obrębie jednej linii, zobacz Align Fonts Within a Line.
Czy mogę ustawić język korekty dla części akapitu?
Tak. Ustaw BasePortionFormat::setLanguageId dla poszczególnych fragmentów, dzięki czemu jeden akapit może zawierać tekst w wielu językach.