
PHPでプレゼンテーションテキストをフォーマット
概要
この記事では、Aspose.Slides for PHP via Java を使用して PowerPoint および OpenDocument プレゼンテーションのテキストをフォーマットする方法を示します。背景色、透明度、文字間隔、フォントプロパティ、回転、段落間隔、オートフィット動作、テキストのアンカリング、タブストップ、言語設定をカバーしています。
特に指定がない限り、例では sample.pptx を使用します。最初のスライドの最初のシェイプはテキストボックスであり、最初の段落には以下に示すテキストが含まれています。スライドとシェイプのインデックスはゼロベースです。太字部分を選択する例は、継承された太字書式を含む有効な書式設定を使用します。

テキストの検索と置換を行うには、テキストの検索と置換 を参照してください。
テキストの背景色を設定
Paragraph のデフォルトのハイライト色を設定するには ParagraphFormat::getDefaultPortionFormat を使用し、個々のテキスト部分のハイライト色を設定するには BasePortionFormat::getHighlightColor を使用します。
次の例は、最初の段落のデフォルトとしてライトグレーのハイライトを設定します。個々の部分で明示的に設定されたハイライト色はこのデフォルトよりも優先されます:
use aspose\slides\Presentation;
use aspose\slides\SaveFormat;

$presentation = new Presentation("sample.pptx");
try {
    $slide = $presentation->getSlides()->get_Item(0);

    $autoShape = $slide->getShapes()->get_Item(0);
    $paragraph = $autoShape->getTextFrame()->getParagraphs()->get_Item(0);
    $highlightColor = java("java.awt.Color")->LIGHT_GRAY;

    // 段落全体のハイライト色を設定します。
    $paragraph->getParagraphFormat()->getDefaultPortionFormat()->getHighlightColor()->setColor($highlightColor);

    $presentation->save("gray_paragraph.pptx", SaveFormat::Pptx);
} finally {
    $presentation->dispose();
}
結果:

太字フォントのテキスト部分の背景色を設定する方法を示すコード例は以下です:
use aspose\slides\Presentation;
use aspose\slides\SaveFormat;

$presentation = new Presentation("sample.pptx");
try {
    $slide = $presentation->getSlides()->get_Item(0);

    $autoShape = $slide->getShapes()->get_Item(0);
    $paragraph = $autoShape->getTextFrame()->getParagraphs()->get_Item(0);
    $highlightColor = java("java.awt.Color")->LIGHT_GRAY;

    $portionCount = java_values($paragraph->getPortions()->getCount());
    for ($portionIndex = 0; $portionIndex < $portionCount; $portionIndex++) {
        $portion = $paragraph->getPortions()->get_Item($portionIndex);
        if (java_values($portion->getPortionFormat()->getEffective()->getFontBold())) {
            // テキスト部分のハイライト色を設定します。
            $portion->getPortionFormat()->getHighlightColor()->setColor($highlightColor);
        }
    }

    $presentation->save("gray_text_portions.pptx", SaveFormat::Pptx);
} finally {
    $presentation->dispose();
}
結果:

テキスト段落を揃える
ParagraphFormat::setAlignment を使用してテキストフレーム内の段落の配置を設定します。値は中央揃え、左揃え、右揃え、両端揃えなどがあります。
次のコード例は、段落を 中央 に揃える方法を示します:
use aspose\slides\Presentation;
use aspose\slides\SaveFormat;
use aspose\slides\TextAlignment;

$presentation = new Presentation("sample.pptx");
try {
    $slide = $presentation->getSlides()->get_Item(0);

    $autoShape = $slide->getShapes()->get_Item(0);
    $paragraph = $autoShape->getTextFrame()->getParagraphs()->get_Item(0);

    // 段落の配置を中央に設定します。
    $paragraph->getParagraphFormat()->setAlignment(TextAlignment::Center);

    $presentation->save("aligned_paragraph.pptx", SaveFormat::Pptx);
} finally {
    $presentation->dispose();
}
結果:

行内のフォントを揃える
ParagraphFormat::setFontAlignment を使用して、行内の異なるフォントサイズのテキスト部分を垂直方向に揃えます。この設定は段落全体に適用され、各行内の揃え方を制御します。
次の自己完結型例は、1枚のスライドに4つのラベル付きテキストボックスを作成します。各段落は 18、36、54 ポイントの同じテキストを含み、フォント揃えが異なります。Arial を使用し、オートフィットと折り返しを無効にし、テキストフレームを1行分のサイズに保ちます。
use aspose\slides\FillType;
use aspose\slides\FontAlignment;
use aspose\slides\FontData;
use aspose\slides\NullableBool;
use aspose\slides\Paragraph;
use aspose\slides\Portion;
use aspose\slides\Presentation;
use aspose\slides\SaveFormat;
use aspose\slides\ShapeType;
use aspose\slides\TextAlignment;
use aspose\slides\TextAnchorType;
use aspose\slides\TextAutofitType;

$presentation = new Presentation();
try {
    $slide = $presentation->getSlides()->get_Item(0);

    $alignments = [FontAlignment::Baseline, FontAlignment::Top, FontAlignment::Center, FontAlignment::Bottom];
    $alignmentNames = ["Baseline", "Top", "Center", "Bottom"];
    $fontSizes = [18, 36, 54];
    $font = new FontData("Arial");
    $gray = java("java.awt.Color")->GRAY;
    $black = java("java.awt.Color")->BLACK;

    for ($i = 0; $i < count($alignments); $i++) {
        $shape = $slide->getShapes()->addAutoShape(ShapeType::Rectangle, 30, 20 + $i * 130, 660, 120);
        $shape->getFillFormat()->setFillType(FillType::NoFill);
        $shape->getLineFormat()->getFillFormat()->setFillType(FillType::NoFill);

        $textFrame = $shape->getTextFrame();
        $textFrame->getTextFrameFormat()->setAnchoringType(TextAnchorType::Top);
        $textFrame->getTextFrameFormat()->setAutofitType(TextAutofitType::None);
        $textFrame->getTextFrameFormat()->setWrapText(NullableBool::False);

        $label = $textFrame->getParagraphs()->get_Item(0);
        $label->setText($alignmentNames[$i]);
        $label->getParagraphFormat()->setAlignment(TextAlignment::Left);
        $label->getParagraphFormat()->getDefaultPortionFormat()->setFontHeight(14);
        $label->getParagraphFormat()->getDefaultPortionFormat()->setLatinFont($font);
        $label->getParagraphFormat()->getDefaultPortionFormat()->getFillFormat()->setFillType(FillType::Solid);
        $label->getParagraphFormat()->getDefaultPortionFormat()->getFillFormat()->getSolidFillColor()->setColor($gray);

        $paragraph = new Paragraph();
        $paragraph->getParagraphFormat()->setFontAlignment($alignments[$i]);
        $paragraph->getParagraphFormat()->setAlignment(TextAlignment::Left);
        $paragraph->getParagraphFormat()->getDefaultPortionFormat()->setLatinFont($font);
        $paragraph->getParagraphFormat()->getDefaultPortionFormat()->getFillFormat()->setFillType(FillType::Solid);
        $paragraph->getParagraphFormat()->getDefaultPortionFormat()->getFillFormat()->getSolidFillColor()->setColor($black);

        foreach ($fontSizes as $fontSize) {
            $portion = new Portion("Ag ");
            $portion->getPortionFormat()->setFontHeight($fontSize);
            $paragraph->getPortions()->add($portion);
        }

        $textFrame->getParagraphs()->add($paragraph);
    }

    $presentation->save("font_alignment.pptx", SaveFormat::Pptx);
} finally {
    $presentation->dispose();
}
結果:
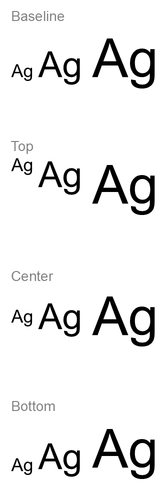
フォント揃えはフォントメトリクスに基づくため、文字ごとの見た目の端が必ずしも正確に一致するわけではありません。例では大文字とディセンダーの両方を含め、ベースラインとボトム揃えの違いを示しています。フォントの利用可否や代替、使用する文字、フォントサイズの違いが結果に影響します。フレームの寸法、余白、行間、折り返し、オートフィットもレイアウトに影響するため、モードを比較する際は同じフォントとレイアウト設定を使用してください。
この設定は、段落の水平揃えを制御する ParagraphFormat::setAlignment とは異なり、シェイプ内でテキストブロックを垂直方向に配置する TextFrameFormat::setAnchoringType とは別物です。また、BasePortionFormat::setEscapement による上付き・下付きの書式設定は、段落の行のフォント揃えを設定するのではなく、ベースラインに対して個々の部分をシフトさせます。
テキストの透明度を設定
テキストの透明度は、BasePortionFormat::getFillFormat に割り当てられた色のアルファ成分で制御します。以下の例では、alpha = 50 は 0〜255 のスケールの ARGB アルファチャネル値であり、透明率ではありません。
段落全体に透明度を適用する方法を示すコード例は以下です:
use aspose\slides\FillType;
use aspose\slides\Presentation;
use aspose\slides\SaveFormat;

$alpha = 50;

$presentation = new Presentation("sample.pptx");
try {
    $slide = $presentation->getSlides()->get_Item(0);

    $autoShape = $slide->getShapes()->get_Item(0);
    $paragraph = $autoShape->getTextFrame()->getParagraphs()->get_Item(0);
    $fillFormat = $paragraph->getParagraphFormat()->getDefaultPortionFormat()->getFillFormat();

    // テキストの塗りつぶし色を透明な色に設定します。
    $fillFormat->setFillType(FillType::Solid);
    $transparentColor = new Java("java.awt.Color", 0, 0, 0, $alpha);
    $fillFormat->getSolidFillColor()->setColor($transparentColor);

    $presentation->save("transparent_paragraph.pptx", SaveFormat::Pptx);
} finally {
    $presentation->dispose();
}
結果:

太字フォントのテキスト部分に透明度を適用する方法を示すコード例は以下です:
use aspose\slides\FillType;
use aspose\slides\Presentation;
use aspose\slides\SaveFormat;

$alpha = 50;

$presentation = new Presentation("sample.pptx");
try {
    $slide = $presentation->getSlides()->get_Item(0);

    $autoShape = $slide->getShapes()->get_Item(0);
    $paragraph = $autoShape->getTextFrame()->getParagraphs()->get_Item(0);
    $transparentColor = new Java("java.awt.Color", 0, 0, 0, $alpha);

    $portionCount = java_values($paragraph->getPortions()->getCount());
    for ($portionIndex = 0; $portionIndex < $portionCount; $portionIndex++) {
        $portion = $paragraph->getPortions()->get_Item($portionIndex);
        if (java_values($portion->getPortionFormat()->getEffective()->getFontBold())) {
            // テキスト部分の透明度を設定します。
            $fillFormat = $portion->getPortionFormat()->getFillFormat();
            $fillFormat->setFillType(FillType::Solid);
            $fillFormat->getSolidFillColor()->setColor($transparentColor);
        }
    }

    $presentation->save("transparent_text_portions.pptx", SaveFormat::Pptx);
} finally {
    $presentation->dispose();
}
結果:

テキストの文字間隔を設定
BasePortionFormat::setSpacing を使用して、テキストボックス内の文字間隔を広げたり縮めたりします。例では 3 ポイントの間隔を追加しています。負の値はテキストを縮めます。
段落全体の文字間隔を拡大する方法を示す PHP コードは以下です:
use aspose\slides\Presentation;
use aspose\slides\SaveFormat;

$presentation = new Presentation("sample.pptx");
try {
    $slide = $presentation->getSlides()->get_Item(0);

    $autoShape = $slide->getShapes()->get_Item(0);
    $paragraph = $autoShape->getTextFrame()->getParagraphs()->get_Item(0);

    // 注: 文字間隔を縮めるには負の値を使用します。
    $paragraph->getParagraphFormat()->getDefaultPortionFormat()->setSpacing(3); // 文字間隔を拡大します。

    $presentation->save("character_spacing_in_paragraph.pptx", SaveFormat::Pptx);
} finally {
    $presentation->dispose();
}
結果:

太字フォントのテキスト部分の文字間隔を拡大する方法を示すコード例は以下です:
use aspose\slides\Presentation;
use aspose\slides\SaveFormat;

$presentation = new Presentation("sample.pptx");
try {
    $slide = $presentation->getSlides()->get_Item(0);

    $autoShape = $slide->getShapes()->get_Item(0);
    $paragraph = $autoShape->getTextFrame()->getParagraphs()->get_Item(0);

    $portionCount = java_values($paragraph->getPortions()->getCount());
    for ($portionIndex = 0; $portionIndex < $portionCount; $portionIndex++) {
        $portion = $paragraph->getPortions()->get_Item($portionIndex);
        if (java_values($portion->getPortionFormat()->getEffective()->getFontBold())) {
            // 注: 文字間隔を縮めるには負の値を使用します。
            $portion->getPortionFormat()->setSpacing(3); // 文字間隔を拡大します。
        }
    }

    $presentation->save("character_spacing_in_text_portions.pptx", SaveFormat::Pptx);
} finally {
    $presentation->dispose();
}
結果:

特定のフォントのカーニングを無効にする
場合によっては、Aspose.Slidesでレンダリングされたテキストが PowerPoint で表示される同じテキストよりもやや詰まって見えることがあります。これは、PowerPoint が特定のフォントのカーニングデータを無視することがあるためで、フォントに有効なカーニング情報が含まれていても、PowerPoint の設定でカーニングが有効になっていても起こります。
このような場合に出力を PowerPoint に近づけるには、影響を受けるフォントを使用したテキスト部分のカーニングを無効にできます。BasePortionFormat::setKerningMinimalSize を実際のフォントサイズより大きい値に設定します。この例では、最初のスライドの最初のシェイプがテキストボックスである “presentation.pptx” が必要です。実効フォント名(継承されたフォントを含む)をチェックし、Roboto を使用する部分に対して 100 ポイントの閾値を設定します。これにより、フォントサイズが 100 ポイント未満の該当部分のカーニングが無効になります:
use aspose\slides\Presentation;
use aspose\slides\SaveFormat;

$presentation = new Presentation("presentation.pptx");
try {
    $slide = $presentation->getSlides()->get_Item(0);

    $autoShape = $slide->getShapes()->get_Item(0);
    $targetFont = "Roboto";

    $paragraphCount = java_values($autoShape->getTextFrame()->getParagraphs()->getCount());
    for ($paragraphIndex = 0; $paragraphIndex < $paragraphCount; $paragraphIndex++) {
        $paragraph = $autoShape->getTextFrame()->getParagraphs()->get_Item($paragraphIndex);
        $portionCount = java_values($paragraph->getPortions()->getCount());
        for ($portionIndex = 0; $portionIndex < $portionCount; $portionIndex++) {
            $portion = $paragraph->getPortions()->get_Item($portionIndex);
            $portionFormat = $portion->getPortionFormat()->getEffective();
            $latinFont = $portionFormat->getLatinFont();
            $eastAsianFont = $portionFormat->getEastAsianFont();
            $complexScriptFont = $portionFormat->getComplexScriptFont();

            if ((!java_is_null($latinFont) && $latinFont->getFontName() == $targetFont) ||
                (!java_is_null($eastAsianFont) && $eastAsianFont->getFontName() == $targetFont) ||
                (!java_is_null($complexScriptFont) && $complexScriptFont->getFontName() == $targetFont)) {
                $portion->getPortionFormat()->setKerningMinimalSize(100);
            }
        }
    }

    $presentation->save("output.pptx", SaveFormat::Pptx);
} finally {
    $presentation->dispose();
}
閾値未満の該当テキストに対しては、この設定によりカーニングが無効になり、PowerPoint 固有の動作の影響を受けるフォントの Aspose.Slides のレンダリングを PowerPoint の視覚出力に合わせるのに役立ちます。
テキストフォントプロパティの管理
フォントプロパティは、ParagraphFormat::getDefaultPortionFormat を使用して段落レベルで設定するか、PortionFormat を使用して個々の部分で設定できます。
次の例は、最初の段落のデフォルトフォントを 12 ポイントの Times New Roman に設定し、太字、斜体、点線下線の書式を適用します。個々の部分での明示的な書式設定は、これらのデフォルトよりも優先されます。
use aspose\slides\FontData;
use aspose\slides\NullableBool;
use aspose\slides\Presentation;
use aspose\slides\SaveFormat;
use aspose\slides\TextUnderlineType;

$presentation = new Presentation("sample.pptx");
try {
    $slide = $presentation->getSlides()->get_Item(0);

    $autoShape = $slide->getShapes()->get_Item(0);
    $paragraph = $autoShape->getTextFrame()->getParagraphs()->get_Item(0);
    $defaultPortionFormat = $paragraph->getParagraphFormat()->getDefaultPortionFormat();
    $font = new FontData("Times New Roman");

    // 段落のフォントプロパティを設定します。
    $defaultPortionFormat->setFontHeight(12);
    $defaultPortionFormat->setFontBold(NullableBool::True);
    $defaultPortionFormat->setFontItalic(NullableBool::True);
    $defaultPortionFormat->setFontUnderline(TextUnderlineType::Dotted);
    $defaultPortionFormat->setLatinFont($font);

    $presentation->save("font_properties_for_paragraph.pptx", SaveFormat::Pptx);
} finally {
    $presentation->dispose();
}
結果:

次の例は、実効書式が太字である部分に対して 13 ポイントの Times New Roman、斜体、点線下線を適用します:
use aspose\slides\FontData;
use aspose\slides\NullableBool;
use aspose\slides\Presentation;
use aspose\slides\SaveFormat;
use aspose\slides\TextUnderlineType;

$presentation = new Presentation("sample.pptx");
try {
    $slide = $presentation->getSlides()->get_Item(0);

    $autoShape = $slide->getShapes()->get_Item(0);
    $paragraph = $autoShape->getTextFrame()->getParagraphs()->get_Item(0);
    $font = new FontData("Times New Roman");

    $portionCount = java_values($paragraph->getPortions()->getCount());
    for ($portionIndex = 0; $portionIndex < $portionCount; $portionIndex++) {
        $portion = $paragraph->getPortions()->get_Item($portionIndex);
        if (java_values($portion->getPortionFormat()->getEffective()->getFontBold())) {
            // テキスト部分のフォントプロパティを設定します。
            $portionFormat = $portion->getPortionFormat();
            $portionFormat->setFontHeight(13);
            $portionFormat->setFontItalic(NullableBool::True);
            $portionFormat->setFontUnderline(TextUnderlineType::Dotted);
            $portionFormat->setLatinFont($font);
        }
    }

    $presentation->save("font_properties_for_text_portions.pptx", SaveFormat::Pptx);
} finally {
    $presentation->dispose();
}
結果:

テキスト回転を設定
TextFrameFormat::setTextVerticalType を使用して、シェイプ内のテキストの事前定義された向きを設定します。
次のコード例は、シェイプ内のテキスト向きを TextVerticalType::Vertical270 に設定し、テキストを 反時計回りに90度 回転させます:
use aspose\slides\Presentation;
use aspose\slides\SaveFormat;
use aspose\slides\TextVerticalType;

$presentation = new Presentation("sample.pptx");
try {
    $slide = $presentation->getSlides()->get_Item(0);

    $autoShape = $slide->getShapes()->get_Item(0);
    $autoShape->getTextFrame()->getTextFrameFormat()->setTextVerticalType(TextVerticalType::Vertical270);

    $presentation->save("text_rotation.pptx", SaveFormat::Pptx);
} finally {
    $presentation->dispose();
}
結果:

テキストフレームのカスタム回転を設定
TextFrameFormat::setRotationAngle を使用して、TextFrame のカスタム回転角度を設定します。
次のコード例は、シェイプ内でテキストフレームを 時計回りに3度 回転させます:
use aspose\slides\Presentation;
use aspose\slides\SaveFormat;

$presentation = new Presentation("sample.pptx");
try {
    $slide = $presentation->getSlides()->get_Item(0);

    $autoShape = $slide->getShapes()->get_Item(0);
    $autoShape->getTextFrame()->getTextFrameFormat()->setRotationAngle(3);

    $presentation->save("custom_text_rotation.pptx", SaveFormat::Pptx);
} finally {
    $presentation->dispose();
}
結果:

段落の行間を設定
Aspose.Slides は、段落間隔を制御するために ParagraphFormat::setSpaceAfter、ParagraphFormat::setSpaceBefore、ParagraphFormat::setSpaceWithin を提供します。これらのプロパティは以下のように使用します:
- 正の値を使用して、行間を行の高さのパーセンテージで指定します。
- 負の値を使用して、行間をポイントで指定します。
次の例は、最初の段落の内部間隔を行の高さの 200%(二倍行間)に設定します:
use aspose\slides\Presentation;
use aspose\slides\SaveFormat;

$presentation = new Presentation("sample.pptx");
try {
    $slide = $presentation->getSlides()->get_Item(0);

    $autoShape = $slide->getShapes()->get_Item(0);

    $paragraph = $autoShape->getTextFrame()->getParagraphs()->get_Item(0);
    $paragraph->getParagraphFormat()->setSpaceWithin(200);

    $presentation->save("line_spacing.pptx", SaveFormat::Pptx);
} finally {
    $presentation->dispose();
}
結果:

改行制御
Paragraph の改行規則は、狭いテキストブロックやラテン文字と東アジア文字が混在するプレゼンテーションで役立ちます。以下のメソッドは ParagraphFormat に属し、段落全体に適用されます:
- setLatinLineBreak はラテン文字の改行規則を制御します。混在テキストでは、これを変更すると隣接する東アジア文字や句読点の改行位置も変わることがあります。
- setEastAsianLineBreak は東アジア文字の改行規則を制御し、行頭・行末の文字に対する制限を含みます。
これらの規則は、テキストフレーム内で自動折り返しを有効にする TextFrameFormat::setWrapText を置き換えるものではありません。折り返しが発生したときのレイアウトに影響を与えますが、改行文字を挿入するわけではありません。明示的な改行は、利用可能な幅に関係なく段落内に新しい行を強制します。
次の自己完結型例は、中国語とラテン文字を含む狭いテキストブロックを作成します。両方の改行オプションを明示的に設定し、“line_breaking.pptx” として保存します。各規則を試すには、もう一方の設定を固定したまま該当する値を変更します。例では 24 ポイントの Arial と SimSun を使用し、フレーム幅を 160 ポイント、水平テキストフレーム余白を 0 に設定しています。TextFrameFormat::setAutofitType を TextAutofitType::None で呼び出し、テキストサイズとフレーム寸法を固定します。
use aspose\slides\FillType;
use aspose\slides\FontData;
use aspose\slides\NullableBool;
use aspose\slides\Presentation;
use aspose\slides\SaveFormat;
use aspose\slides\ShapeType;
use aspose\slides\TextAlignment;
use aspose\slides\TextAutofitType;

$presentation = new Presentation();
try {
    $slide = $presentation->getSlides()->get_Item(0);

    $shape = $slide->getShapes()->addAutoShape(ShapeType::Rectangle, 50, 50, 160, 300);
    $shape->getFillFormat()->setFillType(FillType::NoFill);

    $textFrame = $shape->getTextFrame();
    $textFrame->getTextFrameFormat()->setWrapText(NullableBool::True);
    $textFrame->getTextFrameFormat()->setAutofitType(TextAutofitType::None);
    $textFrame->getTextFrameFormat()->setMarginLeft(0);
    $textFrame->getTextFrameFormat()->setMarginRight(0);

    $paragraph = $textFrame->getParagraphs()->get_Item(0);
    $paragraph->setText("中文排版测试,PowerPoint 中文演示。");

    $format = $paragraph->getParagraphFormat();
    $format->setAlignment(TextAlignment::Left);
    $format->getDefaultPortionFormat()->setFontHeight(24);
    $latinFont = new FontData("Arial");
    $format->getDefaultPortionFormat()->setLatinFont($latinFont);
    $eastAsianFont = new FontData("SimSun");
    $format->getDefaultPortionFormat()->setEastAsianFont($eastAsianFont);
    $format->getDefaultPortionFormat()->getFillFormat()->setFillType(FillType::Solid);
    $blackColor = java("java.awt.Color")->BLACK;
    $format->getDefaultPortionFormat()->getFillFormat()->getSolidFillColor()->setColor($blackColor);
    $format->setLatinLineBreak(NullableBool::False);
    $format->setEastAsianLineBreak(NullableBool::True);

    $presentation->save("line_breaking.pptx", SaveFormat::Pptx);
} finally {
    $presentation->dispose();
}
ハンギング句読点の制御
ParagraphFormat::setHangingPunctuation は、対象となる句読点が次の行を占有せず、テキスト行の右端を超えて伸びることを可能にします。段落全体に適用され、ハンギングインデントとは異なります。
次の自己完結型例は、幅 100 ポイントのテキストフレームでハンギング句読点を有効にし、“hanging_punctuation.pptx” として保存します。24 ポイントの Arial と水平テキストフレーム余白 0 の状態で、最後の句点は “sentence” の後に残り、右端を超えて表示されます。比較のためにプロパティを NullableBool::False に設定すると、句点が別行に配置されます。折り返しは有効でオートフィットは無効にして、利用可能幅を固定しています。
use aspose\slides\FillType;
use aspose\slides\FontData;
use aspose\slides\NullableBool;
use aspose\slides\Presentation;
use aspose\slides\SaveFormat;
use aspose\slides\ShapeType;
use aspose\slides\TextAlignment;
use aspose\slides\TextAutofitType;

$presentation = new Presentation();
try {
    $slide = $presentation->getSlides()->get_Item(0);

    $shape = $slide->getShapes()->addAutoShape(ShapeType::Rectangle, 50, 50, 100, 200);
    $shape->getFillFormat()->setFillType(FillType::NoFill);

    $textFrame = $shape->getTextFrame();
    $textFrame->getTextFrameFormat()->setWrapText(NullableBool::True);
    $textFrame->getTextFrameFormat()->setAutofitType(TextAutofitType::None);
    $textFrame->getTextFrameFormat()->setMarginLeft(0);
    $textFrame->getTextFrameFormat()->setMarginRight(0);

    $paragraph = $textFrame->getParagraphs()->get_Item(0);
    $paragraph->setText("Simple text, next sentence.");

    $format = $paragraph->getParagraphFormat();
    $format->setAlignment(TextAlignment::Left);
    $format->getDefaultPortionFormat()->setFontHeight(24);
    $latinFont = new FontData("Arial");
    $format->getDefaultPortionFormat()->setLatinFont($latinFont);
    $format->getDefaultPortionFormat()->getFillFormat()->setFillType(FillType::Solid);
    $blackColor = java("java.awt.Color")->BLACK;
    $format->getDefaultPortionFormat()->getFillFormat()->getSolidFillColor()->setColor($blackColor);
    $format->setHangingPunctuation(NullableBool::True);

    $presentation->save("hanging_punctuation.pptx", SaveFormat::Pptx);
} finally {
    $presentation->dispose();
}
すべての句読点がハンギングできるわけではありません。上記のフォントとレイアウト条件 もこの比較に適用されます。フォント、利用可能幅、余白、またはオートフィット設定を変更すると、目に見える違いがなくなることがあります。
テキストフレームのオートフィットタイプを設定
TextFrameFormat::setAutofitType は、テキストがコンテナの境界を超えたときの動作を決定します。テキストが縮小するか、はみ出すか、シェイプが自動的にサイズ変更されるかを制御します。次の例は、シェイプをテキストに合わせてサイズ変更するように構成し、結果を “autofit_type.pptx” として保存します。
use aspose\slides\Presentation;
use aspose\slides\SaveFormat;
use aspose\slides\TextAutofitType;

$presentation = new Presentation("sample.pptx");
try {
    $slide = $presentation->getSlides()->get_Item(0);

    $autoShape = $slide->getShapes()->get_Item(0);
    $autoShape->getTextFrame()->getTextFrameFormat()->setAutofitType(TextAutofitType::Shape);

    $presentation->save("autofit_type.pptx", SaveFormat::Pptx);
} finally {
    $presentation->dispose();
}
自動折り返し後の行数をカウントし、テキストまたはシェイプの幅の変化が結果に与える影響を確認するには、描画された行数のカウント を参照してください。行数だけではテキストがコンテナからはみ出しているかどうかは判断できません。
テキストフレームのアンカーを設定
TextFrameFormat::setAnchoringType は、テキストをシェイプ内の上部、中央、下部など垂直方向に配置する方法を定義します。次の例はテキストを最初のシェイプの下部にアンカーし、結果を “text_anchor.pptx” として保存します。
use aspose\slides\Presentation;
use aspose\slides\SaveFormat;
use aspose\slides\TextAnchorType;

$presentation = new Presentation("sample.pptx");
try {
    $slide = $presentation->getSlides()->get_Item(0);

    $autoShape = $slide->getShapes()->get_Item(0);
    $autoShape->getTextFrame()->getTextFrameFormat()->setAnchoringType(TextAnchorType::Bottom);

    $presentation->save("text_anchor.pptx", SaveFormat::Pptx);
} finally {
    $presentation->dispose();
}
テキストのタブ設定
ParagraphFormat::setDefaultTabSize と ParagraphFormat::getTabs を使用して、段落内のタブストップを構成します。次の例はデフォルトタブ間隔を 100 ポイントに設定し、30 ポイントに左揃えタブストップを追加します。これらの設定はタブ文字を含むテキストに影響します。
use aspose\slides\Presentation;
use aspose\slides\SaveFormat;
use aspose\slides\TabAlignment;

$presentation = new Presentation("sample.pptx");
try {
    $slide = $presentation->getSlides()->get_Item(0);

    $autoShape = $slide->getShapes()->get_Item(0);

    $paragraph = $autoShape->getTextFrame()->getParagraphs()->get_Item(0);
    $paragraph->getParagraphFormat()->setDefaultTabSize(100);
    $paragraph->getParagraphFormat()->getTabs()->add(30, TabAlignment::Left);

    $presentation->save("paragraph_tabs.pptx", SaveFormat::Pptx);
} finally {
    $presentation->dispose();
}
結果:

校正言語を設定
Aspose.Slides は、テキスト部分の校正言語を設定できる BasePortionFormat::setLanguageId を提供します。校正言語は PowerPoint でのスペルチェックや文法チェックに使用される言語を決定します。
次の例は、最初のスライドの最初のシェイプがテキストボックスである “presentation.pptx” が必要です。最初の段落の内容を “1。” に置き換え、フォントを SimSun に設定し、校正言語を簡体字中国語 (zh-CN) に割り当てます。結果は “proofing_language.pptx” として保存されます:
use aspose\slides\FontData;
use aspose\slides\Portion;
use aspose\slides\Presentation;
use aspose\slides\SaveFormat;

$presentation = new Presentation("presentation.pptx");
try {
    $slide = $presentation->getSlides()->get_Item(0);

    $autoShape = $slide->getShapes()->get_Item(0);

    $paragraph = $autoShape->getTextFrame()->getParagraphs()->get_Item(0);
    $paragraph->getPortions()->clear();

    $font = new FontData("SimSun");

    $textPortion = new Portion();
    $textPortion->getPortionFormat()->setComplexScriptFont($font);
    $textPortion->getPortionFormat()->setEastAsianFont($font);
    $textPortion->getPortionFormat()->setLatinFont($font);

    // 校正言語の Id を設定します。
    $textPortion->getPortionFormat()->setLanguageId("zh-CN");

    $textPortion->setText("1。");
    $paragraph->getPortions()->add($textPortion);

    $presentation->save("proofing_language.pptx", SaveFormat::Pptx);
} finally {
    $presentation->dispose();
}
デフォルト言語を設定
LoadOptions::setDefaultTextLanguage を使用して、プレゼンテーションの読み込みまたは作成時に作成されるテキストのデフォルト言語を定義します。次の例はデフォルトテキスト言語として米国英語を設定したプレゼンテーションを作成し、テキストボックスを追加し、最初のテキスト部分の言語コードとして en-US を出力します。
use aspose\slides\LoadOptions;
use aspose\slides\Presentation;
use aspose\slides\ShapeType;

$loadOptions = new LoadOptions();
$loadOptions->setDefaultTextLanguage("en-US");

$presentation = new Presentation($loadOptions);
try {
    $slide = $presentation->getSlides()->get_Item(0);

    // 新しい矩形シェイプをテキスト付きで追加します。
    $shape = $slide->getShapes()->addAutoShape(ShapeType::Rectangle, 20, 20, 150, 50);
    $shape->getTextFrame()->setText("Sample text");

    // 最初のテキスト部分の言語を確認します。
    $portion = $shape->getTextFrame()->getParagraphs()->get_Item(0)->getPortions()->get_Item(0);
    echo $portion->getPortionFormat()->getLanguageId();
} finally {
    $presentation->dispose();
}
デフォルトテキストスタイルを設定
プレゼンテーションレベルでデフォルトのテキスト書式設定を適用するには、Presentation::getDefaultTextStyle を使用します。
次の例は、新しいプレゼンテーションのトップレベル段落のデフォルトとして 14 ポイントの太字フォントを設定し、結果を “default_text_style.pptx” として保存します。テキストはこれらのデフォルトを継承できますが、より具体的な書式設定が上書きします。
use aspose\slides\NullableBool;
use aspose\slides\Presentation;
use aspose\slides\SaveFormat;

$presentation = new Presentation();
try {
    // トップレベルの段落書式を取得します。
    $paragraphFormat = $presentation->getDefaultTextStyle()->getLevel(0);

    if (!java_is_null($paragraphFormat)) {
        $paragraphFormat->getDefaultPortionFormat()->setFontHeight(14);
        $paragraphFormat->getDefaultPortionFormat()->setFontBold(NullableBool::True);
    }

    $presentation->save("default_text_style.pptx", SaveFormat::Pptx);
} finally {
    $presentation->dispose();
}
All Caps の効果でテキストを抽出
PowerPoint では、All Caps フォント効果を適用すると、元が小文字で入力されていてもスライド上では大文字で表示されます。Aspose.Slides でそのようなテキスト部分を取得すると、ライブラリは入力時のテキストをそのまま返します。表示されたテキストと一致させるには、TextCapType を確認し、値が All の場合は返された文字列を大文字に変換します。
この例は、最初のスライドの最初のシェイプがテキストボックスである “sample2.pptx” が必要です。最初の段落の最初の部分に All Caps 効果が適用された “Hello, Aspose!” が含まれています(下図参照)。

以下のコード例は、All Caps 効果が適用されたテキストを抽出する方法を示します:
use aspose\slides\Presentation;
use aspose\slides\TextCapType;

$presentation = new Presentation("sample2.pptx");
try {
    $slide = $presentation->getSlides()->get_Item(0);

    $autoShape = $slide->getShapes()->get_Item(0);
    $textPortion = $autoShape->getTextFrame()->getParagraphs()->get_Item(0)->getPortions()->get_Item(0);

    $originalText = $textPortion->getText();
    echo "Original text: ", $originalText, "\n";

    $textFormat = $textPortion->getPortionFormat()->getEffective();
    if (java_values($textFormat->getTextCapType()) === TextCapType::All) {
        $text = strtoupper($originalText);
        echo "All-Caps effect: ", $text, "\n";
    }
} finally {
    $presentation->dispose();
}
出力:
Original text: Hello, Aspose!
All-Caps effect: HELLO, ASPOSE!
よくある質問
スライド上のテーブルのテキストを変更するにはどうすればよいですか?
スライド上のテーブルのテキストを変更するには、Table を使用します。セルを反復処理し、各セルを Cell::getTextFrame で更新し、Paragraph::getParagraphFormat で段落書式を設定します。
PowerPoint スライドのテキストにグラデーションカラーを適用するにはどうすればよいですか?
テキストにグラデーションカラーを適用するには、BasePortionFormat::getFillFormat を使用します。FillFormat::setFillType を FillType::Gradient に設定し、グラデーションストップ、方向、透明度を構成します。