
จัดรูปแบบข้อความการนำเสนอใน PHP
ภาพรวม
บทความนี้แสดงวิธีการจัดรูปแบบข้อความในงานนำเสนอ PowerPoint และ OpenDocument โดยใช้ Aspose.Slides สำหรับ PHP ผ่าน Java. มันครอบคลุมสีพื้นหลัง, ความโปร่งใส, การเว้นระยะระหว่างอักขระ, คุณสมบัติฟอนต์, การหมุน, การเว้นระยะย่อหน้า, พฤติกรรม autofit, การยึดข้อความ, จุดหยุดแท็บ, และการตั้งค่าภาษา.
หากไม่ได้ระบุเป็นอย่างอื่น ตัวอย่างจะใช้ sample.pptx. รูปทรงแรกบนสไลด์แรกเป็นกล่องข้อความ, และย่อหน้แรกของมันมีข้อความที่แสดงด้านล่าง ทั้งดัชนีของสไลด์และรูปทรงเริ่มนับจากศูนย์ ตัวอย่างที่เลือกส่วนที่หนาใช้การจัดรูปแบบที่มีผล, รวมถึงการจัดรูปแบบหนาที่สืบทอด:

เพื่อค้นหาและเน้นข้อความตามตัวอักษรหรือการจับคู่ด้วย regular-expression, ดูที่ ค้นหาและแทนที่ข้อความ.
ตั้งค่าสีพื้นหลังของข้อความ
ใช้ ParagraphFormat::getDefaultPortionFormat เพื่อกำหนดสีไฮไลท์เริ่มต้นสำหรับย่อหน้า, หรือใช้ BasePortionFormat::getHighlightColor สำหรับส่วนข้อความแต่ละส่วน.
ตัวอย่างต่อไปนี้ตั้งค่าการไฮไลท์สีเทาอ่อนเป็นค่าเริ่มต้นสำหรับย่อหน้าแรก. สีไฮไลท์ที่ระบุโดยเฉพาะบนส่วนข้อความแต่ละส่วนจะมีลำดับความสำคัญสูงกว่าค่าเริ่มต้นนี้:
use aspose\slides\Presentation;
use aspose\slides\SaveFormat;

$presentation = new Presentation("sample.pptx");
try {
    $slide = $presentation->getSlides()->get_Item(0);

    $autoShape = $slide->getShapes()->get_Item(0);
    $paragraph = $autoShape->getTextFrame()->getParagraphs()->get_Item(0);
    $highlightColor = java("java.awt.Color")->LIGHT_GRAY;

    // กำหนดสีไฮไลท์สำหรับย่อหน้าทั้งหมด.
    $paragraph->getParagraphFormat()->getDefaultPortionFormat()->getHighlightColor()->setColor($highlightColor);

    $presentation->save("gray_paragraph.pptx", SaveFormat::Pptx);
} finally {
    $presentation->dispose();
}
ผลลัพธ์:

ตัวอย่างโค้ดด้านล่างแสดงวิธีการตั้งค่าสีพื้นหลังสำหรับ ส่วนข้อความที่มีฟอนต์หนา:
use aspose\slides\Presentation;
use aspose\slides\SaveFormat;

$presentation = new Presentation("sample.pptx");
try {
    $slide = $presentation->getSlides()->get_Item(0);

    $autoShape = $slide->getShapes()->get_Item(0);
    $paragraph = $autoShape->getTextFrame()->getParagraphs()->get_Item(0);
    $highlightColor = java("java.awt.Color")->LIGHT_GRAY;

    $portionCount = java_values($paragraph->getPortions()->getCount());
    for ($portionIndex = 0; $portionIndex < $portionCount; $portionIndex++) {
        $portion = $paragraph->getPortions()->get_Item($portionIndex);
        if (java_values($portion->getPortionFormat()->getEffective()->getFontBold())) {
            // กำหนดสีไฮไลท์สำหรับส่วนข้อความ.
            $portion->getPortionFormat()->getHighlightColor()->setColor($highlightColor);
        }
    }

    $presentation->save("gray_text_portions.pptx", SaveFormat::Pptx);
} finally {
    $presentation->dispose();
}
ผลลัพธ์:

จัดแนวย่อหน้าข้อความ
ใช้ ParagraphFormat::setAlignment เพื่อกำหนดการจัดแนวย่อหน้าภายในกรอบข้อความ. ค่าที่กำหนดอาจเป็นจัดกึ่งกลาง, จัดซ้าย, จัดขวา, จัดชิดข้าง, เป็นต้น.
ตัวอย่างโค้ดต่อไปนี้แสดงวิธีการจัดแนวย่อหน้าให้อยู่ กึ่งกลาง:
use aspose\slides\Presentation;
use aspose\slides\SaveFormat;
use aspose\slides\TextAlignment;

$presentation = new Presentation("sample.pptx");
try {
    $slide = $presentation->getSlides()->get_Item(0);

    $autoShape = $slide->getShapes()->get_Item(0);
    $paragraph = $autoShape->getTextFrame()->getParagraphs()->get_Item(0);

    // ตั้งค่าการจัดแนวของย่อหน้าเป็นกึ่งกลาง.
    $paragraph->getParagraphFormat()->setAlignment(TextAlignment::Center);

    $presentation->save("aligned_paragraph.pptx", SaveFormat::Pptx);
} finally {
    $presentation->dispose();
}
ผลลัพธ์:

จัดแนวฟอนต์ภายในบรรทัด
ใช้ ParagraphFormat::setFontAlignment เพื่อจัดแนวตามแนวตั้งของส่วนข้อความที่มีขนาดฟอนต์ต่างกันภายในบรรทัด. การตั้งค่านี้ใช้กับย่อหน้าทั้งหมดและควบคุมการจัดแนวภายในแต่ละบรรทัดของมัน.
ตัวอย่างที่ทำงานอิสระต่อไปนี้สร้างกล่องข้อความที่มีป้ายกำกับสี่กล่องบนสไลด์เดียว. แต่ละย่อหน้ามีข้อความเดียวกันที่ขนาด 18, 36, และ 54 จุด, โดยมีการจัดแนวฟอนต์ที่ต่างกัน. ตัวอย่างใช้ Arial, ปิดการใช้งาน autofit และการห่อข้อความ, และทำให้กรอบข้อความใหญ่พอสำหรับบรรทัดเดียว.
use aspose\slides\FillType;
use aspose\slides\FontAlignment;
use aspose\slides\FontData;
use aspose\slides\NullableBool;
use aspose\slides\Paragraph;
use aspose\slides\Portion;
use aspose\slides\Presentation;
use aspose\slides\SaveFormat;
use aspose\slides\ShapeType;
use aspose\slides\TextAlignment;
use aspose\slides\TextAnchorType;
use aspose\slides\TextAutofitType;

$presentation = new Presentation();
try {
    $slide = $presentation->getSlides()->get_Item(0);

    $alignments = [FontAlignment::Baseline, FontAlignment::Top, FontAlignment::Center, FontAlignment::Bottom];
    $alignmentNames = ["Baseline", "Top", "Center", "Bottom"];
    $fontSizes = [18, 36, 54];
    $font = new FontData("Arial");
    $gray = java("java.awt.Color")->GRAY;
    $black = java("java.awt.Color")->BLACK;

    for ($i = 0; $i < count($alignments); $i++) {
        $shape = $slide->getShapes()->addAutoShape(ShapeType::Rectangle, 30, 20 + $i * 130, 660, 120);
        $shape->getFillFormat()->setFillType(FillType::NoFill);
        $shape->getLineFormat()->getFillFormat()->setFillType(FillType::NoFill);

        $textFrame = $shape->getTextFrame();
        $textFrame->getTextFrameFormat()->setAnchoringType(TextAnchorType::Top);
        $textFrame->getTextFrameFormat()->setAutofitType(TextAutofitType::None);
        $textFrame->getTextFrameFormat()->setWrapText(NullableBool::False);

        $label = $textFrame->getParagraphs()->get_Item(0);
        $label->setText($alignmentNames[$i]);
        $label->getParagraphFormat()->setAlignment(TextAlignment::Left);
        $label->getParagraphFormat()->getDefaultPortionFormat()->setFontHeight(14);
        $label->getParagraphFormat()->getDefaultPortionFormat()->setLatinFont($font);
        $label->getParagraphFormat()->getDefaultPortionFormat()->getFillFormat()->setFillType(FillType::Solid);
        $label->getParagraphFormat()->getDefaultPortionFormat()->getFillFormat()->getSolidFillColor()->setColor($gray);

        $paragraph = new Paragraph();
        $paragraph->getParagraphFormat()->setFontAlignment($alignments[$i]);
        $paragraph->getParagraphFormat()->setAlignment(TextAlignment::Left);
        $paragraph->getParagraphFormat()->getDefaultPortionFormat()->setLatinFont($font);
        $paragraph->getParagraphFormat()->getDefaultPortionFormat()->getFillFormat()->setFillType(FillType::Solid);
        $paragraph->getParagraphFormat()->getDefaultPortionFormat()->getFillFormat()->getSolidFillColor()->setColor($black);

        foreach ($fontSizes as $fontSize) {
            $portion = new Portion("Ag ");
            $portion->getPortionFormat()->setFontHeight($fontSize);
            $paragraph->getPortions()->add($portion);
        }

        $textFrame->getParagraphs()->add($paragraph);
    }

    $presentation->save("font_alignment.pptx", SaveFormat::Pptx);
} finally {
    $presentation->dispose();
}
ผลลัพธ์:
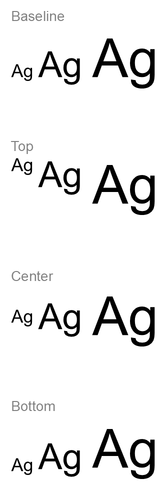
การจัดแนวฟอนต์ใช้เมตริกของฟอนต์, ดังนั้นขอบที่มองเห็นของตัวอักษรแต่ละตัวอาจไม่ตรงกันอย่างสมบูรณ์. ตัวอย่างรวมทั้งอักษรพิมพ์ใหญ่และตัวลงล่างเพื่อช่วยแสดงความแตกต่างระหว่างการจัดแนว baseline กับ bottom. ความพร้อมของฟอนต์และการทดแทน, ตัวอักษรที่ใช้, และความแตกต่างของขนาดฟอนต์มีผลต่อผลลัพธ์. มิติของกรอบ, ระยะขอบ, ระยะห่างบรรทัด, การห่อ, และ autofit ก็ส่งผลต่อการจัดวาง; ใช้ฟอนต์และการตั้งค่าการจัดวางเดียวกันเมื่อเปรียบเทียบโหมด.
การตั้งค่านี้แตกต่างจาก ParagraphFormat::setAlignment, ซึ่งควบคุมการจัดแนวย่อหน้าในแนวนอน, และ TextFrameFormat::setAnchoringType, ซึ่งกำหนดตำแหน่งบล็อกข้อความในแนวตั้งภายในรูปร่าง. การจัดรูปแบบตัวตัวยกและตัวย่อผ่าน BasePortionFormat::setEscapement จะย้ายส่วนข้อความแต่ละส่วนสัมพันธ์กับ baseline แทนการตั้งค่าการจัดแนวฟอนต์สำหรับบรรทัดของย่อหน้า.
ตั้งค่าความโปร่งแสงของข้อความ
ความโปร่งแสงของข้อความควบคุมโดยส่วนอัลฟาของสีที่กำหนดให้กับ BasePortionFormat::getFillFormat. ในตัวอย่างด้านล่าง, alpha = 50 คือค่าช่องอัลฟา ARGB ในช่วง 0–255, ไม่ใช่เปอร์เซ็นต์ความโปร่งแสง.
ตัวอย่างโค้ดด้านล่างแสดงวิธีการใช้ความโปร่งแสงกับ ย่อหน้าทั้งหมด:
use aspose\slides\FillType;
use aspose\slides\Presentation;
use aspose\slides\SaveFormat;

$alpha = 50;

$presentation = new Presentation("sample.pptx");
try {
    $slide = $presentation->getSlides()->get_Item(0);

    $autoShape = $slide->getShapes()->get_Item(0);
    $paragraph = $autoShape->getTextFrame()->getParagraphs()->get_Item(0);
    $fillFormat = $paragraph->getParagraphFormat()->getDefaultPortionFormat()->getFillFormat();

    // ตั้งค่าสีเติมของข้อความเป็นสีโปร่งแสง.
    $fillFormat->setFillType(FillType::Solid);
    $transparentColor = new Java("java.awt.Color", 0, 0, 0, $alpha);
    $fillFormat->getSolidFillColor()->setColor($transparentColor);

    $presentation->save("transparent_paragraph.pptx", SaveFormat::Pptx);
} finally {
    $presentation->dispose();
}
ผลลัพธ์:

ตัวอย่างโค้ดต่อไปนี้แสดงวิธีการใช้ความโปร่งแสงกับ ส่วนข้อความที่มีฟอนต์หนา:
use aspose\slides\FillType;
use aspose\slides\Presentation;
use aspose\slides\SaveFormat;

$alpha = 50;

$presentation = new Presentation("sample.pptx");
try {
    $slide = $presentation->getSlides()->get_Item(0);

    $autoShape = $slide->getShapes()->get_Item(0);
    $paragraph = $autoShape->getTextFrame()->getParagraphs()->get_Item(0);
    $transparentColor = new Java("java.awt.Color", 0, 0, 0, $alpha);

    $portionCount = java_values($paragraph->getPortions()->getCount());
    for ($portionIndex = 0; $portionIndex < $portionCount; $portionIndex++) {
        $portion = $paragraph->getPortions()->get_Item($portionIndex);
        if (java_values($portion->getPortionFormat()->getEffective()->getFontBold())) {
            // ตั้งค่าความโปร่งใสของส่วนข้อความ.
            $fillFormat = $portion->getPortionFormat()->getFillFormat();
            $fillFormat->setFillType(FillType::Solid);
            $fillFormat->getSolidFillColor()->setColor($transparentColor);
        }
    }

    $presentation->save("transparent_text_portions.pptx", SaveFormat::Pptx);
} finally {
    $presentation->dispose();
}
ผลลัพธ์:

ตั้งค่าการเว้นระยะระหว่างอักขระของข้อความ
ใช้ BasePortionFormat::setSpacing เพื่อขยายหรือหดระยะห่างระหว่างอักขระในกล่องข้อความ. ตัวอย่างเพิ่มระยะห่าง 3 จุด; ค่าติดลบทำให้ข้อความหด.
โค้ด PHP ด้านล่างแสดงวิธีขยายการเว้นระยะอักขระใน ย่อหน้าทั้งหมด:
use aspose\slides\Presentation;
use aspose\slides\SaveFormat;

$presentation = new Presentation("sample.pptx");
try {
    $slide = $presentation->getSlides()->get_Item(0);

    $autoShape = $slide->getShapes()->get_Item(0);
    $paragraph = $autoShape->getTextFrame()->getParagraphs()->get_Item(0);

    // หมายเหตุ: ใช้ค่าติดลบเพื่อบีบอัดการเว้นระยะอักขระ.
    $paragraph->getParagraphFormat()->getDefaultPortionFormat()->setSpacing(3); // ขยายการเว้นระยะอักขระ.

    $presentation->save("character_spacing_in_paragraph.pptx", SaveFormat::Pptx);
} finally {
    $presentation->dispose();
}
ผลลัพธ์:

ตัวอย่างโค้ดต่อไปนี้แสดงวิธีขยายการเว้นระยะอักขระใน ส่วนข้อความที่มีฟอนต์หนา:
use aspose\slides\Presentation;
use aspose\slides\SaveFormat;

$presentation = new Presentation("sample.pptx");
try {
    $slide = $presentation->getSlides()->get_Item(0);

    $autoShape = $slide->getShapes()->get_Item(0);
    $paragraph = $autoShape->getTextFrame()->getParagraphs()->get_Item(0);

    $portionCount = java_values($paragraph->getPortions()->getCount());
    for ($portionIndex = 0; $portionIndex < $portionCount; $portionIndex++) {
        $portion = $paragraph->getPortions()->get_Item($portionIndex);
        if (java_values($portion->getPortionFormat()->getEffective()->getFontBold())) {
            // หมายเหตุ: ใช้ค่าติดลบเพื่อบีบอัดการเว้นระยะอักขระ.
            $portion->getPortionFormat()->setSpacing(3); // ขยายการเว้นระยะอักขระ.
        }
    }

    $presentation->save("character_spacing_in_text_portions.pptx", SaveFormat::Pptx);
} finally {
    $presentation->dispose();
}
ผลลัพธ์:

ปิดการ Kerning สำหรับฟอนต์เฉพาะ
ในบางกรณี, ข้อความที่แสดงโดย Aspose.Slides อาจดูแคบกว่าข้อความเดียวกันที่แสดงใน PowerPoint เล็กน้อย. สิ่งนี้อาจเกิดขึ้นเนื่องจาก PowerPoint อาจละเลยข้อมูล kerning สำหรับฟอนต์บางตัว, แม้ว่าฟอนต์นั้นจะมีข้อมูล kerning ที่ถูกต้องและได้เปิดใช้งาน kerning ในการตั้งค่าของ PowerPoint.
เพื่อทำให้ผลลัพธ์ที่แสดงใกล้เคียงกับ PowerPoint ในกรณีดังกล่าว, คุณสามารถปิดการ kerning สำหรับส่วนข้อความที่ใช้ฟอนต์ที่ได้รับผลกระทบ. ตั้งค่า BasePortionFormat::setKerningMinimalSize เป็นค่าที่มากกว่าขนาดฟอนต์จริง. ตัวอย่างนี้ต้องการไฟล์ “presentation.pptx” ที่มีกล่องข้อความเป็นรูปร่างแรกบนสไลด์แรก. มันตรวจสอบชื่อฟอนต์ที่มีผล, รวมถึงฟอนต์ที่สืบทอด, และตั้งค่าขีดจำกัด 100 จุดสำหรับส่วนที่ใช้ Roboto. นี้จะปิด kerning สำหรับส่วนที่ตรงกันที่มีขนาดฟอนต์น้อยกว่า 100 จุด:
use aspose\slides\Presentation;
use aspose\slides\SaveFormat;

$presentation = new Presentation("presentation.pptx");
try {
    $slide = $presentation->getSlides()->get_Item(0);

    $autoShape = $slide->getShapes()->get_Item(0);
    $targetFont = "Roboto";

    $paragraphCount = java_values($autoShape->getTextFrame()->getParagraphs()->getCount());
    for ($paragraphIndex = 0; $paragraphIndex < $paragraphCount; $paragraphIndex++) {
        $paragraph = $autoShape->getTextFrame()->getParagraphs()->get_Item($paragraphIndex);
        $portionCount = java_values($paragraph->getPortions()->getCount());
        for ($portionIndex = 0; $portionIndex < $portionCount; $portionIndex++) {
            $portion = $paragraph->getPortions()->get_Item($portionIndex);
            $portionFormat = $portion->getPortionFormat()->getEffective();
            $latinFont = $portionFormat->getLatinFont();
            $eastAsianFont = $portionFormat->getEastAsianFont();
            $complexScriptFont = $portionFormat->getComplexScriptFont();

            if ((!java_is_null($latinFont) && $latinFont->getFontName() == $targetFont) ||
                (!java_is_null($eastAsianFont) && $eastAsianFont->getFontName() == $targetFont) ||
                (!java_is_null($complexScriptFont) && $complexScriptFont->getFontName() == $targetFont)) {
                $portion->getPortionFormat()->setKerningMinimalSize(100);
            }
        }
    }

    $presentation->save("output.pptx", SaveFormat::Pptx);
} finally {
    $presentation->dispose();
}
สำหรับข้อความที่ตรงกับเกณฑ์แต่มีขนาดต่ำกว่าขีดจำกัดนี้, การตั้งค่านี้จะป้องกัน kerning และสามารถช่วยให้การแสดงผลของ Aspose.Slides สอดคล้องกับผลลัพธ์ภาพของ PowerPoint สำหรับฟอนต์ที่ได้รับผลกระทบจากพฤติกรรมเฉพาะของ PowerPoint นี้.
จัดการคุณสมบัติฟอนต์ของข้อความ
คุณสมบัติฟอนต์สามารถตั้งค่าได้ระดับย่อหน้าโดยใช้ ParagraphFormat::getDefaultPortionFormat หรือบนส่วนข้อความแต่ละส่วนโดยใช้ PortionFormat.
ตัวอย่างต่อไปนี้ตั้งค่าฟอนต์เริ่มต้นของย่อหน้าแรกเป็น Times New Roman ขนาด 12 จุด พร้อมการจัดรูปแบบหนา, เอน, และขีดเส้นประใต้. การจัดรูปแบบที่ระบุโดยเฉพาะบนส่วนข้อความแต่ละส่วนจะมีลำดับความสำคัญสูงกว่าค่าดีฟอลท์เหล่านี้.
use aspose\slides\FontData;
use aspose\slides\NullableBool;
use aspose\slides\Presentation;
use aspose\slides\SaveFormat;
use aspose\slides\TextUnderlineType;

$presentation = new Presentation("sample.pptx");
try {
    $slide = $presentation->getSlides()->get_Item(0);

    $autoShape = $slide->getShapes()->get_Item(0);
    $paragraph = $autoShape->getTextFrame()->getParagraphs()->get_Item(0);
    $defaultPortionFormat = $paragraph->getParagraphFormat()->getDefaultPortionFormat();
    $font = new FontData("Times New Roman");

    // ตั้งค่าคุณสมบัติฟอนต์สำหรับย่อหน้า.
    $defaultPortionFormat->setFontHeight(12);
    $defaultPortionFormat->setFontBold(NullableBool::True);
    $defaultPortionFormat->setFontItalic(NullableBool::True);
    $defaultPortionFormat->setFontUnderline(TextUnderlineType::Dotted);
    $defaultPortionFormat->setLatinFont($font);

    $presentation->save("font_properties_for_paragraph.pptx", SaveFormat::Pptx);
} finally {
    $presentation->dispose();
}
ผลลัพธ์:

ตัวอย่างต่อไปนี้ใช้ Times New Roman ขนาด 13 จุด, การจัดรูปแบบเอน, และขีดเส้นประใต้สำหรับส่วนที่มีการจัดรูปแบบผลลัพธ์เป็นตัวหนา:
use aspose\slides\FontData;
use aspose\slides\NullableBool;
use aspose\slides\Presentation;
use aspose\slides\SaveFormat;
use aspose\slides\TextUnderlineType;

$presentation = new Presentation("sample.pptx");
try {
    $slide = $presentation->getSlides()->get_Item(0);

    $autoShape = $slide->getShapes()->get_Item(0);
    $paragraph = $autoShape->getTextFrame()->getParagraphs()->get_Item(0);
    $font = new FontData("Times New Roman");

    $portionCount = java_values($paragraph->getPortions()->getCount());
    for ($portionIndex = 0; $portionIndex < $portionCount; $portionIndex++) {
        $portion = $paragraph->getPortions()->get_Item($portionIndex);
        if (java_values($portion->getPortionFormat()->getEffective()->getFontBold())) {
            // ตั้งค่าคุณสมบัติฟอนต์สำหรับส่วนข้อความ.
            $portionFormat = $portion->getPortionFormat();
            $portionFormat->setFontHeight(13);
            $portionFormat->setFontItalic(NullableBool::True);
            $portionFormat->setFontUnderline(TextUnderlineType::Dotted);
            $portionFormat->setLatinFont($font);
        }
    }

    $presentation->save("font_properties_for_text_portions.pptx", SaveFormat::Pptx);
} finally {
    $presentation->dispose();
}
ผลลัพธ์:

ตั้งค่าการหมุนของข้อความ
ใช้ TextFrameFormat::setTextVerticalType เพื่อตั้งค่าการวางแนวข้อความที่กำหนดไว้ล่วงหน้าภายในรูปร่าง.
ตัวอย่างโค้ดต่อไปนี้ตั้งค่าการวางแนวข้อความในรูปร่างเป็น TextVerticalType::Vertical270, ซึ่งจะหมุนข้อความ 90 องศาในแนวทวนเข็มนาฬิกา:
use aspose\slides\Presentation;
use aspose\slides\SaveFormat;
use aspose\slides\TextVerticalType;

$presentation = new Presentation("sample.pptx");
try {
    $slide = $presentation->getSlides()->get_Item(0);

    $autoShape = $slide->getShapes()->get_Item(0);
    $autoShape->getTextFrame()->getTextFrameFormat()->setTextVerticalType(TextVerticalType::Vertical270);

    $presentation->save("text_rotation.pptx", SaveFormat::Pptx);
} finally {
    $presentation->dispose();
}
ผลลัพธ์:

ตั้งค่าการหมุนแบบกำหนดเองสำหรับกรอบข้อความ
ใช้ TextFrameFormat::setRotationAngle เพื่อกำหนดมุมการหมุนแบบกำหนดเองสำหรับ TextFrame.
ตัวอย่างโค้ดด้านล่างหมุนกรอบข้อความโดย 3 องศาในแนวเข็มนาฬิกาภายในรูปร่าง:
use aspose\slides\Presentation;
use aspose\slides\SaveFormat;

$presentation = new Presentation("sample.pptx");
try {
    $slide = $presentation->getSlides()->get_Item(0);

    $autoShape = $slide->getShapes()->get_Item(0);
    $autoShape->getTextFrame()->getTextFrameFormat()->setRotationAngle(3);

    $presentation->save("custom_text_rotation.pptx", SaveFormat::Pptx);
} finally {
    $presentation->dispose();
}
ผลลัพธ์:

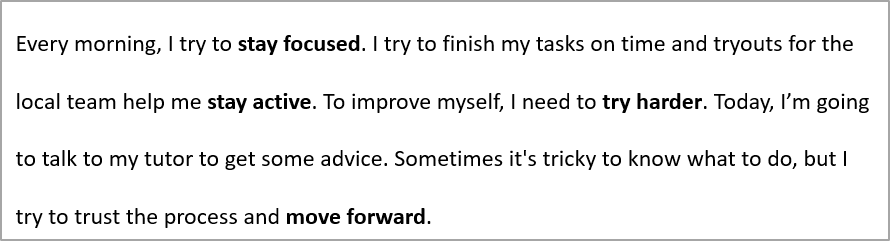
ตั้งค่าการเว้นระยะบรรทัดของย่อหน้า
Aspose.Slides มี ParagraphFormat::setSpaceAfter, ParagraphFormat::setSpaceBefore, และ ParagraphFormat::setSpaceWithin เพื่อควบคุมการเว้นระยะของย่อหน้า. คุณสมบัติเหล่านี้ใช้ดังนี้:
- ใช้ค่าบวกเพื่อระบุการเว้นระยะบรรทัดเป็นเปอร์เซ็นต์ของความสูงบรรทัด.
- ใช้ค่าลบเพื่อระบุการเว้นระยะบรรทัดเป็นจุด.
ตัวอย่างต่อไปนี้ตั้งค่าการเว้นระยะภายในย่อหน้าแรกเป็น 200% ของความสูงบรรทัด (เว้นระยะสองเท่า):
use aspose\slides\Presentation;
use aspose\slides\SaveFormat;

$presentation = new Presentation("sample.pptx");
try {
    $slide = $presentation->getSlides()->get_Item(0);

    $autoShape = $slide->getShapes()->get_Item(0);

    $paragraph = $autoShape->getTextFrame()->getParagraphs()->get_Item(0);
    $paragraph->getParagraphFormat()->setSpaceWithin(200);

    $presentation->save("line_spacing.pptx", SaveFormat::Pptx);
} finally {
    $presentation->dispose();
}
ผลลัพธ์:
ควบคุมการตัดบรรทัด
กฎการตัดบรรทัดของย่อหน้ามีประโยชน์ในบล็อกข้อความแคบและการนำเสนอที่ผสมข้อความละตินและเอเชียตะวันออก. วิธีต่อไปนี้เป็นสมาชิกของ ParagraphFormat, ดังนั้นจึงใช้กับย่อหน้าทั้งหมด:
- setLatinLineBreak ควบคุมกฎการตัดบรรทัดของข้อความละติน. ในข้อความผสม, การเปลี่ยนค่าอาจทำให้ตำแหน่งการห่อของข้อความเอเชียตะวันออกและเครื่องหมายวรรคตอนที่อยู่ติดกันเปลี่ยนไป.
- setEastAsianLineBreak ควบคุมกฎการตัดบรรทัดของข้อความเอเชียตะวันออก, รวมถึงข้อจำกัดของอักขระที่อยู่ต้นหรือท้ายบรรทัด.
กฎเหล่านี้ไม่ทดแทน TextFrameFormat::setWrapText, ซึ่งเปิดใช้งานการห่ออัตโนมัติภายในกรอบข้อความ. พวกมันมีผลต่อการจัดวางเมื่อมีการห่อ; ไม่ได้แทรกอักขระการตัดบรรทัด. การตัดบรรทัดโดยตรงบังคับให้มีบรรทัดใหม่ภายในย่อหน้าโดยไม่คำนึงถึงความกว้างที่มี.
ตัวอย่างที่ทำงานอิสระต่อไปนี้สร้างบล็อกข้อความแคบที่มีข้อความภาษาจีนและละติน. มันตั้งค่าตัวเลือกการตัดบรรทัดทั้งสองอย่างโดยชัดเจนและบันทึกเป็น “line_breaking.pptx”. เพื่อทดลองกับกฎใดกฎหนึ่ง, เปลี่ยนค่าที่สอดคล้องกันโดยคงการตั้งค่าอื่นไว้คงที่. ตัวอย่างใช้ Arial ขนาด 24 จุดและ SimSun พร้อมความกว้างกรอบ 160 จุดและระยะขอบกรอบข้อความแนวนอนเป็นศูนย์. TextFrameFormat::setAutofitType ถูกเรียกด้วย TextAutofitType::None เพื่อให้ขนาดข้อความและมิติกรอบคงที่.
use aspose\slides\FillType;
use aspose\slides\FontData;
use aspose\slides\NullableBool;
use aspose\slides\Presentation;
use aspose\slides\SaveFormat;
use aspose\slides\ShapeType;
use aspose\slides\TextAlignment;
use aspose\slides\TextAutofitType;

$presentation = new Presentation();
try {
    $slide = $presentation->getSlides()->get_Item(0);

    $shape = $slide->getShapes()->addAutoShape(ShapeType::Rectangle, 50, 50, 160, 300);
    $shape->getFillFormat()->setFillType(FillType::NoFill);

    $textFrame = $shape->getTextFrame();
    $textFrame->getTextFrameFormat()->setWrapText(NullableBool::True);
    $textFrame->getTextFrameFormat()->setAutofitType(TextAutofitType::None);
    $textFrame->getTextFrameFormat()->setMarginLeft(0);
    $textFrame->getTextFrameFormat()->setMarginRight(0);

    $paragraph = $textFrame->getParagraphs()->get_Item(0);
    $paragraph->setText("中文排版测试,PowerPoint 中文演示。");

    $format = $paragraph->getParagraphFormat();
    $format->setAlignment(TextAlignment::Left);
    $format->getDefaultPortionFormat()->setFontHeight(24);
    $latinFont = new FontData("Arial");
    $format->getDefaultPortionFormat()->setLatinFont($latinFont);
    $eastAsianFont = new FontData("SimSun");
    $format->getDefaultPortionFormat()->setEastAsianFont($eastAsianFont);
    $format->getDefaultPortionFormat()->getFillFormat()->setFillType(FillType::Solid);
    $blackColor = java("java.awt.Color")->BLACK;
    $format->getDefaultPortionFormat()->getFillFormat()->getSolidFillColor()->setColor($blackColor);
    $format->setLatinLineBreak(NullableBool::False);
    $format->setEastAsianLineBreak(NullableBool::True);

    $presentation->save("line_breaking.pptx", SaveFormat::Pptx);
} finally {
    $presentation->dispose();
}
ควบคุมเครื่องหมายการวางล่วงหน้า
ParagraphFormat::setHangingPunctuation ทำให้เครื่องหมายวรรคตอนที่เหมาะสมขยายออกนอกขอบขวาของบรรทัดข้อความแทนที่จะอยู่ในบรรทัดต่อไป. มันใช้กับย่อหน้าทั้งหมดและแตกต่างจากการเยื้องล่าง.
ตัวอย่างที่ทำงานอิสระต่อไปนี้เปิดใช้งานการวางล่วงหน้าของเครื่องหมายวรรคตอนในกรอบข้อความกว้าง 100 จุดและบันทึกเป็น “hanging_punctuation.pptx”. ด้วย Arial ขนาด 24 จุดและระยะขอบกรอบข้อความแนวนอนเป็นศูนย์, จุดเต็มสุดท้ายจะคงอยู่หลัง “sentence” และขยายออกนอกขอบขวาของข้อความ. ตั้งค่าคุณสมบัตินี้เป็น NullableBool::False เพื่อเปรียบเทียบ: ด้วยการตั้งค่านี้, จุดเต็มจะอยู่ในบรรทัดแยก. การห่อเปิดใช้งานและ autofit ปิดเพื่อรักษาความกว้างที่มี.
use aspose\slides\FillType;
use aspose\slides\FontData;
use aspose\slides\NullableBool;
use aspose\slides\Presentation;
use aspose\slides\SaveFormat;
use aspose\slides\ShapeType;
use aspose\slides\TextAlignment;
use aspose\slides\TextAutofitType;

$presentation = new Presentation();
try {
    $slide = $presentation->getSlides()->get_Item(0);

    $shape = $slide->getShapes()->addAutoShape(ShapeType::Rectangle, 50, 50, 100, 200);
    $shape->getFillFormat()->setFillType(FillType::NoFill);

    $textFrame = $shape->getTextFrame();
    $textFrame->getTextFrameFormat()->setWrapText(NullableBool::True);
    $textFrame->getTextFrameFormat()->setAutofitType(TextAutofitType::None);
    $textFrame->getTextFrameFormat()->setMarginLeft(0);
    $textFrame->getTextFrameFormat()->setMarginRight(0);

    $paragraph = $textFrame->getParagraphs()->get_Item(0);
    $paragraph->setText("Simple text, next sentence.");

    $format = $paragraph->getParagraphFormat();
    $format->setAlignment(TextAlignment::Left);
    $format->getDefaultPortionFormat()->setFontHeight(24);
    $latinFont = new FontData("Arial");
    $format->getDefaultPortionFormat()->setLatinFont($latinFont);
    $format->getDefaultPortionFormat()->getFillFormat()->setFillType(FillType::Solid);
    $blackColor = java("java.awt.Color")->BLACK;
    $format->getDefaultPortionFormat()->getFillFormat()->getSolidFillColor()->setColor($blackColor);
    $format->setHangingPunctuation(NullableBool::True);

    $presentation->save("hanging_punctuation.pptx", SaveFormat::Pptx);
} finally {
    $presentation->dispose();
}
ไม่ใช่ทุกเครื่องหมายวรรคตอนที่สามารถวางล่วงหน้าได้. เงื่อนไขของ ฟอนต์และการจัดวางที่อธิบายข้างต้น ยังใช้กับการเปรียบเทียนี้: การเปลี่ยนฟอนต์, ความกว้างที่มี, ระยะขอบ, หรือการตั้งค่า autofit สามารถทำให้ความแตกต่างที่มองเห็นได้หายไป.
ตั้งค่าชนิด Autofit สำหรับกรอบข้อความ
TextFrameFormat::setAutofitType กำหนดว่าข้อความทำอย่างไรเมื่อเกินขอบเขตของคอนเทนเนอร์. ใช้เพื่อควบคุมว่าข้อความจะหด, ล้น, หรือปรับขนาดรูปร่างโดยอัตโนมัติ. ตัวอย่างต่อไปนี้กำหนดค่ารูปร่างให้ปรับขนาดให้พอดีกับข้อความและบันทึกผลลัพธ์เป็น “autofit_type.pptx”.
use aspose\slides\Presentation;
use aspose\slides\SaveFormat;
use aspose\slides\TextAutofitType;

$presentation = new Presentation("sample.pptx");
try {
    $slide = $presentation->getSlides()->get_Item(0);

    $autoShape = $slide->getShapes()->get_Item(0);
    $autoShape->getTextFrame()->getTextFrameFormat()->setAutofitType(TextAutofitType::Shape);

    $presentation->save("autofit_type.pptx", SaveFormat::Pptx);
} finally {
    $presentation->dispose();
}
เพื่อทำการนับจำนวนบรรทัดหลังการห่ออัตโนมัติและดูว่าขนาดข้อความหรือรูปร่างเปลี่ยนผลลัพธ์อย่างไร, ดูที่ Count Rendered Lines. การนับบรรทัดเพียงอย่างเดียวไม่ได้บ่งบอกว่าข้อความล้นคอนเทนเนอร์หรือไม่.
ตั้งค่าตำแหน่งยึดของกรอบข้อความ
TextFrameFormat::setAnchoringType กำหนดว่าข้อความจะวางตำแหน่งในแนวตั้งภายในรูปร่างอย่างไร, เช่น ที่บน, กึ่งกลาง, หรือด้านล่าง. ตัวอย่างต่อไปนี้วางข้อความยึดที่ด้านล่างของรูปร่างแรกและบันทึกผลลัพธ์เป็น “text_anchor.pptx”.
use aspose\slides\Presentation;
use aspose\slides\SaveFormat;
use aspose\slides\TextAnchorType;

$presentation = new Presentation("sample.pptx");
try {
    $slide = $presentation->getSlides()->get_Item(0);

    $autoShape = $slide->getShapes()->get_Item(0);
    $autoShape->getTextFrame()->getTextFrameFormat()->setAnchoringType(TextAnchorType::Bottom);

    $presentation->save("text_anchor.pptx", SaveFormat::Pptx);
} finally {
    $presentation->dispose();
}
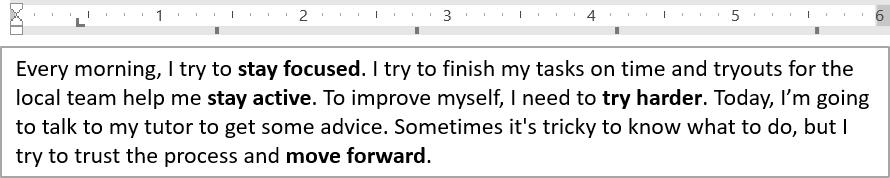
ตั้งค่าการแท็บข้อความ
ใช้ ParagraphFormat::setDefaultTabSize และ ParagraphFormat::getTabs เพื่อกำหนดตำแหน่งหยุดแท็บในย่อหน้า. ตัวอย่างต่อไปนี้ตั้งค่าช่วงเวลาแท็บเริ่มต้นเป็น 100 จุดและเพิ่มหยุดแท็บจัดซ้ายที่ 30 จุด. การตั้งค่าเหล่านี้มีผลต่อข้อความที่มีอักขระแท็บ.
use aspose\slides\Presentation;
use aspose\slides\SaveFormat;
use aspose\slides\TabAlignment;

$presentation = new Presentation("sample.pptx");
try {
    $slide = $presentation->getSlides()->get_Item(0);

    $autoShape = $slide->getShapes()->get_Item(0);

    $paragraph = $autoShape->getTextFrame()->getParagraphs()->get_Item(0);
    $paragraph->getParagraphFormat()->setDefaultTabSize(100);
    $paragraph->getParagraphFormat()->getTabs()->add(30, TabAlignment::Left);

    $presentation->save("paragraph_tabs.pptx", SaveFormat::Pptx);
} finally {
    $presentation->dispose();
}
ผลลัพธ์:
ตั้งค่าภาษาการตรวจสอบ
Aspose.Slides มี BasePortionFormat::setLanguageId ซึ่งให้คุณตั้งค่าภาษาการตรวจสอบสำหรับส่วนข้อความ. ภาษาการตรวจสอบกำหนดภาษาที่ใช้สำหรับการตรวจสอบการสะกดและไวยากรณ์ใน PowerPoint.
ตัวอย่างต่อไปนี้ต้องการไฟล์ “presentation.pptx” ที่มีกล่องข้อความเป็นรูปร่างแรกบนสไลด์แรกและอย่างน้อยหนึ่งย่อหน้า. มันแทนที่เนื้อหาย่อหน้าแรกด้วย “1。”, ตั้งค่า SimSun เป็นฟอนต์, และกำหนดภาษาการตรวจสอบเป็นภาษาจีนตัวย่อ (zh-CN). บันทึกผลลัพธ์เป็น “proofing_language.pptx”:
use aspose\slides\FontData;
use aspose\slides\Portion;
use aspose\slides\Presentation;
use aspose\slides\SaveFormat;

$presentation = new Presentation("presentation.pptx");
try {
    $slide = $presentation->getSlides()->get_Item(0);

    $autoShape = $slide->getShapes()->get_Item(0);

    $paragraph = $autoShape->getTextFrame()->getParagraphs()->get_Item(0);
    $paragraph->getPortions()->clear();

    $font = new FontData("SimSun");

    $textPortion = new Portion();
    $textPortion->getPortionFormat()->setComplexScriptFont($font);
    $textPortion->getPortionFormat()->setEastAsianFont($font);
    $textPortion->getPortionFormat()->setLatinFont($font);

    // ตั้งค่า Id ของภาษาการตรวจสอบ.
    $textPortion->getPortionFormat()->setLanguageId("zh-CN");

    $textPortion->setText("1。");
    $paragraph->getPortions()->add($textPortion);

    $presentation->save("proofing_language.pptx", SaveFormat::Pptx);
} finally {
    $presentation->dispose();
}
ตั้งค่าภาษาเริ่มต้น
ใช้ LoadOptions::setDefaultTextLanguage เพื่อกำหนดภาษาดีฟอลท์สำหรับข้อความที่สร้างระหว่างการโหลดหรือสร้างงานนำเสนอ. ตัวอย่างต่อไปนี้สร้างงานนำเสนอโดยตั้งค่าภาษาอังกฤษสหรัฐเป็นภาษาข้อความเริ่มต้น, เพิ่มกล่องข้อความ, และพิมพ์ en-US สำหรับส่วนข้อความแรก.
use aspose\slides\LoadOptions;
use aspose\slides\Presentation;
use aspose\slides\ShapeType;

$loadOptions = new LoadOptions();
$loadOptions->setDefaultTextLanguage("en-US");

$presentation = new Presentation($loadOptions);
try {
    $slide = $presentation->getSlides()->get_Item(0);

    // เพิ่มรูปสี่เหลี่ยมผืนผ้าใหม่พร้อมข้อความ.
    $shape = $slide->getShapes()->addAutoShape(ShapeType::Rectangle, 20, 20, 150, 50);
    $shape->getTextFrame()->setText("Sample text");

    // ตรวจสอบภาษาของส่วนข้อความแรก.
    $portion = $shape->getTextFrame()->getParagraphs()->get_Item(0)->getPortions()->get_Item(0);
    echo $portion->getPortionFormat()->getLanguageId();
} finally {
    $presentation->dispose();
}
ตั้งค่าสไตล์ข้อความเริ่มต้น
เพื่อใช้การจัดรูปแบบข้อความเริ่มต้นในระดับงานนำเสนอ, ใช้ Presentation::getDefaultTextStyle.
ตัวอย่างต่อไปนี้ตั้งค่าฟอนต์ขนาด 14 จุดหนาเป็นค่าเริ่มต้นสำหรับย่อหน้าในระดับบนของงานนำเสนอใหม่และบันทึกเป็น “default_text_style.pptx”. ข้อความสามารถสืบทอดค่าเริ่มต้นเหล่านี้ได้ยกเว้นมีการจัดรูปแบบที่เจาะจงกว่าฝีเขตเหนือ.
use aspose\slides\NullableBool;
use aspose\slides\Presentation;
use aspose\slides\SaveFormat;

$presentation = new Presentation();
try {
    // ดึงรูปแบบย่อหน้าระดับบนสุด.
    $paragraphFormat = $presentation->getDefaultTextStyle()->getLevel(0);

    if (!java_is_null($paragraphFormat)) {
        $paragraphFormat->getDefaultPortionFormat()->setFontHeight(14);
        $paragraphFormat->getDefaultPortionFormat()->setFontBold(NullableBool::True);
    }

    $presentation->save("default_text_style.pptx", SaveFormat::Pptx);
} finally {
    $presentation->dispose();
}
สกัดข้อความด้วยเอฟเฟกต์ All-Caps
ใน PowerPoint, การใช้เอฟเฟกต์ฟอนต์ All Caps ทำให้ข้อความแสดงเป็นตัวพิมพ์ใหญ่บนสไลด์แม้ว่าจะพิมพ์เป็นตัวพิมพ์เล็กในต้นฉบับ. เมื่อคุณดึงส่วนข้อความเช่นนี้ด้วย Aspose.Slides, ไลบรารีจะคืนค่าข้อความตามที่ป้อนไว้. เพื่อตรงกับข้อความที่แสดง, ตรวจสอบ TextCapType และแปลงสตริงที่คืนค่าเป็นตัวพิมพ์ใหญ่เมื่อค่าคือ All.
ตัวอย่างนี้ต้องการไฟล์ “sample2.pptx” ที่มีกล่องข้อความเป็นรูปร่างแรกบนสไลด์แรก. ส่วนแรกของย่อหน้าแรกมีข้อความ “Hello, Aspose!” ที่มีเอฟเฟกต์ All Caps ถูกใช้, ดังที่แสดงด้านล่าง.

ตัวอย่างโค้ดด้านล่างแสดงวิธีสกัดข้อความที่มีเอฟเฟกต์ All Caps ถูกใช้:
use aspose\slides\Presentation;
use aspose\slides\TextCapType;

$presentation = new Presentation("sample2.pptx");
try {
    $slide = $presentation->getSlides()->get_Item(0);

    $autoShape = $slide->getShapes()->get_Item(0);
    $textPortion = $autoShape->getTextFrame()->getParagraphs()->get_Item(0)->getPortions()->get_Item(0);

    $originalText = $textPortion->getText();
    echo "Original text: ", $originalText, "\n";

    $textFormat = $textPortion->getPortionFormat()->getEffective();
    if (java_values($textFormat->getTextCapType()) === TextCapType::All) {
        $text = strtoupper($originalText);
        echo "All-Caps effect: ", $text, "\n";
    }
} finally {
    $presentation->dispose();
}
ผลลัพธ์:
Original text: Hello, Aspose!
All-Caps effect: HELLO, ASPOSE!
คำถามที่พบบ่อย
ฉันจะแก้ไขข้อความในตารางบนสไลด์อย่างไร?
เพื่อแก้ไขข้อความในตารางบนสไลด์, ใช้ Table. วนลูปผ่านเซลล์และอัปเดตแต่ละเซลล์ผ่าน Cell::getTextFrame และจัดรูปแบบย่อหน้าผ่าน Paragraph::getParagraphFormat.
ฉันจะแปลงสีแบบไล่เฉดให้กับข้อความบนสไลด์ PowerPoint อย่างไร?
เพื่อใช้สีไล่เฉดกับข้อความ, ใช้ BasePortionFormat::getFillFormat. ตั้งค่า FillFormat::setFillType เป็น FillType::Gradient และกำหนดจุดหยุดไล่เฉด, ทิศทาง, และความโปร่งแสง.