
Formatera presentationstext i C++
Översikt
Den här artikeln visar hur man formaterar text i PowerPoint- och OpenDocument-presentationer med Aspose.Slides för C++. Den täcker bakgrundsfärger, transparens, teckenavstånd, teckensnittsegenskaper, rotation, styckeavstånd, autofit‑beteende, textförankring, tabbstopp och språkinställningar.
Om inte annat anges använder exemplen sample.pptx. Den första formen på den första bilden är en textruta och dess första stycke innehåller texten som visas nedan. Både bild‑ och formindex är nollbaserade. Exempel som markerar fetstilta delar använder effektiv formatering, inklusive ärvd fetstilning:

För att hitta och markera bokstavlig text eller reguljära uttryck, se Sök och ersätt text.
Ange bakgrundsfärg för text
Använd IParagraphFormat::get_DefaultPortionFormat för att ange standardmarkeringsfärgen för ett stycke, eller använd IBasePortionFormat::get_HighlightColor för enskilda textdelar.
Följande exempel anger en ljusgrå markering som standard för det första stycket. Explicita markeringsfärger på enskilda delar har företräde framför denna standard:
#include <DOM/IAutoShape.h>
#include <DOM/IColorFormat.h>
#include <DOM/IParagraph.h>
#include <DOM/IParagraphFormat.h>
#include <DOM/IPortionFormat.h>
#include <DOM/ISlide.h>
#include <DOM/ITextFrame.h>
#include <DOM/Presentation.h>
#include <Export/SaveFormat.h>
#include <drawing/color.h>

using namespace Aspose::Slides;
using namespace Aspose::Slides::Export;

auto presentation = System::MakeObject<Presentation>(u"sample.pptx");
auto firstShape = presentation->get_Slide(0)->get_Shape(0);

auto autoShape = System::ExplicitCast<IAutoShape>(firstShape);

auto paragraph = autoShape->get_TextFrame()->get_Paragraph(0);
auto defaultPortionFormat = paragraph->get_ParagraphFormat()->get_DefaultPortionFormat();
auto highlightColor = System::Drawing::Color::get_LightGray();

// Ställ in markeringsfärgen för hela stycket.
defaultPortionFormat->get_HighlightColor()->set_Color(highlightColor);

presentation->Save(u"gray_paragraph.pptx", SaveFormat::Pptx);
presentation->Dispose();
Resultatet:

Kodexemplet nedan visar hur man anger bakgrundsfärgen för textdelar med ett fetstilt teckensnitt:
#include <DOM/IAutoShape.h>
#include <DOM/IColorFormat.h>
#include <DOM/IParagraph.h>
#include <DOM/IPortion.h>
#include <DOM/IPortionCollection.h>
#include <DOM/IPortionFormat.h>
#include <DOM/IPortionFormatEffectiveData.h>
#include <DOM/ISlide.h>
#include <DOM/ITextFrame.h>
#include <DOM/Presentation.h>
#include <Export/SaveFormat.h>
#include <drawing/color.h>

using namespace Aspose::Slides;
using namespace Aspose::Slides::Export;

auto presentation = System::MakeObject<Presentation>(u"sample.pptx");
auto firstShape = presentation->get_Slide(0)->get_Shape(0);

auto autoShape = System::ExplicitCast<IAutoShape>(firstShape);

auto paragraph = autoShape->get_TextFrame()->get_Paragraph(0);
auto portions = paragraph->get_Portions();
int portionCount = portions->get_Count();
auto highlightColor = System::Drawing::Color::get_LightGray();

for (int portionIndex = 0; portionIndex < portionCount; portionIndex++)
{
    auto portion = paragraph->get_Portion(portionIndex);
    auto portionFormat = portion->get_PortionFormat();
    if (portionFormat->GetEffective()->get_FontBold())
    {
        // Ställ in markeringsfärgen för textdelen.
        portionFormat->get_HighlightColor()->set_Color(highlightColor);
    }
}

presentation->Save(u"gray_text_portions.pptx", SaveFormat::Pptx);
presentation->Dispose();
Resultatet:

Justera textstycken
Använd IParagraphFormat::set_Alignment för att ange styckejustering inom en textram. Värdet kan vara centrerat, vänsterjusterat, höggerjusterat, justerat osv.
Följande kodexempel visar hur man justerar stycket till centrum:
#include <DOM/IAutoShape.h>
#include <DOM/IParagraph.h>
#include <DOM/IParagraphFormat.h>
#include <DOM/ISlide.h>
#include <DOM/ITextFrame.h>
#include <DOM/Presentation.h>
#include <DOM/TextAlignment.h>
#include <Export/SaveFormat.h>

using namespace Aspose::Slides;
using namespace Aspose::Slides::Export;

auto presentation = System::MakeObject<Presentation>(u"sample.pptx");
auto firstShape = presentation->get_Slide(0)->get_Shape(0);

auto autoShape = System::ExplicitCast<IAutoShape>(firstShape);
auto paragraph = autoShape->get_TextFrame()->get_Paragraph(0);

// Ställ in justeringen av stycket till centrum.
paragraph->get_ParagraphFormat()->set_Alignment(TextAlignment::Center);

presentation->Save(u"aligned_paragraph.pptx", SaveFormat::Pptx);
presentation->Dispose();
Resultatet:

Justera teckensnitt inom en rad
Använd IParagraphFormat::set_FontAlignment för att vertikalt justera textdelar med olika teckenstorlekar inom en rad. Denna inställning gäller för hela stycket och styr justeringen inom varje rad.
Följande fristående exempel skapar fyra märkta textrutor på en bild. Varje stycke innehåller samma text i 18, 36 och 54 punkter, med olika teckenjustering. Det använder Arial, inaktiverar autofit och radbrytning, och håller textramarna tillräckligt stora för en enda rad.
#include <DOM/FontAlignment.h>
#include <DOM/Fonts/FontData.h>
#include <DOM/IAutoShape.h>
#include <DOM/IColorFormat.h>
#include <DOM/IFillFormat.h>
#include <DOM/ILineFormat.h>
#include <DOM/IParagraph.h>
#include <DOM/IParagraphCollection.h>
#include <DOM/IParagraphFormat.h>
#include <DOM/IPortionCollection.h>
#include <DOM/IPortionFormat.h>
#include <DOM/IShapeCollection.h>
#include <DOM/ISlide.h>
#include <DOM/ITextFrame.h>
#include <DOM/ITextFrameFormat.h>
#include <DOM/FillType.h>
#include <DOM/NullableBool.h>
#include <DOM/Paragraph.h>
#include <DOM/Portion.h>
#include <DOM/Presentation.h>
#include <DOM/ShapeType.h>
#include <DOM/TextAlignment.h>
#include <DOM/TextAnchorType.h>
#include <DOM/TextAutofitType.h>
#include <Export/SaveFormat.h>
#include <drawing/color.h>

using namespace Aspose::Slides;
using namespace Aspose::Slides::Export;
using namespace System;
using namespace System::Drawing;

auto presentation = MakeObject<Presentation>();
auto slide = presentation->get_Slide(0);

FontAlignment alignments[] = { FontAlignment::Baseline, FontAlignment::Top, FontAlignment::Center, FontAlignment::Bottom };
String labels[] = { u"Baseline", u"Top", u"Center", u"Bottom" };
float fontSizes[] = { 18.0f, 36.0f, 54.0f };
auto font = MakeObject<FontData>(u"Arial");

for (auto i = 0; i < 4; i++)
{
    auto shape = slide->get_Shapes()->AddAutoShape(ShapeType::Rectangle, 30, 20 + i * 130, 660, 120);
    shape->get_FillFormat()->set_FillType(FillType::NoFill);
    shape->get_LineFormat()->get_FillFormat()->set_FillType(FillType::NoFill);

    auto textFrame = shape->get_TextFrame();
    textFrame->get_TextFrameFormat()->set_AnchoringType(TextAnchorType::Top);
    textFrame->get_TextFrameFormat()->set_AutofitType(TextAutofitType::None);
    textFrame->get_TextFrameFormat()->set_WrapText(NullableBool::False);

    auto label = textFrame->get_Paragraph(0);
    label->set_Text(labels[i]);
    label->get_ParagraphFormat()->set_Alignment(TextAlignment::Left);
    auto labelFormat = label->get_ParagraphFormat()->get_DefaultPortionFormat();
    labelFormat->set_FontHeight(14);
    labelFormat->set_LatinFont(font);
    labelFormat->get_FillFormat()->set_FillType(FillType::Solid);
    labelFormat->get_FillFormat()->get_SolidFillColor()->set_Color(Color::get_Gray());

    auto paragraph = MakeObject<Paragraph>();
    paragraph->get_ParagraphFormat()->set_FontAlignment(alignments[i]);
    paragraph->get_ParagraphFormat()->set_Alignment(TextAlignment::Left);
    auto portionFormat = paragraph->get_ParagraphFormat()->get_DefaultPortionFormat();
    portionFormat->set_LatinFont(font);
    portionFormat->get_FillFormat()->set_FillType(FillType::Solid);
    portionFormat->get_FillFormat()->get_SolidFillColor()->set_Color(Color::get_Black());

    for (auto fontSize : fontSizes)
    {
        auto portion = MakeObject<Portion>(u"Ag ");
        portion->get_PortionFormat()->set_FontHeight(fontSize);
        paragraph->get_Portions()->Add(portion);
    }

    textFrame->get_Paragraphs()->Add(paragraph);
}

presentation->Save(u"font_alignment.pptx", SaveFormat::Pptx);
presentation->Dispose();
Resultatet:
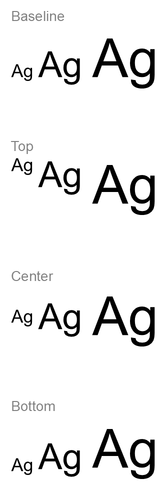
Teckenjustering använder teckensnittsmått, så de synliga kanterna på enskilda bokstäver nödvändigtvis inte linjerar exakt. Exemplet innehåller både en versal bokstav och en nedåtklingande bokstav för att visa skillnaden mellan baslinje- och bottenjustering. Tillgänglighet av teckensnitt och ersättning, tecknen som används och skillnaden i teckenstorlekar påverkar resultatet. Ramdimensioner, marginaler, radavstånd, radbrytning och autofit påverkar också layouten; använd samma teckensnitt och layoutinställningar när du jämför lägen. Denna inställning skiljer sig från IParagraphFormat::set_Alignment, som styr horisontell styckejustering, och ITextFrameFormat::set_AnchoringType, som positionerar textblocket vertikalt inom sin form. Upphöjd och nedsänkt formatering via IBasePortionFormat::set_Escapement förflyttar enskilda delar relativt baslinjen istället för att ställa in teckenjustering för styckets rader.
Ange transparens för text
Texttransparens styrs genom alfakomponenten i den färg som tilldelas via IBasePortionFormat::get_FillFormat. I exemplen nedan är alpha = 50 ett ARGB‑alfavärde på skalan 0–255, inte en transparensprocent.
Kodexemplet nedan visar hur man applicerar transparens på hela stycket:
#include <DOM/FillType.h>
#include <DOM/IAutoShape.h>
#include <DOM/IColorFormat.h>
#include <DOM/IFillFormat.h>
#include <DOM/IParagraph.h>
#include <DOM/IParagraphFormat.h>
#include <DOM/IPortionFormat.h>
#include <DOM/ISlide.h>
#include <DOM/ITextFrame.h>
#include <DOM/Presentation.h>
#include <Export/SaveFormat.h>
#include <drawing/color.h>

using namespace Aspose::Slides;
using namespace Aspose::Slides::Export;

int alpha = 50;

auto presentation = System::MakeObject<Presentation>(u"sample.pptx");
auto firstShape = presentation->get_Slide(0)->get_Shape(0);

auto autoShape = System::ExplicitCast<IAutoShape>(firstShape);

auto paragraph = autoShape->get_TextFrame()->get_Paragraph(0);
auto defaultPortionFormat = paragraph->get_ParagraphFormat()->get_DefaultPortionFormat();

// Ställ in fyllnadsfärgen för texten till transparent färg.
defaultPortionFormat->get_FillFormat()->set_FillType(FillType::Solid);
auto baseColor = System::Drawing::Color::get_Black();
auto transparentColor = System::Drawing::Color::FromArgb(alpha, baseColor);
defaultPortionFormat->get_FillFormat()->get_SolidFillColor()->set_Color(transparentColor);

presentation->Save(u"transparent_paragraph.pptx", SaveFormat::Pptx);
presentation->Dispose();
Resultatet:

Följande kodexempel visar hur man applicerar transparens på textdelar med ett fetstilt teckensnitt:
#include <DOM/FillType.h>
#include <DOM/IAutoShape.h>
#include <DOM/IColorFormat.h>
#include <DOM/IFillFormat.h>
#include <DOM/IParagraph.h>
#include <DOM/IPortion.h>
#include <DOM/IPortionCollection.h>
#include <DOM/IPortionFormat.h>
#include <DOM/IPortionFormatEffectiveData.h>
#include <DOM/ISlide.h>
#include <DOM/ITextFrame.h>
#include <DOM/Presentation.h>
#include <Export/SaveFormat.h>
#include <drawing/color.h>

using namespace Aspose::Slides;
using namespace Aspose::Slides::Export;

int alpha = 50;

auto presentation = System::MakeObject<Presentation>(u"sample.pptx");
auto firstShape = presentation->get_Slide(0)->get_Shape(0);

auto autoShape = System::ExplicitCast<IAutoShape>(firstShape);

auto paragraph = autoShape->get_TextFrame()->get_Paragraph(0);
auto portions = paragraph->get_Portions();
int portionCount = portions->get_Count();

for (int portionIndex = 0; portionIndex < portionCount; portionIndex++)
{
    auto portion = paragraph->get_Portion(portionIndex);
    auto portionFormat = portion->get_PortionFormat();
    if (portionFormat->GetEffective()->get_FontBold())
    {
        // Ställ in transparensen för textdelen.
        portionFormat->get_FillFormat()->set_FillType(FillType::Solid);
        auto baseColor = System::Drawing::Color::get_Black();
        auto transparentColor = System::Drawing::Color::FromArgb(alpha, baseColor);
        portionFormat->get_FillFormat()->get_SolidFillColor()->set_Color(transparentColor);
    }
}

presentation->Save(u"transparent_text_portions.pptx", SaveFormat::Pptx);
presentation->Dispose();
Resultatet:

Ange teckenavstånd för text
Använd IBasePortionFormat::set_Spacing för att öka eller minska avståndet mellan tecken i en textruta. Exemplen lägger till 3 punkters avstånd; negativa värden minskar avståndet.
Följande C++‑kod visar hur man ökar teckenavståndet i hela stycket:
#include <DOM/IAutoShape.h>
#include <DOM/IParagraph.h>
#include <DOM/IParagraphFormat.h>
#include <DOM/IPortionFormat.h>
#include <DOM/ISlide.h>
#include <DOM/ITextFrame.h>
#include <DOM/Presentation.h>
#include <Export/SaveFormat.h>

using namespace Aspose::Slides;
using namespace Aspose::Slides::Export;

auto presentation = System::MakeObject<Presentation>(u"sample.pptx");
auto firstShape = presentation->get_Slide(0)->get_Shape(0);

auto autoShape = System::ExplicitCast<IAutoShape>(firstShape);
auto paragraph = autoShape->get_TextFrame()->get_Paragraph(0);

// Obs: Använd negativa värden för att komprimera teckenavståndet.
paragraph->get_ParagraphFormat()->get_DefaultPortionFormat()->set_Spacing(3.0f); // Utöka teckenavståndet.

presentation->Save(u"character_spacing_in_paragraph.pptx", SaveFormat::Pptx);
presentation->Dispose();
Resultatet:

Kodexemplet nedan visar hur man ökar teckenavståndet i textdelar med ett fetstilt teckensnitt:
#include <DOM/IAutoShape.h>
#include <DOM/IParagraph.h>
#include <DOM/IPortion.h>
#include <DOM/IPortionCollection.h>
#include <DOM/IPortionFormat.h>
#include <DOM/IPortionFormatEffectiveData.h>
#include <DOM/ISlide.h>
#include <DOM/ITextFrame.h>
#include <DOM/Presentation.h>
#include <Export/SaveFormat.h>

using namespace Aspose::Slides;
using namespace Aspose::Slides::Export;

auto presentation = System::MakeObject<Presentation>(u"sample.pptx");
auto firstShape = presentation->get_Slide(0)->get_Shape(0);

auto autoShape = System::ExplicitCast<IAutoShape>(firstShape);

auto paragraph = autoShape->get_TextFrame()->get_Paragraph(0);
auto portions = paragraph->get_Portions();
int portionCount = portions->get_Count();

for (int portionIndex = 0; portionIndex < portionCount; portionIndex++)
{
    auto portion = paragraph->get_Portion(portionIndex);
    auto portionFormat = portion->get_PortionFormat();
    if (portionFormat->GetEffective()->get_FontBold())
    {
        // Obs: Använd negativa värden för att komprimera teckenavståndet.
        portionFormat->set_Spacing(3.0f); // Utöka teckenavståndet.
    }
}

presentation->Save(u"character_spacing_in_text_portions.pptx", SaveFormat::Pptx);
presentation->Dispose();
Resultatet:

Inaktivera kerning för specifika teckensnitt
I vissa fall kan text som renderas av Aspose.Slides se något tajtare ut än samma text i PowerPoint. Detta kan ske eftersom PowerPoint kan ignorera kerningdata för vissa teckensnitt, även när teckensnittet innehåller giltig kerninginformation och kerning är aktiverat i PowerPoint‑inställningarna.
För att få den renderade utdata närmare PowerPoint i sådana fall kan du inaktivera kerning för textdelar som använder det påverkade teckensnittet. Använd IBasePortionFormat::set_KerningMinimalSize för att ange ett värde som är större än den faktiska teckenstorleken. Detta exempel kräver “presentation.pptx” med en textruta som den första formen på den första bilden. Det kontrollerar effektiva teckensnittsnamn, inklusive ärvda teckensnitt, och sätter en tröskel på 100 punkter för delar som använder Roboto. Detta inaktiverar kerning för matchande delar med en teckenstorlek under 100 punkter:
#include <DOM/IAutoShape.h>
#include <DOM/IFontData.h>
#include <DOM/IPortionFormatEffectiveData.h>
#include <DOM/IParagraph.h>
#include <DOM/IParagraphCollection.h>
#include <DOM/IPortion.h>
#include <DOM/IPortionCollection.h>
#include <DOM/IPortionFormat.h>
#include <DOM/ISlide.h>
#include <DOM/ITextFrame.h>
#include <DOM/Presentation.h>
#include <Export/SaveFormat.h>

using namespace Aspose::Slides;
using namespace Aspose::Slides::Export;

auto presentation = System::MakeObject<Presentation>(u"presentation.pptx");
auto firstShape = presentation->get_Slide(0)->get_Shape(0);

auto autoShape = System::ExplicitCast<IAutoShape>(firstShape);
System::String targetFont = u"Roboto";
auto textFrame = autoShape->get_TextFrame();
auto paragraphs = textFrame->get_Paragraphs();
int paragraphCount = paragraphs->get_Count();

for (int paragraphIndex = 0; paragraphIndex < paragraphCount; paragraphIndex++)
{
    auto paragraph = textFrame->get_Paragraph(paragraphIndex);
    auto portions = paragraph->get_Portions();
    int portionCount = portions->get_Count();

    for (int portionIndex = 0; portionIndex < portionCount; portionIndex++)
    {
        auto portion = paragraph->get_Portion(portionIndex);
        auto portionFormat = portion->get_PortionFormat();
        auto textFormat = portionFormat->GetEffective();
        auto latinFont = textFormat->get_LatinFont();
        auto eastAsianFont = textFormat->get_EastAsianFont();
        auto complexScriptFont = textFormat->get_ComplexScriptFont();

        bool isLatinFont = latinFont != nullptr && latinFont->get_FontName() == targetFont;
        bool isEastAsianFont = eastAsianFont != nullptr && eastAsianFont->get_FontName() == targetFont;
        bool isComplexScriptFont = complexScriptFont != nullptr && complexScriptFont->get_FontName() == targetFont;

        if (isLatinFont || isEastAsianFont || isComplexScriptFont)
        {
            portionFormat->set_KerningMinimalSize(100.0f);
        }
    }
}

presentation->Save(u"output.pptx", SaveFormat::Pptx);
presentation->Dispose();
För matchande text under tröskeln förhindrar denna inställning kerning och kan hjälpa Aspose.Slides‑renderingen att likna PowerPoints visuella resultat för teckensnitt som påverkas av detta PowerPoint‑specifika beteende.
Hantera teckensnittsegenskaper för text
Teckensnittsegenskaper kan anges på styckennivå via IParagraphFormat::get_DefaultPortionFormat eller på enskilda delar via IPortionFormat.
Följande exempel anger det första styckets standardteckensnitt till 12‑punkts Times New Roman med fet, kursiv och prickad understrykning. Explicita formateringar på enskilda delar har företräde framför dessa standardvärden:
#include <DOM/Fonts/FontData.h>
#include <DOM/IAutoShape.h>
#include <DOM/IParagraph.h>
#include <DOM/IParagraphFormat.h>
#include <DOM/IPortionFormat.h>
#include <DOM/ISlide.h>
#include <DOM/ITextFrame.h>
#include <DOM/NullableBool.h>
#include <DOM/Presentation.h>
#include <DOM/TextUnderlineType.h>
#include <Export/SaveFormat.h>

using namespace Aspose::Slides;
using namespace Aspose::Slides::Export;

auto presentation = System::MakeObject<Presentation>(u"sample.pptx");
auto firstShape = presentation->get_Slide(0)->get_Shape(0);

auto autoShape = System::ExplicitCast<IAutoShape>(firstShape);
auto paragraph = autoShape->get_TextFrame()->get_Paragraph(0);
auto defaultPortionFormat = paragraph->get_ParagraphFormat()->get_DefaultPortionFormat();

// Ange teckensnittsegenskaper för stycket.
defaultPortionFormat->set_FontHeight(12.0f);
defaultPortionFormat->set_FontBold(NullableBool::True);
defaultPortionFormat->set_FontItalic(NullableBool::True);
defaultPortionFormat->set_FontUnderline(TextUnderlineType::Dotted);
auto font = System::MakeObject<FontData>(u"Times New Roman");
defaultPortionFormat->set_LatinFont(font);

presentation->Save(u"font_properties_for_paragraph.pptx", SaveFormat::Pptx);
presentation->Dispose();
Resultatet:

Följande exempel applicerar 13‑punkts Times New Roman, kursiv formatering och en prickad understrykning på delar vars effektiva formatering är fet:
#include <DOM/Fonts/FontData.h>
#include <DOM/IAutoShape.h>
#include <DOM/IParagraph.h>
#include <DOM/IPortion.h>
#include <DOM/IPortionCollection.h>
#include <DOM/IPortionFormat.h>
#include <DOM/IPortionFormatEffectiveData.h>
#include <DOM/ISlide.h>
#include <DOM/ITextFrame.h>
#include <DOM/NullableBool.h>
#include <DOM/Presentation.h>
#include <DOM/TextUnderlineType.h>
#include <Export/SaveFormat.h>

using namespace Aspose::Slides;
using namespace Aspose::Slides::Export;

auto presentation = System::MakeObject<Presentation>(u"sample.pptx");
auto firstShape = presentation->get_Slide(0)->get_Shape(0);

auto autoShape = System::ExplicitCast<IAutoShape>(firstShape);
auto paragraph = autoShape->get_TextFrame()->get_Paragraph(0);
auto portions = paragraph->get_Portions();
int portionCount = portions->get_Count();
auto font = System::MakeObject<FontData>(u"Times New Roman");

for (int portionIndex = 0; portionIndex < portionCount; portionIndex++)
{
    auto portion = paragraph->get_Portion(portionIndex);
    auto portionFormat = portion->get_PortionFormat();
    if (portionFormat->GetEffective()->get_FontBold())
    {
        // Ange teckensnittsegenskaper för textdelen.
        portionFormat->set_FontHeight(13.0f);
        portionFormat->set_FontItalic(NullableBool::True);
        portionFormat->set_FontUnderline(TextUnderlineType::Dotted);
        portionFormat->set_LatinFont(font);
    }
}

presentation->Save(u"font_properties_for_text_portions.pptx", SaveFormat::Pptx);
presentation->Dispose();
Resultatet:

Ange textrotation
Använd ITextFrameFormat::set_TextVerticalType för att ange en fördefinierad textorientering inom en form.
Följande kodexempel sätter textorienteringen i formen till TextVerticalType::Vertical270, vilket roterar texten 90 grader moturs:
#include <DOM/IAutoShape.h>
#include <DOM/ISlide.h>
#include <DOM/ITextFrame.h>
#include <DOM/ITextFrameFormat.h>
#include <DOM/Presentation.h>
#include <DOM/TextVerticalType.h>
#include <Export/SaveFormat.h>

using namespace Aspose::Slides;
using namespace Aspose::Slides::Export;

auto presentation = System::MakeObject<Presentation>(u"sample.pptx");
auto firstShape = presentation->get_Slide(0)->get_Shape(0);

auto autoShape = System::ExplicitCast<IAutoShape>(firstShape);
autoShape->get_TextFrame()->get_TextFrameFormat()->set_TextVerticalType(TextVerticalType::Vertical270);

presentation->Save(u"text_rotation.pptx", SaveFormat::Pptx);
presentation->Dispose();
Resultatet:

Ange anpassad rotation för textramlar
Använd ITextFrameFormat::set_RotationAngle för att ange en anpassad rotationsvinkel för ett ITextFrame.
Kodexemplet nedan roterar textramen med 3 grader medurs inom formen:
#include <DOM/IAutoShape.h>
#include <DOM/ISlide.h>
#include <DOM/ITextFrame.h>
#include <DOM/ITextFrameFormat.h>
#include <DOM/Presentation.h>
#include <Export/SaveFormat.h>

using namespace Aspose::Slides;
using namespace Aspose::Slides::Export;

auto presentation = System::MakeObject<Presentation>(u"sample.pptx");
auto firstShape = presentation->get_Slide(0)->get_Shape(0);

auto autoShape = System::ExplicitCast<IAutoShape>(firstShape);
autoShape->get_TextFrame()->get_TextFrameFormat()->set_RotationAngle(3.0f);

presentation->Save(u"custom_text_rotation.pptx", SaveFormat::Pptx);
presentation->Dispose();
Resultatet:

Ange radavstånd för stycken
Aspose.Slides tillhandahåller IParagraphFormat::set_SpaceAfter, IParagraphFormat::set_SpaceBefore och IParagraphFormat::set_SpaceWithin för att styra styckeavstånd. Metoderna används så här:
- Använd ett positivt värde för att ange radavstånd som en procent av radhöjden.
- Använd ett negativt värde för att ange radavstånd i punkter.
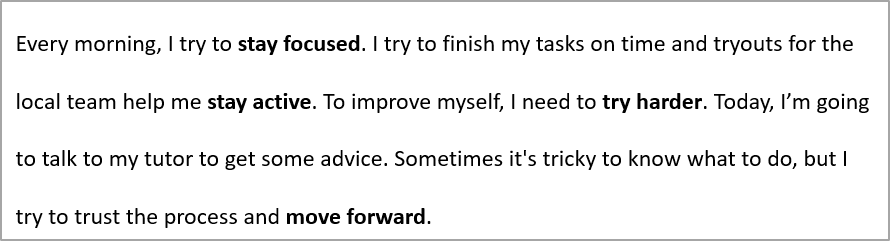
Följande exempel sätter avståndet inom det första stycket till 200 % av radhöjden (dubbelt radavstånd):
#include <DOM/IAutoShape.h>
#include <DOM/IParagraph.h>
#include <DOM/IParagraphFormat.h>
#include <DOM/ISlide.h>
#include <DOM/ITextFrame.h>
#include <DOM/Presentation.h>
#include <Export/SaveFormat.h>

using namespace Aspose::Slides;
using namespace Aspose::Slides::Export;

auto presentation = System::MakeObject<Presentation>(u"sample.pptx");
auto firstShape = presentation->get_Slide(0)->get_Shape(0);

auto autoShape = System::ExplicitCast<IAutoShape>(firstShape);

auto paragraph = autoShape->get_TextFrame()->get_Paragraph(0);
paragraph->get_ParagraphFormat()->set_SpaceWithin(200.0f);

presentation->Save(u"line_spacing.pptx", SaveFormat::Pptx);
presentation->Dispose();
Resultatet:
Styr radbrytning
Paragraf‑radbrytningsregler är användbara i smala textblock och presentationer som blandar latinsk och östasiatisk text. Följande metoder tillhör IParagraphFormat, så de gäller för ett helt stycke:
- IParagraphFormat::set_LatinLineBreak styr latinska radbrytningsregler. I blandad text kan en ändring också påverka var intilliggande östasiatisk text och skiljetecken bryts.
- IParagraphFormat::set_EastAsianLineBreak styr östasiatiska radbrytningsregler, inklusive begränsningar för tecken i början och slutet av en rad.
Dessa regler ersätter inte ITextFrameFormat::set_WrapText, som möjliggör automatisk radbrytning inom en textram. De påverkar layouten när radbrytning sker; de infogar inte radbrytningstecken. En explicit radbrytning tvingar en ny rad i stycket oberoende av tillgänglig bredd.
Följande fristående exempel skapar ett smalt textblock med kinesisk och latinsk text. Det anger båda radbrytningsreglerna explicit och sparar “line_breaking.pptx”. För att experimentera med någon av reglerna, ändra värdet som skickas till dess setter medan de andra inställningarna lämnas oförändrade. Exemplet använder 24‑punkts Arial och SimSun med en rambredd på 160 punkter och noll horisontella marginaler för textramen. ITextFrameFormat::set_AutofitType anropas med TextAutofitType::None så att textstorlek och ramdimensioner förblir fasta.
#include <DOM/Fonts/FontData.h>
#include <DOM/IAutoShape.h>
#include <DOM/IColorFormat.h>
#include <DOM/IFillFormat.h>
#include <DOM/IParagraph.h>
#include <DOM/IParagraphFormat.h>
#include <DOM/IPortionFormat.h>
#include <DOM/IShapeCollection.h>
#include <DOM/ISlide.h>
#include <DOM/ITextFrame.h>
#include <DOM/ITextFrameFormat.h>
#include <DOM/FillType.h>
#include <DOM/NullableBool.h>
#include <DOM/Presentation.h>
#include <DOM/ShapeType.h>
#include <DOM/TextAlignment.h>
#include <DOM/TextAutofitType.h>
#include <Export/SaveFormat.h>
#include <drawing/color.h>

using namespace Aspose::Slides;
using namespace Aspose::Slides::Export;

auto presentation = System::MakeObject<Presentation>();
auto slide = presentation->get_Slide(0);

auto shape = slide->get_Shapes()->AddAutoShape(ShapeType::Rectangle, 50.0f, 50.0f, 160.0f, 300.0f);
shape->get_FillFormat()->set_FillType(FillType::NoFill);

auto textFrame = shape->get_TextFrame();
textFrame->get_TextFrameFormat()->set_WrapText(NullableBool::True);
textFrame->get_TextFrameFormat()->set_AutofitType(TextAutofitType::None);
textFrame->get_TextFrameFormat()->set_MarginLeft(0);
textFrame->get_TextFrameFormat()->set_MarginRight(0);

auto paragraph = textFrame->get_Paragraph(0);
paragraph->set_Text(u"中文排版测试,PowerPoint 中文演示。");

auto format = paragraph->get_ParagraphFormat();
format->set_Alignment(TextAlignment::Left);
auto portionFormat = format->get_DefaultPortionFormat();
portionFormat->set_FontHeight(24.0f);
auto latinFont = System::MakeObject<FontData>(u"Arial");
portionFormat->set_LatinFont(latinFont);
auto eastAsianFont = System::MakeObject<FontData>(u"SimSun");
portionFormat->set_EastAsianFont(eastAsianFont);
portionFormat->get_FillFormat()->set_FillType(FillType::Solid);
portionFormat->get_FillFormat()->get_SolidFillColor()->set_Color(System::Drawing::Color::get_Black());
format->set_LatinLineBreak(NullableBool::False);
format->set_EastAsianLineBreak(NullableBool::True);

presentation->Save(u"line_breaking.pptx", SaveFormat::Pptx);
presentation->Dispose();
Styr hängande interpunktion
IParagraphFormat::set_HangingPunctuation låter berättigad interpunktion sträcka sig utanför textradens högra kant istället för att ta nästa rad. Den gäller för hela stycket och skiljer sig från ett hängande indrag.
Följande fristående exempel aktiverar hängande interpunktion i en 100‑punkts bred textram och sparar “hanging_punctuation.pptx”. Med 24‑punkts Arial och noll horisontella marginaler för textramen förblir den slutgiltiga punkten efter “sentence” och sträcker sig utanför den högra textkanten. Skicka NullableBool::False till settern för att jämföra: med dessa inställningar upptar punkten en egen rad. Radbrytning är aktiverad och autofit inaktiverad för att hålla den tillgängliga bredden fast.
#include <DOM/Fonts/FontData.h>
#include <DOM/IAutoShape.h>
#include <DOM/IColorFormat.h>
#include <DOM/IFillFormat.h>
#include <DOM/IParagraph.h>
#include <DOM/IParagraphFormat.h>
#include <DOM/IPortionFormat.h>
#include <DOM/IShapeCollection.h>
#include <DOM/ISlide.h>
#include <DOM/ITextFrame.h>
#include <DOM/ITextFrameFormat.h>
#include <DOM/FillType.h>
#include <DOM/NullableBool.h>
#include <DOM/Presentation.h>
#include <DOM/ShapeType.h>
#include <DOM/TextAlignment.h>
#include <DOM/TextAutofitType.h>
#include <Export/SaveFormat.h>
#include <drawing/color.h>

using namespace Aspose::Slides;
using namespace Aspose::Slides::Export;

auto presentation = System::MakeObject<Presentation>();
auto slide = presentation->get_Slide(0);

auto shape = slide->get_Shapes()->AddAutoShape(ShapeType::Rectangle, 50.0f, 50.0f, 100.0f, 200.0f);
shape->get_FillFormat()->set_FillType(FillType::NoFill);

auto textFrame = shape->get_TextFrame();
textFrame->get_TextFrameFormat()->set_WrapText(NullableBool::True);
textFrame->get_TextFrameFormat()->set_AutofitType(TextAutofitType::None);
textFrame->get_TextFrameFormat()->set_MarginLeft(0);
textFrame->get_TextFrameFormat()->set_MarginRight(0);

auto paragraph = textFrame->get_Paragraph(0);
paragraph->set_Text(u"Simple text, next sentence.");

auto format = paragraph->get_ParagraphFormat();
format->set_Alignment(TextAlignment::Left);
auto portionFormat = format->get_DefaultPortionFormat();
portionFormat->set_FontHeight(24.0f);
auto latinFont = System::MakeObject<FontData>(u"Arial");
portionFormat->set_LatinFont(latinFont);
portionFormat->get_FillFormat()->set_FillType(FillType::Solid);
portionFormat->get_FillFormat()->get_SolidFillColor()->set_Color(System::Drawing::Color::get_Black());
format->set_HangingPunctuation(NullableBool::True);

presentation->Save(u"hanging_punctuation.pptx", SaveFormat::Pptx);
presentation->Dispose();
Inte varje skiljetecken kan hänga. De teckensnitts‑ och layoutvillkor som beskrivs ovan gäller också för denna jämförelse: förändring av teckensnitt, tillgänglig bredd, marginaler eller autofit‑inställningar kan ta bort den synliga skillnaden.
Ange autofit‑typ för textramlar
ITextFrameFormat::set_AutofitType bestämmer hur text beter sig när den överskrider behållarens gränser. Använd den för att styra om texten krymper, rinner över eller ändrar formens storlek automatiskt. Följande exempel konfigurerar formen så att den anpassar storleken för att passa sin text och sparar resultatet till “autofit_type.pptx”.
#include <DOM/IAutoShape.h>
#include <DOM/ISlide.h>
#include <DOM/ITextFrame.h>
#include <DOM/ITextFrameFormat.h>
#include <DOM/Presentation.h>
#include <DOM/TextAutofitType.h>
#include <Export/SaveFormat.h>

using namespace Aspose::Slides;
using namespace Aspose::Slides::Export;

auto presentation = System::MakeObject<Presentation>(u"sample.pptx");
auto firstShape = presentation->get_Slide(0)->get_Shape(0);

auto autoShape = System::ExplicitCast<IAutoShape>(firstShape);
autoShape->get_TextFrame()->get_TextFrameFormat()->set_AutofitType(TextAutofitType::Shape);

presentation->Save(u"autofit_type.pptx", SaveFormat::Pptx);
presentation->Dispose();
För att räkna rader efter automatisk radbrytning och se hur text‑ eller formbredd förändrar resultatet, se Räkna renderade rader. Antalet rader visar inte ensam om texten överskrider behållaren.
Ange ankare för textramlar
ITextFrameFormat::set_AnchoringType definierar hur text positioneras vertikalt i en form, t.ex. högst upp, i mitten eller längst ner. Följande exempel förankrar texten till botten av den första formen och sparar resultatet till “text_anchor.pptx”.
#include <DOM/IAutoShape.h>
#include <DOM/ISlide.h>
#include <DOM/ITextFrame.h>
#include <DOM/ITextFrameFormat.h>
#include <DOM/Presentation.h>
#include <DOM/TextAnchorType.h>
#include <Export/SaveFormat.h>

using namespace Aspose::Slides;
using namespace Aspose::Slides::Export;

auto presentation = System::MakeObject<Presentation>(u"sample.pptx");
auto firstShape = presentation->get_Slide(0)->get_Shape(0);

auto autoShape = System::ExplicitCast<IAutoShape>(firstShape);
autoShape->get_TextFrame()->get_TextFrameFormat()->set_AnchoringType(TextAnchorType::Bottom);

presentation->Save(u"text_anchor.pptx", SaveFormat::Pptx);
presentation->Dispose();
Ange texttabulering
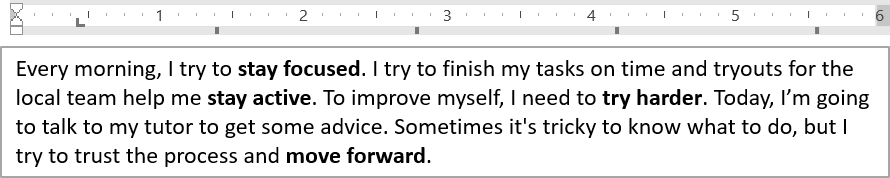
Använd IParagraphFormat::set_DefaultTabSize och IParagraphFormat::get_Tabs för att konfigurera tabbstopp i ett stycke. Följande exempel sätter standardtabbsteg till 100 punkter och lägger till ett vänsterjusterat tabbstopp vid 30 punkter. Dessa inställningar påverkar text som innehåller tabulatortecken.
#include <DOM/IAutoShape.h>
#include <DOM/IParagraph.h>
#include <DOM/IParagraphFormat.h>
#include <DOM/ISlide.h>
#include <DOM/ITabCollection.h>
#include <DOM/ITextFrame.h>
#include <DOM/Presentation.h>
#include <DOM/TabAlignment.h>
#include <Export/SaveFormat.h>

using namespace Aspose::Slides;
using namespace Aspose::Slides::Export;

auto presentation = System::MakeObject<Presentation>(u"sample.pptx");
auto firstShape = presentation->get_Slide(0)->get_Shape(0);

auto autoShape = System::ExplicitCast<IAutoShape>(firstShape);

auto paragraph = autoShape->get_TextFrame()->get_Paragraph(0);
paragraph->get_ParagraphFormat()->set_DefaultTabSize(100.0f);
paragraph->get_ParagraphFormat()->get_Tabs()->Add(30.0f, TabAlignment::Left);

presentation->Save(u"paragraph_tabs.pptx", SaveFormat::Pptx);
presentation->Dispose();
Resultatet:
Ange språk för korrekturläsning
Aspose.Slides tillhandahåller IBasePortionFormat::set_LanguageId, vilket låter dig ange språk för korrekturläsning för en textdel. Språket för korrekturläsning bestämmer vilket språk som används för stavnings‑ och grammatikkontroller i PowerPoint.
Följande exempel kräver “presentation.pptx” med en textruta som den första formen på den första bilden och minst ett stycke. Det ersätter det första styckets innehåll med “1。”, sätter SimSun som teckensnitt och tilldelar språk för korrekturläsning förenklad kinesiska (zh-CN). Det sparar resultatet till “proofing_language.pptx”:
#include <DOM/Fonts/FontData.h>
#include <DOM/IAutoShape.h>
#include <DOM/IParagraph.h>
#include <DOM/IPortionCollection.h>
#include <DOM/IPortionFormat.h>
#include <DOM/ISlide.h>
#include <DOM/ITextFrame.h>
#include <DOM/Portion.h>
#include <DOM/Presentation.h>
#include <Export/SaveFormat.h>

using namespace Aspose::Slides;
using namespace Aspose::Slides::Export;

auto presentation = System::MakeObject<Presentation>(u"presentation.pptx");
auto firstShape = presentation->get_Slide(0)->get_Shape(0);

auto autoShape = System::ExplicitCast<IAutoShape>(firstShape);

auto paragraph = autoShape->get_TextFrame()->get_Paragraph(0);
paragraph->get_Portions()->Clear();

auto font = System::MakeObject<FontData>(u"SimSun");

auto textPortion = System::MakeObject<Portion>();
auto portionFormat = textPortion->get_PortionFormat();
portionFormat->set_ComplexScriptFont(font);
portionFormat->set_EastAsianFont(font);
portionFormat->set_LatinFont(font);

// Ställ in språk för korrekturläsning till förenklad kinesiska.
portionFormat->set_LanguageId(u"zh-CN");

textPortion->set_Text(u"1。");
paragraph->get_Portions()->Add(textPortion);

presentation->Save(u"proofing_language.pptx", SaveFormat::Pptx);
presentation->Dispose();
Ange standardspråk
Använd LoadOptions::set_DefaultTextLanguage för att definiera standardspråk för text som skapas vid inläsning eller skapande av en presentation. Följande exempel skapar en presentation med amerikansk engelska som standardtextspråk, lägger till en textruta och skriver ut en-US för dess första textdel.
#include <DOM/IAutoShape.h>
#include <DOM/IParagraph.h>
#include <DOM/IPortion.h>
#include <DOM/IPortionFormat.h>
#include <DOM/IShapeCollection.h>
#include <DOM/ISlide.h>
#include <DOM/ITextFrame.h>
#include <DOM/LoadOptions.h>
#include <DOM/Presentation.h>
#include <DOM/ShapeType.h>
#include <system/console.h>

using namespace Aspose::Slides;

auto loadOptions = System::MakeObject<LoadOptions>();
loadOptions->set_DefaultTextLanguage(u"en-US");

auto presentation = System::MakeObject<Presentation>(loadOptions);
auto slide = presentation->get_Slide(0);

// Lägg till en ny rektangelform med text.
auto shape = slide->get_Shapes()->AddAutoShape(ShapeType::Rectangle, 20.0f, 20.0f, 150.0f, 50.0f);
shape->get_TextFrame()->set_Text(u"Sample text");

// Kontrollera språk för den första delen.
auto portion = shape->get_TextFrame()->get_Paragraph(0)->get_Portion(0);
auto languageId = portion->get_PortionFormat()->get_LanguageId();
System::Console::WriteLine(languageId);

presentation->Dispose();
Ange standardtextstil
För att tillämpa standardtextformatering på presentationsnivå, använd IPresentation::get_DefaultTextStyle.
Följande exempel sätter ett 14‑punkts fetstilteckensnitt som standard för toppnivåstycken i en ny presentation och sparar den till “default_text_style.pptx”. Text kan ärva dessa standardvärden såvida inte mer specifik formatering åsidosätter dem.
#include <DOM/IParagraphFormat.h>
#include <DOM/IPortionFormat.h>
#include <DOM/ITextStyle.h>
#include <DOM/NullableBool.h>
#include <DOM/Presentation.h>
#include <Export/SaveFormat.h>

using namespace Aspose::Slides;
using namespace Aspose::Slides::Export;

auto presentation = System::MakeObject<Presentation>();

// Hämta paragrafformat på högsta nivå.
auto paragraphFormat = presentation->get_DefaultTextStyle()->GetLevel(0);

if (paragraphFormat != nullptr)
{
    auto defaultPortionFormat = paragraphFormat->get_DefaultPortionFormat();
    defaultPortionFormat->set_FontHeight(14.0f);
    defaultPortionFormat->set_FontBold(NullableBool::True);
}

presentation->Save(u"default_text_style.pptx", SaveFormat::Pptx);
presentation->Dispose();
Extrahera text med versaler‑effekt
I PowerPoint gör All Caps‑teffekten att text visas med stora bokstäver på bilden även om den ursprungligen skrevs med gemener. När du hämtar en sådan textdel med Aspose.Slides returnerar biblioteket exakt den text som angavs. För att matcha den visade texten, kontrollera TextCapType och konvertera den returnerade strängen till versaler när värdet är TextCapType::All.
Detta exempel kräver “sample2.pptx” med en textruta som den första formen på den första bilden. Dess första stycke‑första del innehåller “Hello, Aspose!” med All Caps‑effekt, som visas nedan.

Kodexemplet nedan visar hur man extraherar texten med versaler‑effekt tillämpad:
#include <DOM/IAutoShape.h>
#include <DOM/IParagraph.h>
#include <DOM/IPortion.h>
#include <DOM/IPortionFormat.h>
#include <DOM/IPortionFormatEffectiveData.h>
#include <DOM/ISlide.h>
#include <DOM/ITextFrame.h>
#include <DOM/Presentation.h>
#include <DOM/TextCapType.h>
#include <system/console.h>

using namespace Aspose::Slides;

auto presentation = System::MakeObject<Presentation>(u"sample2.pptx");
auto firstShape = presentation->get_Slide(0)->get_Shape(0);

auto autoShape = System::ExplicitCast<IAutoShape>(firstShape);
auto textPortion = autoShape->get_TextFrame()->get_Paragraph(0)->get_Portion(0);

auto originalText = textPortion->get_Text();
System::Console::WriteLine(u"Original text: " + originalText);

auto textFormat = textPortion->get_PortionFormat()->GetEffective();
if (textFormat->get_TextCapType() == TextCapType::All)
{
    auto uppercaseText = originalText.ToUpper();
    System::Console::WriteLine(u"All-Caps effect: " + uppercaseText);
}

presentation->Dispose();
Utdata:
Original text: Hello, Aspose!
All-Caps effect: HELLO, ASPOSE!
FAQ
Hur ändrar jag text i en tabell på en bild?
För att ändra text i en tabell på en bild, använd ITable. Iterera genom cellerna och uppdatera varje cell via ICell::get_TextFrame och styckeformatering via IParagraph::get_ParagraphFormat.
Hur applicerar jag en gradientfärg på text i en PowerPoint‑bild?
För att applicera en gradientfärg på text, använd IBasePortionFormat::get_FillFormat. Ställ in IFillFormat::set_FillType till FillType::Gradient och konfigurera gradientstopp, riktning och transparens.