
Opmaak van presentatietekst in C++
Overzicht
Dit artikel laat zien hoe u tekst kunt opmaken in PowerPoint‑ en OpenDocument‑presentaties met Aspose.Slides voor C++. Het behandelt achtergrondkleuren, transparantie, tekenafstand, lettertype‑eigenschappen, rotatie, alinea‑afstand, autofit‑gedrag, tekst‑verankering, tab‑stops en taalinstellingen.
Tenzij anders aangegeven, gebruiken de voorbeelden sample.pptx. De eerste vorm op de eerste dia is een tekstvak, en de eerste alinea daarvan bevat de hieronder getoonde tekst. Zowel dia‑ als vorm‑indices beginnen bij nul. Voorbeelden die vette delen selecteren gebruiken effectieve opmaak, inclusief geërfde vette opmaak:

Om letterlijke tekst of reguliere‑expressie‑overeenkomsten te vinden en te markeren, zie Zoeken en vervangen van tekst.
Tekstachtergrondkleur instellen
Gebruik IParagraphFormat::get_DefaultPortionFormat om de standaard markeerkleur voor een alinea in te stellen, of gebruik IBasePortionFormat::get_HighlightColor voor afzonderlijke tekstgedeelten.
Het volgende voorbeeld stelt een lichtgrijze markering in als standaard voor de eerste alinea. Expliciete markeerkleuren op afzonderlijke gedeelten hebben voorrang op deze standaard:
#include <DOM/IAutoShape.h>
#include <DOM/IColorFormat.h>
#include <DOM/IParagraph.h>
#include <DOM/IParagraphFormat.h>
#include <DOM/IPortionFormat.h>
#include <DOM/ISlide.h>
#include <DOM/ITextFrame.h>
#include <DOM/Presentation.h>
#include <Export/SaveFormat.h>
#include <drawing/color.h>

using namespace Aspose::Slides;
using namespace Aspose::Slides::Export;

auto presentation = System::MakeObject<Presentation>(u"sample.pptx");
auto firstShape = presentation->get_Slide(0)->get_Shape(0);

auto autoShape = System::ExplicitCast<IAutoShape>(firstShape);

auto paragraph = autoShape->get_TextFrame()->get_Paragraph(0);
auto defaultPortionFormat = paragraph->get_ParagraphFormat()->get_DefaultPortionFormat();
auto highlightColor = System::Drawing::Color::get_LightGray();

// Stel de markeerkleur in voor de hele alinea.
presentation->Save(u"gray_paragraph.pptx", SaveFormat::Pptx);
presentation->Dispose();
Het resultaat:

Het code‑voorbeeld hieronder laat zien hoe u de achtergrondkleur instelt voor tekstgedeelten met een vet lettertype:
#include <DOM/IAutoShape.h>
#include <DOM/IColorFormat.h>
#include <DOM/IParagraph.h>
#include <DOM/IPortion.h>
#include <DOM/IPortionCollection.h>
#include <DOM/IPortionFormat.h>
#include <DOM/IPortionFormatEffectiveData.h>
#include <DOM/ISlide.h>
#include <DOM/ITextFrame.h>
#include <DOM/Presentation.h>
#include <Export/SaveFormat.h>
#include <drawing/color.h>

using namespace Aspose::Slides;
using namespace Aspose::Slides::Export;

auto presentation = System::MakeObject<Presentation>(u"sample.pptx");
auto firstShape = presentation->get_Slide(0)->get_Shape(0);

auto autoShape = System::ExplicitCast<IAutoShape>(firstShape);

auto paragraph = autoShape->get_TextFrame()->get_Paragraph(0);
auto portions = paragraph->get_Portions();
int portionCount = portions->get_Count();
auto highlightColor = System::Drawing::Color::get_LightGray();

for (int portionIndex = 0; portionIndex < portionCount; portionIndex++)
{
    auto portion = paragraph->get_Portion(portionIndex);
    auto portionFormat = portion->get_PortionFormat();
    if (portionFormat->GetEffective()->get_FontBold())
    {
        // Stel de markeerkleur in voor het tekstgedeelte.
        portionFormat->get_HighlightColor()->set_Color(highlightColor);
    }
}

presentation->Save(u"gray_text_portions.pptx", SaveFormat::Pptx);
presentation->Dispose();
Het resultaat:

Alinea’s uitlijnen
Gebruik IParagraphFormat::set_Alignment om de uitlijning van een alinea binnen een tekstraster in te stellen. De waarde kan gecentreerd, links uitgelijnd, rechts uitgelijnd, uitgevuld, enzovoort zijn.
Het volgende code‑voorbeeld toont hoe u de alinea op het midden uitlijnt:
#include <DOM/IAutoShape.h>
#include <DOM/IParagraph.h>
#include <DOM/IParagraphFormat.h>
#include <DOM/ISlide.h>
#include <DOM/ITextFrame.h>
#include <DOM/Presentation.h>
#include <DOM/TextAlignment.h>
#include <Export/SaveFormat.h>

using namespace Aspose::Slides;
using namespace Aspose::Slides::Export;

auto presentation = System::MakeObject<Presentation>(u"sample.pptx");
auto firstShape = presentation->get_Slide(0)->get_Shape(0);

auto autoShape = System::ExplicitCast<IAutoShape>(firstShape);
auto paragraph = autoShape->get_TextFrame()->get_Paragraph(0);

// Stel de uitlijning van de alinea in op midden.
paragraph->get_ParagraphFormat()->set_Alignment(TextAlignment::Center);

presentation->Save(u"aligned_paragraph.pptx", SaveFormat::Pptx);
presentation->Dispose();
Het resultaat:

Lettertype uitlijnen binnen een regel
Gebruik IParagraphFormat::set_FontAlignment om tekstgedeelten met verschillende lettergroottes binnen een regel verticaal uit te lijnen. Deze instelling geldt voor de gehele alinea en bepaalt de uitlijning binnen elk van zijn regels.
Het volgende zelfstandige voorbeeld maakt vier gelabelde tekstvakken op één dia. Elke alinea bevat dezelfde tekst in 18, 36 en 54 punten, met een andere lettertype‑uitlijning. Het gebruikt Arial, schakelt autofit en omslag uit, en houdt de tekstvakken groot genoeg voor één regel.
#include <DOM/FontAlignment.h>
#include <DOM/Fonts/FontData.h>
#include <DOM/IAutoShape.h>
#include <DOM/IColorFormat.h>
#include <DOM/IFillFormat.h>
#include <DOM/ILineFormat.h>
#include <DOM/IParagraph.h>
#include <DOM/IParagraphCollection.h>
#include <DOM/IParagraphFormat.h>
#include <DOM/IPortionCollection.h>
#include <DOM/IPortionFormat.h>
#include <DOM/IShapeCollection.h>
#include <DOM/ISlide.h>
#include <DOM/ITextFrame.h>
#include <DOM/ITextFrameFormat.h>
#include <DOM/FillType.h>
#include <DOM/NullableBool.h>
#include <DOM/Paragraph.h>
#include <DOM/Portion.h>
#include <DOM/Presentation.h>
#include <DOM/ShapeType.h>
#include <DOM/TextAlignment.h>
#include <DOM/TextAnchorType.h>
#include <DOM/TextAutofitType.h>
#include <Export/SaveFormat.h>
#include <drawing/color.h>

using namespace Aspose::Slides;
using namespace Aspose::Slides::Export;
using namespace System;
using namespace System::Drawing;

auto presentation = MakeObject<Presentation>();
auto slide = presentation->get_Slide(0);

FontAlignment alignments[] = { FontAlignment::Baseline, FontAlignment::Top, FontAlignment::Center, FontAlignment::Bottom };
String labels[] = { u"Baseline", u"Top", u"Center", u"Bottom" };
float fontSizes[] = { 18.0f, 36.0f, 54.0f };
auto font = MakeObject<FontData>(u"Arial");

for (auto i = 0; i < 4; i++)
{
    auto shape = slide->get_Shapes()->AddAutoShape(ShapeType::Rectangle, 30, 20 + i * 130, 660, 120);
    shape->get_FillFormat()->set_FillType(FillType::NoFill);
    shape->get_LineFormat()->get_FillFormat()->set_FillType(FillType::NoFill);

    auto textFrame = shape->get_TextFrame();
    textFrame->get_TextFrameFormat()->set_AnchoringType(TextAnchorType::Top);
    textFrame->get_TextFrameFormat()->set_AutofitType(TextAutofitType::None);
    textFrame->get_TextFrameFormat()->set_WrapText(NullableBool::False);

    auto label = textFrame->get_Paragraph(0);
    label->set_Text(labels[i]);
    label->get_ParagraphFormat()->set_Alignment(TextAlignment::Left);
    auto labelFormat = label->get_ParagraphFormat()->get_DefaultPortionFormat();
    labelFormat->set_FontHeight(14);
    labelFormat->set_LatinFont(font);
    labelFormat->get_FillFormat()->set_FillType(FillType::Solid);
    labelFormat->get_FillFormat()->get_SolidFillColor()->set_Color(Color::get_Gray());

    auto paragraph = MakeObject<Paragraph>();
    paragraph->get_ParagraphFormat()->set_FontAlignment(alignments[i]);
    paragraph->get_ParagraphFormat()->set_Alignment(TextAlignment::Left);
    auto portionFormat = paragraph->get_ParagraphFormat()->get_DefaultPortionFormat();
    portionFormat->set_LatinFont(font);
    portionFormat->get_FillFormat()->set_FillType(FillType::Solid);
    portionFormat->get_FillFormat()->get_SolidFillColor()->set_Color(Color::get_Black());

    for (auto fontSize : fontSizes)
    {
        auto portion = MakeObject<Portion>(u"Ag ");
        portion->get_PortionFormat()->set_FontHeight(fontSize);
        paragraph->get_Portions()->Add(portion);
    }

    textFrame->get_Paragraphs()->Add(paragraph);
}

presentation->Save(u"font_alignment.pptx", SaveFormat::Pptx);
presentation->Dispose();
Het resultaat:
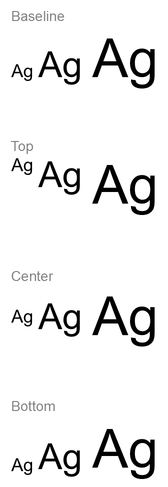
Lettertype‑uitlijning maakt gebruik van font‑metriek, waardoor de zichtbare randen van individuele letters niet per se exact op één lijn liggen. Het voorbeeld bevat zowel een hoofdletter als een afdalende letter om het verschil tussen baseline‑ en onder‑uitlijning te verduidelijken. Beschikbaarheid van lettertypes en vervanging, de gebruikte tekens en het verschil in lettergroottes beïnvloeden het resultaat. Frame‑afmetingen, marges, regelafstand, omslag en autofit beïnvloeden eveneens de lay‑out; gebruik dezelfde lettertypes en lay‑out‑instellingen bij het vergelijken van de modi.
Deze instelling verschilt van IParagraphFormat::set_Alignment, die de horizontale alinea‑uitlijning regelt, en van ITextFrameFormat::set_AnchoringType, die het tekstblok verticaal binnen zijn vorm positioneert. Superscript‑ en subscript‑opmaak via IBasePortionFormat::set_Escapement verschuift afzonderlijke gedeelten ten opzichte van de baseline in plaats van de lettertype‑uitlijning voor de regels van de alinea in te stellen.
Transparantie voor tekst instellen
Tekst‑transparantie wordt geregeld via het alfa‑component van de kleur die is toegewezen via IBasePortionFormat::get_FillFormat. In de onderstaande voorbeelden is alpha = 50 een ARGB‑alfa‑kanaalwaarde op de 0–255‑schaal, geen transparantie‑percentage.
Het code‑voorbeeld hieronder toont hoe u transparantie toepast op de hele alinea:
#include <DOM/FillType.h>
#include <DOM/IAutoShape.h>
#include <DOM/IColorFormat.h>
#include <DOM/IFillFormat.h>
#include <DOM/IParagraph.h>
#include <DOM/IParagraphFormat.h>
#include <DOM/IPortionFormat.h>
#include <DOM/ISlide.h>
#include <DOM/ITextFrame.h>
#include <DOM/Presentation.h>
#include <Export/SaveFormat.h>
#include <drawing/color.h>

using namespace Aspose::Slides;
using namespace Aspose::Slides::Export;

int alpha = 50;

auto presentation = System::MakeObject<Presentation>(u"sample.pptx");
auto firstShape = presentation->get_Slide(0)->get_Shape(0);

auto autoShape = System::ExplicitCast<IAutoShape>(firstShape);

auto paragraph = autoShape->get_TextFrame()->get_Paragraph(0);
auto defaultPortionFormat = paragraph->get_ParagraphFormat()->get_DefaultPortionFormat();

// Stel de vulkleur van de tekst in op een transparante kleur.
defaultPortionFormat->get_FillFormat()->set_FillType(FillType::Solid);
auto baseColor = System::Drawing::Color::get_Black();
auto transparentColor = System::Drawing::Color::FromArgb(alpha, baseColor);
defaultPortionFormat->get_FillFormat()->get_SolidFillColor()->set_Color(transparentColor);

presentation->Save(u"transparent_paragraph.pptx", SaveFormat::Pptx);
presentation->Dispose();
Het resultaat:

Het volgende code‑voorbeeld toont hoe u transparantie toepast op tekstgedeelten met een vet lettertype:
#include <DOM/FillType.h>
#include <DOM/IAutoShape.h>
#include <DOM/IColorFormat.h>
#include <DOM/IFillFormat.h>
#include <DOM/IParagraph.h>
#include <DOM/IPortion.h>
#include <DOM/IPortionCollection.h>
#include <DOM/IPortionFormat.h>
#include <DOM/IPortionFormatEffectiveData.h>
#include <DOM/ISlide.h>
#include <DOM/ITextFrame.h>
#include <DOM/Presentation.h>
#include <Export/SaveFormat.h>
#include <drawing/color.h>

using namespace Aspose::Slides;
using namespace Aspose::Slides::Export;

int alpha = 50;

auto presentation = System::MakeObject<Presentation>(u"sample.pptx");
auto firstShape = presentation->get_Slide(0)->get_Shape(0);

auto autoShape = System::ExplicitCast<IAutoShape>(firstShape);

auto paragraph = autoShape->get_TextFrame()->get_Paragraph(0);
auto portions = paragraph->get_Portions();
int portionCount = portions->get_Count();

for (int portionIndex = 0; portionIndex < portionCount; portionIndex++)
{
    auto portion = paragraph->get_Portion(portionIndex);
    auto portionFormat = portion->get_PortionFormat();
    if (portionFormat->GetEffective()->get_FontBold())
    {
        // Stel de transparantie van het tekstgedeelte in.
        portionFormat->get_FillFormat()->set_FillType(FillType::Solid);
        auto baseColor = System::Drawing::Color::get_Black();
        auto transparentColor = System::Drawing::Color::FromArgb(alpha, baseColor);
        portionFormat->get_FillFormat()->get_SolidFillColor()->set_Color(transparentColor);
    }
}

presentation->Save(u"transparent_text_portions.pptx", SaveFormat::Pptx);
presentation->Dispose();
Het resultaat:

Tekenafstand voor tekst instellen
Gebruik IBasePortionFormat::set_Spacing om de afstand tussen tekens in een tekstvak uit te breiden of te verkleinen. De voorbeelden voegen 3 punten toe; negatieve waarden verkleinen de tekst.
De volgende C++‑code laat zien hoe u de tekenafstand in de hele alinea vergroot:
#include <DOM/IAutoShape.h>
#include <DOM/IParagraph.h>
#include <DOM/IParagraphFormat.h>
#include <DOM/IPortionFormat.h>
#include <DOM/ISlide.h>
#include <DOM/ITextFrame.h>
#include <DOM/Presentation.h>
#include <Export/SaveFormat.h>

using namespace Aspose::Slides;
using namespace Aspose::Slides::Export;

auto presentation = System::MakeObject<Presentation>(u"sample.pptx");
auto firstShape = presentation->get_Slide(0)->get_Shape(0);

auto autoShape = System::ExplicitCast<IAutoShape>(firstShape);
auto paragraph = autoShape->get_TextFrame()->get_Paragraph(0);

// Opmerking: gebruik negatieve waarden om de tekenafstand te verkleinen.
paragraph->get_ParagraphFormat()->get_DefaultPortionFormat()->set_Spacing(3.0f); // Vergroot de tekenafstand.

presentation->Save(u"character_spacing_in_paragraph.pptx", SaveFormat::Pptx);
presentation->Dispose();
Het resultaat:

Het code‑voorbeeld hieronder toont hoe u de tekenafstand vergroot in tekstgedeelten met een vet lettertype:
#include <DOM/IAutoShape.h>
#include <DOM/IParagraph.h>
#include <DOM/IPortion.h>
#include <DOM/IPortionCollection.h>
#include <DOM/IPortionFormat.h>
#include <DOM/IPortionFormatEffectiveData.h>
#include <DOM/ISlide.h>
#include <DOM/ITextFrame.h>
#include <DOM/Presentation.h>
#include <Export/SaveFormat.h>

using namespace Aspose::Slides;
using namespace Aspose::Slides::Export;

auto presentation = System::MakeObject<Presentation>(u"sample.pptx");
auto firstShape = presentation->get_Slide(0)->get_Shape(0);

auto autoShape = System::ExplicitCast<IAutoShape>(firstShape);

auto paragraph = autoShape->get_TextFrame()->get_Paragraph(0);
auto portions = paragraph->get_Portions();
int portionCount = portions->get_Count();

for (int portionIndex = 0; portionIndex < portionCount; portionIndex++)
{
    auto portion = paragraph->get_Portion(portionIndex);
    auto portionFormat = portion->get_PortionFormat();
    if (portionFormat->GetEffective()->get_FontBold())
    {
        // Opmerking: gebruik negatieve waarden om de tekenafstand te verkleinen.
        portionFormat->set_Spacing(3.0f); // Vergroot de tekenafstand.
    }
}

presentation->Save(u"character_spacing_in_text_portions.pptx", SaveFormat::Pptx);
presentation->Dispose();
Het resultaat:

Kerning uitschakelen voor specifieke lettertypes
In sommige gevallen kan door Aspose.Slides gerenderde tekst er iets strakker uitzien dan dezelfde tekst in PowerPoint. Dit kan gebeuren omdat PowerPoint kerning‑gegevens voor bepaalde lettertypes negeert, zelfs wanneer het lettertype geldige kerning‑informatie bevat en kerning is ingeschakeld in de PowerPoint‑instellingen.
Om de gegenereerde uitvoer in dergelijke gevallen dichter bij PowerPoint te laten komen, kunt u kerning uitschakelen voor tekstgedeelten die het betreffende lettertype gebruiken. Gebruik IBasePortionFormat::set_KerningMinimalSize om een waarde in te stellen die groter is dan de werkelijke lettergrootte. Dit voorbeeld vereist “presentation.pptx” met een tekstvak als eerste vorm op de eerste dia. Het controleert de effectieve lettertype‑namen, inclusief geërfde lettertypes, en stelt een drempel van 100 punten in voor gedeelten die Roboto gebruiken. Dit schakelt kerning uit voor overeenkomende gedeelten met een lettergrootte kleiner dan 100 punten:
#include <DOM/IAutoShape.h>
#include <DOM/IFontData.h>
#include <DOM/IPortionFormatEffectiveData.h>
#include <DOM/IParagraph.h>
#include <DOM/IParagraphCollection.h>
#include <DOM/IPortion.h>
#include <DOM/IPortionCollection.h>
#include <DOM/IPortionFormat.h>
#include <DOM/ISlide.h>
#include <DOM/ITextFrame.h>
#include <DOM/Presentation.h>
#include <Export/SaveFormat.h>

using namespace Aspose::Slides;
using namespace Aspose::Slides::Export;

auto presentation = System::MakeObject<Presentation>(u"presentation.pptx");
auto firstShape = presentation->get_Slide(0)->get_Shape(0);

auto autoShape = System::ExplicitCast<IAutoShape>(firstShape);
System::String targetFont = u"Roboto";
auto textFrame = autoShape->get_TextFrame();
auto paragraphs = textFrame->get_Paragraphs();
int paragraphCount = paragraphs->get_Count();

for (int paragraphIndex = 0; paragraphIndex < paragraphCount; paragraphIndex++)
{
    auto paragraph = textFrame->get_Paragraph(paragraphIndex);
    auto portions = paragraph->get_Portions();
    int portionCount = portions->get_Count();

    for (int portionIndex = 0; portionIndex < portionCount; portionIndex++)
    {
        auto portion = paragraph->get_Portion(portionIndex);
        auto portionFormat = portion->get_PortionFormat();
        auto textFormat = portionFormat->GetEffective();
        auto latinFont = textFormat->get_LatinFont();
        auto eastAsianFont = textFormat->get_EastAsianFont();
        auto complexScriptFont = textFormat->get_ComplexScriptFont();

        bool isLatinFont = latinFont != nullptr && latinFont->get_FontName() == targetFont;
        bool isEastAsianFont = eastAsianFont != nullptr && eastAsianFont->get_FontName() == targetFont;
        bool isComplexScriptFont = complexScriptFont != nullptr && complexScriptFont->get_FontName() == targetFont;

        if (isLatinFont || isEastAsianFont || isComplexScriptFont)
        {
            portionFormat->set_KerningMinimalSize(100.0f);
        }
    }
}

presentation->Save(u"output.pptx", SaveFormat::Pptx);
presentation->Dispose();
Voor overeenkomstige tekst onder de drempel voorkomt deze instelling kerning en kan het helpen de rendering van Aspose.Slides af te stemmen op de visuele uitvoer van PowerPoint voor lettertypes die door dit PowerPoint‑specifieke gedrag worden beïnvloed.
Tekst‑lettertype‑eigenschappen beheren
Lettertype‑eigenschappen kunnen op alinea‑niveau worden ingesteld via IParagraphFormat::get_DefaultPortionFormat of op afzonderlijke gedeelten via IPortionFormat.
Het volgende voorbeeld stelt het standaardlettertype van de eerste alinea in op 12 punten Times New Roman met vet, cursief en gestippelde onderstreping. Expliciete opmaak op afzonderlijke gedeelten heeft voorrang op deze standaarden.
#include <DOM/Fonts/FontData.h>
#include <DOM/IAutoShape.h>
#include <DOM/IParagraph.h>
#include <DOM/IParagraphFormat.h>
#include <DOM/IPortionFormat.h>
#include <DOM/ISlide.h>
#include <DOM/ITextFrame.h>
#include <DOM/NullableBool.h>
#include <DOM/Presentation.h>
#include <DOM/TextUnderlineType.h>
#include <Export/SaveFormat.h>

using namespace Aspose::Slides;
using namespace Aspose::Slides::Export;

auto presentation = System::MakeObject<Presentation>(u"sample.pptx");
auto firstShape = presentation->get_Slide(0)->get_Shape(0);

auto autoShape = System::ExplicitCast<IAutoShape>(firstShape);
auto paragraph = autoShape->get_TextFrame()->get_Paragraph(0);
auto defaultPortionFormat = paragraph->get_ParagraphFormat()->get_DefaultPortionFormat();

// Stel de lettertype-eigenschappen voor de alinea in.
defaultPortionFormat->set_FontHeight(12.0f);
defaultPortionFormat->set_FontBold(NullableBool::True);
defaultPortionFormat->set_FontItalic(NullableBool::True);
defaultPortionFormat->set_FontUnderline(TextUnderlineType::Dotted);
auto font = System::MakeObject<FontData>(u"Times New Roman");
defaultPortionFormat->set_LatinFont(font);

presentation->Save(u"font_properties_for_paragraph.pptx", SaveFormat::Pptx);
presentation->Dispose();
Het resultaat:

Het volgende voorbeeld past 13 punten Times New Roman, cursieve opmaak en een gestippelde onderstreping toe op gedeelten waarvan de effectieve opmaak vet is:
#include <DOM/Fonts/FontData.h>
#include <DOM/IAutoShape.h>
#include <DOM/IParagraph.h>
#include <DOM/IPortion.h>
#include <DOM/IPortionCollection.h>
#include <DOM/IPortionFormat.h>
#include <DOM/IPortionFormatEffectiveData.h>
#include <DOM/ISlide.h>
#include <DOM/ITextFrame.h>
#include <DOM/NullableBool.h>
#include <DOM/Presentation.h>
#include <DOM/TextUnderlineType.h>
#include <Export/SaveFormat.h>

using namespace Aspose::Slides;
using namespace Aspose::Slides::Export;

auto presentation = System::MakeObject<Presentation>(u"sample.pptx");
auto firstShape = presentation->get_Slide(0)->get_Shape(0);

auto autoShape = System::ExplicitCast<IAutoShape>(firstShape);
auto paragraph = autoShape->get_TextFrame()->get_Paragraph(0);
auto portions = paragraph->get_Portions();
int portionCount = portions->get_Count();
auto font = System::MakeObject<FontData>(u"Times New Roman");

for (int portionIndex = 0; portionIndex < portionCount; portionIndex++)
{
    auto portion = paragraph->get_Portion(portionIndex);
    auto portionFormat = portion->get_PortionFormat();
    if (portionFormat->GetEffective()->get_FontBold())
    {
        // Stel de lettertype‑eigenschappen voor het tekstgedeelte in.
        portionFormat->set_FontHeight(13.0f);
        portionFormat->set_FontItalic(NullableBool::True);
        portionFormat->set_FontUnderline(TextUnderlineType::Dotted);
        portionFormat->set_LatinFont(font);
    }
}

presentation->Save(u"font_properties_for_text_portions.pptx", SaveFormat::Pptx);
presentation->Dispose();
Het resultaat:

Tekstrotatie instellen
Gebruik ITextFrameFormat::set_TextVerticalType om een vooraf gedefinieerde tekstoriëntatie binnen een vorm in te stellen.
Het volgende code‑voorbeeld stelt de tekstoriëntatie in de vorm in op TextVerticalType::Vertical270, wat de tekst 90 graden tegen de klok in roteert:
#include <DOM/IAutoShape.h>
#include <DOM/ISlide.h>
#include <DOM/ITextFrame.h>
#include <DOM/ITextFrameFormat.h>
#include <DOM/Presentation.h>
#include <DOM/TextVerticalType.h>
#include <Export/SaveFormat.h>

using namespace Aspose::Slides;
using namespace Aspose::Slides::Export;

auto presentation = System::MakeObject<Presentation>(u"sample.pptx");
auto firstShape = presentation->get_Slide(0)->get_Shape(0);

auto autoShape = System::ExplicitCast<IAutoShape>(firstShape);
autoShape->get_TextFrame()->get_TextFrameFormat()->set_TextVerticalType(TextVerticalType::Vertical270);

presentation->Save(u"text_rotation.pptx", SaveFormat::Pptx);
presentation->Dispose();
Het resultaat:

Aangepaste rotatie voor tekstkaders instellen
Gebruik ITextFrameFormat::set_RotationAngle om een aangepaste rotatiehoek in te stellen voor een ITextFrame.
Het code‑voorbeeld hieronder roteert het tekstkader met 3 graden met de klok mee binnen de vorm:
#include <DOM/IAutoShape.h>
#include <DOM/ISlide.h>
#include <DOM/ITextFrame.h>
#include <DOM/ITextFrameFormat.h>
#include <DOM/Presentation.h>
#include <Export/SaveFormat.h>

using namespace Aspose::Slides;
using namespace Aspose::Slides::Export;

auto presentation = System::MakeObject<Presentation>(u"sample.pptx");
auto firstShape = presentation->get_Slide(0)->get_Shape(0);

auto autoShape = System::ExplicitCast<IAutoShape>(firstShape);
autoShape->get_TextFrame()->get_TextFrameFormat()->set_RotationAngle(3.0f);

presentation->Save(u"custom_text_rotation.pptx", SaveFormat::Pptx);
presentation->Dispose();
Het resultaat:

Regelafstand voor alinea’s instellen
Aspose.Slides biedt IParagraphFormat::set_SpaceAfter, IParagraphFormat::set_SpaceBefore, en IParagraphFormat::set_SpaceWithin om de alinea‑afstand te regelen. Deze methoden worden als volgt gebruikt:
- Gebruik een positieve waarde om de regelafstand op te geven als een percentage van de regelhoogte.
- Gebruik een negatieve waarde om de regelafstand in punten op te geven.
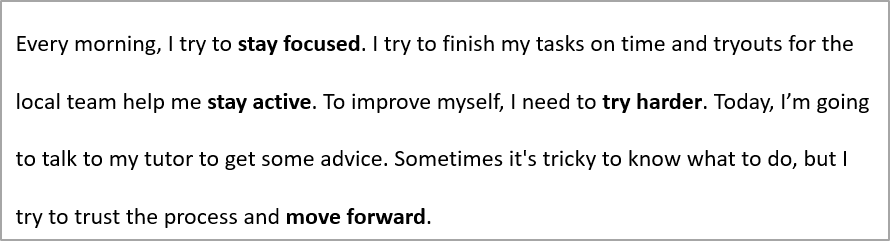
Het volgende voorbeeld stelt de afstand binnen de eerste alinea in op 200 % van de regelhoogte (dubbele regelafstand):
#include <DOM/IAutoShape.h>
#include <DOM/IParagraph.h>
#include <DOM/IParagraphFormat.h>
#include <DOM/ISlide.h>
#include <DOM/ITextFrame.h>
#include <DOM/Presentation.h>
#include <Export/SaveFormat.h>

using namespace Aspose::Slides;
using namespace Aspose::Slides::Export;

auto presentation = System::MakeObject<Presentation>(u"sample.pptx");
auto firstShape = presentation->get_Slide(0)->get_Shape(0);

auto autoShape = System::ExplicitCast<IAutoShape>(firstShape);

auto paragraph = autoShape->get_TextFrame()->get_Paragraph(0);
paragraph->get_ParagraphFormat()->set_SpaceWithin(200.0f);

presentation->Save(u"line_spacing.pptx", SaveFormat::Pptx);
presentation->Dispose();
Het resultaat:
Regelafbreking beheren
Regel‑afbreekregels voor alinea’s zijn nuttig in smalle tekstblokken en presentaties die Latijnse en Oost‑Aziatische tekst mengen. De volgende methoden behoren tot IParagraphFormat, zodat ze op een hele alinea van toepassing zijn:
- IParagraphFormat::set_LatinLineBreak regelt de Latijnse regel‑afbreekregels. In gemengde tekst kan het wijzigen hiervan ook bepalen waar naastliggende Oost‑Aziatische tekst en interpunctie worden afgebroken.
- IParagraphFormat::set_EastAsianLineBreak regelt de Oost‑Aziatische regel‑afbreekregels, inclusief beperkingen op tekens aan het begin en einde van een regel.
Deze regels vervangen niet ITextFrameFormat::set_WrapText, die automatisch omslaan binnen een tekstkader inschakelt. Ze beïnvloeden de layout wanneer omslaan optreedt; ze voegen geen regel‑afbreektekens toe. Een expliciete regel‑afbreking dwingt een nieuwe regel binnen de alinea, onafhankelijk van de beschikbare breedte.
Het volgende zelfstandige voorbeeld maakt een smal tekstblok met Chinese en Latijnse tekst. Het stelt beide regel‑afbreekregels expliciet in en slaat “line_breaking.pptx” op. Om met een van de regels te experimenteren, wijzig de waarde die aan de setter wordt doorgegeven terwijl de andere instellingen ongewijzigd blijven. Het voorbeeld gebruikt 24‑punten Arial en SimSun met een frame‑breedte van 160 punten en nul horizontale tekst‑frame‑marges. ITextFrameFormat::set_AutofitType wordt aangeroepen met TextAutofitType::None zodat de tekstgrootte en frame‑afmetingen vast blijven:
#include <DOM/Fonts/FontData.h>
#include <DOM/IAutoShape.h>
#include <DOM/IColorFormat.h>
#include <DOM/IFillFormat.h>
#include <DOM/IParagraph.h>
#include <DOM/IParagraphFormat.h>
#include <DOM/IPortionFormat.h>
#include <DOM/IShapeCollection.h>
#include <DOM/ISlide.h>
#include <DOM/ITextFrame.h>
#include <DOM/ITextFrameFormat.h>
#include <DOM/FillType.h>
#include <DOM/NullableBool.h>
#include <DOM/Presentation.h>
#include <DOM/ShapeType.h>
#include <DOM/TextAlignment.h>
#include <DOM/TextAutofitType.h>
#include <Export/SaveFormat.h>
#include <drawing/color.h>

using namespace Aspose::Slides;
using namespace Aspose::Slides::Export;

auto presentation = System::MakeObject<Presentation>();
auto slide = presentation->get_Slide(0);

auto shape = slide->get_Shapes()->AddAutoShape(ShapeType::Rectangle, 50.0f, 50.0f, 160.0f, 300.0f);
shape->get_FillFormat()->set_FillType(FillType::NoFill);

auto textFrame = shape->get_TextFrame();
textFrame->get_TextFrameFormat()->set_WrapText(NullableBool::True);
textFrame->get_TextFrameFormat()->set_AutofitType(TextAutofitType::None);
textFrame->get_TextFrameFormat()->set_MarginLeft(0);
textFrame->get_TextFrameFormat()->set_MarginRight(0);

auto paragraph = textFrame->get_Paragraph(0);
paragraph->set_Text(u"中文排版测试,PowerPoint 中文演示。");

auto format = paragraph->get_ParagraphFormat();
format->set_Alignment(TextAlignment::Left);
auto portionFormat = format->get_DefaultPortionFormat();
portionFormat->set_FontHeight(24.0f);
auto latinFont = System::MakeObject<FontData>(u"Arial");
portionFormat->set_LatinFont(latinFont);
auto eastAsianFont = System::MakeObject<FontData>(u"SimSun");
portionFormat->set_EastAsianFont(eastAsianFont);
portionFormat->get_FillFormat()->set_FillType(FillType::Solid);
portionFormat->get_FillFormat()->get_SolidFillColor()->set_Color(System::Drawing::Color::get_Black());
format->set_LatinLineBreak(NullableBool::False);
format->set_EastAsianLineBreak(NullableBool::True);

presentation->Save(u"line_breaking.pptx", SaveFormat::Pptx);
presentation->Dispose();
Hangende interpunctie beheren
IParagraphFormat::set_HangingPunctuation staat toe dat in aanmerking komende interpunctie zich uitstrekt voorbij de rechterrand van de tekstregel in plaats van de volgende regel in te nemen. Het geldt voor de gehele alinea en verschilt van een hangende inspringing.
Het volgende zelfstandige voorbeeld schakelt hangende interpunctie in een 100‑punten breed tekstkader in en slaat “hanging_punctuation.pptx” op. Met 24‑punten Arial en nul horizontale tekst‑frame‑marges blijft de laatste punt achter “sentence” staan en strekt zich uit voorbij de rechterkant van de tekst. Geef NullableBool::False door aan de setter om te vergelijken: met deze instellingen neemt de punt een aparte regel in. Omslaan is ingeschakeld en autofit uitgeschakeld om de beschikbare breedte vast te houden.
#include <DOM/Fonts/FontData.h>
#include <DOM/IAutoShape.h>
#include <DOM/IColorFormat.h>
#include <DOM/IFillFormat.h>
#include <DOM/IParagraph.h>
#include <DOM/IParagraphFormat.h>
#include <DOM/IPortionFormat.h>
#include <DOM/IShapeCollection.h>
#include <DOM/ISlide.h>
#include <DOM/ITextFrame.h>
#include <DOM/ITextFrameFormat.h>
#include <DOM/FillType.h>
#include <DOM/NullableBool.h>
#include <DOM/Presentation.h>
#include <DOM/ShapeType.h>
#include <DOM/TextAlignment.h>
#include <DOM/TextAutofitType.h>
#include <Export/SaveFormat.h>
#include <drawing/color.h>

using namespace Aspose::Slides;
using namespace Aspose::Slides::Export;

auto presentation = System::MakeObject<Presentation>();
auto slide = presentation->get_Slide(0);

auto shape = slide->get_Shapes()->AddAutoShape(ShapeType::Rectangle, 50.0f, 50.0f, 100.0f, 200.0f);
shape->get_FillFormat()->set_FillType(FillType::NoFill);

auto textFrame = shape->get_TextFrame();
textFrame->get_TextFrameFormat()->set_WrapText(NullableBool::True);
textFrame->get_TextFrameFormat()->set_AutofitType(TextAutofitType::None);
textFrame->get_TextFrameFormat()->set_MarginLeft(0);
textFrame->get_TextFrameFormat()->set_MarginRight(0);

auto paragraph = textFrame->get_Paragraph(0);
paragraph->set_Text(u"Simple text, next sentence.");

auto format = paragraph->get_ParagraphFormat();
format->set_Alignment(TextAlignment::Left);
auto portionFormat = format->get_DefaultPortionFormat();
portionFormat->set_FontHeight(24.0f);
auto latinFont = System::MakeObject<FontData>(u"Arial");
portionFormat->set_LatinFont(latinFont);
portionFormat->get_FillFormat()->set_FillType(FillType::Solid);
portionFormat->get_FillFormat()->get_SolidFillColor()->set_Color(System::Drawing::Color::get_Black());
format->set_HangingPunctuation(NullableBool::True);

presentation->Save(u"hanging_punctuation.pptx", SaveFormat::Pptx);
presentation->Dispose();
Niet elk leesteken kan hangen. De lettertype‑ en lay‑out‑condities beschreven hierboven zijn ook van toepassing op deze vergelijking: het wijzigen van het lettertype, de beschikbare breedte, marges of autofit‑instellingen kan het zichtbare verschil wegnemen.
Autofit‑type voor tekstkaders instellen
ITextFrameFormat::set_AutofitType bepaalt hoe tekst zich gedraagt wanneer deze de grenzen van zijn container overschrijdt. Gebruik het om te bepalen of de tekst verkleint, overlapt, of de vorm automatisch aanpast. Het volgende voorbeeld configureert de vorm om te schalen zodat de tekst past en slaat het resultaat op als “autofit_type.pptx”.
#include <DOM/IAutoShape.h>
#include <DOM/ISlide.h>
#include <DOM/ITextFrame.h>
#include <DOM/ITextFrameFormat.h>
#include <DOM/Presentation.h>
#include <DOM/TextAutofitType.h>
#include <Export/SaveFormat.h>

using namespace Aspose::Slides;
using namespace Aspose::Slides::Export;

auto presentation = System::MakeObject<Presentation>(u"sample.pptx");
auto firstShape = presentation->get_Slide(0)->get_Shape(0);

auto autoShape = System::ExplicitCast<IAutoShape>(firstShape);
autoShape->get_TextFrame()->get_TextFrameFormat()->set_AutofitType(TextAutofitType::Shape);

presentation->Save(u"autofit_type.pptx", SaveFormat::Pptx);
presentation->Dispose();
Om het aantal regels te tellen na automatisch omslaan en te zien hoe tekst‑ of vorm‑breedte het resultaat verandert, zie Count Rendered Lines. Alleen het aantal regels geeft niet aan of de tekst buiten de container overlapt.
Anker van tekstkaders instellen
ITextFrameFormat::set_AnchoringType bepaalt hoe tekst verticaal binnen een vorm wordt gepositioneerd, bijvoorbeeld bovenaan, in het midden of onderaan. Het volgende voorbeeld verankert de tekst aan de onderkant van de eerste vorm en slaat het resultaat op als “text_anchor.pptx”.
#include <DOM/IAutoShape.h>
#include <DOM/ISlide.h>
#include <DOM/ITextFrame.h>
#include <DOM/ITextFrameFormat.h>
#include <DOM/Presentation.h>
#include <DOM/TextAnchorType.h>
#include <Export/SaveFormat.h>

using namespace Aspose::Slides;
using namespace Aspose::Slides::Export;

auto presentation = System::MakeObject<Presentation>(u"sample.pptx");
auto firstShape = presentation->get_Slide(0)->get_Shape(0);

auto autoShape = System::ExplicitCast<IAutoShape>(firstShape);
autoShape->get_TextFrame()->get_TextFrameFormat()->set_AnchoringType(TextAnchorType::Bottom);

presentation->Save(u"text_anchor.pptx", SaveFormat::Pptx);
presentation->Dispose();
Tekst‑tabulatie instellen
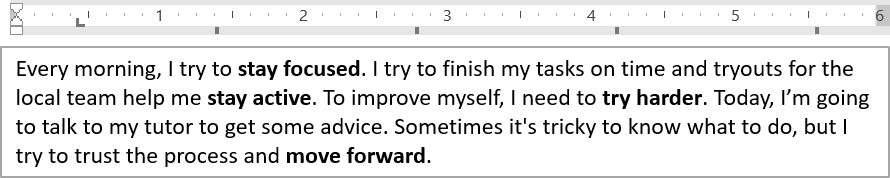
Gebruik IParagraphFormat::set_DefaultTabSize en IParagraphFormat::get_Tabs om tab‑stops in een alinea te configureren. Het volgende voorbeeld stelt de standaard tab‑intervallen in op 100 punten en voegt een links‑uitgelijnde tab‑stop toe op 30 punten. Deze instellingen hebben invloed op tekst die tab‑tekens bevat.
#include <DOM/IAutoShape.h>
#include <DOM/IParagraph.h>
#include <DOM/IParagraphFormat.h>
#include <DOM/ISlide.h>
#include <DOM/ITabCollection.h>
#include <DOM/ITextFrame.h>
#include <DOM/Presentation.h>
#include <DOM/TabAlignment.h>
#include <Export/SaveFormat.h>

using namespace Aspose::Slides;
using namespace Aspose::Slides::Export;

auto presentation = System::MakeObject<Presentation>(u"sample.pptx");
auto firstShape = presentation->get_Slide(0)->get_Shape(0);

auto autoShape = System::ExplicitCast<IAutoShape>(firstShape);

auto paragraph = autoShape->get_TextFrame()->get_Paragraph(0);
paragraph->get_ParagraphFormat()->set_DefaultTabSize(100.0f);
paragraph->get_ParagraphFormat()->get_Tabs()->Add(30.0f, TabAlignment::Left);

presentation->Save(u"paragraph_tabs.pptx", SaveFormat::Pptx);
presentation->Dispose();
Het resultaat:
Proefleestaal instellen
Aspose.Slides biedt IBasePortionFormat::set_LanguageId, waarmee u de proefleestaal voor een tekstgedeelte kunt instellen. De proefleestaal bepaalt de taal die wordt gebruikt voor spelling‑ en grammaticacontrole in PowerPoint.
Het volgende voorbeeld vereist “presentation.pptx” met een tekstvak als eerste vorm op de eerste dia en ten minste één alinea. Het vervangt de inhoud van de eerste alinea door “1。”, stelt SimSun in als lettertype en wijst de vereenvoudigde Chinese proefleestaal (zh-CN) toe. Het slaat het resultaat op als “proofing_language.pptx”:
#include <DOM/Fonts/FontData.h>
#include <DOM/IAutoShape.h>
#include <DOM/IParagraph.h>
#include <DOM/IPortionCollection.h>
#include <DOM/IPortionFormat.h>
#include <DOM/ISlide.h>
#include <DOM/ITextFrame.h>
#include <DOM/Portion.h>
#include <DOM/Presentation.h>
#include <Export/SaveFormat.h>

using namespace Aspose::Slides;
using namespace Aspose::Slides::Export;

auto presentation = System::MakeObject<Presentation>(u"presentation.pptx");
auto firstShape = presentation->get_Slide(0)->get_Shape(0);

auto autoShape = System::ExplicitCast<IAutoShape>(firstShape);

auto paragraph = autoShape->get_TextFrame()->get_Paragraph(0);
paragraph->get_Portions()->Clear();

auto font = System::MakeObject<FontData>(u"SimSun");

auto textPortion = System::MakeObject<Portion>();
auto portionFormat = textPortion->get_PortionFormat();
portionFormat->set_ComplexScriptFont(font);
portionFormat->set_EastAsianFont(font);
portionFormat->set_LatinFont(font);

// Stel de proefleestaal in op Vereenvoudigd Chinees.
portionFormat->set_LanguageId(u"zh-CN");

textPortion->set_Text(u"1。");
paragraph->get_Portions()->Add(textPortion);

presentation->Save(u"proofing_language.pptx", SaveFormat::Pptx);
presentation->Dispose();
Standaardtaal instellen
Gebruik LoadOptions::set_DefaultTextLanguage om de standaardtaal te definiëren voor tekst die wordt aangemaakt tijdens het laden of maken van een presentatie. Het volgende voorbeeld maakt een presentatie met Engels (VS) als standaard‑teksttaal, voegt een tekstvak toe, en drukt en-US af voor het eerste tekstgedeelte.
#include <DOM/IAutoShape.h>
#include <DOM/IParagraph.h>
#include <DOM/IPortion.h>
#include <DOM/IPortionFormat.h>
#include <DOM/IShapeCollection.h>
#include <DOM/ISlide.h>
#include <DOM/ITextFrame.h>
#include <DOM/LoadOptions.h>
#include <DOM/Presentation.h>
#include <DOM/ShapeType.h>
#include <system/console.h>

using namespace Aspose::Slides;

auto loadOptions = System::MakeObject<LoadOptions>();
loadOptions->set_DefaultTextLanguage(u"en-US");

auto presentation = System::MakeObject<Presentation>(loadOptions);
auto slide = presentation->get_Slide(0);

// Voeg een nieuw rechthoekvorm met tekst toe.
auto shape = slide->get_Shapes()->AddAutoShape(ShapeType::Rectangle, 20.0f, 20.0f, 150.0f, 50.0f);
shape->get_TextFrame()->set_Text(u"Sample text");

// Controleer de taal van het eerste tekstgedeelte.
auto portion = shape->get_TextFrame()->get_Paragraph(0)->get_Portion(0);
auto languageId = portion->get_PortionFormat()->get_LanguageId();
System::Console::WriteLine(languageId);

presentation->Dispose();
Standaard‑tekststijl instellen
Om standaard‑tekstopmaak op presentatieniveau toe te passen, gebruik IPresentation::get_DefaultTextStyle.
Het volgende voorbeeld stelt een 14‑punten vet lettertype in als standaard voor top‑level alinea’s in een nieuwe presentatie en slaat deze op als “default_text_style.pptx”. Tekst kan deze standaarden erven, tenzij specifiekere opmaak ze overschrijft.
#include <DOM/IParagraphFormat.h>
#include <DOM/IPortionFormat.h>
#include <DOM/ITextStyle.h>
#include <DOM/NullableBool.h>
#include <DOM/Presentation.h>
#include <Export/SaveFormat.h>

using namespace Aspose::Slides;
using namespace Aspose::Slides::Export;

auto presentation = System::MakeObject<Presentation>();

// Verkrijg het alineaformaat van het hoogste niveau.
auto paragraphFormat = presentation->get_DefaultTextStyle()->GetLevel(0);

if (paragraphFormat != nullptr)
{
    auto defaultPortionFormat = paragraphFormat->get_DefaultPortionFormat();
    defaultPortionFormat->set_FontHeight(14.0f);
    defaultPortionFormat->set_FontBold(NullableBool::True);
}

presentation->Save(u"default_text_style.pptx", SaveFormat::Pptx);
presentation->Dispose();
Tekst extraheren met het All‑Caps‑effect
In PowerPoint zorgt het toepassen van het All Caps‑lettertype‑effect ervoor dat tekst in hoofdletters wordt weergegeven op de dia, zelfs wanneer deze oorspronkelijk in kleine letters werd getypt. Wanneer u zo’n tekstgedeelte ophaalt met Aspose.Slides, retourneert de bibliotheek de tekst precies zoals ingevoerd. Om de weergegeven tekst overeen te laten komen, controleer TextCapType en zet de geretourneerde tekenreeks om in hoofdletters wanneer de waarde TextCapType::All is.
Dit voorbeeld vereist “sample2.pptx” met een tekstvak als eerste vorm op de eerste dia. Het eerste gedeelte van de eerste alinea bevat “Hello, Aspose!” met het All Caps‑effect toegepast, zoals hieronder weergegeven.

Het code‑voorbeeld hieronder toont hoe u de tekst kunt extraheren met toegepast All Caps‑effect:
#include <DOM/IAutoShape.h>
#include <DOM/IParagraph.h>
#include <DOM/IPortion.h>
#include <DOM/IPortionFormat.h>
#include <DOM/IPortionFormatEffectiveData.h>
#include <DOM/ISlide.h>
#include <DOM/ITextFrame.h>
#include <DOM/Presentation.h>
#include <DOM/TextCapType.h>
#include <system/console.h>

using namespace Aspose::Slides;

auto presentation = System::MakeObject<Presentation>(u"sample2.pptx");
auto firstShape = presentation->get_Slide(0)->get_Shape(0);

auto autoShape = System::ExplicitCast<IAutoShape>(firstShape);
auto textPortion = autoShape->get_TextFrame()->get_Paragraph(0)->get_Portion(0);

auto originalText = textPortion->get_Text();
System::Console::WriteLine(u"Original text: " + originalText);

auto textFormat = textPortion->get_PortionFormat()->GetEffective();
if (textFormat->get_TextCapType() == TextCapType::All)
{
    auto uppercaseText = originalText.ToUpper();
    System::Console::WriteLine(u"All-Caps effect: " + uppercaseText);
}

presentation->Dispose();
Uitvoer:
Original text: Hello, Aspose!
All-Caps effect: HELLO, ASPOSE!
FAQ
Hoe wijzig ik tekst in een tabel op een dia?
Om tekst in een tabel op een dia te wijzigen, gebruik ITable. Loop door de cellen en werk elke cel bij via ICell::get_TextFrame en alinea‑opmaak via IParagraph::get_ParagraphFormat.
Hoe pas ik een verloopkleur toe op tekst in een PowerPoint‑dia?
Om een verloopkleur op tekst toe te passen, gebruik IBasePortionFormat::get_FillFormat. Stel IFillFormat::set_FillType in op FillType::Gradient en configureer de verloop‑stops, richting en transparantie.