
สร้างและใช้เอฟเฟกต์ WordArt ใน .NET
ภาพรวม
เอฟเฟกต์ WordArt ช่วยให้คุณจัดรูปแบบข้อความด้วยการเติมสี, ขอบ, เงา, การสะท้อน, คำรบกวน, การแปลงรูป, และการจัดรูปแบบ 3 มิติ บทความนี้อธิบายวิธีสร้างและปรับแต่งเอฟเฟกต์เหล่านี้ในงานนำเสนอ PowerPoint โดยใช้ Aspose.Slides for .NET โดยไม่ต้องติดตั้ง Microsoft Office
สร้างเทมเพลต WordArt อย่างง่ายและนำไปใช้กับข้อความ
ตัวอย่างต่อไปนี้สร้างสไตล์ WordArt อย่างง่ายโดยกำหนดข้อความ, แบบอักษร, การเติมลายรูปแบบ, และขอบ
แต่ละตัวอย่างสร้างงานนำเสนอใหม่และเพิ่มสี่เหลี่ยมผืนผ้าไปยังสไลด์แรก; ไม่จำเป็นต้องใช้ไฟล์อินพุต ตัวอย่างแรกกำหนดข้อความเป็น “Aspose.Slides” ตำแหน่งและขนาดของรูปร่างวัดเป็นจุด:
using Aspose.Slides;

using var presentation = new Presentation();
var slide = presentation.Slides[0];

var autoShape = slide.Shapes.AddAutoShape(ShapeType.Rectangle, 20, 20, 400, 200);
var textFrame = autoShape.TextFrame;

var portion = textFrame.Paragraphs[0].Portions[0];
portion.Text = "Aspose.Slides";
ตั้งแบบอักษรเป็น Arial Black ขนาด 36 จุดเพื่อให้การจัดรูปแบบเห็นได้ชัดเจนยิ่งขึ้น:
using Aspose.Slides;

using var presentation = new Presentation();
var slide = presentation.Slides[0];

var autoShape = slide.Shapes.AddAutoShape(ShapeType.Rectangle, 20, 20, 400, 200);

var portion = autoShape.TextFrame.Paragraphs[0].Portions[0];
portion.Text = "Aspose.Slides";
portion.PortionFormat.LatinFont = new FontData("Arial Black");
portion.PortionFormat.FontHeight = 36;
ใช้ลายรูปแบบ SmallGrid ด้วยสีหน้าส้มเข้มและพื้นหลังสีขาว จากนั้นเพิ่มขอบข้อความสีดำความกว้าง 1 จุด:
using System.Drawing;
using Aspose.Slides;

using var presentation = new Presentation();
var slide = presentation.Slides[0];

var autoShape = slide.Shapes.AddAutoShape(ShapeType.Rectangle, 20, 20, 400, 200);

var portion = autoShape.TextFrame.Paragraphs[0].Portions[0];
portion.Text = "Aspose.Slides";
portion.PortionFormat.LatinFont = new FontData("Arial Black");
portion.PortionFormat.FontHeight = 36;

portion.PortionFormat.FillFormat.FillType = FillType.Pattern;
portion.PortionFormat.FillFormat.PatternFormat.ForeColor.Color = Color.DarkOrange;
portion.PortionFormat.FillFormat.PatternFormat.BackColor.Color = Color.White;
portion.PortionFormat.FillFormat.PatternFormat.PatternStyle = PatternStyle.SmallGrid;

portion.PortionFormat.LineFormat.Width = 1;
portion.PortionFormat.LineFormat.FillFormat.FillType = FillType.Solid;
portion.PortionFormat.LineFormat.FillFormat.SolidFillColor.Color = Color.Black;
ข้อความที่ได้:

ใช้เอฟเฟกต์ WordArt อื่น ๆ
ตัวอย่างต่อไปนี้แสดงวิธีการใช้เงา, การสะท้อน, เรืองแสง, การแปลงรูป, และเอฟเฟกต์ 3 มิติ กับข้อความ
ใช้เอฟเฟกต์เงานอก
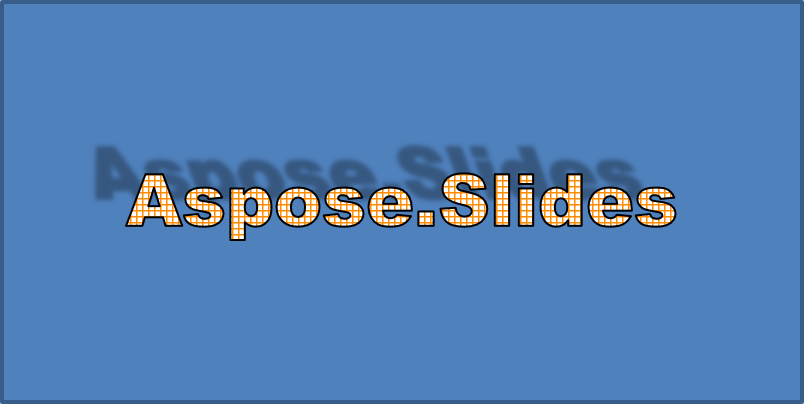
เงานอกเพิ่มความลึกโดยวางเงาที่อยู่ด้านหลังข้อความ คุณสามารถปรับแต่งสี, ทิศทาง, ระยะห่าง, รัศมีเบลอ, สเกล, และความเอียงของมันได้
ตัวอย่างนี้เรียกใช้ EnableOuterShadowEffect และตั้งเงาสีดำโดยมีรัศมีเบลอ 4 จุด, ทิศทาง 230 องศา, และระยะห่าง 30 จุด ค่าการสเกล 100 จะคงขนาดเงาไว้, ส่วนการเอียงแนวนอนทำให้เงาเอียง 20 องศา การแปลงอัลฟาจะตั้งความทึบเป็น 32%:
using System.Drawing;
using Aspose.Slides;

using var presentation = new Presentation();
var slide = presentation.Slides[0];

var autoShape = slide.Shapes.AddAutoShape(ShapeType.Rectangle, 20, 20, 400, 200);

var portion = autoShape.TextFrame.Paragraphs[0].Portions[0];
portion.Text = "Aspose.Slides";
portion.PortionFormat.LatinFont = new FontData("Arial Black");
portion.PortionFormat.FontHeight = 36;

portion.PortionFormat.EffectFormat.EnableOuterShadowEffect();
portion.PortionFormat.EffectFormat.OuterShadowEffect.ShadowColor.Color = Color.Black;
portion.PortionFormat.EffectFormat.OuterShadowEffect.ScaleHorizontal = 100;
portion.PortionFormat.EffectFormat.OuterShadowEffect.ScaleVertical = 100;
portion.PortionFormat.EffectFormat.OuterShadowEffect.BlurRadius = 4;
portion.PortionFormat.EffectFormat.OuterShadowEffect.Direction = 230;
portion.PortionFormat.EffectFormat.OuterShadowEffect.Distance = 30;
portion.PortionFormat.EffectFormat.OuterShadowEffect.SkewHorizontal = 20;
portion.PortionFormat.EffectFormat.OuterShadowEffect.SkewVertical = 0;
portion.PortionFormat.EffectFormat.OuterShadowEffect.ShadowColor.ColorTransform.Add(ColorTransformOperation.SetAlpha, 0.32f);
ข้อความที่ได้:
Note
- เมื่อใช้เงานอกและเงาที่ตั้งล่วงหน้าพร้อมกัน จะใช้เฉพาะเงานอกเท่านั้น.
- หากใช้เงานอกและเงาภายในพร้อมกัน ผลลัพธ์จะขึ้นอยู่กับเวอร์ชันของ PowerPoint ตัวอย่างเช่น ใน PowerPoint 2013 เอฟเฟกต์จะเพิ่มเป็นสองเท่า ในขณะที่ใน PowerPoint 2007 จะใช้เฉพาะเงานอกเท่านั้น.
ใช้เอฟเฟกต์การสะท้อน
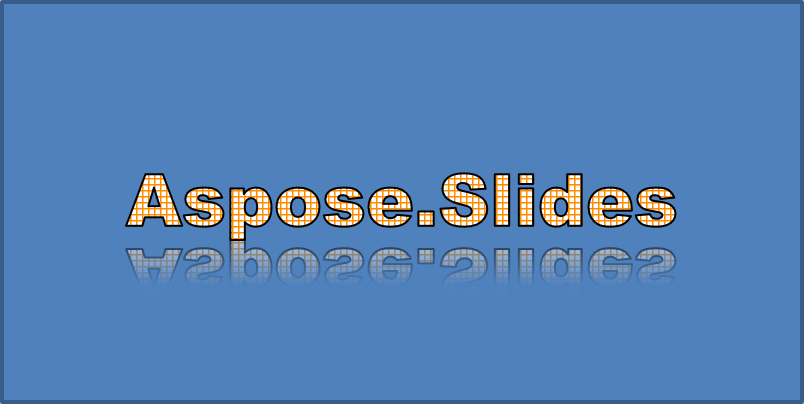
การสะท้อนจะสร้างสำเนาแบบกระจกของข้อความ ปรับตำแหน่ง, สเกล, ความเบลอ, และความทึบเพื่อควบคุมลักษณะของมัน
ตัวอย่างนี้เรียกใช้ EnableReflectionEffect และพลิกการสะท้อนในแนวตั้งโดยสเกล -100% ใช้รัศมีเบลอ 0.5 จุดและระยะห่าง 4.72 จุด ความทึบจะลดจาก 60% เหลือ 0.9% ระหว่างตำแหน่ง 0% ถึง 60% ของการสะท้อน:
using Aspose.Slides;

using var presentation = new Presentation();
var slide = presentation.Slides[0];

var autoShape = slide.Shapes.AddAutoShape(ShapeType.Rectangle, 20, 20, 400, 200);

var portion = autoShape.TextFrame.Paragraphs[0].Portions[0];
portion.Text = "Aspose.Slides";
portion.PortionFormat.LatinFont = new FontData("Arial Black");
portion.PortionFormat.FontHeight = 36;

portion.PortionFormat.EffectFormat.EnableReflectionEffect();
portion.PortionFormat.EffectFormat.ReflectionEffect.BlurRadius = 0.5;
portion.PortionFormat.EffectFormat.ReflectionEffect.Distance = 4.72;
portion.PortionFormat.EffectFormat.ReflectionEffect.StartPosAlpha = 0f;
portion.PortionFormat.EffectFormat.ReflectionEffect.EndPosAlpha = 60f;
portion.PortionFormat.EffectFormat.ReflectionEffect.Direction = 90;
portion.PortionFormat.EffectFormat.ReflectionEffect.ScaleHorizontal = 100;
portion.PortionFormat.EffectFormat.ReflectionEffect.ScaleVertical = -100;
portion.PortionFormat.EffectFormat.ReflectionEffect.StartReflectionOpacity = 60f;
portion.PortionFormat.EffectFormat.ReflectionEffect.EndReflectionOpacity = 0.9f;
portion.PortionFormat.EffectFormat.ReflectionEffect.RectangleAlign = RectangleAlignment.BottomLeft;
ข้อความที่ได้:
ใช้เอฟเฟกต์เรืองแสง
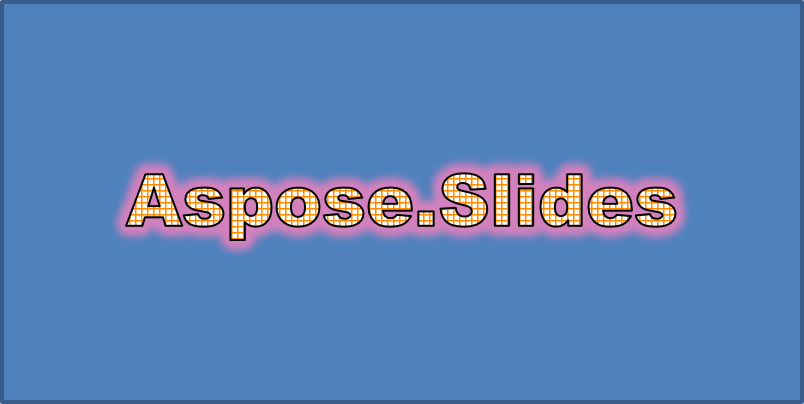
เรืองแสงเพิ่มขอบสีอ่อนรอบข้อความ ปรับสี, ความทึบ, และรัศมีเพื่อควบคุมเอฟเฟกต์
ตัวอย่างนี้เรียกใช้ EnableGlowEffect และใช้เรืองแสงสีแดงด้วยความทึบ 54% และรัศมี 7 จุด:
using Aspose.Slides;

using var presentation = new Presentation();
var slide = presentation.Slides[0];

var autoShape = slide.Shapes.AddAutoShape(ShapeType.Rectangle, 20, 20, 400, 200);

var portion = autoShape.TextFrame.Paragraphs[0].Portions[0];
portion.Text = "Aspose.Slides";
portion.PortionFormat.LatinFont = new FontData("Arial Black");
portion.PortionFormat.FontHeight = 36;

portion.PortionFormat.EffectFormat.EnableGlowEffect();
portion.PortionFormat.EffectFormat.GlowEffect.Color.Color = System.Drawing.Color.Red;
portion.PortionFormat.EffectFormat.GlowEffect.Color.ColorTransform.Add(ColorTransformOperation.SetAlpha, 0.54f);
portion.PortionFormat.EffectFormat.GlowEffect.Radius = 7;
ข้อความที่ได้:
ใช้การแปลง WordArt
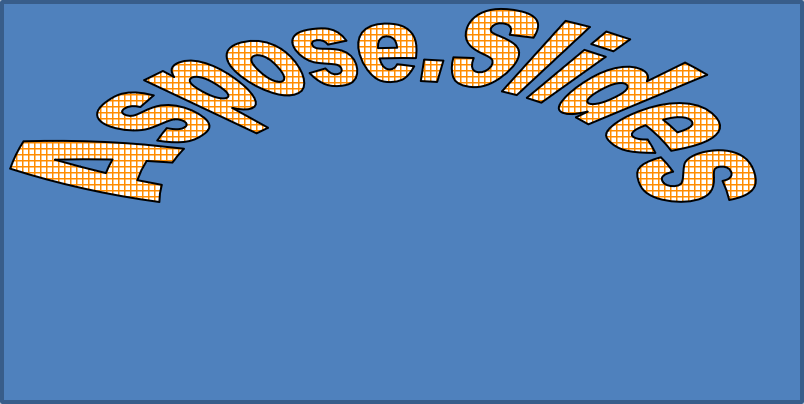
การแปลง WordArt จะดึง, ขยาย หรือบิดบล็อกของข้อความ
ตั้งค่า Transform เป็น ArchUpPour เพื่อโค้งกรอบข้อความทั้งหมดขึ้นด้านบน:
using Aspose.Slides;

using var presentation = new Presentation();
var slide = presentation.Slides[0];

var autoShape = slide.Shapes.AddAutoShape(ShapeType.Rectangle, 20, 20, 400, 200);

var textFrame = autoShape.TextFrame;
textFrame.Text = "Aspose.Slides";
textFrame.TextFrameFormat.Transform = TextShapeType.ArchUpPour;
ข้อความที่ได้:
Note
Aspose.Slides for .NET มีชุดประเภทการแปลงที่กำหนดไว้ล่วงหน้า transformation types.ใช้เอฟเฟกต์ 3 มิติ กับรูปร่างและข้อความ
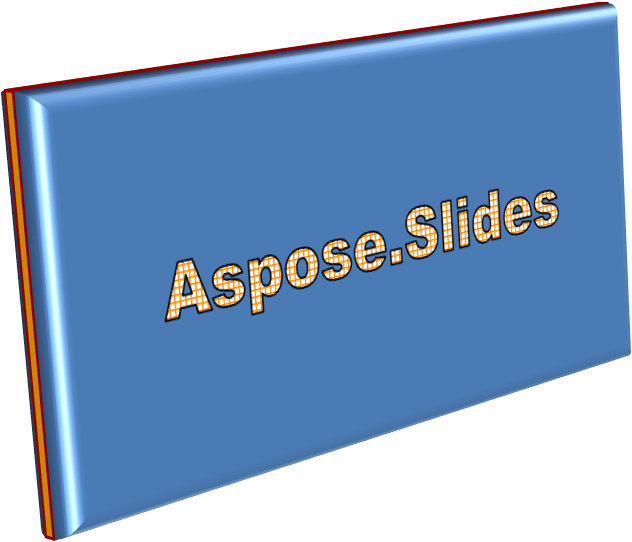
คุณสามารถใช้เอฟเฟกต์ 3 มิติกับรูปร่างหรือข้อความของมันได้ เบเวล, การดันออก, แสงสว่าง, และการตั้งค่ากล้องจะควบคุมลักษณะที่ได้
ตัวอย่างต่อไปนี้ใช้ ThreeDFormat เพื่อเพิ่มเบเวลเป็นวงกลม, การดันออกสีส้ม, และคอนทัวร์สีแดงเข้มให้กับสี่เหลี่ยม มิติของเบเวล, ความสูงการดันออก, ความกว้างคอนทัวร์, และความลึกวัดเป็นจุด วัสดุพลาสติก, แสงสว่างสมดุลที่หมุน 40 องศารอบแกน Z, และกล้องมุมมองกำหนดลักษณะของมัน:
using System.Drawing;
using Aspose.Slides;

using var presentation = new Presentation();
var slide = presentation.Slides[0];

var autoShape = slide.Shapes.AddAutoShape(ShapeType.Rectangle, 20, 20, 400, 200);
autoShape.TextFrame.Text = "Aspose.Slides";

autoShape.ThreeDFormat.BevelBottom.BevelType = BevelPresetType.Circle;
autoShape.ThreeDFormat.BevelBottom.Height = 10.5;
autoShape.ThreeDFormat.BevelBottom.Width = 10.5;

autoShape.ThreeDFormat.BevelTop.BevelType = BevelPresetType.Circle;
autoShape.ThreeDFormat.BevelTop.Height = 12.5;
autoShape.ThreeDFormat.BevelTop.Width = 11;

autoShape.ThreeDFormat.ExtrusionColor.Color = Color.Orange;
autoShape.ThreeDFormat.ExtrusionHeight = 6;

autoShape.ThreeDFormat.ContourColor.Color = Color.DarkRed;
autoShape.ThreeDFormat.ContourWidth = 1.5;

autoShape.ThreeDFormat.Depth = 3;

autoShape.ThreeDFormat.Material = MaterialPresetType.Plastic;

autoShape.ThreeDFormat.LightRig.Direction = LightingDirection.Top;
autoShape.ThreeDFormat.LightRig.LightType = LightRigPresetType.Balanced;
autoShape.ThreeDFormat.LightRig.SetRotation(0, 0, 40);

autoShape.ThreeDFormat.Camera.CameraType = CameraPresetType.PerspectiveContrastingRightFacing;
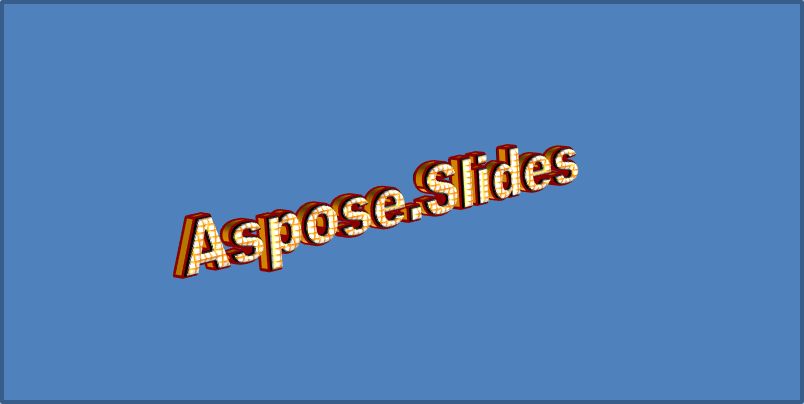
ตัวอย่างนี้ใช้การจัดรูปแบบ 3 มิติที่คล้ายกันกับข้อความผ่าน TextFrameFormat.ThreeDFormat. เบเวลที่เล็กกว่าให้รูปทรงขอบตัวอักษร, ส่วนการดันออกและแสงสว่างทำให้ข้อความมีความลึก:
using System.Drawing;
using Aspose.Slides;

using var presentation = new Presentation();
var slide = presentation.Slides[0];

var autoShape = slide.Shapes.AddAutoShape(ShapeType.Rectangle, 20, 20, 400, 200);
var textFrame = autoShape.TextFrame;
textFrame.Text = "Aspose.Slides";

textFrame.TextFrameFormat.ThreeDFormat.BevelBottom.BevelType = BevelPresetType.Circle;
textFrame.TextFrameFormat.ThreeDFormat.BevelBottom.Height = 3.5;
textFrame.TextFrameFormat.ThreeDFormat.BevelBottom.Width = 3.5;

textFrame.TextFrameFormat.ThreeDFormat.BevelTop.BevelType = BevelPresetType.Circle;
textFrame.TextFrameFormat.ThreeDFormat.BevelTop.Height = 4;
textFrame.TextFrameFormat.ThreeDFormat.BevelTop.Width = 4;

textFrame.TextFrameFormat.ThreeDFormat.ExtrusionColor.Color = Color.Orange;
textFrame.TextFrameFormat.ThreeDFormat.ExtrusionHeight = 6;

textFrame.TextFrameFormat.ThreeDFormat.ContourColor.Color = Color.DarkRed;
textFrame.TextFrameFormat.ThreeDFormat.ContourWidth = 1.5;

textFrame.TextFrameFormat.ThreeDFormat.Depth = 3;

textFrame.TextFrameFormat.ThreeDFormat.Material = MaterialPresetType.Plastic;

textFrame.TextFrameFormat.ThreeDFormat.LightRig.Direction = LightingDirection.Top;
textFrame.TextFrameFormat.ThreeDFormat.LightRig.LightType = LightRigPresetType.Balanced;
textFrame.TextFrameFormat.ThreeDFormat.LightRig.SetRotation(0, 0, 40);

textFrame.TextFrameFormat.ThreeDFormat.Camera.CameraType = CameraPresetType.PerspectiveContrastingRightFacing;
Note
การใช้เอฟเฟกต์ 3 มิติกับข้อความหรือรูปร่างของมัน—และการโต้ตอบระหว่างเอฟเฟกต์เหล่านี้—ถูกกำหนดโดยกฎเฉพาะ พิจารณาฉากที่เกี่ยวข้องทั้งข้อความและรูปร่างที่บรรจุข้อความนั้น เอฟเฟกต์ 3 มิติรวมถึงการแสดงผล 3 มิติของอ็อบเจ็กต์และฉากที่วางอยู่
- หากกำหนดฉากทั้งสำหรับรูปร่างและข้อความ ฉากของรูปร่างจะมีลำดับความสำคัญและฉากของข้อความจะถูกละเลย
- หากรูปร่างไม่มีฉากของตนเองแต่มีการแสดงผล 3 มิติ จะใช้ฉากของข้อความ
- หากรูปร่างไม่มีเอฟเฟกต์ 3 มิติเลย จะถือว่าเป็นแบนและเอฟเฟกต์ 3 มิติจะใช้กับข้อความเท่านั้น
พฤติกรรมเหล่านี้เกี่ยวข้องกับคุณสมบัติ ThreeDFormat.LightRig และ ThreeDFormat.Camera.
เพื่อให้ข้อความเป็นแบนและอ่านง่ายในขณะที่ยังคงการจัดรูปแบบ 3 มิติของรูปร่าง ดูที่ ทำให้ข้อความแบนบนรูป 3 มิติ สำหรับการเปรียบเทียบของทั้งสองการตั้งค่าและตัวอย่าง C# แบบเต็ม
คำถามที่พบบ่อย
ฉันสามารถใช้เอฟเฟกต์ WordArt กับแบบอักษรหรือสคริปต์ที่แตกต่างกัน (เช่น Arabic, Chinese) ได้หรือไม่?
ใช่, Aspose.Slides for .NET รองรับ Unicode และทำงานกับแบบอักษรและสคริปต์หลักทั้งหมด เอฟเฟกต์ WordArt เช่น เงา, การเติม, และขอบสามารถใช้ได้โดยไม่คำนึงถึงภาษา แม้ว่าความพร้อมใช้งานของแบบอักษรและการเรนเดอร์อาจขึ้นอยู่กับแบบอักษรของระบบ
ฉันสามารถใช้เอฟเฟกต์ WordArt กับองค์ประกอบของสไลด์มาสเตอร์ได้หรือไม่?
ได้, คุณสามารถใช้เอฟเฟกต์ WordArt กับรูปร่างบนสไลด์มาสเตอร์ได้ รวมถึงตำแหน่งข้อความหัวเรื่อง, ส่วนท้าย, หรือข้อความพื้นหลัง การเปลี่ยนแปลงที่ทำบนเค้าโครงมาสเตอร์จะสะท้อนไปยังสไลด์ที่เชื่อมโยงทั้งหมด
เอฟเฟกต์ WordArt มีผลต่อขนาดไฟล์งานนำเสนอหรือไม่?
เพียงเล็กน้อย. เอฟเฟกต์ WordArt เช่น เงา, เรืองแสง, และการเติมไล่สีอาจเพิ่มขนาดไฟล์เล็กน้อยเนื่องจากเมตาดาต้าการจัดรูปแบบที่เพิ่มเข้ามา แต่ส่วนต่างมักไม่สำคัญมาก
ฉันสามารถดูตัวอย่างผลของเอฟเฟกต์ WordArt ได้โดยไม่ต้องบันทึกงานนำเสนอหรือไม่?
ได้, คุณสามารถเรนเดอร์สไลด์ที่มี WordArt เป็นภาพ (เช่น PNG, JPEG) ด้วยการใช้ ISlide.GetImage, หรือเรนเดอร์รูปร่างแต่ละชิ้นด้วย IShape.GetImage. วิธีนี้ช่วยให้คุณสามารถดูตัวอย่างผลลัพธ์ในหน่วยความจำหรือบนหน้าจอก่อนบันทึกหรือส่งออกงานนำเสนอเต็มรูปแบบ.