
C++ में WordArt प्रभाव बनाना और लागू करना
अवलोकन
WordArt प्रभाव आपको टेक्स्ट को फ़िल, आउटलाइन्स, शैडो, रिफ्लेक्शन, ग्लो, ट्रांसफ़ॉर्मेशन और 3D फ़ॉर्मेटिंग के साथ स्टाइल करने देते हैं। यह लेख PowerPoint प्रेज़ेंटेशन में Aspose.Slides for C++ का उपयोग करके इन प्रभावों को बनाने और अनुकूलित करने का तरीका बताता है, बिना Microsoft Office स्थापित किए।
एक साधारण WordArt टेम्पलेट बनाएं और इसे टेक्स्ट पर लागू करें
निम्न उदाहरण टेक्स्ट, फ़ॉन्ट, पैटर्न फ़िल और आउटलाइन सेट करके एक साधारण WordArt शैली बनाते हैं।
प्रत्येक उदाहरण एक नई प्रेज़ेंटेशन बनाता है और उसकी पहली स्लाइड पर एक आयत जोड़ता है; कोई इनपुट फ़ाइल आवश्यक नहीं है। पहला उदाहरण टेक्स्ट को “Aspose.Slides” सेट करता है। आकृति की स्थिति और आयाम पॉइंट्स में मापे जाते हैं:
#include <DOM/IAutoShape.h>
#include <DOM/IParagraph.h>
#include <DOM/IParagraphCollection.h>
#include <DOM/IPortion.h>
#include <DOM/IPortionCollection.h>
#include <DOM/IShapeCollection.h>
#include <DOM/ISlide.h>
#include <DOM/ITextFrame.h>
#include <DOM/Presentation.h>
#include <DOM/ShapeType.h>

using namespace Aspose::Slides;

auto presentation = System::MakeObject<Presentation>();
auto slide = presentation->get_Slide(0);

auto autoShape = slide->get_Shapes()->AddAutoShape(ShapeType::Rectangle, 20.0f, 20.0f, 400.0f, 200.0f);
auto textFrame = autoShape->get_TextFrame();

auto portion = textFrame->get_Paragraphs()->idx_get(0)->get_Portions()->idx_get(0);
portion->set_Text(u"Aspose.Slides");
फ़ॉन्ट को Arial Black 36 पॉइंट पर सेट करें ताकि फ़ॉर्मेटिंग अधिक स्पष्ट दिखे:
#include <DOM/Fonts/FontData.h>
#include <DOM/IAutoShape.h>
#include <DOM/IParagraph.h>
#include <DOM/IParagraphCollection.h>
#include <DOM/IPortion.h>
#include <DOM/IPortionCollection.h>
#include <DOM/IPortionFormat.h>
#include <DOM/IShapeCollection.h>
#include <DOM/ISlide.h>
#include <DOM/ITextFrame.h>
#include <DOM/Presentation.h>
#include <DOM/ShapeType.h>

using namespace Aspose::Slides;

auto presentation = System::MakeObject<Presentation>();
auto slide = presentation->get_Slide(0);

auto autoShape = slide->get_Shapes()->AddAutoShape(ShapeType::Rectangle, 20.0f, 20.0f, 400.0f, 200.0f);
auto textFrame = autoShape->get_TextFrame();

auto portion = textFrame->get_Paragraphs()->idx_get(0)->get_Portions()->idx_get(0);
portion->set_Text(u"Aspose.Slides");

auto fontData = System::MakeObject<FontData>(u"Arial Black");
portion->get_PortionFormat()->set_LatinFont(fontData);
portion->get_PortionFormat()->set_FontHeight(36.0f);
एक SmallGrid पैटर्न को डार्क ऑरेंज फ़ोरग्राउंड और सफेद बैकग्राउंड के साथ लागू करें, फिर 1 पॉइंट चौड़ाई वाला काला टेक्स्ट आउटलाइन जोड़ें:
#include <DOM/Fonts/FontData.h>
#include <DOM/FillType.h>
#include <DOM/IAutoShape.h>
#include <DOM/IColorFormat.h>
#include <DOM/IFillFormat.h>
#include <DOM/ILineFillFormat.h>
#include <DOM/ILineFormat.h>
#include <DOM/IParagraph.h>
#include <DOM/IParagraphCollection.h>
#include <DOM/IPortion.h>
#include <DOM/IPortionCollection.h>
#include <DOM/IPortionFormat.h>
#include <DOM/IShapeCollection.h>
#include <DOM/ISlide.h>
#include <DOM/ITextFrame.h>
#include <DOM/IPatternFormat.h>
#include <DOM/PatternStyle.h>
#include <DOM/Presentation.h>
#include <DOM/ShapeType.h>
#include <drawing/color.h>

using namespace Aspose::Slides;
using namespace System::Drawing;

auto presentation = System::MakeObject<Presentation>();
auto slide = presentation->get_Slide(0);

auto autoShape = slide->get_Shapes()->AddAutoShape(ShapeType::Rectangle, 20.0f, 20.0f, 400.0f, 200.0f);
auto textFrame = autoShape->get_TextFrame();

auto portion = textFrame->get_Paragraphs()->idx_get(0)->get_Portions()->idx_get(0);
portion->set_Text(u"Aspose.Slides");

auto fontData = System::MakeObject<FontData>(u"Arial Black");
portion->get_PortionFormat()->set_LatinFont(fontData);
portion->get_PortionFormat()->set_FontHeight(36.0f);

auto fillFormat = portion->get_PortionFormat()->get_FillFormat();
fillFormat->set_FillType(FillType::Pattern);
fillFormat->get_PatternFormat()->get_ForeColor()->set_Color(Color::get_DarkOrange());
fillFormat->get_PatternFormat()->get_BackColor()->set_Color(Color::get_White());
fillFormat->get_PatternFormat()->set_PatternStyle(PatternStyle::SmallGrid);

portion->get_PortionFormat()->get_LineFormat()->set_Width(1);
auto lineFillFormat = portion->get_PortionFormat()->get_LineFormat()->get_FillFormat();
lineFillFormat->set_FillType(FillType::Solid);
lineFillFormat->get_SolidFillColor()->set_Color(Color::get_Black());
परिणामी टेक्स्ट:

अन्य WordArt प्रभाव लागू करें
निम्न उदाहरण शैडो, रिफ्लेक्शन, ग्लो, ट्रांसफ़ॉर्मेशन और 3D प्रभावों को टेक्स्ट पर लागू करने का प्रदर्शन करते हैं।
बाहरी शैडो प्रभाव लागू करें
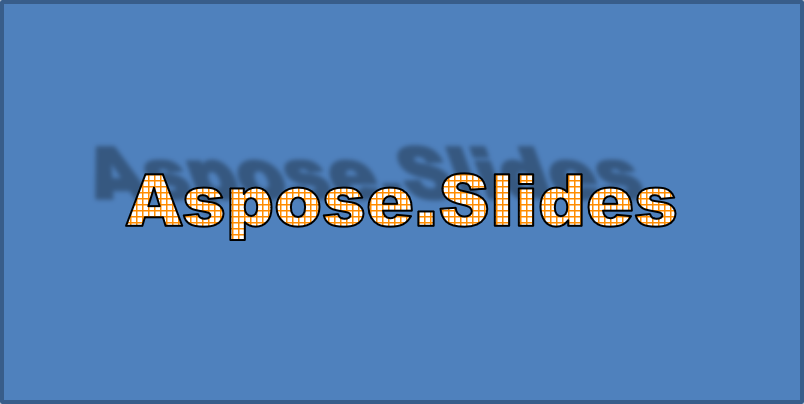
एक बाहरी शैडो टेक्स्ट के पीछे शैडो रखकर गहराई जोड़ता है। आप इसका रंग, दिशा, दूरी, ब्लर रेडियस, स्केल और स्क्यू कस्टमाइज़ कर सकते हैं।
यह उदाहरण EnableOuterShadowEffect को कॉल करता है और 4‑पॉइंट ब्लर रेडियस, 230‑डिग्री दिशा और 30‑पॉइंट दूरी वाला काला शैडो सेट करता है। स्केल मान 100 शैडो आकार को बरकरार रखते हैं, जबकि हॉरिज़ॉन्टल स्क्यू इसे 20 डिग्री झुकाता है। अल्फा ट्रांसफ़ॉर्म शैडो की अपारदर्शिता को 32 % सेट करता है:
#include <DOM/Fonts/FontData.h>
#include <DOM/ColorTransformOperation.h>
#include <DOM/Effects/IOuterShadow.h>
#include <DOM/IAutoShape.h>
#include <DOM/IColorFormat.h>
#include <DOM/IColorOperationCollection.h>
#include <DOM/IEffectFormat.h>
#include <DOM/IParagraph.h>
#include <DOM/IParagraphCollection.h>
#include <DOM/IPortion.h>
#include <DOM/IPortionCollection.h>
#include <DOM/IPortionFormat.h>
#include <DOM/IShapeCollection.h>
#include <DOM/ISlide.h>
#include <DOM/ITextFrame.h>
#include <DOM/Presentation.h>
#include <DOM/ShapeType.h>
#include <drawing/color.h>

using namespace Aspose::Slides;
using namespace System::Drawing;

auto presentation = System::MakeObject<Presentation>();
auto slide = presentation->get_Slide(0);

auto autoShape = slide->get_Shapes()->AddAutoShape(ShapeType::Rectangle, 20.0f, 20.0f, 400.0f, 200.0f);
auto textFrame = autoShape->get_TextFrame();

auto portion = textFrame->get_Paragraphs()->idx_get(0)->get_Portions()->idx_get(0);
portion->set_Text(u"Aspose.Slides");

auto fontData = System::MakeObject<FontData>(u"Arial Black");
portion->get_PortionFormat()->set_LatinFont(fontData);
portion->get_PortionFormat()->set_FontHeight(36.0f);

auto effectFormat = portion->get_PortionFormat()->get_EffectFormat();
effectFormat->EnableOuterShadowEffect();

auto outerShadowEffect = effectFormat->get_OuterShadowEffect();
outerShadowEffect->get_ShadowColor()->set_Color(Color::get_Black());
outerShadowEffect->set_ScaleHorizontal(100);
outerShadowEffect->set_ScaleVertical(100);
outerShadowEffect->set_BlurRadius(4);
outerShadowEffect->set_Direction(230.0f);
outerShadowEffect->set_Distance(30);
outerShadowEffect->set_SkewHorizontal(20);
outerShadowEffect->set_SkewVertical(0);
outerShadowEffect->get_ShadowColor()->get_ColorTransform()->Add(ColorTransformOperation::SetAlpha, 0.32f);
परिणामी टेक्स्ट:
Note
- जब बाहरी और प्रीसेट शैडो एक साथ उपयोग किए जाते हैं, तो केवल बाहरी शैडो लागू होता है।
- यदि बाहरी और आंतरिक शैडो एक साथ उपयोग किए जाते हैं, तो परिणामशील प्रभाव PowerPoint संस्करण पर निर्भर करता है। उदाहरण के लिए, PowerPoint 2013 में प्रभाव दो गुना होता है, जबकि PowerPoint 2007 में केवल बाहरी शैडो लागू होता है।
रिफ्लेक्शन प्रभाव लागू करें
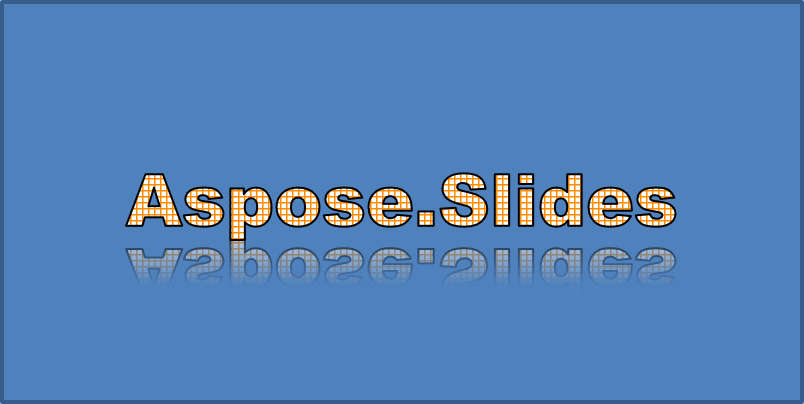
रिफ्लेक्शन टेक्स्ट की एक मिरर कॉपी बनाता है। उसकी स्थिति, स्केल, ब्लर और अपारदर्शिता को समायोजित करके दिखावट को नियंत्रित करें।
यह उदाहरण EnableReflectionEffect को कॉल करता है और रिफ्लेक्शन को वर्टिकली उल्टा करता है, स्केल -100 % सेट करता है। यह 0.5‑पॉइंट ब्लर रेडियस और 4.72‑पॉइंट दूरी का उपयोग करता है। अपारदर्शिता 0 % से 60 % तक स्थितियों 0 % से 60 % के बीच घटती है:
#include <DOM/Fonts/FontData.h>
#include <DOM/Effects/IReflection.h>
#include <DOM/IAutoShape.h>
#include <DOM/IEffectFormat.h>
#include <DOM/IParagraph.h>
#include <DOM/IParagraphCollection.h>
#include <DOM/IPortion.h>
#include <DOM/IPortionCollection.h>
#include <DOM/IPortionFormat.h>
#include <DOM/IShapeCollection.h>
#include <DOM/ISlide.h>
#include <DOM/ITextFrame.h>
#include <DOM/Presentation.h>
#include <DOM/RectangleAlignment.h>
#include <DOM/ShapeType.h>

using namespace Aspose::Slides;

auto presentation = System::MakeObject<Presentation>();
auto slide = presentation->get_Slide(0);

auto autoShape = slide->get_Shapes()->AddAutoShape(ShapeType::Rectangle, 20.0f, 20.0f, 400.0f, 200.0f);
auto textFrame = autoShape->get_TextFrame();

auto portion = textFrame->get_Paragraphs()->idx_get(0)->get_Portions()->idx_get(0);
portion->set_Text(u"Aspose.Slides");

auto fontData = System::MakeObject<FontData>(u"Arial Black");
portion->get_PortionFormat()->set_LatinFont(fontData);
portion->get_PortionFormat()->set_FontHeight(36.0f);

auto effectFormat = portion->get_PortionFormat()->get_EffectFormat();
effectFormat->EnableReflectionEffect();

auto reflectionEffect = effectFormat->get_ReflectionEffect();
reflectionEffect->set_BlurRadius(0.5);
reflectionEffect->set_Distance(4.72);
reflectionEffect->set_StartPosAlpha(0.f);
reflectionEffect->set_EndPosAlpha(60.f);
reflectionEffect->set_Direction(90.0f);
reflectionEffect->set_ScaleHorizontal(100);
reflectionEffect->set_ScaleVertical(-100);
reflectionEffect->set_StartReflectionOpacity(60.f);
reflectionEffect->set_EndReflectionOpacity(0.9f);
reflectionEffect->set_RectangleAlign(RectangleAlignment::BottomLeft);
परिणामी टेक्स्ट:
ग्लो प्रभाव लागू करें
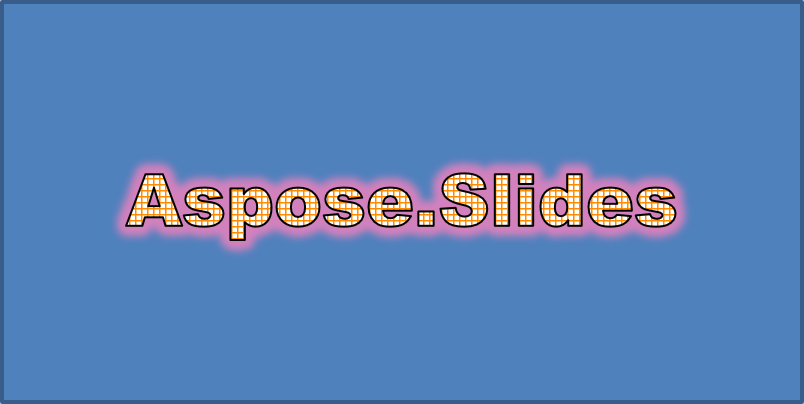
ग्लो टेक्स्ट के चारों ओर एक नरम रंगीन आउटलाइन जोड़ता है। रंग, अपारदर्शिता और रेडियस को समायोजित करके प्रभाव को नियंत्रित करें।
यह उदाहरण EnableGlowEffect को कॉल करता है और लाल ग्लो को 54 % अपारदर्शिता और 7 पॉइंट रेडियस के साथ लागू करता है:
#include <drawing/color.h>
#include <DOM/Fonts/FontData.h>
#include <DOM/ColorTransformOperation.h>
#include <DOM/Effects/IGlow.h>
#include <DOM/IAutoShape.h>
#include <DOM/IColorFormat.h>
#include <DOM/IColorOperationCollection.h>
#include <DOM/IEffectFormat.h>
#include <DOM/IParagraph.h>
#include <DOM/IParagraphCollection.h>
#include <DOM/IPortion.h>
#include <DOM/IPortionCollection.h>
#include <DOM/IPortionFormat.h>
#include <DOM/IShapeCollection.h>
#include <DOM/ISlide.h>
#include <DOM/ITextFrame.h>
#include <DOM/Presentation.h>
#include <DOM/ShapeType.h>

using namespace Aspose::Slides;
using namespace System::Drawing;

auto presentation = System::MakeObject<Presentation>();
auto slide = presentation->get_Slide(0);

auto autoShape = slide->get_Shapes()->AddAutoShape(ShapeType::Rectangle, 20.0f, 20.0f, 400.0f, 200.0f);
auto textFrame = autoShape->get_TextFrame();

auto portion = textFrame->get_Paragraphs()->idx_get(0)->get_Portions()->idx_get(0);
portion->set_Text(u"Aspose.Slides");

auto fontData = System::MakeObject<FontData>(u"Arial Black");
portion->get_PortionFormat()->set_LatinFont(fontData);
portion->get_PortionFormat()->set_FontHeight(36.0f);

auto effectFormat = portion->get_PortionFormat()->get_EffectFormat();
effectFormat->EnableGlowEffect();

auto glowEffect = effectFormat->get_GlowEffect();
glowEffect->get_Color()->set_Color(Color::get_Red());
glowEffect->get_Color()->get_ColorTransform()->Add(ColorTransformOperation::SetAlpha, 0.54f);
glowEffect->set_Radius(7);
परिणामी टेक्स्ट:
WordArt ट्रांसफ़ॉर्मेशन लागू करें
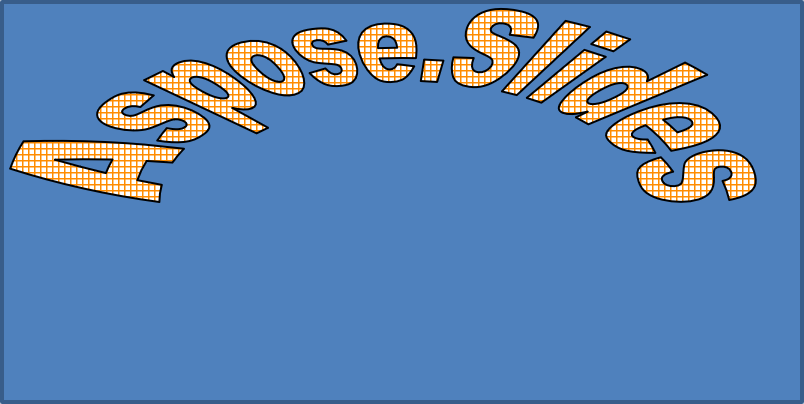
WordArt ट्रांसफ़ॉर्मेशन टेक्स्ट के ब्लॉक को मोड़ते, खींचते या वॉर्प करते हैं।
ITextFrameFormat::set_Transform को ArchUpPour पर सेट करके पूरे टेक्स्ट फ़्रेम को ऊपर की ओर वक्रित करें:
#include <DOM/IAutoShape.h>
#include <DOM/IShapeCollection.h>
#include <DOM/ISlide.h>
#include <DOM/ITextFrame.h>
#include <DOM/ITextFrameFormat.h>
#include <DOM/Presentation.h>
#include <DOM/ShapeType.h>
#include <DOM/TextShapeType.h>

using namespace Aspose::Slides;

auto presentation = System::MakeObject<Presentation>();
auto slide = presentation->get_Slide(0);

auto autoShape = slide->get_Shapes()->AddAutoShape(ShapeType::Rectangle, 20.0f, 20.0f, 400.0f, 200.0f);

auto textFrame = autoShape->get_TextFrame();
textFrame->set_Text(u"Aspose.Slides");
textFrame->get_TextFrameFormat()->set_Transform(TextShapeType::ArchUpPour);
परिणामी टेक्स्ट:
Note
Aspose.Slides for C++ पूर्वनिर्धारित ट्रांसफ़ॉर्मेशन प्रकार का एक सेट प्रदान करता है।आकारों और टेक्स्ट पर 3D प्रभाव लागू करें
आप आकार या उसके टेक्स्ट पर 3D प्रभाव लागू कर सकते हैं। बीवेल, एक्सट्रूज़न, लाइटिंग और कैमरा सेटिंग्स परिणामशील दिखावट को नियंत्रित करते हैं।
निम्न उदाहरण IThreeDFormat का उपयोग करके आयत में सर्कुलर बीवेल, नारंगी एक्सट्रूज़न और डार्क रेड कंटूर जोड़ता है। बीवेल आयाम, एक्सट्रूज़न ऊँचाई, कंटूर चौड़ाई और गहराई पॉइंट्स में मापी जाती हैं। प्लास्टिक मटेरियल, Z-अक्ष के चारों ओर 40 डिग्री घुमाई गई बैलेंस्ड लाइटिंग, और पर्सपेक्टिव कैमरा इसकी दिखावट को परिभाषित करते हैं:
#include <DOM/BevelPresetType.h>
#include <DOM/CameraPresetType.h>
#include <DOM/IAutoShape.h>
#include <DOM/ICamera.h>
#include <DOM/IColorFormat.h>
#include <DOM/ILightRig.h>
#include <DOM/IShapeBevel.h>
#include <DOM/IShapeCollection.h>
#include <DOM/ISlide.h>
#include <DOM/ITextFrame.h>
#include <DOM/IThreeDFormat.h>
#include <DOM/LightRigPresetType.h>
#include <DOM/LightingDirection.h>
#include <DOM/MaterialPresetType.h>
#include <DOM/Presentation.h>
#include <DOM/ShapeType.h>
#include <drawing/color.h>

using namespace Aspose::Slides;
using namespace System::Drawing;

auto presentation = System::MakeObject<Presentation>();
auto slide = presentation->get_Slide(0);

auto autoShape = slide->get_Shapes()->AddAutoShape(ShapeType::Rectangle, 20.0f, 20.0f, 400.0f, 200.0f);
autoShape->get_TextFrame()->set_Text(u"Aspose.Slides");

auto threeDFormat = autoShape->get_ThreeDFormat();

threeDFormat->get_BevelBottom()->set_BevelType(BevelPresetType::Circle);
threeDFormat->get_BevelBottom()->set_Height(10.5);
threeDFormat->get_BevelBottom()->set_Width(10.5);

threeDFormat->get_BevelTop()->set_BevelType(BevelPresetType::Circle);
threeDFormat->get_BevelTop()->set_Height(12.5);
threeDFormat->get_BevelTop()->set_Width(11);

threeDFormat->get_ExtrusionColor()->set_Color(Color::get_Orange());
threeDFormat->set_ExtrusionHeight(6);

threeDFormat->get_ContourColor()->set_Color(Color::get_DarkRed());
threeDFormat->set_ContourWidth(1.5);

threeDFormat->set_Depth(3);

threeDFormat->set_Material(MaterialPresetType::Plastic);

threeDFormat->get_LightRig()->set_Direction(LightingDirection::Top);
threeDFormat->get_LightRig()->set_LightType(LightRigPresetType::Balanced);
threeDFormat->get_LightRig()->SetRotation(0.0f, 0.0f, 40.0f);

threeDFormat->get_Camera()->set_CameraType(CameraPresetType::PerspectiveContrastingRightFacing);
परिणामी आकार:
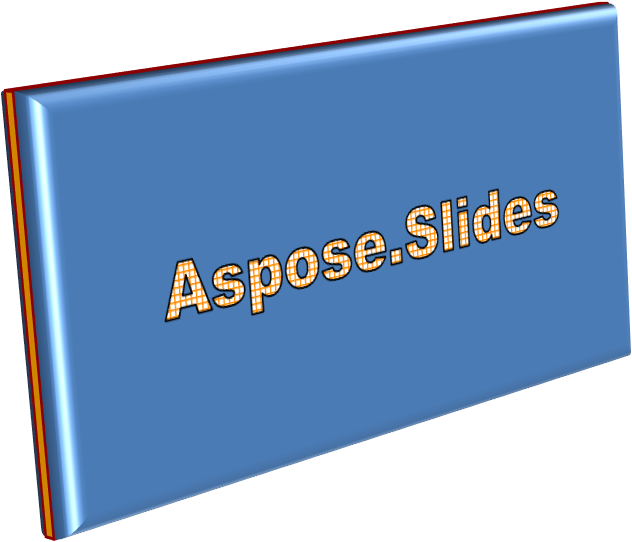
यह उदाहरण ITextFrameFormat::get_ThreeDFormat के माध्यम से टेक्स्ट पर समान 3D फ़ॉर्मेटिंग लागू करता है। छोटे बीवेल अक्षर किनारों को आकार देते हैं, जबकि एक्सट्रूज़न और लाइटिंग टेक्स्ट को गहराई प्रदान करते हैं:
#include <DOM/BevelPresetType.h>
#include <DOM/CameraPresetType.h>
#include <DOM/IAutoShape.h>
#include <DOM/ICamera.h>
#include <DOM/IColorFormat.h>
#include <DOM/ILightRig.h>
#include <DOM/IShapeBevel.h>
#include <DOM/IShapeCollection.h>
#include <DOM/ISlide.h>
#include <DOM/ITextFrame.h>
#include <DOM/ITextFrameFormat.h>
#include <DOM/IThreeDFormat.h>
#include <DOM/LightRigPresetType.h>
#include <DOM/LightingDirection.h>
#include <DOM/MaterialPresetType.h>
#include <DOM/Presentation.h>
#include <DOM/ShapeType.h>
#include <drawing/color.h>

using namespace Aspose::Slides;
using namespace System::Drawing;

auto presentation = System::MakeObject<Presentation>();
auto slide = presentation->get_Slide(0);

auto autoShape = slide->get_Shapes()->AddAutoShape(ShapeType::Rectangle, 20.0f, 20.0f, 400.0f, 200.0f);

auto textFrame = autoShape->get_TextFrame();
textFrame->set_Text(u"Aspose.Slides");

auto threeDFormat = textFrame->get_TextFrameFormat()->get_ThreeDFormat();

threeDFormat->get_BevelBottom()->set_BevelType(BevelPresetType::Circle);
threeDFormat->get_BevelBottom()->set_Height(3.5);
threeDFormat->get_BevelBottom()->set_Width(3.5);

threeDFormat->get_BevelTop()->set_BevelType(BevelPresetType::Circle);
threeDFormat->get_BevelTop()->set_Height(4);
threeDFormat->get_BevelTop()->set_Width(4);

threeDFormat->get_ExtrusionColor()->set_Color(Color::get_Orange());
threeDFormat->set_ExtrusionHeight(6);

threeDFormat->get_ContourColor()->set_Color(Color::get_DarkRed());
threeDFormat->set_ContourWidth(1.5);

threeDFormat->set_Depth(3);

threeDFormat->set_Material(MaterialPresetType::Plastic);

threeDFormat->get_LightRig()->set_Direction(LightingDirection::Top);
threeDFormat->get_LightRig()->set_LightType(LightRigPresetType::Balanced);
threeDFormat->get_LightRig()->SetRotation(0.0f, 0.0f, 40.0f);

threeDFormat->get_Camera()->set_CameraType(CameraPresetType::PerspectiveContrastingRightFacing);
परिणामी टेक्स्ट:
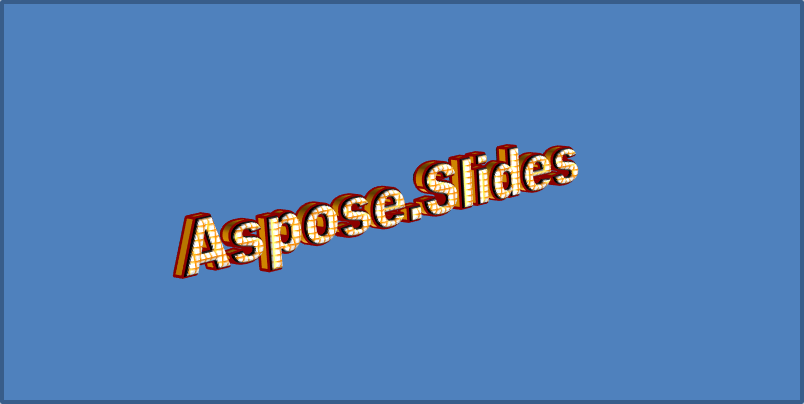
Note
टेक्स्ट या उनके आकारों पर 3D प्रभावों का उपयोग—और इन प्रभावों के बीच की इंटरैक्शन—विशिष्ट नियमों द्वारा नियंत्रित होता है। दोनों टेक्स्ट और उसे समेटने वाले आकार को शामिल करने वाले एक सीन को विचार करें। एक 3D प्रभाव में ऑब्जेक्ट का 3D प्रतिनिधित्व और वह सीन शामिल होता है जिसमें वह रखा गया है।
- यदि सीन दोनों आकार और टेक्स्ट दोनों के लिए सेट किया गया है, तो आकार का सीन प्राथमिकता लेता है और टेक्स्ट का सीन अनदेखा किया जाता है।
- यदि आकार का अपना सीन नहीं है लेकिन उसके पास 3D प्रतिनिधित्व है, तो टेक्स्ट का सीन उपयोग किया जाता है।
- यदि आकार के पास बिल्कुल ही 3D प्रभाव नहीं है, तो इसे फ्लैट माना जाता है, और 3D प्रभाव केवल टेक्स्ट पर लागू किया जाता है।
ये व्यवहार IThreeDFormat::get_LightRig और IThreeDFormat::get_Camera मेथड्स से संबंधित हैं।
टेक्स्ट को सपाट और पठनीय रखने के साथ-साथ उसके आकार की 3D फ़ॉर्मेटिंग को बनाए रखने के लिए, दोनों सेटिंग्स की तुलना और एक पूर्ण C++ उदाहरण के लिए देखें Keep Text Flat on a 3D Shape।
अक्सर पूछे जाने वाले प्रश्न
क्या मैं WordArt प्रभावों को विभिन्न फॉन्ट्स या स्क्रिप्ट्स (जैसे अरबी, चीनी) के साथ उपयोग कर सकता हूँ?
हाँ, Aspose.Slides for C++ यूनिकॉड का समर्थन करता है और सभी प्रमुख फॉन्ट्स एवं स्क्रिप्ट्स के साथ काम करता है। शैडो, फ़िल और आउटलाइन जैसी WordArt प्रभावें भाषा की परवाह किए बिना लागू की जा सकती हैं, हालांकि फॉन्ट उपलब्धता और रेंडरिंग सिस्टम फ़ॉन्ट्स पर निर्भर हो सकती है।
क्या मैं स्लाइड मास्टर तत्वों पर WordArt प्रभाव लागू कर सकता हूँ?
हाँ, आप मास्टर स्लाइड पर मौजूद आकारों, जैसे टाइटल प्लेसहोल्डर्स, फुटर या बैकग्राउंड टेक्स्ट पर WordArt प्रभाव लागू कर सकते हैं। मास्टर लेआउट में किए गए बदलाव सभी सम्बद्ध स्लाइड्स में परिलक्षित होंगे।
क्या WordArt प्रभाव प्रस्तुति फ़ाइल आकार को प्रभावित करते हैं?
हैं, लेकिन बहुत कम। शैडो, ग्लो और ग्रेडिएंट फ़िल जैसी WordArt प्रभावें कुछ अतिरिक्त फ़ॉर्मेटिंग मेटा डेटा जोड़ते हैं, जिससे फ़ाइल आकार थोड़ा बढ़ सकता है, परंतु अंतर सामान्यतः नगण्य रहता है।
क्या मैं प्रस्तुति को सहेजे बिना WordArt प्रभावों का परिणाम प्रीव्यू कर सकता हूँ?
हाँ, आप ISlide::GetImage का उपयोग करके WordArt वाले स्लाइड को इमेज (जैसे PNG, JPEG) में रेंडर कर सकते हैं, या IShape::GetImage से व्यक्तिगत आकार को इमेज में बदल सकते हैं। यह आपको पूरी प्रस्तुति को सेव या एक्सपोर्ट करने से पहले मेमोरी या स्क्रीन पर परिणाम का प्रीव्यू देखने की सुविधा देता है।