
Membuat dan Menerapkan Efek WordArt dalam C++
Gambaran Umum
Efek WordArt memungkinkan Anda memberi gaya pada teks dengan isian, garis luar, bayangan, refleksi, cahaya bersinar, transformasi, dan format 3D. Artikel ini menjelaskan cara membuat dan menyesuaikan efek-efek tersebut dalam presentasi PowerPoint menggunakan Aspose.Slides untuk C++, tanpa perlu menginstal Microsoft Office.
Buat Template WordArt Sederhana dan Terapkan ke Teks
Contoh-contoh berikut membuat gaya WordArt sederhana dengan mengatur teks, font, isian pola, dan garis luar.
Setiap contoh membuat presentasi baru dan menambahkan sebuah persegi panjang ke slide pertama; tidak diperlukan file input. Contoh pertama mengatur teks menjadi “Aspose.Slides”. Posisi dan dimensi shape diukur dalam poin:
#include <DOM/IAutoShape.h>
#include <DOM/IParagraph.h>
#include <DOM/IParagraphCollection.h>
#include <DOM/IPortion.h>
#include <DOM/IPortionCollection.h>
#include <DOM/IShapeCollection.h>
#include <DOM/ISlide.h>
#include <DOM/ITextFrame.h>
#include <DOM/Presentation.h>
#include <DOM/ShapeType.h>

using namespace Aspose::Slides;

auto presentation = System::MakeObject<Presentation>();
auto slide = presentation->get_Slide(0);

auto autoShape = slide->get_Shapes()->AddAutoShape(ShapeType::Rectangle, 20.0f, 20.0f, 400.0f, 200.0f);
auto textFrame = autoShape->get_TextFrame();

auto portion = textFrame->get_Paragraphs()->idx_get(0)->get_Portions()->idx_get(0);
portion->set_Text(u"Aspose.Slides");
Atur font menjadi Arial Black dengan ukuran 36 poin agar formatnya lebih terlihat:
#include <DOM/Fonts/FontData.h>
#include <DOM/IAutoShape.h>
#include <DOM/IParagraph.h>
#include <DOM/IParagraphCollection.h>
#include <DOM/IPortion.h>
#include <DOM/IPortionCollection.h>
#include <DOM/IPortionFormat.h>
#include <DOM/IShapeCollection.h>
#include <DOM/ISlide.h>
#include <DOM/ITextFrame.h>
#include <DOM/Presentation.h>
#include <DOM/ShapeType.h>

using namespace Aspose::Slides;

auto presentation = System::MakeObject<Presentation>();
auto slide = presentation->get_Slide(0);

auto autoShape = slide->get_Shapes()->AddAutoShape(ShapeType::Rectangle, 20.0f, 20.0f, 400.0f, 200.0f);
auto textFrame = autoShape->get_TextFrame();

auto portion = textFrame->get_Paragraphs()->idx_get(0)->get_Portions()->idx_get(0);
portion->set_Text(u"Aspose.Slides");

auto fontData = System::MakeObject<FontData>(u"Arial Black");
portion->get_PortionFormat()->set_LatinFont(fontData);
portion->get_PortionFormat()->set_FontHeight(36.0f);
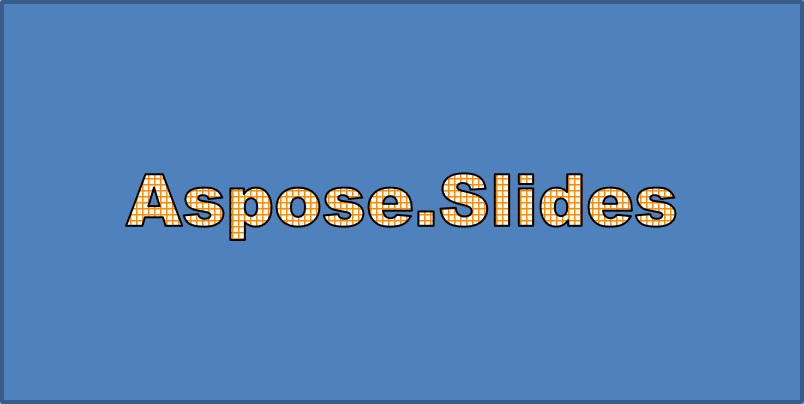
Terapkan pola SmallGrid dengan latar depan oranye tua dan latar belakang putih, lalu tambahkan garis luar teks berwarna hitam dengan lebar 1 poin:
#include <DOM/Fonts/FontData.h>
#include <DOM/FillType.h>
#include <DOM/IAutoShape.h>
#include <DOM/IColorFormat.h>
#include <DOM/IFillFormat.h>
#include <DOM/ILineFillFormat.h>
#include <DOM/ILineFormat.h>
#include <DOM/IParagraph.h>
#include <DOM/IParagraphCollection.h>
#include <DOM/IPortion.h>
#include <DOM/IPortionCollection.h>
#include <DOM/IPortionFormat.h>
#include <DOM/IShapeCollection.h>
#include <DOM/ISlide.h>
#include <DOM/ITextFrame.h>
#include <DOM/IPatternFormat.h>
#include <DOM/PatternStyle.h>
#include <DOM/Presentation.h>
#include <DOM/ShapeType.h>
#include <drawing/color.h>

using namespace Aspose::Slides;
using namespace System::Drawing;

auto presentation = System::MakeObject<Presentation>();
auto slide = presentation->get_Slide(0);

auto autoShape = slide->get_Shapes()->AddAutoShape(ShapeType::Rectangle, 20.0f, 20.0f, 400.0f, 200.0f);
auto textFrame = autoShape->get_TextFrame();

auto portion = textFrame->get_Paragraphs()->idx_get(0)->get_Portions()->idx_get(0);
portion->set_Text(u"Aspose.Slides");

auto fontData = System::MakeObject<FontData>(u"Arial Black");
portion->get_PortionFormat()->set_LatinFont(fontData);
portion->get_PortionFormat()->set_FontHeight(36.0f);

auto fillFormat = portion->get_PortionFormat()->get_FillFormat();
fillFormat->set_FillType(FillType::Pattern);
fillFormat->get_PatternFormat()->get_ForeColor()->set_Color(Color::get_DarkOrange());
fillFormat->get_PatternFormat()->get_BackColor()->set_Color(Color::get_White());
fillFormat->get_PatternFormat()->set_PatternStyle(PatternStyle::SmallGrid);

portion->get_PortionFormat()->get_LineFormat()->set_Width(1);
auto lineFillFormat = portion->get_PortionFormat()->get_LineFormat()->get_FillFormat();
lineFillFormat->set_FillType(FillType::Solid);
lineFillFormat->get_SolidFillColor()->set_Color(Color::get_Black());
Teks yang dihasilkan:
Terapkan Efek WordArt Lainnya
Contoh-contoh berikut menunjukkan cara menerapkan bayangan, refleksi, cahaya bersinar, transformasi, dan efek 3D ke teks.
Terapkan Efek Bayangan Luar
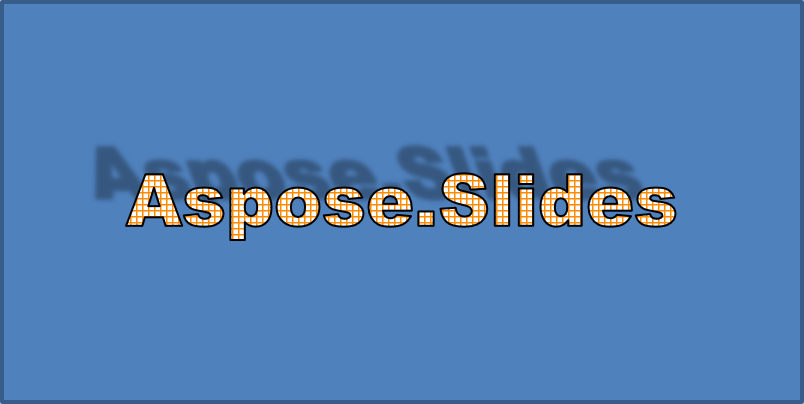
Bayangan luar menambah kedalaman dengan menempatkan bayangan di belakang teks. Anda dapat menyesuaikan warna, arah, jarak, radius blur, skala, dan kemiringan bayangan.
Contoh ini memanggil EnableOuterShadowEffect dan mengatur bayangan hitam dengan radius blur 4 poin, arah 230 derajat, dan jarak 30 poin. Nilai skala 100 mempertahankan ukuran bayangan, sementara skew horizontal memiringkannya 20 derajat. Transformasi alfa mengatur opasitas menjadi 32%:
#include <DOM/Fonts/FontData.h>
#include <DOM/ColorTransformOperation.h>
#include <DOM/Effects/IOuterShadow.h>
#include <DOM/IAutoShape.h>
#include <DOM/IColorFormat.h>
#include <DOM/IColorOperationCollection.h>
#include <DOM/IEffectFormat.h>
#include <DOM/IParagraph.h>
#include <DOM/IParagraphCollection.h>
#include <DOM/IPortion.h>
#include <DOM/IPortionCollection.h>
#include <DOM/IPortionFormat.h>
#include <DOM/IShapeCollection.h>
#include <DOM/ISlide.h>
#include <DOM/ITextFrame.h>
#include <DOM/Presentation.h>
#include <DOM/ShapeType.h>
#include <drawing/color.h>

using namespace Aspose::Slides;
using namespace System::Drawing;

auto presentation = System::MakeObject<Presentation>();
auto slide = presentation->get_Slide(0);

auto autoShape = slide->get_Shapes()->AddAutoShape(ShapeType::Rectangle, 20.0f, 20.0f, 400.0f, 200.0f);
auto textFrame = autoShape->get_TextFrame();

auto portion = textFrame->get_Paragraphs()->idx_get(0)->get_Portions()->idx_get(0);
portion->set_Text(u"Aspose.Slides");

auto fontData = System::MakeObject<FontData>(u"Arial Black");
portion->get_PortionFormat()->set_LatinFont(fontData);
portion->get_PortionFormat()->set_FontHeight(36.0f);

auto effectFormat = portion->get_PortionFormat()->get_EffectFormat();
effectFormat->EnableOuterShadowEffect();

auto outerShadowEffect = effectFormat->get_OuterShadowEffect();
outerShadowEffect->get_ShadowColor()->set_Color(Color::get_Black());
outerShadowEffect->set_ScaleHorizontal(100);
outerShadowEffect->set_ScaleVertical(100);
outerShadowEffect->set_BlurRadius(4);
outerShadowEffect->set_Direction(230.0f);
outerShadowEffect->set_Distance(30);
outerShadowEffect->set_SkewHorizontal(20);
outerShadowEffect->set_SkewVertical(0);
outerShadowEffect->get_ShadowColor()->get_ColorTransform()->Add(ColorTransformOperation::SetAlpha, 0.32f);
Teks yang dihasilkan:
Note
- Ketika bayangan luar dan bayangan preset digunakan bersamaan, hanya bayangan luar yang diterapkan.
- Jika bayangan luar dan dalam digunakan secara bersamaan, efek yang dihasilkan bergantung pada versi PowerPoint. Misalnya, di PowerPoint 2013, efeknya menjadi dua kali lipat, sementara di PowerPoint 2007, hanya bayangan luar yang diterapkan.
Terapkan Efek Refleksi
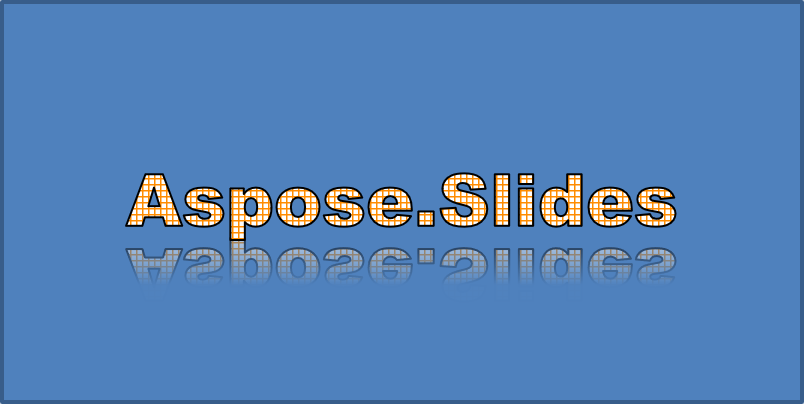
Refleksi membuat salinan teks yang terbayang. Sesuaikan posisinya, skala, blur, dan opasitas untuk mengontrol tampilannya.
Contoh ini memanggil EnableReflectionEffect dan membalik refleksi secara vertikal dengan skala -100%. Menggunakan radius blur 0,5 poin dan jarak 4,72 poin. Opasitas menurun dari 60% menjadi 0,9% antara posisi 0% dan 60% sepanjang refleksi:
#include <DOM/Fonts/FontData.h>
#include <DOM/Effects/IReflection.h>
#include <DOM/IAutoShape.h>
#include <DOM/IEffectFormat.h>
#include <DOM/IParagraph.h>
#include <DOM/IParagraphCollection.h>
#include <DOM/IPortion.h>
#include <DOM/IPortionCollection.h>
#include <DOM/IPortionFormat.h>
#include <DOM/IShapeCollection.h>
#include <DOM/ISlide.h>
#include <DOM/ITextFrame.h>
#include <DOM/Presentation.h>
#include <DOM/RectangleAlignment.h>
#include <DOM/ShapeType.h>

using namespace Aspose::Slides;

auto presentation = System::MakeObject<Presentation>();
auto slide = presentation->get_Slide(0);

auto autoShape = slide->get_Shapes()->AddAutoShape(ShapeType::Rectangle, 20.0f, 20.0f, 400.0f, 200.0f);
auto textFrame = autoShape->get_TextFrame();

auto portion = textFrame->get_Paragraphs()->idx_get(0)->get_Portions()->idx_get(0);
portion->set_Text(u"Aspose.Slides");

auto fontData = System::MakeObject<FontData>(u"Arial Black");
portion->get_PortionFormat()->set_LatinFont(fontData);
portion->get_PortionFormat()->set_FontHeight(36.0f);

auto effectFormat = portion->get_PortionFormat()->get_EffectFormat();
effectFormat->EnableReflectionEffect();

auto reflectionEffect = effectFormat->get_ReflectionEffect();
reflectionEffect->set_BlurRadius(0.5);
reflectionEffect->set_Distance(4.72);
reflectionEffect->set_StartPosAlpha(0.f);
reflectionEffect->set_EndPosAlpha(60.f);
reflectionEffect->set_Direction(90.0f);
reflectionEffect->set_ScaleHorizontal(100);
reflectionEffect->set_ScaleVertical(-100);
reflectionEffect->set_StartReflectionOpacity(60.f);
reflectionEffect->set_EndReflectionOpacity(0.9f);
reflectionEffect->set_RectangleAlign(RectangleAlignment::BottomLeft);
Teks yang dihasilkan:
Terapkan Efek Cahaya Bersinar
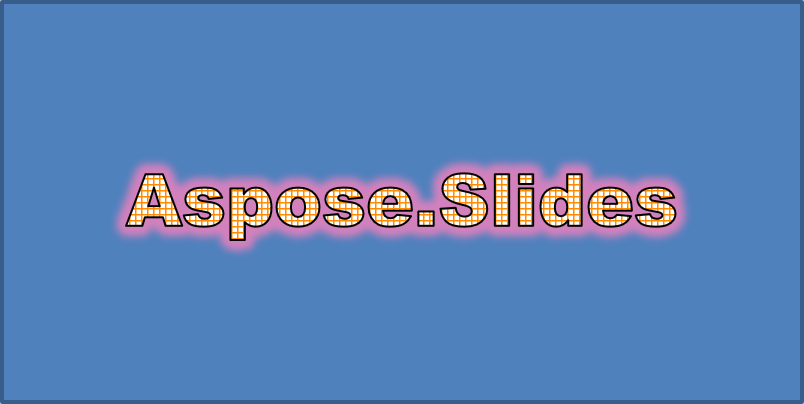
Cahaya bersinar menambahkan garis luar berwarna lembut di sekitar teks. Sesuaikan warna, opasitas, dan radius untuk mengontrol efeknya.
Contoh ini memanggil EnableGlowEffect dan menerapkan cahaya bersinar merah dengan opasitas 54% dan radius 7 poin:
#include <drawing/color.h>
#include <DOM/Fonts/FontData.h>
#include <DOM/ColorTransformOperation.h>
#include <DOM/Effects/IGlow.h>
#include <DOM/IAutoShape.h>
#include <DOM/IColorFormat.h>
#include <DOM/IColorOperationCollection.h>
#include <DOM/IEffectFormat.h>
#include <DOM/IParagraph.h>
#include <DOM/IParagraphCollection.h>
#include <DOM/IPortion.h>
#include <DOM/IPortionCollection.h>
#include <DOM/IPortionFormat.h>
#include <DOM/IShapeCollection.h>
#include <DOM/ISlide.h>
#include <DOM/ITextFrame.h>
#include <DOM/Presentation.h>
#include <DOM/ShapeType.h>

using namespace Aspose::Slides;
using namespace System::Drawing;

auto presentation = System::MakeObject<Presentation>();
auto slide = presentation->get_Slide(0);

auto autoShape = slide->get_Shapes()->AddAutoShape(ShapeType::Rectangle, 20.0f, 20.0f, 400.0f, 200.0f);
auto textFrame = autoShape->get_TextFrame();

auto portion = textFrame->get_Paragraphs()->idx_get(0)->get_Portions()->idx_get(0);
portion->set_Text(u"Aspose.Slides");

auto fontData = System::MakeObject<FontData>(u"Arial Black");
portion->get_PortionFormat()->set_LatinFont(fontData);
portion->get_PortionFormat()->set_FontHeight(36.0f);

auto effectFormat = portion->get_PortionFormat()->get_EffectFormat();
effectFormat->EnableGlowEffect();

auto glowEffect = effectFormat->get_GlowEffect();
glowEffect->get_Color()->set_Color(Color::get_Red());
glowEffect->get_Color()->get_ColorTransform()->Add(ColorTransformOperation::SetAlpha, 0.54f);
glowEffect->set_Radius(7);
Teks yang dihasilkan:
Terapkan Transformasi WordArt
Transformasi WordArt membengkokkan, meregangkan, atau melengkungkan blok teks.
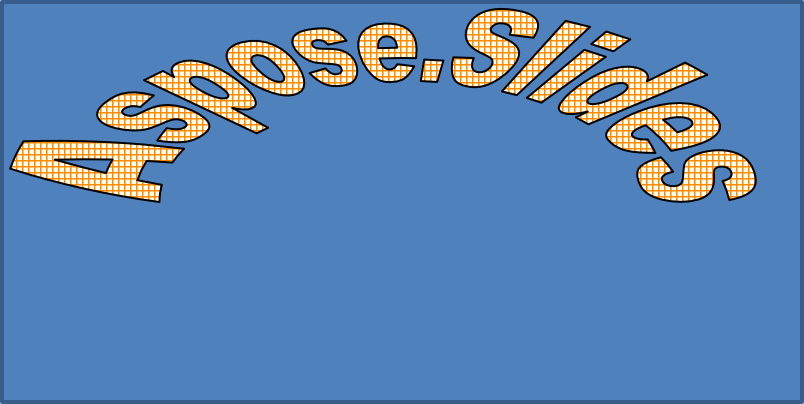
Atur ITextFrameFormat::set_Transform ke ArchUpPour untuk melengkungkan seluruh frame teks ke atas:
#include <DOM/IAutoShape.h>
#include <DOM/IShapeCollection.h>
#include <DOM/ISlide.h>
#include <DOM/ITextFrame.h>
#include <DOM/ITextFrameFormat.h>
#include <DOM/Presentation.h>
#include <DOM/ShapeType.h>
#include <DOM/TextShapeType.h>

using namespace Aspose::Slides;

auto presentation = System::MakeObject<Presentation>();
auto slide = presentation->get_Slide(0);

auto autoShape = slide->get_Shapes()->AddAutoShape(ShapeType::Rectangle, 20.0f, 20.0f, 400.0f, 200.0f);

auto textFrame = autoShape->get_TextFrame();
textFrame->set_Text(u"Aspose.Slides");
textFrame->get_TextFrameFormat()->set_Transform(TextShapeType::ArchUpPour);
Teks yang dihasilkan:
Note
Aspose.Slides untuk C++ menyediakan sekumpulan transformation types yang telah ditentukan sebelumnya.Terapkan Efek 3D ke Bentuk dan Teks
Anda dapat menerapkan efek 3D ke bentuk atau ke teksnya. Bevel, ekstrusi, pencahayaan, dan pengaturan kamera mengontrol tampilan yang dihasilkan.
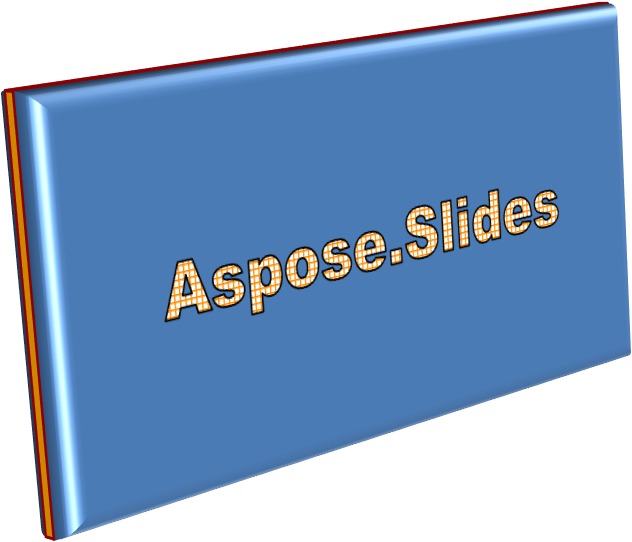
Contoh berikut menggunakan IThreeDFormat untuk menambahkan bevel melingkar, ekstrusi oranye, dan kontur merah tua ke persegi panjang. Dimensi bevel, tinggi ekstrusi, lebar kontur, dan kedalaman diukur dalam poin. Bahan plastik, pencahayaan seimbang yang diputar 40 derajat sekitar sumbu Z, serta kamera perspektif menentukan tampilannya:
#include <DOM/BevelPresetType.h>
#include <DOM/CameraPresetType.h>
#include <DOM/IAutoShape.h>
#include <DOM/ICamera.h>
#include <DOM/IColorFormat.h>
#include <DOM/ILightRig.h>
#include <DOM/IShapeBevel.h>
#include <DOM/IShapeCollection.h>
#include <DOM/ISlide.h>
#include <DOM/ITextFrame.h>
#include <DOM/IThreeDFormat.h>
#include <DOM/LightRigPresetType.h>
#include <DOM/LightingDirection.h>
#include <DOM/MaterialPresetType.h>
#include <DOM/Presentation.h>
#include <DOM/ShapeType.h>
#include <drawing/color.h>

using namespace Aspose::Slides;
using namespace System::Drawing;

auto presentation = System::MakeObject<Presentation>();
auto slide = presentation->get_Slide(0);

auto autoShape = slide->get_Shapes()->AddAutoShape(ShapeType::Rectangle, 20.0f, 20.0f, 400.0f, 200.0f);
autoShape->get_TextFrame()->set_Text(u"Aspose.Slides");

auto threeDFormat = autoShape->get_ThreeDFormat();

threeDFormat->get_BevelBottom()->set_BevelType(BevelPresetType::Circle);
threeDFormat->get_BevelBottom()->set_Height(10.5);
threeDFormat->get_BevelBottom()->set_Width(10.5);

threeDFormat->get_BevelTop()->set_BevelType(BevelPresetType::Circle);
threeDFormat->get_BevelTop()->set_Height(12.5);
threeDFormat->get_BevelTop()->set_Width(11);

threeDFormat->get_ExtrusionColor()->set_Color(Color::get_Orange());
threeDFormat->set_ExtrusionHeight(6);

threeDFormat->get_ContourColor()->set_Color(Color::get_DarkRed());
threeDFormat->set_ContourWidth(1.5);

threeDFormat->set_Depth(3);

threeDFormat->set_Material(MaterialPresetType::Plastic);

threeDFormat->get_LightRig()->set_Direction(LightingDirection::Top);
threeDFormat->get_LightRig()->set_LightType(LightRigPresetType::Balanced);
threeDFormat->get_LightRig()->SetRotation(0.0f, 0.0f, 40.0f);

threeDFormat->get_Camera()->set_CameraType(CameraPresetType::PerspectiveContrastingRightFacing);
Bentuk yang dihasilkan:
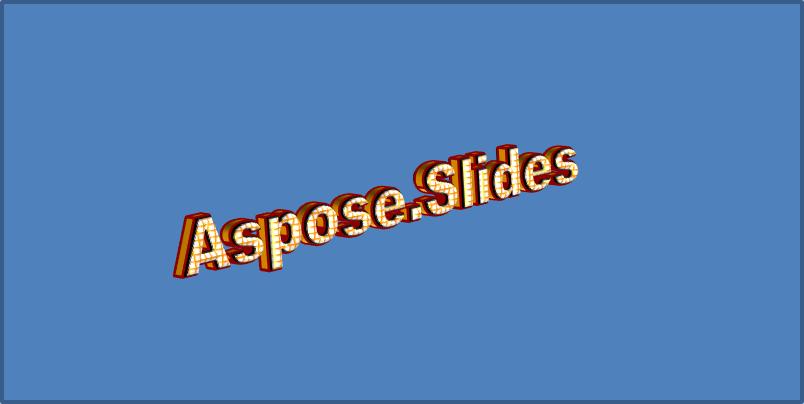
Contoh ini menerapkan pemformatan 3D serupa ke teks melalui ITextFrameFormat::get_ThreeDFormat. Bevel yang lebih kecil membentuk tepi huruf, sementara ekstrusi dan pencahayaan memberi kedalaman pada teks:
#include <DOM/BevelPresetType.h>
#include <DOM/CameraPresetType.h>
#include <DOM/IAutoShape.h>
#include <DOM/ICamera.h>
#include <DOM/IColorFormat.h>
#include <DOM/ILightRig.h>
#include <DOM/IShapeBevel.h>
#include <DOM/IShapeCollection.h>
#include <DOM/ISlide.h>
#include <DOM/ITextFrame.h>
#include <DOM/ITextFrameFormat.h>
#include <DOM/IThreeDFormat.h>
#include <DOM/LightRigPresetType.h>
#include <DOM/LightingDirection.h>
#include <DOM/MaterialPresetType.h>
#include <DOM/Presentation.h>
#include <DOM/ShapeType.h>
#include <drawing/color.h>

using namespace Aspose::Slides;
using namespace System::Drawing;

auto presentation = System::MakeObject<Presentation>();
auto slide = presentation->get_Slide(0);

auto autoShape = slide->get_Shapes()->AddAutoShape(ShapeType::Rectangle, 20.0f, 20.0f, 400.0f, 200.0f);

auto textFrame = autoShape->get_TextFrame();
textFrame->set_Text(u"Aspose.Slides");

auto threeDFormat = textFrame->get_TextFrameFormat()->get_ThreeDFormat();

threeDFormat->get_BevelBottom()->set_BevelType(BevelPresetType::Circle);
threeDFormat->get_BevelBottom()->set_Height(3.5);
threeDFormat->get_BevelBottom()->set_Width(3.5);

threeDFormat->get_BevelTop()->set_BevelType(BevelPresetType::Circle);
threeDFormat->get_BevelTop()->set_Height(4);
threeDFormat->get_BevelTop()->set_Width(4);

threeDFormat->get_ExtrusionColor()->set_Color(Color::get_Orange());
threeDFormat->set_ExtrusionHeight(6);

threeDFormat->get_ContourColor()->set_Color(Color::get_DarkRed());
threeDFormat->set_ContourWidth(1.5);

threeDFormat->set_Depth(3);

threeDFormat->set_Material(MaterialPresetType::Plastic);

threeDFormat->get_LightRig()->set_Direction(LightingDirection::Top);
threeDFormat->get_LightRig()->set_LightType(LightRigPresetType::Balanced);
threeDFormat->get_LightRig()->SetRotation(0.0f, 0.0f, 40.0f);

threeDFormat->get_Camera()->set_CameraType(CameraPresetType::PerspectiveContrastingRightFacing);
Teks yang dihasilkan:
Note
Penerapan efek 3D pada teks atau bentuknya—dan interaksi antara efek-efek tersebut—diatur oleh aturan khusus. Pertimbangkan sebuah adegan yang melibatkan baik teks maupun bentuk yang menampungnya. Efek 3D mencakup representasi 3D objek dan adegan tempat objek tersebut ditempatkan.
- Jika adegan diatur untuk bentuk dan teks, adegan bentuk mengambil prioritas dan adegan teks diabaikan.
- Jika bentuk tidak memiliki adegan sendiri tetapi memiliki representasi 3D, adegan teks yang digunakan.
- Jika bentuk tidak memiliki efek 3D sama sekali, bentuk tersebut diperlakukan datar, dan efek 3D diterapkan hanya pada teks.
Perilaku ini terkait dengan metode IThreeDFormat::get_LightRig dan IThreeDFormat::get_Camera.
Untuk menjaga teks tetap datar dan dapat dibaca sambil mempertahankan pemformatan 3D bentuknya, lihat Keep Text Flat on a 3D Shape untuk perbandingan kedua pengaturan dan contoh lengkap C++.
FAQ
Apakah saya dapat menggunakan efek WordArt dengan font atau skrip berbeda (misalnya Arab, Mandarin)?
Ya, Aspose.Slides untuk C++ mendukung Unicode dan bekerja dengan semua font serta skrip utama. Efek WordArt seperti bayangan, isian, dan garis luar dapat diterapkan terlepas dari bahasa, meskipun ketersediaan font dan rendering dapat bergantung pada font sistem.
Apakah saya dapat menerapkan efek WordArt pada elemen master slide?
Ya, Anda dapat menerapkan efek WordArt pada shape di master slide, termasuk placeholder judul, footer, atau teks latar belakang. Perubahan pada tata letak master akan tercermin pada semua slide terkait.
Apakah efek WordArt memengaruhi ukuran file presentasi?
Sedikit. Efek WordArt seperti bayangan, cahaya bersinar, dan isian gradasi dapat sedikit menambah ukuran file karena metadata format tambahan, tetapi perbedaannya biasanya tidak signifikan.
Apakah saya dapat melihat pratinjau hasil efek WordArt tanpa menyimpan presentasi?
Ya, Anda dapat merender slide yang berisi WordArt menjadi gambar (misalnya PNG, JPEG) menggunakan ISlide::GetImage, atau merender shape individual menggunakan IShape::GetImage. Ini memungkinkan Anda melihat pratinjau hasil di memori atau layar sebelum menyimpan atau mengekspor presentasi secara lengkap.