
Tworzenie i stosowanie efektów WordArt w C++
Przegląd
Efekty WordArt umożliwiają stylizowanie tekstu przy użyciu wypełnień, konturów, cieni, odbić, poświaty, przekształceń i formatowania 3D. Ten artykuł wyjaśnia, jak tworzyć i dostosowywać te efekty w prezentacjach PowerPoint przy użyciu Aspose.Slides dla C++, bez zainstalowanego Microsoft Office.
Utwórz prosty szablon WordArt i zastosuj go do tekstu
Poniższe przykłady tworzą prosty styl WordArt, ustawiając tekst, czcionkę, wypełnienie wzorem i kontur.
Każdy przykład tworzy nową prezentację i dodaje prostokąt do jej pierwszego slajdu; nie jest wymagany żaden plik wejściowy. Pierwszy przykład ustawia tekst na „Aspose.Slides”. Pozycja i wymiary kształtu są mierzone w punktach:
#include <DOM/IAutoShape.h>
#include <DOM/IParagraph.h>
#include <DOM/IParagraphCollection.h>
#include <DOM/IPortion.h>
#include <DOM/IPortionCollection.h>
#include <DOM/IShapeCollection.h>
#include <DOM/ISlide.h>
#include <DOM/ITextFrame.h>
#include <DOM/Presentation.h>
#include <DOM/ShapeType.h>

using namespace Aspose::Slides;

auto presentation = System::MakeObject<Presentation>();
auto slide = presentation->get_Slide(0);

auto autoShape = slide->get_Shapes()->AddAutoShape(ShapeType::Rectangle, 20.0f, 20.0f, 400.0f, 200.0f);
auto textFrame = autoShape->get_TextFrame();

auto portion = textFrame->get_Paragraphs()->idx_get(0)->get_Portions()->idx_get(0);
portion->set_Text(u"Aspose.Slides");
Ustaw czcionkę na Arial Black o rozmiarze 36 punktów, aby formatowanie było bardziej widoczne:
#include <DOM/Fonts/FontData.h>
#include <DOM/IAutoShape.h>
#include <DOM/IParagraph.h>
#include <DOM/IParagraphCollection.h>
#include <DOM/IPortion.h>
#include <DOM/IPortionCollection.h>
#include <DOM/IPortionFormat.h>
#include <DOM/IShapeCollection.h>
#include <DOM/ISlide.h>
#include <DOM/ITextFrame.h>
#include <DOM/Presentation.h>
#include <DOM/ShapeType.h>

using namespace Aspose::Slides;

auto presentation = System::MakeObject<Presentation>();
auto slide = presentation->get_Slide(0);

auto autoShape = slide->get_Shapes()->AddAutoShape(ShapeType::Rectangle, 20.0f, 20.0f, 400.0f, 200.0f);
auto textFrame = autoShape->get_TextFrame();

auto portion = textFrame->get_Paragraphs()->idx_get(0)->get_Portions()->idx_get(0);
portion->set_Text(u"Aspose.Slides");

auto fontData = System::MakeObject<FontData>(u"Arial Black");
portion->get_PortionFormat()->set_LatinFont(fontData);
portion->get_PortionFormat()->set_FontHeight(36.0f);
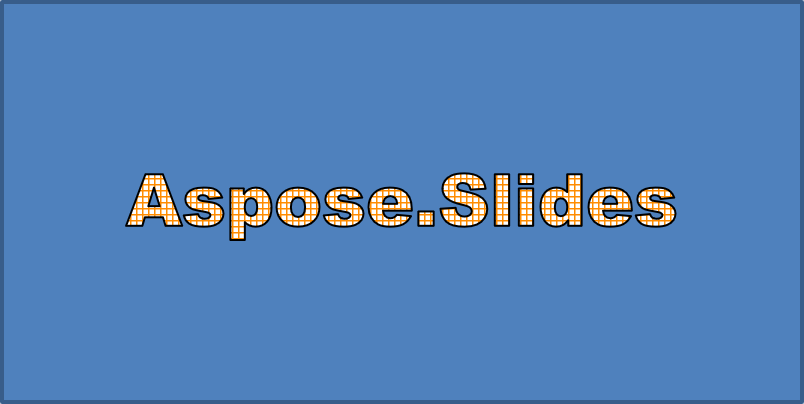
Zastosuj wzór SmallGrid z ciemnopomarańczowym pierwszym planem i białym tłem, a następnie dodaj czarny kontur tekstu o szerokości 1 punktu:
#include <DOM/Fonts/FontData.h>
#include <DOM/FillType.h>
#include <DOM/IAutoShape.h>
#include <DOM/IColorFormat.h>
#include <DOM/IFillFormat.h>
#include <DOM/ILineFillFormat.h>
#include <DOM/ILineFormat.h>
#include <DOM/IParagraph.h>
#include <DOM/IParagraphCollection.h>
#include <DOM/IPortion.h>
#include <DOM/IPortionCollection.h>
#include <DOM/IPortionFormat.h>
#include <DOM/IShapeCollection.h>
#include <DOM/ISlide.h>
#include <DOM/ITextFrame.h>
#include <DOM/IPatternFormat.h>
#include <DOM/PatternStyle.h>
#include <DOM/Presentation.h>
#include <DOM/ShapeType.h>
#include <drawing/color.h>

using namespace Aspose::Slides;
using namespace System::Drawing;

auto presentation = System::MakeObject<Presentation>();
auto slide = presentation->get_Slide(0);

auto autoShape = slide->get_Shapes()->AddAutoShape(ShapeType::Rectangle, 20.0f, 20.0f, 400.0f, 200.0f);
auto textFrame = autoShape->get_TextFrame();

auto portion = textFrame->get_Paragraphs()->idx_get(0)->get_Portions()->idx_get(0);
portion->set_Text(u"Aspose.Slides");

auto fontData = System::MakeObject<FontData>(u"Arial Black");
portion->get_PortionFormat()->set_LatinFont(fontData);
portion->get_PortionFormat()->set_FontHeight(36.0f);

auto fillFormat = portion->get_PortionFormat()->get_FillFormat();
fillFormat->set_FillType(FillType::Pattern);
fillFormat->get_PatternFormat()->get_ForeColor()->set_Color(Color::get_DarkOrange());
fillFormat->get_PatternFormat()->get_BackColor()->set_Color(Color::get_White());
fillFormat->get_PatternFormat()->set_PatternStyle(PatternStyle::SmallGrid);

portion->get_PortionFormat()->get_LineFormat()->set_Width(1);
auto lineFillFormat = portion->get_PortionFormat()->get_LineFormat()->get_FillFormat();
lineFillFormat->set_FillType(FillType::Solid);
lineFillFormat->get_SolidFillColor()->set_Color(Color::get_Black());
Otrzymany tekst:
Zastosuj inne efekty WordArt
Poniższe przykłady pokazują, jak zastosować cienie, odbicia, poświatę, przekształcenia i efekty 3D do tekstu.
Zastosuj efekty zewnętrznego cienia
Zewnętrzny cień dodaje głębi, umieszczając cień za tekstem. Możesz dostosować jego kolor, kierunek, odległość, promień rozmycia, skalę i pochylenie.
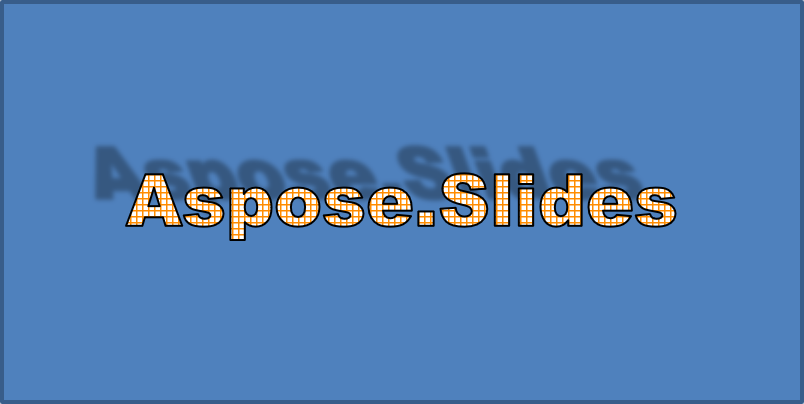
Ten przykład wywołuje EnableOuterShadowEffect i ustawia czarny cień z promieniem rozmycia 4 punkty, kierunkiem 230 stopni i odległością 30 punktów. Wartości skali 100 zachowują rozmiar cienia, a pochylenie poziome przechyla go o 20 stopni. Transformacja alfa ustawia jego nieprzezroczystość na 32%:
#include <DOM/Fonts/FontData.h>
#include <DOM/ColorTransformOperation.h>
#include <DOM/Effects/IOuterShadow.h>
#include <DOM/IAutoShape.h>
#include <DOM/IColorFormat.h>
#include <DOM/IColorOperationCollection.h>
#include <DOM/IEffectFormat.h>
#include <DOM/IParagraph.h>
#include <DOM/IParagraphCollection.h>
#include <DOM/IPortion.h>
#include <DOM/IPortionCollection.h>
#include <DOM/IPortionFormat.h>
#include <DOM/IShapeCollection.h>
#include <DOM/ISlide.h>
#include <DOM/ITextFrame.h>
#include <DOM/Presentation.h>
#include <DOM/ShapeType.h>
#include <drawing/color.h>

using namespace Aspose::Slides;
using namespace System::Drawing;

auto presentation = System::MakeObject<Presentation>();
auto slide = presentation->get_Slide(0);

auto autoShape = slide->get_Shapes()->AddAutoShape(ShapeType::Rectangle, 20.0f, 20.0f, 400.0f, 200.0f);
auto textFrame = autoShape->get_TextFrame();

auto portion = textFrame->get_Paragraphs()->idx_get(0)->get_Portions()->idx_get(0);
portion->set_Text(u"Aspose.Slides");

auto fontData = System::MakeObject<FontData>(u"Arial Black");
portion->get_PortionFormat()->set_LatinFont(fontData);
portion->get_PortionFormat()->set_FontHeight(36.0f);

auto effectFormat = portion->get_PortionFormat()->get_EffectFormat();
effectFormat->EnableOuterShadowEffect();

auto outerShadowEffect = effectFormat->get_OuterShadowEffect();
outerShadowEffect->get_ShadowColor()->set_Color(Color::get_Black());
outerShadowEffect->set_ScaleHorizontal(100);
outerShadowEffect->set_ScaleVertical(100);
outerShadowEffect->set_BlurRadius(4);
outerShadowEffect->set_Direction(230.0f);
outerShadowEffect->set_Distance(30);
outerShadowEffect->set_SkewHorizontal(20);
outerShadowEffect->set_SkewVertical(0);
outerShadowEffect->get_ShadowColor()->get_ColorTransform()->Add(ColorTransformOperation::SetAlpha, 0.32f);
Otrzymany tekst:
Note
- Gdy używane są jednocześnie zewnętrzne i presetowane cienie, stosowany jest tylko zewnętrzny cień.
- Jeśli jednocześnie zastosowane są zewnętrzne i wewnętrzne cienie, uzyskany efekt zależy od wersji PowerPoint. Na przykład w PowerPoint 2013 efekt jest podwajany, natomiast w PowerPoint 2007 stosowany jest tylko zewnętrzny cień.
Zastosuj efekty odbicia
Odbicie tworzy lustrzaną kopię tekstu. Dostosuj jego pozycję, skalę, rozmycie i nieprzezroczystość, aby kontrolować wygląd.
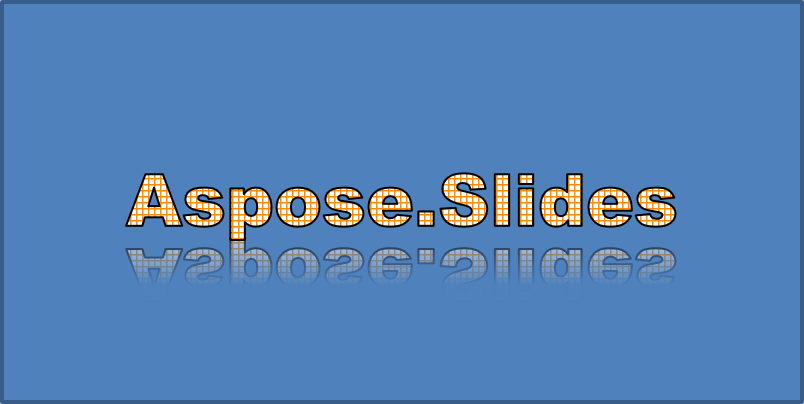
Ten przykład wywołuje EnableReflectionEffect i odwraca odbicie pionowo ze skalą -100%. Używa promienia rozmycia 0,5 punktu i odległości 4,72 punktu. Nieprzezroczystość zmniejsza się z 60% do 0,9% między pozycjami 0% a 60% wzdłuż odbicia:
#include <DOM/Fonts/FontData.h>
#include <DOM/Effects/IReflection.h>
#include <DOM/IAutoShape.h>
#include <DOM/IEffectFormat.h>
#include <DOM/IParagraph.h>
#include <DOM/IParagraphCollection.h>
#include <DOM/IPortion.h>
#include <DOM/IPortionCollection.h>
#include <DOM/IPortionFormat.h>
#include <DOM/IShapeCollection.h>
#include <DOM/ISlide.h>
#include <DOM/ITextFrame.h>
#include <DOM/Presentation.h>
#include <DOM/RectangleAlignment.h>
#include <DOM/ShapeType.h>

using namespace Aspose::Slides;

auto presentation = System::MakeObject<Presentation>();
auto slide = presentation->get_Slide(0);

auto autoShape = slide->get_Shapes()->AddAutoShape(ShapeType::Rectangle, 20.0f, 20.0f, 400.0f, 200.0f);
auto textFrame = autoShape->get_TextFrame();

auto portion = textFrame->get_Paragraphs()->idx_get(0)->get_Portions()->idx_get(0);
portion->set_Text(u"Aspose.Slides");

auto fontData = System::MakeObject<FontData>(u"Arial Black");
portion->get_PortionFormat()->set_LatinFont(fontData);
portion->get_PortionFormat()->set_FontHeight(36.0f);

auto effectFormat = portion->get_PortionFormat()->get_EffectFormat();
effectFormat->EnableReflectionEffect();

auto reflectionEffect = effectFormat->get_ReflectionEffect();
reflectionEffect->set_BlurRadius(0.5);
reflectionEffect->set_Distance(4.72);
reflectionEffect->set_StartPosAlpha(0.f);
reflectionEffect->set_EndPosAlpha(60.f);
reflectionEffect->set_Direction(90.0f);
reflectionEffect->set_ScaleHorizontal(100);
reflectionEffect->set_ScaleVertical(-100);
reflectionEffect->set_StartReflectionOpacity(60.f);
reflectionEffect->set_EndReflectionOpacity(0.9f);
reflectionEffect->set_RectangleAlign(RectangleAlignment::BottomLeft);
Otrzymany tekst:
Zastosuj efekty poświaty
Poświata dodaje miękki, kolorowy kontur wokół tekstu. Dostosuj jej kolor, nieprzezroczystość i promień, aby kontrolować efekt.
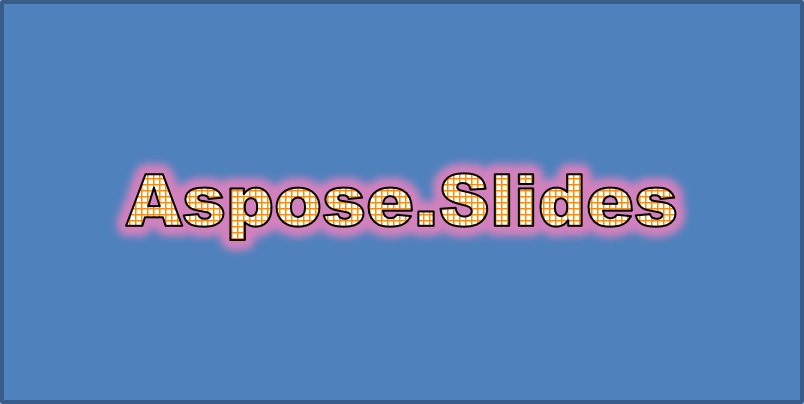
Ten przykład wywołuje EnableGlowEffect i stosuje czerwoną poświatę z nieprzezroczystością 54% oraz promieniem 7 punktów:
#include <drawing/color.h>
#include <DOM/Fonts/FontData.h>
#include <DOM/ColorTransformOperation.h>
#include <DOM/Effects/IGlow.h>
#include <DOM/IAutoShape.h>
#include <DOM/IColorFormat.h>
#include <DOM/IColorOperationCollection.h>
#include <DOM/IEffectFormat.h>
#include <DOM/IParagraph.h>
#include <DOM/IParagraphCollection.h>
#include <DOM/IPortion.h>
#include <DOM/IPortionCollection.h>
#include <DOM/IPortionFormat.h>
#include <DOM/IShapeCollection.h>
#include <DOM/ISlide.h>
#include <DOM/ITextFrame.h>
#include <DOM/Presentation.h>
#include <DOM/ShapeType.h>

using namespace Aspose::Slides;
using namespace System::Drawing;

auto presentation = System::MakeObject<Presentation>();
auto slide = presentation->get_Slide(0);

auto autoShape = slide->get_Shapes()->AddAutoShape(ShapeType::Rectangle, 20.0f, 20.0f, 400.0f, 200.0f);
auto textFrame = autoShape->get_TextFrame();

auto portion = textFrame->get_Paragraphs()->idx_get(0)->get_Portions()->idx_get(0);
portion->set_Text(u"Aspose.Slides");

auto fontData = System::MakeObject<FontData>(u"Arial Black");
portion->get_PortionFormat()->set_LatinFont(fontData);
portion->get_PortionFormat()->set_FontHeight(36.0f);

auto effectFormat = portion->get_PortionFormat()->get_EffectFormat();
effectFormat->EnableGlowEffect();

auto glowEffect = effectFormat->get_GlowEffect();
glowEffect->get_Color()->set_Color(Color::get_Red());
glowEffect->get_Color()->get_ColorTransform()->Add(ColorTransformOperation::SetAlpha, 0.54f);
glowEffect->set_Radius(7);
Otrzymany tekst:
Zastosuj przekształcenia WordArt
Przekształcenia WordArt wyginają, rozciągają lub deformują blok tekstu.
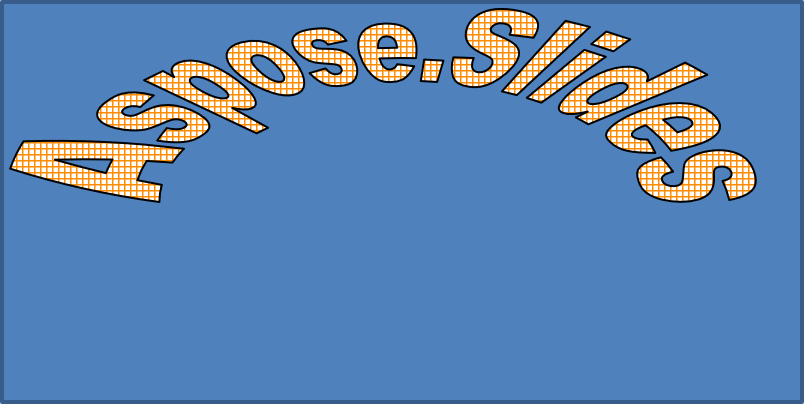
Ustaw ITextFrameFormat::set_Transform na ArchUpPour, aby zakrzywić cały tekst w górę:
#include <DOM/IAutoShape.h>
#include <DOM/IShapeCollection.h>
#include <DOM/ISlide.h>
#include <DOM/ITextFrame.h>
#include <DOM/ITextFrameFormat.h>
#include <DOM/Presentation.h>
#include <DOM/ShapeType.h>
#include <DOM/TextShapeType.h>

using namespace Aspose::Slides;

auto presentation = System::MakeObject<Presentation>();
auto slide = presentation->get_Slide(0);

auto autoShape = slide->get_Shapes()->AddAutoShape(ShapeType::Rectangle, 20.0f, 20.0f, 400.0f, 200.0f);

auto textFrame = autoShape->get_TextFrame();
textFrame->set_Text(u"Aspose.Slides");
textFrame->get_TextFrameFormat()->set_Transform(TextShapeType::ArchUpPour);
Otrzymany tekst:
Note
Aspose.Slides dla C++ udostępnia zestaw predefiniowanych typów przekształceń.Zastosuj efekty 3D do kształtów i tekstu
Możesz zastosować efekty 3D do kształtu lub jego tekstu. Krawężniki, wyciąganie, oświetlenie i ustawienia kamery kontrolują uzyskany wygląd.
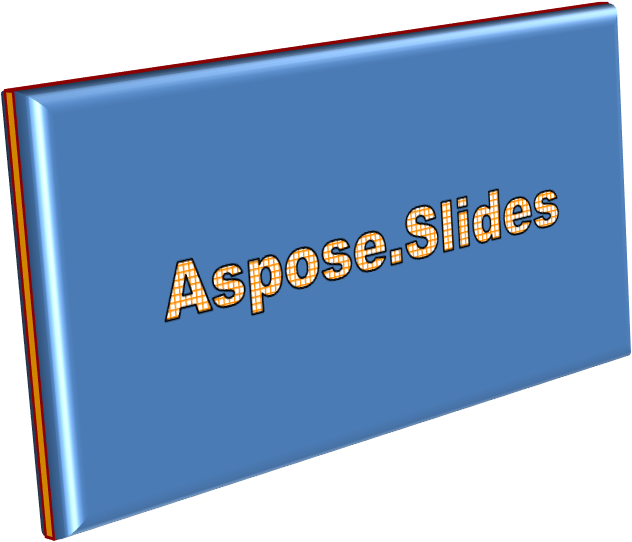
Poniższy przykład używa IThreeDFormat do dodania okrągłych krawężników, pomarańczowego wyciągnięcia i ciemnoczerwonego konturu do prostokąta. Wymiary krawężników, wysokość wyciągnięcia, szerokość konturu i głębokość są mierzone w punktach. Materiał plastikowy, zrównoważone oświetlenie obrócone o 40 stopni wokół osi Z oraz kamera perspektywiczna definiują jego wygląd:
#include <DOM/BevelPresetType.h>
#include <DOM/CameraPresetType.h>
#include <DOM/IAutoShape.h>
#include <DOM/ICamera.h>
#include <DOM/IColorFormat.h>
#include <DOM/ILightRig.h>
#include <DOM/IShapeBevel.h>
#include <DOM/IShapeCollection.h>
#include <DOM/ISlide.h>
#include <DOM/ITextFrame.h>
#include <DOM/IThreeDFormat.h>
#include <DOM/LightRigPresetType.h>
#include <DOM/LightingDirection.h>
#include <DOM/MaterialPresetType.h>
#include <DOM/Presentation.h>
#include <DOM/ShapeType.h>
#include <drawing/color.h>

using namespace Aspose::Slides;
using namespace System::Drawing;

auto presentation = System::MakeObject<Presentation>();
auto slide = presentation->get_Slide(0);

auto autoShape = slide->get_Shapes()->AddAutoShape(ShapeType::Rectangle, 20.0f, 20.0f, 400.0f, 200.0f);
autoShape->get_TextFrame()->set_Text(u"Aspose.Slides");

auto threeDFormat = autoShape->get_ThreeDFormat();

threeDFormat->get_BevelBottom()->set_BevelType(BevelPresetType::Circle);
threeDFormat->get_BevelBottom()->set_Height(10.5);
threeDFormat->get_BevelBottom()->set_Width(10.5);

threeDFormat->get_BevelTop()->set_BevelType(BevelPresetType::Circle);
threeDFormat->get_BevelTop()->set_Height(12.5);
threeDFormat->get_BevelTop()->set_Width(11);

threeDFormat->get_ExtrusionColor()->set_Color(Color::get_Orange());
threeDFormat->set_ExtrusionHeight(6);

threeDFormat->get_ContourColor()->set_Color(Color::get_DarkRed());
threeDFormat->set_ContourWidth(1.5);

threeDFormat->set_Depth(3);

threeDFormat->set_Material(MaterialPresetType::Plastic);

threeDFormat->get_LightRig()->set_Direction(LightingDirection::Top);
threeDFormat->get_LightRig()->set_LightType(LightRigPresetType::Balanced);
threeDFormat->get_LightRig()->SetRotation(0.0f, 0.0f, 40.0f);

threeDFormat->get_Camera()->set_CameraType(CameraPresetType::PerspectiveContrastingRightFacing);
Otrzymany kształt:
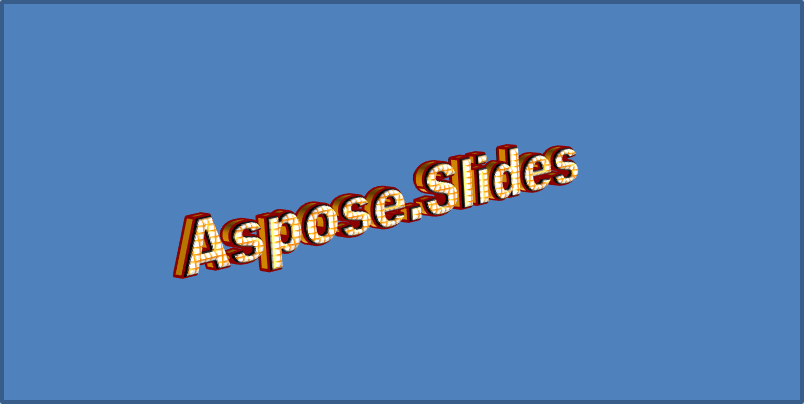
Ten przykład stosuje podobne formatowanie 3D do tekstu za pomocą ITextFrameFormat::get_ThreeDFormat. Mniejsze krawężniki kształtują krawędzie liter, a wyciągnięcie i oświetlenie nadają tekstowi głębokość:
#include <DOM/BevelPresetType.h>
#include <DOM/CameraPresetType.h>
#include <DOM/IAutoShape.h>
#include <DOM/ICamera.h>
#include <DOM/IColorFormat.h>
#include <DOM/ILightRig.h>
#include <DOM/IShapeBevel.h>
#include <DOM/IShapeCollection.h>
#include <DOM/ISlide.h>
#include <DOM/ITextFrame.h>
#include <DOM/ITextFrameFormat.h>
#include <DOM/IThreeDFormat.h>
#include <DOM/LightRigPresetType.h>
#include <DOM/LightingDirection.h>
#include <DOM/MaterialPresetType.h>
#include <DOM/Presentation.h>
#include <DOM/ShapeType.h>
#include <drawing/color.h>

using namespace Aspose::Slides;
using namespace System::Drawing;

auto presentation = System::MakeObject<Presentation>();
auto slide = presentation->get_Slide(0);

auto autoShape = slide->get_Shapes()->AddAutoShape(ShapeType::Rectangle, 20.0f, 20.0f, 400.0f, 200.0f);

auto textFrame = autoShape->get_TextFrame();
textFrame->set_Text(u"Aspose.Slides");

auto threeDFormat = textFrame->get_TextFrameFormat()->get_ThreeDFormat();

threeDFormat->get_BevelBottom()->set_BevelType(BevelPresetType::Circle);
threeDFormat->get_BevelBottom()->set_Height(3.5);
threeDFormat->get_BevelBottom()->set_Width(3.5);

threeDFormat->get_BevelTop()->set_BevelType(BevelPresetType::Circle);
threeDFormat->get_BevelTop()->set_Height(4);
threeDFormat->get_BevelTop()->set_Width(4);

threeDFormat->get_ExtrusionColor()->set_Color(Color::get_Orange());
threeDFormat->set_ExtrusionHeight(6);

threeDFormat->get_ContourColor()->set_Color(Color::get_DarkRed());
threeDFormat->set_ContourWidth(1.5);

threeDFormat->set_Depth(3);

threeDFormat->set_Material(MaterialPresetType::Plastic);

threeDFormat->get_LightRig()->set_Direction(LightingDirection::Top);
threeDFormat->get_LightRig()->set_LightType(LightRigPresetType::Balanced);
threeDFormat->get_LightRig()->SetRotation(0.0f, 0.0f, 40.0f);

threeDFormat->get_Camera()->set_CameraType(CameraPresetType::PerspectiveContrastingRightFacing);
Otrzymany tekst:
Note
Stosowanie efektów 3D do tekstu lub ich kształtów — oraz interakcja między tymi efektami — jest regulowane przez określone zasady. Rozważ scenę obejmującą zarówno tekst, jak i kształt go zawierający. Efekt 3D obejmuje trójwymiarową reprezentację obiektu oraz scenę, w której jest umieszczony.
- Jeśli scena jest ustawiona zarówno dla kształtu, jak i tekstu, scena kształtu ma pierwszeństwo i scena tekstu jest ignorowana.
- Jeśli kształt nie ma własnej sceny, ale ma reprezentację 3D, używana jest scena tekstu.
- Jeśli kształt nie ma żadnego efektu 3D, jest traktowany jako płaski, a efekt 3D jest stosowany wyłącznie do tekstu.
Te zachowania odnoszą się do metod IThreeDFormat::get_LightRig i IThreeDFormat::get_Camera.
Aby utrzymać tekst płaski i czytelny przy zachowaniu formatowania 3D kształtu, zobacz Keep Text Flat on a 3D Shape po porównanie obu ustawień i pełny przykład C++.
FAQ
Czy mogę używać efektów WordArt z różnymi czcionkami lub skryptami (np. arabski, chiński)?
Tak, Aspose.Slides dla C++ obsługuje Unicode i działa ze wszystkimi głównymi czcionkami i skryptami. Efekty WordArt, takie jak cień, wypełnienie i kontur, mogą być stosowane niezależnie od języka, choć dostępność czcionek i renderowanie mogą zależeć od czcionek systemowych.
Czy mogę zastosować efekty WordArt do elementów mastera slajdu?
Tak, możesz stosować efekty WordArt do kształtów na slajdach master, w tym do placeholderów tytułu, stopki lub tekstu w tle. Zmiany w układzie master będą widoczne we wszystkich powiązanych slajdach.
Czy efekty WordArt wpływają na rozmiar pliku prezentacji?
Nieznacznie. Efekty WordArt, takie jak cienie, poświaty i gradientowe wypełnienia, mogą nieco zwiększyć rozmiar pliku ze względu na dodatkowe metadane formatowania, ale różnica jest zazwyczaj pomijalna.
Czy mogę zobaczyć podgląd efektów WordArt bez zapisywania prezentacji?
Tak, możesz renderować slajdy zawierające WordArt do obrazów (np. PNG, JPEG) przy użyciu ISlide::GetImage, lub renderować pojedyncze kształty przy użyciu IShape::GetImage. Pozwala to na podgląd wyniku w pamięci lub na ekranie przed zapisaniem lub eksportem całej prezentacji.