
Python으로 프레젠테이션 텍스트 서식 지정
개요
이 문서는 Aspose.Slides for Python via .NET을 사용하여 PowerPoint 및 OpenDocument 프레젠테이션의 텍스트를 서식 지정하는 방법을 보여줍니다. 배경 색, 투명도, 문자 간격, 글꼴 속성, 회전, 단락 간격, 자동 맞춤 동작, 텍스트 앵커링, 탭 정지점 및 언어 설정을 다룹니다.
특별히 명시되지 않는 한 예제는 sample.pptx를 사용합니다. 첫 번째 슬라이드의 첫 번째 도형은 텍스트 상자이며, 첫 번째 단락에 아래와 같은 텍스트가 들어 있습니다. 슬라이드와 도형 인덱스는 0부터 시작합니다. 굵게 표시된 부분을 선택하는 예제는 상속된 굵은 서식을 포함한 실제 서식을 사용합니다:

리터럴 텍스트 또는 정규식 일치를 찾고 강조 표시하려면 텍스트 검색 및 바꾸기를 참조하십시오.
텍스트 배경 색 설정
단락의 기본 강조 색을 설정하려면 ParagraphFormat.default_portion_format을 사용하고, 개별 텍스트 부분에 대해서는 BasePortionFormat.highlight_color를 사용합니다.
다음 예제는 첫 번째 단락의 기본 강조 색을 연한 회색으로 설정합니다. 개별 부분에 지정된 강조 색이 이 기본값보다 우선합니다:
import aspose.pydrawing as draw
import aspose.slides as slides

with slides.Presentation("sample.pptx") as presentation:
    slide = presentation.slides[0]

    auto_shape = slide.shapes[0]
    paragraph = auto_shape.text_frame.paragraphs[0]

    # 전체 단락에 대한 강조 색을 설정합니다.
    paragraph.paragraph_format.default_portion_format.highlight_color.color = draw.Color.light_gray

    presentation.save("gray_paragraph.pptx", slides.export.SaveFormat.PPTX)
결과:

다음 코드 예제는 굵은 글꼴을 사용하는 텍스트 부분의 배경 색을 설정하는 방법을 보여줍니다:
import aspose.pydrawing as draw
import aspose.slides as slides

with slides.Presentation("sample.pptx") as presentation:
    slide = presentation.slides[0]

    auto_shape = slide.shapes[0]
    paragraph = auto_shape.text_frame.paragraphs[0]

    for portion in paragraph.portions:
        if portion.portion_format.get_effective().font_bold:
            # 텍스트 부분에 대한 강조 색을 설정합니다.
            portion.portion_format.highlight_color.color = draw.Color.light_gray

    presentation.save("gray_text_portions.pptx", slides.export.SaveFormat.PPTX)
결과:

텍스트 단락 정렬
텍스트 프레임 내에서 단락 정렬을 설정하려면 ParagraphFormat.alignment을 사용합니다. 값은 중앙, 왼쪽 정렬, 오른쪽 정렬, 양쪽 맞춤 등일 수 있습니다.
다음 코드 예제는 단락을 중앙에 정렬하는 방법을 보여줍니다:
import aspose.slides as slides

with slides.Presentation("sample.pptx") as presentation:
    slide = presentation.slides[0]

    auto_shape = slide.shapes[0]
    paragraph = auto_shape.text_frame.paragraphs[0]

    # 단락 정렬을 가운데로 설정합니다.
    paragraph.paragraph_format.alignment = slides.TextAlignment.CENTER

    presentation.save("aligned_paragraph.pptx", slides.export.SaveFormat.PPTX)
결과:

줄 내에서 글꼴 정렬
줄 내에서 서로 다른 글꼴 크기의 텍스트 부분을 수직으로 정렬하려면 ParagraphFormat.font_alignment을 사용합니다. 이 설정은 전체 단락에 적용되며 각 줄 내에서 정렬을 제어합니다.
다음 독립형 예제는 하나의 슬라이드에 네 개의 라벨이 있는 텍스트 상자를 생성합니다. 각 단락은 18, 36, 54포인트의 동일한 텍스트를 포함하며, 서로 다른 글꼴 정렬을 적용합니다. Arial을 사용하고 자동 맞춤 및 줄 바꿈을 비활성화하며, 텍스트 프레임은 한 줄에 충분히 크게 유지합니다.
import aspose.pydrawing as draw
import aspose.slides as slides

with slides.Presentation() as presentation:
    slide = presentation.slides[0]

    alignments = [slides.FontAlignment.BASELINE, slides.FontAlignment.TOP, slides.FontAlignment.CENTER, slides.FontAlignment.BOTTOM]
    font_sizes = [18, 36, 54]

    for i, alignment in enumerate(alignments):
        shape = slide.shapes.add_auto_shape(slides.ShapeType.RECTANGLE, 30, 20 + i * 130, 660, 120)
        shape.fill_format.fill_type = slides.FillType.NO_FILL
        shape.line_format.fill_format.fill_type = slides.FillType.NO_FILL

        text_frame = shape.text_frame
        text_frame.text_frame_format.anchoring_type = slides.TextAnchorType.TOP
        text_frame.text_frame_format.autofit_type = slides.TextAutofitType.NONE
        text_frame.text_frame_format.wrap_text = slides.NullableBool.FALSE

        label = text_frame.paragraphs[0]
        label.text = alignment.name.title()
        label.paragraph_format.alignment = slides.TextAlignment.LEFT
        label.paragraph_format.default_portion_format.font_height = 14
        label.paragraph_format.default_portion_format.latin_font = slides.FontData("Arial")
        label.paragraph_format.default_portion_format.fill_format.fill_type = slides.FillType.SOLID
        label.paragraph_format.default_portion_format.fill_format.solid_fill_color.color = draw.Color.gray

        paragraph = slides.Paragraph()
        paragraph.paragraph_format.font_alignment = alignment
        paragraph.paragraph_format.alignment = slides.TextAlignment.LEFT
        paragraph.paragraph_format.default_portion_format.latin_font = slides.FontData("Arial")
        paragraph.paragraph_format.default_portion_format.fill_format.fill_type = slides.FillType.SOLID
        paragraph.paragraph_format.default_portion_format.fill_format.solid_fill_color.color = draw.Color.black

        for font_size in font_sizes:
            portion = slides.Portion("Ag ")
            portion.portion_format.font_height = font_size
            paragraph.portions.add(portion)

        text_frame.paragraphs.add(paragraph)

    presentation.save("font_alignment.pptx", slides.export.SaveFormat.PPTX)
결과:
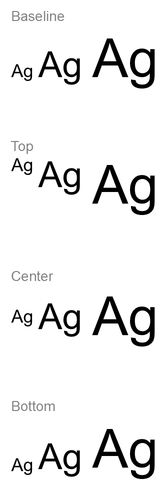
글꼴 정렬은 글꼴 메트릭을 사용하므로 개별 문자 가장자리가 정확히 일치하지 않을 수 있습니다. 예제에는 대문자와 하강자가 포함되어 baseline과 bottom 정렬의 차이를 보여줍니다. 글꼴 가용성, 대체, 사용된 문자 및 글꼴 크기 차이가 결과에 영향을 줍니다. 프레임 크기, 여백, 줄 간격, 줄 바꿈 및 자동 맞춤도 레이아웃에 영향을 미칩니다; 모드를 비교할 때는 동일한 글꼴과 레이아웃 설정을 사용하십시오.
이 설정은 수평 단락 정렬을 제어하는 ParagraphFormat.alignment 및 텍스트 블록을 도형 내에서 수직으로 위치시키는 TextFrameFormat.anchoring_type와 다릅니다. BasePortionFormat.escapement를 통한 위첨자 및 아래첨자 서식은 개별 부분을 baseline 대비 이동시키며, 단락 줄에 대한 글꼴 정렬을 설정하지 않습니다.
텍스트 투명도 설정
텍스트 투명도는 BasePortionFormat.fill_format에 할당된 색상의 알파 구성 요소로 제어합니다. 아래 예제에서 alpha = 50은 0–255 스케일의 ARGB 알파 값이며, 투명도 백분율이 아닙니다.
다음 코드 예제는 전체 단락에 투명도를 적용하는 방법을 보여줍니다:
import aspose.pydrawing as draw
import aspose.slides as slides

alpha = 50

with slides.Presentation("sample.pptx") as presentation:
    slide = presentation.slides[0]

    auto_shape = slide.shapes[0]
    paragraph = auto_shape.text_frame.paragraphs[0]

    # 텍스트에 반투명 검은색 채우기를 설정합니다.
    paragraph.paragraph_format.default_portion_format.fill_format.fill_type = slides.FillType.SOLID
    paragraph.paragraph_format.default_portion_format.fill_format.solid_fill_color.color = draw.Color.from_argb(alpha, draw.Color.black)

    presentation.save("transparent_paragraph.pptx", slides.export.SaveFormat.PPTX)
결과:

다음 코드 예제는 굵은 글꼴을 사용하는 텍스트 부분에 투명도를 적용하는 방법을 보여줍니다:
import aspose.pydrawing as draw
import aspose.slides as slides

alpha = 50

with slides.Presentation("sample.pptx") as presentation:
    slide = presentation.slides[0]

    auto_shape = slide.shapes[0]
    paragraph = auto_shape.text_frame.paragraphs[0]

    for portion in paragraph.portions:
        if portion.portion_format.get_effective().font_bold:
            # 텍스트 부분의 투명도를 설정합니다.
            portion.portion_format.fill_format.fill_type = slides.FillType.SOLID
            portion.portion_format.fill_format.solid_fill_color.color = draw.Color.from_argb(alpha, draw.Color.black)

    presentation.save("transparent_text_portions.pptx", slides.export.SaveFormat.PPTX)
결과:

텍스트 문자 간격 설정
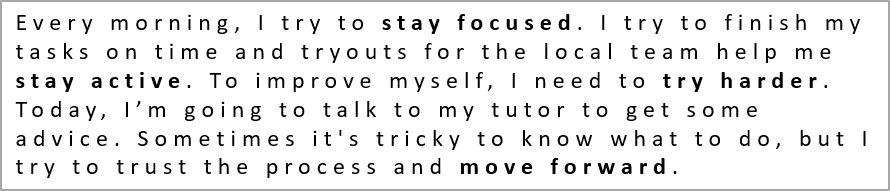
텍스트 상자에서 문자 사이 간격을 확장하거나 축소하려면 BasePortionFormat.spacing을 사용합니다. 예제는 3포인트 간격을 추가하며, 음수 값은 텍스트를 압축합니다.
다음 Python 코드에서는 전체 단락의 문자 간격을 확장하는 방법을 보여줍니다:
import aspose.slides as slides

with slides.Presentation("sample.pptx") as presentation:
    slide = presentation.slides[0]

    auto_shape = slide.shapes[0]
    paragraph = auto_shape.text_frame.paragraphs[0]

    # 참고: 문자 간격을 압축하려면 음수 값을 사용합니다.
    paragraph.paragraph_format.default_portion_format.spacing = 3  # 문자 간격을 확장합니다.

    presentation.save("character_spacing_in_paragraph.pptx", slides.export.SaveFormat.PPTX)
결과:
다음 코드 예제는 굵은 글꼴을 사용하는 텍스트 부분의 문자 간격을 확장하는 방법을 보여줍니다:
import aspose.slides as slides

with slides.Presentation("sample.pptx") as presentation:
    slide = presentation.slides[0]

    auto_shape = slide.shapes[0]
    paragraph = auto_shape.text_frame.paragraphs[0]

    for portion in paragraph.portions:
        if portion.portion_format.get_effective().font_bold:
            # 참고: 문자 간격을 압축하려면 음수 값을 사용합니다.
            portion.portion_format.spacing = 3  # 문자 간격을 확장합니다.

    presentation.save("character_spacing_in_text_portions.pptx", slides.export.SaveFormat.PPTX)
결과:

특정 글꼴에 대한 커닝 비활성화
때때로 Aspose.Slides가 렌더링한 텍스트가 PowerPoint에서 표시되는 텍스트보다 약간 더 조밀하게 보일 수 있습니다. 이는 PowerPoint가 특정 글꼴에 대해 커닝 데이터를 무시할 때 발생합니다(글꼴에 유효한 커닝 정보가 있어도 PowerPoint 설정에서 커닝이 활성화된 경우에도).
이를 해결하려면 해당 글꼴을 사용하는 텍스트 부분에 대해 커닝을 비활성화할 수 있습니다. BasePortionFormat.kerning_minimal_size을 실제 글꼴 크기보다 큰 값으로 설정하면 됩니다. 이 예제는 첫 번째 슬라이드의 첫 번째 도형에 텍스트 상자가 있는 “presentation.pptx"가 필요합니다. 효과적인 글꼴 이름(상속된 글꼴 포함)을 확인하고 Roboto를 사용하는 부분에 100포인트 임계값을 설정합니다. 이 설정은 100포인트 미만의 크기를 가진 해당 부분에 대해 커닝을 비활성화합니다:
import aspose.slides as slides

with slides.Presentation("presentation.pptx") as presentation:
    slide = presentation.slides[0]

    auto_shape = slide.shapes[0]
    target_font = "Roboto"

    for paragraph in auto_shape.text_frame.paragraphs:
        for portion in paragraph.portions:
            text_format = portion.portion_format.get_effective()
            fonts = (text_format.latin_font, text_format.east_asian_font, text_format.complex_script_font)
            uses_target_font = any(font is not None and font.font_name == target_font for font in fonts)

            if uses_target_font:
                portion.portion_format.kerning_minimal_size = 100

    presentation.save("output.pptx", slides.export.SaveFormat.PPTX)
임계값 이하의 일치하는 텍스트에 대해 이 설정은 커닝을 방지하고, PowerPoint 특유의 동작에 영향을 받는 글꼴에 대해 Aspose.Slides 렌더링을 PowerPoint 시각적 출력에 가깝게 맞출 수 있습니다.
텍스트 글꼴 속성 관리
글꼴 속성은 ParagraphFormat.default_portion_format을 통해 단락 수준에서 설정하거나, PortionFormat을 통해 개별 부분에서 설정할 수 있습니다.
다음 예제는 첫 번째 단락의 기본 글꼴을 12포인트 Times New Roman, 굵게, 기울임꼴, 점선 밑줄로 설정합니다. 개별 부분에 대한 명시적 서식은 이러한 기본값보다 우선합니다:
import aspose.slides as slides

with slides.Presentation("sample.pptx") as presentation:
    slide = presentation.slides[0]

    auto_shape = slide.shapes[0]
    paragraph = auto_shape.text_frame.paragraphs[0]

    # 단락에 대한 글꼴 속성을 설정합니다.
    portion_format = paragraph.paragraph_format.default_portion_format
    portion_format.font_height = 12
    portion_format.font_bold = slides.NullableBool.TRUE
    portion_format.font_italic = slides.NullableBool.TRUE
    portion_format.font_underline = slides.TextUnderlineType.DOTTED
    portion_format.latin_font = slides.FontData("Times New Roman")

    presentation.save("font_properties_for_paragraph.pptx", slides.export.SaveFormat.PPTX)
결과:

다음 예제는 효과적인 서식이 굵게인 부분에 13포인트 Times New Roman, 기울임꼴, 점선 밑줄을 적용합니다:
import aspose.slides as slides

with slides.Presentation("sample.pptx") as presentation:
    slide = presentation.slides[0]

    auto_shape = slide.shapes[0]
    paragraph = auto_shape.text_frame.paragraphs[0]

    for portion in paragraph.portions:
        if portion.portion_format.get_effective().font_bold:
            # 텍스트 부분에 대한 글꼴 속성을 설정합니다.
            portion.portion_format.font_height = 13
            portion.portion_format.font_italic = slides.NullableBool.TRUE
            portion.portion_format.font_underline = slides.TextUnderlineType.DOTTED
            portion.portion_format.latin_font = slides.FontData("Times New Roman")

    presentation.save("font_properties_for_text_portions.pptx", slides.export.SaveFormat.PPTX)
결과:

텍스트 회전 설정
TextFrameFormat.text_vertical_type을 사용하여 도형 내 텍스트 방향을 미리 정의된 값으로 설정합니다.
다음 코드 예제는 텍스트 방향을 TextVerticalType.VERTICAL270으로 설정합니다. 이 값은 텍스트를 시계 반대 방향으로 90도 회전시킵니다:
import aspose.slides as slides

with slides.Presentation("sample.pptx") as presentation:
    slide = presentation.slides[0]

    auto_shape = slide.shapes[0]

    auto_shape.text_frame.text_frame_format.text_vertical_type = slides.TextVerticalType.VERTICAL270

    presentation.save("text_rotation.pptx", slides.export.SaveFormat.PPTX)
결과:

텍스트 프레임 사용자 정의 회전 설정
TextFrameFormat.rotation_angle을 사용하여 TextFrame에 대한 사용자 정의 회전 각도를 설정할 수 있습니다.
다음 코드 예제는 도형 내 텍스트 프레임을 시계 방향으로 3도 회전합니다:
import aspose.slides as slides

with slides.Presentation("sample.pptx") as presentation:
    slide = presentation.slides[0]

    auto_shape = slide.shapes[0]

    auto_shape.text_frame.text_frame_format.rotation_angle = 3

    presentation.save("custom_text_rotation.pptx", slides.export.SaveFormat.PPTX)
결과:

단락 줄 간격 설정
Aspose.Slides는 ParagraphFormat.space_after, ParagraphFormat.space_before, 및 ParagraphFormat.space_within을 제공하여 단락 간격을 제어합니다. 사용 방법은 다음과 같습니다:
- 양수 값을 사용하면 줄 높이의 백분율로 줄 간격을 지정합니다.
- 음수 값을 사용하면 포인트 단위로 줄 간격을 지정합니다.
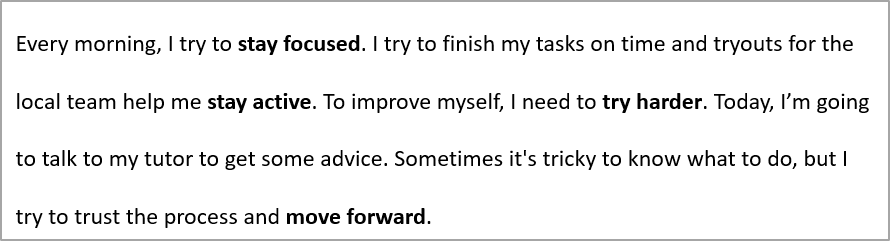
다음 예제는 첫 번째 단락의 내부 간격을 줄 높이의 200% (두 배 간격)로 설정합니다:
import aspose.slides as slides

with slides.Presentation("sample.pptx") as presentation:
    slide = presentation.slides[0]

    auto_shape = slide.shapes[0]
    paragraph = auto_shape.text_frame.paragraphs[0]

    paragraph.paragraph_format.space_within = 200

    presentation.save("line_spacing.pptx", slides.export.SaveFormat.PPTX)
결과:
줄 바꿈 제어
단락 줄 바꿈 규칙은 좁은 텍스트 블록이나 라틴어와 동아시아어가 혼합된 프레젠테이션에서 유용합니다. 아래 속성들은 ParagraphFormat에 속하므로 전체 단락에 적용됩니다:
- latin_line_break은 라틴어 줄 바꿈 규칙을 제어합니다. 혼합 텍스트에서 이를 변경하면 인접한 동아시아어 텍스트와 구두점의 줄 바꿈 위치에도 영향을 줄 수 있습니다.
- east_asian_line_break은 동아시아어 줄 바꿈 규칙을 제어하며, 라인 시작 및 종료 문자에 대한 제한을 포함합니다.
이 규칙들은 텍스트 프레임 내 자동 줄 바꿈을 활성화하는 TextFrameFormat.wrap_text을 대체하지 않으며, 줄 바꿈이 발생할 때 레이아웃에 영향을 미칩니다; 줄 바꿈 문자를 삽입하지는 않습니다. 명시적 줄 바꿈은 가용 너비와 무관하게 단락 내에 새 줄을 강제로 삽입합니다.
다음 독립형 예제는 중국어와 라틴어가 혼합된 좁은 텍스트 블록을 생성하고, 두 줄 바꿈 속성을 명시적으로 설정한 뒤 “line_breaking.pptx"로 저장합니다. 규칙을 실험하려면 다른 속성의 값을 유지한 채 해당 속성만 변경하십시오. 예제는 24포인트 Arial 및 SimSun을 사용하고, 프레임 너비 160포인트, 수평 여백 0으로 설정합니다. TextFrameFormat.autofit_type은 TextAutofitType.NONE으로 설정하여 텍스트 크기와 프레임 크기가 고정되도록 합니다:
import aspose.pydrawing as draw
import aspose.slides as slides

with slides.Presentation() as presentation:
    slide = presentation.slides[0]

    shape = slide.shapes.add_auto_shape(slides.ShapeType.RECTANGLE, 50, 50, 160, 300)
    shape.fill_format.fill_type = slides.FillType.NO_FILL

    text_frame = shape.text_frame
    text_frame.text_frame_format.wrap_text = slides.NullableBool.TRUE
    text_frame.text_frame_format.autofit_type = slides.TextAutofitType.NONE
    text_frame.text_frame_format.margin_left = 0
    text_frame.text_frame_format.margin_right = 0

    paragraph = text_frame.paragraphs[0]
    paragraph.text = "中文排版测试,PowerPoint 中文演示。"

    paragraph_format = paragraph.paragraph_format
    paragraph_format.alignment = slides.TextAlignment.LEFT
    paragraph_format.default_portion_format.font_height = 24
    paragraph_format.default_portion_format.latin_font = slides.FontData("Arial")
    paragraph_format.default_portion_format.east_asian_font = slides.FontData("SimSun")
    paragraph_format.default_portion_format.fill_format.fill_type = slides.FillType.SOLID
    paragraph_format.default_portion_format.fill_format.solid_fill_color.color = draw.Color.black
    paragraph_format.latin_line_break = slides.NullableBool.FALSE
    paragraph_format.east_asian_line_break = slides.NullableBool.TRUE

    presentation.save("line_breaking.pptx", slides.export.SaveFormat.PPTX)
걸이 구두점 제어
ParagraphFormat.hanging_punctuation을 사용하면 해당 구두점이 텍스트 라인의 오른쪽 가장자리를 넘어 확장될 수 있으며, 다음 라인을 차지하지 않습니다. 이는 전체 단락에 적용되며 걸이 들여쓰기와는 다릅니다.
다음 독립형 예제는 100포인트 너비 텍스트 프레임에서 걸이 구두점을 활성화하고 “hanging_punctuation.pptx"로 저장합니다. 24포인트 Arial과 수평 여백 0을 사용하면 마지막 마침표가 “sentence” 뒤에 남으며 오른쪽 텍스트 가장자를 넘어 확장됩니다. 속성을 NullableBool.FALSE로 설정하면 마침표가 별도의 줄에 배치됩니다. 줄 바꿈은 활성화하고 자동 맞춤은 비활성화하여 가용 너비를 고정합니다:
import aspose.pydrawing as draw
import aspose.slides as slides

with slides.Presentation() as presentation:
    slide = presentation.slides[0]

    shape = slide.shapes.add_auto_shape(slides.ShapeType.RECTANGLE, 50, 50, 100, 200)
    shape.fill_format.fill_type = slides.FillType.NO_FILL

    text_frame = shape.text_frame
    text_frame.text_frame_format.wrap_text = slides.NullableBool.TRUE
    text_frame.text_frame_format.autofit_type = slides.TextAutofitType.NONE
    text_frame.text_frame_format.margin_left = 0
    text_frame.text_frame_format.margin_right = 0

    paragraph = text_frame.paragraphs[0]
    paragraph.text = "Simple text, next sentence."

    paragraph_format = paragraph.paragraph_format
    paragraph_format.alignment = slides.TextAlignment.LEFT
    paragraph_format.default_portion_format.font_height = 24
    paragraph_format.default_portion_format.latin_font = slides.FontData("Arial")
    paragraph_format.default_portion_format.fill_format.fill_type = slides.FillType.SOLID
    paragraph_format.default_portion_format.fill_format.solid_fill_color.color = draw.Color.black
    paragraph_format.hanging_punctuation = slides.NullableBool.TRUE

    presentation.save("hanging_punctuation.pptx", slides.export.SaveFormat.PPTX)
모든 구두점이 걸이될 수 있는 것은 아닙니다. 가시 결과는 글꼴 및 레이아웃 조건에 따라 달라지며, 글꼴, 가용 너비, 여백 또는 자동 맞춤 설정을 변경하면 차이가 사라질 수 있습니다.
텍스트 프레임 자동 맞춤 유형 설정
TextFrameFormat.autofit_type은 텍스트가 컨테이너 경계를 초과할 때 텍스트가 어떻게 동작할지를 결정합니다. 텍스트가 축소, 넘침, 또는 도형이 자동으로 크기 조정되는지를 제어합니다. 다음 예제는 도형이 텍스트에 맞게 크기를 조정하도록 구성하고 결과를 “autofit_type.pptx"로 저장합니다:
import aspose.slides as slides

with slides.Presentation("sample.pptx") as presentation:
    slide = presentation.slides[0]

    auto_shape = slide.shapes[0]

    auto_shape.text_frame.text_frame_format.autofit_type = slides.TextAutofitType.SHAPE

    presentation.save("autofit_type.pptx", slides.export.SaveFormat.PPTX)
자동 줄 바꿈 후 라인 수를 확인하고 텍스트 또는 도형 너비가 결과에 어떤 영향을 미치는지 보려면 렌더링된 라인 수 셈을 참조하십시오. 라인 수만으로는 텍스트가 컨테이너를 초과했는지 여부를 판단할 수 없습니다.
텍스트 프레임 앵커 설정
TextFrameFormat.anchoring_type은 텍스트가 도형 내부에서 수직으로 어떻게 배치될지를 정의합니다(예: 상단, 중간, 하단). 다음 예제는 텍스트를 첫 번째 도형의 하단에 앵커하고 결과를 “text_anchor.pptx"로 저장합니다:
import aspose.slides as slides

with slides.Presentation("sample.pptx") as presentation:
    slide = presentation.slides[0]

    auto_shape = slide.shapes[0]

    auto_shape.text_frame.text_frame_format.anchoring_type = slides.TextAnchorType.BOTTOM

    presentation.save("text_anchor.pptx", slides.export.SaveFormat.PPTX)
텍스트 탭 설정
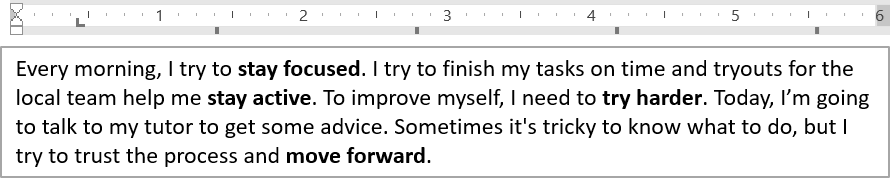
ParagraphFormat.default_tab_size와 ParagraphFormat.tabs을 사용하여 단락의 탭 정지점을 구성합니다. 다음 예제는 기본 탭 간격을 100포인트로 설정하고, 30포인트에 왼쪽 정렬 탭 정지점을 추가합니다. 이러한 설정은 탭 문자를 포함한 텍스트에 영향을 줍니다:
import aspose.slides as slides

with slides.Presentation("sample.pptx") as presentation:
    slide = presentation.slides[0]

    auto_shape = slide.shapes[0]
    paragraph = auto_shape.text_frame.paragraphs[0]

    paragraph.paragraph_format.default_tab_size = 100
    paragraph.paragraph_format.tabs.add(30, slides.TabAlignment.LEFT)

    presentation.save("paragraph_tabs.pptx", slides.export.SaveFormat.PPTX)
결과:
교정 언어 설정
Aspose.Slides는 BasePortionFormat.language_id를 제공하여 텍스트 부분의 교정 언어를 설정할 수 있습니다. 교정 언어는 PowerPoint에서 맞춤법 및 문법 검사를 수행할 때 사용되는 언어를 결정합니다.
다음 예제는 첫 번째 슬라이드의 첫 번째 도형에 텍스트 상자가 있는 “presentation.pptx"가 필요합니다. 첫 번째 단락의 내용을 “1。“로 교체하고, 글꼴을 SimSun으로 설정한 뒤, 교정 언어를 간체 중국어(zh-CN)로 지정합니다. 결과는 “proofing_language.pptx"로 저장됩니다:
import aspose.slides as slides

with slides.Presentation("presentation.pptx") as presentation:
    slide = presentation.slides[0]

    auto_shape = slide.shapes[0]

    paragraph = auto_shape.text_frame.paragraphs[0]
    paragraph.portions.clear()

    font = slides.FontData("SimSun")

    text_portion = slides.Portion()
    text_portion.portion_format.complex_script_font = font
    text_portion.portion_format.east_asian_font = font
    text_portion.portion_format.latin_font = font

    # 교정 언어를 간체 중국어로 설정합니다.
    text_portion.portion_format.language_id = "zh-CN"

    text_portion.text = "1。"
    paragraph.portions.add(text_portion)

    presentation.save("proofing_language.pptx", slides.export.SaveFormat.PPTX)
기본 언어 설정
LoadOptions.default_text_language을 사용하면 프레젠테이션을 로드하거나 생성하는 동안 생성되는 텍스트의 기본 언어를 정의할 수 있습니다. 다음 예제는 기본 텍스트 언어를 미국 영어로 설정한 프레젠테이션을 만들고, 텍스트 상자를 추가한 뒤 첫 번째 텍스트 부분에 대해 en-US를 출력합니다:
import aspose.slides as slides

load_options = slides.LoadOptions()
load_options.default_text_language = "en-US"

with slides.Presentation(load_options) as presentation:
    slide = presentation.slides[0]

    # 텍스트가 포함된 새 사각형 도형을 추가합니다.
    shape = slide.shapes.add_auto_shape(slides.ShapeType.RECTANGLE, 20, 20, 150, 50)
    shape.text_frame.text = "Sample text"

    # 첫 번째 부분의 언어를 확인합니다.
    portion = shape.text_frame.paragraphs[0].portions[0]
    print(portion.portion_format.language_id)
기본 텍스트 스타일 설정
프레젠테이션 수준에서 기본 텍스트 서식을 적용하려면 Presentation.default_text_style를 사용합니다.
다음 예제는 새 프레젠테이션의 최상위 단락에 14포인트 굵은 글꼴을 기본값으로 설정하고 “default_text_style.pptx"로 저장합니다. 텍스트는 보다 구체적인 서식이 없을 경우 이러한 기본값을 상속받습니다:
import aspose.slides as slides

with slides.Presentation() as presentation:
    # 최상위 수준 단락 서식을 가져옵니다.
    paragraph_format = presentation.default_text_style.get_level(0)

    if paragraph_format is not None:
        paragraph_format.default_portion_format.font_height = 14
        paragraph_format.default_portion_format.font_bold = slides.NullableBool.TRUE

    presentation.save("default_text_style.pptx", slides.export.SaveFormat.PPTX)
All-Caps 효과를 사용한 텍스트 추출
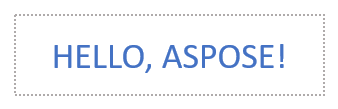
PowerPoint에서 All Caps 글꼴 효과를 적용하면 슬라이드에 표시될 때 텍스트가 대문자로 보이지만, Aspose.Slides를 사용해 해당 텍스트 부분을 가져오면 라이브러리는 원본 입력 그대로 반환합니다. 표시된 텍스트와 일치시키려면 TextCapType을 확인하고, 값이 ALL인 경우 반환 문자열을 대문자로 변환해야 합니다.
이 예제는 첫 번째 슬라이드의 첫 번째 도형에 텍스트 상자가 있는 “sample2.pptx"가 필요합니다. 첫 번째 단락의 첫 번째 부분에 All Caps 효과가 적용된 “Hello, Aspose!“가 포함되어 있습니다(아래 이미지 참조).
다음 코드 예제는 All Caps 효과가 적용된 텍스트를 추출하는 방법을 보여줍니다:
import aspose.slides as slides

with slides.Presentation("sample2.pptx") as presentation:
    slide = presentation.slides[0]

    auto_shape = slide.shapes[0]
    text_portion = auto_shape.text_frame.paragraphs[0].portions[0]

    print("Original text:", text_portion.text)

    text_format = text_portion.portion_format.get_effective()
    if text_format.text_cap_type == slides.TextCapType.ALL:
        text = text_portion.text.upper()
        print("All-Caps effect:", text)
출력:
Original text: Hello, Aspose!
All-Caps effect: HELLO, ASPOSE!
FAQ
슬라이드의 표에서 텍스트를 어떻게 수정합니까?
표의 텍스트를 수정하려면 Table을 사용하십시오. 셀을 순회하면서 각 셀을 Cell.text_frame으로 업데이트하고, 단락 서식은 Paragraph.paragraph_format을 통해 지정합니다.
PowerPoint 슬라이드의 텍스트에 그라디언트 색을 어떻게 적용합니까?
그라디언트 색을 적용하려면 BasePortionFormat.fill_format을 사용합니다. FillFormat.fill_type을 FillType.GRADIENT으로 설정하고, 그라디언트 정지점, 방향 및 투명도를 구성합니다.