
在 Python 中格式化簡報文字
概觀
本文說明如何使用 Aspose.Slides for Python via .NET 於 PowerPoint 與 OpenDocument 簡報中格式化文字。內容涵蓋背景色彩、透明度、字元間距、字型屬性、旋轉、段落間距、自動縮放行為、文字錨點、定位點與語言設定。
除非另有說明,範例皆使用 sample.pptx。其第一張投影片的第一個圖形是一個文字方塊,第一段落包含下列文字。投影片與圖形索引皆為零基礎。選取粗體部份的範例使用有效的格式設定,包括繼承的粗體格式:

若要尋找並突顯文字字面值或正規表示式匹配,請參閱 Search and Replace Text。
設定文字背景色彩
使用 ParagraphFormat.default_portion_format 設定段落的預設醒目顏色,或使用 BasePortionFormat.highlight_color 設定個別文字段落的醒目顏色。
下列範例將第一段落的預設醒目色設為淡灰色。個別段落上明確設定的醒目色會優先於此預設:
import aspose.pydrawing as draw
import aspose.slides as slides

with slides.Presentation("sample.pptx") as presentation:
    slide = presentation.slides[0]

    auto_shape = slide.shapes[0]
    paragraph = auto_shape.text_frame.paragraphs[0]

    # 設定整個段落的醒目顏色。
    paragraph.paragraph_format.default_portion_format.highlight_color.color = draw.Color.light_gray

    presentation.save("gray_paragraph.pptx", slides.export.SaveFormat.PPTX)
結果:

以下程式碼示範如何為 粗體字的文字段落 設定背景色:
import aspose.pydrawing as draw
import aspose.slides as slides

with slides.Presentation("sample.pptx") as presentation:
    slide = presentation.slides[0]

    auto_shape = slide.shapes[0]
    paragraph = auto_shape.text_frame.paragraphs[0]

    for portion in paragraph.portions:
        if portion.portion_format.get_effective().font_bold:
            # 設定文字段落的醒目顏色。
            portion.portion_format.highlight_color.color = draw.Color.light_gray

    presentation.save("gray_text_portions.pptx", slides.export.SaveFormat.PPTX)
結果:

對齊文字段落
使用 ParagraphFormat.alignment 設定文字框內段落的對齊方式。可設定為置中、左對齊、右對齊、兩端對齊等。
下列程式碼示範如何將段落對齊至 置中:
import aspose.slides as slides

with slides.Presentation("sample.pptx") as presentation:
    slide = presentation.slides[0]

    auto_shape = slide.shapes[0]
    paragraph = auto_shape.text_frame.paragraphs[0]

    # 將段落的對齊方式設定為置中。
    paragraph.paragraph_format.alignment = slides.TextAlignment.CENTER

    presentation.save("aligned_paragraph.pptx", slides.export.SaveFormat.PPTX)
結果:

在同一行內對齊字型
使用 ParagraphFormat.font_alignment 於同一行內垂直對齊不同字型大小的文字段落。此設定套用於整個段落,並控制每行內的對齊方式。
下列自行完整的範例在同一張投影片上建立四個標示文字方塊。每個段落以 18、36、54 點字型大小寫入相同文字,且字型對齊方式各不相同。使用 Arial、停用自動縮放與換行,並確保文字框足夠容納單行文字。
import aspose.pydrawing as draw
import aspose.slides as slides

with slides.Presentation() as presentation:
    slide = presentation.slides[0]

    alignments = [slides.FontAlignment.BASELINE, slides.FontAlignment.TOP, slides.FontAlignment.CENTER, slides.FontAlignment.BOTTOM]
    font_sizes = [18, 36, 54]

    for i, alignment in enumerate(alignments):
        shape = slide.shapes.add_auto_shape(slides.ShapeType.RECTANGLE, 30, 20 + i * 130, 660, 120)
        shape.fill_format.fill_type = slides.FillType.NO_FILL
        shape.line_format.fill_format.fill_type = slides.FillType.NO_FILL

        text_frame = shape.text_frame
        text_frame.text_frame_format.anchoring_type = slides.TextAnchorType.TOP
        text_frame.text_frame_format.autofit_type = slides.TextAutofitType.NONE
        text_frame.text_frame_format.wrap_text = slides.NullableBool.FALSE

        label = text_frame.paragraphs[0]
        label.text = alignment.name.title()
        label.paragraph_format.alignment = slides.TextAlignment.LEFT
        label.paragraph_format.default_portion_format.font_height = 14
        label.paragraph_format.default_portion_format.latin_font = slides.FontData("Arial")
        label.paragraph_format.default_portion_format.fill_format.fill_type = slides.FillType.SOLID
        label.paragraph_format.default_portion_format.fill_format.solid_fill_color.color = draw.Color.gray

        paragraph = slides.Paragraph()
        paragraph.paragraph_format.font_alignment = alignment
        paragraph.paragraph_format.alignment = slides.TextAlignment.LEFT
        paragraph.paragraph_format.default_portion_format.latin_font = slides.FontData("Arial")
        paragraph.paragraph_format.default_portion_format.fill_format.fill_type = slides.FillType.SOLID
        paragraph.paragraph_format.default_portion_format.fill_format.solid_fill_color.color = draw.Color.black

        for font_size in font_sizes:
            portion = slides.Portion("Ag ")
            portion.portion_format.font_height = font_size
            paragraph.portions.add(portion)

        text_frame.paragraphs.add(paragraph)

    presentation.save("font_alignment.pptx", slides.export.SaveFormat.PPTX)
結果:
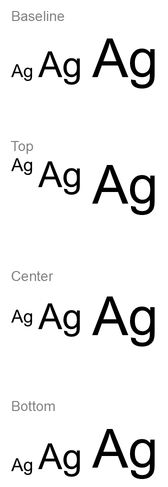
字型對齊使用字型度量,因此個別字母的可見邊緣不一定完全對齊。範例同時包含大寫字母與降部字元,以協助說明基線與底部對齊的差異。字型可用性與替代、所使用的字元以及字型大小差異都會影響最終結果。框架尺寸、邊距、行距、換行與自動縮放亦會影響版面配置;在比較模式時請使用相同的字型與版面設定。
此設定不同於 ParagraphFormat.alignment,後者控制水平段落對齊;也不同於 TextFrameFormat.anchoring_type,後者在圖形內垂直定位文字區塊。透過 BasePortionFormat.escapement 設定的上標與下標會相對於基線位移個別段落,而非設定段落行的字型對齊方式。
設定文字透明度
文字透明度透過指派給 BasePortionFormat.fill_format 的顏色之 alpha 元件來控制。以下範例中,alpha = 50 為 ARGB alpha 通道值,範圍 0–255,並非透明度百分比。
下列程式碼示範如何將 整個段落 設為透明:
import aspose.pydrawing as draw
import aspose.slides as slides

alpha = 50

with slides.Presentation("sample.pptx") as presentation:
    slide = presentation.slides[0]

    auto_shape = slide.shapes[0]
    paragraph = auto_shape.text_frame.paragraphs[0]

    # 設定文字的半透明黑色填滿。
    paragraph.paragraph_format.default_portion_format.fill_format.fill_type = slides.FillType.SOLID
    paragraph.paragraph_format.default_portion_format.fill_format.solid_fill_color.color = draw.Color.from_argb(alpha, draw.Color.black)

    presentation.save("transparent_paragraph.pptx", slides.export.SaveFormat.PPTX)
結果:

以下程式碼示範如何將 粗體字的文字段落 設為透明:
import aspose.pydrawing as draw
import aspose.slides as slides

alpha = 50

with slides.Presentation("sample.pptx") as presentation:
    slide = presentation.slides[0]

    auto_shape = slide.shapes[0]
    paragraph = auto_shape.text_frame.paragraphs[0]

    for portion in paragraph.portions:
        if portion.portion_format.get_effective().font_bold:
            # 設定文字段落的透明度。
            portion.portion_format.fill_format.fill_type = slides.FillType.SOLID
            portion.portion_format.fill_format.solid_fill_color.color = draw.Color.from_argb(alpha, draw.Color.black)

    presentation.save("transparent_text_portions.pptx", slides.export.SaveFormat.PPTX)
結果:

設定文字字元間距
使用 BasePortionFormat.spacing 來擴大或縮小文字方塊內字元之間的間距。以下範例在段落中加入 3 點的間距;負值則會壓縮文字。
下列 Python 程式碼示範如何在 整個段落 中展開字元間距:
import aspose.slides as slides

with slides.Presentation("sample.pptx") as presentation:
    slide = presentation.slides[0]

    auto_shape = slide.shapes[0]
    paragraph = auto_shape.text_frame.paragraphs[0]

    # 注意:使用負值來壓縮字元間距。
    paragraph.paragraph_format.default_portion_format.spacing = 3  # 展開字元間距。

    presentation.save("character_spacing_in_paragraph.pptx", slides.export.SaveFormat.PPTX)
結果:

以下程式碼示範如何在 粗體字的文字段落 中展開字元間距:
import aspose.slides as slides

with slides.Presentation("sample.pptx") as presentation:
    slide = presentation.slides[0]

    auto_shape = slide.shapes[0]
    paragraph = auto_shape.text_frame.paragraphs[0]

    for portion in paragraph.portions:
        if portion.portion_format.get_effective().font_bold:
            # 注意:使用負值來壓縮字元間距。
            portion.portion_format.spacing = 3  # 展開字元間距。

    presentation.save("character_spacing_in_text_portions.pptx", slides.export.SaveFormat.PPTX)
結果:

針對特定字型停用字距調整 (Kerning)
在某些情況下,Aspose.Slides 所渲染的文字可能比 PowerPoint 顯示的文字稍微緊密。這可能是因為 PowerPoint 會忽略某些字型的字距資訊,即使該字型包含有效的字距資料且在 PowerPoint 設定中已啟用字距。
若想讓渲染結果更接近 PowerPoint,可針對使用受影響字型的文字段落停用字距。將 BasePortionFormat.kerning_minimal_size 設為大於實際字型大小的值。此範例需要「presentation.pptx」且第一張投影片的第一個圖形為文字方塊。它會檢查有效的字型名稱(包含繼承的字型),並對使用 Roboto、字型大小低於 100 點的段落套用 100 點的門檻值,以停用字距:
import aspose.slides as slides

with slides.Presentation("presentation.pptx") as presentation:
    slide = presentation.slides[0]

    auto_shape = slide.shapes[0]
    target_font = "Roboto"

    for paragraph in auto_shape.text_frame.paragraphs:
        for portion in paragraph.portions:
            text_format = portion.portion_format.get_effective()
            fonts = (text_format.latin_font, text_format.east_asian_font, text_format.complex_script_font)
            uses_target_font = any(font is not None and font.font_name == target_font for font in fonts)

            if uses_target_font:
                portion.portion_format.kerning_minimal_size = 100

    presentation.save("output.pptx", slides.export.SaveFormat.PPTX)
對於低於門檻的符合文字,此設定會阻止字距調整,從而協助使 Aspose.Slides 的渲染與 PowerPoint 受此行為影響的字型之視覺輸出更為一致。
管理文字字型屬性
字型屬性可透過 ParagraphFormat.default_portion_format 在段落層級設定,或透過 PortionFormat 在個別段落設定。
下列範例將第一段落的預設字型設定為 12 點 Times New Roman,且具備粗體、斜體與點狀底線。個別段落的明確格式會優先於這些預設值:
import aspose.slides as slides

with slides.Presentation("sample.pptx") as presentation:
    slide = presentation.slides[0]

    auto_shape = slide.shapes[0]
    paragraph = auto_shape.text_frame.paragraphs[0]

    # 設定段落的字型屬性。
    portion_format = paragraph.paragraph_format.default_portion_format
    portion_format.font_height = 12
    portion_format.font_bold = slides.NullableBool.TRUE
    portion_format.font_italic = slides.NullableBool.TRUE
    portion_format.font_underline = slides.TextUnderlineType.DOTTED
    portion_format.latin_font = slides.FontData("Times New Roman")

    presentation.save("font_properties_for_paragraph.pptx", slides.export.SaveFormat.PPTX)
結果:

下列範例對有效格式為粗體的段落套用 13 點 Times New Roman、斜體與點狀底線:
import aspose.slides as slides

with slides.Presentation("sample.pptx") as presentation:
    slide = presentation.slides[0]

    auto_shape = slide.shapes[0]
    paragraph = auto_shape.text_frame.paragraphs[0]

    for portion in paragraph.portions:
        if portion.portion_format.get_effective().font_bold:
            # 設定文字段落的字型屬性。
            portion.portion_format.font_height = 13
            portion.portion_format.font_italic = slides.NullableBool.TRUE
            portion.portion_format.font_underline = slides.TextUnderlineType.DOTTED
            portion.portion_format.latin_font = slides.FontData("Times New Roman")

    presentation.save("font_properties_for_text_portions.pptx", slides.export.SaveFormat.PPTX)
結果:

設定文字旋轉
使用 TextFrameFormat.text_vertical_type 設定形狀內的預定義文字方向。
下列程式碼將文字方向設定為 TextVerticalType.VERTICAL270,即將文字 逆時針旋轉 90 度:
import aspose.slides as slides

with slides.Presentation("sample.pptx") as presentation:
    slide = presentation.slides[0]

    auto_shape = slide.shapes[0]

    auto_shape.text_frame.text_frame_format.text_vertical_type = slides.TextVerticalType.VERTICAL270

    presentation.save("text_rotation.pptx", slides.export.SaveFormat.PPTX)
結果:

設定文字框自訂旋轉角度
使用 TextFrameFormat.rotation_angle 為 TextFrame 設定自訂旋轉角度。
下列程式碼將文字框在形狀內順時針旋轉 3 度:
import aspose.slides as slides

with slides.Presentation("sample.pptx") as presentation:
    slide = presentation.slides[0]

    auto_shape = slide.shapes[0]

    auto_shape.text_frame.text_frame_format.rotation_angle = 3

    presentation.save("custom_text_rotation.pptx", slides.export.SaveFormat.PPTX)
結果:

設定段落行距
Aspose.Slides 提供 ParagraphFormat.space_after、ParagraphFormat.space_before、以及 ParagraphFormat.space_within 以控制段落間距。這些屬性的使用方式如下:
- 正值表示以行高的百分比指定行距。
- 負值則以點數指定行距。
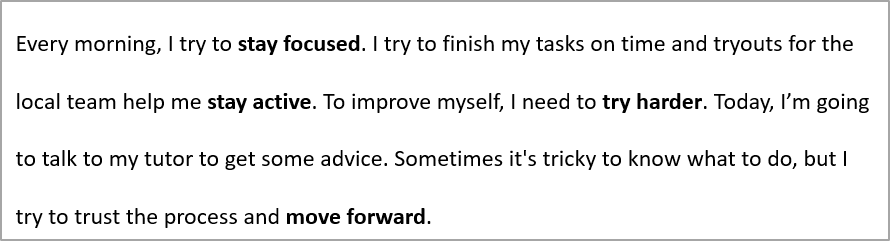
下列範例將第一段落的行內間距設定為行高的 200%(雙倍行距):
import aspose.slides as slides

with slides.Presentation("sample.pptx") as presentation:
    slide = presentation.slides[0]

    auto_shape = slide.shapes[0]
    paragraph = auto_shape.text_frame.paragraphs[0]

    paragraph.paragraph_format.space_within = 200

    presentation.save("line_spacing.pptx", slides.export.SaveFormat.PPTX)
結果:
控制換行行為
段落換行規則在窄小文字區塊與混合拉丁文與東亞文字的簡報中相當有用。以下屬性屬於 ParagraphFormat,會套用於整個段落:
- latin_line_break 控制拉丁文字的換行規則。於混合文字中變更此屬性亦可能影響相鄰東亞文字與標點的換行位置。
- east_asian_line_break 控制東亞文字的換行規則,包含行首與行尾字元的限制。
這些規則不會取代 TextFrameFormat.wrap_text,後者啟用文字框內的自動換行。規則在換行發生時會影響版面配置,但不會插入換行字元。使用顯式換行符號則會在段落內強制另起一行,與可用寬度無關。
下列自行完整的範例建立一個包含中文與拉丁文字的窄小文字區塊,明確設定兩項換行屬性,並儲存為「line_breaking.pptx」。若要測試任一規則,可在保持另一設定不變的情況下變更對應屬性的值。範例使用 24 點 Arial 與 SimSun,框寬 160 點,水平文字框邊距為 0。將 TextFrameFormat.autofit_type 設為 TextAutofitType.NONE,以使文字大小與框架尺寸固定:
import aspose.pydrawing as draw
import aspose.slides as slides

with slides.Presentation() as presentation:
    slide = presentation.slides[0]

    shape = slide.shapes.add_auto_shape(slides.ShapeType.RECTANGLE, 50, 50, 160, 300)
    shape.fill_format.fill_type = slides.FillType.NO_FILL

    text_frame = shape.text_frame
    text_frame.text_frame_format.wrap_text = slides.NullableBool.TRUE
    text_frame.text_frame_format.autofit_type = slides.TextAutofitType.NONE
    text_frame.text_frame_format.margin_left = 0
    text_frame.text_frame_format.margin_right = 0

    paragraph = text_frame.paragraphs[0]
    paragraph.text = "中文排版测试,PowerPoint 中文演示。"

    paragraph_format = paragraph.paragraph_format
    paragraph_format.alignment = slides.TextAlignment.LEFT
    paragraph_format.default_portion_format.font_height = 24
    paragraph_format.default_portion_format.latin_font = slides.FontData("Arial")
    paragraph_format.default_portion_format.east_asian_font = slides.FontData("SimSun")
    paragraph_format.default_portion_format.fill_format.fill_type = slides.FillType.SOLID
    paragraph_format.default_portion_format.fill_format.solid_fill_color.color = draw.Color.black
    paragraph_format.latin_line_break = slides.NullableBool.FALSE
    paragraph_format.east_asian_line_break = slides.NullableBool.TRUE

    presentation.save("line_breaking.pptx", slides.export.SaveFormat.PPTX)
控制懸掛標點
ParagraphFormat.hanging_punctuation 允許符合條件的標點超出文字行的右邊緣,而非佔據下一行。它套用於整個段落,且不同於懸掛縮排。
下列自行完整的範例在寬度為 100 點的文字框中啟用懸掛標點,並儲存為「hanging_punctuation.pptx」。使用 24 點 Arial 與水平文字框邊距為 0 時,句點會停留在「sentence」之後,並延伸至文字右邊緣。將屬性設為 NullableBool.FALSE 可比較:在此設定下,句點會佔據獨立一行。啟用換行且停用自動縮放以固定可用寬度。
import aspose.pydrawing as draw
import aspose.slides as slides

with slides.Presentation() as presentation:
    slide = presentation.slides[0]

    shape = slide.shapes.add_auto_shape(slides.ShapeType.RECTANGLE, 50, 50, 100, 200)
    shape.fill_format.fill_type = slides.FillType.NO_FILL

    text_frame = shape.text_frame
    text_frame.text_frame_format.wrap_text = slides.NullableBool.TRUE
    text_frame.text_frame_format.autofit_type = slides.TextAutofitType.NONE
    text_frame.text_frame_format.margin_left = 0
    text_frame.text_frame_format.margin_right = 0

    paragraph = text_frame.paragraphs[0]
    paragraph.text = "Simple text, next sentence."

    paragraph_format = paragraph.paragraph_format
    paragraph_format.alignment = slides.TextAlignment.LEFT
    paragraph_format.default_portion_format.font_height = 24
    paragraph_format.default_portion_format.latin_font = slides.FontData("Arial")
    paragraph_format.default_portion_format.fill_format.fill_type = slides.FillType.SOLID
    paragraph_format.default_portion_format.fill_format.solid_fill_color.color = draw.Color.black
    paragraph_format.hanging_punctuation = slides.NullableBool.TRUE

    presentation.save("hanging_punctuation.pptx", slides.export.SaveFormat.PPTX)
並非所有標點皆可懸掛。可見結果取決於 字型與版面條件:變更字型、可用寬度、邊距或自動縮放設定皆可能使可見差異消失。
設定文字框自動縮放類型
TextFrameFormat.autofit_type 決定文字超出容器邊界時的行為。可用來控制文字是縮小、溢出,或自動調整圖形大小。下列範例將圖形設定為依文字自動調整大小,並儲存為「autofit_type.pptx」:
import aspose.slides as slides

with slides.Presentation("sample.pptx") as presentation:
    slide = presentation.slides[0]

    auto_shape = slide.shapes[0]

    auto_shape.text_frame.text_frame_format.autofit_type = slides.TextAutofitType.SHAPE

    presentation.save("autofit_type.pptx", slides.export.SaveFormat.PPTX)
若要在自動換行後計算行數,或觀察文字或圖形寬度變化的結果,請參閱 Count Rendered Lines。僅依行數無法判斷文字是否溢出容器。
設定文字框錨點
TextFrameFormat.anchoring_type 定義文字在圖形內的垂直定位方式,例如置頂、置中或置底。下列範例將文字錨點設定為第一個圖形的底部,並儲存為「text_anchor.pptx」:
import aspose.slides as slides

with slides.Presentation("sample.pptx") as presentation:
    slide = presentation.slides[0]

    auto_shape = slide.shapes[0]

    auto_shape.text_frame.text_frame_format.anchoring_type = slides.TextAnchorType.BOTTOM

    presentation.save("text_anchor.pptx", slides.export.SaveFormat.PPTX)
設定文字定位點 (Tab)
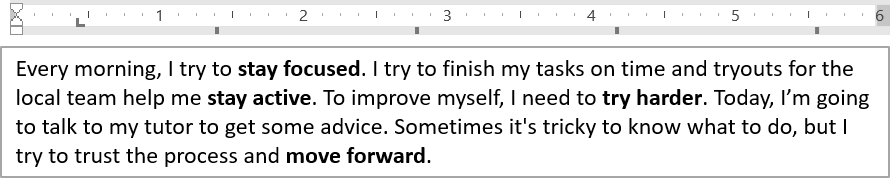
使用 ParagraphFormat.default_tab_size 與 ParagraphFormat.tabs 來設定段落中的定位點。下列範例將預設定位點間距設定為 100 點,並在 30 點處加入左對齊的定位點。此設定會影響包含定位字符的文字。
import aspose.slides as slides

with slides.Presentation("sample.pptx") as presentation:
    slide = presentation.slides[0]

    auto_shape = slide.shapes[0]
    paragraph = auto_shape.text_frame.paragraphs[0]

    paragraph.paragraph_format.default_tab_size = 100
    paragraph.paragraph_format.tabs.add(30, slides.TabAlignment.LEFT)

    presentation.save("paragraph_tabs.pptx", slides.export.SaveFormat.PPTX)
結果:
設定校對語言
Aspose.Slides 提供 BasePortionFormat.language_id,允許為文字段落設定校對語言。校對語言決定 PowerPoint 於拼字與文法檢查時使用的語言。
下列範例需要「presentation.pptx」且第一張投影片的第一個圖形為文字方塊,且至少包含一個段落。它會將第一段落的內容替換為「1。」、將字型設定為 SimSun,並指派簡體中文校對語言 (zh-CN)。最後儲存為「proofing_language.pptx」:
import aspose.slides as slides

with slides.Presentation("presentation.pptx") as presentation:
    slide = presentation.slides[0]

    auto_shape = slide.shapes[0]

    paragraph = auto_shape.text_frame.paragraphs[0]
    paragraph.portions.clear()

    font = slides.FontData("SimSun")

    text_portion = slides.Portion()
    text_portion.portion_format.complex_script_font = font
    text_portion.portion_format.east_asian_font = font
    text_portion.portion_format.latin_font = font

    # 設定校對語言為簡體中文。
    text_portion.portion_format.language_id = "zh-CN"

    text_portion.text = "1。"
    paragraph.portions.add(text_portion)

    presentation.save("proofing_language.pptx", slides.export.SaveFormat.PPTX)
設定預設語言
使用 LoadOptions.default_text_language 定義在載入或建立簡報時,預設的文字語言。下列範例建立一個預設文字語言為美式英語的簡報,新增文字方塊,並輸出其第一個文字段落的語言代碼 en-US:
import aspose.slides as slides

load_options = slides.LoadOptions()
load_options.default_text_language = "en-US"

with slides.Presentation(load_options) as presentation:
    slide = presentation.slides[0]

    # 新增一個帶文字的矩形圖形。
    shape = slide.shapes.add_auto_shape(slides.ShapeType.RECTANGLE, 20, 20, 150, 50)
    shape.text_frame.text = "Sample text"

    # 檢查第一個段落的文字語言。
    portion = shape.text_frame.paragraphs[0].portions[0]
    print(portion.portion_format.language_id)
設定預設文字樣式
若要在簡報層級套用預設文字格式,使用 Presentation.default_text_style。
下列範例將新簡報的頂層段落預設為 14 點粗體字型,並儲存為「default_text_style.pptx」。文字會繼承這些預設,除非更具體的格式設定覆寫它們。
import aspose.slides as slides

with slides.Presentation() as presentation:
    # 取得頂層段落格式。
    paragraph_format = presentation.default_text_style.get_level(0)

    if paragraph_format is not None:
        paragraph_format.default_portion_format.font_height = 14
        paragraph_format.default_portion_format.font_bold = slides.NullableBool.TRUE

    presentation.save("default_text_style.pptx", slides.export.SaveFormat.PPTX)
擷取全部大寫效果的文字
在 PowerPoint 中,套用 All Caps(全大寫)字型效果會使投影片上的文字呈現為大寫,即使原始輸入為小寫。使用 Aspose.Slides 取得此類文字段落時,函式庫會回傳原始輸入的文字。若要取得顯示的文字,請檢查 TextCapType,當其值為 ALL 時,將回傳字串轉為大寫。
此範例需要「sample2.pptx」且第一張投影片的第一個圖形為文字方塊。其第一段落的第一段文字為「Hello, Aspose!」,套用了 All Caps 效果,如下所示:
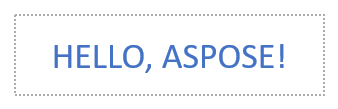
以下程式碼示範如何擷取套用 All Caps 效果的文字:
import aspose.slides as slides

with slides.Presentation("sample2.pptx") as presentation:
    slide = presentation.slides[0]

    auto_shape = slide.shapes[0]
    text_portion = auto_shape.text_frame.paragraphs[0].portions[0]

    print("Original text:", text_portion.text)

    text_format = text_portion.portion_format.get_effective()
    if text_format.text_cap_type == slides.TextCapType.ALL:
        text = text_portion.text.upper()
        print("All-Caps effect:", text)
輸出:
Original text: Hello, Aspose!
All-Caps effect: HELLO, ASPOSE!
常見問題
如何修改投影片上表格中的文字?
要修改投影片上表格的文字,請使用 Table。遍歷儲存格,並透過 Cell.text_frame 更新每個儲存格的文字,及透過 Paragraph.paragraph_format 設定段落格式。
如何在 PowerPoint 投影片上的文字套用漸層顏色?
要在文字上套用漸層顏色,請使用 BasePortionFormat.fill_format。將 FillFormat.fill_type 設為 FillType.GRADIENT,然後設定漸層停靠點、方向與透明度。