
จัดรูปแบบข้อความในการนำเสนอด้วย Python
ภาพรวม
บทความนี้แสดงวิธีจัดรูปแบบข้อความในงานนำเสนอ PowerPoint และ OpenDocument โดยใช้ Aspose.Slides for Python ผ่าน .NET ครอบคลุมสีพื้นหลัง, ความโปร่งใส, การเว้นระยะระหว่างอักขระ, คุณสมบัติของฟอนต์, การหมุน, การเว้นระยะย่อหน้า, พฤติกรรม autofit, การวางตำแหน่งข้อความ, จุดหยุดแท็บ, และการตั้งค่าภาษา.
หากไม่ได้ระบุเป็นอย่างอื่น ตัวอย่างจะใช้ sample.pptx ตัวรูปทรงแรกบนสไลด์แรกเป็นกล่องข้อความและย่อหน้าแรกของมันมีข้อความที่แสดงด้านล่าง ดัชนีของสไลด์และรูปทรงเริ่มจากศูนย์ ตัวอย่างที่เลือกส่วนที่หนาใช้การจัดรูปแบบที่มีผลจริง รวมถึงการจัดรูปแบบหนาที่สืบทอด:

เพื่อค้นหาและเน้นข้อความตามตัวอักษรหรือการจับคู่ด้วยนิพจน์ปกติ ดูที่ ค้นหาและแทนที่ข้อความ.
ตั้งค่าสีพื้นหลังของข้อความ
ใช้ ParagraphFormat.default_portion_format เพื่อกำหนดสีไฮไลท์เริ่มต้นสำหรับย่อหน้า หรือใช้ BasePortionFormat.highlight_color สำหรับส่วนข้อความแต่ละส่วน.
ตัวอย่างต่อไปนี้ตั้งค่าไฮไลท์สีเทาอ่อนเป็นค่าเริ่มต้นสำหรับย่อหน้าแรก สีไฮไลท์ที่ระบุโดยตรงบนส่วนข้อความแต่ละส่วนจะมีลำดับความสำคัญเหนือค่านี้:
import aspose.pydrawing as draw
import aspose.slides as slides

with slides.Presentation("sample.pptx") as presentation:
    slide = presentation.slides[0]

    auto_shape = slide.shapes[0]
    paragraph = auto_shape.text_frame.paragraphs[0]

    # ตั้งค่าสีไฮไลท์สำหรับย่อหน้าทั้งหมด.
    paragraph.paragraph_format.default_portion_format.highlight_color.color = draw.Color.light_gray

    presentation.save("gray_paragraph.pptx", slides.export.SaveFormat.PPTX)
ผลลัพธ์:

ตัวอย่างโค้ดด้านล่างแสดงวิธีตั้งค่าสีพื้นหลังสำหรับ ส่วนข้อความที่มีฟอนต์หนา:
import aspose.pydrawing as draw
import aspose.slides as slides

with slides.Presentation("sample.pptx") as presentation:
    slide = presentation.slides[0]

    auto_shape = slide.shapes[0]
    paragraph = auto_shape.text_frame.paragraphs[0]

    for portion in paragraph.portions:
        if portion.portion_format.get_effective().font_bold:
            # ตั้งค่าสีไฮไลท์สำหรับส่วนข้อความ.
            portion.portion_format.highlight_color.color = draw.Color.light_gray

    presentation.save("gray_text_portions.pptx", slides.export.SaveFormat.PPTX)
ผลลัพธ์:

จัดแนวย่อหน้าข้อความ
ใช้ ParagraphFormat.alignment เพื่อตั้งค่าการจัดแนวย่อหน้าภายในกรอบข้อความ ค่าที่กำหนดอาจเป็นการจัดกึ่งกลาง, จัดซ้าย, จัดขวา, จัดแนวศูนย์, หรืออื่น ๆ
ตัวอย่างโค้ดต่อไปนี้แสดงวิธีจัดแนวย่อหน้าให้ กึ่งกลาง:
import aspose.slides as slides

with slides.Presentation("sample.pptx") as presentation:
    slide = presentation.slides[0]

    auto_shape = slide.shapes[0]
    paragraph = auto_shape.text_frame.paragraphs[0]

    # ตั้งค่าการจัดแนวของย่อหน้าเป็นกึ่งกลาง.
    paragraph.paragraph_format.alignment = slides.TextAlignment.CENTER

    presentation.save("aligned_paragraph.pptx", slides.export.SaveFormat.PPTX)
ผลลัพธ์:

จัดแนวฟอนต์ภายในบรรทัด
ใช้ ParagraphFormat.font_alignment เพื่อจัดแนวแนวตั้งของส่วนข้อความที่มีขนาดฟอนต์ต่างกันภายในบรรทัด การตั้งค่านี้ใช้กับย่อหน้าเต็มและควบคุมการจัดแนวในแต่ละบรรทัดของมัน.
ตัวอย่างที่เป็นอิสระต่อไปนี้สร้างกล่องข้อความที่มีป้ายกำกับสี่กล่องบนสไลด์หนึ่ง แต่ละย่อหน้ามีข้อความเดียวกันที่ขนาด 18, 36, และ 54 จุด พร้อมการจัดแนวฟอนต์ที่แตกต่างกัน ใช้ Arial ปิดการทำ autofit และการห่อข้อความ และทำให้กรอบข้อความใหญ่พอสำหรับบรรทัดเดียว.
import aspose.pydrawing as draw
import aspose.slides as slides

with slides.Presentation() as presentation:
    slide = presentation.slides[0]

    alignments = [slides.FontAlignment.BASELINE, slides.FontAlignment.TOP, slides.FontAlignment.CENTER, slides.FontAlignment.BOTTOM]
    font_sizes = [18, 36, 54]

    for i, alignment in enumerate(alignments):
        shape = slide.shapes.add_auto_shape(slides.ShapeType.RECTANGLE, 30, 20 + i * 130, 660, 120)
        shape.fill_format.fill_type = slides.FillType.NO_FILL
        shape.line_format.fill_format.fill_type = slides.FillType.NO_FILL

        text_frame = shape.text_frame
        text_frame.text_frame_format.anchoring_type = slides.TextAnchorType.TOP
        text_frame.text_frame_format.autofit_type = slides.TextAutofitType.NONE
        text_frame.text_frame_format.wrap_text = slides.NullableBool.FALSE

        label = text_frame.paragraphs[0]
        label.text = alignment.name.title()
        label.paragraph_format.alignment = slides.TextAlignment.LEFT
        label.paragraph_format.default_portion_format.font_height = 14
        label.paragraph_format.default_portion_format.latin_font = slides.FontData("Arial")
        label.paragraph_format.default_portion_format.fill_format.fill_type = slides.FillType.SOLID
        label.paragraph_format.default_portion_format.fill_format.solid_fill_color.color = draw.Color.gray

        paragraph = slides.Paragraph()
        paragraph.paragraph_format.font_alignment = alignment
        paragraph.paragraph_format.alignment = slides.TextAlignment.LEFT
        paragraph.paragraph_format.default_portion_format.latin_font = slides.FontData("Arial")
        paragraph.paragraph_format.default_portion_format.fill_format.fill_type = slides.FillType.SOLID
        paragraph.paragraph_format.default_portion_format.fill_format.solid_fill_color.color = draw.Color.black

        for font_size in font_sizes:
            portion = slides.Portion("Ag ")
            portion.portion_format.font_height = font_size
            paragraph.portions.add(portion)

        text_frame.paragraphs.add(paragraph)

    presentation.save("font_alignment.pptx", slides.export.SaveFormat.PPTX)
ผลลัพธ์:
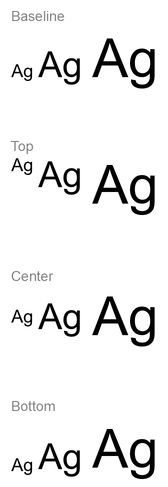
การจัดแนวฟอนต์ใช้เมตริกของฟอนต์ ดังนั้นขอบที่มองเห็นของตัวอักษรแต่ละตัวอาจไม่ตรงกันอย่างแม่นยำ ตัวอย่างรวมถึงตัวอักษรพิมพ์ใหญ่และตัวที่มีส่วนลงล่างเพื่อแสดงความแตกต่างระหว่างการจัดแนวพื้นฐานและการจัดแนวล่าง การวางฟอนต์และการแทนที่, ตัวอักษรที่ใช้, และความแตกต่างของขนาดฟอนต์มีผลต่อผลลัพธ์ ขนาดกรอบ, ระยะขอบ, ระยะห่างบรรทัด, การห่อข้อความและ autofit ก็มีผลต่อการจัดวาง; ใช้ฟอนต์และการตั้งค่า layout เดียวกันเมื่อต้องการเปรียบเทียบโหมด.
การตั้งค่านี้แตกต่างจาก ParagraphFormat.alignment, ซึ่งควบคุมการจัดแนวย่อหน้าในแนวนอน, และ TextFrameFormat.anchoring_type, ซึ่งกำหนดตำแหน่งบล็อกข้อความในแนวตั้งภายในรูปทรง การจัดรูปแบบตัวอักษรยกสูงและตัวอักษรยกต่ำผ่าน BasePortionFormat.escapement จะย้ายส่วนแต่ละส่วนสัมพันธ์กับพื้นฐานแทนการตั้งค่าการจัดแนวฟอนต์สำหรับบรรทัดของย่อหน้า.
ตั้งค่าความโปร่งใสสำหรับข้อความ
ความโปร่งใสของข้อความควบคุมโดยส่วนประกอบอัลฟาของสีที่กำหนดให้กับ BasePortionFormat.fill_format. ในตัวอย่างด้านล่าง alpha = 50 เป็นค่าช่องอัลฟา ARGB บนสเกล 0–255, ไม่ใช่เปอร์เซ็นต์ความโปร่งใส.
ตัวอย่างโค้ดด้านล่างแสดงวิธีใช้ความโปร่งใสกับ ย่อหน้าทั้งหมด:
import aspose.pydrawing as draw
import aspose.slides as slides

alpha = 50

with slides.Presentation("sample.pptx") as presentation:
    slide = presentation.slides[0]

    auto_shape = slide.shapes[0]
    paragraph = auto_shape.text_frame.paragraphs[0]

    # ตั้งค่าการเติมสีดำกึ่งโปร่งใสสำหรับข้อความ.
    paragraph.paragraph_format.default_portion_format.fill_format.fill_type = slides.FillType.SOLID
    paragraph.paragraph_format.default_portion_format.fill_format.solid_fill_color.color = draw.Color.from_argb(alpha, draw.Color.black)

    presentation.save("transparent_paragraph.pptx", slides.export.SaveFormat.PPTX)
ผลลัพธ์:

ตัวอย่างโค้ดต่อไปนี้แสดงวิธีใช้ความโปร่งใสกับ ส่วนข้อความที่มีฟอนต์หนา:
import aspose.pydrawing as draw
import aspose.slides as slides

alpha = 50

with slides.Presentation("sample.pptx") as presentation:
    slide = presentation.slides[0]

    auto_shape = slide.shapes[0]
    paragraph = auto_shape.text_frame.paragraphs[0]

    for portion in paragraph.portions:
        if portion.portion_format.get_effective().font_bold:
            # ตั้งค่าความโปร่งใสของส่วนข้อความ.
            portion.portion_format.fill_format.fill_type = slides.FillType.SOLID
            portion.portion_format.fill_format.solid_fill_color.color = draw.Color.from_argb(alpha, draw.Color.black)

    presentation.save("transparent_text_portions.pptx", slides.export.SaveFormat.PPTX)
ผลลัพธ์:

ตั้งค่าการเว้นระยะอักขระสำหรับข้อความ
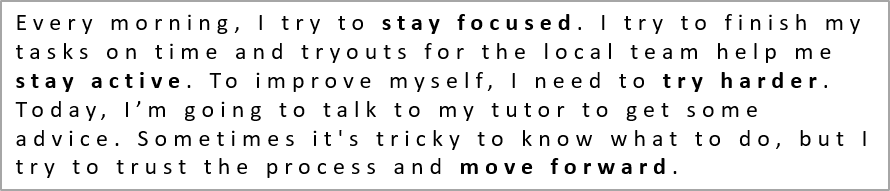
ใช้ BasePortionFormat.spacing เพื่อขยายหรือบีบอัดระยะห่างระหว่างอักขระในกล่องข้อความ ตัวอย่างเพิ่มระยะห่าง 3 จุด; ค่าติดลบจะบีบอัดข้อความ.
โค้ด Python ต่อไปนี้แสดงวิธีขยายการเว้นระยะอักขระใน ย่อหน้าทั้งหมด:
import aspose.slides as slides

with slides.Presentation("sample.pptx") as presentation:
    slide = presentation.slides[0]

    auto_shape = slide.shapes[0]
    paragraph = auto_shape.text_frame.paragraphs[0]

    # หมายเหตุ: ใช้ค่าลบเพื่อบีบอัดระยะห่างระหว่างอักขระ.
    paragraph.paragraph_format.default_portion_format.spacing = 3  # ขยายระยะห่างระหว่างอักขระ.

    presentation.save("character_spacing_in_paragraph.pptx", slides.export.SaveFormat.PPTX)
ผลลัพธ์:
ตัวอย่างโค้ดด้านล่างแสดงวิธีขยายการเว้นระยะอักขระใน ส่วนข้อความที่มีฟอนต์หนา:
import aspose.slides as slides

with slides.Presentation("sample.pptx") as presentation:
    slide = presentation.slides[0]

    auto_shape = slide.shapes[0]
    paragraph = auto_shape.text_frame.paragraphs[0]

    for portion in paragraph.portions:
        if portion.portion_format.get_effective().font_bold:
            # หมายเหตุ: ใช้ค่าลบเพื่อบีบอัดระยะห่างระหว่างอักขระ.
            portion.portion_format.spacing = 3  # ขยายระยะห่างระหว่างอักขระ.

    presentation.save("character_spacing_in_text_portions.pptx", slides.export.SaveFormat.PPTX)
ผลลัพธ์:

ปิดการ Kerning สำหรับฟอนต์เฉพาะ
ในบางกรณี ข้อความที่แสดงโดย Aspose.Slides อาจดูแน่นกว่าข้อความเดียวกันใน PowerPoint สิ่งนี้อาจเกิดจาก PowerPoint เพิกเฉยต่อข้อมูล kerning ของฟอนต์บางตัว แม้ว่าฟอนต์จะมีข้อมูล kerning ที่ถูกต้องและการตั้งค่า kerning ถูกเปิดใน PowerPoint.
เพื่อให้ผลลัพธ์ที่แสดงใกล้เคียงกับ PowerPoint มากขึ้นในกรณีดังกล่าว คุณสามารถปิด kerning สำหรับส่วนข้อความที่ใช้ฟอนต์ที่ได้รับผลกระทบ ตั้งค่า BasePortionFormat.kerning_minimal_size เป็นค่าที่ใหญ่กว่าขนาดฟอนต์จริง ตัวอย่างนี้ต้องใช้ “presentation.pptx” ที่มีกล่องข้อความเป็นรูปทรงแรกบนสไลด์แรก มันตรวจสอบชื่อฟอนต์ที่มีผลจริง รวมถึงฟอนต์ที่สืบทอด, และตั้งค่าขีดจำกัด 100 จุดสำหรับส่วนที่ใช้ Roboto การตั้งค่านี้จะปิด kerning สำหรับส่วนที่ตรงกับฟอนต์ที่มีขนาดต่ำกว่า 100 จุด:
import aspose.slides as slides

with slides.Presentation("presentation.pptx") as presentation:
    slide = presentation.slides[0]

    auto_shape = slide.shapes[0]
    target_font = "Roboto"

    for paragraph in auto_shape.text_frame.paragraphs:
        for portion in paragraph.portions:
            text_format = portion.portion_format.get_effective()
            fonts = (text_format.latin_font, text_format.east_asian_font, text_format.complex_script_font)
            uses_target_font = any(font is not None and font.font_name == target_font for font in fonts)

            if uses_target_font:
                portion.portion_format.kerning_minimal_size = 100

    presentation.save("output.pptx", slides.export.SaveFormat.PPTX)
สำหรับข้อความที่ตรงกับเกณฑ์และมีขนาดต่ำกว่าขีดจำกัด การตั้งค่านี้จะป้องกัน kerning และช่วยให้การแสดงผลของ Aspose.Slides สอดคล้องกับผลลัพธ์ภาพของ PowerPoint สำหรับฟอนต์ที่ได้รับผลกระทบจากพฤติกรรมเฉพาะของ PowerPoint นี้.
จัดการคุณสมบัติโฟอนต์ข้อความ
คุณสมบัติของฟอนต์สามารถตั้งค่าที่ระดับย่อหน้าผ่าน ParagraphFormat.default_portion_format หรือที่ส่วนข้อความแต่ละส่วนผ่าน PortionFormat.
ตัวอย่างต่อไปนี้ตั้งค่าฟอนต์เริ่มต้นของย่อหน้าแรกเป็น Times New Roman ขนาด 12 จุดพร้อมการจัดรูปแบบหนา, เอียง, และขีดเส้นใต้เป็นจุด ส่วนการจัดรูปแบบที่ระบุโดยตรงบนส่วนข้อความแต่ละส่วนจะมีลำดับความสำคัญเหนือค่าเริ่มต้นเหล่านี้.
import aspose.slides as slides

with slides.Presentation("sample.pptx") as presentation:
    slide = presentation.slides[0]

    auto_shape = slide.shapes[0]
    paragraph = auto_shape.text_frame.paragraphs[0]

    # ตั้งค่าคุณสมบัติโฟอนต์สำหรับย่อหน้า.
    portion_format = paragraph.paragraph_format.default_portion_format
    portion_format.font_height = 12
    portion_format.font_bold = slides.NullableBool.TRUE
    portion_format.font_italic = slides.NullableBool.TRUE
    portion_format.font_underline = slides.TextUnderlineType.DOTTED
    portion_format.latin_font = slides.FontData("Times New Roman")

    presentation.save("font_properties_for_paragraph.pptx", slides.export.SaveFormat.PPTX)
ผลลัพธ์:

ตัวอย่างต่อไปนี้ใช้ Times New Roman ขนาด 13 จุด, การจัดรูปแบบเอียง, และขีดเส้นใต้เป็นจุดกับส่วนข้อความที่มีการจัดรูปแบบเป็นหนาจริง ๆ:
import aspose.slides as slides

with slides.Presentation("sample.pptx") as presentation:
    slide = presentation.slides[0]

    auto_shape = slide.shapes[0]
    paragraph = auto_shape.text_frame.paragraphs[0]

    for portion in paragraph.portions:
        if portion.portion_format.get_effective().font_bold:
            # ตั้งค่าคุณสมบัติโฟอนต์สำหรับส่วนข้อความ.
            portion.portion_format.font_height = 13
            portion.portion_format.font_italic = slides.NullableBool.TRUE
            portion.portion_format.font_underline = slides.TextUnderlineType.DOTTED
            portion.portion_format.latin_font = slides.FontData("Times New Roman")

    presentation.save("font_properties_for_text_portions.pptx", slides.export.SaveFormat.PPTX)
ผลลัพธ์:

ตั้งค่าการหมุนข้อความ
ใช้ TextFrameFormat.text_vertical_type เพื่อตั้งค่าการวางแนวข้อความที่กำหนดไว้ล่วงหน้าภายในรูปทรง.
ตัวอย่างโค้ดต่อไปนี้ตั้งค่าการวางแนวข้อความในรูปทรงเป็น TextVerticalType.VERTICAL270, ซึ่งจะหมุนข้อความ 90 องศาตรงทวนเข็มนาฬิกา:
import aspose.slides as slides

with slides.Presentation("sample.pptx") as presentation:
    slide = presentation.slides[0]

    auto_shape = slide.shapes[0]

    auto_shape.text_frame.text_frame_format.text_vertical_type = slides.TextVerticalType.VERTICAL270

    presentation.save("text_rotation.pptx", slides.export.SaveFormat.PPTX)
ผลลัพธ์:

ตั้งค่าการหมุนแบบกำหนดเองสำหรับกรอบข้อความ
ใช้ TextFrameFormat.rotation_angle เพื่อตั้งค่ามุมการหมุนแบบกำหนดเองสำหรับ TextFrame.
ตัวอย่างโค้ดด้านล่างหมุนกรอบข้อความ 3 องศาตามเข็มนาฬิกาภายในรูปทรง:
import aspose.slides as slides

with slides.Presentation("sample.pptx") as presentation:
    slide = presentation.slides[0]

    auto_shape = slide.shapes[0]

    auto_shape.text_frame.text_frame_format.rotation_angle = 3

    presentation.save("custom_text_rotation.pptx", slides.export.SaveFormat.PPTX)
ผลลัพธ์:

ตั้งค่าการเว้นระยะบรรทัดของย่อหน้า
Aspose.Slides มี ParagraphFormat.space_after, ParagraphFormat.space_before, และ ParagraphFormat.space_within เพื่อควบคุมการเว้นระยะของย่อหน้า คุณสมบัติเหล่านี้ใช้ดังนี้:
- ใช้ค่าบวกเพื่อระบุการเว้นระยะบรรทัดเป็นเปอร์เซ็นต์ของความสูงบรรทัด.
- ใช้ค่าลบเพื่อระบุการเว้นระยะบรรทัดเป็นหน่วยจุด.
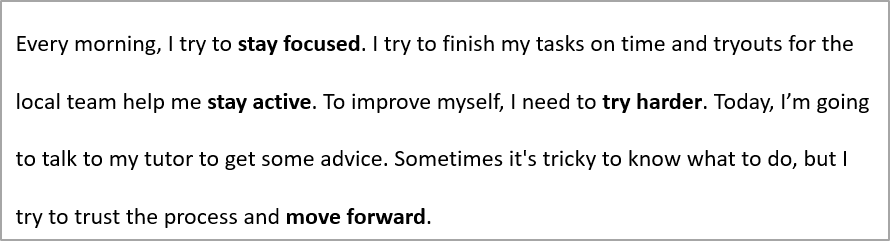
ตัวอย่างต่อไปนี้ตั้งค่าการเว้นระยะภายในย่อหน้าแรกเป็น 200% ของความสูงบรรทัด (เว้นระยะสองเท่า):
import aspose.slides as slides

with slides.Presentation("sample.pptx") as presentation:
    slide = presentation.slides[0]

    auto_shape = slide.shapes[0]
    paragraph = auto_shape.text_frame.paragraphs[0]

    paragraph.paragraph_format.space_within = 200

    presentation.save("line_spacing.pptx", slides.export.SaveFormat.PPTX)
ผลลัพธ์:
ควบคุมการตัดบรรทัด
กฎการตัดบรรทัดของย่อหน้ามีประโยชน์ในบล็อกข้อความแคบและงานนำเสนอที่ผสมข้อความละตินและเอเชียตะวันออก คุณสมบัติดังต่อไปนี้เป็นของ ParagraphFormat, ดังนั้นจึงใช้กับย่อหน้าเต็ม:
- latin_line_break ควบคุมกฎการตัดบรรทัดของข้อความละติน ในข้อความผสม การเปลี่ยนแปลงอาจทำให้ตำแหน่งการตัดบรรทัดของข้อความเอเชียตะวันออกและเครื่องหมายวรรคตอนที่อยู่ติดกันเปลี่ยนได้.
- east_asian_line_break ควบคุมกฎการตัดบรรทัดของข้อความเอเชียตะวันออกรวมถึงข้อจำกัดของอักขระที่ตำแหน่งเริ่มต้นและสิ้นสุดของบรรทัด.
กฎเหล่านี้ไม่ทดแทน TextFrameFormat.wrap_text, ซึ่งเปิดการห่อข้อความอัตโนมัติภายในกรอบข้อความ พวกมันมีผลต่อการจัดวางเมื่อมีการห่อข้อความ; ไม่ได้แทรกอักขระการตัดบรรทัด การตัดบรรทัดโดยตรงบังคับให้เกิดบรรทัดใหม่ภายในย่อหน้าโดยไม่คำนึงถึงความกว้างที่มี.
ตัวอย่างที่เป็นอิสระต่อไปนี้สร้างบล็อกข้อความแคบที่มีข้อความจีนและละติน มันตั้งค่าคุณสมบัติการตัดบรรทัดทั้งสองอย่างชัดเจนและบันทึกเป็น “line_breaking.pptx” เพื่อทดลองกับกฎใดกฎหนึ่ง ให้เปลี่ยนค่าของคุณสมบัตินั้นในขณะที่ตั้งค่าอื่นคงที่ ตัวอย่างใช้ Arial ขนาด 24 จุด และ SimSun พร้อมความกว้างกรอบ 160 จุดและระยะขอบแนวนอนเป็นศูนย์ TextFrameFormat.autofit_type ถูกตั้งค่าเป็น TextAutofitType.NONE เพื่อให้ขนาดข้อความและมิติของกรอบคงที่.
import aspose.pydrawing as draw
import aspose.slides as slides

with slides.Presentation() as presentation:
    slide = presentation.slides[0]

    shape = slide.shapes.add_auto_shape(slides.ShapeType.RECTANGLE, 50, 50, 160, 300)
    shape.fill_format.fill_type = slides.FillType.NO_FILL

    text_frame = shape.text_frame
    text_frame.text_frame_format.wrap_text = slides.NullableBool.TRUE
    text_frame.text_frame_format.autofit_type = slides.TextAutofitType.NONE
    text_frame.text_frame_format.margin_left = 0
    text_frame.text_frame_format.margin_right = 0

    paragraph = text_frame.paragraphs[0]
    paragraph.text = "中文排版测试,PowerPoint 中文演示。"

    paragraph_format = paragraph.paragraph_format
    paragraph_format.alignment = slides.TextAlignment.LEFT
    paragraph_format.default_portion_format.font_height = 24
    paragraph_format.default_portion_format.latin_font = slides.FontData("Arial")
    paragraph_format.default_portion_format.east_asian_font = slides.FontData("SimSun")
    paragraph_format.default_portion_format.fill_format.fill_type = slides.FillType.SOLID
    paragraph_format.default_portion_format.fill_format.solid_fill_color.color = draw.Color.black
    paragraph_format.latin_line_break = slides.NullableBool.FALSE
    paragraph_format.east_asian_line_break = slides.NullableBool.TRUE

    presentation.save("line_breaking.pptx", slides.export.SaveFormat.PPTX)
ควบคุมเครื่องหมายวรรคตอนที่ห้อย
ParagraphFormat.hanging_punctuation อนุญาตให้เครื่องหมายวรรคตอนที่เหมาะสมต่อออกไปเหนือขอบขวาของบรรทัดข้อความแทนที่จะอยู่นาในบรรทัดต่อไป ใช้กับย่อหน้าเต็มและแตกต่างจากการเยื้องห้อย.
ตัวอย่างที่เป็นอิสระต่อไปนี้เปิดใช้งานการห้อยเครื่องหมายวรรคตอนในกรอบข้อความความกว้าง 100 จุดและบันทึกเป็น “hanging_punctuation.pptx” ด้วย Arial ขนาด 24 จุดและระยะขอบแนวนอนเป็นศูนย์ จุดสุดท้ายของประโยคจะอยู่หลัง “sentence” และต่อออกไปเหนือขอบขวาของข้อความ ตั้งค่าคุณสมบัติเป็น NullableBool.FALSE เพื่อเปรียบเทียบ: กับการตั้งค่านี้ จุดจุดเต็มจะอยู่ในบรรทัดแยก การห่อข้อความเปิดใช้งานและการทำ autofit ปิดเพื่อคงความกว้างที่ใช้ได้คงที่.
import aspose.pydrawing as draw
import aspose.slides as slides

with slides.Presentation() as presentation:
    slide = presentation.slides[0]

    shape = slide.shapes.add_auto_shape(slides.ShapeType.RECTANGLE, 50, 50, 100, 200)
    shape.fill_format.fill_type = slides.FillType.NO_FILL

    text_frame = shape.text_frame
    text_frame.text_frame_format.wrap_text = slides.NullableBool.TRUE
    text_frame.text_frame_format.autofit_type = slides.TextAutofitType.NONE
    text_frame.text_frame_format.margin_left = 0
    text_frame.text_frame_format.margin_right = 0

    paragraph = text_frame.paragraphs[0]
    paragraph.text = "Simple text, next sentence."

    paragraph_format = paragraph.paragraph_format
    paragraph_format.alignment = slides.TextAlignment.LEFT
    paragraph_format.default_portion_format.font_height = 24
    paragraph_format.default_portion_format.latin_font = slides.FontData("Arial")
    paragraph_format.default_portion_format.fill_format.fill_type = slides.FillType.SOLID
    paragraph_format.default_portion_format.fill_format.solid_fill_color.color = draw.Color.black
    paragraph_format.hanging_punctuation = slides.NullableBool.TRUE

    presentation.save("hanging_punctuation.pptx", slides.export.SaveFormat.PPTX)
ไม่ใช่เครื่องหมายวรรคตอนทุกตัวจะห้อยได้ ผลลัพธ์ที่มองเห็นขึ้นอยู่กับ เงื่อนไขของฟอนต์และการจัดวาง: การเปลี่ยนฟอนต์, ความกว้างที่ใช้ได้, ระยะขอบ, หรือการตั้งค่า autofit อาจทำให้ความแตกต่างที่มองเห็นหายไป.
ตั้งค่าชนิด Autofit สำหรับกรอบข้อความ
TextFrameFormat.autofit_type กำหนดพฤติกรรมของข้อความเมื่อเกินขอบเขตของภาชนะ ใช้เพื่อควบคุมว่าข้อความจะย่อ, ล้นออกมานอก, หรือปรับขนาดรูปทรงโดยอัตโนมัติ ตัวอย่างต่อไปนี้กำหนดรูปทรงให้ปรับขนาดให้พอดีกับข้อความและบันทึกผลเป็น “autofit_type.pptx”.
import aspose.slides as slides

with slides.Presentation("sample.pptx") as presentation:
    slide = presentation.slides[0]

    auto_shape = slide.shapes[0]

    auto_shape.text_frame.text_frame_format.autofit_type = slides.TextAutofitType.SHAPE

    presentation.save("autofit_type.pptx", slides.export.SaveFormat.PPTX)
เพื่อนับจำนวนบรรทัดหลังการห่อข้อความอัตโนมัติและดูว่า ความกว้างของข้อความหรือรูปทรงเปลี่ยนแปลงผลอย่างไร ดูที่ Count Rendered Lines. จำนวนบรรทัดเพียงอย่างเดียวไม่ได้บ่งบอกว่าข้อความล้นออกจากภาชนะหรือไม่.
ตั้งค่าตำแหน่งยึดของกรอบข้อความ
TextFrameFormat.anchoring_type กำหนดว่าข้อความจะวางตำแหน่งแนวตั้งภายในรูปทรงอย่างไร เช่น ด้านบน, ตรงกลาง, หรือด้านล่าง ตัวอย่างต่อไปนี้ยึดข้อความไว้ที่ด้านล่างของรูปทรงแรกและบันทึกผลเป็น “text_anchor.pptx”.
import aspose.slides as slides

with slides.Presentation("sample.pptx") as presentation:
    slide = presentation.slides[0]

    auto_shape = slide.shapes[0]

    auto_shape.text_frame.text_frame_format.anchoring_type = slides.TextAnchorType.BOTTOM

    presentation.save("text_anchor.pptx", slides.export.SaveFormat.PPTX)
ตั้งค่าการแท็บข้อความ
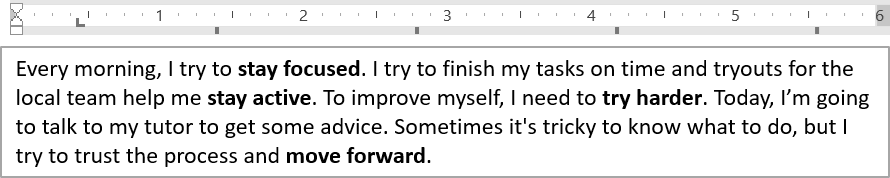
ใช้ ParagraphFormat.default_tab_size และ ParagraphFormat.tabs เพื่อกำหนดจุดหยุดแท็บในย่อหน้า ตัวอย่างต่อไปนี้ตั้งค่าช่วงเวลาแท็บเริ่มต้นเป็น 100 จุดและเพิ่มจุดหยุดแท็บจัดซ้ายที่ 30 จุด การตั้งค่าเหล่านี้มีผลต่อข้อความที่มีอักขระแท็บ.
import aspose.slides as slides

with slides.Presentation("sample.pptx") as presentation:
    slide = presentation.slides[0]

    auto_shape = slide.shapes[0]
    paragraph = auto_shape.text_frame.paragraphs[0]

    paragraph.paragraph_format.default_tab_size = 100
    paragraph.paragraph_format.tabs.add(30, slides.TabAlignment.LEFT)

    presentation.save("paragraph_tabs.pptx", slides.export.SaveFormat.PPTX)
ผลลัพธ์:
ตั้งค่าภาษาตรวจสอบการพิมพ์
Aspose.Slides ให้ BasePortionFormat.language_id ซึ่งทำให้คุณตั้งค่าภาษาในการตรวจสอบการพิมพ์สำหรับส่วนข้อความ ภาษาตรวจสอบการพิมพ์จะกำหนดภาษาที่ใช้สำหรับการตรวจสอบการสะกดและไวยากรณ์ใน PowerPoint.
ตัวอย่างต่อไปนี้ต้องใช้ “presentation.pptx” ที่มีกล่องข้อความเป็นรูปทรงแรกบนสไลด์แรกและอย่างน้อยหนึ่งย่อหน้า มันแทนที่เนื้อหาของย่อหน้าแรกด้วย “1。”, ตั้งฟอนต์เป็น SimSun, และกำหนดภาษาตรวจสอบการพิมพ์เป็นภาษาจีนกลางแบบง่าย (zh-CN). บันทึกผลเป็น “proofing_language.pptx”:
import aspose.slides as slides

with slides.Presentation("presentation.pptx") as presentation:
    slide = presentation.slides[0]

    auto_shape = slide.shapes[0]

    paragraph = auto_shape.text_frame.paragraphs[0]
    paragraph.portions.clear()

    font = slides.FontData("SimSun")

    text_portion = slides.Portion()
    text_portion.portion_format.complex_script_font = font
    text_portion.portion_format.east_asian_font = font
    text_portion.portion_format.latin_font = font

    # ตั้งค่าภาษาในการตรวจสอบเป็นภาษาจีนแบบง่าย.
    text_portion.portion_format.language_id = "zh-CN"

    text_portion.text = "1。"
    paragraph.portions.add(text_portion)

    presentation.save("proofing_language.pptx", slides.export.SaveFormat.PPTX)
ตั้งค่าภาษาเริ่มต้น
ใช้ LoadOptions.default_text_language เพื่อกำหนดภาษาตั้งต้นสำหรับข้อความที่สร้างขณะโหลดหรือสร้างงานนำเสนอ ตัวอย่างต่อไปนี้สร้างงานนำเสนอที่มีภาษาอังกฤษสหรัฐเป็นภาษาข้อความเริ่มต้น, เพิ่มกล่องข้อความ, และพิมพ์ en-US สำหรับส่วนข้อความแรกของมัน.
import aspose.slides as slides

load_options = slides.LoadOptions()
load_options.default_text_language = "en-US"

with slides.Presentation(load_options) as presentation:
    slide = presentation.slides[0]

    # เพิ่มรูปทรงสี่เหลี่ยมใหม่พร้อมข้อความ.
    shape = slide.shapes.add_auto_shape(slides.ShapeType.RECTANGLE, 20, 20, 150, 50)
    shape.text_frame.text = "Sample text"

    # ตรวจสอบภาษาของส่วนแรก.
    portion = shape.text_frame.paragraphs[0].portions[0]
    print(portion.portion_format.language_id)
ตั้งค่าสไตล์ข้อความเริ่มต้น
เพื่อใช้การจัดรูปแบบข้อความเริ่มต้นในระดับงานนำเสนอ ใช้ Presentation.default_text_style.
ตัวอย่างต่อไปนี้ตั้งค่าฟอนต์หนาขนาด 14 จุดเป็นค่าเริ่มต้นสำหรับย่อหน้าในระดับบนของงานนำเสนอใหม่และบันทึกเป็น “default_text_style.pptx”. ข้อความสามารถสืบทอดค่าเริ่มต้นเหล่านี้ได้ เว้นแต่การจัดรูปแบบที่เจาะจงมากกว่าจะทับค่าดังกล่าว.
import aspose.slides as slides

with slides.Presentation() as presentation:
    # รับรูปแบบย่อหน้าระดับบนสุด.
    paragraph_format = presentation.default_text_style.get_level(0)

    if paragraph_format is not None:
        paragraph_format.default_portion_format.font_height = 14
        paragraph_format.default_portion_format.font_bold = slides.NullableBool.TRUE

    presentation.save("default_text_style.pptx", slides.export.SaveFormat.PPTX)
ดึงข้อความพร้อมเอฟเฟกต์อักษรพิมพ์ใหญ่ทั้งหมด
ใน PowerPoint การใช้เอฟเฟกต์ฟอนต์ All Caps ทำให้ข้อความปรากฏเป็นตัวพิมพ์ใหญ่บนสไลด์แม้เดิมพิมพ์เป็นตัวพิมพ์เล็ก เมื่อคุณดึงส่วนข้อความเช่นนี้ด้วย Aspose.Slides ไลบรารีจะคืนข้อความตามที่พิมพ์ไว้ เพื่อให้ตรงกับข้อความที่แสดง ให้ตรวจสอบ TextCapType และแปลงสตริงที่ได้ให้เป็นตัวพิมพ์ใหญ่เมื่อค่าคือ ALL.
ตัวอย่างนี้ต้องใช้ “sample2.pptx” ที่มีกล่องข้อความเป็นรูปทรงแรกบนสไลด์แรก ส่วนแรกของย่อหน้าแรกมีข้อความ “Hello, Aspose!” พร้อมเอฟเฟกต์ All Caps ตามที่แสดงด้านล่าง.
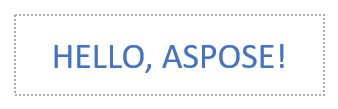
ตัวอย่างโค้ดด้านล่างแสดงวิธีดึงข้อความที่มีเอฟเฟกต์ All Caps ถูกใช้:
import aspose.slides as slides

with slides.Presentation("sample2.pptx") as presentation:
    slide = presentation.slides[0]

    auto_shape = slide.shapes[0]
    text_portion = auto_shape.text_frame.paragraphs[0].portions[0]

    print("Original text:", text_portion.text)

    text_format = text_portion.portion_format.get_effective()
    if text_format.text_cap_type == slides.TextCapType.ALL:
        text = text_portion.text.upper()
        print("All-Caps effect:", text)
ผลลัพธ์:
Original text: Hello, Aspose!
All-Caps effect: HELLO, ASPOSE!
คำถามที่พบบ่อย
ฉันจะแก้ไขข้อความในตารางบนสไลด์อย่างไร?
เพื่อแก้ไขข้อความในตารางบนสไลด์ ให้ใช้ Table. ทำการวนลูปผ่านเซลล์และอัปเดตแต่ละเซลล์ผ่าน Cell.text_frame และการจัดรูปแบบย่อหน้าผ่าน Paragraph.paragraph_format.
ฉันจะใช้สีไล่ระดับกับข้อความบนสไลด์ PowerPoint อย่างไร?
เพื่อใช้สีไล่ระดับกับข้อความ ให้ใช้ BasePortionFormat.fill_format. ตั้งค่า FillFormat.fill_type เป็น FillType.GRADIENT และกำหนดจุดหยุดไล่ระดับ, ทิศทาง, และความโปร่งใส.