
จัดรูปแบบข้อความการนำเสนอใน JavaScript
ภาพรวม
บทความนี้แสดงวิธีฟอร์แมตข้อความในงานนำเสนอ PowerPoint และ OpenDocument โดยใช้ Aspose.Slides for Node.js ผ่าน Java ครอบคลุมสีพื้นหลัง ความโปร่งแสง การจัดระยะห่างระหว่างอักขระ คุณสมบัติของฟอนต์ การหมุน ระยะห่างระหว่างย่อหน้า พฤติกรรม Autofit การยึดข้อความ จุดหยุดแท็บ และการตั้งค่าภาษา
ยกเว้นจะระบุไว้เป็นอย่างอื่น ตัวอย่างทั้งหมดใช้ sample.pptx รูปร่างแรกในสไลด์แรกเป็นกล่องข้อความและย่อหน้าแรกมีข้อความตามที่แสดงด้านล่าง ดัชนีของสไลด์และรูปร่างเริ่มจากศูนย์ ตัวอย่างที่เลือกส่วนหนาใช้ฟอร์แมตที่มีผลรวมถึงการสืบทอดฟอร์แมตหนา:

หากต้องการค้นหาและไฮไลท์ข้อความตัวอักษรหรือการจับคู่แบบ regular expression ให้ดูที่ Search and Replace Text
ตั้งค่าสีพื้นหลังของข้อความ
ใช้ ParagraphFormat.getDefaultPortionFormat เพื่อกำหนดสีไฮไลท์เริ่มต้นสำหรับย่อหน้า หรือใช้ BasePortionFormat.getHighlightColor สำหรับส่วนข้อความแต่ละส่วน
ตัวอย่างต่อไปนี้ตั้งค่าการไฮไลท์สีเทาอ่อนเป็นค่าเริ่มต้นสำหรับย่อหน้าแรก สีไฮไลท์ที่ระบุโดยตรงในแต่ละส่วนจะมีลำดับความสำคัญเหนือค่าเริ่มต้น:
const aspose = { slides: require("aspose.slides.via.java") };
const java = require("java");

const presentation = new aspose.slides.Presentation("sample.pptx");
try {
    const slide = presentation.getSlides().get_Item(0);

    const autoShape = slide.getShapes().get_Item(0);
    const paragraph = autoShape.getTextFrame().getParagraphs().get_Item(0);

    // ตั้งค่าสีไฮไลท์สำหรับย่อหน้าเต็ม.
    paragraph.getParagraphFormat().getDefaultPortionFormat().getHighlightColor().setColor(java.getStaticFieldValue("java.awt.Color", "LIGHT_GRAY"));

    presentation.save("gray_paragraph.pptx", aspose.slides.SaveFormat.Pptx);
} finally {
    presentation.dispose();
}
ผลลัพธ์:

ตัวอย่างโค้ดต่อไปนี้แสดงวิธีตั้งค่าสีพื้นหลังสำหรับ ส่วนข้อความที่มีฟอนต์หนา:
const aspose = { slides: require("aspose.slides.via.java") };
const java = require("java");

const presentation = new aspose.slides.Presentation("sample.pptx");
try {
    const slide = presentation.getSlides().get_Item(0);

    const autoShape = slide.getShapes().get_Item(0);
    const paragraph = autoShape.getTextFrame().getParagraphs().get_Item(0);
    const portions = paragraph.getPortions();
    const portionCount = portions.getCount();

    for (let portionIndex = 0; portionIndex < portionCount; portionIndex++) {
        const portion = portions.get_Item(portionIndex);
        if (portion.getPortionFormat().getEffective().getFontBold()) {
            // ตั้งค่าสีไฮไลท์สำหรับส่วนข้อความ.
            portion.getPortionFormat().getHighlightColor().setColor(java.getStaticFieldValue("java.awt.Color", "LIGHT_GRAY"));
        }
    }

    presentation.save("gray_text_portions.pptx", aspose.slides.SaveFormat.Pptx);
} finally {
    presentation.dispose();
}
ผลลัพธ์:

จัดแนวย่อหน้าของข้อความ
ใช้ ParagraphFormat.setAlignment เพื่อกำหนดการจัดแนวย่อหน้าในกรอบข้อความ ค่าอาจเป็นกึ่งกลาง ซ้าย ขวา หรือจัดเต็ม
ตัวอย่างโค้ดต่อไปนี้แสดงวิธีจัดแนวย่อหน้าให้ ศูนย์กลาง:
const aspose = { slides: require("aspose.slides.via.java") };

const presentation = new aspose.slides.Presentation("sample.pptx");
try {
    const slide = presentation.getSlides().get_Item(0);

    const autoShape = slide.getShapes().get_Item(0);
    const paragraph = autoShape.getTextFrame().getParagraphs().get_Item(0);

    // ตั้งค่าการจัดแนวของย่อหน้าให้เป็นศูนย์กลาง.
    paragraph.getParagraphFormat().setAlignment(aspose.slides.TextAlignment.Center);

    presentation.save("aligned_paragraph.pptx", aspose.slides.SaveFormat.Pptx);
} finally {
    presentation.dispose();
}
ผลลัพธ์:

ตั้งค่าความโปร่งแสงของข้อความ
ความโปร่งแสงของข้อความควบคุมผ่านส่วนประกอบอัลฟ่าของสีที่กำหนดให้กับ BasePortionFormat.getFillFormat ในตัวอย่างต่อไปนี้ alpha = 50 เป็นค่าชาแนลอัลฟ่า ARGB บนสเกล 0–255 ไม่ใช่เปอร์เซ็นต์ความโปร่งแสง
ตัวอย่างโค้ดต่อไปนี้แสดงวิธีใช้ความโปร่งแสงกับ ย่อหน้าเต็ม:
const aspose = { slides: require("aspose.slides.via.java") };
const java = require("java");

const alpha = 50;
const transparentBlack = java.newInstanceSync("java.awt.Color", 0, 0, 0, alpha);
const presentation = new aspose.slides.Presentation("sample.pptx");
try {
    const slide = presentation.getSlides().get_Item(0);

    const autoShape = slide.getShapes().get_Item(0);
    const paragraph = autoShape.getTextFrame().getParagraphs().get_Item(0);
    const fillFormat = paragraph.getParagraphFormat().getDefaultPortionFormat().getFillFormat();

    // ตั้งค่าสีเติมของข้อความให้เป็นสีโปร่งใส.
    fillFormat.setFillType(java.newByte(aspose.slides.FillType.Solid));
    fillFormat.getSolidFillColor().setColor(transparentBlack);

    presentation.save("transparent_paragraph.pptx", aspose.slides.SaveFormat.Pptx);
} finally {
    presentation.dispose();
}
ผลลัพธ์:

ตัวอย่างต่อไปนี้แสดงวิธีใช้ความโปร่งแสงกับ ส่วนข้อความที่มีฟอนต์หนา:
const aspose = { slides: require("aspose.slides.via.java") };
const java = require("java");

const alpha = 50;
const transparentBlack = java.newInstanceSync("java.awt.Color", 0, 0, 0, alpha);
const presentation = new aspose.slides.Presentation("sample.pptx");
try {
    const slide = presentation.getSlides().get_Item(0);

    const autoShape = slide.getShapes().get_Item(0);
    const paragraph = autoShape.getTextFrame().getParagraphs().get_Item(0);
    const portions = paragraph.getPortions();
    const portionCount = portions.getCount();

    for (let portionIndex = 0; portionIndex < portionCount; portionIndex++) {
        const portion = portions.get_Item(portionIndex);
        if (portion.getPortionFormat().getEffective().getFontBold()) {
            const fillFormat = portion.getPortionFormat().getFillFormat();

            // ตั้งค่าความโปร่งใสของส่วนข้อความ.
            fillFormat.setFillType(java.newByte(aspose.slides.FillType.Solid));
            fillFormat.getSolidFillColor().setColor(transparentBlack);
        }
    }

    presentation.save("transparent_text_portions.pptx", aspose.slides.SaveFormat.Pptx);
} finally {
    presentation.dispose();
}
ผลลัพธ์:

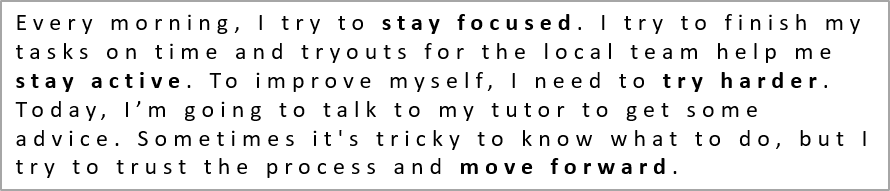
ตั้งค่าการจัดระยะห่างระหว่างอักขระของข้อความ
ใช้ BasePortionFormat.setSpacing เพื่อเพิ่มหรือย่อระยะห่างระหว่างอักขระในกล่องข้อความ ตัวอย่างเพิ่มระยะห่าง 3 พอยต์; ค่าติดลบจะทำให้ข้อความกระชับขึ้น
โค้ด JavaScript ด้านล่างแสดงวิธีขยายระยะห่างอักขระใน ย่อหน้าเต็ม:
const aspose = { slides: require("aspose.slides.via.java") };

const presentation = new aspose.slides.Presentation("sample.pptx");
try {
    const slide = presentation.getSlides().get_Item(0);

    const autoShape = slide.getShapes().get_Item(0);
    const paragraph = autoShape.getTextFrame().getParagraphs().get_Item(0);

    // หมายเหตุ: ใช้ค่าลบเพื่อลดระยะห่างระหว่างอักขระ.
    paragraph.getParagraphFormat().getDefaultPortionFormat().setSpacing(3); // เพิ่มระยะห่างอักขระ.

    presentation.save("character_spacing_in_paragraph.pptx", aspose.slides.SaveFormat.Pptx);
} finally {
    presentation.dispose();
}
ผลลัพธ์:
โค้ดต่อไปนี้แสดงวิธีขยายระยะห่างอักขระใน ส่วนข้อความที่มีฟอนต์หนา:
const aspose = { slides: require("aspose.slides.via.java") };

const presentation = new aspose.slides.Presentation("sample.pptx");
try {
    const slide = presentation.getSlides().get_Item(0);

    const autoShape = slide.getShapes().get_Item(0);
    const paragraph = autoShape.getTextFrame().getParagraphs().get_Item(0);
    const portions = paragraph.getPortions();
    const portionCount = portions.getCount();

    for (let portionIndex = 0; portionIndex < portionCount; portionIndex++) {
        const portion = portions.get_Item(portionIndex);
        if (portion.getPortionFormat().getEffective().getFontBold()) {
            // หมายเหตุ: ใช้ค่าลบเพื่อลดระยะห่างระหว่างอักขระ.
            portion.getPortionFormat().setSpacing(3); // เพิ่มระยะห่างอักขระ.
        }
    }

    presentation.save("character_spacing_in_text_portions.pptx", aspose.slides.SaveFormat.Pptx);
} finally {
    presentation.dispose();
}
ผลลัพธ์:

ปิดการทำ Kerning สำหรับฟอนต์เฉพาะ
ในบางกรณีข้อความที่แสดงโดย Aspose.Slides อาจดูแคบกว่าที่ PowerPoint แสดง เนื่องจาก PowerPoint บางครั้งอาจละเลยข้อมูล Kerning ของฟอนต์บางตัว แม้ว่าฟอนต์จะมีข้อมูล Kerning ที่ถูกต้องและ Kerning ถูกเปิดในการตั้งค่า PowerPoint
เพื่อให้ผลลัพธ์ที่เรนเดอร์ใกล้เคียงกับ PowerPoint มากขึ้น คุณสามารถปิด Kerning สำหรับส่วนข้อความที่ใช้ฟอนต์ที่ได้รับผลกระทบได้ ตั้งค่า BasePortionFormat.setKerningMinimalSize ให้มีค่ามากกว่าขนาดฟอนต์จริง ตัวอย่างนี้ต้องมีไฟล์ “presentation.pptx” ที่มีกล่องข้อความเป็นรูปร่างแรกในสไลด์แรก ตรวจสอบชื่อฟอนต์ที่มีผลรวมรวมถึงฟอนต์ที่สืบทอด และตั้งค่าเกณฑ์ 100 พอยต์สำหรับส่วนที่ใช้ Roboto ซึ่งจะปิด Kerning สำหรับส่วนที่มีขนาดฟอนต์ต่ำกว่า 100 พอยต์:
const aspose = { slides: require("aspose.slides.via.java") };

const presentation = new aspose.slides.Presentation("presentation.pptx");
try {
    const slide = presentation.getSlides().get_Item(0);

    const autoShape = slide.getShapes().get_Item(0);
    const paragraphs = autoShape.getTextFrame().getParagraphs();
    const paragraphCount = paragraphs.getCount();
    const targetFont = "Roboto";

    for (let paragraphIndex = 0; paragraphIndex < paragraphCount; paragraphIndex++) {
        const portions = paragraphs.get_Item(paragraphIndex).getPortions();
        const portionCount = portions.getCount();

        for (let portionIndex = 0; portionIndex < portionCount; portionIndex++) {
            const portion = portions.get_Item(portionIndex);
            const portionFormat = portion.getPortionFormat().getEffective();
            const latinFont = portionFormat.getLatinFont();
            const eastAsianFont = portionFormat.getEastAsianFont();
            const complexScriptFont = portionFormat.getComplexScriptFont();

            if ((latinFont !== null && latinFont.getFontName() === targetFont) ||
                (eastAsianFont !== null && eastAsianFont.getFontName() === targetFont) ||
                (complexScriptFont !== null && complexScriptFont.getFontName() === targetFont)) {
                portion.getPortionFormat().setKerningMinimalSize(100);
            }
        }
    }

    presentation.save("output.pptx", aspose.slides.SaveFormat.Pptx);
} finally {
    presentation.dispose();
}
สำหรับข้อความที่อยู่ต่ำกว่าขีดจำกัดนี้ การตั้งค่าจะป้องกัน Kerning และช่วยให้การเรนเดอร์ของ Aspose.Slides สอดคล้องกับการแสดงผลของ PowerPoint สำหรับฟอนต์ที่ได้รับผลจากพฤติกรรมเฉพาะของ PowerPoint นี้
จัดการคุณสมบัติฟอนต์ของข้อความ
คุณสมบัติฟอนต์สามารถตั้งค่าที่ระดับย่อหน้าได้ผ่าน ParagraphFormat.getDefaultPortionFormat หรือบนส่วนข้อความแต่ละส่วนผ่าน PortionFormat
ตัวอย่างต่อไปนี้ตั้งค่าฟอนต์เริ่มต้นของย่อหน้าแรกเป็น Times New Roman ขนาด 12 จุด พร้อมหนา, เอน, และขีดเส้นใต้แบบจุด สีฟอร์แมตที่ระบุโดยตรงในแต่ละส่วนจะมีลำดับความสำคัญเหนือค่าดีฟอลต์:
const aspose = { slides: require("aspose.slides.via.java") };
const java = require("java");

const presentation = new aspose.slides.Presentation("sample.pptx");
try {
    const slide = presentation.getSlides().get_Item(0);

    const autoShape = slide.getShapes().get_Item(0);
    const paragraph = autoShape.getTextFrame().getParagraphs().get_Item(0);
    const defaultPortionFormat = paragraph.getParagraphFormat().getDefaultPortionFormat();

    // ตั้งค่าคุณสมบัติฟอนต์สำหรับย่อหน้า.
    defaultPortionFormat.setFontHeight(12);
    defaultPortionFormat.setFontBold(java.newByte(aspose.slides.NullableBool.True));
    defaultPortionFormat.setFontItalic(java.newByte(aspose.slides.NullableBool.True));
    defaultPortionFormat.setFontUnderline(java.newByte(aspose.slides.TextUnderlineType.Dotted));
    defaultPortionFormat.setLatinFont(new aspose.slides.FontData("Times New Roman"));

    presentation.save("font_properties_for_paragraph.pptx", aspose.slides.SaveFormat.Pptx);
} finally {
    presentation.dispose();
}
ผลลัพธ์:

ตัวอย่างต่อไปนี้นำ Times New Roman ขนาด 13 จุด, เอน, และขีดเส้นใต้แบบจุด ไปใช้กับส่วนที่มีฟอร์แมตผลรวมเป็นหนา:
const aspose = { slides: require("aspose.slides.via.java") };
const java = require("java");

const presentation = new aspose.slides.Presentation("sample.pptx");
try {
    const slide = presentation.getSlides().get_Item(0);

    const autoShape = slide.getShapes().get_Item(0);
    const paragraph = autoShape.getTextFrame().getParagraphs().get_Item(0);
    const portions = paragraph.getPortions();
    const portionCount = portions.getCount();

    for (let portionIndex = 0; portionIndex < portionCount; portionIndex++) {
        const portion = portions.get_Item(portionIndex);
        if (portion.getPortionFormat().getEffective().getFontBold()) {
            const portionFormat = portion.getPortionFormat();

            // ตั้งค่าคุณสมบัติฟอนต์สำหรับส่วนข้อความ.
            portionFormat.setFontHeight(13);
            portionFormat.setFontItalic(java.newByte(aspose.slides.NullableBool.True));
            portionFormat.setFontUnderline(java.newByte(aspose.slides.TextUnderlineType.Dotted));
            portionFormat.setLatinFont(new aspose.slides.FontData("Times New Roman"));
        }
    }

    presentation.save("font_properties_for_text_portions.pptx", aspose.slides.SaveFormat.Pptx);
} finally {
    presentation.dispose();
}
ผลลัพธ์:

ตั้งค่าการหมุนของข้อความ
ใช้ TextFrameFormat.setTextVerticalType เพื่อกำหนดทิศทางข้อความที่กำหนดไว้ล่วงหน้าในรูปร่าง
โค้ดต่อไปนี้ตั้งค่าการวางแนวข้อความในรูปร่างเป็น TextVerticalType.Vertical270 ซึ่งจะหมุนข้อความ 90 องศาตามเข็มนาฬิกาในทางตรงกันข้าม:
const aspose = { slides: require("aspose.slides.via.java") };
const java = require("java");

const presentation = new aspose.slides.Presentation("sample.pptx");
try {
    const slide = presentation.getSlides().get_Item(0);

    const autoShape = slide.getShapes().get_Item(0);
    autoShape.getTextFrame().getTextFrameFormat().setTextVerticalType(java.newByte(aspose.slides.TextVerticalType.Vertical270));

    presentation.save("text_rotation.pptx", aspose.slides.SaveFormat.Pptx);
} finally {
    presentation.dispose();
}
ผลลัพธ์:

ตั้งค่าการหมุนแบบกำหนดเองสำหรับ TextFrame
ใช้ TextFrameFormat.setRotationAngle เพื่อกำหนดมุมการหมุนแบบกำหนดเองสำหรับ TextFrame
โค้ดต่อไปนี้หมุน TextFrame ไป 3 องศาตามเข็มนาฬิกาในรูปร่าง:
const aspose = { slides: require("aspose.slides.via.java") };

const presentation = new aspose.slides.Presentation("sample.pptx");
try {
    const slide = presentation.getSlides().get_Item(0);

    const autoShape = slide.getShapes().get_Item(0);
    autoShape.getTextFrame().getTextFrameFormat().setRotationAngle(3);

    presentation.save("custom_text_rotation.pptx", aspose.slides.SaveFormat.Pptx);
} finally {
    presentation.dispose();
}
ผลลัพธ์:

ตั้งค่าการเว้นบรรทัดของย่อหน้า
Aspose.Slides มี ParagraphFormat.setSpaceAfter, ParagraphFormat.setSpaceBefore, และ ParagraphFormat.setSpaceWithin เพื่อควบคุมระยะห่างระหว่างย่อหน้า คุณสมบัติเหล่านี้ใช้ดังนี้
- ใช้ค่าบวกเพื่อระบุการเว้นบรรทัดเป็นเปอร์เซ็นต์ของความสูงบรรทัด
- ใช้ค่าลบเพื่อระบุการเว้นบรรทัดเป็นจุด
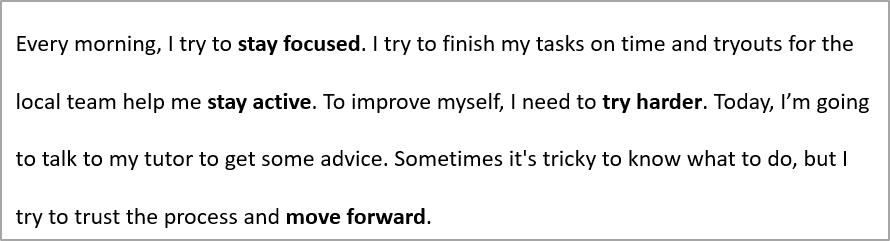
ตัวอย่างต่อไปนี้ตั้งค่าการเว้นบรรทัดภายในย่อหน้าแรกเป็น 200 % ของความสูงบรรทัด (เว้นบรรทัดสองเท่า):
const aspose = { slides: require("aspose.slides.via.java") };

const presentation = new aspose.slides.Presentation("sample.pptx");
try {
    const slide = presentation.getSlides().get_Item(0);

    const autoShape = slide.getShapes().get_Item(0);

    const paragraph = autoShape.getTextFrame().getParagraphs().get_Item(0);
    paragraph.getParagraphFormat().setSpaceWithin(200);

    presentation.save("line_spacing.pptx", aspose.slides.SaveFormat.Pptx);
} finally {
    presentation.dispose();
}
ผลลัพธ์:
ควบคุมการตัดบรรทัด
กฎการตัดบรรทัดของย่อหน้าเป็นประโยชน์ในบล็อกข้อความแคบและงานนำเสนอที่ผสมข้อความลาตินและเอเชียตะวันออก วิธีต่อไปนี้เป็นของ ParagraphFormat ดังนั้นจึงใช้กับย่อหน้าเต็ม
- setLatinLineBreak ควบคุมกฎการตัดบรรทัดของลาติน ในข้อความผสม การเปลี่ยนแปลงนี้อาจส่งผลต่อการตัดบรรทัดของข้อความเอเชียตะวันออกและเครื่องหมายวรรคตอนที่อยู่ใกล้เคียง
- setEastAsianLineBreak ควบคุมกฎการตัดบรรทัดของเอเชียตะวันออก รวมถึงข้อจำกัดของอักขระที่อยู่ต้นหรือท้ายบรรทัด
กฎเหล่านี้ไม่แทนที่ TextFrameFormat.setWrapText ซึ่งเปิดใช้งานการตัดบรรทัดอัตโนมัติภายใน TextFrame พวกมันมีผลต่อการจัดวางเมื่อเกิดการตัดบรรทัด; ไม่ได้แทรกอักขระตัดบรรทัด การใส่บรรทัดใหม่แบบชัดเจนจะบังคับให้เกิดบรรทัดใหม่ภายในย่อหน้าโดยอิสระจากความกว้างที่มี
ตัวอย่างต่อไปนี้สร้างบล็อกข้อความแคบที่มีภาษาจีนและลาติน ตั้งค่าตัวเลือกการตัดบรรทัดทั้งสองอย่างชัดเจนและบันทึกเป็น “line_breaking.pptx” เพื่อทดลองใช้กฎใดกฎหนึ่งให้เปลี่ยนค่าที่สอดคล้องกันขณะที่ค่าที่เหลือคงที่ ตัวอย่างใช้ Arial ขนาด 24 จุดและ SimSun พร้อมความกว้างเฟรม 160 จุดและระยะขอบแนวนอนของ TextFrame เป็นศูนย์ TextFrameFormat.setAutofitType ถูกตั้งค่าเป็น TextAutofitType.None เพื่อให้ขนาดข้อความและมิติของเฟรมคงที่:
const aspose = { slides: require("aspose.slides.via.java") };
const java = require("java");

const presentation = new aspose.slides.Presentation();
try {
    const slide = presentation.getSlides().get_Item(0);

    const shape = slide.getShapes().addAutoShape(aspose.slides.ShapeType.Rectangle, 50, 50, 160, 300);
    shape.getFillFormat().setFillType(java.newByte(aspose.slides.FillType.NoFill));

    const textFrame = shape.getTextFrame();
    textFrame.getTextFrameFormat().setWrapText(java.newByte(aspose.slides.NullableBool.True));
    textFrame.getTextFrameFormat().setAutofitType(java.newByte(aspose.slides.TextAutofitType.None));
    textFrame.getTextFrameFormat().setMarginLeft(0);
    textFrame.getTextFrameFormat().setMarginRight(0);

    const paragraph = textFrame.getParagraphs().get_Item(0);
    paragraph.setText("中文排版测试,PowerPoint 中文演示。");

    const format = paragraph.getParagraphFormat();
    format.setAlignment(aspose.slides.TextAlignment.Left);
    format.getDefaultPortionFormat().setFontHeight(24);
    const latinFont = new aspose.slides.FontData("Arial");
    format.getDefaultPortionFormat().setLatinFont(latinFont);
    const eastAsianFont = new aspose.slides.FontData("SimSun");
    format.getDefaultPortionFormat().setEastAsianFont(eastAsianFont);
    format.getDefaultPortionFormat().getFillFormat().setFillType(java.newByte(aspose.slides.FillType.Solid));
    const textColor = java.getStaticFieldValue("java.awt.Color", "BLACK");
    format.getDefaultPortionFormat().getFillFormat().getSolidFillColor().setColor(textColor);
    format.setLatinLineBreak(java.newByte(aspose.slides.NullableBool.False));
    format.setEastAsianLineBreak(java.newByte(aspose.slides.NullableBool.True));

    presentation.save("line_breaking.pptx", aspose.slides.SaveFormat.Pptx);
} finally {
    presentation.dispose();
}
ควบคุมการใช้เครื่องหมายวรรคตอนแบบ Hanging
ParagraphFormat.setHangingPunctuation อนุญาตให้เครื่องหมายวรรคตอนที่มีคุณสมบัติเหมาะสมขยายออกไปเหนือขอบขวาของบรรทัดข้อความแทนที่จะใช้บรรทัดถัดไป มันใช้กับย่อหน้าทั้งหมดและแตกต่างจากการทำ Hanging Indent
ตัวอย่างต่อไปนี้เปิดใช้ Hanging Punctuation ในเฟรมข้อความกว้าง 100 พอยท์และบันทึกเป็น “hanging_punctuation.pptx” ด้วย Arial ขนาด 24 จุดและระยะขอบแนวนอนเป็นศูนย์ จุดจุดสุดท้ายจะอยู่หลังคำว่า “sentence” และขยายออกเหนือขอบขวาของข้อความ ตั้งค่าคุณสมบัตินี้เป็น NullableBool.False เพื่อเปรียบเทียบ: ในการตั้งค่านี้ จุดจุดสุดท้ายจะอยู่ในบรรทัดแยกกัน การตัดบรรทัดเปิดใช้งานและ Autofit ปิดเพื่อให้ความกว้างที่ใช้คงที่:
const aspose = { slides: require("aspose.slides.via.java") };
const java = require("java");

const presentation = new aspose.slides.Presentation();
try {
    const slide = presentation.getSlides().get_Item(0);

    const shape = slide.getShapes().addAutoShape(aspose.slides.ShapeType.Rectangle, 50, 50, 100, 200);
    shape.getFillFormat().setFillType(java.newByte(aspose.slides.FillType.NoFill));

    const textFrame = shape.getTextFrame();
    textFrame.getTextFrameFormat().setWrapText(java.newByte(aspose.slides.NullableBool.True));
    textFrame.getTextFrameFormat().setAutofitType(java.newByte(aspose.slides.TextAutofitType.None));
    textFrame.getTextFrameFormat().setMarginLeft(0);
    textFrame.getTextFrameFormat().setMarginRight(0);

    const paragraph = textFrame.getParagraphs().get_Item(0);
    paragraph.setText("Simple text, next sentence.");

    const format = paragraph.getParagraphFormat();
    format.setAlignment(aspose.slides.TextAlignment.Left);
    format.getDefaultPortionFormat().setFontHeight(24);
    const latinFont = new aspose.slides.FontData("Arial");
    format.getDefaultPortionFormat().setLatinFont(latinFont);
    format.getDefaultPortionFormat().getFillFormat().setFillType(java.newByte(aspose.slides.FillType.Solid));
    const textColor = java.getStaticFieldValue("java.awt.Color", "BLACK");
    format.getDefaultPortionFormat().getFillFormat().getSolidFillColor().setColor(textColor);
    format.setHangingPunctuation(java.newByte(aspose.slides.NullableBool.True));

    presentation.save("hanging_punctuation.pptx", aspose.slides.SaveFormat.Pptx);
} finally {
    presentation.dispose();
}
ไม่ใช่เครื่องหมายวรรคตอนทุกตัวจะสามารถ Hanging ได้ ผลลัพธ์ที่มองเห็นได้ขึ้นอยู่กับการใช้ฟอนต์และการจัดวาง: การเปลี่ยนฟอนต์ ความกว้างที่ใช้ ระยะขอบ หรือการตั้งค่า Autofit อาจทำให้ความแตกต่างที่มองเห็นหายไป
ตั้งค่า Autofit Type สำหรับ TextFrame
TextFrameFormat.setAutofitType กำหนดว่าข้อความจะทำอย่างไรเมื่อมีขนาดเกินขอบเขตของคอนเทนเนอร์ ใช้เพื่อควบคุมว่าข้อความจะหด, ล้นออก, หรือปรับขนาดรูปร่างโดยอัตโนมัติ ตัวอย่างต่อไปนี้ตั้งค่าให้รูปร่างปรับขนาดให้พอดีกับข้อความและบันทึกผลลัพธ์เป็น “autofit_type.pptx”
const aspose = { slides: require("aspose.slides.via.java") };
const java = require("java");

const presentation = new aspose.slides.Presentation("sample.pptx");
try {
    const slide = presentation.getSlides().get_Item(0);

    const autoShape = slide.getShapes().get_Item(0);
    autoShape.getTextFrame().getTextFrameFormat().setAutofitType(java.newByte(aspose.slides.TextAutofitType.Shape));

    presentation.save("autofit_type.pptx", aspose.slides.SaveFormat.Pptx);
} finally {
    presentation.dispose();
}
หากต้องการนับบรรทัดหลังการตัดบรรทัดอัตโนมัติและดูว่าขนาดข้อความหรือความกว้างของรูปร่างเปลี่ยนแปลงผลลัพธ์อย่างไร ให้ดูที่ Count Rendered Lines จำนวนบรรทัดอย่างเดียวไม่ได้บ่งบอกว่าข้อความล้นคอนเทนเนอร์หรือไม่
ตั้งค่า Anchor ของ TextFrame
TextFrameFormat.setAnchoringType กำหนดว่าข้อความจะวางแนวตั้งอย่างไรภายในรูปร่าง เช่น อยู่ด้านบน กลาง หรือด้านล่าง ตัวอย่างต่อไปนี้ยึดข้อความไว้ที่ด้านล่างของรูปร่างแรกและบันทึกผลลัพธ์เป็น “text_anchor.pptx”
const aspose = { slides: require("aspose.slides.via.java") };
const java = require("java");

const presentation = new aspose.slides.Presentation("sample.pptx");
try {
    const slide = presentation.getSlides().get_Item(0);

    const autoShape = slide.getShapes().get_Item(0);
    autoShape.getTextFrame().getTextFrameFormat().setAnchoringType(java.newByte(aspose.slides.TextAnchorType.Bottom));

    presentation.save("text_anchor.pptx", aspose.slides.SaveFormat.Pptx);
} finally {
    presentation.dispose();
}
ตั้งค่า Tabulation ของข้อความ
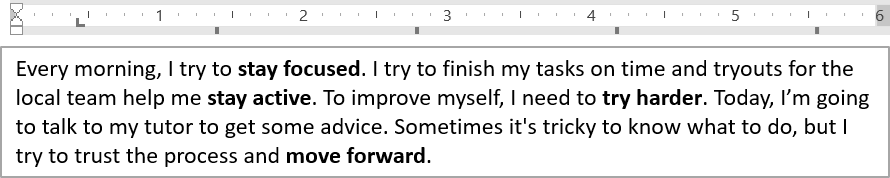
ใช้ ParagraphFormat.setDefaultTabSize และ ParagraphFormat.getTabs เพื่อกำหนดจุดหยุดแท็บในย่อหน้า ตัวอย่างต่อไปนี้ตั้งค่าช่วงแท็บเริ่มต้นเป็น 100 พอยท์และเพิ่มจุดหยุดแท็บแบบชิดซ้ายที่ 30 พอยท์ การตั้งค่าเหล่านี้ส่งผลต่อข้อความที่มีอักขระแท็บ
const aspose = { slides: require("aspose.slides.via.java") };
const java = require("java");

const presentation = new aspose.slides.Presentation("sample.pptx");
try {
    const slide = presentation.getSlides().get_Item(0);

    const autoShape = slide.getShapes().get_Item(0);

    const paragraph = autoShape.getTextFrame().getParagraphs().get_Item(0);
    paragraph.getParagraphFormat().setDefaultTabSize(100);
    paragraph.getParagraphFormat().getTabs().add(30, java.newByte(aspose.slides.TabAlignment.Left));

    presentation.save("paragraph_tabs.pptx", aspose.slides.SaveFormat.Pptx);
} finally {
    presentation.dispose();
}
ผลลัพธ์:
ตั้งค่าภาษา Proofing
Aspose.Slides มี BasePortionFormat.setLanguageId ให้คุณกำหนดภาษาการตรวจสอบการสะกดและไวยากรณ์สำหรับส่วนข้อความ ภาษานี้จะใช้ในการตรวจสอบการสะกดและไวยากรณ์ใน PowerPoint
ตัวอย่างต่อไปนี้ต้องใช้ไฟล์ “presentation.pptx” ที่มีกล่องข้อความเป็นรูปร่างแรกของสไลด์แรกและมีอย่างน้อยหนึ่งย่อหน้า จะเปลี่ยนเนื้อหาของย่อหน้าแรกเป็น “1。” ตั้งค่า SimSun เป็นฟอนต์และกำหนดภาษาการตรวจสอบเป็นภาษาจีนตัวย่อ (zh-CN) จากนั้นบันทึกผลลัพธ์เป็น “proofing_language.pptx”:
const aspose = { slides: require("aspose.slides.via.java") };

const presentation = new aspose.slides.Presentation("presentation.pptx");
try {
    const slide = presentation.getSlides().get_Item(0);

    const autoShape = slide.getShapes().get_Item(0);

    const paragraph = autoShape.getTextFrame().getParagraphs().get_Item(0);
    paragraph.getPortions().clear();

    const font = new aspose.slides.FontData("SimSun");
    const textPortion = new aspose.slides.Portion();
    textPortion.getPortionFormat().setComplexScriptFont(font);
    textPortion.getPortionFormat().setEastAsianFont(font);
    textPortion.getPortionFormat().setLatinFont(font);

    // ตั้งค่า Id ของภาษาตรวจสอบ.
    textPortion.getPortionFormat().setLanguageId("zh-CN");

    textPortion.setText("1。");
    paragraph.getPortions().add(textPortion);

    presentation.save("proofing_language.pptx", aspose.slides.SaveFormat.Pptx);
} finally {
    presentation.dispose();
}
ตั้งค่าภาษาเริ่มต้น
ใช้ LoadOptions.setDefaultTextLanguage เพื่อกำหนดภาษาที่ใช้เป็นค่าเริ่มต้นสำหรับข้อความที่สร้างระหว่างการโหลดหรือการสร้างงานนำเสนอ ตัวอย่างต่อไปนี้สร้างงานนำเสนอที่มีภาษาอังกฤษสหรัฐเป็นภาษาข้อความเริ่มต้น เพิ่มกล่องข้อความและพิมพ์ en-US สำหรับส่วนข้อความแรก:
const aspose = { slides: require("aspose.slides.via.java") };

const loadOptions = new aspose.slides.LoadOptions();
loadOptions.setDefaultTextLanguage("en-US");

const presentation = new aspose.slides.Presentation(loadOptions);
try {
    const slide = presentation.getSlides().get_Item(0);

    // เพิ่มรูปสี่เหลี่ยมผืนผ้าใหม่พร้อมข้อความ.
    const shape = slide.getShapes().addAutoShape(aspose.slides.ShapeType.Rectangle, 20, 20, 150, 50);
    shape.getTextFrame().setText("Sample text");

    // ตรวจสอบภาษาของส่วนข้อความแรก.
    const portion = shape.getTextFrame().getParagraphs().get_Item(0).getPortions().get_Item(0);
    console.log(portion.getPortionFormat().getLanguageId());
} finally {
    presentation.dispose();
}
ตั้งค่า Default Text Style
เพื่อใช้การฟอร์แมตข้อความเริ่มต้นในระดับงานนำเสนอ ใช้ Presentation.getDefaultTextStyle
ตัวอย่างต่อไปนี้ตั้งค่าแบบอักษรหนาขนาด 14 จุดเป็นค่าเริ่มต้นสำหรับย่อหน้าในระดับบนของงานนำเสนอใหม่และบันทึกเป็น “default_text_style.pptx” ข้อความสามารถสืบทอดค่าเริ่มต้นเหล่านี้ได้ เว้นแต่การฟอร์แมตที่เจาะจงจะทับซ้อน
const aspose = { slides: require("aspose.slides.via.java") };
const java = require("java");

const presentation = new aspose.slides.Presentation();
try {
    // รับฟอร์แมตย่อหน้าระดับบน.
    const paragraphFormat = presentation.getDefaultTextStyle().getLevel(0);

    if (paragraphFormat !== null) {
        paragraphFormat.getDefaultPortionFormat().setFontHeight(14);
        paragraphFormat.getDefaultPortionFormat().setFontBold(java.newByte(aspose.slides.NullableBool.True));
    }

    presentation.save("default_text_style.pptx", aspose.slides.SaveFormat.Pptx);
} finally {
    presentation.dispose();
}
ดึงข้อความที่มีเอฟเฟกต์ All-Caps
ใน PowerPoint การใช้เอฟเฟกต์ฟอนต์ All Caps ทำให้ข้อความแสดงเป็นตัวพิมพ์ใหญ่บนสไลด์ แม้ว่าจะพิมพ์เป็นตัวพิมพ์เล็กก็ตาม เมื่อดึงส่วนข้อความดังกล่าวด้วย Aspose.Slides ไลบรารีจะคืนค่าข้อความตามที่ใส่ไว้ เพื่อตรงกับข้อความที่แสดง ให้ตรวจสอบ TextCapType แล้วแปลงสตริงที่คืนค่ามาเป็นตัวพิมพ์ใหญ่เมื่อค่าเป็น All
ตัวอย่างนี้ต้องใช้ไฟล์ “sample2.pptx” ที่มีกล่องข้อความเป็นรูปร่างแรกของสไลด์แรก ส่วนแรกของย่อหน้าแรกมีข้อความ “Hello, Aspose!” พร้อมเอฟเฟกต์ All Caps ดังที่แสดงด้านล่าง

โค้ดต่อไปนี้แสดงวิธีดึงข้อความพร้อมเอฟเฟกต์ All Caps:
const aspose = { slides: require("aspose.slides.via.java") };

const presentation = new aspose.slides.Presentation("sample2.pptx");
try {
    const slide = presentation.getSlides().get_Item(0);

    const autoShape = slide.getShapes().get_Item(0);
    const textPortion = autoShape.getTextFrame().getParagraphs().get_Item(0).getPortions().get_Item(0);

    console.log("Original text: " + textPortion.getText());

    const textFormat = textPortion.getPortionFormat().getEffective();
    if (textFormat.getTextCapType() === aspose.slides.TextCapType.All) {
        const text = textPortion.getText().toUpperCase();
        console.log("All-Caps effect: " + text);
    }
} finally {
    presentation.dispose();
}
ผลลัพธ์:
Original text: Hello, Aspose!
All-Caps effect: HELLO, ASPOSE!
FAQ
ฉันจะแก้ไขข้อความในตารางบนสไลด์อย่างไร?
เพื่อแก้ไขข้อความในตารางบนสไลด์ ให้ใช้ Table. วนลูปผ่านเซลล์และอัปเดตแต่ละเซลล์ผ่าน Cell.getTextFrame แล้วจัดรูปแบบย่อหน้าผ่าน Paragraph.getParagraphFormat
ฉันจะใส่สีไล่ระดับให้กับข้อความบนสไลด์ PowerPoint อย่างไร?
เพื่อใส่สีไล่ระดับให้กับข้อความ ให้ใช้ BasePortionFormat.getFillFormat. ตั้งค่า FillFormat.setFillType ให้เป็น FillType.Gradient แล้วกำหนดจุดไล่ระดับ, ทิศทาง, และความโปร่งแสง