
นำการเคลื่อนไหวของรูปร่างไปใช้ในงานนำเสนอด้วย Python
ภาพรวม
เพื่อทำงานกับพฤติกรรมแต่ละอย่างภายในเอฟเฟกต์หรือแก้ไขส่วนของ motion‑path ให้ดูที่ การเคลื่อนไหวที่กำหนดเอง.
Aspose.Slides for Python via .NET แสดงการเคลื่อนไหวของสไลด์เป็นเอฟเฟกต์ในไทม์ไลน์ของสไลด์ เอฟเฟกต์หนึ่งมีรูปร่างเป้าหมาย, ประเภทและชนิดย่อยของการเคลื่อนไหว, ตัวกระตุ้น, การตั้งค่าเวลา, และคุณสมบัติเสริมเช่นเสียงหรือพฤติกรรมหลังการเคลื่อนไหว.
ไทม์ไลน์มีลำดับสองประเภท:
- ลำดับหลัก ทำงานเมื่อสไลด์ก้าวหน้า.
- ลำดับโต้ตอบ เริ่มต้นเมื่อรูปทรงตัวกระตุ้นถูกคลิก.
เนื่องจากกล่องข้อความ, รูปภาพ, แผนภูมิ, ตาราง, และวัตถุสไลด์อื่น ๆ มีการใช้งาน IShape, คุณจึงใช้เมธอด Sequence.add_effect เดียวกันสำหรับเนื้อหาสไลด์ส่วนใหญ่ เอฟเฟกต์ที่ใช้ได้จะถูกแสดงใน enumeration EffectType.
เพิ่มการเคลื่อนไหวของรูปร่าง
เพื่อเพิ่มการเคลื่อนไหว, ดึงลำดับหลักของสไลด์และเรียก Sequence.add_effect พร้อมด้วยรูปร่างเป้าหมาย, ประเภทเอฟเฟกต์, ชนิดย่อย, และตัวกระตุ้น. สำหรับเอฟเฟกต์ที่เริ่มเมื่อรูปร่างอื่นถูกคลิก, สร้างลำดับโต้ตอบที่ตัวกระตุ้นคือรูปร่างนั้น.
ตัวอย่างต่อไปนี้สร้างทั้งสองประเภทของการเคลื่อนไหวและบันทึกผลลัพธ์เป็น shape-animations.pptx.
import aspose.slides as slides


with slides.Presentation() as presentation:
    slide = presentation.slides[0]

    target_shape = slide.shapes.add_auto_shape(slides.ShapeType.ROUND_CORNER_RECTANGLE, 120, 100, 320, 80)
    target_shape.text_frame.text = "Click to animate this shape"

    main_sequence = slide.timeline.main_sequence
    entrance_effect = main_sequence.add_effect(target_shape, slides.animation.EffectType.FADE, slides.animation.EffectSubtype.NONE, slides.animation.EffectTriggerType.ON_CLICK)
    entrance_effect.timing.duration = 1.5

    trigger_shape = slide.shapes.add_auto_shape(slides.ShapeType.BEVEL, 20, 20, 100, 40)
    trigger_shape.text_frame.text = "Move"

    interactive_sequence = slide.timeline.interactive_sequences.add(trigger_shape)
    interactive_sequence.add_effect(target_shape, slides.animation.EffectType.PATH_FOOTBALL, slides.animation.EffectSubtype.NONE, slides.animation.EffectTriggerType.ON_CLICK)

    presentation.save("shape-animations.pptx", slides.export.SaveFormat.PPTX)
ตัวกระตุ้นกำหนดว่าเอฟเฟกต์จะเริ่มเมื่อใด:
- EffectTriggerType.ON_CLICK รอคลิกในลำดับหลัก, หรือรอคลิกบนรูปทรงตัวกระตุ้นในลำดับโต้ตอบ.
- EffectTriggerType.WITH_PREVIOUS เริ่มพร้อมกับเอฟเฟกต์ก่อนหน้า.
- EffectTriggerType.AFTER_PREVIOUS เริ่มเมื่อเอฟเฟกต์ก่อนหน้าสิ้นสุด.
เพื่อเคลื่อนไหวรูปภาพ, แผนภูมิ, หรือรูปร่างประเภทอื่น, ให้ส่งอ็อบเจ็กต์นั้นไปยัง Sequence.add_effect แทน target_shape. สำหรับตัวเลือกการจัดกลุ่มเฉพาะแผนภูมิ, ดูที่ Animated Charts.
อ่านการเคลื่อนไหวของรูปร่าง
ใช้ Sequence.get_effects_by_shape เมื่อคุณทราบรูปร่างเป้าหมาย. หากต้องการตรวจสอบทุกเอฟเฟกต์, ทำการวนซ้ำผ่านลำดับหลักและลำดับโต้ตอบทุกลำดับ. การวนซ้ำช่วยหลีกเลี่ยงการสันนิษฐานว่าลำดับมีเอฟเฟกต์ที่ตำแหน่ง 0.
ตัวอย่างต่อไปนี้สร้างรูปร่างพร้อมเอฟเฟกต์ลำดับหลักและโต้ตอบ, ดึงเอฟเฟกต์ที่เป้าหมายคือรูปร่างนั้น, จากนั้นวนซ้ำทุกลำดับบนสไลด์.
import aspose.slides as slides


def print_sequence(label, sequence):
    print(f"  {label}: {sequence.count} effect(s)")

    for effect in sequence:
        target_name = "unknown" if effect.target_shape is None else effect.target_shape.name
        effect_description = f"{effect.type.name} {effect.subtype.name}; target: {target_name}; trigger: {effect.timing.trigger_type.name}"
        print(f"    {effect_description}")


with slides.Presentation() as presentation:
    slide = presentation.slides[0]
    target_shape = slide.shapes.add_auto_shape(slides.ShapeType.RECTANGLE, 120, 100, 320, 80)
    target_shape.text_frame.text = "Animated shape"

    main_sequence = slide.timeline.main_sequence
    main_sequence.add_effect(target_shape, slides.animation.EffectType.FADE, slides.animation.EffectSubtype.NONE, slides.animation.EffectTriggerType.ON_CLICK)

    trigger_shape = slide.shapes.add_auto_shape(slides.ShapeType.BEVEL, 20, 20, 100, 40)
    trigger_shape.text_frame.text = "Move"

    interactive_sequence = slide.timeline.interactive_sequences.add(trigger_shape)
    interactive_sequence.add_effect(target_shape, slides.animation.EffectType.PATH_FOOTBALL, slides.animation.EffectSubtype.NONE, slides.animation.EffectTriggerType.ON_CLICK)

    target_effects = main_sequence.get_effects_by_shape(target_shape)
    print(f"The main sequence contains {len(target_effects)} effect(s) for {target_shape.name}.")

    print_sequence("Main sequence", main_sequence)

    for interactive_index, sequence in enumerate(slide.timeline.interactive_sequences, start=1):
        trigger_name = "unknown" if sequence.trigger_shape is None else sequence.trigger_shape.name
        sequence_label = f"Interactive sequence {interactive_index}, trigger: {trigger_name}"
        print_sequence(sequence_label, sequence)
หากคุณต้องการเอฟเฟกต์สำหรับรูปร่างเดียว, ให้ระบุรูปร่างโดยชื่อ, ประเภท placeholder, หรือคุณสมบัติที่คงที่อื่น; จากนั้นเรียก Sequence.get_effects_by_shape. อย่าสันนิษฐานว่ารูปร่างที่ตำแหน่ง 0 เป็นวัตถุที่ต้องการเสมอ.
ทำงานกับเอฟเฟกต์ของ Placeholder ที่สืบทอด
Placeholder บนสไลด์ปกติสามารถสืบทอดพฤติกรรมการเคลื่อนไหวจาก placeholder ที่สอดคล้องบนสไลด์เลย์เอาต์และสไลด์มาสเตอร์ได้. Shape.get_base_placeholder คืนค่า placeholder พาเรนต์นั้น, หรือ None หากไม่มีพาเรนต์.
ในตัวอย่างการนำเสนอด้านล่าง, ส่วนท้ายมี Random Bars บนสไลด์ปกติ, Split บนสไลด์เลย์เอาต์, และ Fly In บนสไลด์มาสเตอร์.
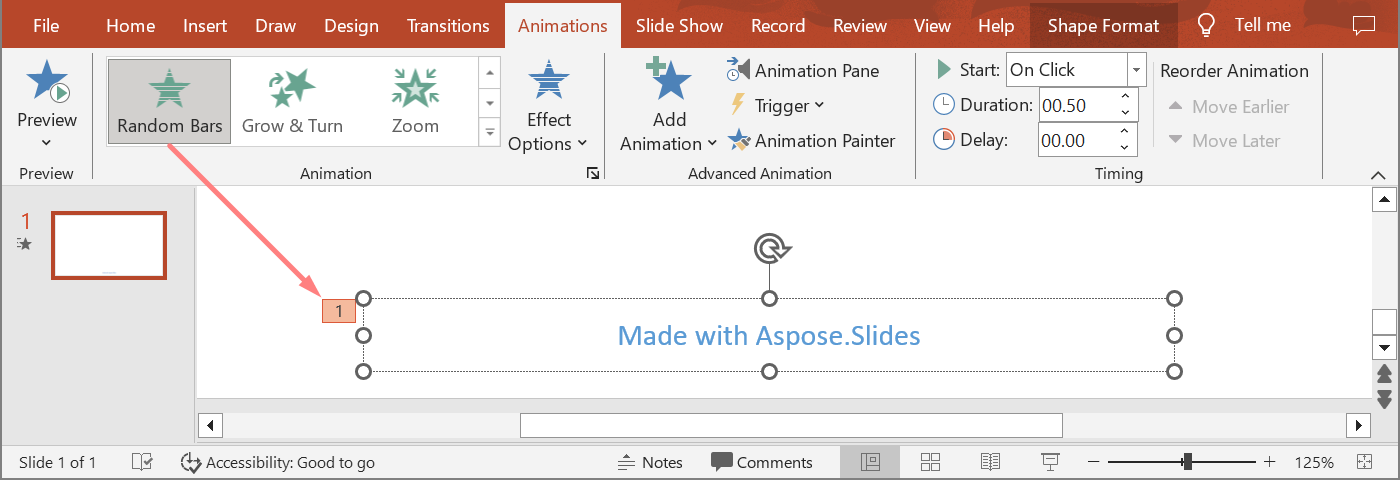
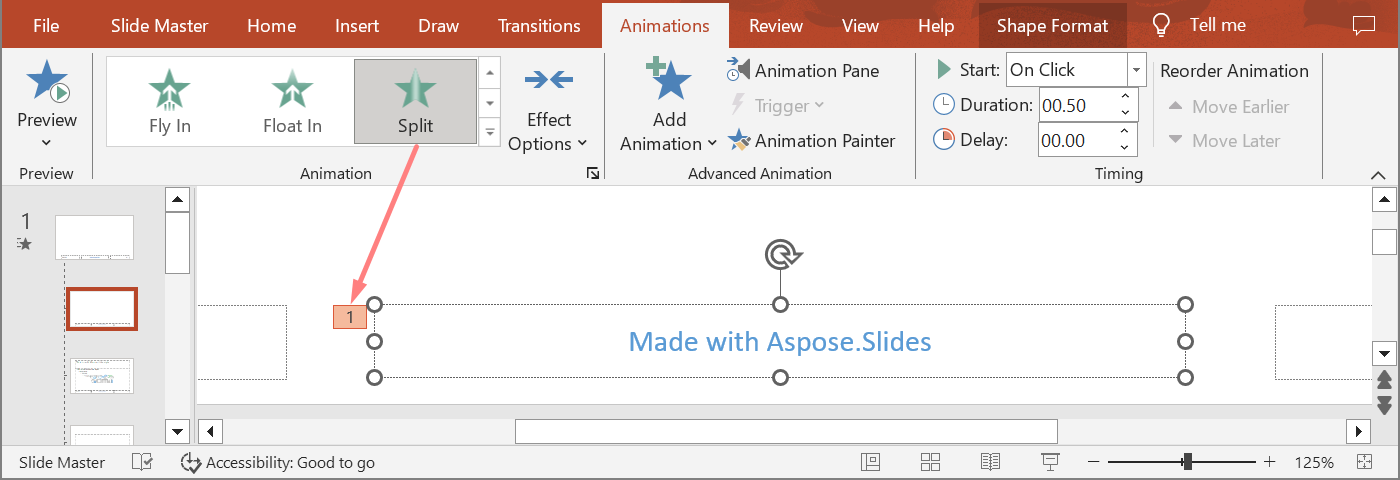
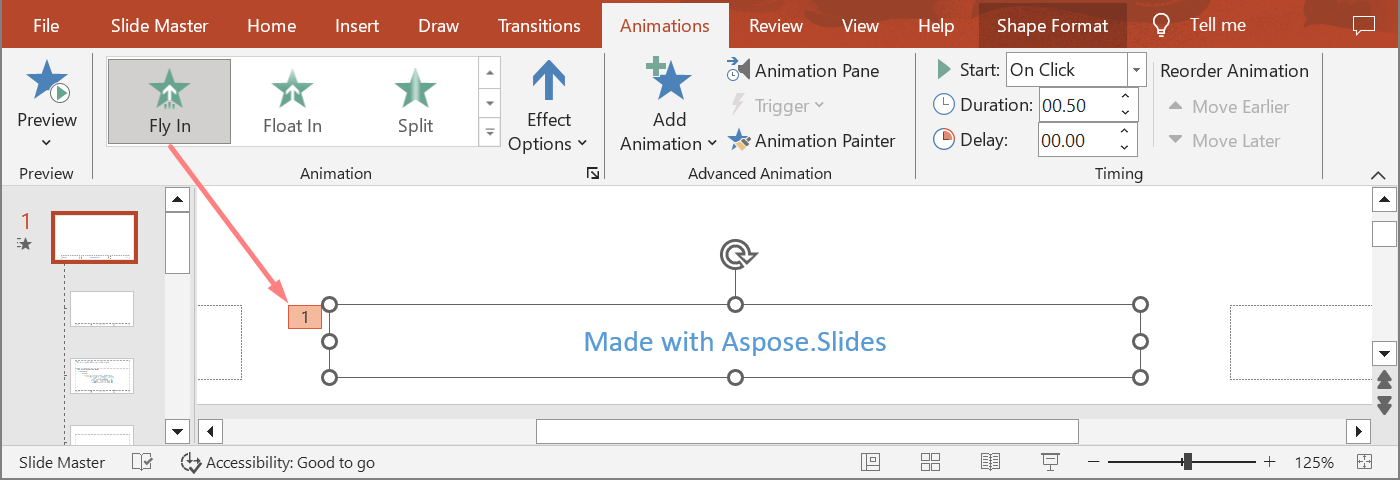
ตัวอย่างต่อไปนี้สร้างลำดับขั้นของ placeholder เอง. จะเพิ่มเอฟเฟกต์ให้กับ placeholder มาสเตอร์, placeholder เลย์เอาต์, และ placeholder ที่สอดคล้องบนสไลด์ปกติ. ทุกครั้งที่เรียก Shape.get_base_placeholder จะตรวจสอบผลลัพธ์ก่อนใช้รูปร่างที่ได้รับ.
import aspose.slides as slides


def find_placeholder_with_base(slide):
    for shape in slide.shapes:
        if shape.get_base_placeholder() is not None:
            return shape

    return None


def print_effects(source, effects):
    print(f"{source}: {len(effects)} effect(s)")

    for effect in effects:
        print(f"  {effect.type.name} {effect.subtype.name}")


with slides.Presentation() as presentation:
    layout_slide = presentation.layout_slides.get_by_type(slides.SlideLayoutType.BLANK)
    layout_placeholder = layout_slide.placeholder_manager.add_text_placeholder(100, 100, 400, 80)
    layout_slide.timeline.main_sequence.add_effect(layout_placeholder, slides.animation.EffectType.SPLIT, slides.animation.EffectSubtype.VERTICAL_IN, slides.animation.EffectTriggerType.ON_CLICK)

    master_placeholder = layout_placeholder.get_base_placeholder()
    if master_placeholder is not None:
        master_sequence = layout_slide.master_slide.timeline.main_sequence
        master_sequence.add_effect(master_placeholder, slides.animation.EffectType.FLY, slides.animation.EffectSubtype.BOTTOM, slides.animation.EffectTriggerType.ON_CLICK)

    slide = presentation.slides.add_empty_slide(layout_slide)
    slide_placeholder = find_placeholder_with_base(slide)

    if slide_placeholder is None:
        raise RuntimeError("The slide does not contain a placeholder linked to its layout slide.")

    slide.timeline.main_sequence.add_effect(slide_placeholder, slides.animation.EffectType.RANDOM_BARS, slides.animation.EffectSubtype.HORIZONTAL, slides.animation.EffectTriggerType.ON_CLICK)
    print_effects("Normal slide", slide.timeline.main_sequence.get_effects_by_shape(slide_placeholder))

    base_layout_placeholder = slide_placeholder.get_base_placeholder()
    if base_layout_placeholder is not None:
        print_effects("Layout slide", layout_slide.timeline.main_sequence.get_effects_by_shape(base_layout_placeholder))

        base_master_placeholder = base_layout_placeholder.get_base_placeholder()
        if base_master_placeholder is not None:
            print_effects("Master slide", layout_slide.master_slide.timeline.main_sequence.get_effects_by_shape(base_master_placeholder))

    presentation.save("placeholder-animations.pptx", slides.export.SaveFormat.PPTX)
เปลี่ยนการตั้งค่าเวลาในการเคลื่อนไหว
Dialog Timing ของ PowerPoint เชื่อมกับคุณสมบัติของ Timing.
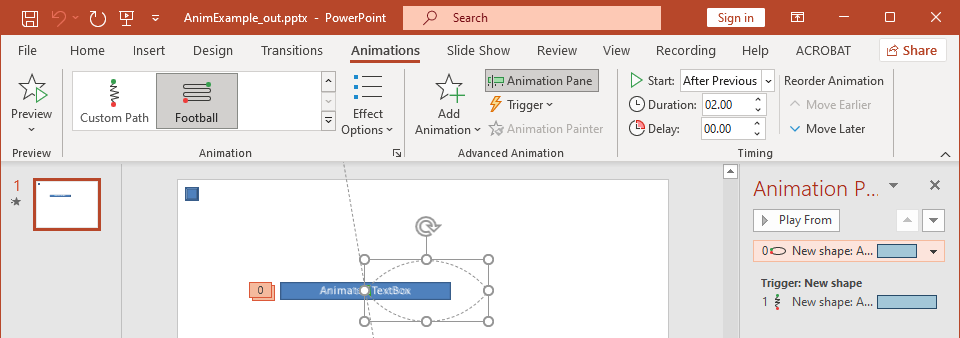
- Start เชื่อมกับ Timing.trigger_type.
- Duration เชื่อมกับ Timing.duration, หน่วยเป็นวินาที.
- Delay เชื่อมกับ Timing.trigger_delay_time, หน่วยเป็นวินาที.
- Repeat เชื่อมกับ Timing.repeat_count, Timing.repeat_until_next_click, หรือ Timing.repeat_until_end_slide.
- Rewind when done playing เชื่อมกับ Timing.rewind.
ตัวอย่างอิสระนี้เพิ่มเอฟเฟกต์, เปลี่ยนการตั้งค่าเวลาผ่านออบเจ็กต์ที่คืนจาก Sequence.add_effect, และบันทึกผลลัพธ์. การเก็บอ้างอิง Effect ที่คืนมาช่วยหลีกเลี่ยงการดึงดัชนีคอลเลกชันที่ไม่จำเป็น.
import aspose.slides as slides


with slides.Presentation() as presentation:
    slide = presentation.slides[0]
    shape = slide.shapes.add_auto_shape(slides.ShapeType.RECTANGLE, 120, 100, 320, 80)
    shape.text_frame.text = "Timed animation"

    effect = slide.timeline.main_sequence.add_effect(shape, slides.animation.EffectType.FADE, slides.animation.EffectSubtype.NONE, slides.animation.EffectTriggerType.ON_CLICK)
    effect.timing.trigger_type = slides.animation.EffectTriggerType.ON_CLICK
    effect.timing.duration = 2.0
    effect.timing.trigger_delay_time = 0.5
    effect.timing.repeat_until_next_click = False
    effect.timing.repeat_until_end_slide = False
    effect.timing.repeat_count = 2.0
    effect.timing.rewind = True

    presentation.save("shape-animation-timing.pptx", slides.export.SaveFormat.PPTX)
ใช้โหมดการทำซ้ำแบบเดียวโดยตั้งใจ. การผสมจำนวนครั้งกับแฟlags “until” อาจทำให้ผลลัพธ์สับสนในโปรแกรมดูต่าง ๆ. เมื่อตั้งค่าโหมดทำซ้ำ, ให้ตั้งค่า Timing.repeat_until_next_click และ Timing.repeat_until_end_slide ก่อน Timing.repeat_count, เนื่องจากการตั้งค่าแฟlags ใด ๆ จะเปลี่ยนโหมดทำซ้ำที่เปิดใช้งานด้วย.
เพิ่มและสกัดเสียงการเคลื่อนไหว
เอฟเฟกต์การเคลื่อนไหวสามารถอ้างอิงไฟล์เสียงฝังโดยใช้ Effect.sound. Effect.stop_previous_sound สั่งให้เอฟเฟกต์หยุดเสียงที่เริ่มโดยเอฟเฟกต์ก่อนหน้า.
เพิ่มเสียงให้กับเอฟเฟกต์
ตัวอย่างต่อไปนี้คาดว่าจะมีไฟล์เสียงโลคัลชื่อ animation-sound.wav. จะสร้างสองเอฟเฟกต์, ฝังไฟล์นั้นเป็นเสียงของเอฟเฟกต์แรก, และกำหนดให้เอฟเฟกต์ที่สองหยุดเสียง. ใช้ออบเจ็กต์ที่คืนจาก Sequence.add_effect, ดังนั้นไม่ต้องระบุดัชนีลำดับ.
import aspose.slides as slides


with slides.Presentation() as presentation:
    slide = presentation.slides[0]
    first_shape = slide.shapes.add_auto_shape(slides.ShapeType.RECTANGLE, 80, 100, 240, 80)
    second_shape = slide.shapes.add_auto_shape(slides.ShapeType.RECTANGLE, 400, 100, 240, 80)
    first_shape.text_frame.text = "Starts sound"
    second_shape.text_frame.text = "Stops sound"

    sequence = slide.timeline.main_sequence
    first_effect = sequence.add_effect(first_shape, slides.animation.EffectType.FADE, slides.animation.EffectSubtype.NONE, slides.animation.EffectTriggerType.ON_CLICK)
    second_effect = sequence.add_effect(second_shape, slides.animation.EffectType.FADE, slides.animation.EffectSubtype.NONE, slides.animation.EffectTriggerType.ON_CLICK)

    with open("animation-sound.wav", "rb") as audio_file:
        effect_sound = presentation.audios.add_audio(audio_file.read())

    first_effect.sound = effect_sound
    second_effect.stop_previous_sound = True

    presentation.save("shape-animation-sound.pptx", slides.export.SaveFormat.PPTX)
สกัดเสียงเอฟเฟกต์ที่ฝังไว้
ตัวอย่างต่อไปนี้คาดว่าจะมีไฟล์งานนำเสนอโลคัลชื่อ presentation-with-animation-sounds.pptx. จะสแกนลำดับหลักและลำดับโต้ตอบและบันทึกเสียงเอฟเฟกต์ที่ฝังไว้ทั้งหมดไปยังโฟลเดอร์ extracted-animation-sounds. ส่วนขยายไฟล์จะถูกเลือกจาก MIME type ของเสียงที่เปิดเผยโดย Audio.content_type.
import os

import aspose.slides as slides


def get_audio_extension(content_type):
    normalized_type = "" if content_type is None else content_type.lower()

    if normalized_type == "audio/mpeg":
        return ".mp3"
    if normalized_type == "audio/mp4":
        return ".m4a"
    if normalized_type == "audio/ogg":
        return ".ogg"
    if normalized_type in ("audio/wav", "audio/x-wav"):
        return ".wav"

    return ".bin"


def save_sounds(sequence, output_directory, sound_index):
    for effect in sequence:
        if effect.sound is None:
            continue

        extension = get_audio_extension(effect.sound.content_type)
        output_path = os.path.join(output_directory, f"effect-sound-{sound_index}{extension}")
        with open(output_path, "wb") as output_file:
            output_file.write(bytes(effect.sound.binary_data))
        sound_index += 1

    return sound_index


input_path = "presentation-with-animation-sounds.pptx"
output_directory = "extracted-animation-sounds"

os.makedirs(output_directory, exist_ok=True)

with slides.Presentation(input_path) as presentation:
    sound_index = 1

    for slide in presentation.slides:
        sound_index = save_sounds(slide.timeline.main_sequence, output_directory, sound_index)

        for sequence in slide.timeline.interactive_sequences:
            sound_index = save_sounds(sequence, output_directory, sound_index)

print(f"Extracted {sound_index - 1} sound file(s) to {os.path.abspath(output_directory)}.")
สำหรับอ็อบเจ็กต์เสียงขนาดใหญ่, ควรใช้ Audio.get_stream แล้วคัดลอกสตรีมไปยังไฟล์แทนการโหลดอ็อบเจ็กต์ทั้งหมดเข้าสู่ byte array.
ตั้งค่าพฤติกรรมหลังการเคลื่อนไหว
ตัวเลือก After animation ควบคุมว่าอะไรจะเกิดขึ้นกับรูปร่างหลังจากเอฟเฟกต์เสร็จสิ้น.
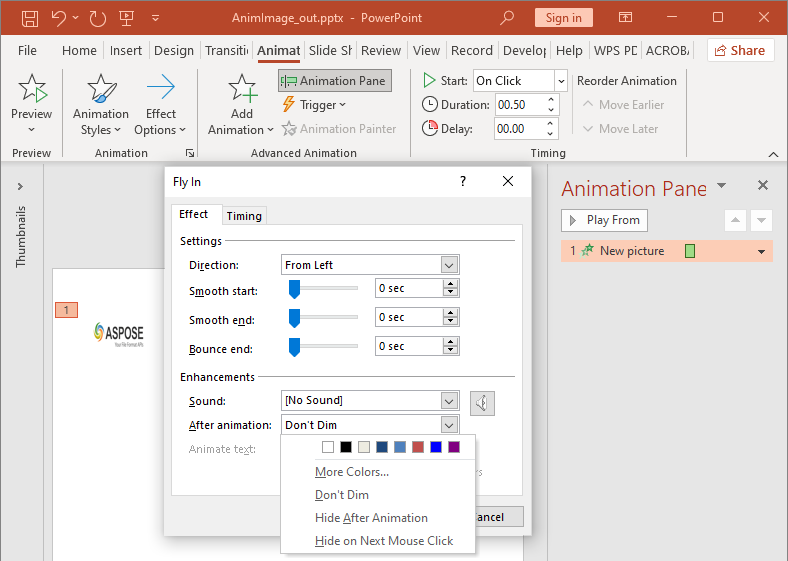
enumeration AfterAnimationType รองรับการเว้นรูปร่างไว้โดยไม่เปลี่ยนแปลง, การเปลี่ยนสี, การซ่อนหลังการเคลื่อนไหว, หรือการซ่อนเมื่อคลิกครั้งถัดไป. เมื่อประเภทเป็น AfterAnimationType.COLOR, ให้ตั้งค่า Effect.after_animation_color ด้วย.
ตัวอย่างอิสระนี้สร้างเอฟเฟกต์, ตั้งค่าพฤติกรรมหลังการเคลื่อนไหวผ่านอ็อบเจ็กต์เอฟเฟกต์ที่คืนมา, และบันทึกผลลัพธ์.
import aspose.pydrawing as draw
import aspose.slides as slides


with slides.Presentation() as presentation:
    slide = presentation.slides[0]
    shape = slide.shapes.add_auto_shape(slides.ShapeType.RECTANGLE, 120, 100, 320, 80)
    shape.text_frame.text = "Dim after animation"

    effect = slide.timeline.main_sequence.add_effect(shape, slides.animation.EffectType.FADE, slides.animation.EffectSubtype.NONE, slides.animation.EffectTriggerType.ON_CLICK)
    effect.after_animation_type = slides.animation.AfterAnimationType.COLOR
    effect.after_animation_color.color = draw.Color.light_gray

    presentation.save("shape-animation-after-effect.pptx", slides.export.SaveFormat.PPTX)
การเปลี่ยนประเภทออกจาก AfterAnimationType.COLOR จะลบการตั้งค่าสีหลังการเคลื่อนไหว.
เคลื่อนไหวข้อความ
การเคลื่อนไหวข้อความมีการควบคุมสองส่วนที่เกี่ยวข้อง:
- TextAnimation.build_type ควบคุมว่าข้อความย่อหน้าจะปรากฏพร้อมกันหรือเป็นระดับย่อหน้า.
- Effect.animate_text_type ควบคุมว่าข้อความจะแสดงทั้งหมดพร้อมกัน, ทีละคำ, หรือทีละตัวอักษร. Effect.delay_between_text_parts ตั้งค่าการหน่วงเวลาระหว่างคำหรืออักษร. ค่าบวกคือเปอร์เซ็นต์ของระยะเวลาเอฟเฟกต์; ค่าลบคือการหน่วงเวลาเป็นวินาที.
ตัวอย่างอิสระต่อไปนี้เคลื่อนไหวคำในกล่องข้อความ. BuildType.AS_ONE_OBJECT ปิดการสร้างทีละย่อหน้าเพื่อให้การตั้งค่าคำใช้กับกรอบข้อความทั้งหมด.
import aspose.slides as slides


with slides.Presentation() as presentation:
    slide = presentation.slides[0]
    text_box = slide.shapes.add_auto_shape(slides.ShapeType.RECTANGLE, 80, 80, 560, 100)
    text_box.text_frame.text = "Aspose.Slides animates this sentence word by word."

    effect = slide.timeline.main_sequence.add_effect(text_box, slides.animation.EffectType.FADE, slides.animation.EffectSubtype.NONE, slides.animation.EffectTriggerType.ON_CLICK)
    effect.text_animation.build_type = slides.animation.BuildType.AS_ONE_OBJECT
    effect.animate_text_type = slides.animation.AnimateTextType.BY_WORD
    effect.delay_between_text_parts = 20.0

    presentation.save("animated-text.pptx", slides.export.SaveFormat.PPTX)
เพื่อสร้างกล่องข้อความโดยย่อหน้า, ตั้งค่า BuildType.BY_LEVEL_PARAGRAPHS1 (หรือระดับย่อหน้าอื่น). เพื่อกำหนดเอฟเฟกต์ให้กับย่อหน้าเดียวที่มีเอฟเฟกต์ของตนเอง, ใช้การ overload ของ Sequence.add_effect ที่รับ IParagraph. ดู Animated Text สำหรับตัวอย่างระดับย่อหน้า.
หมายเหตุการส่งออกและความเข้ากันได้
- การบันทึกเป็น PPT หรือ PPTX จะคงโมเดลการเคลื่อนไหวไว้, แต่การเล่นขั้นสุดท้ายถูกควบคุมโดยโปรแกรมดูงานนำเสนอ.
- PDF และภาพคงที่จะไม่เล่นการเคลื่อนไหว. ใช้ HTML5 export, GIF เคลื่อนไหว, หรือ video conversion เมื่อผลลัพธ์ต้องแสดงการเคลื่อนไหว.
- สำหรับ HTML5, เปิดใช้ Html5Options.animate_shapes และเมื่อต้องการ, Html5Options.animate_transitions.
- การเรนเดอร์วิดีโอรองรับเอฟเฟกต์การเข้ามา, เน้น, ออกจาก, และ motion‑path ที่พบบ่อยหลายประเภท, แต่ไม่รองรับทุกเอฟเฟกต์ของ PowerPoint. ตรวจสอบ supported animations and effects ปัจจุบันและทดสอบงานนำเสนอที่สำคัญกับเวอร์ชัน Aspose.Slides ที่คุณใช้.
- เอฟเฟกต์ที่กำหนดเองขั้นสูงและเอฟเฟกต์ที่นำเข้าจากรูปแบบงานนำเสนออื่นอาจถูกเก็บไว้ในไฟล์แต่แสดงผลต่างกันใน PowerPoint, HTML5, หรือวิดีโอ. ตรวจสอบผลลัพธ์ที่ส่งออกแทนการพึ่งพาชื่อเอฟเฟกต์อย่างเดียว.
คำถามที่พบบ่อย
ทำไมการเคลื่อนไหวจึงแสดงใน PowerPoint แต่ไม่แสดงใน PDF?
PDF เป็นรูปแบบคงที่, ดังนั้นการเคลื่อนไหวและการเปลี่ยนสไลด์ไม่ทำงาน. ให้ส่งออกเป็น HTML5, GIF เคลื่อนไหว, หรือวิดีโอเมื่อจำเป็นต้องคงการเคลื่อนไหว.
ทำไมเอฟเฟกต์จึงเล่นแตกต่างกันในวิดีโอ?
การส่งออกวิดีโอจะเรนเดอร์การเคลื่อนไหวแทนการเก็บพฤติกรรมเดิมของ PowerPoint. เอฟเฟกต์ขั้นสูงบางอย่างอาจไม่รองรับหรือถูกประมาณค่า. ตรวจสอบตารางเอฟเฟกต์ที่สนับสนุนและทดสอบงานนำเสนอจริงก่อนใช้งานจริง.
การย้ายรูปร่างไปข้างหน้าหรือข้างหลังเปลี่ยนลำดับการเคลื่อนไหวหรือไม่?
ไม่. การจัดลำดับ z‑order ของรูปร่างควบคุมการทับกัน, ส่วนลำดับในไทม์ไลน์และตัวกระตุ้นควบคุมการเล่นการเคลื่อนไหว. ให้เปลี่ยนไทม์ไลน์หากต้องการลำดับการเล่นที่แตกต่าง.