
จัดรูปแบบรูปร่าง PowerPoint ใน Python
บทนำ
ใน PowerPoint คุณสามารถเพิ่มรูปทรงลงในสไลด์ได้ เนื่องจากรูปทรงประกอบด้วยเส้น คุณสามารถจัดรูปแบบโดยการแก้ไขหรือใช้เอฟเฟกต์กับเส้นขอบของมัน นอกจากนี้คุณยังสามารถจัดรูปแบบรูปทรงโดยระบุการตั้งค่าที่ควบคุมการเติมสีภายในของรูปทรง
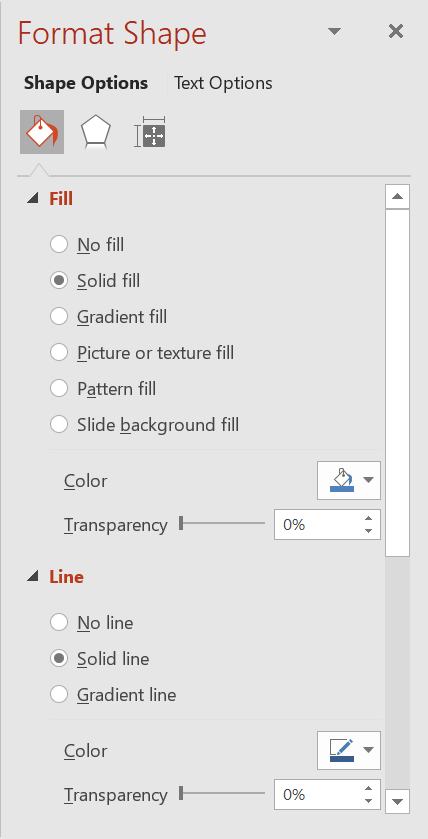
Aspose.Slides for Python มีคลาสและคุณสมบัติที่ช่วยให้คุณจัดรูปแบบรูปทรงโดยใช้ตัวเลือกเดียวกับที่มีใน PowerPoint.
จัดรูปแบบเส้น
โดยใช้ Aspose.Slides คุณสามารถระบุรูปแบบเส้นที่กำหนดเองสำหรับรูปทรง ขั้นตอนต่อไปนี้สรุปขั้นตอนการทำ:
- สร้างอินสแตนซ์ของคลาส Presentation.
- รับการอ้างอิงถึงสไลด์ตามดัชนีของมัน.
- เพิ่ม AutoShape ลงในสไลด์.
- ตั้งค่า line style ของรูปทรง.
- ตั้งค่าความกว้างของเส้น.
- ตั้งค่า dash style ของรูปทรง.
- ตั้งค่าสีเส้นสำหรับรูปทรง.
- บันทึกงานนำเสนอที่แก้ไขแล้วเป็นไฟล์ PPTX.
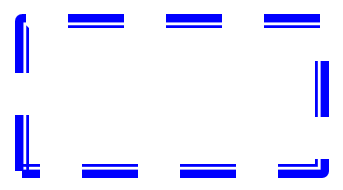
โค้ด Python ต่อไปนี้แสดงวิธีการจัดรูปแบบ AutoShape แบบสี่เหลี่ยมผืนผ้า:
import aspose.slides as slides
import aspose.pydrawing as draw

# สร้างอินสแตนซ์ของคลาส Presentation ที่เป็นตัวแทนไฟล์การนำเสนอ.
with slides.Presentation() as presentation:

    # ดึงสไลด์แรก.
    slide = presentation.slides[0]

    # เพิ่ม AutoShape ประเภท Rectangle.
    shape = slide.shapes.add_auto_shape(slides.ShapeType.RECTANGLE, 50, 150, 150, 75)

    # ลบการเติมจากรูปทรงสี่เหลี่ยมผืนผ้าเพื่อให้เห็นเฉพาะเส้นเท่านั้น.
    shape.fill_format.fill_type = slides.FillType.NO_FILL

    # ใช้การจัดรูปแบบกับเส้นของสี่เหลี่ยมผืนผ้า.
    shape.line_format.style = slides.LineStyle.THICK_THIN
    shape.line_format.width = 7
    shape.line_format.dash_style = slides.LineDashStyle.DASH

    # ตั้งค่าสีสำหรับเส้นของสี่เหลี่ยมผืนผ้า.
    shape.line_format.fill_format.fill_type = slides.FillType.SOLID
    shape.line_format.fill_format.solid_fill_color.color = draw.Color.blue

    # บันทึกไฟล์ PPTX ไปยังดิสก์.
    presentation.save("formatted_lines.pptx", slides.export.SaveFormat.PPTX)
ผลลัพธ์:
ใช้เอฟเฟกต์สเก็ตช์กับเส้นรูปทรง
เอฟเฟกต์สเก็ตช์ทำให้เส้นของรูปทรงดูเหมือนวาดด้วยมือ ใช้ Shape.line_format เพื่อเข้าถึงการตั้งค่าเส้น, LineFormat.sketch_format เพื่อเข้าถึงการตั้งค่าสเก็ตช์, และ SketchFormat.sketch_type เพื่อเลือกค่าจาก enumeration ของ LineSketchType.
โค้ด Python ต่อไปนี้แสดงวิธีการใช้เอฟเฟกต์ LineSketchType.CURVED , อ่านค่าที่กำหนดโดยตรง, และลบเอฟเฟกต์ด้วย LineSketchType.NONE:
import aspose.slides as slides

with slides.Presentation() as presentation:
    slide = presentation.slides[0]
    shape = slide.shapes.add_auto_shape(slides.ShapeType.RECTANGLE, 50, 50, 200, 100)

    # เข้าถึงรูปแบบเส้นของรูปทรงและรูปแบบสเก็ตช์ของมัน.
    sketch_format = shape.line_format.sketch_format

    # ใช้เอฟเฟ็กต์สเก็ตช์.
    sketch_format.sketch_type = slides.LineSketchType.CURVED

    # อ่านเอฟเฟ็กต์สเก็ตช์ที่กำหนดโดยตรงให้กับรูปทรง.
    explicit_sketch_type = sketch_format.sketch_type
    print(f"Explicit sketch type: {explicit_sketch_type}")

    # ลบเอฟเฟ็กต์สเก็ตช์.
    sketch_format.sketch_type = slides.LineSketchType.NONE
ค่าที่คืนจาก SketchFormat.sketch_type แสดงการตั้งค่าที่กำหนดโดยตรงให้กับรูปทรง หากการจัดรูปแบบเส้นสามารถสืบทอดจากธีม, มาสเตอร์สไลด์ หรือเลย์เอาต์สไลด์ ให้ใช้ LineFormat.get_effective, เข้าถึงคุณสมบัติ sketch_format ของอ็อบเจ็กต์ที่คืนค่าและอ่านคุณสมบัติ sketch_type ของมัน ค่าที่มีผลจริงจะแสดงการจัดรูปแบบที่นำไปใช้จริงหลังจากการสืบทอดได้รับการแก้ไข:
import aspose.slides as slides

with slides.Presentation("presentation.pptx") as presentation:
    shape = presentation.slides[0].shapes[0]
    line_format = shape.line_format

    explicit_sketch_type = line_format.sketch_format.sketch_type
    effective_line_format = line_format.get_effective()
    effective_sketch_type = effective_line_format.sketch_format.sketch_type

    print(f"Explicit sketch type: {explicit_sketch_type}")
    print(f"Effective sketch type: {effective_sketch_type}")
จัดรูปแบบสไตล์การเชื่อมต่อ
ต่อไปนี้คือสามตัวเลือกประเภทการเชื่อมต่อ:
- กลม
- มิตเตอร์
- เบเวล
โดยค่าเริ่มต้น เมื่อ PowerPoint เชื่อมสองเส้นที่มุม (เช่นที่มุมของรูปทรง) จะใช้การตั้งค่า Round อย่างไรก็ตาม หากคุณกำลังวาดรูปทรงที่มีมุมแหลม คุณอาจต้องการตัวเลือก Miter
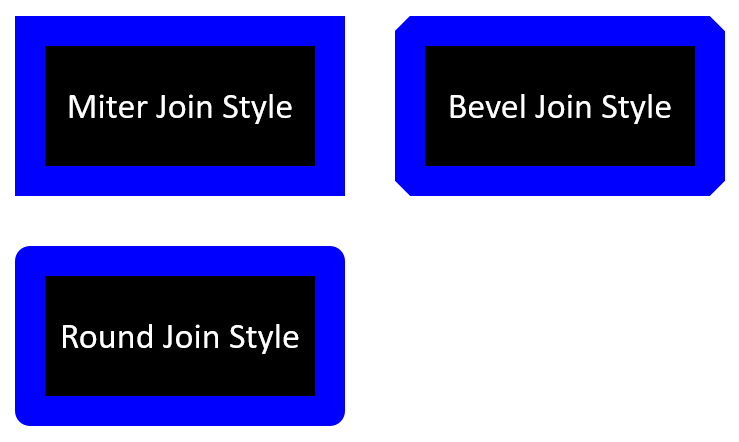
โค้ด Python ต่อไปนี้แสดงวิธีการสร้างสี่เหลี่ยมสามรูป (ตามรูปด้านบน) โดยใช้การตั้งค่าประเภทการเชื่อมต่อ Miter, Bevel, และ Round:
import aspose.slides as slides
import aspose.pydrawing as draw

# สร้างอินสแตนซ์ของคลาส Presentation ที่เป็นตัวแทนไฟล์การนำเสนอ.
with slides.Presentation() as presentation:

	# ดึงสไลด์แรก.
	slide = presentation.slides[0]

	# เพิ่ม AutoShape 3 รูปแบบ Rectangle.
	shape1 = slide.shapes.add_auto_shape(slides.ShapeType.RECTANGLE, 20, 20, 150, 75)
	shape2 = slide.shapes.add_auto_shape(slides.ShapeType.RECTANGLE, 210, 20, 150, 75)
	shape3 = slide.shapes.add_auto_shape(slides.ShapeType.RECTANGLE, 20, 135, 150, 75)

	# ตั้งค่าสีเติมสำหรับแต่ละรูปทรงสี่เหลี่ยม.
	shape1.fill_format.fill_type = slides.FillType.SOLID
	shape1.fill_format.solid_fill_color.color = draw.Color.black
	shape2.fill_format.fill_type = slides.FillType.SOLID
	shape2.fill_format.solid_fill_color.color = draw.Color.black
	shape3.fill_format.fill_type = slides.FillType.SOLID
	shape3.fill_format.solid_fill_color.color = draw.Color.black

	# ตั้งค่าความกว้างของเส้น.
	shape1.line_format.width = 15
	shape2.line_format.width = 15
	shape3.line_format.width = 15

	# ตั้งค่าสีสำหรับเส้นของแต่ละสี่เหลี่ยม.
	shape1.line_format.fill_format.fill_type = slides.FillType.SOLID
	shape1.line_format.fill_format.solid_fill_color.color = draw.Color.blue
	shape2.line_format.fill_format.fill_type = slides.FillType.SOLID
	shape2.line_format.fill_format.solid_fill_color.color = draw.Color.blue
	shape3.line_format.fill_format.fill_type = slides.FillType.SOLID
	shape3.line_format.fill_format.solid_fill_color.color = draw.Color.blue

	# ตั้งค่าสไตล์การเชื่อมต่อ.
	shape1.line_format.join_style = slides.LineJoinStyle.MITER
	shape2.line_format.join_style = slides.LineJoinStyle.BEVEL
	shape3.line_format.join_style = slides.LineJoinStyle.ROUND

	# เพิ่มข้อความให้แต่ละสี่เหลี่ยม.
	shape1.text_frame.text = "Miter Join style"
	shape2.text_frame.text = "Bevel Join style"
	shape3.text_frame.text = "Round Join style"

	# บันทึกไฟล์ PPTX ไปยังดิสก์.
	presentation.save("join_styles.pptx", slides.export.SaveFormat.PPTX)
การเติมสีไล่โทน (Gradient Fill)
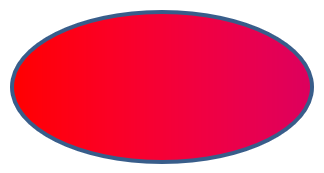
ใน PowerPoint, Gradient Fill เป็นตัวเลือกการจัดรูปแบบที่ให้คุณเติมสีต่อเนื่องหลายสีลงในรูปทรง ตัวอย่างเช่น คุณสามารถใช้สีสองสีหรือมากกว่าให้สีหนึ่งค่อย ๆ จางลงเป็นอีกสีหนึ่ง
ต่อไปนี้คือวิธีการใช้ Gradient Fill เติมสีไล่โทนลงในรูปทรงโดยใช้ Aspose.Slides:
- สร้างอินสแตนซ์ของคลาส Presentation.
- รับการอ้างอิงถึงสไลด์ตามดัชนีของมัน.
- เพิ่ม AutoShape ลงในสไลด์.
- ตั้งค่า FillType ของรูปทรงเป็น
GRADIENT. - เพิ่มสีสองสีที่คุณต้องการพร้อมตำแหน่งที่กำหนดโดยใช้เมธอด
addของคอลเลกชันgradient_stopsที่ให้โดยคลาส GradientFormat. - บันทึกงานนำเสนอที่แก้ไขแล้วเป็นไฟล์ PPTX.
import aspose.slides as slides

# สร้างอินสแตนซ์ของคลาส Presentation ที่เป็นตัวแทนไฟล์การนำเสนอ.
with slides.Presentation() as presentation:

    # ดึงสไลด์แรก.
    slide = presentation.slides[0]

    # เพิ่ม AutoShape ประเภท Ellipse.
    shape = slide.shapes.add_auto_shape(slides.ShapeType.ELLIPSE, 50, 50, 150, 75)

    # ใช้การจัดรูปแบบไล่สีกับรูปวงรี.
    shape.fill_format.fill_type = slides.FillType.GRADIENT
    shape.fill_format.gradient_format.gradient_shape = slides.GradientShape.LINEAR

    # ตั้งค่าทิศทางของไล่สี.
    shape.fill_format.gradient_format.gradient_direction = slides.GradientDirection.FROM_CORNER2

    # เพิ่มจุดหยุดไล่สีสองจุด.
    shape.fill_format.gradient_format.gradient_stops.add(1.0, slides.PresetColor.PURPLE)
    shape.fill_format.gradient_format.gradient_stops.add(0, slides.PresetColor.RED)

    # บันทึกไฟล์ PPTX ไปยังดิสก์.
    presentation.save("gradient_fill.pptx", slides.export.SaveFormat.PPTX)
ผลลัพธ์:
การเติมลาย (Pattern Fill)
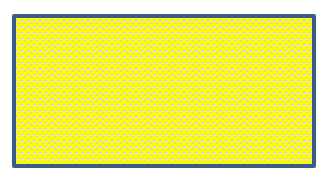
ใน PowerPoint, Pattern Fill เป็นตัวเลือกการจัดรูปแบบที่ให้คุณใช้การออกแบบสองสี—เช่น จุด, แถบ, ลายขัดกัน, หรือ ลายตาราง—ลงในรูปทรง คุณสามารถเลือกสีกำหนดเองสำหรับพื้นหน้าและพื้นหลังของลายได้
Aspose.Slides มีรูปแบบลายที่กำหนดล่วงหน้ากว่า 45 แบบที่คุณสามารถนำไปใช้กับรูปทรงเพื่อเพิ่มความสวยงามของการนำเสนอ แม้หลังจากเลือกลายที่กำหนดล่วงหน้าแล้ว คุณก็สามารถระบุสีที่ต้องการให้ลายใช้ได้
ต่อไปนี้คือวิธีการใช้ Pattern Fill เติมลายลงในรูปทรงโดยใช้ Aspose.Slides:
- สร้างอินสแตนซ์ของคลาส Presentation.
- รับการอ้างอิงถึงสไลด์ตามดัชนีของมัน.
- เพิ่ม AutoShape ลงในสไลด์.
- ตั้งค่า FillType ของรูปทรงเป็น
PATTERN. - เลือกรูปแบบลายจากตัวเลือกที่กำหนดล่วงหน้า.
- ตั้งค่า back_color ของลาย.
- ตั้งค่า fore_color ของลาย.
- บันทึกงานนำเสนอที่แก้ไขแล้วเป็นไฟล์ PPTX.
import aspose.slides as slides
import aspose.pydrawing as draw

# สร้างอินสแตนซ์ของคลาส Presentation ที่เป็นตัวแทนไฟล์การนำเสนอ.
with slides.Presentation() as presentation:

    # ดึงสไลด์แรก.
    slide = presentation.slides[0]

    # เพิ่ม AutoShape ประเภท Rectangle.
    shape = slide.shapes.add_auto_shape(slides.ShapeType.RECTANGLE, 50, 50, 150, 75)

    # ตั้งค่า FillType เป็น Pattern.
    shape.fill_format.fill_type = slides.FillType.PATTERN

    # ตั้งค่า PatternStyle.
    shape.fill_format.pattern_format.pattern_style = slides.PatternStyle.TRELLIS

    # ตั้งค่าสีพื้นหลังและสีหน้าของลาย.
    shape.fill_format.pattern_format.back_color.color = draw.Color.light_gray
    shape.fill_format.pattern_format.fore_color.color = draw.Color.yellow

    # บันทึกไฟล์ PPTX ไปยังดิสก์.
    presentation.save("pattern_fill.pptx", slides.export.SaveFormat.PPTX)
ผลลัพธ์:
การเติมรูปภาพ (Picture Fill)
ใน PowerPoint, Picture Fill เป็นตัวเลือกการจัดรูปแบบที่ให้คุณแทรกรูปภาพภายในรูปทรง—โดยใช้รูปภาพเป็นพื้นหลังของรูปทรง
ต่อไปนี้เป็นวิธีการใช้ Aspose.Slides เพื่อใส่ Picture Fill ลงในรูปทรง:
- สร้างอินสแตนซ์ของคลาส Presentation.
- รับการอ้างอิงถึงสไลด์ตามดัชนีของมัน.
- เพิ่ม AutoShape ลงในสไลด์.
- ตั้งค่า FillType ของรูปทรงเป็น
PICTURE. - ตั้งค่าโหมด picture fill เป็น
TILE(หรือโหมดอื่นที่ต้องการ). - สร้างอ็อบเจ็กต์ PPImage จากรูปภาพที่ต้องการใช้.
- กำหนดรูปภาพนี้ให้กับคุณสมบัติ
picture.imageของpicture_fill_formatของรูปทรง. - บันทึกงานนำเสนอที่แก้ไขแล้วเป็นไฟล์ PPTX.
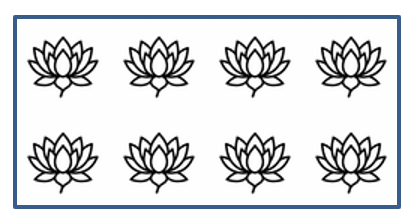
สมมติว่ามีไฟล์ “lotus.png” พร้อมรูปภาพดังนี้:

โค้ด Python ต่อไปนี้แสดงวิธีเติมรูปทรงด้วยรูปภาพ:
import aspose.slides as slides

# สร้างอินสแตนซ์ของคลาส Presentation ที่เป็นตัวแทนไฟล์การนำเสนอ.
with slides.Presentation() as presentation:

    # ดึงสไลด์แรก.
    slide = presentation.slides[0]

    # เพิ่ม AutoShape ประเภท Rectangle.
    shape = slide.shapes.add_auto_shape(slides.ShapeType.RECTANGLE, 50, 50, 192, 95)

    # ตั้งค่า FillType เป็น Picture.
    shape.fill_format.fill_type = slides.FillType.PICTURE

    # ตั้งค่าโหมดการเติมรูปภาพ.
    shape.fill_format.picture_fill_format.picture_fill_mode = slides.PictureFillMode.TILE

    # โหลดรูปภาพและเพิ่มลงในทรัพยากรของการนำเสนอ.
    with slides.Images.from_file("lotus.png") as image:
        presentation_image = presentation.images.add_image(image)

    # ตั้งค่ารูปภาพ.
    shape.fill_format.picture_fill_format.picture.image = presentation_image

    # บันทึกไฟล์ PPTX ไปยังดิสก์.
    presentation.save("picture_fill.pptx", slides.export.SaveFormat.PPTX)
ผลลัพธ์:
การทำภาพเป็นเท็กซ์เจอร์แบบต่อกัน (Tile Picture As Texture)
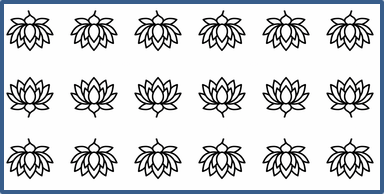
หากคุณต้องการตั้งค่ารูปภาพต่อกันเป็นเท็กซ์เจอร์และปรับพฤติกรรมการต่อ คุณสามารถใช้คุณสมบัติดังต่อไปนี้ของคลาส PictureFillFormat:
- picture_fill_mode: กำหนดโหมดการเติมรูปภาพ—
TILEหรือSTRETCH. - tile_alignment: ระบุการจัดตำแหน่งของกระเบื้องภายในรูปทรง.
- tile_flip: ควบคุมว่ากระเบื้องจะพลิกแนวนอน แนวตั้ง หรือทั้งสองอย่าง.
- tile_offset_x: กำหนดการย้ายแนวนอนของกระเบื้อง (เป็นพอยท์) จากตำแหน่งต้นของรูปทรง.
- tile_offset_y: กำหนดการย้ายแนวตั้งของกระเบื้อง (เป็นพอยท์) จากตำแหน่งต้นของรูปทรง.
- tile_scale_x: กำหนดสเกลแนวนอนของกระเบื้องเป็นเปอร์เซ็นต์.
- tile_scale_y: กำหนดสเกลแนวตั้งของกระเบื้องเป็นเปอร์เซ็นต์.
import aspose.slides as slides

# สร้างอินสแตนซ์ของคลาส Presentation ที่เป็นตัวแทนไฟล์การนำเสนอ.
with slides.Presentation() as presentation:

    # ดึงสไลด์แรก.
    first_slide = presentation.slides[0]

    # เพิ่ม AutoShape รูปสี่เหลี่ยม.
    shape = first_slide.shapes.add_auto_shape(slides.ShapeType.RECTANGLE, 50, 50, 190, 95)

    # ตั้งค่า FillType ของรูปทรงเป็น Picture.
    shape.fill_format.fill_type = slides.FillType.PICTURE

    # โหลดรูปภาพและเพิ่มลงในทรัพยากรของการนำเสนอ.
    with slides.Images.from_file("lotus.png") as source_image:
        presentation_image = presentation.images.add_image(source_image)

    # กำหนดรูปภาพให้กับรูปทรง.
    picture_fill_format = shape.fill_format.picture_fill_format
    picture_fill_format.picture.image = presentation_image

    # กำหนดค่าโหมดการเติมรูปภาพและคุณสมบัติการต่อรูป.
    picture_fill_format.picture_fill_mode = slides.PictureFillMode.TILE
    picture_fill_format.tile_offset_x = -32
    picture_fill_format.tile_offset_y = -32
    picture_fill_format.tile_scale_x = 50
    picture_fill_format.tile_scale_y = 50
    picture_fill_format.tile_alignment = slides.RectangleAlignment.BOTTOM_RIGHT
    picture_fill_format.tile_flip = slides.TileFlip.FLIP_BOTH

    # บันทึกไฟล์ PPTX ไปยังดิสก์.
    presentation.save("tile.pptx", slides.export.SaveFormat.PPTX)
ผลลัพธ์:
การเติมสีเดี่ยว (Solid Color Fill)
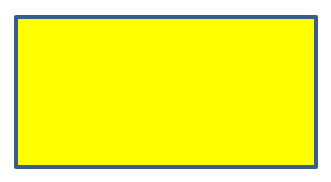
ใน PowerPoint, Solid Color Fill เป็นตัวเลือกการจัดรูปแบบที่เติมสีเดียวที่สม่ำเสมอลงในรูปทรง สีพื้นหลังแบบเรียบนี้จะไม่มีการไล่สี, เท็กซ์เจอร์ หรือ ลาย
เพื่อใช้ Solid Color Fill เติมสีเดี่ยวลงในรูปทรงด้วย Aspose.Slides ให้ทำตามขั้นตอนต่อไปนี้:
- สร้างอินสแตนซ์ของคลาส Presentation.
- รับการอ้างอิงถึงสไลด์ตามดัชนีของมัน.
- เพิ่ม AutoShape ลงในสไลด์.
- ตั้งค่า FillType ของรูปทรงเป็น
SOLID. - กำหนดสีเติมที่คุณต้องการให้กับรูปทรง.
- บันทึกงานนำเสนอที่แก้ไขแล้วเป็นไฟล์ PPTX.
import aspose.slides as slides
import aspose.pydrawing as draw

# สร้างอินสแตนซ์ของคลาส Presentation ที่เป็นตัวแทนไฟล์การนำเสนอ.
with slides.Presentation() as presentation:

    # ดึงสไลด์แรก.
    slide = presentation.slides[0]

    # เพิ่ม AutoShape ประเภท Rectangle.
    shape = slide.shapes.add_auto_shape(slides.ShapeType.RECTANGLE, 50, 50, 150, 75)

    # ตั้งค่า FillType เป็น Solid.
    shape.fill_format.fill_type = slides.FillType.SOLID

    # ตั้งค่าสีเติม.
    shape.fill_format.solid_fill_color.color = draw.Color.yellow

    # บันทึกไฟล์ PPTX ไปยังดิสก์.
    presentation.save("solid_color_fill.pptx", slides.export.SaveFormat.PPTX)
ผลลัพธ์:
ตั้งค่าความโปร่งใส
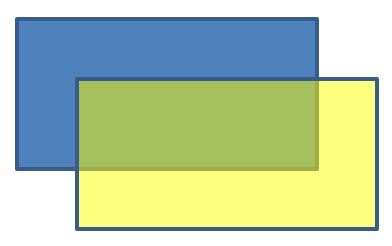
ใน PowerPoint เมื่อคุณใช้การเติมสีเดี่ยว, ไล่สี, รูปภาพ หรือเท็กซ์เจอร์กับรูปทรง คุณสามารถตั้งค่าระดับความโปร่งใสเพื่อควบคุมความทึบของการเติม ค่า ความโปร่งใสที่สูงขึ้นทำให้รูปทรงดูใสมากขึ้น ทำให้พื้นหลังหรือวัตถุติดอยู่เบื้องหลังมองเห็นได้บางส่วน
Aspose.Slides ให้คุณตั้งค่าความโปร่งใสโดยปรับค่าอัลฟ่าในสีที่ใช้สำหรับการเติม ดังนี้:
- สร้างอินสแตนซ์ของคลาส Presentation.
- รับการอ้างอิงถึงสไลด์ตามดัชนีของมัน.
- เพิ่ม AutoShape ลงในสไลด์.
- ตั้งค่า fill type เป็น
SOLID. - ใช้
Color.from_argbเพื่อกำหนดสีที่มีความโปร่งใส (ส่วนalphaควบคุมความโปร่งใส). - บันทึกงานนำเสนอ.
import aspose.pydrawing as draw
import aspose.slides as slides

# สร้างอินสแตนซ์ของคลาส Presentation ที่เป็นตัวแทนไฟล์การนำเสนอ.
with slides.Presentation() as presentation:

    # ดึงสไลด์แรก.
    slide = presentation.slides[0]

    # เพิ่ม AutoShape สี่เหลี่ยมทึบ.
    slide.shapes.add_auto_shape(slides.ShapeType.RECTANGLE, 50, 50, 150, 75)

    # เพิ่ม AutoShape สี่เหลี่ยมโปร่งใสเหนือรูปสี่เหลี่ยมที่ทึบ.
    shape = slide.shapes.add_auto_shape(slides.ShapeType.RECTANGLE, 80, 80, 150, 75)
    shape.fill_format.fill_type = slides.FillType.SOLID
    shape.fill_format.solid_fill_color.color = draw.Color.from_argb(128, 204, 102, 0)

    presentation.save("shape_transparency.pptx", slides.export.SaveFormat.PPTX)
ผลลัพธ์:
หมุนรูปทรง
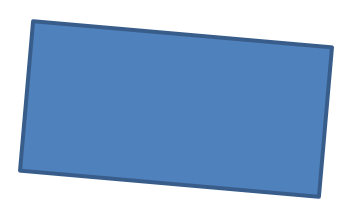
Aspose.Slides ให้คุณหมุนรูปทรงในงานนำเสนอ PowerPoint ซึ่งเป็นประโยชน์เมื่อต้องการจัดตำแหน่งองค์ประกอบภาพแบบมีการจัดแนวหรือความต้องการด้านการออกแบบเฉพาะ
เพื่อหมุนรูปทรงบนสไลด์ ให้ทำตามขั้นตอนต่อไปนี้:
- สร้างอินสแตนซ์ของคลาส Presentation.
- รับการอ้างอิงถึงสไลด์ตามดัชนีของมัน.
- เพิ่ม AutoShape ลงในสไลด์.
- ตั้งค่าคุณสมบัติ
rotationของรูปทรงเป็นมุมที่ต้องการ. - บันทึกงานนำเสนอ.
import aspose.slides as slides

# สร้างอินสแตนซ์ของคลาส Presentation ที่เป็นตัวแทนไฟล์การนำเสนอ.
with slides.Presentation() as presentation:

    # ดึงสไลด์แรก.
    slide = presentation.slides[0]

    # เพิ่ม AutoShape ประเภท Rectangle.
    shape = slide.shapes.add_auto_shape(slides.ShapeType.RECTANGLE, 50, 50, 150, 75)

    # หมุนรูปทรงโดย 5 องศา.
    shape.rotation = 5

    # บันทึกไฟล์ PPTX ไปยังดิสก์.
    presentation.save("shape_rotation.pptx", slides.export.SaveFormat.PPTX)
ผลลัพธ์:
เพิ่มเอฟเฟกต์ 3D Bevel
Aspose.Slides ให้คุณใช้เอฟเฟกต์ 3D Bevel กับรูปทรงโดยการกำหนดค่าคุณสมบัติของ ThreeDFormat
เพื่อเพิ่มเอฟเฟกต์ 3D Bevel ให้กับรูปทรง ให้ทำตามขั้นตอนต่อไปนี้:
- สร้างอินสแตนซ์ของคลาส Presentation.
- รับการอ้างอิงถึงสไลด์ตามดัชนีของมัน.
- เพิ่ม AutoShape ลงในสไลด์.
- กำหนดค่า ThreeDFormat ของรูปทรงเพื่อระบุการตั้งค่า bevel.
- บันทึกงานนำเสนอ.
import aspose.slides as slides
import aspose.pydrawing as draw

# สร้างอินสแตนซ์ของคลาส Presentation.
with slides.Presentation() as presentation:

    slide = presentation.slides[0]

    # เพิ่มรูปทรงลงในสไลด์.
    shape = slide.shapes.add_auto_shape(slides.ShapeType.ELLIPSE, 50, 50, 100, 100)
    shape.fill_format.fill_type = slides.FillType.SOLID
    shape.fill_format.solid_fill_color.color = draw.Color.green
    shape.line_format.fill_format.fill_type = slides.FillType.SOLID
    shape.line_format.fill_format.solid_fill_color.color = draw.Color.orange
    shape.line_format.width = 2.0

    # ตั้งค่าคุณสมบัติ ThreeDFormat ของรูปทรง.
    shape.three_d_format.depth = 4
    shape.three_d_format.bevel_top.bevel_type = slides.BevelPresetType.CIRCLE
    shape.three_d_format.bevel_top.height = 6
    shape.three_d_format.bevel_top.width = 6
    shape.three_d_format.camera.camera_type = slides.CameraPresetType.ORTHOGRAPHIC_FRONT
    shape.three_d_format.light_rig.light_type = slides.LightRigPresetType.THREE_PT
    shape.three_d_format.light_rig.direction = slides.LightingDirection.TOP

    # บันทึกการนำเสนอเป็นไฟล์ PPTX.
    presentation.save("3D_bevel_effect.pptx", slides.export.SaveFormat.PPTX)
ผลลัพธ์:

เพิ่มเอฟเฟกต์การหมุน 3D
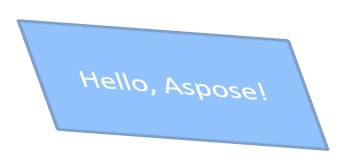
Aspose.Slides ให้คุณใช้เอฟเฟกต์การหมุน 3D กับรูปทรงโดยการกำหนดค่าคุณสมบัติของ ThreeDFormat
เพื่อใช้การหมุน 3D กับรูปทรง:
- สร้างอินสแตนซ์ของคลาส Presentation.
- รับการอ้างอิงถึงสไลด์ตามดัชนีของมัน.
- เพิ่ม AutoShape ลงในสไลด์.
- ตั้งค่า camera_type และ light_type ของรูปทรงเพื่อกำหนดการหมุน 3D.
- บันทึกงานนำเสนอ.
import aspose.slides as slides

# สร้างอินสแตนซ์ของคลาส Presentation.
with slides.Presentation() as presentation:

    slide = presentation.slides[0]

    auto_shape = slide.shapes.add_auto_shape(slides.ShapeType.RECTANGLE, 50, 50, 150, 75)
    auto_shape.text_frame.text = "Hello, Aspose!"

    auto_shape.three_d_format.depth = 6
    auto_shape.three_d_format.camera.set_rotation(40, 35, 20)
    auto_shape.three_d_format.camera.camera_type = slides.CameraPresetType.ISOMETRIC_LEFT_UP
    auto_shape.three_d_format.light_rig.light_type = slides.LightRigPresetType.BALANCED

    # บันทึกการนำเสนอเป็นไฟล์ PPTX.
    presentation.save("3D_rotation_effect.pptx", slides.export.SaveFormat.PPTX)
ผลลัพธ์:
ควบคุมการแสดงผลขาวดำสำหรับรูปทรง
คุณสมบัติ Shape.black_white_mode ระบุว่ารูปทรงเดี่ยวจะถูกเรนเดอร์อย่างไรเมื่อการนำเสนอถูกดูหรือประมวลผลในโหมดขาวดำ มันไม่ได้เปิดใช้งานการแสดงผลขาวดำเองและไม่เปลี่ยนการเติม, เส้น หรือการจัดรูปแบบอื่นของรูปทรงในโหมดสีปกติ
ใช้ค่าจาก enumeration ของ BlackWhiteMode เพื่อเลือกพฤติกรรมที่ต้องการ ตัวอย่างเช่น AUTOMATIC ให้แอปพลิเคชันเรนเดอร์เลือกการแปลง, GRAY และ LIGHT_GRAY ใช้สีเทา, BLACK_WHITE ใช้เฉพาะสีดำและขาว, BLACK และ WHITE บังคับสีเดียว, COLOR รักษาสีปกติ, และ HIDDEN ไม่แสดงรูปทรงในโหมดขาวดำ, NOT_DEFINED หมายถึงไม่มีการกำหนดโหมดระดับรูปทรง
โค้ด Python ต่อไปนี้สร้างรูปทรงสีและทำให้แสดงเป็นสีเทาเมื่อแสดงผลในโหมดขาวดำ:
import aspose.slides as slides
import aspose.pydrawing as draw

with slides.Presentation() as presentation:
    slide = presentation.slides[0]

    shape = slide.shapes.add_auto_shape(slides.ShapeType.RECTANGLE, 50, 50, 200, 100)
    shape.fill_format.fill_type = slides.FillType.SOLID
    shape.fill_format.solid_fill_color.color = draw.Color.orange

    # คงการเติมสีส้มในโหมดสี, แต่เรนเดอร์รูปทรงด้วยสีเทาในโหมดขาวดำ.
    shape.black_white_mode = slides.BlackWhiteMode.GRAY

    presentation.save("shape_black_white_mode.pptx", slides.export.SaveFormat.PPTX)
รีเซ็ตการจัดรูปแบบ
โค้ด Python ต่อไปนี้แสดงวิธีการรีเซ็ตการจัดรูปแบบของสไลด์และคืนตำแหน่ง, ขนาด, และการจัดรูปแบบของรูปทรงทั้งหมดที่มี placeholders บน LayoutSlide ไปยังค่าตั้งต้นของมัน:
import aspose.slides as slides

with slides.Presentation("sample.pptx") as presentation:

    for slide in presentation.slides:
        # รีเซ็ตแต่ละรูปทรงบนสไลด์ที่มี placeholder บนเลย์เอาต์.
        slide.reset()

    presentation.save("reset_formatting.pptx", slides.export.SaveFormat.PPTX)
คำถามที่พบบ่อย
การจัดรูปแบบรูปทรงมีผลต่อขนาดไฟล์ของงานนำเสนอสุดท้ายหรือไม่?
เพียงเล็กน้อย เท่านั้น รูปภาพและสื่อที่ฝังอยู่ใช้พื้นที่ส่วนใหญ่ของไฟล์ ส่วนพารามิเตอร์ของรูปทรงเช่นสี, เอฟเฟกต์, และไล่สีจะถูกเก็บเป็นเมตาดาต้าและแทบไม่มีขนาดเพิ่ม
ฉันจะตรวจจับรูปทรงบนสไลด์ที่มีการจัดรูปแบบเดียวกันเพื่อสามารถจัดกลุ่มได้อย่างไร?
เปรียบเทียบคุณสมบัติการจัดรูปแบบหลักของแต่ละรูปทรง—การเติม, เส้น, และการตั้งค่าเอฟเฟกต์ หากค่าที่สอดคล้องกันทั้งหมดตรงกัน ให้ถือว่าสไตล์เดียวกันและจัดกลุ่มรูปทรงเหล่านั้นในเชิงตรรกะ ซึ่งทำให้การจัดการสไตล์ต่อไปง่ายขึ้น
ฉันสามารถบันทึกชุดสไตล์รูปทรงแบบกำหนดเองลงในไฟล์แยกเพื่อใช้ในงานนำเสนออื่นได้หรือไม่?
ได้. เก็บรูปทรงตัวอย่างที่มีสไตล์ที่ต้องการในชุดสไลด์แม่แบบหรือไฟล์แม่แบบ .POTX เมื่อต้องการสร้างงานนำเสนอใหม่ ให้เปิดแม่แบบ, คัดลอกรูปทรงที่มีสไตล์ที่ต้องการ, และนำการจัดรูปแบบของมันไปใช้ใหม่ตามต้องการ.