
จัดรูปแบบข้อความการนำเสนอใน Java
ภาพรวม
บทความนี้แสดงวิธีจัดรูปแบบข้อความในงานนำเสนอ PowerPoint และ OpenDocument โดยใช้ Aspose.Slides for Java ครอบคลุมสีพื้นหลัง, ความโปร่งแสง, การเว้นระยะระหว่างอักขระ, คุณสมบัติของฟอนท์, การหมุน, การเว้นระยะย่อหน้า, พฤติกรรม autofit, การกำหนดตำแหน่งข้อความ, จุดหยุดแท็บ, และการตั้งค่าภาษา
หากไม่ได้ระบุเป็นพิเศษ ตัวอย่างจะใช้ sample.pptx เนื้อหาในสไลด์แรกของรูปทรงแรกเป็นกล่องข้อความ และย่อหน้าแรกของมันมีข้อความที่แสดงด้านล่าง ดัชนีของสไลด์และรูปทรงเริ่มที่ศูนย์ ตัวอย่างที่เลือกส่วนข้อความหนาจะใช้การจัดรูปแบบที่มีผลรวมถึงการจัดรูปแบบหนาที่สืบทอด:

เพื่อค้นหาและไฮไลท์ข้อความตามตัวอักษรหรือผลการจับคู่แบบ regular-expression ดูที่ Search and Replace Text.
ตั้งค่าสีพื้นหลังของข้อความ
ใช้ IParagraphFormat.getDefaultPortionFormat เพื่อกำหนดสีไฮไลท์เริ่มต้นสำหรับย่อหน้า หรือใช้ IBasePortionFormat.getHighlightColor สำหรับส่วนข้อความแต่ละส่วน
ตัวอย่างต่อไปนี้กำหนดไฮไลท์สีเทาอ่อนเป็นค่าเริ่มต้นสำหรับย่อหน้าแรก สีไฮไลท์เฉพาะของแต่ละส่วนจะลำดับความสำคัญเหนือค่าดีฟอลต์นี้:
import com.aspose.slides.*;
import java.awt.Color;

Presentation presentation = new Presentation("sample.pptx");
try {
    ISlide slide = presentation.getSlides().get_Item(0);

    IAutoShape autoShape = (IAutoShape)slide.getShapes().get_Item(0);
    IParagraph paragraph = autoShape.getTextFrame().getParagraphs().get_Item(0);

    // ตั้งค่าสีไฮไลท์สำหรับย่อหน้าทั้งหมด.
    paragraph.getParagraphFormat().getDefaultPortionFormat().getHighlightColor().setColor(Color.LIGHT_GRAY);

    presentation.save("gray_paragraph.pptx", SaveFormat.Pptx);
} finally {
    presentation.dispose();
}
ผลลัพธ์:

ตัวอย่างโค้ดด้านล่างแสดงวิธีตั้งค่าสีพื้นหลังสำหรับ ส่วนข้อความที่มีฟอนท์หนา:
import com.aspose.slides.*;
import java.awt.Color;

Presentation presentation = new Presentation("sample.pptx");
try {
    ISlide slide = presentation.getSlides().get_Item(0);

    IAutoShape autoShape = (IAutoShape)slide.getShapes().get_Item(0);
    IParagraph paragraph = autoShape.getTextFrame().getParagraphs().get_Item(0);

    for (IPortion portion : paragraph.getPortions()) {
        if (portion.getPortionFormat().getEffective().getFontBold()) {
            // ตั้งค่าสีไฮไลท์สำหรับส่วนข้อความ.
            portion.getPortionFormat().getHighlightColor().setColor(Color.LIGHT_GRAY);
        }
    }

    presentation.save("gray_text_portions.pptx", SaveFormat.Pptx);
} finally {
    presentation.dispose();
}
ผลลัพธ์:

จัดแนวย่อหน้าของข้อความ
ใช้ IParagraphFormat.setAlignment เพื่อกำหนดการจัดแนวย่อหน้าในกรอบข้อความ ค่าที่กำหนดได้อาจเป็นการจัดกึ่งกลาง, จัดซ้าย, จัดขวา, จัดขอบชิด, ฯลฯ
ตัวอย่างโค้ดต่อไปนี้แสดงวิธีจัดแนวย่อหน้าให้อยู่ที่ กึ่งกลาง:
import com.aspose.slides.*;

Presentation presentation = new Presentation("sample.pptx");
try {
    ISlide slide = presentation.getSlides().get_Item(0);

    IAutoShape autoShape = (IAutoShape)slide.getShapes().get_Item(0);
    IParagraph paragraph = autoShape.getTextFrame().getParagraphs().get_Item(0);

    // ตั้งค่าการจัดแนวของย่อหน้าให้อยู่กึ่งกลาง.
    paragraph.getParagraphFormat().setAlignment(TextAlignment.Center);

    presentation.save("aligned_paragraph.pptx", SaveFormat.Pptx);
} finally {
    presentation.dispose();
}
ผลลัพธ์:

จัดแนวฟอนท์ภายในบรรทัด
ใช้ IParagraphFormat.setFontAlignment เพื่อจัดแนวแนวตั้งของส่วนข้อความที่มีขนาดฟอนท์ต่างกันภายในบรรทัด การตั้งค่านี้ใช้กับย่อหน้าทั้งหมดและควบคุมการจัดแนวภายในแต่ละบรรทัดของย่อหน้า
ตัวอย่างต่อไปนี้สร้างกล่องข้อความที่มีป้ายกำกับสี่อันบนสไลด์เดียวกัน แต่ละย่อหน้ามีข้อความเดียวกันที่ขนาด 18, 36, และ 54 จุด พร้อมการจัดแนวฟอนท์ที่ต่างกัน ใช้ฟอนท์ Arial ปิดการ autofit และการเคลื่อนย้ายบรรทัด และทำให้กรอบข้อความมีขนาดพอสำหรับบรรทัดเดียว
import com.aspose.slides.*;
import java.awt.Color;

Presentation presentation = new Presentation();
try {
    ISlide slide = presentation.getSlides().get_Item(0);

    int[] alignments = { FontAlignment.Baseline, FontAlignment.Top, FontAlignment.Center, FontAlignment.Bottom };
    String[] alignmentNames = { "Baseline", "Top", "Center", "Bottom" };
    float[] fontSizes = { 18f, 36f, 54f };

    for (int i = 0; i < alignments.length; i++) {
        IAutoShape shape = slide.getShapes().addAutoShape(ShapeType.Rectangle, 30, 20 + i * 130, 660, 120);
        shape.getFillFormat().setFillType(FillType.NoFill);
        shape.getLineFormat().getFillFormat().setFillType(FillType.NoFill);

        ITextFrame textFrame = shape.getTextFrame();
        textFrame.getTextFrameFormat().setAnchoringType(TextAnchorType.Top);
        textFrame.getTextFrameFormat().setAutofitType(TextAutofitType.None);
        textFrame.getTextFrameFormat().setWrapText(NullableBool.False);

        IParagraph label = textFrame.getParagraphs().get_Item(0);
        label.setText(alignmentNames[i]);
        label.getParagraphFormat().setAlignment(TextAlignment.Left);
        label.getParagraphFormat().getDefaultPortionFormat().setFontHeight(14);
        label.getParagraphFormat().getDefaultPortionFormat().setLatinFont(new FontData("Arial"));
        label.getParagraphFormat().getDefaultPortionFormat().getFillFormat().setFillType(FillType.Solid);
        label.getParagraphFormat().getDefaultPortionFormat().getFillFormat().getSolidFillColor().setColor(Color.GRAY);

        Paragraph paragraph = new Paragraph();
        paragraph.getParagraphFormat().setFontAlignment(alignments[i]);
        paragraph.getParagraphFormat().setAlignment(TextAlignment.Left);
        paragraph.getParagraphFormat().getDefaultPortionFormat().setLatinFont(new FontData("Arial"));
        paragraph.getParagraphFormat().getDefaultPortionFormat().getFillFormat().setFillType(FillType.Solid);
        paragraph.getParagraphFormat().getDefaultPortionFormat().getFillFormat().getSolidFillColor().setColor(Color.BLACK);

        for (float fontSize : fontSizes) {
            Portion portion = new Portion("Ag ");
            portion.getPortionFormat().setFontHeight(fontSize);
            paragraph.getPortions().add(portion);
        }

        textFrame.getParagraphs().add(paragraph);
    }

    presentation.save("font_alignment.pptx", SaveFormat.Pptx);
} finally {
    presentation.dispose();
}
ผลลัพธ์:
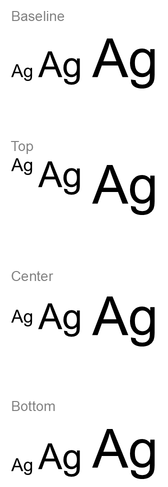
การจัดแนวฟอนท์อิงตามเมตริกของฟอนท์ ดังนั้นขอบของตัวอักษรแต่ละตัวอาจไม่ตรงกันอย่างสมบูรณ์ ตัวอย่างรวมอักษรตัวพิมพ์ใหญ่และตัวลงล่างเพื่อแสดงความแตกต่างระหว่างการจัดแนวที่เส้นฐานและด้านล่าง ความพร้อมใช้ของฟอนท์และการแทนที่, ตัวอักษรที่ใช้, และความแตกต่างของขนาดฟอนท์ส่งผลต่อผลลัพธ์ มิติของกรอบ, ระยะขอบ, การเว้นระยะบรรทัด, การเคลื่อนย้าย, และการ autofit ก็มีผลต่อการจัดวาง; ใช้ฟอนท์และการตั้งค่าเดียวกันเมื่อต้องการเปรียบเทียบโหมดต่าง ๆ
การตั้งค่านี้แตกต่างจาก IParagraphFormat.setAlignment ซึ่งควบคุมการจัดแนวย่อยแนวนอนของย่อหน้า, และ ITextFrameFormat.setAnchoringType ซึ่งกำหนดตำแหน่งบล็อกข้อความในแนวตั้งภายในรูปทรง การจัดรูปแบบซูเปอร์สคริปท์และซับสคริปท์ด้วย IBasePortionFormat.setEscapement จะเลื่อนส่วนข้อความแต่ละส่วนสัมพันธ์กับเส้นฐานแทนการตั้งค่าการจัดแนวฟอนท์สำหรับบรรทัดของย่อหน้า
ตั้งค่าความโปร่งแสงของข้อความ
ความโปร่งแสงของข้อความถูกควบคุมผ่านส่วนประกอบอัลฟาของสีที่กำหนดให้กับ IBasePortionFormat.getFillFormat ในตัวอย่างด้านล่าง alpha = 50 คือค่าช่องอัลฟา ARGB บนสเกล 0–255 ไม่ใช่เปอร์เซ็นต์ความโปร่งแสง
ตัวอย่างโค้ดด้านล่างแสดงวิธีใช้ความโปร่งแสงกับ ย่อหน้าทั้งหมด:
import com.aspose.slides.*;
import java.awt.Color;

int alpha = 50;

Presentation presentation = new Presentation("sample.pptx");
try {
    ISlide slide = presentation.getSlides().get_Item(0);

    IAutoShape autoShape = (IAutoShape)slide.getShapes().get_Item(0);
    IParagraph paragraph = autoShape.getTextFrame().getParagraphs().get_Item(0);

    // ตั้งค่าสีเติมของข้อความให้เป็นสีโปร่งแสง.
    paragraph.getParagraphFormat().getDefaultPortionFormat().getFillFormat().setFillType(FillType.Solid);
    paragraph.getParagraphFormat().getDefaultPortionFormat().getFillFormat().getSolidFillColor().setColor(new Color(0, 0, 0, alpha));

    presentation.save("transparent_paragraph.pptx", SaveFormat.Pptx);
} finally {
    presentation.dispose();
}
ผลลัพธ์:

ตัวอย่างโค้ดต่อไปนี้แสดงวิธีใช้ความโปร่งแสงกับ ส่วนข้อความที่มีฟอนท์หนา:
import com.aspose.slides.*;
import java.awt.Color;

int alpha = 50;

Presentation presentation = new Presentation("sample.pptx");
try {
    ISlide slide = presentation.getSlides().get_Item(0);

    IAutoShape autoShape = (IAutoShape)slide.getShapes().get_Item(0);
    IParagraph paragraph = autoShape.getTextFrame().getParagraphs().get_Item(0);

    for (IPortion portion : paragraph.getPortions()) {
        if (portion.getPortionFormat().getEffective().getFontBold()) {
            // ตั้งค่าความโปร่งแสงของส่วนข้อความ.
            portion.getPortionFormat().getFillFormat().setFillType(FillType.Solid);
            portion.getPortionFormat().getFillFormat().getSolidFillColor().setColor(new Color(0, 0, 0, alpha));
        }
    }

    presentation.save("transparent_text_portions.pptx", SaveFormat.Pptx);
} finally {
    presentation.dispose();
}
ผลลัพธ์:

ตั้งค่าการเว้นระยะระหว่างอักขระของข้อความ
ใช้ IBasePortionFormat.setSpacing เพื่อขยายหรือย่อระยะห่างระหว่างอักขระในกล่องข้อความ ตัวอย่างเพิ่มระยะห่าง 3 จุด; ค่าลบจะทำให้ข้อความบีบอัด
โค้ด Java ต่อไปนี้แสดงวิธีขยายการเว้นระยะอักขระใน ย่อหน้าทั้งหมด:
import com.aspose.slides.*;

Presentation presentation = new Presentation("sample.pptx");
try {
    ISlide slide = presentation.getSlides().get_Item(0);

    IAutoShape autoShape = (IAutoShape)slide.getShapes().get_Item(0);
    IParagraph paragraph = autoShape.getTextFrame().getParagraphs().get_Item(0);

    // หมายเหตุ: ใช้ค่าลบเพื่อบีบอัดการเว้นระยะอักขระ.
    paragraph.getParagraphFormat().getDefaultPortionFormat().setSpacing(3); // ขยายการเว้นระยะอักขระ.

    presentation.save("character_spacing_in_paragraph.pptx", SaveFormat.Pptx);
} finally {
    presentation.dispose();
}
ผลลัพธ์:

ตัวอย่างโค้ดด้านล่างแสดงวิธีขยายการเว้นระยะอักขระใน ส่วนข้อความที่มีฟอนท์หนา:
import com.aspose.slides.*;

Presentation presentation = new Presentation("sample.pptx");
try {
    ISlide slide = presentation.getSlides().get_Item(0);

    IAutoShape autoShape = (IAutoShape)slide.getShapes().get_Item(0);
    IParagraph paragraph = autoShape.getTextFrame().getParagraphs().get_Item(0);

    for (IPortion portion : paragraph.getPortions()) {
        if (portion.getPortionFormat().getEffective().getFontBold()) {
            // หมายเหตุ: ใช้ค่าลบเพื่อบีบอัดการเว้นระยะอักขระ.
            portion.getPortionFormat().setSpacing(3); // ขยายการเว้นระยะอักขระ.
        }
    }

    presentation.save("character_spacing_in_text_portions.pptx", SaveFormat.Pptx);
} finally {
    presentation.dispose();
}
ผลลัพธ์:

ปิดการ Kerning สำหรับฟอนท์ที่กำหนด
ในบางกรณี ข้อความที่แสดงโดย Aspose.Slides อาจดูแคบกว่าข้อความเดียวกันที่แสดงใน PowerPoint เนื่องจาก PowerPoint อาจละเลยข้อมูล kerning สำหรับฟอนท์บางตัว แม้ฟอนท์จะมีข้อมูล kerning ที่ถูกต้องและเปิดใช้งาน kerning ในการตั้งค่า PowerPoint
เพื่อให้ผลลัพธ์ที่แสดงใกล้เคียงกับ PowerPoint มากขึ้น คุณสามารถปิดการ kerning สำหรับส่วนข้อความที่ใช้ฟอนท์ที่ได้รับผลกระทบ ตั้งค่า IBasePortionFormat.setKerningMinimalSize เป็นค่าที่ใหญ่กว่าขนาดฟอนท์จริง ตัวอย่างนี้ต้องการไฟล์ “presentation.pptx” ที่มีกล่องข้อความเป็นรูปทรงแรกบนสไลด์แรก ตรวจสอบชื่อฟอนท์ที่มีผลรวมรวมถึงฟอนท์ที่สืบทอด และตั้งค่าเกณฑ์ 100 จุดสำหรับส่วนข้อความที่ใช้ Roboto วิธีนี้จะปิด kerning สำหรับส่วนข้อความที่ตรงกันและมีขนาดฟอนท์ต่ำกว่า 100 จุด:
import com.aspose.slides.*;

Presentation presentation = new Presentation("presentation.pptx");
try {
    ISlide slide = presentation.getSlides().get_Item(0);

    IAutoShape autoShape = (IAutoShape)slide.getShapes().get_Item(0);
    String targetFont = "Roboto";

    for (IParagraph paragraph : autoShape.getTextFrame().getParagraphs()) {
        for (IPortion portion : paragraph.getPortions()) {
            IPortionFormatEffectiveData portionFormat = portion.getPortionFormat().getEffective();

            if ((portionFormat.getLatinFont() != null &&
                 portionFormat.getLatinFont().getFontName().equals(targetFont)) ||
                (portionFormat.getEastAsianFont() != null &&
                 portionFormat.getEastAsianFont().getFontName().equals(targetFont)) ||
                (portionFormat.getComplexScriptFont() != null &&
                 portionFormat.getComplexScriptFont().getFontName().equals(targetFont))) {
                portion.getPortionFormat().setKerningMinimalSize(100);
            }
        }
    }

    presentation.save("output.pptx", SaveFormat.Pptx);
} finally {
    presentation.dispose();
}
สำหรับข้อความที่ตรงตามเกณฑ์และต่ำกว่าขนาดที่กำหนด การตั้งค่านี้จะป้องกัน kerning และช่วยให้การแสดงผลของ Aspose.Slides ใกล้เคียงกับผลลัพธ์ที่ PowerPoint แสดงสำหรับฟอนท์ที่ได้รับผลกระทบจากพฤติกรรมเฉพาะของ PowerPoint นี้
จัดการคุณสมบัติฟอนท์ของข้อความ
คุณสมบัติฟอนท์สามารถตั้งค่าที่ระดับย่อหน้าได้ผ่าน IParagraphFormat.getDefaultPortionFormat หรือบนส่วนข้อความแต่ละส่วนผ่าน IPortionFormat
ตัวอย่างต่อไปนี้ตั้งค่าฟอนท์เริ่มต้นของย่อหน้าแรกเป็น Times New Roman ขนาด 12 จุด พร้อมการจัดรูปแบบหนา, ตัวเอียง, และขีดเส้นจุด การจัดรูปแบบเฉพาะบนส่วนข้อความจะมีลำดับความสำคัญเหนือค่าดีฟอลต์เหล่านี้:
import com.aspose.slides.*;

Presentation presentation = new Presentation("sample.pptx");
try {
    ISlide slide = presentation.getSlides().get_Item(0);

    IAutoShape autoShape = (IAutoShape)slide.getShapes().get_Item(0);
    IParagraph paragraph = autoShape.getTextFrame().getParagraphs().get_Item(0);

    // ตั้งค่าคุณสมบัติฟอนท์สำหรับย่อหน้า.
    paragraph.getParagraphFormat().getDefaultPortionFormat().setFontHeight(12);
    paragraph.getParagraphFormat().getDefaultPortionFormat().setFontBold(NullableBool.True);
    paragraph.getParagraphFormat().getDefaultPortionFormat().setFontItalic(NullableBool.True);
    paragraph.getParagraphFormat().getDefaultPortionFormat().setFontUnderline(TextUnderlineType.Dotted);
    paragraph.getParagraphFormat().getDefaultPortionFormat().setLatinFont(new FontData("Times New Roman"));

    presentation.save("font_properties_for_paragraph.pptx", SaveFormat.Pptx);
} finally {
    presentation.dispose();
}
ผลลัพธ์:

ตัวอย่างต่อไปนี้ใช้ Times New Roman ขนาด 13 จุด, การจัดรูปแบบตัวเอียง, และขีดเส้นจุดกับส่วนข้อความที่มีการจัดรูปแบบเป็นหนา:
import com.aspose.slides.*;

Presentation presentation = new Presentation("sample.pptx");
try {
    ISlide slide = presentation.getSlides().get_Item(0);

    IAutoShape autoShape = (IAutoShape)slide.getShapes().get_Item(0);
    IParagraph paragraph = autoShape.getTextFrame().getParagraphs().get_Item(0);

    for (IPortion portion : paragraph.getPortions()) {
        if (portion.getPortionFormat().getEffective().getFontBold()) {
            // ตั้งค่าคุณสมบัติฟอนท์สำหรับส่วนข้อความ.
            portion.getPortionFormat().setFontHeight(13);
            portion.getPortionFormat().setFontItalic(NullableBool.True);
            portion.getPortionFormat().setFontUnderline(TextUnderlineType.Dotted);
            portion.getPortionFormat().setLatinFont(new FontData("Times New Roman"));
        }
    }

    presentation.save("font_properties_for_text_portions.pptx", SaveFormat.Pptx);
} finally {
    presentation.dispose();
}
ผลลัพธ์:

ตั้งค่าการหมุนของข้อความ
ใช้ ITextFrameFormat.setTextVerticalType เพื่อกำหนดทิศทางข้อความที่กำหนดไว้ล่วงหน้าในรูปทรง
ตัวอย่างโค้ดต่อไปนี้ตั้งค่าทิศทางข้อความในรูปทรงเป็น TextVerticalType.Vertical270, ซึ่งจะหมุนข้อความ 90 องศาตรงข้ามเข็มนาฬิกา:
import com.aspose.slides.*;

Presentation presentation = new Presentation("sample.pptx");
try {
    ISlide slide = presentation.getSlides().get_Item(0);

    IAutoShape autoShape = (IAutoShape)slide.getShapes().get_Item(0);
    autoShape.getTextFrame().getTextFrameFormat().setTextVerticalType(TextVerticalType.Vertical270);

    presentation.save("text_rotation.pptx", SaveFormat.Pptx);
} finally {
    presentation.dispose();
}
ผลลัพธ์:

ตั้งค่าการหมุนแบบกำหนดเองสำหรับกรอบข้อความ
ใช้ ITextFrameFormat.setRotationAngle เพื่อกำหนดมุมการหมุนแบบกำหนดเองสำหรับ ITextFrame
โค้ดต่อไปนี้หมุนกรอบข้อความ 3 องศาตามเข็มนาฬิกาในรูปทรง:
import com.aspose.slides.*;

Presentation presentation = new Presentation("sample.pptx");
try {
    ISlide slide = presentation.getSlides().get_Item(0);

    IAutoShape autoShape = (IAutoShape)slide.getShapes().get_Item(0);
    autoShape.getTextFrame().getTextFrameFormat().setRotationAngle(3);

    presentation.save("custom_text_rotation.pptx", SaveFormat.Pptx);
} finally {
    presentation.dispose();
}
ผลลัพธ์:

ตั้งค่าการเว้นระยะบรรทัดของย่อหน้า
Aspose.Slides มี IParagraphFormat.setSpaceAfter, IParagraphFormat.setSpaceBefore, และ IParagraphFormat.setSpaceWithin เพื่อควบคุมการเว้นระยะของย่อหน้า คุณสมบัติเหล่านี้ใช้ดังนี้
- ใช้ค่าบวกเพื่อระบุการเว้นระยะบรรทัดเป็นเปอร์เซ็นต์ของความสูงบรรทัด
- ใช้ค่าลบเพื่อระบุการเว้นระยะบรรทัดเป็นจุด
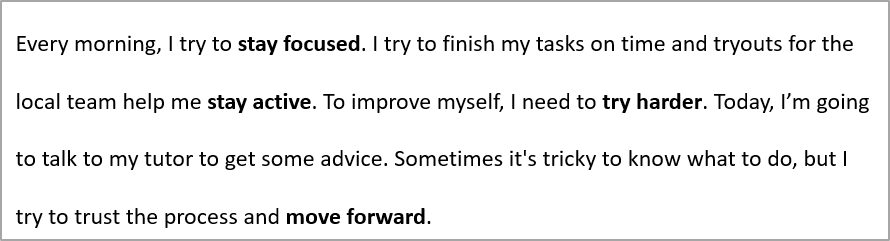
ตัวอย่างต่อไปนี้ตั้งค่าเว้นระยะภายในย่อหน้าแรกเป็น 200 % ของความสูงบรรทัด (การเว้นระยะสองเท่า):
import com.aspose.slides.*;

Presentation presentation = new Presentation("sample.pptx");
try {
    ISlide slide = presentation.getSlides().get_Item(0);

    IAutoShape autoShape = (IAutoShape)slide.getShapes().get_Item(0);

    IParagraph paragraph = autoShape.getTextFrame().getParagraphs().get_Item(0);
    paragraph.getParagraphFormat().setSpaceWithin(200);

    presentation.save("line_spacing.pptx", SaveFormat.Pptx);
} finally {
    presentation.dispose();
}
ผลลัพธ์:
ควบคุมการตัดบรรทัด
กฎการตัดบรรทัดของย่อหน้าเป็นประโยชน์ในบล็อกข้อความแคบและงานนำเสนอที่ผสมข้อความละตินและเอเชียตะวันออก วิธีต่อไปนี้เป็นของ IParagraphFormat, จึงใช้กับย่อหน้าทั้งหมด
- setLatinLineBreak ควบคุมกฎการตัดบรรทัดของละติน ในข้อความผสม การเปลี่ยนแปลงอาจทำให้การตัดบรรทัดของข้อความเอเชียตะวันออกและเครื่องหมายวรรคตอนที่อยู่ติดกันเปลี่ยนไป
- setEastAsianLineBreak ควบคุมกฎการตัดบรรทัดของเอเชียตะวันออก รวมถึงข้อจำกัดของอักขระที่อยู่ต้นและปลายบรรทัด
กฎเหล่านี้ไม่ได้แทนที่ ITextFrameFormat.setWrapText, ซึ่งเปิดการตัดบรรทัดอัตโนมัติภายในกรอบข้อความ พวกมันมีผลต่อการจัดวางเมื่อเกิดการตัดบรรทัด; พวกมันไม่ได้แทรกอักขระการตัดบรรทัด การตัดบรรทัดแบบชัดเจนจะบังคับให้ย่อหน้าเริ่มบรรทัดใหม่โดยไม่คำนึงถึงความกว้างที่ใช้ได้
ตัวอย่างต่อไปนี้สร้างบล็อกข้อความแคบที่ประกอบด้วยภาษาจีนและละติน ตั้งค่าตัวเลือกการตัดบรรทัดทั้งสองอย่างชัดเจนและบันทึกเป็น “line_breaking.pptx” เพื่อทดลองแต่ละกฎ ให้เปลี่ยนค่าที่เกี่ยวข้องพร้อมกันโดยรักษาการตั้งค่าอื่นไว้ ตัวอย่างใช้ฟอนท์ Arial ขนาด 24 จุดและ SimSun พร้อมความกว้างกรอบ 160 จุดและระยะขอบแนวนอนเป็นศูนย์ ITextFrameFormat.setAutofitType ถูกเรียกด้วย TextAutofitType.None เพื่อให้ขนาดข้อความและมิติของกรอบคงที่
import com.aspose.slides.*;
import java.awt.Color;

Presentation presentation = new Presentation();
try {
    ISlide slide = presentation.getSlides().get_Item(0);

    IAutoShape shape = slide.getShapes().addAutoShape(ShapeType.Rectangle, 50, 50, 160, 300);
    shape.getFillFormat().setFillType(FillType.NoFill);

    ITextFrame textFrame = shape.getTextFrame();
    textFrame.getTextFrameFormat().setWrapText(NullableBool.True);
    textFrame.getTextFrameFormat().setAutofitType(TextAutofitType.None);
    textFrame.getTextFrameFormat().setMarginLeft(0);
    textFrame.getTextFrameFormat().setMarginRight(0);

    IParagraph paragraph = textFrame.getParagraphs().get_Item(0);
    paragraph.setText("中文排版测试,PowerPoint 中文演示。");

    IParagraphFormat format = paragraph.getParagraphFormat();
    format.setAlignment(TextAlignment.Left);
    format.getDefaultPortionFormat().setFontHeight(24);
    FontData latinFont = new FontData("Arial");
    format.getDefaultPortionFormat().setLatinFont(latinFont);
    FontData eastAsianFont = new FontData("SimSun");
    format.getDefaultPortionFormat().setEastAsianFont(eastAsianFont);
    format.getDefaultPortionFormat().getFillFormat().setFillType(FillType.Solid);
    format.getDefaultPortionFormat().getFillFormat().getSolidFillColor().setColor(Color.BLACK);
    format.setLatinLineBreak(NullableBool.False);
    format.setEastAsianLineBreak(NullableBool.True);

    presentation.save("line_breaking.pptx", SaveFormat.Pptx);
} finally {
    presentation.dispose();
}
ควบคุมการแสดงเครื่องหมายวรรคตอนลอย
IParagraphFormat.setHangingPunctuation ทำให้เครื่องหมายวรรคตอนที่มีคุณสมบัติเหมาะสมลอยออกนอกขอบขวาของบรรทัดข้อความ แทนที่จะย้ายไปบรรทัดถัดไป การตั้งค่านี้ใช้กับย่อหน้าทั้งหมดและแตกต่างจากการเยื้องลอย
ตัวอย่างต่อไปนี้เปิดใช้การลอยเครื่องหมายวรรคตอนในกรอบข้อความกว้าง 100 จุดและบันทึกเป็น “hanging_punctuation.pptx” ด้วยฟอนท์ Arial ขนาด 24 จุดและระยะขอบแนวนอนเป็นศูนย์ จุดสุดท้ายของประโยคจะคงอยู่หลังคำว่า “sentence” และลอยออกนอกขอบขวาของข้อความ ตั้งค่าคุณสมบัตินี้เป็น NullableBool.False เพื่อเปรียบเทียบ: ด้วยการตั้งค่านี้ จุดสุดท้ายจะอยู่บนบรรทัดแยก การตัดบรรทัดเปิดใช้งานและการ autofit ปิดเพื่อคงความกว้างที่ใช้ได้คงที่
import com.aspose.slides.*;
import java.awt.Color;

Presentation presentation = new Presentation();
try {
    ISlide slide = presentation.getSlides().get_Item(0);

    IAutoShape shape = slide.getShapes().addAutoShape(ShapeType.Rectangle, 50, 50, 100, 200);
    shape.getFillFormat().setFillType(FillType.NoFill);

    ITextFrame textFrame = shape.getTextFrame();
    textFrame.getTextFrameFormat().setWrapText(NullableBool.True);
    textFrame.getTextFrameFormat().setAutofitType(TextAutofitType.None);
    textFrame.getTextFrameFormat().setMarginLeft(0);
    textFrame.getTextFrameFormat().setMarginRight(0);

    IParagraph paragraph = textFrame.getParagraphs().get_Item(0);
    paragraph.setText("Simple text, next sentence.");

    IParagraphFormat format = paragraph.getParagraphFormat();
    format.setAlignment(TextAlignment.Left);
    format.getDefaultPortionFormat().setFontHeight(24);
    FontData latinFont = new FontData("Arial");
    format.getDefaultPortionFormat().setLatinFont(latinFont);
    format.getDefaultPortionFormat().getFillFormat().setFillType(FillType.Solid);
    format.getDefaultPortionFormat().getFillFormat().getSolidFillColor().setColor(Color.BLACK);
    format.setHangingPunctuation(NullableBool.True);

    presentation.save("hanging_punctuation.pptx", SaveFormat.Pptx);
} finally {
    presentation.dispose();
}
ไม่ใช่เครื่องหมายวรรคตอนทุกตัวจะสามารถลอยได้ เงื่อนไขของฟอนท์และการจัดวางที่อธิบายไว้ใน ส่วนควบคุมการตัดบรรทัด ก็ใช้กับการเปรียบเทียบนี้: การเปลี่ยนฟอนท์, ความกว้างที่ใช้ได้, ระยะขอบ, หรือการตั้งค่า autofit อาจทำให้ความแตกต่างที่มองเห็นได้หายไป
ตั้งค่าประเภท Autofit สำหรับกรอบข้อความ
ITextFrameFormat.setAutofitType กำหนดว่าข้อความจะทำอย่างไรเมื่อเกินขอบเขตของคอนเทนเนอร์ ใช้เพื่อควบคุมว่าข้อความจะย่อ, ล้น, หรือเปลี่ยนขนาดรูปทรงโดยอัตโนมัติ ตัวอย่างต่อไปนี้กำหนดให้รูปทรงปรับขนาดเพื่อให้พอดีกับข้อความและบันทึกผลลัพธ์เป็น “autofit_type.pptx”
import com.aspose.slides.*;

Presentation presentation = new Presentation("sample.pptx");
try {
    ISlide slide = presentation.getSlides().get_Item(0);

    IAutoShape autoShape = (IAutoShape)slide.getShapes().get_Item(0);
    autoShape.getTextFrame().getTextFrameFormat().setAutofitType(TextAutofitType.Shape);

    presentation.save("autofit_type.pptx", SaveFormat.Pptx);
} finally {
    presentation.dispose();
}
หากต้องการนับจำนวนบรรทัดหลังจากการตัดบรรทัดอัตโนมัติและดูว่าขนาดข้อความหรือความกว้างของรูปทรงเปลี่ยนผลลัพธ์อย่างไร ให้ดูที่ Count Rendered Lines จำนวนบรรทัดอย่างเดียวไม่ได้บ่งบอกว่าข้อความล้นคอนเทนเนอร์หรือไม่
ตั้งค่าตำแหน่งยึดของกรอบข้อความ
ITextFrameFormat.setAnchoringType กำหนดว่าข้อความจะวางตำแหน่งแนวตั้งภายในรูปทรงอย่างไร เช่น ที่บน, กลาง, หรือล่าง ตัวอย่างต่อไปนี้ยึดข้อความไว้ที่ล่างของรูปทรงแรกและบันทึกผลลัพธ์เป็น “text_anchor.pptx”
import com.aspose.slides.*;

Presentation presentation = new Presentation("sample.pptx");
try {
    ISlide slide = presentation.getSlides().get_Item(0);

    IAutoShape autoShape = (IAutoShape)slide.getShapes().get_Item(0);
    autoShape.getTextFrame().getTextFrameFormat().setAnchoringType(TextAnchorType.Bottom);

    presentation.save("text_anchor.pptx", SaveFormat.Pptx);
} finally {
    presentation.dispose();
}
ตั้งค่าการจัดตำแหน่งแท็บของข้อความ
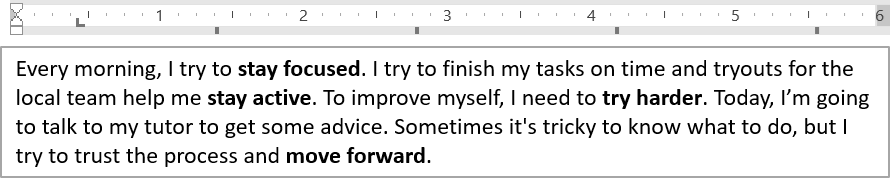
ใช้ IParagraphFormat.setDefaultTabSize และ IParagraphFormat.getTabs เพื่อกำหนดจุดหยุดแท็บในย่อหน้า ตัวอย่างต่อไปนี้ตั้งค่าช่วงแท็บเริ่มต้นเป็น 100 จุดและเพิ่มจุดหยุดแท็บแบบจัดชิดซ้ายที่ 30 จุด การตั้งค่าเหล่านี้มีผลต่อข้อความที่มีอักขระแท็บ
import com.aspose.slides.*;

Presentation presentation = new Presentation("sample.pptx");
try {
    ISlide slide = presentation.getSlides().get_Item(0);

    IAutoShape autoShape = (IAutoShape)slide.getShapes().get_Item(0);

    IParagraph paragraph = autoShape.getTextFrame().getParagraphs().get_Item(0);
    paragraph.getParagraphFormat().setDefaultTabSize(100);
    paragraph.getParagraphFormat().getTabs().add(30, TabAlignment.Left);

    presentation.save("paragraph_tabs.pptx", SaveFormat.Pptx);
} finally {
    presentation.dispose();
}
ผลลัพธ์:
ตั้งค่าภาษา Proofing
Aspose.Slides มี IBasePortionFormat.setLanguageId ให้คุณตั้งค่าภาษา proofing สำหรับส่วนข้อความ ภาษา proofing กำหนดภาษาที่ใช้สำหรับการตรวจสอบการสะกดและไวยากรณ์ใน PowerPoint
ตัวอย่างต่อไปนี้ต้องการไฟล์ “presentation.pptx” ที่มีกล่องข้อความเป็นรูปทรงแรกบนสไลด์แรกและอย่างน้อยหนึ่งย่อหน้า จะเปลี่ยนเนื้อหาของย่อหน้าแรกเป็น “1。” ตั้งค่า SimSun เป็นฟอนท์ของมันและกำหนดภาษา proofing ภาษาจีนตัวย่อ (zh-CN) แล้วบันทึกผลลัพธ์เป็น “proofing_language.pptx”:
import com.aspose.slides.*;

Presentation presentation = new Presentation("presentation.pptx");
try {
    ISlide slide = presentation.getSlides().get_Item(0);
    IAutoShape autoShape = (IAutoShape)slide.getShapes().get_Item(0);

    IParagraph paragraph = autoShape.getTextFrame().getParagraphs().get_Item(0);
    paragraph.getPortions().clear();

    FontData font = new FontData("SimSun");

    Portion textPortion = new Portion();
    textPortion.getPortionFormat().setComplexScriptFont(font);
    textPortion.getPortionFormat().setEastAsianFont(font);
    textPortion.getPortionFormat().setLatinFont(font);

    // ตั้งค่า Id ของภาษาการตรวจสอบ.
    textPortion.getPortionFormat().setLanguageId("zh-CN");

    textPortion.setText("1。");
    paragraph.getPortions().add(textPortion);

    presentation.save("proofing_language.pptx", SaveFormat.Pptx);
} finally {
    presentation.dispose();
}
ตั้งค่าภาษาเริ่มต้น
ใช้ LoadOptions.setDefaultTextLanguage เพื่อกำหนดภาษาตั้งต้นสำหรับข้อความที่สร้างขณะโหลดหรือสร้างงานนำเสนอ ตัวอย่างต่อไปนี้สร้างงานนำเสนอโดยตั้งค่าภาษาอังกฤษสหรัฐเป็นภาษาข้อความเริ่มต้น เพิ่มกล่องข้อความและพิมพ์ en-US สำหรับส่วนข้อความแรก:
import com.aspose.slides.*;

LoadOptions loadOptions = new LoadOptions();
loadOptions.setDefaultTextLanguage("en-US");

Presentation presentation = new Presentation(loadOptions);
try {
    ISlide slide = presentation.getSlides().get_Item(0);

    // เพิ่มรูปทรงสี่เหลี่ยมใหม่พร้อมข้อความ.
    IAutoShape shape = slide.getShapes().addAutoShape(ShapeType.Rectangle, 20, 20, 150, 50);
    shape.getTextFrame().setText("Sample text");

    // ตรวจสอบภาษาของส่วนข้อความแรก.
    IPortion portion = shape.getTextFrame().getParagraphs().get_Item(0).getPortions().get_Item(0);
    System.out.println(portion.getPortionFormat().getLanguageId());
} finally {
    presentation.dispose();
}
ตั้งค่า Style ข้อความเริ่มต้น
เพื่อใช้การจัดรูปแบบข้อความเริ่มต้นระดับงานนำเสนอ ใช้ IPresentation.getDefaultTextStyle
ตัวอย่างต่อไปนี้ตั้งค่าฟอนท์หนาขนาด 14 จุดเป็นค่าเริ่มต้นสำหรับย่อหน้า‑ระดับบนในงานนำเสนอใหม่และบันทึกเป็น “default_text_style.pptx” ข้อความสามารถสืบทอดค่าเริ่มต้นเหล่านี้ได้ เว้นแต่จะมีการจัดรูปแบบที่เฉพาะเจาะจงมากกว่าแทนที่
import com.aspose.slides.*;

Presentation presentation = new Presentation();
try {
    // ดึงรูปแบบย่อหน้าระดับบน.
    IParagraphFormat paragraphFormat = presentation.getDefaultTextStyle().getLevel(0);

    if (paragraphFormat != null) {
        paragraphFormat.getDefaultPortionFormat().setFontHeight(14);
        paragraphFormat.getDefaultPortionFormat().setFontBold(NullableBool.True);
    }

    presentation.save("default_text_style.pptx", SaveFormat.Pptx);
} finally {
    presentation.dispose();
}
สกัดข้อความด้วยเอฟเฟกต์ All‑Caps
ใน PowerPoint การใช้เอฟเฟกต์ฟอนท์ All Caps ทำให้ข้อความปรากฏเป็นตัวพิมพ์ใหญ่บนสไลด์ แม้ว่าจะพิมพ์เป็นตัวพิมพ์เล็กไว้เดิมก็ตาม เมื่อคุณดึงส่วนข้อความเช่นนั้นด้วย Aspose.Slides ไลบรารีจะคืนข้อความตามที่ป้อนไว้ เพื่อให้ตรงกับข้อความที่แสดง ให ตรวจสอบ TextCapType และแปลงสตริงที่คืนค่ามาเป็นตัวพิมพ์ใหญ่เมื่อค่าเป็น All
ตัวอย่างนี้ต้องการไฟล์ “sample2.pptx” ที่มีกล่องข้อความเป็นรูปทรงแรกบนสไลด์แรก ย่อหน้าแรกของมันมีส่วนแรกเป็น “Hello, Aspose!” พร้อมเอฟเฟกต์ All Caps ตามที่แสดงด้านล่าง

โค้ดตัวอย่างด้านล่างแสดงวิธีสกัดข้อความที่มีเอฟเฟกต์ All Caps:
import com.aspose.slides.*;

Presentation presentation = new Presentation("sample2.pptx");
try {
    ISlide slide = presentation.getSlides().get_Item(0);

    IAutoShape autoShape = (IAutoShape)slide.getShapes().get_Item(0);
    IPortion textPortion = autoShape.getTextFrame().getParagraphs().get_Item(0).getPortions().get_Item(0);

    System.out.println("Original text: " + textPortion.getText());

    IPortionFormatEffectiveData textFormat = textPortion.getPortionFormat().getEffective();
    if (textFormat.getTextCapType() == TextCapType.All) {
        String text = textPortion.getText().toUpperCase();
        System.out.println("All-Caps effect: " + text);
    }
} finally {
    presentation.dispose();
}
ผลลัพธ์:
Original text: Hello, Aspose!
All-Caps effect: HELLO, ASPOSE!
FAQ
ฉันจะแก้ไขข้อความในตารางบนสไลด์อย่างไร?
เพื่อแก้ไขข้อความในตารางบนสไลด์ ใช้ ITable วนลูปผ่านเซลล์และอัปเดตแต่ละเซลล์ผ่าน ICell.getTextFrame พร้อมการจัดรูปแบบย่อหน้าผ่าน IParagraph.getParagraphFormat
ฉันจะใส่สีไล่ระดับให้กับข้อความบนสไลด์ PowerPoint อย่างไร?
เพื่อใส่สีไล่ระดับให้กับข้อความ ใช้ IBasePortionFormat.getFillFormat ตั้งค่า IFillFormat.setFillType เป็น FillType.Gradient และกำหนดจุดหยุดไล่ระดับ, ทิศทาง, และความโปร่งแสง