
จัดการย่อหน้าข้อความ PowerPoint ใน Java
ภาพรวม
Aspose.Slides for Java แสดงข้อความเป็นลำดับชั้นของกรอบข้อความ, ย่อหน้า, และส่วนย่อย:
- ITextFrame เป็นคอนเทนเนอร์ข้อความในรูปร่างและให้การเข้าถึงคอลเลกชันย่อหน้า
- IParagraph แสดงย่อหน้าเดียวในกรอบข้อความและให้การเข้าถึงส่วนย่อยและการจัดรูปแบบระดับย่อหน้า
- IPortion เป็นส่วนย่อยของข้อความภายในย่อหน้า แต่ละส่วนย่อยสามารถมีข้อความและการจัดรูปแบบระดับอักขระของตนเองได้
ดังนั้น ย่อหน้าจึงสามารถบรรจุข้อความที่มีฟอนท์, สี, ขนาด, และการจัดรูปแบบอื่น ๆ แตกต่างกันได้โดยใช้หลายส่วนย่อย
สร้างและจัดรูปแบบย่อหน้า
สร้างย่อหน้าด้วยหลายส่วนย่อย
ขั้นตอนต่อไปนี้จะสร้างกรอบข้อความที่มีสามย่อหน้า, แต่ละย่อหน้ามีสามส่วนย่อย:
- สร้างอินสแตนซ์ของคลาส Presentation
- เข้าถึงสไลด์ที่เกี่ยวข้องผ่านดัชนีของมัน
- เพิ่ม IAutoShape แบบสี่เหลี่ยมมุมฉากไปยังสไลด์
- เข้าถึง ITextFrame ของรูปร่าง
- ใช้ย่อหน้าเริ่มต้นและเพิ่มวัตถุ IParagraph อีกสองอันไปยังกรอบข้อความ
- เพิ่มวัตถุ IPortion เพียงพอสำหรับแต่ละย่อหน้าให้มีสามส่วนย่อย ย่อหน้าเริ่มต้นมีส่วนย่อยว่างหนึ่งส่วนอยู่แล้ว
- ตั้งค่าข้อความของแต่ละส่วนย่อย
- ใช้การจัดรูปแบบระดับอักขระผ่าน IPortion.getPortionFormat
- บันทึกการนำเสนอที่แก้ไขแล้ว
ตัวอย่าง Java นี้ดำเนินตามขั้นตอนดังกล่าว:
import com.aspose.slides.*;
import java.awt.Color;

Presentation presentation = new Presentation();
try {
    ISlide slide = presentation.getSlides().get_Item(0);
    IAutoShape shape = slide.getShapes().addAutoShape(ShapeType.Rectangle, 50, 150, 300, 150);
    ITextFrame textFrame = shape.getTextFrame();

    IParagraph firstParagraph = textFrame.getParagraphs().get_Item(0);
    firstParagraph.getPortions().add(new Portion());
    firstParagraph.getPortions().add(new Portion());

    IParagraph secondParagraph = new Paragraph();
    secondParagraph.getPortions().add(new Portion());
    secondParagraph.getPortions().add(new Portion());
    secondParagraph.getPortions().add(new Portion());
    textFrame.getParagraphs().add(secondParagraph);

    IParagraph thirdParagraph = new Paragraph();
    thirdParagraph.getPortions().add(new Portion());
    thirdParagraph.getPortions().add(new Portion());
    thirdParagraph.getPortions().add(new Portion());
    textFrame.getParagraphs().add(thirdParagraph);

    int paragraphCount = textFrame.getParagraphs().getCount();
    for (int paragraphIndex = 0; paragraphIndex < paragraphCount; paragraphIndex++) {
        IParagraph paragraph = textFrame.getParagraphs().get_Item(paragraphIndex);
        int portionCount = paragraph.getPortions().getCount();
        for (int portionIndex = 0; portionIndex < portionCount; portionIndex++) {
            IPortion portion = paragraph.getPortions().get_Item(portionIndex);
            portion.setText("Portion " + (paragraphIndex + 1) + "." + (portionIndex + 1));

            if (portionIndex == 0) {
                portion.getPortionFormat().getFillFormat().setFillType(FillType.Solid);
                portion.getPortionFormat().getFillFormat().getSolidFillColor().setColor(Color.RED);
                portion.getPortionFormat().setFontBold(NullableBool.True);
                portion.getPortionFormat().setFontHeight(15);
            } else if (portionIndex == 1) {
                portion.getPortionFormat().getFillFormat().setFillType(FillType.Solid);
                portion.getPortionFormat().getFillFormat().getSolidFillColor().setColor(Color.BLUE);
                portion.getPortionFormat().setFontItalic(NullableBool.True);
                portion.getPortionFormat().setFontHeight(18);
            }
        }
    }

    presentation.save("paragraphs_with_portions.pptx", SaveFormat.Pptx);
} finally {
    presentation.dispose();
}
สร้างรายการแบบหัวข้อย่อยและลำดับเลข
สร้างรายการแบบหัวข้อย่อยหรือแบบลำดับเลข
หัวข้อย่อยและการนับเลขทำให้การสแกนรายการที่เกี่ยวข้องง่ายขึ้น ใน Aspose.Slides การตั้งค่ารายการจะกำหนดผ่าน IBulletFormat
- สร้างอินสแตนซ์ของคลาส Presentation
- เข้าถึงสไลด์ที่เกี่ยวข้องผ่านดัชนีของมัน
- เพิ่ม IAutoShape ไปยังสไลด์ที่เลือก
- เข้าถึง ITextFrame ของรูปร่าง
- ลบย่อหน้าเริ่มต้นออกจากกรอบข้อความ
- สร้าง Paragraph สำหรับหัวข้อสัญลักษณ์
- ตั้งค่า IBulletFormat.setType เป็น BulletType.Symbol และระบุอักขระหัวข้อ
- ตั้งค่าข้อความย่อหน้า, ระยะเยื้อง, สีหัวข้อ, และความสูงหัวข้อ
- เพิ่มย่อหน้าไปยังกรอบข้อความ
- สร้างย่อหน้าที่สองและตั้งค่า IBulletFormat.setType เป็น BulletType.Numbered
- กำหนดรูปแบบหัวข้อเลขลำดับและเพิ่มย่อหน้าไปยังกรอบข้อความ
- บันทึกการนำเสนอ
ตัวอย่าง Java นี้สร้างหัวข้อสัญลักษณ์และหัวข้อเลขลำดับ:
import com.aspose.slides.*;
import java.awt.Color;

Presentation presentation = new Presentation();
try {
    ISlide slide = presentation.getSlides().get_Item(0);
    IAutoShape shape = slide.getShapes().addAutoShape(ShapeType.Rectangle, 200, 200, 400, 200);
    ITextFrame textFrame = shape.getTextFrame();
    textFrame.getParagraphs().clear();

    Paragraph symbolParagraph = new Paragraph();
    symbolParagraph.setText("Welcome to Aspose.Slides");
    symbolParagraph.getParagraphFormat().getBullet().setType(BulletType.Symbol);
    symbolParagraph.getParagraphFormat().getBullet().setChar((char) 0x2022);
    symbolParagraph.getParagraphFormat().setIndent(25);
    symbolParagraph.getParagraphFormat().getBullet().getColor().setColorType(ColorType.RGB);
    symbolParagraph.getParagraphFormat().getBullet().getColor().setColor(Color.BLACK);
    symbolParagraph.getParagraphFormat().getBullet().setBulletHardColor(NullableBool.True);
    symbolParagraph.getParagraphFormat().getBullet().setHeight(100);
    textFrame.getParagraphs().add(symbolParagraph);

    Paragraph numberedParagraph = new Paragraph();
    numberedParagraph.setText("This is a numbered item");
    numberedParagraph.getParagraphFormat().getBullet().setType(BulletType.Numbered);
    numberedParagraph.getParagraphFormat().getBullet().setNumberedBulletStyle(NumberedBulletStyle.BulletCircleNumWDBlackPlain);
    numberedParagraph.getParagraphFormat().setIndent(25);
    numberedParagraph.getParagraphFormat().getBullet().getColor().setColorType(ColorType.RGB);
    numberedParagraph.getParagraphFormat().getBullet().getColor().setColor(Color.BLACK);
    numberedParagraph.getParagraphFormat().getBullet().setBulletHardColor(NullableBool.True);
    numberedParagraph.getParagraphFormat().getBullet().setHeight(100);
    textFrame.getParagraphs().add(numberedParagraph);

    presentation.save("bulleted_and_numbered_list.pptx", SaveFormat.Pptx);
} finally {
    presentation.dispose();
}
ใช้หัวข้อภาพ
หัวข้อภาพให้คุณใช้ภาพกำหนดเองแทนสัญลักษณ์หรือเลข
- สร้างอินสแตนซ์ของคลาส Presentation
- เข้าถึงสไลด์ที่เกี่ยวข้องผ่านดัชนีของมัน
- เพิ่ม IAutoShape และเข้าถึง ITextFrame
- ลบย่อหน้าเริ่มต้นออกจากกรอบข้อความ
- โหลดภาพหัวข้อและเพิ่มไปยังคอลเลกชันภาพของการนำเสนอเป็น IPPImage
- สร้าง Paragraph และตั้งค่าข้อความของมัน
- ตั้งค่า IBulletFormat.setType เป็น BulletType.Picture
- กำหนดภาพผ่าน IBulletFormat.getPicture และตั้งค่าความสูงหัวข้อ
- เพิ่มย่อหน้าไปยังกรอบข้อความ
- บันทึกการนำเสนอที่แก้ไขแล้ว
ตัวอย่าง Java นี้สร้างหัวข้อภาพ:
import com.aspose.slides.*;

Presentation presentation = new Presentation();
try {
    ISlide slide = presentation.getSlides().get_Item(0);

    IImage bulletImage = Images.fromFile("bullets.png");
    IPPImage presentationImage;
    try {
        presentationImage = presentation.getImages().addImage(bulletImage);
    } finally {
        bulletImage.dispose();
    }

    IAutoShape shape = slide.getShapes().addAutoShape(ShapeType.Rectangle, 200, 200, 400, 200);
    ITextFrame textFrame = shape.getTextFrame();
    textFrame.getParagraphs().clear();

    Paragraph paragraph = new Paragraph();
    paragraph.setText("Welcome to Aspose.Slides");
    paragraph.getParagraphFormat().getBullet().setType(BulletType.Picture);
    paragraph.getParagraphFormat().getBullet().getPicture().setImage(presentationImage);
    paragraph.getParagraphFormat().getBullet().setHeight(100);
    textFrame.getParagraphs().add(paragraph);

    presentation.save("picture_bullet.pptx", SaveFormat.Pptx);
    presentation.save("picture_bullet.ppt", SaveFormat.Ppt);
} finally {
    presentation.dispose();
}
สร้างรายการหลายระดับ
ตั้งค่า IParagraphFormat.setDepth เพื่อวางย่อหน้าในระดับต่าง ๆ ของรายการ ระดับบนสุดมีความลึกเป็น 0
- สร้าง Presentation และเข้าถึงสไลด์
- เพิ่ม IAutoShape แล้วลบย่อหน้าเริ่มต้นออกจากกรอบข้อความของมัน
- สร้างสี่ย่อหน้าและกำหนดสัญลักษณ์หัวข้อให้แต่ละอัน
- ตั้งค่าความลึกของพวกมันด้วย IParagraphFormat.setDepth เป็น
0,1,2, และ3 - เพิ่มย่อหน้าไปยังกรอบข้อความและบันทึกการนำเสนอ
ตัวอย่าง Java นี้สร้างรายการหัวข้อย่อยสี่ระดับ:
import com.aspose.slides.*;
import java.awt.Color;

Presentation presentation = new Presentation();
try {
    ISlide slide = presentation.getSlides().get_Item(0);
    IAutoShape shape = slide.getShapes().addAutoShape(ShapeType.Rectangle, 200, 200, 400, 200);
    ITextFrame textFrame = shape.getTextFrame();
    textFrame.getParagraphs().clear();

    IParagraph firstParagraph = new Paragraph();
    firstParagraph.setText("Content");
    firstParagraph.getParagraphFormat().getBullet().setType(BulletType.Symbol);
    firstParagraph.getParagraphFormat().getBullet().setChar((char) 0x2022);
    firstParagraph.getParagraphFormat().getDefaultPortionFormat().getFillFormat().setFillType(FillType.Solid);
    firstParagraph.getParagraphFormat().getDefaultPortionFormat().getFillFormat().getSolidFillColor().setColor(Color.BLACK);
    firstParagraph.getParagraphFormat().setDepth((short) 0);

    IParagraph secondParagraph = new Paragraph();
    secondParagraph.setText("Second level");
    secondParagraph.getParagraphFormat().getBullet().setType(BulletType.Symbol);
    secondParagraph.getParagraphFormat().getBullet().setChar('-');
    secondParagraph.getParagraphFormat().getDefaultPortionFormat().getFillFormat().setFillType(FillType.Solid);
    secondParagraph.getParagraphFormat().getDefaultPortionFormat().getFillFormat().getSolidFillColor().setColor(Color.BLACK);
    secondParagraph.getParagraphFormat().setDepth((short) 1);

    IParagraph thirdParagraph = new Paragraph();
    thirdParagraph.setText("Third level");
    thirdParagraph.getParagraphFormat().getBullet().setType(BulletType.Symbol);
    thirdParagraph.getParagraphFormat().getBullet().setChar((char) 0x2022);
    thirdParagraph.getParagraphFormat().getDefaultPortionFormat().getFillFormat().setFillType(FillType.Solid);
    thirdParagraph.getParagraphFormat().getDefaultPortionFormat().getFillFormat().getSolidFillColor().setColor(Color.BLACK);
    thirdParagraph.getParagraphFormat().setDepth((short) 2);

    IParagraph fourthParagraph = new Paragraph();
    fourthParagraph.setText("Fourth level");
    fourthParagraph.getParagraphFormat().getBullet().setType(BulletType.Symbol);
    fourthParagraph.getParagraphFormat().getBullet().setChar('-');
    fourthParagraph.getParagraphFormat().getDefaultPortionFormat().getFillFormat().setFillType(FillType.Solid);
    fourthParagraph.getParagraphFormat().getDefaultPortionFormat().getFillFormat().getSolidFillColor().setColor(Color.BLACK);
    fourthParagraph.getParagraphFormat().setDepth((short) 3);

    textFrame.getParagraphs().add(firstParagraph);
    textFrame.getParagraphs().add(secondParagraph);
    textFrame.getParagraphs().add(thirdParagraph);
    textFrame.getParagraphs().add(fourthParagraph);

    presentation.save("multilevel_list.pptx", SaveFormat.Pptx);
} finally {
    presentation.dispose();
}
กำหนดค่าตัวเลขเริ่มต้นของรายการลำดับเลข
ใช้ IBulletFormat.setNumberedBulletStartWith เพื่อกำหนดเลขเริ่มต้นที่แสดงสำหรับย่อหน้าลำดับเลข
- สร้าง Presentation และเพิ่ม IAutoShape ไปยังสไลด์
- ลบย่อหน้าเริ่มต้นออกจากกรอบข้อความของรูปร่าง
- สร้างย่อหน้าลำดับเลขสามอัน
- ตั้งค่า IBulletFormat.setNumberedBulletStartWith เป็น
2,3, และ7สำหรับย่อหน้าแต่ละอัน - เพิ่มย่อหน้าไปยังกรอบข้อความและบันทึกการนำเสนอ
ตัวอย่าง Java นี้กำหนดเลขเริ่มต้นแบบกำหนดเองให้แต่ละย่อหน้า:
import com.aspose.slides.*;

Presentation presentation = new Presentation();
try {
    ISlide slide = presentation.getSlides().get_Item(0);
    IAutoShape shape = slide.getShapes().addAutoShape(ShapeType.Rectangle, 200, 200, 400, 200);
    ITextFrame textFrame = shape.getTextFrame();
    textFrame.getParagraphs().clear();

    Paragraph firstParagraph = new Paragraph();
    firstParagraph.setText("Start at 2");
    firstParagraph.getParagraphFormat().getBullet().setType(BulletType.Numbered);
    firstParagraph.getParagraphFormat().getBullet().setNumberedBulletStartWith((short) 2);
    textFrame.getParagraphs().add(firstParagraph);

    Paragraph secondParagraph = new Paragraph();
    secondParagraph.setText("Start at 3");
    secondParagraph.getParagraphFormat().getBullet().setType(BulletType.Numbered);
    secondParagraph.getParagraphFormat().getBullet().setNumberedBulletStartWith((short) 3);
    textFrame.getParagraphs().add(secondParagraph);

    Paragraph thirdParagraph = new Paragraph();
    thirdParagraph.setText("Start at 7");
    thirdParagraph.getParagraphFormat().getBullet().setType(BulletType.Numbered);
    thirdParagraph.getParagraphFormat().getBullet().setNumberedBulletStartWith((short) 7);
    textFrame.getParagraphs().add(thirdParagraph);

    presentation.save("custom_numbered_list.pptx", SaveFormat.Pptx);
} finally {
    presentation.dispose();
}
ควบคุมการจัดวางและคุณสมบัติของย่อหน้าที่จบ
ตั้งค่าเยื้องบรรทัดแรก
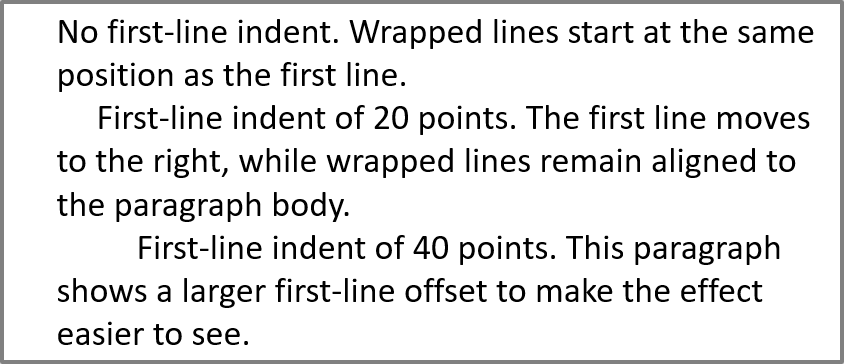
ใช้ IParagraphFormat.setIndent เพื่อควบคุมการเยื้องบรรทัดแรกของย่อหน้า วิธีนี้จะย้ายเฉพาะบรรทัดแรกโดยอิงตามขอบซ้ายของย่อหน้า ค่าเป็นบวกจะเลื่อนบรรทัดแรกไปทางขวา ส่วนบรรทัดที่เหลือจะคงแนวตามเนื้อหาย่อหน้า
ใช้ IParagraphFormat.setMarginLeft เมื่อคุณต้องการย้ายทั้งย่อหน้า ใช้ IParagraphFormat.setIndent เมื่อต้องการย้ายเฉพาะบรรทัดแรกเท่านั้น
ตัวอย่างด้านล่างสร้างหลายย่อหน้าและใช้ค่า IParagraphFormat.setIndent ที่แตกต่างกันเพื่อแสดงว่าการเยื้องบรรทัดแรกส่งผลต่อการจัดวางอย่างไร
- สร้างอินสแตนซ์ของคลาส Presentation
- เข้าถึงสไลด์เป้าหมาย
- เพิ่ม IAutoShape แบบสี่เหลี่ยมมุมฉากไปยังสไลด์
- เข้าถึง ITextFrame ของรูปร่างและลบย่อหน้าเริ่มต้น
- สร้างหลายย่อหน้าและตั้งค่าค่า IParagraphFormat.setIndent ที่แตกต่างกันสำหรับแต่ละย่อหน้า
- เพิ่มย่อหน้าไปยังกรอบข้อความ
- บันทึกการนำเสนอที่แก้ไขแล้ว
โค้ดนี้แสดงวิธีตั้งค่าเยื้องย่อหน้า:
import com.aspose.slides.*;
import java.awt.Color;

Presentation presentation = new Presentation();
try {
    ISlide slide = presentation.getSlides().get_Item(0);

    IAutoShape shape = slide.getShapes().addAutoShape(ShapeType.Rectangle, 50, 50, 420, 220);
    shape.getFillFormat().setFillType(FillType.NoFill);
    shape.getLineFormat().getFillFormat().setFillType(FillType.Solid);
    shape.getLineFormat().getFillFormat().getSolidFillColor().setColor(Color.GRAY);

    ITextFrame textFrame = shape.getTextFrame();
    textFrame.getTextFrameFormat().setAutofitType(TextAutofitType.Shape);
    textFrame.getParagraphs().clear();

    Paragraph firstParagraph = new Paragraph();
    firstParagraph.setText("No first-line indent. Wrapped lines start at the same position as the first line.");
    firstParagraph.getParagraphFormat().getDefaultPortionFormat().getFillFormat().setFillType(FillType.Solid);
    firstParagraph.getParagraphFormat().getDefaultPortionFormat().getFillFormat().getSolidFillColor().setColor(Color.BLACK);
    firstParagraph.getParagraphFormat().setMarginLeft(20f);
    firstParagraph.getParagraphFormat().setIndent(0f);

    Paragraph secondParagraph = new Paragraph();
    secondParagraph.setText("First-line indent of 20 points. The first line moves to the right, while wrapped lines remain aligned to the paragraph body.");
    secondParagraph.getParagraphFormat().getDefaultPortionFormat().getFillFormat().setFillType(FillType.Solid);
    secondParagraph.getParagraphFormat().getDefaultPortionFormat().getFillFormat().getSolidFillColor().setColor(Color.BLACK);
    secondParagraph.getParagraphFormat().setMarginLeft(20f);
    secondParagraph.getParagraphFormat().setIndent(20f);

    Paragraph thirdParagraph = new Paragraph();
    thirdParagraph.setText("First-line indent of 40 points. This paragraph shows a larger first-line offset to make the effect easier to see.");
    thirdParagraph.getParagraphFormat().getDefaultPortionFormat().getFillFormat().setFillType(FillType.Solid);
    thirdParagraph.getParagraphFormat().getDefaultPortionFormat().getFillFormat().getSolidFillColor().setColor(Color.BLACK);
    thirdParagraph.getParagraphFormat().setMarginLeft(20f);
    thirdParagraph.getParagraphFormat().setIndent(40f);

    textFrame.getParagraphs().add(firstParagraph);
    textFrame.getParagraphs().add(secondParagraph);
    textFrame.getParagraphs().add(thirdParagraph);

    presentation.save("paragraph_indent.pptx", SaveFormat.Pptx);
} finally {
    presentation.dispose();
}
ผลลัพธ์:
ตั้งค่าเยื้องลอย
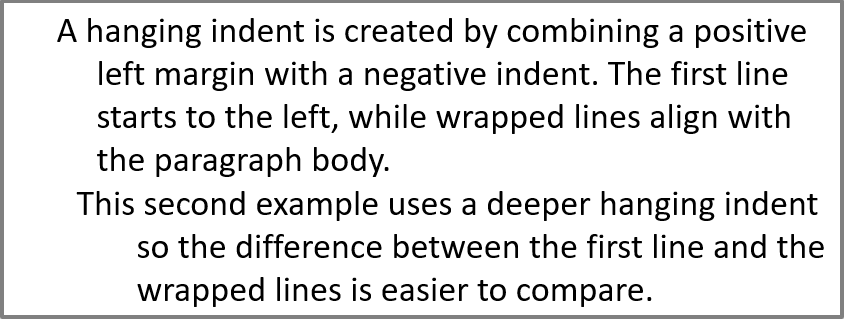
เยื้องลอยเป็นการจัดวางย่อหน้าโดยบรรทัดแรกเริ่มอยู่ทางซ้ายของบรรทัดที่เหลือ ใน Aspose.Slides คุณสร้างเอฟเฟกต์นี้ด้วย IParagraphFormat.setIndent โดยกำหนดค่าติดลบเพื่อย้ายบรรทัดแรกไปทางซ้ายเมื่อเทียบกับตัวเนื้อหาย่อหน้า
โดยปฏิบัติ, IParagraphFormat.setMarginLeft กำหนดตำแหน่งซ้ายของเนื้อหาย่อหน้า, ส่วน IParagraphFormat.setIndent กำหนดตำแหน่งของบรรทัดแรกเมื่อเทียบกับระยะซ้ายนั้น เพื่อสร้างเยื้องลอย ให้กำหนดค่าบวกให้กับ setMarginLeft และค่าลบให้กับ setIndent
การจัดรูปแบบนี้มีประโยชน์สำหรับบรรณานุกรม, การอ้างอิง, รายการอภิธานศัพท์, และย่อหน้าอื่น ๆ ที่บรรทัดที่พับต้องจัดแนวใต้เนื้อหาย่อหน้าแทนที่จะอยู่ใต้ตัวอักษรแรกของบรรทัดแรก
- สร้างอินสแตนซ์ของคลาส Presentation
- เข้าถึงสไลด์เป้าหมาย
- เพิ่ม IAutoShape แบบสี่เหลี่ยมมุมฉากไปยังสไลด์
- เข้าถึง ITextFrame ของรูปร่างและลบย่อหน้าเริ่มต้น
- สร้างย่อหน้าและกำหนดค่าบวกให้กับ IParagraphFormat.setMarginLeft สำหรับแต่ละย่อหน้า
- กำหนดค่าลบให้กับ IParagraphFormat.setIndent เพื่อสร้างเอฟเฟกต์เยื้องลอย
- เพิ่มย่อหน้าไปยังกรอบข้อความ
- บันทึกการนำเสนอที่แก้ไขแล้ว
โค้ดนี้แสดงวิธีตั้งค่าเยื้องลอยสำหรับย่อหน้า:
import com.aspose.slides.*;
import java.awt.Color;

Presentation presentation = new Presentation();
try {
    ISlide slide = presentation.getSlides().get_Item(0);

    IAutoShape shape = slide.getShapes().addAutoShape(ShapeType.Rectangle, 50, 50, 420, 220);
    shape.getFillFormat().setFillType(FillType.NoFill);
    shape.getLineFormat().getFillFormat().setFillType(FillType.Solid);
    shape.getLineFormat().getFillFormat().getSolidFillColor().setColor(Color.GRAY);

    ITextFrame textFrame = shape.getTextFrame();
    textFrame.getTextFrameFormat().setAutofitType(TextAutofitType.Shape);
    textFrame.getParagraphs().clear();

    Paragraph firstParagraph = new Paragraph();
    firstParagraph.setText("A hanging indent is created by combining a positive left margin with a negative indent. The first line starts to the left, while wrapped lines align with the paragraph body.");
    firstParagraph.getParagraphFormat().getDefaultPortionFormat().getFillFormat().setFillType(FillType.Solid);
    firstParagraph.getParagraphFormat().getDefaultPortionFormat().getFillFormat().getSolidFillColor().setColor(Color.BLACK);
    firstParagraph.getParagraphFormat().setMarginLeft(40f);
    firstParagraph.getParagraphFormat().setIndent(-20f);

    Paragraph secondParagraph = new Paragraph();
    secondParagraph.setText("This second example uses a deeper hanging indent so the difference between the first line and the wrapped lines is easier to compare.");
    secondParagraph.getParagraphFormat().getDefaultPortionFormat().getFillFormat().setFillType(FillType.Solid);
    secondParagraph.getParagraphFormat().getDefaultPortionFormat().getFillFormat().getSolidFillColor().setColor(Color.BLACK);
    secondParagraph.getParagraphFormat().setMarginLeft(60f);
    secondParagraph.getParagraphFormat().setIndent(-30f);

    textFrame.getParagraphs().add(firstParagraph);
    textFrame.getParagraphs().add(secondParagraph);

    presentation.save("hanging_indent.pptx", SaveFormat.Pptx);
} finally {
    presentation.dispose();
}
ผลลัพธ์:
ตั้งค่าคุณสมบัติการทำงานของส่วนย่อยตอนจบย่อหน้า
IParagraph.setEndParagraphPortionFormat ควบคุมการจัดรูปแบบของสัญลักษณ์จบย่อหน้า ตัวอย่างต่อไปนี้กำหนดขนาดฟอนท์และฟอนท์ละตินให้กับสัญลักษณ์จบของย่อหน้าที่สอง:
- โหลด Presentation และเข้าถึงสไลด์
- เพิ่ม IAutoShape แล้วลบย่อหน้าเริ่มต้นของมัน
- สร้างสองย่อหน้าและเพิ่มส่วนย่อยของข้อความลงไป
- สร้าง PortionFormat สำหรับสัญลักษณ์จบของย่อหน้าที่สอง
- ตั้งค่า IBasePortionFormat.setFontHeight และ IBasePortionFormat.setLatinFont
- กำหนดรูปแบบโดยใช้ IParagraph.setEndParagraphPortionFormat แล้วบันทึกการนำเสนอ
import com.aspose.slides.*;

Presentation presentation = new Presentation("Test.pptx");
try {
    ISlide slide = presentation.getSlides().get_Item(0);
    IAutoShape shape = slide.getShapes().addAutoShape(ShapeType.Rectangle, 10, 10, 200, 250);
    ITextFrame textFrame = shape.getTextFrame();
    textFrame.getParagraphs().clear();

    Paragraph firstParagraph = new Paragraph();
    firstParagraph.getPortions().add(new Portion("Sample text"));

    Paragraph secondParagraph = new Paragraph();
    secondParagraph.getPortions().add(new Portion("Sample text 2"));

    PortionFormat endParagraphFormat = new PortionFormat();
    endParagraphFormat.setFontHeight(48);
    endParagraphFormat.setLatinFont(new FontData("Times New Roman"));
    secondParagraph.setEndParagraphPortionFormat(endParagraphFormat);

    textFrame.getParagraphs().add(firstParagraph);
    textFrame.getParagraphs().add(secondParagraph);

    presentation.save("end_paragraph_format.pptx", SaveFormat.Pptx);
} finally {
    presentation.dispose();
}
นับจำนวนบรรทัดที่เรนเดอร์
สำหรับกฎของย่อหน้าที่ส่งผลต่อการบรรจบอัตโนมัติและเครื่องหมายวรรคตอนที่ปลายบรรทัด, ดูที่ Control Line Breaking และ Control Hanging Punctuation
ใช้ IParagraph.getLinesCount เพื่อให้นับจำนวนบรรทัดที่ย่อหน้าครอบครองหลังจากการจัดวางข้อความ, รวมถึงการบรรจบอัตโนมัติ ซึ่งมีประโยชน์เมื่อเช็คความยาวของข้อความและการจัดวางในแม่แบบการนำเสนอ
ย่อหน้าเป็นรายการหนึ่งใน ITextFrame.getParagraphs และอาจครอบคลุมหลายบรรทัดที่เรนเดอร์ การใส่การขึ้นบรรทัดใหม่อย่างชัดเจนภายในย่อหน้าจะบังคับให้เกิดบรรทัดใหม่โดยไม่ต้องสร้างย่อหน้าใหม่ การบรรจบอัตโนมัติสร้างบรรทัดตามความกว้างที่มีอยู่โดยไม่แทรกการขึ้นบรรทัดใหม่ในข้อความ ดังนั้นการนับย่อหน้าหรืออักขระการขึ้นบรรทัดจึงไม่ได้ให้จำนวนบรรทัดที่เรนเดอร์
ตัวอย่างต่อไปนี้สร้างรูปร่างข้อความ, นับบรรทัดของมัน, ทำให้รูปร่างแคบลง, แล้วแทนที่ข้อความด้วยสตริงสั้นลง การบรรจบเปิดและการปรับขนาดอัตโนมัติปิดเพื่อให้ความกว้างของรูปร่างควบคุมการบรรจบโดยไม่ย่อข้อความหรือปรับขนาดรูปร่างโดยอัตโนมัติ มาตรฐานเป็นจุดสุดท้าย ตัวอย่างสุดท้ายเพิ่มย่อหน้าอีกหนึ่งอันและรวมจำนวนบรรทัดทั้งหมดในกรอบข้อความ
import com.aspose.slides.*;

Presentation presentation = new Presentation();
try {
    ISlide slide = presentation.getSlides().get_Item(0);

    IAutoShape shape = slide.getShapes().addAutoShape(ShapeType.Rectangle, 50, 50, 400, 200);
    ITextFrame textFrame = shape.getTextFrame();
    textFrame.getTextFrameFormat().setWrapText(NullableBool.True);
    textFrame.getTextFrameFormat().setAutofitType(TextAutofitType.None);

    IParagraph paragraph = textFrame.getParagraphs().get_Item(0);
    paragraph.getParagraphFormat().getDefaultPortionFormat().setFontHeight(20);
    paragraph.setText("This text demonstrates how automatic wrapping changes the number of rendered lines.");
    System.out.println("Original width: " + paragraph.getLinesCount());

    shape.setWidth(150);
    System.out.println("Narrower shape: " + paragraph.getLinesCount());

    paragraph.setText("Short text.");
    System.out.println("Shorter text: " + paragraph.getLinesCount());

    Paragraph secondParagraph = new Paragraph();
    secondParagraph.setText("Another paragraph.");
    secondParagraph.getParagraphFormat().getDefaultPortionFormat().setFontHeight(20);
    textFrame.getParagraphs().add(secondParagraph);

    int totalLineCount = 0;
    for (IParagraph currentParagraph : textFrame.getParagraphs()) {
        totalLineCount += currentParagraph.getLinesCount();
    }
    System.out.println("Total lines in the text frame: " + totalLineCount);
} finally {
    presentation.dispose();
}
ด้วยข้อความและขนาดเหล่านี้, การทำให้รูปร่างแคบลงจะเพิ่มจำนวนบรรทัด, ในขณะที่การแทนที่ข้อความด้วยสตริงสั้นจะลดจำนวนบรรทัด จำนวนที่แน่นอนอาจแตกต่างตามฟอนท์ที่มีและการทดแทน, ขนาดฟอนท์, ระยะขอบ, ระยะเยื้อง, การบรรจบ, และการตั้งค่า autofit ใช้ฟอนท์และการตั้งค่าการจัดวางที่ตั้งใจสำหรับสภาพแวดล้อมเป้าหมายเมื่อทำการตรวจสอบแม่แบบ
จำนวนบรรทัดเพียงอย่างเดียวไม่ได้กำหนดว่าข้อความจะล้นที่เก็บหรือไม่ ความสูงที่มี, ความสูงของบรรทัด, การเว้นระยะของย่อหน้าและบรรทัด, รวมถึงพฤติกรรม autofit ก็มีผลด้วย; แม้บรรทัดเดียวอาจเกินความกว้างที่มีเมื่อปิดการบรรจบ
นำเข้าและส่งออกเนื้อหาย่อหน้า
นำเข้า HTML เข้าสู่ย่อหน้า
ใช้ ParagraphCollection.addFromHtml เพื่อแปลงมาร์กอัป HTML เป็นย่อหน้าและส่วนย่อยในกรอบข้อความ
- สร้างอินสแตนซ์ของคลาส Presentation
- เข้าถึงสไลด์และเพิ่ม IAutoShape
- เข้าถึง ITextFrame ของรูปร่างและลบย่อหน้าเริ่มต้น
- อ่านไฟล์ HTML แหล่งที่มา
- ส่งสตริง HTML ไปยัง ParagraphCollection.addFromHtml
- บันทึกการนำเสนอที่แก้ไขแล้ว
ตัวอย่าง Java นี้นำเข้า HTML ไปยังกรอบข้อความ:
import com.aspose.slides.*;
import java.io.IOException;
import java.nio.charset.StandardCharsets;
import java.nio.file.Files;
import java.nio.file.Paths;

Presentation presentation = new Presentation();
try {
    ISlide slide = presentation.getSlides().get_Item(0);
    float shapeWidth = (float) presentation.getSlideSize().getSize().getWidth() - 20;
    float shapeHeight = (float) presentation.getSlideSize().getSize().getHeight() - 20;
    IAutoShape shape = slide.getShapes().addAutoShape(ShapeType.Rectangle, 10, 10, shapeWidth, shapeHeight);
    shape.getFillFormat().setFillType(FillType.NoFill);
    shape.getTextFrame().getParagraphs().clear();

    try {
        byte[] htmlBytes = Files.readAllBytes(Paths.get("file.html"));
        String html = new String(htmlBytes, StandardCharsets.UTF_8);
        shape.getTextFrame().getParagraphs().addFromHtml(html);
        presentation.save("html_text.pptx", SaveFormat.Pptx);
    } catch (IOException exception) {
        System.out.println("The HTML file could not be read: " + exception.getMessage());
    }
} finally {
    presentation.dispose();
}
ส่งออกข้อความย่อหน้าเป็น HTML
ใช้ ParagraphCollection.exportToHtml เพื่อส่งออกช่วงย่อหน้าที่เลือกเป็น HTML
- สร้างอินสแตนซ์ของคลาส Presentation และโหลดการนำเสนอที่ต้องการ
- เข้าถึงสไลด์และค้นหา IAutoShape ที่มีข้อความ
- เข้าถึง ITextFrame
- เรียก ParagraphCollection.exportToHtml พร้อมดัชนีย่อหน้าเริ่มต้นและจำนวนย่อหน้าที่ต้องการส่งออก
- เขียนสตริง HTML ที่คืนค่าลงไฟล์
ตัวอย่าง Java นี้ส่งออกย่อหน้าทั้งหมดจากรูปข้อความแรก:
import com.aspose.slides.*;
import java.io.IOException;
import java.nio.charset.StandardCharsets;
import java.nio.file.Files;
import java.nio.file.Paths;

Presentation presentation = new Presentation("ExportingHTMLText.pptx");
try {
    IShape shape = presentation.getSlides().get_Item(0).getShapes().get_Item(0);

    if (shape instanceof IAutoShape) {
        IAutoShape textShape = (IAutoShape) shape;
        ITextFrame textFrame = textShape.getTextFrame();
        if (textFrame != null) {
            IParagraphCollection paragraphs = textFrame.getParagraphs();
            String html = paragraphs.exportToHtml(0, paragraphs.getCount(), null);
            try {
                Files.write(Paths.get("paragraphs.html"), html.getBytes(StandardCharsets.UTF_8));
            } catch (IOException exception) {
                System.out.println("The HTML file could not be written: " + exception.getMessage());
            }
        } else {
            System.out.println("The first shape does not contain a text frame.");
        }
    } else {
        System.out.println("The first shape is not a text shape.");
    }
} finally {
    presentation.dispose();
}
เรนเดอร์ย่อหน้าเป็นภาพ
IParagraph.getImage เรนเดอร์ย่อหน้าเดี่ยวโดยตรงและคืนค่าเป็น IImage บันทึกผลลัพธ์เป็นไฟล์หรือสตรีมด้วย IImage.save คุณไม่จำเป็นต้องเรนเดอร์รูปร่างที่บรรจุหรือครอบตัดบิตแมพด้วยตนเอง
IParagraph.getImage อาจคืนค่า null หากย่อหาไม่พบในคอลเลกชันแม่, ไม่มีขอบเขตการเรนเดอร์ที่ถูกต้อง, หรือไม่สามารถเรนเดอร์ได้ ตรวจสอบผลลัพธ์ก่อนบันทึกและทำลายภาพที่คืนค่าหลังการใช้งาน
เรนเดอร์ย่อหน้าที่สเกลเริ่มต้น
สมมติว่าเรามีไฟล์การนำเสนอชื่อ sample.pptx ที่มีสไลด์หนึ่งใบ โดยรูปร่างแรกเป็นกล่องข้อความที่มีสามย่อหน้า
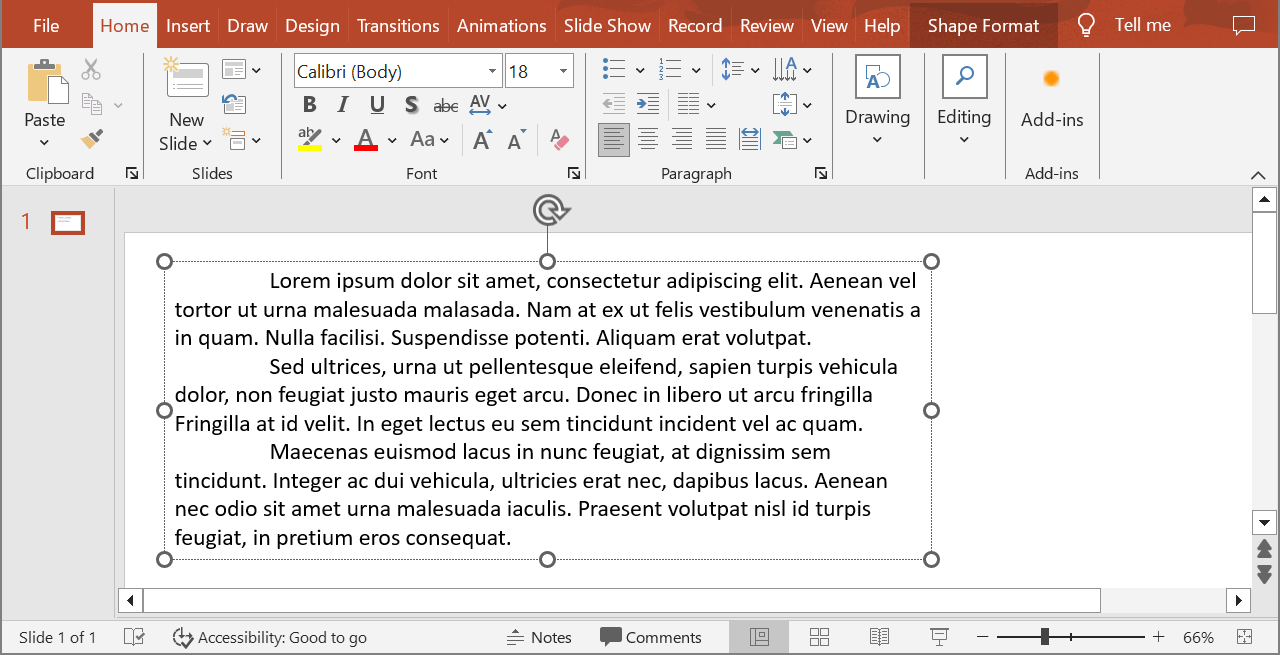
ตัวอย่างต่อไปนี้เรนเดอร์ย่อหน้าที่สองในรูปร่างข้อความปกติที่สเกลเริ่มต้นและบันทึกภาพที่คืนค่าเป็น PNG บล็อก finally ทำให้แน่ใจว่าภาพถูกทำลายอย่างถูกต้อง
import com.aspose.slides.*;

Presentation presentation = new Presentation("sample.pptx");
try {
    IShape shape = presentation.getSlides().get_Item(0).getShapes().get_Item(0);

    if (shape instanceof IAutoShape) {
        IAutoShape textShape = (IAutoShape) shape;
        ITextFrame textFrame = textShape.getTextFrame();
        if (textFrame != null && textFrame.getParagraphs().getCount() > 1) {
            IParagraph paragraph = textFrame.getParagraphs().get_Item(1);
            IImage paragraphImage = paragraph.getImage();

            if (paragraphImage != null) {
                try {
                    paragraphImage.save("paragraph.png", ImageFormat.Png);
                } finally {
                    paragraphImage.dispose();
                }
            } else {
                System.out.println("The paragraph could not be rendered.");
            }
        } else {
            System.out.println("The expected paragraph was not found.");
        }
    } else {
        System.out.println("The first shape is not a text shape.");
    }
} finally {
    presentation.dispose();
}
ผลลัพธ์:

เรนเดอร์ย่อหน้าในเซลล์ตารางพร้อมสเกล
ใช้ overload ของ IParagraph.getImage ที่รับพารามิเตอร์ float scaleX และ float scaleY เพื่อกำหนดปัจจัยสเกลแนวนอนและแนวตั้ง ตัวอย่างต่อไปนี้สร้างตาราง, เรนเดอร์ย่อหน้าในเซลล์แรกที่กว้างและสูงเป็นสองเท่าของค่าปกติ, แล้วบันทึกผลเป็นภาพ PNG
import com.aspose.slides.*;

float scaleX = 2f;
float scaleY = 2f;

Presentation presentation = new Presentation();
try {
    ISlide slide = presentation.getSlides().get_Item(0);
    ITable table = slide.getShapes().addTable(50, 50, new double[] { 300 }, new double[] { 80 });
    IParagraph paragraph = table.get_Item(0, 0).getTextFrame().getParagraphs().get_Item(0);
    paragraph.setText("Text in a table cell");

    IImage paragraphImage = paragraph.getImage(scaleX, scaleY);
    if (paragraphImage != null) {
        try {
            paragraphImage.save("table_paragraph.png", ImageFormat.Png);
        } finally {
            paragraphImage.dispose();
        }
    } else {
        System.out.println("The paragraph could not be rendered.");
    }
} finally {
    presentation.dispose();
}
ปัจจัยสเกล 1 ทำให้แกนนั้นคงขนาดพิกเซลเริ่มต้น ตัวอย่างเช่น 2 สำหรับทั้งสองแกนจะสร้างภาพที่กว้างและสูงประมาณสองเท่าของมิติเริ่มต้น, ทำให้จำนวนพิกเซลเพิ่มเป็นสี่เท่า ปัจจัยที่ใหญ่กว่าจะให้ข้อความคมชัดสำหรับการซูมหรือเอาท์พุตความละเอียดสูง, แต่ก็เพิ่มการใช้หน่วยความจำและขนาดไฟล์ ปัจจัยที่ต่ำกว่า 1 จะทำให้ภาพเล็กลงและรายละเอียดน้อยลง ใช้ปัจจัยเท่ากันเพื่อคงอัตราส่วนของย่อหน้า; ปัจจัยแนวนอนและแนวตั้งต่างกันจะยืดผลลัพธ์แยกกัน
การเรนเดอร์รูปแบบเต็มของรูปร่างด้วย IShape.getImage ยังคงเป็นประโยชน์เมื่อผลลัพธ์ต้องรวมการเติมสี, ขอบ, หรือบริบทภาพอื่นของรูปร่าง สำหรับภาพที่มีแค่ย่อหน้าเดียว ให้ใช้ IParagraph.getImage
คำถามที่พบบ่อย
ฉันสามารถปิดการบรรจบบรรทัดภายในกรอบข้อความได้โดยสมบูรณ์หรือไม่?
ได้. ตั้งค่า ITextFrameFormat.setWrapText เพื่อปิดการบรรจบ ทำให้บรรทัดไม่แตกที่ขอบของกรอบข้อความ
ฉันจะรับค่าขอบเขตบนสไลด์ของย่อหน้าที่ระบุได้อย่างแม่นยำอย่างไร?
ใช้ IParagraph.getRect เพื่อดึงสี่เหลี่ยมขอบของย่อหน้า IPortion.getRect ให้ขอบเขตของส่วนย่อยแต่ละส่วน
การจัดแนวของย่อหน้า (ซ้าย, ขวา, กลาง, หรือจัดเต็ม) ถูกควบคุมที่ไหน?
IParagraphFormat.setAlignment เป็นการตั้งค่าระดับย่อหน้าและจะนำไปใช้กับย่อหน้าทั้งหมดโดยไม่คำนึงถึงการจัดรูปแบบของส่วนย่อยแต่ละส่วน
เพื่อจัดแนวฟอนท์ที่มีขนาดต่างกันในแต่ละบรรทัด, ดูที่ Align Fonts Within a Line
ฉันสามารถตั้งค่าภาษา proofing สำหรับส่วนหนึ่งของย่อหน้าได้หรือไม่?
ได้. ตั้งค่า IBasePortionFormat.setLanguageId สำหรับส่วนย่อยแต่ละส่วน, เพื่อให้ย่อหน้าหนึ่งสามารถมีข้อความหลายภาษาได้.