
在 Android 上格式化演示文稿文本
概述
本文展示了如何使用 Aspose.Slides for Android via Java 对 PowerPoint 和 OpenDocument 演示文稿中的文本进行格式化。内容涉及背景颜色、透明度、字符间距、字体属性、旋转、段落间距、自动适应行为、文本锚点、制表位以及语言设置。
除非另有说明,示例均使用 sample.pptx。其第一页的第一个形状是一个文本框,首个段落包含下文所示的文本。幻灯片和形状的索引均从零开始。选择粗体部分的示例使用有效格式,包括继承的粗体格式:

要查找并突出显示文字或正则表达式匹配,请参见 Search and Replace Text。
设置文本背景颜色
使用 IParagraphFormat.getDefaultPortionFormat 为段落设置默认的突出显示颜色,或使用 IBasePortionFormat.getHighlightColor 为单独的文本片段设置突出显示颜色。
下面的示例将浅灰色突出显示设为第一段的默认颜色。对单独片段的显式突出显示颜色优先于此默认颜色:
import com.aspose.slides.*;
import android.graphics.Color;

Presentation presentation = new Presentation("sample.pptx");
try {
    ISlide slide = presentation.getSlides().get_Item(0);

    IAutoShape autoShape = (IAutoShape)slide.getShapes().get_Item(0);
    IParagraph paragraph = autoShape.getTextFrame().getParagraphs().get_Item(0);

    // 为整段设置突出显示颜色。
    paragraph.getParagraphFormat().getDefaultPortionFormat().getHighlightColor().setColor(Color.LTGRAY);

    presentation.save("gray_paragraph.pptx", SaveFormat.Pptx);
} finally {
    presentation.dispose();
}
结果:

下面的代码示例演示如何为 粗体字体的文本片段 设置背景颜色:
import com.aspose.slides.*;
import android.graphics.Color;

Presentation presentation = new Presentation("sample.pptx");
try {
    ISlide slide = presentation.getSlides().get_Item(0);

    IAutoShape autoShape = (IAutoShape)slide.getShapes().get_Item(0);
    IParagraph paragraph = autoShape.getTextFrame().getParagraphs().get_Item(0);

    for (IPortion portion : paragraph.getPortions()) {
        if (portion.getPortionFormat().getEffective().getFontBold()) {
            // 为文本片段设置突出显示颜色。
            portion.getPortionFormat().getHighlightColor().setColor(Color.LTGRAY);
        }
    }

    presentation.save("gray_text_portions.pptx", SaveFormat.Pptx);
} finally {
    presentation.dispose();
}
结果:

对齐文本段落
使用 IParagraphFormat.setAlignment 设置文本框内段落的对齐方式。值可以是居中、左对齐、右对齐、两端对齐等。
下面的代码示例演示如何将段落对齐至 居中:
import com.aspose.slides.*;

Presentation presentation = new Presentation("sample.pptx");
try {
    ISlide slide = presentation.getSlides().get_Item(0);

    IAutoShape autoShape = (IAutoShape)slide.getShapes().get_Item(0);
    IParagraph paragraph = autoShape.getTextFrame().getParagraphs().get_Item(0);

    // 将段落的对齐方式设置为居中。
    paragraph.getParagraphFormat().setAlignment(TextAlignment.Center);

    presentation.save("aligned_paragraph.pptx", SaveFormat.Pptx);
} finally {
    presentation.dispose();
}
结果:

在行内对齐字体
使用 IParagraphFormat.setFontAlignment 在行内垂直对齐不同字号的文本片段。此设置适用于整个段落并控制每行的对齐方式。
下面的自包含示例在同一幻灯片上创建四个带标签的文本框。每个段落使用相同的文本,字号分别为 18、36、54 点,并使用不同的字体对齐方式。示例使用 Arial,禁用自动适应和换行,并保持文本框足够大以容纳单行文本。
import com.aspose.slides.*;
import android.graphics.Color;

Presentation presentation = new Presentation();
try {
    ISlide slide = presentation.getSlides().get_Item(0);

    int[] alignments = { FontAlignment.Baseline, FontAlignment.Top, FontAlignment.Center, FontAlignment.Bottom };
    String[] alignmentNames = { "Baseline", "Top", "Center", "Bottom" };
    float[] fontSizes = { 18f, 36f, 54f };

    for (int i = 0; i < alignments.length; i++) {
        IAutoShape shape = slide.getShapes().addAutoShape(ShapeType.Rectangle, 30, 20 + i * 130, 660, 120);
        shape.getFillFormat().setFillType(FillType.NoFill);
        shape.getLineFormat().getFillFormat().setFillType(FillType.NoFill);

        ITextFrame textFrame = shape.getTextFrame();
        textFrame.getTextFrameFormat().setAnchoringType(TextAnchorType.Top);
        textFrame.getTextFrameFormat().setAutofitType(TextAutofitType.None);
        textFrame.getTextFrameFormat().setWrapText(NullableBool.False);

        IParagraph label = textFrame.getParagraphs().get_Item(0);
        label.setText(alignmentNames[i]);
        label.getParagraphFormat().setAlignment(TextAlignment.Left);
        label.getParagraphFormat().getDefaultPortionFormat().setFontHeight(14);
        label.getParagraphFormat().getDefaultPortionFormat().setLatinFont(new FontData("Arial"));
        label.getParagraphFormat().getDefaultPortionFormat().getFillFormat().setFillType(FillType.Solid);
        label.getParagraphFormat().getDefaultPortionFormat().getFillFormat().getSolidFillColor().setColor(Color.GRAY);

        Paragraph paragraph = new Paragraph();
        paragraph.getParagraphFormat().setFontAlignment(alignments[i]);
        paragraph.getParagraphFormat().setAlignment(TextAlignment.Left);
        paragraph.getParagraphFormat().getDefaultPortionFormat().setLatinFont(new FontData("Arial"));
        paragraph.getParagraphFormat().getDefaultPortionFormat().getFillFormat().setFillType(FillType.Solid);
        paragraph.getParagraphFormat().getDefaultPortionFormat().getFillFormat().getSolidFillColor().setColor(Color.BLACK);

        for (float fontSize : fontSizes) {
            Portion portion = new Portion("Ag ");
            portion.getPortionFormat().setFontHeight(fontSize);
            paragraph.getPortions().add(portion);
        }

        textFrame.getParagraphs().add(paragraph);
    }

    presentation.save("font_alignment.pptx", SaveFormat.Pptx);
} finally {
    presentation.dispose();
}
结果:
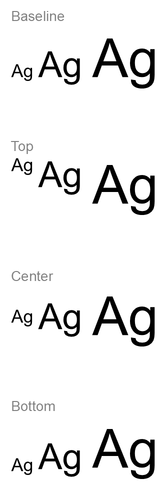
字体对齐使用字体度量,因此单个字母的可见边缘不一定完全对齐。示例包含大写字母和下行字符,以帮助显示基线与底部对齐的差异。字体可用性、字符选择以及字号差异都会影响结果。框架尺寸、边距、行距、换行和自动适应也会影响布局;比较模式时请使用相同的字体和布局设置。
此设置不同于 IParagraphFormat.setAlignment,后者控制水平段落对齐;也不同于 ITextFrameFormat.setAnchoringType,后者在形状内部垂直定位文本块。通过 IBasePortionFormat.setEscapement 实现的上标和下标格式会相对于基线偏移,而不是为段落行设置字体对齐。
设置文本透明度
文本透明度通过分配给 IBasePortionFormat.getFillFormat 的颜色的 alpha 分量来控制。在下面的示例中,alpha = 50 是 0–255 量表上的 ARGB alpha 通道值,而非透明度百分比。
下面的代码示例展示如何对 整个段落 应用透明度:
import com.aspose.slides.*;
import android.graphics.Color;

int alpha = 50;

Presentation presentation = new Presentation("sample.pptx");
try {
    ISlide slide = presentation.getSlides().get_Item(0);

    IAutoShape autoShape = (IAutoShape)slide.getShapes().get_Item(0);
    IParagraph paragraph = autoShape.getTextFrame().getParagraphs().get_Item(0);

    // 将文本的填充颜色设置为透明颜色。
    paragraph.getParagraphFormat().getDefaultPortionFormat().getFillFormat().setFillType(FillType.Solid);
    paragraph.getParagraphFormat().getDefaultPortionFormat().getFillFormat().getSolidFillColor().setColor(Color.argb(alpha, 0, 0, 0));

    presentation.save("transparent_paragraph.pptx", SaveFormat.Pptx);
} finally {
    presentation.dispose();
}
结果:

下面的代码示例展示如何对 粗体字体的文本片段 应用透明度:
import com.aspose.slides.*;
import android.graphics.Color;

int alpha = 50;

Presentation presentation = new Presentation("sample.pptx");
try {
    ISlide slide = presentation.getSlides().get_Item(0);

    IAutoShape autoShape = (IAutoShape)slide.getShapes().get_Item(0);
    IParagraph paragraph = autoShape.getTextFrame().getParagraphs().get_Item(0);

    for (IPortion portion : paragraph.getPortions()) {
        if (portion.getPortionFormat().getEffective().getFontBold()) {
            // 设置文本片段的透明度。
            portion.getPortionFormat().getFillFormat().setFillType(FillType.Solid);
            portion.getPortionFormat().getFillFormat().getSolidFillColor().setColor(Color.argb(alpha, 0, 0, 0));
        }
    }

    presentation.save("transparent_text_portions.pptx", SaveFormat.Pptx);
} finally {
    presentation.dispose();
}
结果:

设置文本字符间距
使用 IBasePortionFormat.setSpacing 可以在文本框内扩展或压缩字符之间的间距。示例中添加了 3 点间距;负值会压缩文本。
下面的 Java 代码展示如何在 整个段落 中扩大字符间距:
import com.aspose.slides.*;

Presentation presentation = new Presentation("sample.pptx");
try {
    ISlide slide = presentation.getSlides().get_Item(0);

    IAutoShape autoShape = (IAutoShape)slide.getShapes().get_Item(0);
    IParagraph paragraph = autoShape.getTextFrame().getParagraphs().get_Item(0);

    // 注意: 使用负值压缩字符间距。
    paragraph.getParagraphFormat().getDefaultPortionFormat().setSpacing(3); // 扩大字符间距。

    presentation.save("character_spacing_in_paragraph.pptx", SaveFormat.Pptx);
} finally {
    presentation.dispose();
}
结果:

下面的代码示例展示如何在 粗体字体的文本片段 中扩大字符间距:
import com.aspose.slides.*;

Presentation presentation = new Presentation("sample.pptx");
try {
    ISlide slide = presentation.getSlides().get_Item(0);

    IAutoShape autoShape = (IAutoShape)slide.getShapes().get_Item(0);
    IParagraph paragraph = autoShape.getTextFrame().getParagraphs().get_Item(0);

    for (IPortion portion : paragraph.getPortions()) {
        if (portion.getPortionFormat().getEffective().getFontBold()) {
            // 注意: 使用负值压缩字符间距。
            portion.getPortionFormat().setSpacing(3); // 扩大字符间距。
        }
    }

    presentation.save("character_spacing_in_text_portions.pptx", SaveFormat.Pptx);
} finally {
    presentation.dispose();
}
结果:

为特定字体禁用字距调整
在某些情况下,Aspose.Slides 渲染的文本可能比 PowerPoint 中的同样文本略紧。这可能是因为 PowerPoint 对某些字体会忽略字距信息,即使该字体包含有效的字距数据且在 PowerPoint 设置中已启用字距。
为了使渲染输出更接近 PowerPoint,您可以为使用受影响字体的文本片段禁用字距。将 IBasePortionFormat.setKerningMinimalSize 设置为大于实际字体大小的值。本例需要 “presentation.pptx”,其中第一页的第一个形状是一个文本框。它会检查有效的字体名称(包括继承的字体),并为使用 Roboto 的片段设置 100 点的阈值:低于该阈值的片段将禁用字距。
import com.aspose.slides.*;

Presentation presentation = new Presentation("presentation.pptx");
try {
    ISlide slide = presentation.getSlides().get_Item(0);

    IAutoShape autoShape = (IAutoShape)slide.getShapes().get_Item(0);
    String targetFont = "Roboto";

    for (IParagraph paragraph : autoShape.getTextFrame().getParagraphs()) {
        for (IPortion portion : paragraph.getPortions()) {
            IPortionFormatEffectiveData portionFormat = portion.getPortionFormat().getEffective();

            if ((portionFormat.getLatinFont() != null &&
                 portionFormat.getLatinFont().getFontName().equals(targetFont)) ||
                (portionFormat.getEastAsianFont() != null &&
                 portionFormat.getEastAsianFont().getFontName().equals(targetFont)) ||
                (portionFormat.getComplexScriptFont() != null &&
                 portionFormat.getComplexScriptFont().getFontName().equals(targetFont))) {
                portion.getPortionFormat().setKerningMinimalSize(100);
            }
        }
    }

    presentation.save("output.pptx", SaveFormat.Pptx);
} finally {
    presentation.dispose();
}
对于低于阈值的匹配文本,此设置会阻止字距,并有助于使 Aspose.Slides 的渲染与 PowerPoint 对受影响字体的视觉输出保持一致。
管理文本字体属性
可以通过 IParagraphFormat.getDefaultPortionFormat 在段落层面设置字体属性,或通过 IPortionFormat 在单独的片段上设置。
下面的示例将第一段的默认字体设置为 12 点 Times New Roman,并使用粗体、斜体和点划线下划线。对单独片段的显式格式优先于这些默认值。
import com.aspose.slides.*;

Presentation presentation = new Presentation("sample.pptx");
try {
    ISlide slide = presentation.getSlides().get_Item(0);

    IAutoShape autoShape = (IAutoShape)slide.getShapes().get_Item(0);
    IParagraph paragraph = autoShape.getTextFrame().getParagraphs().get_Item(0);

    // 为段落设置字体属性。
    paragraph.getParagraphFormat().getDefaultPortionFormat().setFontHeight(12);
    paragraph.getParagraphFormat().getDefaultPortionFormat().setFontBold(NullableBool.True);
    paragraph.getParagraphFormat().getDefaultPortionFormat().setFontItalic(NullableBool.True);
    paragraph.getParagraphFormat().getDefaultPortionFormat().setFontUnderline(TextUnderlineType.Dotted);
    paragraph.getParagraphFormat().getDefaultPortionFormat().setLatinFont(new FontData("Times New Roman"));

    presentation.save("font_properties_for_paragraph.pptx", SaveFormat.Pptx);
} finally {
    presentation.dispose();
}
结果:

下面的示例为有效格式为粗体的片段应用 13 点 Times New Roman、斜体和点划线下划线:
import com.aspose.slides.*;

Presentation presentation = new Presentation("sample.pptx");
try {
    ISlide slide = presentation.getSlides().get_Item(0);

    IAutoShape autoShape = (IAutoShape)slide.getShapes().get_Item(0);
    IParagraph paragraph = autoShape.getTextFrame().getParagraphs().get_Item(0);

    for (IPortion portion : paragraph.getPortions()) {
        if (portion.getPortionFormat().getEffective().getFontBold()) {
            // 设置文本片段的字体属性。
            portion.getPortionFormat().setFontHeight(13);
            portion.getPortionFormat().setFontItalic(NullableBool.True);
            portion.getPortionFormat().setFontUnderline(TextUnderlineType.Dotted);
            portion.getPortionFormat().setLatinFont(new FontData("Times New Roman"));
        }
    }

    presentation.save("font_properties_for_text_portions.pptx", SaveFormat.Pptx);
} finally {
    presentation.dispose();
}
结果:

设置文本旋转
使用 ITextFrameFormat.setTextVerticalType 可以在形状内设置预定义的文本方向。
下面的代码示例将形状中文本的方向设置为 TextVerticalType.Vertical270,这会使文本 逆时针旋转 90 度:
import com.aspose.slides.*;

Presentation presentation = new Presentation("sample.pptx");
try {
    ISlide slide = presentation.getSlides().get_Item(0);

    IAutoShape autoShape = (IAutoShape)slide.getShapes().get_Item(0);
    autoShape.getTextFrame().getTextFrameFormat().setTextVerticalType(TextVerticalType.Vertical270);

    presentation.save("text_rotation.pptx", SaveFormat.Pptx);
} finally {
    presentation.dispose();
}
结果:

为文本框设置自定义旋转
使用 ITextFrameFormat.setRotationAngle 可以为 ITextFrame 设置自定义旋转角度。
下面的代码示例将在形状内将文本框顺时针旋转 3 度:
import com.aspose.slides.*;

Presentation presentation = new Presentation("sample.pptx");
try {
    ISlide slide = presentation.getSlides().get_Item(0);

    IAutoShape autoShape = (IAutoShape)slide.getShapes().get_Item(0);
    autoShape.getTextFrame().getTextFrameFormat().setRotationAngle(3);

    presentation.save("custom_text_rotation.pptx", SaveFormat.Pptx);
} finally {
    presentation.dispose();
}
结果:

设置段落行间距
Aspose.Slides 提供 IParagraphFormat.setSpaceAfter、IParagraphFormat.setSpaceBefore 和 IParagraphFormat.setSpaceWithin 来控制段落间距。这些属性的使用方式如下:
- 使用正值以行高的百分比指定行间距。
- 使用负值以点数指定行间距。
下面的示例将第一段的内部间距设置为行高的 200%(双倍行距):
import com.aspose.slides.*;

Presentation presentation = new Presentation("sample.pptx");
try {
    ISlide slide = presentation.getSlides().get_Item(0);

    IAutoShape autoShape = (IAutoShape)slide.getShapes().get_Item(0);

    IParagraph paragraph = autoShape.getTextFrame().getParagraphs().get_Item(0);
    paragraph.getParagraphFormat().setSpaceWithin(200);

    presentation.save("line_spacing.pptx", SaveFormat.Pptx);
} finally {
    presentation.dispose();
}
结果:

控制换行
段落换行规则在窄文本块以及混合 Latin 与东亚文字的演示文稿中非常有用。以下方法属于 IParagraphFormat,因此适用于整个段落:
- setLatinLineBreak 控制 Latin 换行规则。对混合文本进行更改时,还可能影响相邻的东亚文字和标点的换行位置。
- setEastAsianLineBreak 控制东亚换行规则,包括行首和行尾字符的限制。
这些规则并不取代 ITextFrameFormat.setWrapText,后者启用文本框内的自动换行。它们影响换行发生时的布局;不会插入换行字符。显式换行会在段落内部强制换行,与可用宽度无关。
下面的自包含示例创建一个包含中文和 Latin 文本的窄文本块。它显式设置了两种换行选项并保存为 “line_breaking.pptx”。若要实验任一规则,只需更改相应的值,同时保持另一个设置不变。示例使用 24 点 Arial 与 SimSun,框宽 160 点,水平文本框边距为零。调用 ITextFrameFormat.setAutofitType,并使用 TextAutofitType.None 以固定文本大小和框尺寸。
import com.aspose.slides.*;
import android.graphics.Color;

Presentation presentation = new Presentation();
try {
    ISlide slide = presentation.getSlides().get_Item(0);

    IAutoShape shape = slide.getShapes().addAutoShape(ShapeType.Rectangle, 50, 50, 160, 300);
    shape.getFillFormat().setFillType(FillType.NoFill);

    ITextFrame textFrame = shape.getTextFrame();
    textFrame.getTextFrameFormat().setWrapText(NullableBool.True);
    textFrame.getTextFrameFormat().setAutofitType(TextAutofitType.None);
    textFrame.getTextFrameFormat().setMarginLeft(0);
    textFrame.getTextFrameFormat().setMarginRight(0);

    IParagraph paragraph = textFrame.getParagraphs().get_Item(0);
    paragraph.setText("中文排版测试,PowerPoint 中文演示。");

    IParagraphFormat format = paragraph.getParagraphFormat();
    format.setAlignment(TextAlignment.Left);
    format.getDefaultPortionFormat().setFontHeight(24);
    FontData latinFont = new FontData("Arial");
    format.getDefaultPortionFormat().setLatinFont(latinFont);
    FontData eastAsianFont = new FontData("SimSun");
    format.getDefaultPortionFormat().setEastAsianFont(eastAsianFont);
    format.getDefaultPortionFormat().getFillFormat().setFillType(FillType.Solid);
    format.getDefaultPortionFormat().getFillFormat().getSolidFillColor().setColor(Color.BLACK);
    format.setLatinLineBreak(NullableBool.False);
    format.setEastAsianLineBreak(NullableBool.True);

    presentation.save("line_breaking.pptx", SaveFormat.Pptx);
} finally {
    presentation.dispose();
}
控制悬挂标点
IParagraphFormat.setHangingPunctuation 允许符合条件的标点超出文本行的右边缘,而不是占据下一行。它适用于整个段落,并不同于悬挂缩进。
下面的自包含示例在宽度为 100 点的文本框中启用悬挂标点,并保存为 “hanging_punctuation.pptx”。使用 24 点 Arial 与零水平文本框边距时,句末的句点仍保留在 “sentence” 之后并超出右侧文本边缘。将属性设为 NullableBool.False 进行比较:此时句点占据单独一行。为保持可用宽度固定,启用了换行并禁用了自动适应。
import com.aspose.slides.*;
import android.graphics.Color;

Presentation presentation = new Presentation();
try {
    ISlide slide = presentation.getSlides().get_Item(0);

    IAutoShape shape = slide.getShapes().addAutoShape(ShapeType.Rectangle, 50, 50, 100, 200);
    shape.getFillFormat().setFillType(FillType.NoFill);

    ITextFrame textFrame = shape.getTextFrame();
    textFrame.getTextFrameFormat().setWrapText(NullableBool.True);
    textFrame.getTextFrameFormat().setAutofitType(TextAutofitType.None);
    textFrame.getTextFrameFormat().setMarginLeft(0);
    textFrame.getTextFrameFormat().setMarginRight(0);

    IParagraph paragraph = textFrame.getParagraphs().get_Item(0);
    paragraph.setText("Simple text, next sentence.");

    IParagraphFormat format = paragraph.getParagraphFormat();
    format.setAlignment(TextAlignment.Left);
    format.getDefaultPortionFormat().setFontHeight(24);
    FontData latinFont = new FontData("Arial");
    format.getDefaultPortionFormat().setLatinFont(latinFont);
    format.getDefaultPortionFormat().getFillFormat().setFillType(FillType.Solid);
    format.getDefaultPortionFormat().getFillFormat().getSolidFillColor().setColor(Color.BLACK);
    format.setHangingPunctuation(NullableBool.True);

    presentation.save("hanging_punctuation.pptx", SaveFormat.Pptx);
} finally {
    presentation.dispose();
}
并非所有标点都能悬挂。上述 字体和布局条件 同样适用于此比较:更改字体、可用宽度、边距或自动适应设置都可能消除可见差异。
设置文本框的自动适应类型
ITextFrameFormat.setAutofitType 决定当文本超出容器边界时的行为。使用它可以控制文本是缩小、溢出还是自动调整形状大小。下面的示例将形状配置为随文本自动调整大小,并将结果保存为 “autofit_type.pptx”。
import com.aspose.slides.*;

Presentation presentation = new Presentation("sample.pptx");
try {
    ISlide slide = presentation.getSlides().get_Item(0);

    IAutoShape autoShape = (IAutoShape)slide.getShapes().get_Item(0);
    autoShape.getTextFrame().getTextFrameFormat().setAutofitType(TextAutofitType.Shape);

    presentation.save("autofit_type.pptx", SaveFormat.Pptx);
} finally {
    presentation.dispose();
}
若要在自动换行后统计行数并查看文本或形状宽度变化对结果的影响,请参见 Count Rendered Lines。仅行数并不能表明文本是否已溢出容器。
设置文本框的锚点
ITextFrameFormat.setAnchoringType 定义文本在形状内部的垂直定位方式,例如顶部、居中或底部。下面的示例将文本锚定到第一个形状的底部,并将结果保存为 “text_anchor.pptx”。
import com.aspose.slides.*;

Presentation presentation = new Presentation("sample.pptx");
try {
    ISlide slide = presentation.getSlides().get_Item(0);

    IAutoShape autoShape = (IAutoShape)slide.getShapes().get_Item(0);
    autoShape.getTextFrame().getTextFrameFormat().setAnchoringType(TextAnchorType.Bottom);

    presentation.save("text_anchor.pptx", SaveFormat.Pptx);
} finally {
    presentation.dispose();
}
设置文本制表位
使用 IParagraphFormat.setDefaultTabSize 与 IParagraphFormat.getTabs 可配置段落中的制表位。下面的示例将默认制表间隔设为 100 点,并在 30 点处添加左对齐的制表位。这些设置会影响包含制表符的文本。
import com.aspose.slides.*;

Presentation presentation = new Presentation("sample.pptx");
try {
    ISlide slide = presentation.getSlides().get_Item(0);

    IAutoShape autoShape = (IAutoShape)slide.getShapes().get_Item(0);

    IParagraph paragraph = autoShape.getTextFrame().getParagraphs().get_Item(0);
    paragraph.getParagraphFormat().setDefaultTabSize(100);
    paragraph.getParagraphFormat().getTabs().add(30, TabAlignment.Left);

    presentation.save("paragraph_tabs.pptx", SaveFormat.Pptx);
} finally {
    presentation.dispose();
}
结果:

设置校对语言
Aspose.Slides 提供 IBasePortionFormat.setLanguageId,允许为文本片段设置校对语言。校对语言决定 PowerPoint 在拼写和语法检查时使用的语言。
下面的示例需要 “presentation.pptx”,其第一页的第一个形状为文本框且至少包含一个段落。它将第一段的内容替换为 “1。”,将字体设为 SimSun,并将校对语言设为简体中文 (zh-CN)。结果保存为 “proofing_language.pptx”:
import com.aspose.slides.*;

Presentation presentation = new Presentation("presentation.pptx");
try {
    ISlide slide = presentation.getSlides().get_Item(0);

    IAutoShape autoShape = (IAutoShape)slide.getShapes().get_Item(0);

    IParagraph paragraph = autoShape.getTextFrame().getParagraphs().get_Item(0);
    paragraph.getPortions().clear();

    FontData font = new FontData("SimSun");

    Portion textPortion = new Portion();
    textPortion.getPortionFormat().setComplexScriptFont(font);
    textPortion.getPortionFormat().setEastAsianFont(font);
    textPortion.getPortionFormat().setLatinFont(font);

    // 设置校对语言的 Id。
    textPortion.getPortionFormat().setLanguageId("zh-CN");

    textPortion.setText("1。");
    paragraph.getPortions().add(textPortion);

    presentation.save("proofing_language.pptx", SaveFormat.Pptx);
} finally {
    presentation.dispose();
}
设置默认语言
使用 LoadOptions.setDefaultTextLanguage 来定义在加载或创建演示文稿时创建的文本的默认语言。下面的示例创建一个默认文本语言为美式英语的演示文稿,添加一个文本框,并输出其第一个文本片段的语言代码 en-US。
import com.aspose.slides.*;

LoadOptions loadOptions = new LoadOptions();
loadOptions.setDefaultTextLanguage("en-US");

Presentation presentation = new Presentation(loadOptions);
try {
    ISlide slide = presentation.getSlides().get_Item(0);

    // 添加一个带文本的矩形形状。
    IAutoShape shape = slide.getShapes().addAutoShape(ShapeType.Rectangle, 20, 20, 150, 50);
    shape.getTextFrame().setText("Sample text");

    // 检查第一段文本片段的语言。
    IPortion portion = shape.getTextFrame().getParagraphs().get_Item(0).getPortions().get_Item(0);
    System.out.println(portion.getPortionFormat().getLanguageId());
} finally {
    presentation.dispose();
}
设置默认文本样式
要在演示文稿级别应用默认文本格式,请使用 IPresentation.getDefaultTextStyle.
下面的示例在新演示文稿中将 14 点粗体字体设为顶层段落的默认样式,并将其保存为 “default_text_style.pptx”。文本可以继承这些默认值,除非更具体的格式覆盖它们。
import com.aspose.slides.*;

Presentation presentation = new Presentation();
try {
    // 获取顶级段落格式。
    IParagraphFormat paragraphFormat = presentation.getDefaultTextStyle().getLevel(0);

    if (paragraphFormat != null) {
        paragraphFormat.getDefaultPortionFormat().setFontHeight(14);
        paragraphFormat.getDefaultPortionFormat().setFontBold(NullableBool.True);
    }

    presentation.save("default_text_style.pptx", SaveFormat.Pptx);
} finally {
    presentation.dispose();
}
提取带全大写效果的文本
在 PowerPoint 中,应用 All Caps 字体效果会使文本在幻灯片上显示为大写,即使原始输入为小写。当使用 Aspose.Slides 检索此类文本片段时,库会返回最初输入的文本。若要匹配显示的文本,请检查 TextCapType 并在值为 All 时将返回的字符串转换为大写。
该示例需要 “sample2.pptx”,其第一页的第一个形状为文本框。其首段的首片段包含 “Hello, Aspose!” 并应用了 All Caps 效果,如下所示。

下面的代码示例展示如何提取带 All Caps 效果的文本:
import com.aspose.slides.*;

Presentation presentation = new Presentation("sample2.pptx");
try {
    ISlide slide = presentation.getSlides().get_Item(0);

    IAutoShape autoShape = (IAutoShape)slide.getShapes().get_Item(0);
    IPortion textPortion = autoShape.getTextFrame().getParagraphs().get_Item(0).getPortions().get_Item(0);

    System.out.println("Original text: " + textPortion.getText());

    IPortionFormatEffectiveData textFormat = textPortion.getPortionFormat().getEffective();
    if (textFormat.getTextCapType() == TextCapType.All) {
        String text = textPortion.getText().toUpperCase();
        System.out.println("All-Caps effect: " + text);
    }
} finally {
    presentation.dispose();
}
输出:
Original text: Hello, Aspose!
All-Caps effect: HELLO, ASPOSE!
常见问题
How do I modify text in a table on a slide?
要在幻灯片上的表格中修改文本,请使用 ITable。遍历单元格,并通过 ICell.getTextFrame 更新每个单元格的文本框,再通过 IParagraph.getParagraphFormat 调整段落格式。
How do I apply a gradient color to text on a PowerPoint slide?
要为文本应用渐变颜色,请使用 IBasePortionFormat.getFillFormat。将 IFillFormat.setFillType 设置为 FillType.Gradient,并配置渐变停靠点、方向和透明度。