
قالببندی متن ارائه در اندروید
مرور کلی
این مقاله نحوه قالببندی متن در ارائههای PowerPoint و OpenDocument را با استفاده از Aspose.Slides برای Android از طریق Java نشان میدهد. این مقاله رنگهای پسزمینه، شفافیت، فاصلهگذاری کاراکترها، ویژگیهای قلم، چرخش، فاصلهبندی پاراگراف، رفتار خودپر کردن، تثبیت متن، تنظیمات تب و تنظیمات زبان را پوشش میدهد.
بدون ذکر خلاف، مثالها از sample.pptx استفاده میکنند. اولین شکل در اسلاید اول یک جعبه متن است و اولین پاراگراف آن شامل متنی است که در زیر نشان داده شده است. ایندکسهای اسلاید و شکل به صورت صفر‑مبنای هستند. مثالهایی که بخشهای بولد را انتخاب میکنند، از قالببندی مؤثر، شامل قالببندی بولد به ارث رسیده، استفاده میکنند:

برای یافتن و برجستهسازی متن بهصورت لفظی یا تطبیقهای عبارات منظم، به Search and Replace Text مراجعه کنید.
تنظیم رنگ پسزمینه متن
از IParagraphFormat.getDefaultPortionFormat برای تنظیم رنگ برجسته پیشفرض یک پاراگراف استفاده کنید، یا برای بخشهای متنی فردی از IBasePortionFormat.getHighlightColor بهره ببرید.
مثال زیر برجسته خاکستری روشن را بهعنوان پیشفرض برای اولین پاراگراف تنظیم میکند. رنگهای برجسته صریح در بخشهای فردی اولویت بر این پیشفرض دارند:
import com.aspose.slides.*;
import android.graphics.Color;

Presentation presentation = new Presentation("sample.pptx");
try {
    ISlide slide = presentation.getSlides().get_Item(0);

    IAutoShape autoShape = (IAutoShape)slide.getShapes().get_Item(0);
    IParagraph paragraph = autoShape.getTextFrame().getParagraphs().get_Item(0);

    // رنگ برجسته را برای تمام پاراگراف تنظیم کنید.
    paragraph.getParagraphFormat().getDefaultPortionFormat().getHighlightColor().setColor(Color.LTGRAY);

    presentation.save("gray_paragraph.pptx", SaveFormat.Pptx);
} finally {
    presentation.dispose();
}
نتیجه:

مثال کد زیر نشان میدهد چگونه رنگ پسزمینه برای بخشهای متنی با قلم بولد تنظیم شود:
import com.aspose.slides.*;
import android.graphics.Color;

Presentation presentation = new Presentation("sample.pptx");
try {
    ISlide slide = presentation.getSlides().get_Item(0);

    IAutoShape autoShape = (IAutoShape)slide.getShapes().get_Item(0);
    IParagraph paragraph = autoShape.getTextFrame().getParagraphs().get_Item(0);

    for (IPortion portion : paragraph.getPortions()) {
        if (portion.getPortionFormat().getEffective().getFontBold()) {
            // رنگ برجسته را برای بخش متن تنظیم کنید.
            portion.getPortionFormat().getHighlightColor().setColor(Color.LTGRAY);
        }
    }

    presentation.save("gray_text_portions.pptx", SaveFormat.Pptx);
} finally {
    presentation.dispose();
}
نتیجه:

تراز پاراگرافهای متنی
از IParagraphFormat.setAlignment برای تنظیم تراز پاراگراف درون یک فریم متن استفاده کنید. مقدار میتواند centered، left‑aligned، right‑aligned، justified و غیره باشد.
مثال کد زیر نحوه تراز پاراگراف به مرکز را نشان میدهد:
import com.aspose.slides.*;

Presentation presentation = new Presentation("sample.pptx");
try {
    ISlide slide = presentation.getSlides().get_Item(0);

    IAutoShape autoShape = (IAutoShape)slide.getShapes().get_Item(0);
    IParagraph paragraph = autoShape.getTextFrame().getParagraphs().get_Item(0);

    // تراز پاراگراف را به مرکز تنظیم کنید.
    paragraph.getParagraphFormat().setAlignment(TextAlignment.Center);

    presentation.save("aligned_paragraph.pptx", SaveFormat.Pptx);
} finally {
    presentation.dispose();
}
نتیجه:

تنظیم شفافیت برای متن
شفافیت متن از طریق کامپوننت آلفای رنگ اختصاص یافته به IBasePortionFormat.getFillFormat کنترل میشود. در مثالهای زیر، alpha = 50 مقدار آلفای ARGB بر مقیاس 0–255 است، نه درصد شفافیت.
مثال کد زیر نحوه اعمال شفافیت بر کل پاراگراف را نشان میدهد:
import com.aspose.slides.*;
import android.graphics.Color;

int alpha = 50;

Presentation presentation = new Presentation("sample.pptx");
try {
    ISlide slide = presentation.getSlides().get_Item(0);

    IAutoShape autoShape = (IAutoShape)slide.getShapes().get_Item(0);
    IParagraph paragraph = autoShape.getTextFrame().getParagraphs().get_Item(0);

    // رنگ پر متن را به رنگ شفاف تنظیم کنید.
    paragraph.getParagraphFormat().getDefaultPortionFormat().getFillFormat().setFillType(FillType.Solid);
    paragraph.getParagraphFormat().getDefaultPortionFormat().getFillFormat().getSolidFillColor().setColor(Color.argb(alpha, 0, 0, 0));

    presentation.save("transparent_paragraph.pptx", SaveFormat.Pptx);
} finally {
    presentation.dispose();
}
نتیجه:

مثال کد زیر نحوه اعمال شفافیت بر بخشهای متنی با قلم بولد را نشان میدهد:
import com.aspose.slides.*;
import android.graphics.Color;

int alpha = 50;

Presentation presentation = new Presentation("sample.pptx");
try {
    ISlide slide = presentation.getSlides().get_Item(0);

    IAutoShape autoShape = (IAutoShape)slide.getShapes().get_Item(0);
    IParagraph paragraph = autoShape.getTextFrame().getParagraphs().get_Item(0);

    for (IPortion portion : paragraph.getPortions()) {
        if (portion.getPortionFormat().getEffective().getFontBold()) {
            // شفافیت بخش متن را تنظیم کنید.
            portion.getPortionFormat().getFillFormat().setFillType(FillType.Solid);
            portion.getPortionFormat().getFillFormat().getSolidFillColor().setColor(Color.argb(alpha, 0, 0, 0));
        }
    }

    presentation.save("transparent_text_portions.pptx", SaveFormat.Pptx);
} finally {
    presentation.dispose();
}
نتیجه:

تنظیم فاصله بین کاراکترها برای متن
از IBasePortionFormat.setSpacing برای افزایش یا کاهش فاصله بین کاراکترها در یک جعبه متن استفاده کنید. مثالها 3 پوینت فاصله اضافه میکنند؛ مقادیر منفی متن را فشرده میکند.
کد جاوای زیر نشان میدهد چگونه فاصله کاراکتر در کل پاراگراف افزایش یابد:
import com.aspose.slides.*;
Presentation presentation = new Presentation("sample.pptx");
try {
ISlide slide = presentation.getSlides().get_Item(0);
IAutoShape autoShape = (IAutoShape)slide.getShapes().get_Item(0);
IParagraph paragraph = autoShape.getTextFrame().getParagraphs().get_Item(0);
// توجه: برای فشردهسازی فاصله کاراکترها از مقادیر منفی استفاده کنید.
paragraph.getParagraphFormat().getDefaultPortionFormat().setSpacing(3); // فاصله کاراکترها را گسترش دهید.
presentation.save("character_spacing_in_paragraph.pptx", SaveFormat.Pptx);
} finally {
presentation.dispose();
}
نتیجه:
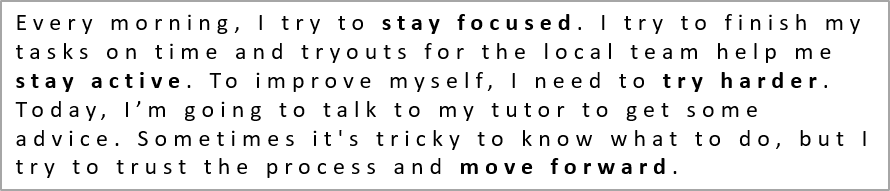
مثال کد زیر نشان میدهد چگونه فاصله کاراکتر در بخشهای متنی با قلم بولد افزایش یابد:
import com.aspose.slides.*;
Presentation presentation = new Presentation("sample.pptx");
try {
ISlide slide = presentation.getSlides().get_Item(0);
IAutoShape autoShape = (IAutoShape)slide.getShapes().get_Item(0);
IParagraph paragraph = autoShape.getTextFrame().getParagraphs().get_Item(0);
for (IPortion portion : paragraph.getPortions()) {
if (portion.getPortionFormat().getEffective().getFontBold()) {
// توجه: برای فشردهسازی فاصله کاراکترها از مقادیر منفی استفاده کنید.
portion.getPortionFormat().setSpacing(3); // فاصله کاراکترها را گسترش دهید.
}
}
presentation.save("character_spacing_in_text_portions.pptx", SaveFormat.Pptx);
} finally {
presentation.dispose();
}
نتیجه:

غیرفعالسازی Kerning برای قلمهای خاص
در برخی موارد، متنی که توسط Aspose.Slides رندر میشود ممکن است نسبت به همان متن در PowerPoint کمی فشردهتر به نظر برسد. این میتواند به این دلیل باشد که PowerPoint دادههای kerning را برای برخی قلمها نادیده میگیرد، حتی اگر قلم دارای اطلاعات kerning معتبر باشد و kerning در تنظیمات PowerPoint فعال باشد.
برای نزدیکتر شدن خروجی رندر به PowerPoint، میتوانید kerning را برای بخشهای متنی که از قلم مورد نظر استفاده میکنند غیرفعال کنید. مقدار IBasePortionFormat.setKerningMinimalSize را بزرگتر از اندازه واقعی قلم تنظیم کنید. این مثال به فایل “presentation.pptx” با یک جعبه متن به عنوان اولین شکل در اولین اسلاید نیاز دارد. نامهای قلم مؤثر، از جمله قلمهای ارثبرده، بررسی میشوند و برای بخشهایی که از Roboto استفاده میکنند آستانه 100 پوینت تنظیم میشود؛ این کار kerning را برای بخشهای مطابقتی با اندازه قلم زیر 100 پوینت غیرفعال میکند:
import com.aspose.slides.*;

Presentation presentation = new Presentation("presentation.pptx");
try {
    ISlide slide = presentation.getSlides().get_Item(0);

    IAutoShape autoShape = (IAutoShape)slide.getShapes().get_Item(0);
    String targetFont = "Roboto";

    for (IParagraph paragraph : autoShape.getTextFrame().getParagraphs()) {
        for (IPortion portion : paragraph.getPortions()) {
            IPortionFormatEffectiveData portionFormat = portion.getPortionFormat().getEffective();

            if ((portionFormat.getLatinFont() != null &&
                 portionFormat.getLatinFont().getFontName().equals(targetFont)) ||
                (portionFormat.getEastAsianFont() != null &&
                 portionFormat.getEastAsianFont().getFontName().equals(targetFont)) ||
                (portionFormat.getComplexScriptFont() != null &&
                 portionFormat.getComplexScriptFont().getFontName().equals(targetFont))) {
                portion.getPortionFormat().setKerningMinimalSize(100);
            }
        }
    }

    presentation.save("output.pptx", SaveFormat.Pptx);
} finally {
    presentation.dispose();
}
برای متنی که زیر آستانه است، این تنظیمات جلوی kerning را میگیرند و میتوانند به هماهنگی رندر Aspose.Slides با خروجی بصری PowerPoint برای قلمهایی که تحت تأثیر این رفتار خاص PowerPoint هستند، کمک کنند.
مدیریت ویژگیهای قلم متن
ویژگیهای قلم میتوانند در سطح پاراگراف از طریق IParagraphFormat.getDefaultPortionFormat یا برای بخشهای فردی از طریق IPortionFormat تنظیم شوند.
مثال زیر قلم پیشفرض اولین پاراگراف را به 12 پوینت Times New Roman با قالببندی بولد، ایتالیک و زیرخط نقطهدار تنظیم میکند. قالببندی صریح در بخشهای فردی بر این پیشفرضها اولویت دارد:
import com.aspose.slides.*;
Presentation presentation = new Presentation("sample.pptx");
try {
ISlide slide = presentation.getSlides().get_Item(0);
IAutoShape autoShape = (IAutoShape)slide.getShapes().get_Item(0);
IParagraph paragraph = autoShape.getTextFrame().getParagraphs().get_Item(0);
// ویژگیهای قلم برای پاراگراف را تنظیم کنید.
paragraph.getParagraphFormat().getDefaultPortionFormat().setFontHeight(12);
paragraph.getParagraphFormat().getDefaultPortionFormat().setFontBold(NullableBool.True);
paragraph.getParagraphFormat().getDefaultPortionFormat().setFontItalic(NullableBool.True);
paragraph.getParagraphFormat().getDefaultPortionFormat().setFontUnderline(TextUnderlineType.Dotted);
paragraph.getParagraphFormat().getDefaultPortionFormat().setLatinFont(new FontData("Times New Roman"));
presentation.save("font_properties_for_paragraph.pptx", SaveFormat.Pptx);
} finally {
presentation.dispose();
}
نتیجه:

مثال زیر 13 پوینت Times New Roman، قالببندی ایتالیک و زیرخط نقطهدار را برای بخشهایی که قالببندی مؤثر آنها بولد است، اعمال میکند:
import com.aspose.slides.*;
Presentation presentation = new Presentation("sample.pptx");
try {
ISlide slide = presentation.getSlides().get_Item(0);
IAutoShape autoShape = (IAutoShape)slide.getShapes().get_Item(0);
IParagraph paragraph = autoShape.getTextFrame().getParagraphs().get_Item(0);
for (IPortion portion : paragraph.getPortions()) {
if (portion.getPortionFormat().getEffective().getFontBold()) {
// ویژگیهای قلم را برای بخش متن تنظیم کنید.
portion.getPortionFormat().setFontHeight(13);
portion.getPortionFormat().setFontItalic(NullableBool.True);
portion.getPortionFormat().setFontUnderline(TextUnderlineType.Dotted);
portion.getPortionFormat().setLatinFont(new FontData("Times New Roman"));
}
}
presentation.save("font_properties_for_text_portions.pptx", SaveFormat.Pptx);
} finally {
presentation.dispose();
}
نتیجه:

تنظیم چرخش متن
از ITextFrameFormat.setTextVerticalType برای تنظیم جهتگیری پیشتعریفشده متن درون یک شکل استفاده کنید.
مثال کد زیر جهتگیری متن در شکل را به TextVerticalType.Vertical270 تنظیم میکند که متن را 90 درجه خلاف ساعت میچرخاند:
import com.aspose.slides.*;

Presentation presentation = new Presentation("sample.pptx");
try {
    ISlide slide = presentation.getSlides().get_Item(0);

    IAutoShape autoShape = (IAutoShape)slide.getShapes().get_Item(0);
    autoShape.getTextFrame().getTextFrameFormat().setTextVerticalType(TextVerticalType.Vertical270);

    presentation.save("text_rotation.pptx", SaveFormat.Pptx);
} finally {
    presentation.dispose();
}
نتیجه:

تنظیم چرخش سفارشی برای فریمهای متنی
از ITextFrameFormat.setRotationAngle برای تنظیم زاویه چرخش سفارشی یک ITextFrame استفاده کنید.
مثال کد زیر فریم متن را به اندازه 3 درجه ساعتگرد درون شکل میچرخاند:
import com.aspose.slides.*;

Presentation presentation = new Presentation("sample.pptx");
try {
    ISlide slide = presentation.getSlides().get_Item(0);

    IAutoShape autoShape = (IAutoShape)slide.getShapes().get_Item(0);
    autoShape.getTextFrame().getTextFrameFormat().setRotationAngle(3);

    presentation.save("custom_text_rotation.pptx", SaveFormat.Pptx);
} finally {
    presentation.dispose();
}
نتیجه:

تنظیم فاصله خطوط پاراگرافها
Aspose.Slides متدهای IParagraphFormat.setSpaceAfter، IParagraphFormat.setSpaceBefore و IParagraphFormat.setSpaceWithin را برای کنترل فاصله بین خطوط فراهم میکند. این ویژگیها به شرح زیر استفاده میشوند:
- برای تعیین فاصله خطوط به صورت درصدی از ارتفاع خط، مقدار مثبت استفاده کنید.
- برای تعیین فاصله خطوط به پوینت، مقدار منفی استفاده کنید.
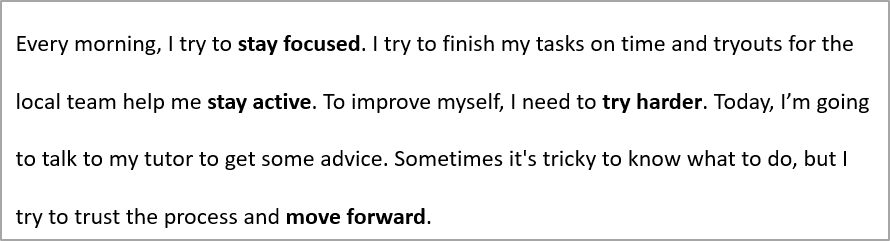
مثال زیر فاصله درون اولین پاراگراف را به 200٪ از ارتفاع خط (دوریک دو برابر) تنظیم میکند:
import com.aspose.slides.*;

Presentation presentation = new Presentation("sample.pptx");
try {
    ISlide slide = presentation.getSlides().get_Item(0);

    IAutoShape autoShape = (IAutoShape)slide.getShapes().get_Item(0);

    IParagraph paragraph = autoShape.getTextFrame().getParagraphs().get_Item(0);
    paragraph.getParagraphFormat().setSpaceWithin(200);

    presentation.save("line_spacing.pptx", SaveFormat.Pptx);
} finally {
    presentation.dispose();
}
نتیجه:
کنترل شکست خطوط
قوانین شکست خطوط پاراگراف در بلوکهای متنی باریک و ارائههایی که متن لاتین و شرق آسیا را ترکیب میکنند، مفید هستند. متدهای زیر متعلق به IParagraphFormat هستند و برای کل پاراگراف اعمال میشوند:
- setLatinLineBreak قواعد شکست خطوط لاتین را کنترل میکند. در متن ترکیبی، تغییر آن میتواند محل شکست متن شرق آسیا و علامتهای نگارشی مجاور را نیز تغییر دهد.
- setEastAsianLineBreak قواعد شکست خطوط شرق آسیا را کنترل میکند، از جمله محدودیتهای کاراکترهای ابتدای و انتهای خط.
این قوانین جایگزین ITextFrameFormat.setWrapText نمیشوند؛ این گزینه بستهبندی خودکار را درون فریم متن فعال میکند. این قوانین بر چینش تأثیر میگذارند؛ آنها کاراکترهای شکست خط را وارد نمیکنند. شکست خط صریح یک خط جدید را داخل پاراگراف ایجاد میکند، صرفنظر از عرض موجود.
مثال خودکفا زیر یک بلوک متنی باریک حاوی متن چینی و لاتین ایجاد میکند. هر دو گزینه شکست خط بهصورت صریح تنظیم میشوند و «line_breaking.pptx» ذخیره میشود. برای آزمایش هر یک از قوانین، مقدار مربوطه را تغییر دهید و تنظیمات دیگر را ثابت نگه دارید. مثال از Arial 24 پوینت و SimSun با عرض فریم 160 پوینت و حاشیه افقی صفر استفاده میکند. ITextFrameFormat.setAutofitType با TextAutofitType.None فراخوانی میشود تا اندازه متن و ابعاد فریم ثابت بمانند:
import com.aspose.slides.*;
import android.graphics.Color;

Presentation presentation = new Presentation();
try {
    ISlide slide = presentation.getSlides().get_Item(0);

    IAutoShape shape = slide.getShapes().addAutoShape(ShapeType.Rectangle, 50, 50, 160, 300);
    shape.getFillFormat().setFillType(FillType.NoFill);

    ITextFrame textFrame = shape.getTextFrame();
    textFrame.getTextFrameFormat().setWrapText(NullableBool.True);
    textFrame.getTextFrameFormat().setAutofitType(TextAutofitType.None);
    textFrame.getTextFrameFormat().setMarginLeft(0);
    textFrame.getTextFrameFormat().setMarginRight(0);

    IParagraph paragraph = textFrame.getParagraphs().get_Item(0);
    paragraph.setText("中文排版测试,PowerPoint 中文演示。");

    IParagraphFormat format = paragraph.getParagraphFormat();
    format.setAlignment(TextAlignment.Left);
    format.getDefaultPortionFormat().setFontHeight(24);
    FontData latinFont = new FontData("Arial");
    format.getDefaultPortionFormat().setLatinFont(latinFont);
    FontData eastAsianFont = new FontData("SimSun");
    format.getDefaultPortionFormat().setEastAsianFont(eastAsianFont);
    format.getDefaultPortionFormat().getFillFormat().setFillType(FillType.Solid);
    format.getDefaultPortionFormat().getFillFormat().getSolidFillColor().setColor(Color.BLACK);
    format.setLatinLineBreak(NullableBool.False);
    format.setEastAsianLineBreak(NullableBool.True);

    presentation.save("line_breaking.pptx", SaveFormat.Pptx);
} finally {
    presentation.dispose();
}
کنترل نقطهگذاری معلق
IParagraphFormat.setHangingPunctuation اجازه میدهد علامت نگارشی مجاز از لبهی راست خط متن فراتر رود بهجای اینکه در خط بعدی قرار گیرد. این تنظیم برای کل پاراگراف اعمال میشود و متفاوت از تورفتگی معلق است.
مثال خودکفا زیر نقطهگذاری معلق را در فریم متنی با عرض 100 پوینت فعال میکند و «hanging_punctuation.pptx» را ذخیره میکند. با Arial 24 پوینت و حاشیه افقی صفر، نقطهٔ نهایی پس از «جمله» باقی میماند و از لبهی راست متن فراتر میرود. برای مقایسه مقدار را به NullableBool.False تغییر دهید: در این حالت نقطه در خط جداگانهای قرار میگیرد. بستهبندی فعال است و autofit غیرفعال شده تا عرض موجود ثابت بماند.
import com.aspose.slides.*;
import android.graphics.Color;

Presentation presentation = new Presentation();
try {
    ISlide slide = presentation.getSlides().get_Item(0);

    IAutoShape shape = slide.getShapes().addAutoShape(ShapeType.Rectangle, 50, 50, 100, 200);
    shape.getFillFormat().setFillType(FillType.NoFill);

    ITextFrame textFrame = shape.getTextFrame();
    textFrame.getTextFrameFormat().setWrapText(NullableBool.True);
    textFrame.getTextFrameFormat().setAutofitType(TextAutofitType.None);
    textFrame.getTextFrameFormat().setMarginLeft(0);
    textFrame.getTextFrameFormat().setMarginRight(0);

    IParagraph paragraph = textFrame.getParagraphs().get_Item(0);
    paragraph.setText("Simple text, next sentence.");

    IParagraphFormat format = paragraph.getParagraphFormat();
    format.setAlignment(TextAlignment.Left);
    format.getDefaultPortionFormat().setFontHeight(24);
    FontData latinFont = new FontData("Arial");
    format.getDefaultPortionFormat().setLatinFont(latinFont);
    format.getDefaultPortionFormat().getFillFormat().setFillType(FillType.Solid);
    format.getDefaultPortionFormat().getFillFormat().getSolidFillColor().setColor(Color.BLACK);
    format.setHangingPunctuation(NullableBool.True);

    presentation.save("hanging_punctuation.pptx", SaveFormat.Pptx);
} finally {
    presentation.dispose();
}
همهٔ علامتهای نگارشی نمیتوانند معلق شوند. نتیجهٔ قابل رؤیت به در دسترس بودن قلم و چیدمان بستگی دارد: تغییر قلم، عرض موجود، حاشیهها یا تنظیمات autofit میتواند تفاوت قابل رؤیت را حذف کند.
تنظیم نوع Autofit برای فریمهای متنی
ITextFrameFormat.setAutofitType تعیین میکند متن هنگام تجاوز از مرزهای محفظهٔ خود چگونه رفتار کند. از آن برای کنترل اینکه آیا متن کوچک شود، سرریز شود یا بهصورت خودکار شکل را تغییر اندازه دهد استفاده کنید. مثال زیر شکل را طوری تنظیم میکند که برای متن خود اندازه را تغییر دهد و نتیجه در «autofit_type.pptx» ذخیره میشود:
import com.aspose.slides.*;

Presentation presentation = new Presentation("sample.pptx");
try {
    ISlide slide = presentation.getSlides().get_Item(0);

    IAutoShape autoShape = (IAutoShape)slide.getShapes().get_Item(0);
    autoShape.getTextFrame().getTextFrameFormat().setAutofitType(TextAutofitType.Shape);

    presentation.save("autofit_type.pptx", SaveFormat.Pptx);
} finally {
    presentation.dispose();
}
برای شمارش خطوط پس از بستهبندی خودکار و مشاهدهٔ چگونگی تغییر عرض متن یا شکل، به Count Rendered Lines مراجعه کنید. تنها شمارش خطوط نشانگر سرریز متن نیست.
تنظیم نقطهٔ لنگر فریمهای متنی
ITextFrameFormat.setAnchoringType نحوه موقعیتگیری عمودی متن داخل یک شکل را تعریف میکند؛ برای مثال در بالا، وسط یا پایین. مثال زیر متن را به پایین اولین شکل لنگر میدهد و نتیجه در «text_anchor.pptx» ذخیره میشود:
import com.aspose.slides.*;

Presentation presentation = new Presentation("sample.pptx");
try {
    ISlide slide = presentation.getSlides().get_Item(0);

    IAutoShape autoShape = (IAutoShape)slide.getShapes().get_Item(0);
    autoShape.getTextFrame().getTextFrameFormat().setAnchoringType(TextAnchorType.Bottom);

    presentation.save("text_anchor.pptx", SaveFormat.Pptx);
} finally {
    presentation.dispose();
}
تنظیم تبهای متنی
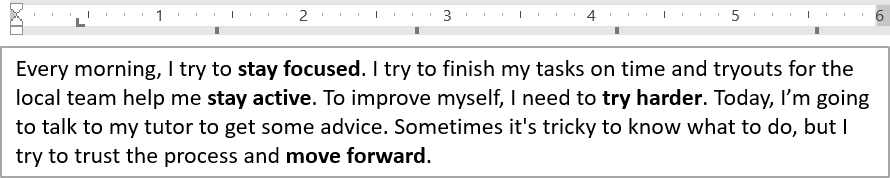
از IParagraphFormat.setDefaultTabSize و IParagraphFormat.getTabs برای پیکربندی توقفهای تب در یک پاراگراف استفاده کنید. مثال زیر فاصلهٔ تب پیشفرض را به 100 پوینت تنظیم میکند و یک توقف تب چپتراست در 30 پوینت اضافه میکند. این تنظیمات بر متنی که شامل کاراکترهای تب باشد اثر میگذارند:
import com.aspose.slides.*;

Presentation presentation = new Presentation("sample.pptx");
try {
    ISlide slide = presentation.getSlides().get_Item(0);

    IAutoShape autoShape = (IAutoShape)slide.getShapes().get_Item(0);

    IParagraph paragraph = autoShape.getTextFrame().getParagraphs().get_Item(0);
    paragraph.getParagraphFormat().setDefaultTabSize(100);
    paragraph.getParagraphFormat().getTabs().add(30, TabAlignment.Left);

    presentation.save("paragraph_tabs.pptx", SaveFormat.Pptx);
} finally {
    presentation.dispose();
}
نتیجه:
تنظیم زبان تصحیح متن
Aspose.Slides متد IBasePortionFormat.setLanguageId را فراهم میکند که به شما اجازه میدهد زبان تصحیح (proofing) برای یک بخش متنی را تنظیم کنید. زبان تصحیح تعیین میکند چه زبانی برای بررسی املا و گرامر در PowerPoint استفاده شود.
مثال زیر به «presentation.pptx» با یک جعبه متن به عنوان اولین شکل در اولین اسلاید و حداقل یک پاراگراف نیاز دارد. محتویات اولین پاراگراف را با «1。» جایگزین میکند، قلم آن را به SimSun تنظیم مینماید و زبان تصحیح چینی ساده (zh-CN) را اختصاص میدهد. نتیجه در «proofing_language.pptx» ذخیره میشود:
import com.aspose.slides.*;

Presentation presentation = new Presentation("presentation.pptx");
try {
    ISlide slide = presentation.getSlides().get_Item(0);

    IAutoShape autoShape = (IAutoShape)slide.getShapes().get_Item(0);

    IParagraph paragraph = autoShape.getTextFrame().getParagraphs().get_Item(0);
    paragraph.getPortions().clear();

    FontData font = new FontData("SimSun");

    Portion textPortion = new Portion();
    textPortion.getPortionFormat().setComplexScriptFont(font);
    textPortion.getPortionFormat().setEastAsianFont(font);
    textPortion.getPortionFormat().setLatinFont(font);

    // شناسهٔ زبان تصحیح را تنظیم کنید.
    textPortion.getPortionFormat().setLanguageId("zh-CN");

    textPortion.setText("1。");
    paragraph.getPortions().add(textPortion);

    presentation.save("proofing_language.pptx", SaveFormat.Pptx);
} finally {
    presentation.dispose();
}
تنظیم زبان پیشفرض
از LoadOptions.setDefaultTextLanguage برای تعیین زبان پیشفرض متنی که هنگام بارگذاری یا ایجاد یک ارائه ایجاد میشود، استفاده کنید. مثال زیر ارائهای با زبان پیشفرض متن «US English» میسازد، یک جعبه متن افزود و en-US را برای اولین بخش متنی آن چاپ میکند:
import com.aspose.slides.*;

LoadOptions loadOptions = new LoadOptions();
loadOptions.setDefaultTextLanguage("en-US");

Presentation presentation = new Presentation(loadOptions);
try {
    ISlide slide = presentation.getSlides().get_Item(0);

    // یک شکل مستطیل جدید با متن اضافه کنید.
    IAutoShape shape = slide.getShapes().addAutoShape(ShapeType.Rectangle, 20, 20, 150, 50);
    shape.getTextFrame().setText("Sample text");

    // زبان اولین بخش متن را بررسی کنید.
    IPortion portion = shape.getTextFrame().getParagraphs().get_Item(0).getPortions().get_Item(0);
    System.out.println(portion.getPortionFormat().getLanguageId());
} finally {
    presentation.dispose();
}
تنظیم سبک پیشفرض متن
برای اعمال قالببندی پیشفرض متن در سطح ارائه، از IPresentation.getDefaultTextStyle استفاده کنید.
مثال زیر قلم بولد 14 پوینت را بهعنوان پیشفرض برای پاراگرافهای سطحبالا در یک ارائهٔ جدید تنظیم میکند و آن را در «default_text_style.pptx» ذخیره مینماید. متن میتواند این پیشفرضها را به ارث ببرد مگر اینکه قالببندی خاصتری آنها را بازنویسی کند:
import com.aspose.slides.*;

Presentation presentation = new Presentation();
try {
    // دریافت قالب پاراگراف سطح بالایی.
    IParagraphFormat paragraphFormat = presentation.getDefaultTextStyle().getLevel(0);

    if (paragraphFormat != null) {
        paragraphFormat.getDefaultPortionFormat().setFontHeight(14);
        paragraphFormat.getDefaultPortionFormat().setFontBold(NullableBool.True);
    }

    presentation.save("default_text_style.pptx", SaveFormat.Pptx);
} finally {
    presentation.dispose();
}
استخراج متن با اثر تمام حروف بزرگ (All‑Caps)
در PowerPoint، اعمال اثر قلم All Caps باعث میشود متن روی اسلاید در حالت بزرگ نمایش داده شود حتی اگر ابتدا با حروف کوچک وارد شده باشد. وقتی چنین بخشی را با Aspose.Slides دریافت میکنید، کتابخانه متن را دقیقاً همانطوری که وارد شده است برمیگرداند. برای تطبیق با متنی که نمایش داده میشود، TextCapType را بررسی کنید و هنگام مقدار All رشتهٔ برگرداندهشده را به حروف بزرگ تبدیل کنید.
این مثال به «sample2.pptx» با یک جعبه متن به عنوان اولین شکل در اولین اسلاید نیاز دارد. اولین پاراگراف بخش اول آن شامل «Hello, Aspose!» با اثر All Caps اعمالشده است، همانطور که در زیر نشان داده شده:

کد مثال زیر نشان میدهد چگونه متن با اثر All Caps استخراج شود:
import com.aspose.slides.*;

Presentation presentation = new Presentation("sample2.pptx");
try {
    ISlide slide = presentation.getSlides().get_Item(0);

    IAutoShape autoShape = (IAutoShape)slide.getShapes().get_Item(0);
    IPortion textPortion = autoShape.getTextFrame().getParagraphs().get_Item(0).getPortions().get_Item(0);

    System.out.println("Original text: " + textPortion.getText());

    IPortionFormatEffectiveData textFormat = textPortion.getPortionFormat().getEffective();
    if (textFormat.getTextCapType() == TextCapType.All) {
        String text = textPortion.getText().toUpperCase();
        System.out.println("All-Caps effect: " + text);
    }
} finally {
    presentation.dispose();
}
خروجی:
Original text: Hello, Aspose!
All-Caps effect: HELLO, ASPOSE!
FAQ
چگونه میتوان متن در یک جدول روی یک اسلاید را ویرایش کرد؟
برای ویرایش متن در یک جدول روی اسلاید، از ITable استفاده کنید. سلولها را پیمایش کنید و هر سلول را از طریق ICell.getTextFrame بهروزرسانی کنید و قالببندی پاراگراف را از طریق IParagraph.getParagraphFormat تنظیم کنید.
چگونه میتوان رنگ گرادیان را به متن روی اسلاید PowerPoint اعمال کرد؟
برای اعمال رنگ گرادیان به متن، از IBasePortionFormat.getFillFormat استفاده کنید. IFillFormat.setFillType را بر روی FillType.Gradient تنظیم کنید و سپس نقاط توقف گرادیان، جهت و شفافیت را پیکربندی کنید.