
Android에서 프레젠테이션 텍스트 서식 지정
개요
이 문서는 Java를 통해 Android용 Aspose.Slides를 사용하여 PowerPoint 및 OpenDocument 프레젠테이션에서 텍스트를 서식 지정하는 방법을 보여줍니다. 배경 색상, 투명도, 문자 간격, 글꼴 속성, 회전, 단락 간격, 자동 맞춤 동작, 텍스트 고정, 탭 정지 및 언어 설정을 다룹니다.
별도로 명시되지 않는 한, 예제는 sample.pptx를 사용합니다. 첫 번째 슬라이드의 첫 번째 도형은 텍스트 상자이며, 첫 번째 단락에는 아래에 표시된 텍스트가 포함되어 있습니다. 슬라이드와 도형 인덱스는 0부터 시작합니다. 굵게 표시된 부분을 선택하는 예제는 효과적인 서식을 사용하며, 여기에는 상속된 굵은 서식도 포함됩니다:

리터럴 텍스트 또는 정규식 일치를 찾고 강조하려면, 텍스트 검색 및 교체를 참조하십시오.
텍스트 배경 색상 설정
단락의 기본 강조 색상을 설정하려면 IParagraphFormat.getDefaultPortionFormat을 사용하고, 개별 텍스트 부분에 대해서는 IBasePortionFormat.getHighlightColor을 사용합니다.
다음 예제는 첫 번째 단락에 기본값으로 연한 회색 강조를 설정합니다. 개별 부분에 대한 명시적인 강조 색상은 이 기본값보다 우선합니다:
import com.aspose.slides.*;
import android.graphics.Color;

Presentation presentation = new Presentation("sample.pptx");
try {
    ISlide slide = presentation.getSlides().get_Item(0);

    IAutoShape autoShape = (IAutoShape)slide.getShapes().get_Item(0);
    IParagraph paragraph = autoShape.getTextFrame().getParagraphs().get_Item(0);

    // 전체 단락에 대한 강조 색상을 설정합니다.
    paragraph.getParagraphFormat().getDefaultPortionFormat().getHighlightColor().setColor(Color.LTGRAY);

    presentation.save("gray_paragraph.pptx", SaveFormat.Pptx);
} finally {
    presentation.dispose();
}
결과:

아래 코드 예제는 굵은 글꼴이 적용된 텍스트 부분의 배경 색상을 설정하는 방법을 보여줍니다:
import com.aspose.slides.*;
import android.graphics.Color;

Presentation presentation = new Presentation("sample.pptx");
try {
    ISlide slide = presentation.getSlides().get_Item(0);

    IAutoShape autoShape = (IAutoShape)slide.getShapes().get_Item(0);
    IParagraph paragraph = autoShape.getTextFrame().getParagraphs().get_Item(0);

    for (IPortion portion : paragraph.getPortions()) {
        if (portion.getPortionFormat().getEffective().getFontBold()) {
                // 텍스트 부분에 대한 강조 색상을 설정합니다.
                portion.getPortionFormat().getHighlightColor().setColor(Color.LTGRAY);
        }
    }

    presentation.save("gray_text_portions.pptx", SaveFormat.Pptx);
} finally {
    presentation.dispose();
}
결과:

텍스트 단락 정렬
텍스트 프레임 내에서 단락 정렬을 설정하려면 IParagraphFormat.setAlignment을 사용합니다. 값은 가운데, 왼쪽 정렬, 오른쪽 정렬, 양쪽 맞춤 등 여러 형태가 가능합니다.
다음 코드 예제는 단락을 가운데 정렬하는 방법을 보여줍니다:
import com.aspose.slides.*;

Presentation presentation = new Presentation("sample.pptx");
try {
    ISlide slide = presentation.getSlides().get_Item(0);

    IAutoShape autoShape = (IAutoShape)slide.getShapes().get_Item(0);
    IParagraph paragraph = autoShape.getTextFrame().getParagraphs().get_Item(0);

    // 단락의 정렬을 가운데로 설정합니다.
    paragraph.getParagraphFormat().setAlignment(TextAlignment.Center);

    presentation.save("aligned_paragraph.pptx", SaveFormat.Pptx);
} finally {
    presentation.dispose();
}
결과:

줄 내에서 글꼴 정렬
줄 내에서 서로 다른 글꼴 크기의 텍스트 부분을 수직으로 정렬하려면 IParagraphFormat.setFontAlignment을 사용합니다. 이 설정은 전체 단락에 적용되며 각 줄 내에서 정렬을 제어합니다.
다음 독립형 예제는 하나의 슬라이드에 네 개의 라벨이 있는 텍스트 상자를 생성합니다. 각 단락은 18, 36, 54 포인트 크기의 동일한 텍스트를 포함하며, 서로 다른 글꼴 정렬을 적용합니다. Arial을 사용하고 자동 맞춤 및 줄 바꿈을 비활성화하며 텍스트 프레임을 한 줄에 충분히 크게 유지합니다.
import com.aspose.slides.*;
import android.graphics.Color;

Presentation presentation = new Presentation();
try {
    ISlide slide = presentation.getSlides().get_Item(0);

    int[] alignments = { FontAlignment.Baseline, FontAlignment.Top, FontAlignment.Center, FontAlignment.Bottom };
    String[] alignmentNames = { "Baseline", "Top", "Center", "Bottom" };
    float[] fontSizes = { 18f, 36f, 54f };

    for (int i = 0; i < alignments.length; i++) {
        IAutoShape shape = slide.getShapes().addAutoShape(ShapeType.Rectangle, 30, 20 + i * 130, 660, 120);
        shape.getFillFormat().setFillType(FillType.NoFill);
        shape.getLineFormat().getFillFormat().setFillType(FillType.NoFill);

        ITextFrame textFrame = shape.getTextFrame();
        textFrame.getTextFrameFormat().setAnchoringType(TextAnchorType.Top);
        textFrame.getTextFrameFormat().setAutofitType(TextAutofitType.None);
        textFrame.getTextFrameFormat().setWrapText(NullableBool.False);

        IParagraph label = textFrame.getParagraphs().get_Item(0);
        label.setText(alignmentNames[i]);
        label.getParagraphFormat().setAlignment(TextAlignment.Left);
        label.getParagraphFormat().getDefaultPortionFormat().setFontHeight(14);
        label.getParagraphFormat().getDefaultPortionFormat().setLatinFont(new FontData("Arial"));
        label.getParagraphFormat().getDefaultPortionFormat().getFillFormat().setFillType(FillType.Solid);
        label.getParagraphFormat().getDefaultPortionFormat().getFillFormat().getSolidFillColor().setColor(Color.GRAY);

        Paragraph paragraph = new Paragraph();
        paragraph.getParagraphFormat().setFontAlignment(alignments[i]);
        paragraph.getParagraphFormat().setAlignment(TextAlignment.Left);
        paragraph.getParagraphFormat().getDefaultPortionFormat().setLatinFont(new FontData("Arial"));
        paragraph.getParagraphFormat().getDefaultPortionFormat().getFillFormat().setFillType(FillType.Solid);
        paragraph.getParagraphFormat().getDefaultPortionFormat().getFillFormat().getSolidFillColor().setColor(Color.BLACK);

        for (float fontSize : fontSizes) {
            Portion portion = new Portion("Ag ");
            portion.getPortionFormat().setFontHeight(fontSize);
            paragraph.getPortions().add(portion);
        }

        textFrame.getParagraphs().add(paragraph);
    }

    presentation.save("font_alignment.pptx", SaveFormat.Pptx);
} finally {
    presentation.dispose();
}
결과:
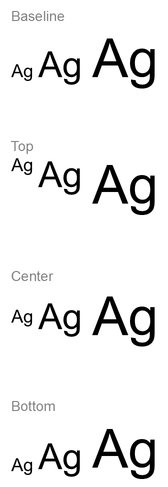
글꼴 정렬은 글꼴 메트릭을 사용하므로 개별 문자들의 눈에 보이는 가장자리가 정확히 일치하지 않을 수 있습니다. 이 예제는 대문자와 하강자를 모두 포함하여 기준선과 하단 정렬의 차이를 보여줍니다. 글꼴 가용성 및 대체, 사용된 문자, 글꼴 크기 차이가 결과에 영향을 줍니다. 프레임 크기, 여백, 줄 간격, 줄 바꿈 및 자동 맞춤도 레이아웃에 영향을 미치므로 모드를 비교할 때 동일한 글꼴 및 레이아웃 설정을 사용하십시오.
이 설정은 수평 단락 정렬을 제어하는 IParagraphFormat.setAlignment, 그리고 도형 내에서 텍스트 블록을 수직으로 위치시키는 ITextFrameFormat.setAnchoringType과는 다릅니다. IBasePortionFormat.setEscapement을 통한 위첨자 및 아래첨자 서식은 단락 줄의 글꼴 정렬을 설정하는 대신, 개별 부분을 기준선에 대해 이동시킵니다.
텍스트 투명도 설정
텍스트 투명도는 IBasePortionFormat.getFillFormat에 할당된 색상의 알파 구성 요소로 제어됩니다. 아래 예제에서 alpha = 50은 0–255 스케일의 ARGB 알파 채널 값이며, 투명도 퍼센트가 아니라는 점에 유의하십시오.
아래 코드 예제는 전체 단락에 투명도를 적용하는 방법을 보여줍니다:
import com.aspose.slides.*;
import android.graphics.Color;

int alpha = 50;

Presentation presentation = new Presentation("sample.pptx");
try {
    ISlide slide = presentation.getSlides().get_Item(0);

    IAutoShape autoShape = (IAutoShape)slide.getShapes().get_Item(0);
    IParagraph paragraph = autoShape.getTextFrame().getParagraphs().get_Item(0);

    // 텍스트의 채우기 색상을 투명 색상으로 설정합니다.
    paragraph.getParagraphFormat().getDefaultPortionFormat().getFillFormat().setFillType(FillType.Solid);
    paragraph.getParagraphFormat().getDefaultPortionFormat().getFillFormat().getSolidFillColor().setColor(Color.argb(alpha, 0, 0, 0));

    presentation.save("transparent_paragraph.pptx", SaveFormat.Pptx);
} finally {
    presentation.dispose();
}
결과:

다음 코드 예제는 굵은 글꼴이 적용된 텍스트 부분에 투명도를 적용하는 방법을 보여줍니다:
import com.aspose.slides.*;
import android.graphics.Color;

int alpha = 50;

Presentation presentation = new Presentation("sample.pptx");
try {
    ISlide slide = presentation.getSlides().get_Item(0);

    IAutoShape autoShape = (IAutoShape)slide.getShapes().get_Item(0);
    IParagraph paragraph = autoShape.getTextFrame().getParagraphs().get_Item(0);

    for (IPortion portion : paragraph.getPortions()) {
        if (portion.getPortionFormat().getEffective().getFontBold()) {
            // 텍스트 부분의 투명도를 설정합니다.
            portion.getPortionFormat().getFillFormat().setFillType(FillType.Solid);
            portion.getPortionFormat().getFillFormat().getSolidFillColor().setColor(Color.argb(alpha, 0, 0, 0));
        }
    }

    presentation.save("transparent_text_portions.pptx", SaveFormat.Pptx);
} finally {
    presentation.dispose();
}
결과:

텍스트 문자 간격 설정
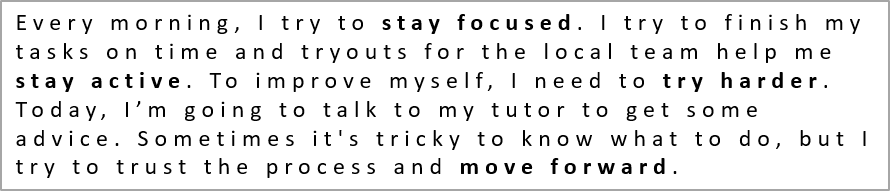
텍스트 상자 내 문자 사이 간격을 확대하거나 축소하려면 IBasePortionFormat.setSpacing을 사용합니다. 예제에서는 3포인트 간격을 추가하며, 음수 값은 텍스트를 축소합니다.
다음 Java 코드는 전체 단락에서 문자 간격을 확대하는 방법을 보여줍니다:
import com.aspose.slides.*;

Presentation presentation = new Presentation("sample.pptx");
try {
    ISlide slide = presentation.getSlides().get_Item(0);

    IAutoShape autoShape = (IAutoShape)slide.getShapes().get_Item(0);
    IParagraph paragraph = autoShape.getTextFrame().getParagraphs().get_Item(0);

    // 참고: 문자 간격을 압축하려면 음수 값을 사용하십시오.
    paragraph.getParagraphFormat().getDefaultPortionFormat().setSpacing(3); // 문자 간격을 확장합니다.

    presentation.save("character_spacing_in_paragraph.pptx", SaveFormat.Pptx);
} finally {
    presentation.dispose();
}
결과:
아래 코드 예제는 굵은 글꼴이 적용된 텍스트 부분에서 문자 간격을 확대하는 방법을 보여줍니다:
import com.aspose.slides.*;

Presentation presentation = new Presentation("sample.pptx");
try {
    ISlide slide = presentation.getSlides().get_Item(0);

    IAutoShape autoShape = (IAutoShape)slide.getShapes().get_Item(0);
    IParagraph paragraph = autoShape.getTextFrame().getParagraphs().get_Item(0);

    for (IPortion portion : paragraph.getPortions()) {
        if (portion.getPortionFormat().getEffective().getFontBold()) {
            // 참고: 문자 간격을 압축하려면 음수 값을 사용하십시오.
            portion.getPortionFormat().setSpacing(3); // 문자 간격을 확장합니다.
        }
    }

    presentation.save("character_spacing_in_text_portions.pptx", SaveFormat.Pptx);
} finally {
    presentation.dispose();
}
결과:

특정 글꼴에 대한 커닝 비활성화
일부 경우에 Aspose.Slides가 렌더링한 텍스트는 PowerPoint에 표시된 동일한 텍스트보다 약간 더 촘촘하게 보일 수 있습니다. 이는 PowerPoint가 해당 글꼴에 유효한 커닝 정보가 있고 PowerPoint 설정에서 커닝이 활성화되어 있어도 특정 글꼴에 대한 커닝 데이터를 무시하기 때문입니다.
이러한 경우에 렌더링 결과를 PowerPoint와 가깝게 만들려면 영향을 받는 글꼴을 사용하는 텍스트 부분에 대해 커닝을 비활성화할 수 있습니다. IBasePortionFormat.setKerningMinimalSize을 실제 글꼴 크기보다 큰 값으로 설정하십시오. 이 예제는 첫 번째 슬라이드의 첫 번째 도형이 텍스트 상자인 “presentation.pptx"가 필요합니다. 효과적인 글꼴 이름(상속된 글꼴 포함)을 확인하고 Roboto를 사용하는 부분에 대해 100포인트 임계값을 설정합니다. 이렇게 하면 100포인트 미만의 글꼴 크기를 가진 일치하는 부분의 커닝이 비활성화됩니다:
import com.aspose.slides.*;

Presentation presentation = new Presentation("presentation.pptx");
try {
    ISlide slide = presentation.getSlides().get_Item(0);

    IAutoShape autoShape = (IAutoShape)slide.getShapes().get_Item(0);
    String targetFont = "Roboto";

    for (IParagraph paragraph : autoShape.getTextFrame().getParagraphs()) {
        for (IPortion portion : paragraph.getPortions()) {
            IPortionFormatEffectiveData portionFormat = portion.getPortionFormat().getEffective();

            if ((portionFormat.getLatinFont() != null &&
                 portionFormat.getLatinFont().getFontName().equals(targetFont)) ||
                (portionFormat.getEastAsianFont() != null &&
                 portionFormat.getEastAsianFont().getFontName().equals(targetFont)) ||
                (portionFormat.getComplexScriptFont() != null &&
                 portionFormat.getComplexScriptFont().getFontName().equals(targetFont))) {
                portion.getPortionFormat().setKerningMinimalSize(100);
            }
        }
    }

    presentation.save("output.pptx", SaveFormat.Pptx);
} finally {
    presentation.dispose();
}
임계값 이하의 일치하는 텍스트에 대해 이 설정은 커닝을 방지하며, PowerPoint 고유 동작의 영향을 받는 글꼴에 대해 Aspose.Slides 렌더링을 PowerPoint의 시각적 출력과 맞추는 데 도움이 될 수 있습니다.
텍스트 글꼴 속성 관리
글꼴 속성은 IParagraphFormat.getDefaultPortionFormat을 통해 단락 수준에서 설정하거나, 개별 부분에 대해서는 IPortionFormat을 통해 설정할 수 있습니다.
다음 예제는 첫 번째 단락의 기본 글꼴을 12포인트 Times New Roman으로 설정하고 굵게, 기울임, 점선 밑줄 서식을 적용합니다. 개별 부분에 대한 명시적인 서식은 이러한 기본값보다 우선합니다:
import com.aspose.slides.*;

Presentation presentation = new Presentation("sample.pptx");
try {
    ISlide slide = presentation.getSlides().get_Item(0);

    IAutoShape autoShape = (IAutoShape)slide.getShapes().get_Item(0);
    IParagraph paragraph = autoShape.getTextFrame().getParagraphs().get_Item(0);

    // 단락의 글꼴 속성을 설정합니다.
    paragraph.getParagraphFormat().getDefaultPortionFormat().setFontHeight(12);
    paragraph.getParagraphFormat().getDefaultPortionFormat().setFontBold(NullableBool.True);
    paragraph.getParagraphFormat().getDefaultPortionFormat().setFontItalic(NullableBool.True);
    paragraph.getParagraphFormat().getDefaultPortionFormat().setFontUnderline(TextUnderlineType.Dotted);
    paragraph.getParagraphFormat().getDefaultPortionFormat().setLatinFont(new FontData("Times New Roman"));

    presentation.save("font_properties_for_paragraph.pptx", SaveFormat.Pptx);
} finally {
    presentation.dispose();
}
결과:

다음 예제는 효과적인 서식이 굵게인 부분에 대해 13포인트 Times New Roman, 기울임 서식 및 점선 밑줄을 적용합니다:
import com.aspose.slides.*;

Presentation presentation = new Presentation("sample.pptx");
try {
    ISlide slide = presentation.getSlides().get_Item(0);

    IAutoShape autoShape = (IAutoShape)slide.getShapes().get_Item(0);
    IParagraph paragraph = autoShape.getTextFrame().getParagraphs().get_Item(0);

    for (IPortion portion : paragraph.getPortions()) {
        if (portion.getPortionFormat().getEffective().getFontBold()) {
            // 텍스트 부분에 대한 글꼴 속성을 설정합니다.
            portion.getPortionFormat().setFontHeight(13);
            portion.getPortionFormat().setFontItalic(NullableBool.True);
            portion.getPortionFormat().setFontUnderline(TextUnderlineType.Dotted);
            portion.getPortionFormat().setLatinFont(new FontData("Times New Roman"));
        }
    }

    presentation.save("font_properties_for_text_portions.pptx", SaveFormat.Pptx);
} finally {
    presentation.dispose();
}
결과:

텍스트 회전 설정
도형 내에서 미리 정의된 텍스트 방향을 설정하려면 ITextFrameFormat.setTextVerticalType을 사용합니다.
다음 코드 예제는 도형의 텍스트 방향을 TextVerticalType.Vertical270으로 설정합니다. 이는 텍스트를 시계 반대 방향으로 90도 회전시킵니다:
import com.aspose.slides.*;

Presentation presentation = new Presentation("sample.pptx");
try {
    ISlide slide = presentation.getSlides().get_Item(0);

    IAutoShape autoShape = (IAutoShape)slide.getShapes().get_Item(0);
    autoShape.getTextFrame().getTextFrameFormat().setTextVerticalType(TextVerticalType.Vertical270);

    presentation.save("text_rotation.pptx", SaveFormat.Pptx);
} finally {
    presentation.dispose();
}
결과:

텍스트 프레임에 대한 사용자 정의 회전 설정
ITextFrame에 대한 사용자 정의 회전 각도를 설정하려면 ITextFrameFormat.setRotationAngle을 사용합니다.
아래 코드 예제는 도형 내에서 텍스트 프레임을 시계 방향으로 3도 회전시킵니다:
import com.aspose.slides.*;

Presentation presentation = new Presentation("sample.pptx");
try {
    ISlide slide = presentation.getSlides().get_Item(0);

    IAutoShape autoShape = (IAutoShape)slide.getShapes().get_Item(0);
    autoShape.getTextFrame().getTextFrameFormat().setRotationAngle(3);

    presentation.save("custom_text_rotation.pptx", SaveFormat.Pptx);
} finally {
    presentation.dispose();
}
결과:

단락 줄 간격 설정
Aspose.Slides는 단락 간격을 제어하기 위해 IParagraphFormat.setSpaceAfter, IParagraphFormat.setSpaceBefore, 및 IParagraphFormat.setSpaceWithin을 제공합니다. 이러한 속성은 다음과 같이 사용됩니다:
- 양수 값을 사용하여 줄 간격을 줄 높이의 백분율로 지정합니다.
- 음수 값을 사용하여 줄 간격을 포인트 단위로 지정합니다.
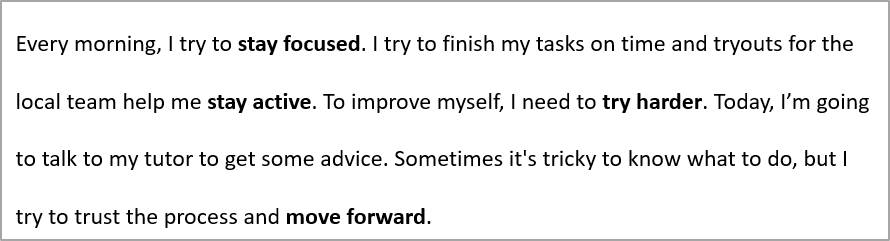
다음 예제는 첫 번째 단락의 내부 간격을 줄 높이의 200% (두 배 간격)로 설정합니다:
import com.aspose.slides.*;

Presentation presentation = new Presentation("sample.pptx");
try {
    ISlide slide = presentation.getSlides().get_Item(0);

    IAutoShape autoShape = (IAutoShape)slide.getShapes().get_Item(0);

    IParagraph paragraph = autoShape.getTextFrame().getParagraphs().get_Item(0);
    paragraph.getParagraphFormat().setSpaceWithin(200);

    presentation.save("line_spacing.pptx", SaveFormat.Pptx);
} finally {
    presentation.dispose();
}
결과:
줄 바꿈 제어
단락 줄 바꿈 규칙은 좁은 텍스트 블록 및 라틴어와 동아시아 텍스트가 혼합된 프레젠테이션에서 유용합니다. 다음 메서드는 IParagraphFormat에 속하므로 전체 단락에 적용됩니다:
- setLatinLineBreak은 라틴어 줄 바꿈 규칙을 제어합니다. 혼합 텍스트에서 이 값을 변경하면 인접한 동아시아 텍스트 및 구두점의 줄 바꿈 위치도 바뀔 수 있습니다.
- setEastAsianLineBreak은 동아시아 줄 바꿈 규칙을 제어하며, 줄 시작 및 끝에 대한 문자 제한을 포함합니다.
이 규칙들은 텍스트 프레임 내 자동 줄 바꿈을 가능하게 하는 ITextFrameFormat.setWrapText을 대체하지 않습니다. 줄 바꿈이 발생할 때 레이아웃에 영향을 주지만, 줄 바꿈 문자를 삽입하지는 않습니다. 명시적인 줄 바꿈은 사용 가능한 너비와 무관하게 단락 내에서 새 줄을 강제합니다.
다음 독립형 예제는 중국어와 라틴어 텍스트를 포함하는 좁은 텍스트 블록을 생성합니다. 두 줄 바꿈 옵션을 명시적으로 설정하고 “line_breaking.pptx"로 저장합니다. 각 규칙을 실험하려면 다른 설정은 고정한 채 해당 값을 변경하십시오. 예제는 24포인트 Arial 및 SimSun을 사용하고 프레임 너비는 160포인트, 수평 텍스트 프레임 여백은 0으로 설정합니다. ITextFrameFormat.setAutofitType은 TextAutofitType.None과 함께 호출되어 텍스트 크기와 프레임 크기가 고정됩니다.
import com.aspose.slides.*;
import android.graphics.Color;

Presentation presentation = new Presentation();
try {
    ISlide slide = presentation.getSlides().get_Item(0);

    IAutoShape shape = slide.getShapes().addAutoShape(ShapeType.Rectangle, 50, 50, 160, 300);
    shape.getFillFormat().setFillType(FillType.NoFill);

    ITextFrame textFrame = shape.getTextFrame();
    textFrame.getTextFrameFormat().setWrapText(NullableBool.True);
    textFrame.getTextFrameFormat().setAutofitType(TextAutofitType.None);
    textFrame.getTextFrameFormat().setMarginLeft(0);
    textFrame.getTextFrameFormat().setMarginRight(0);

    IParagraph paragraph = textFrame.getParagraphs().get_Item(0);
    paragraph.setText("中文排版测试,PowerPoint 中文演示。");

    IParagraphFormat format = paragraph.getParagraphFormat();
    format.setAlignment(TextAlignment.Left);
    format.getDefaultPortionFormat().setFontHeight(24);
    FontData latinFont = new FontData("Arial");
    format.getDefaultPortionFormat().setLatinFont(latinFont);
    FontData eastAsianFont = new FontData("SimSun");
    format.getDefaultPortionFormat().setEastAsianFont(eastAsianFont);
    format.getDefaultPortionFormat().getFillFormat().setFillType(FillType.Solid);
    format.getDefaultPortionFormat().getFillFormat().getSolidFillColor().setColor(Color.BLACK);
    format.setLatinLineBreak(NullableBool.False);
    format.setEastAsianLineBreak(NullableBool.True);

    presentation.save("line_breaking.pptx", SaveFormat.Pptx);
} finally {
    presentation.dispose();
}
걸이 구두점 제어
IParagraphFormat.setHangingPunctuation은 해당 구두점이 다음 줄에 차지하는 대신 텍스트 줄의 오른쪽 끝을 넘어 확장하도록 허용합니다. 전체 단락에 적용되며 걸이 들여쓰기와는 다릅니다.
다음 독립형 예제는 100포인트 너비 텍스트 프레임에서 걸이 구두점을 활성화하고 “hanging_punctuation.pptx"로 저장합니다. 24포인트 Arial 및 수평 텍스트 프레임 여백이 0인 경우, 마지막 마침표가 “sentence” 뒤에 남으며 오른쪽 텍스트 가장자를 넘어 확장됩니다. 비교를 위해 속성을 NullableBool.False로 설정하십시오: 이 설정에서는 마침표가 별도의 줄을 차지합니다. 줄 바꿈은 활성화되고 자동 맞춤은 비활성화되어 사용 가능한 너비가 고정됩니다.
import com.aspose.slides.*;
import android.graphics.Color;

Presentation presentation = new Presentation();
try {
    ISlide slide = presentation.getSlides().get_Item(0);

    IAutoShape shape = slide.getShapes().addAutoShape(ShapeType.Rectangle, 50, 50, 100, 200);
    shape.getFillFormat().setFillType(FillType.NoFill);

    ITextFrame textFrame = shape.getTextFrame();
    textFrame.getTextFrameFormat().setWrapText(NullableBool.True);
    textFrame.getTextFrameFormat().setAutofitType(TextAutofitType.None);
    textFrame.getTextFrameFormat().setMarginLeft(0);
    textFrame.getTextFrameFormat().setMarginRight(0);

    IParagraph paragraph = textFrame.getParagraphs().get_Item(0);
    paragraph.setText("Simple text, next sentence.");

    IParagraphFormat format = paragraph.getParagraphFormat();
    format.setAlignment(TextAlignment.Left);
    format.getDefaultPortionFormat().setFontHeight(24);
    FontData latinFont = new FontData("Arial");
    format.getDefaultPortionFormat().setLatinFont(latinFont);
    format.getDefaultPortionFormat().getFillFormat().setFillType(FillType.Solid);
    format.getDefaultPortionFormat().getFillFormat().getSolidFillColor().setColor(Color.BLACK);
    format.setHangingPunctuation(NullableBool.True);

    presentation.save("hanging_punctuation.pptx", SaveFormat.Pptx);
} finally {
    presentation.dispose();
}
모든 구두점이 걸이될 수 있는 것은 아닙니다. 위에서 언급한 글꼴 및 레이아웃 조건도 이 비교에 적용됩니다: 글꼴, 사용 가능한 너비, 여백 또는 자동 맞춤 설정을 변경하면 눈에 띄는 차이가 사라질 수 있습니다.
텍스트 프레임 자동 맞춤 유형 설정
ITextFrameFormat.setAutofitType은 텍스트가 컨테이너 경계를 초과할 때의 동작을 결정합니다. 텍스트가 축소, 넘침, 또는 도형을 자동으로 크기 조정하도록 제어하는 데 사용합니다. 다음 예제는 도형을 텍스트에 맞게 크기 조정하도록 구성하고 결과를 “autofit_type.pptx"로 저장합니다.
import com.aspose.slides.*;

Presentation presentation = new Presentation("sample.pptx");
try {
    ISlide slide = presentation.getSlides().get_Item(0);

    IAutoShape autoShape = (IAutoShape)slide.getShapes().get_Item(0);
    autoShape.getTextFrame().getTextFrameFormat().setAutofitType(TextAutofitType.Shape);

    presentation.save("autofit_type.pptx", SaveFormat.Pptx);
} finally {
    presentation.dispose();
}
자동 줄 바꿈 후 라인 수를 세고 텍스트 또는 도형 너비가 결과에 어떻게 영향을 미치는지 보려면 렌더링된 라인 수 카운트를 참조하십시오. 라인 수만으로는 텍스트가 컨테이너를 넘었는지 여부를 판단할 수 없습니다.
텍스트 프레임 고정점 설정
ITextFrameFormat.setAnchoringType은 텍스트가 도형 내부에서 수직으로 어떻게 배치되는지를 정의합니다(예: 위, 가운데, 아래). 다음 예제는 텍스트를 첫 번째 도형의 아래쪽에 고정하고 결과를 “text_anchor.pptx"로 저장합니다.
import com.aspose.slides.*;

Presentation presentation = new Presentation("sample.pptx");
try {
    ISlide slide = presentation.getSlides().get_Item(0);

    IAutoShape autoShape = (IAutoShape)slide.getShapes().get_Item(0);
    autoShape.getTextFrame().getTextFrameFormat().setAnchoringType(TextAnchorType.Bottom);

    presentation.save("text_anchor.pptx", SaveFormat.Pptx);
} finally {
    presentation.dispose();
}
텍스트 탭 설정
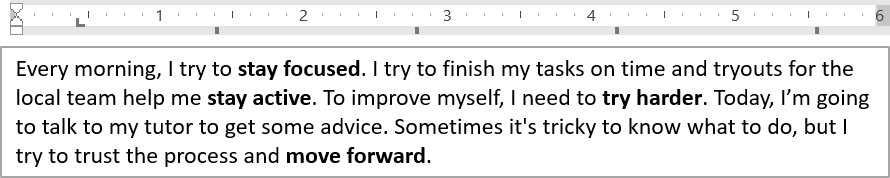
IParagraphFormat.setDefaultTabSize와 IParagraphFormat.getTabs을 사용하여 단락의 탭 정지를 구성합니다. 다음 예제는 기본 탭 간격을 100포인트로 설정하고 30포인트에 왼쪽 정렬 탭 정지를 추가합니다. 이러한 설정은 탭 문자를 포함한 텍스트에 영향을 줍니다.
import com.aspose.slides.*;

Presentation presentation = new Presentation("sample.pptx");
try {
    ISlide slide = presentation.getSlides().get_Item(0);

    IAutoShape autoShape = (IAutoShape)slide.getShapes().get_Item(0);

    IParagraph paragraph = autoShape.getTextFrame().getParagraphs().get_Item(0);
    paragraph.getParagraphFormat().setDefaultTabSize(100);
    paragraph.getParagraphFormat().getTabs().add(30, TabAlignment.Left);

    presentation.save("paragraph_tabs.pptx", SaveFormat.Pptx);
} finally {
    presentation.dispose();
}
결과:
교정 언어 설정
Aspose.Slides는 텍스트 부분에 대한 교정 언어를 설정할 수 있는 IBasePortionFormat.setLanguageId을 제공합니다. 교정 언어는 PowerPoint에서 맞춤법 및 문법 검사를 수행하는 언어를 결정합니다.
다음 예제는 첫 번째 슬라이드의 첫 번째 도형이 텍스트 상자인 “presentation.pptx"와 최소 하나의 단락이 필요합니다. 첫 번째 단락의 내용을 “1。“로 교체하고, 글꼴을 SimSun으로 설정한 뒤, 간체 중국어 교정 언어(zh-CN)를 지정합니다. 결과를 “proofing_language.pptx"로 저장합니다:
import com.aspose.slides.*;

Presentation presentation = new Presentation("presentation.pptx");
try {
    ISlide slide = presentation.getSlides().get_Item(0);

    IAutoShape autoShape = (IAutoShape)slide.getShapes().get_Item(0);

    IParagraph paragraph = autoShape.getTextFrame().getParagraphs().get_Item(0);
    paragraph.getPortions().clear();

    FontData font = new FontData("SimSun");

    Portion textPortion = new Portion();
    textPortion.getPortionFormat().setComplexScriptFont(font);
    textPortion.getPortionFormat().setEastAsianFont(font);
    textPortion.getPortionFormat().setLatinFont(font);

    // 교정 언어의 Id를 설정합니다.
    textPortion.getPortionFormat().setLanguageId("zh-CN");

    textPortion.setText("1。");
    paragraph.getPortions().add(textPortion);

    presentation.save("proofing_language.pptx", SaveFormat.Pptx);
} finally {
    presentation.dispose();
}
기본 언어 설정
LoadOptions.setDefaultTextLanguage을 사용하여 프레젠테이션을 로드하거나 생성할 때 생성되는 텍스트의 기본 언어를 정의합니다. 다음 예제는 기본 텍스트 언어를 미국 영어로 설정한 프레젠테이션을 만들고, 텍스트 상자를 추가한 뒤 첫 번째 텍스트 부분에 대해 en-US를 출력합니다.
import com.aspose.slides.*;

LoadOptions loadOptions = new LoadOptions();
loadOptions.setDefaultTextLanguage("en-US");

Presentation presentation = new Presentation(loadOptions);
try {
    ISlide slide = presentation.getSlides().get_Item(0);

    // 텍스트가 포함된 새 사각형 도형을 추가합니다.
    IAutoShape shape = slide.getShapes().addAutoShape(ShapeType.Rectangle, 20, 20, 150, 50);
    shape.getTextFrame().setText("Sample text");

    // 첫 번째 부분의 언어를 확인합니다.
    IPortion portion = shape.getTextFrame().getParagraphs().get_Item(0).getPortions().get_Item(0);
    System.out.println(portion.getPortionFormat().getLanguageId());
} finally {
    presentation.dispose();
}
기본 텍스트 스타일 설정
프레젠테이션 수준에서 기본 텍스트 서식을 적용하려면 IPresentation.getDefaultTextStyle을 사용합니다.
다음 예제는 새 프레젠테이션에서 최상위 단락의 기본값으로 14포인트 굵은 글꼴을 설정하고 이를 “default_text_style.pptx"로 저장합니다. 텍스트는 더 구체적인 서식이 위에 있지 않는 한 이러한 기본값을 상속받을 수 있습니다.
import com.aspose.slides.*;

Presentation presentation = new Presentation();
try {
    // 최상위 레벨 단락 서식을 가져옵니다.
    IParagraphFormat paragraphFormat = presentation.getDefaultTextStyle().getLevel(0);

    if (paragraphFormat != null) {
        paragraphFormat.getDefaultPortionFormat().setFontHeight(14);
        paragraphFormat.getDefaultPortionFormat().setFontBold(NullableBool.True);
    }

    presentation.save("default_text_style.pptx", SaveFormat.Pptx);
} finally {
    presentation.dispose();
}
All-Caps 효과로 텍스트 추출
PowerPoint에서 All Caps 글꼴 효과를 적용하면 원래 소문자로 입력했더라도 슬라이드에서 텍스트가 대문자로 표시됩니다. Aspose.Slides로 해당 텍스트 부분을 가져오면 라이브러리는 입력된 그대로 텍스트를 반환합니다. 표시된 텍스트와 일치하려면 TextCapType을 확인하고 값이 All인 경우 반환된 문자열을 대문자로 변환하십시오.
이 예제는 첫 번째 슬라이드의 첫 번째 도형이 텍스트 상자인 “sample2.pptx"가 필요합니다. 첫 번째 단락의 첫 번째 부분에 All Caps 효과가 적용된 “Hello, Aspose!“가 포함되어 있습니다(아래와 같이).

아래 코드 예제는 All Caps 효과가 적용된 텍스트를 추출하는 방법을 보여줍니다:
import com.aspose.slides.*;

Presentation presentation = new Presentation("sample2.pptx");
try {
    ISlide slide = presentation.getSlides().get_Item(0);

    IAutoShape autoShape = (IAutoShape)slide.getShapes().get_Item(0);
    IPortion textPortion = autoShape.getTextFrame().getParagraphs().get_Item(0).getPortions().get_Item(0);

    System.out.println("Original text: " + textPortion.getText());

    IPortionFormatEffectiveData textFormat = textPortion.getPortionFormat().getEffective();
    if (textFormat.getTextCapType() == TextCapType.All) {
        String text = textPortion.getText().toUpperCase();
        System.out.println("All-Caps effect: " + text);
    }
} finally {
    presentation.dispose();
}
출력:
Original text: Hello, Aspose!
All-Caps effect: HELLO, ASPOSE!
FAQ
슬라이드의 표에서 텍스트를 수정하려면 어떻게 해야 하나요?
슬라이드의 표에서 텍스트를 수정하려면 ITable을 사용하십시오. 셀을 순회하면서 각 셀을 ICell.getTextFrame을 통해 업데이트하고, 단락 서식은 IParagraph.getParagraphFormat을 통해 적용합니다.
PowerPoint 슬라이드의 텍스트에 그라디언트 색상을 적용하려면 어떻게 해야 하나요?
텍스트에 그라디언트 색상을 적용하려면 IBasePortionFormat.getFillFormat을 사용합니다. IFillFormat.setFillType을 FillType.Gradient으로 설정하고, 그라디언트 정지점, 방향 및 투명도를 구성하십시오.