
C++ में प्रस्तुति आकारों को अनुकूलित करें
अवलोकन
यह लेख Aspose.Slides में प्रस्तुति आकारों को संपादन बिंदुओं और ज्यामिति पथों के माध्यम से आकार ज्यामिति को संपादित करके किनारों को अनुकूलित करने का तरीका बताता है। यह दिखाता है कि GeometryPath और IGeometryPath के साथ काम करके मौजूदा आकारों को संशोधित किया जा सकता है, बुनियादी पथ संपादन संचालन किए जा सकते हैं, बिंदुओं को जोड़ा या हटाया जा सकता है, और अपडेट की गई ज्यामिति को फिर से आकार पर लागू किया जा सकता है।
संपादन बिंदुओं का उपयोग करके आकार बदलें
एक वर्ग पर विचार करें। PowerPoint में, संपादन बिंदुओं का उपयोग करके आप
- वर्ग के कोने को भीतर या बाहर ले जा सकते हैं
- कोने या बिंदु की वक्रता निर्दिष्ट कर सकते हैं
- वर्ग में नए बिंदु जोड़ सकते हैं
- वर्ग के बिंदुओं को हेर-फेर कर सकते हैं, आदि।
वास्तव में, आप इन कार्यों को किसी भी आकार पर लागू कर सकते हैं। संपादन बिंदुओं का उपयोग करके आप किसी आकार को बदल सकते हैं या मौजूदा आकार से नया आकार बना सकते हैं।
आकार संपादन सुझाव
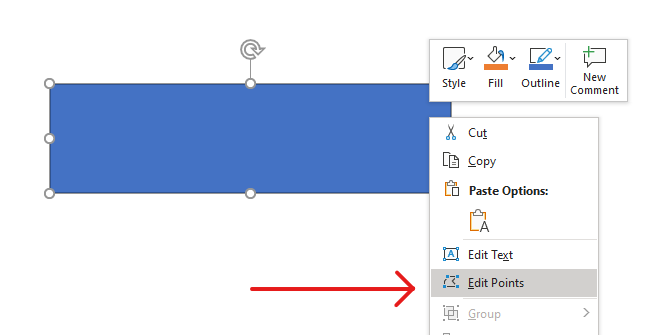
PowerPoint आकारों को संपादन बिंदुओं के माध्यम से संशोधित करने से पहले, आप इन बातों पर विचार कर सकते हैं:
- एक आकार (या उसका पथ) बंद या खुला हो सकता है।
- जब आकार बंद होता है, तो उसमें कोई प्रारंभ या अंत बिंदु नहीं होता। जब आकार खुला होता है, तो उसका एक शुरू और एक अंत बिंदु होता है।
- सभी आकार कम से कम 2 एंकर बिंदुओं से मिलकर बनते हैं जो रेखाओं द्वारा जुड़े होते हैं।
- एक रेखा सीधी या वक्र हो सकती है। एंकर बिंदु रेखा की प्रकृति निर्धारित करते हैं।
- एंकर बिंदु कोने वाले बिंदु, सीधी रेखा वाले बिंदु, या स्मूथ बिंदु के रूप में मौजूद होते हैं:
- कोने वाला बिंदु वह बिंदु है जहाँ दो सीधी रेखाएं कोण पर जुड़ती हैं।
- स्मूथ बिंदु वह बिंदु है जहाँ दो हैंडल एक सीधी रेखा में होते हैं और रेखा के खंड स्मूद कर्व में जुड़ते हैं। इस स्थिति में सभी हैंडल एंकर बिंदु से समान दूरी पर होते हैं।
- सीधा बिंदु वह बिंदु है जहाँ दो हैंडल एक सीधी रेखा में होते हैं और रेखा के खंड स्मूद कर्व में जुड़ते हैं। इस स्थिति में हैंडल का एंकर बिंदु से समान दूरी पर होना आवश्यक नहीं है।
- एंकर बिंदुओं को ले जाएँ या संपादित करें (जिससे रेखाओं का कोण बदलता है), आप आकार की दिखावट बदल सकते हैं।
PowerPoint आकारों को संपादन बिंदुओं के द्वारा संपादित करने हेतु Aspose.Slides निम्नलिखित वर्ग और इंटरफ़ेस प्रदान करता है: GeometryPath और IGeometryPath।
- एक GeometryPath उदाहरण IGeometryShape ऑब्जेक्ट का ज्यामितीय पथ दर्शाता है।
IGeometryShapeउदाहरण सेGeometryPathप्राप्त करने हेतु आप IGeometryShape::GetGeometryPaths मेथड का उपयोग कर सकते हैं।- किसी आकार के लिए
GeometryPathसेट करने हेतु आप इन मेथड्स का प्रयोग कर सकते हैं: सॉलिड आकार के लिये IGeometryShape::SetGeometryPath() और कम्पोज़िट आकार के लिये IGeometryShape::SetGeometryPaths()। - सेगमेंट जोड़ने के लिये आप IGeometryPath के तहत उपलब्ध मेथड्स का उपयोग कर सकते हैं।
- IGeometryPath::set_Stroke() और IGeometryPath::set_FillMode() मेथड्स के द्वारा आप ज्यामितीय पथ की उपस्थिति निर्धारित कर सकते हैं।
- IGeometryPath::get_PathData() मेथड से आप
GeometryShapeकी ज्यामिति पथ को पथ खंडों की array के रूप में प्राप्त कर सकते हैं। - अतिरिक्त आकार ज्यामिति अनुकूलन विकल्पों तक पहुँचने के लिये आप GeometryPath को GraphicsPath में बदल सकते हैं।
- GeometryPathToGraphicsPath और GraphicsPathToGeometryPath मेथड्स (जो ShapeUtil क्लास में हैं) का उपयोग करके आप GeometryPath को GraphicsPath में और वापस बदल सकते हैं।
सरल संपादन संचालन
यह C++ कोड दिखाता है कि कैसे
लाइन जोड़ें पथ के अंत में
void LineTo(PointF point);
void LineTo(float x, float y);
लाइन जोड़ें पथ में निर्दिष्ट स्थिति पर:
void LineTo(PointF point, uint32_t index);
void LineTo(float x, float y, uint32_t index);
क्यूबिक बीज़ियर कर्व जोड़ें पथ के अंत में:
void CubicBezierTo(PointF point1, PointF point2, PointF point3);
void CubicBezierTo(float x1, float y1, float x2, float y2, float x3, float y3);
क्यूबिक बीज़ियर कर्व जोड़ें पथ में निर्दिष्ट स्थिति पर:
void CubicBezierTo(PointF point1, PointF point2, PointF point3, uint32_t index);
void CubicBezierTo(float x1, float y1, float x2, float y2, float x3, float y3, uint32_t index);
क्वाड्रेटिक बीज़ियर कर्व जोड़ें पथ के अंत में:
void QuadraticBezierTo(PointF point1, PointF point2);
void QuadraticBezierTo(float x1, float y1, float x2, float y2);
क्वाड्रेटिक बीज़ियर कर्व जोड़ें पथ में निर्दिष्ट स्थिति पर:
void QuadraticBezierTo(PointF point1, PointF point2, uint32_t index);
void QuadraticBezierTo(float x1, float y1, float x2, float y2, uint32_t index);
दिए गए आर्क को पथ में जोड़ें:
void ArcTo(float width, float heigth, float startAngle, float sweepAngle);
पथ की वर्तमान आकृति को बंद करें:
void CloseFigure();
अगले बिंदु की स्थिति सेट करें:
void MoveTo(PointF point);
void MoveTo(float x, float y);
निर्दिष्ट इंडेक्स पर पथ खंड हटाएँ:
void RemoveAt(int32_t index);
आकार में कस्टम बिंदु जोड़ें
- GeometryShape क्लास का एक उदाहरण बनाएँ और ShapeType.Rectangle प्रकार सेट करें।
- आकार से GeometryPath क्लास का एक उदाहरण प्राप्त करें।
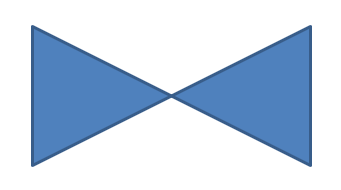
- पथ पर दो शीर्ष बिंदुओं के बीच एक नया बिंदु जोड़ें।
- पथ पर दो नीचे बिंदुओं के बीच एक नया बिंदु जोड़ें।
- पथ को आकार पर लागू करें।
यह C++ कोड दिखाता है कि कैसे कस्टम बिंदु जोड़ें:
SharedPtr<Presentation> pres = System::MakeObject<Presentation>();

SharedPtr<IShapeCollection> shapes = pres->get_Slides()->idx_get(0)->get_Shapes();
SharedPtr<GeometryShape> shape = System::ExplicitCast<GeometryShape>(shapes->AddAutoShape(ShapeType::Rectangle, 100.0f, 100.0f, 200.0f, 100.0f));

SharedPtr<IGeometryPath> geometryPath = shape->GetGeometryPaths()->idx_get(0);

geometryPath->LineTo(100.0f, 50.0f, 1);
geometryPath->LineTo(100.0f, 50.0f, 4);
shape->SetGeometryPath(geometryPath);
आकार से बिंदु हटाएँ
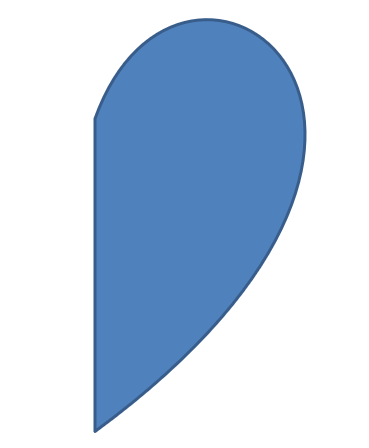
- GeometryShape क्लास का एक उदाहरण बनाएँ और ShapeType.Heart प्रकार सेट करें।
- आकार से GeometryPath क्लास का एक उदाहरण प्राप्त करें।
- पथ का खंड हटाएँ।
- पथ को आकार पर लागू करें।
यह C++ कोड दिखाता है कि कैसे बिंदु हटाएँ:
SharedPtr<Presentation> pres = System::MakeObject<Presentation>();

SharedPtr<IShapeCollection> shapes = pres->get_Slides()->idx_get(0)->get_Shapes();
SharedPtr<GeometryShape> shape = System::ExplicitCast<GeometryShape>(shapes->AddAutoShape(ShapeType::Heart, 100.0f, 100.0f, 300.0f, 300.0f));

SharedPtr<IGeometryPath> path = shape->GetGeometryPaths()->idx_get(0);
path->RemoveAt(2);
shape->SetGeometryPath(path);
कस्टम आकार बनाएँ
- आकार के बिंदुओं की गणना करें।
- GeometryPath क्लास का एक उदाहरण बनाएँ।
- पथ को बिंदुओं से भरें।
- GeometryShape क्लास का एक उदाहरण बनाएँ।
- पथ को आकार पर लागू करें।
यह C++ कोड दिखाता है कि कैसे कस्टम आकार बनाएँ:
SharedPtr<List<PointF>> points = System::MakeObject<List<PointF>>();

float R = 100.0f, r = 50.0f;
int32_t step = 72;

for (int32_t angle = -90; angle < 270; angle += step)
{
    double radians = angle * (Math::PI / 180.f);
    double x = outerRadius * Math::Cos(radians);
    double y = outerRadius * Math::Sin(radians);
    points->Add(PointF((float)x + outerRadius, (float)y + outerRadius));

    radians = Math::PI * (angle + step / 2) / 180.0;
    x = innerRadiusr * Math::Cos(radians);
    y = innerRadiusr * Math::Sin(radians);
    points->Add(PointF((float)x + outerRadius, (float)y + outerRadius));
}

SharedPtr<GeometryPath> starPath = System::MakeObject<GeometryPath>();
starPath->MoveTo(points->idx_get(0));

for (int32_t i = 1; i < points->get_Count(); i++)
{
    starPath->LineTo(points->idx_get(i));
}

starPath->CloseFigure();

SharedPtr<Presentation> pres = System::MakeObject<Presentation>();

SharedPtr<IShapeCollection> shapes = pres->get_Slides()->idx_get(0)->get_Shapes();
SharedPtr<GeometryShape> shape = System::ExplicitCast<GeometryShape>(shapes->AddAutoShape(ShapeType::Rectangle, 100.0f, 100.0f, R * 2, R * 2));

shape->SetGeometryPath(starPath);

कम्पोज़िट कस्टम आकार बनाएँ
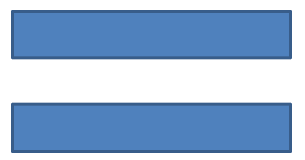
- GeometryShape क्लास का एक उदाहरण बनाएँ।
- पहला GeometryPath क्लास का उदाहरण बनाएँ।
- दूसरा GeometryPath क्लास का उदाहरण बनाएँ।
- पथों को आकार पर लागू करें।
यह C++ कोड दिखाता है कि कैसे कम्पोज़िट कस्टम आकार बनाएँ:
SharedPtr<Presentation> pres = System::MakeObject<Presentation>();

SharedPtr<IShapeCollection> shapes = pres->get_Slides()->idx_get(0)->get_Shapes();
SharedPtr<GeometryShape> shape = System::ExplicitCast<GeometryShape>(shapes->AddAutoShape(ShapeType::Rectangle, 100.0f, 100.0f, 200.0f, 100.0f));

SharedPtr<IGeometryPath> geometryPath0 = System::MakeObject<GeometryPath>();
geometryPath0->MoveTo(0.0f, 0.0f);
geometryPath0->LineTo(shape->get_Width(), 0.0f);
geometryPath0->LineTo(shape->get_Width(), shape->get_Height() / 3);
geometryPath0->LineTo(0.0f, shape->get_Height() / 3);
geometryPath0->CloseFigure();

SharedPtr<IGeometryPath> geometryPath1 = System::MakeObject<GeometryPath>();
geometryPath1->MoveTo(0.0f, shape->get_Height() / 3 * 2);
geometryPath1->LineTo(shape->get_Width(), shape->get_Height() / 3 * 2);
geometryPath1->LineTo(shape->get_Width(), shape->get_Height());
geometryPath1->LineTo(0.0f, shape->get_Height());
geometryPath1->CloseFigure();

shape->SetGeometryPaths(System::MakeArray<SharedPtr<IGeometryPath>>({ geometryPath0, geometryPath1 }));
वक्र कोनों वाला कस्टम आकार बनाएँ
यह C++ कोड दिखाता है कि कैसे वक्र कोनों (भीतर की ओर) वाला कस्टम आकार बनाएँ;
float shapeX = 20.f;
float shapeY = 20.f;
float shapeWidth = 300.f;
float shapeHeight = 200.f;

float leftTopSize = 50.f;
float rightTopSize = 20.f;
float rightBottomSize = 40.f;
float leftBottomSize = 10.f;

auto presentation = System::MakeObject<Presentation>();

auto childShape = presentation->get_Slides()->idx_get(0)->get_Shapes()->AddAutoShape(ShapeType::Custom, shapeX, shapeY, shapeWidth, shapeHeight);

auto geometryPath = System::MakeObject<GeometryPath>();

PointF point1(leftTopSize, 0.0f);
PointF point2(shapeWidth - rightTopSize, 0.0f);
PointF point3(shapeWidth, shapeHeight - rightBottomSize);
PointF point4(leftBottomSize, shapeHeight);
PointF point5(0.0f, leftTopSize);

geometryPath->MoveTo(point1);
geometryPath->LineTo(point2);
geometryPath->ArcTo(rightTopSize, rightTopSize, 180.0f, -90.0f);
geometryPath->LineTo(point3);
geometryPath->ArcTo(rightBottomSize, rightBottomSize, -90.0f, -90.0f);
geometryPath->LineTo(point4);
geometryPath->ArcTo(leftBottomSize, leftBottomSize, 0.0f, -90.0f);
geometryPath->LineTo(point5);
geometryPath->ArcTo(leftTopSize, leftTopSize, 90.0f, -90.0f);

geometryPath->CloseFigure();

childShape->SetGeometryPath(geometryPath);

presentation->Save(u"output.pptx", SaveFormat::Pptx);
जाँचें कि क्या आकार ज्यामिति बंद है
बंद आकार वह है जहाँ उसके सभी पक्ष आपस में जुड़े होते हैं, जिससे कोई अंतर नहीं रहता और एक एकल सीमा बनती है। यह आकार साधारण ज्यामितीय रूप या जटिल कस्टम रूपरेखा हो सकता है। नीचे दिया गया कोड उदाहरण दिखाता है कि कैसे यह जाँचें कि आकार ज्यामिति बंद है:
bool IsGeometryClosed(SharedPtr<IGeometryShape> geometryShape)
{
    bool isClosed = false;

    for (auto&& geometryPath : geometryShape->GetGeometryPaths())
    {
        auto dataLength = geometryPath->get_PathData()->get_Length();
        if (dataLength == 0)
            continue;

        auto lastSegment = geometryPath->get_PathData()[dataLength - 1];
        isClosed = lastSegment->get_PathCommand() == PathCommandType::Close;

        if (!isClosed)
            return false;
    }

    return isClosed;
}
GeometryPath को GraphicsPath में बदलें
- GeometryShape क्लास का एक उदाहरण बनाएँ।
- System.Drawing.Drawing2D नामस्थान की GraphicsPath क्लास का एक उदाहरण बनाएँ।
- ShapeUtil का उपयोग करके GraphicsPath उदाहरण को GeometryPath उदाहरण में बदलें।
- पथों को आकार पर लागू करें।
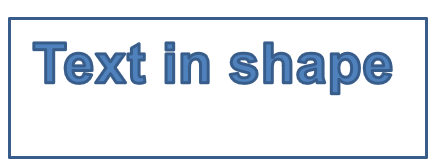
नीचे दिया गया C++ कोड—ऊपर दिए गए चरणों का कार्यान्वयन—GeometryPath से GraphicsPath रूपांतरण प्रक्रिया को प्रदर्शित करता है:
SharedPtr<Presentation> pres = System::MakeObject<Presentation>();

SharedPtr<IShapeCollection> shapes = pres->get_Slides()->idx_get(0)->get_Shapes();
SharedPtr<GeometryShape> shape = System::ExplicitCast<GeometryShape>(shapes->AddAutoShape(ShapeType::Rectangle, 100.0f, 100.0f, 300.0f, 100.0f));

SharedPtr<IGeometryPath> originalPath = shape->GetGeometryPaths()->idx_get(0);
originalPath->set_FillMode(PathFillModeType::None);

SharedPtr<Drawing2D::GraphicsPath> graphicsPath = System::MakeObject<Drawing2D::GraphicsPath>();
graphicsPath->AddString(u"Text in shape", System::MakeObject<FontFamily>(u"Arial"), 1, 40.0f, PointF(10.0f, 10.0f), StringFormat::get_GenericDefault());

SharedPtr<IGeometryPath> textPath = ShapeUtil::GraphicsPathToGeometryPath(graphicsPath);
textPath->set_FillMode(PathFillModeType::Normal);

shape->SetGeometryPaths(System::MakeArray<SharedPtr<IGeometryPath>>({ originalPath, textPath }));
अक्सर पूछे जाने वाले प्रश्न
ज्यामिति बदलने के बाद भराव और रूपरेखा पर क्या प्रभाव पड़ेगा?
शैली आकार के साथ बनी रहती है; केवल रूपरेखा बदलती है। भराव और रूपरेखा स्वचालित रूप से नई ज्यामिति पर लागू हो जाएगी।
मैं कस्टम आकार को उसकी ज्यामिति के साथ सही तरीके से कैसे घुमा सकता हूँ?
आकार की rotation प्रॉपर्टी का उपयोग करें; क्योंकि ज्यामिति आकार के अपने निर्देशांक प्रणाली से बंधी होती है, इसलिए यह घुमाव के साथ घुमेगी।
क्या मैं कस्टम आकार को एक छवि में बदलकर “लॉक” कर सकता हूँ?
हाँ। आवश्यक slide क्षेत्र या स्वयं shape को रास्टर फॉर्मेट में निर्यात करें; इससे भारी ज्यामितियों के साथ आगे का काम सरल हो जाता है।