
ปรับแต่งรูปร่างการนำเสนอใน C++
ภาพรวม
บทความนี้อธิบายวิธีการปรับแต่งรูปร่างการนำเสนอใน Aspose.Slides โดยการแก้ไขเรขาคณิตของรูปร่างผ่านจุดแก้ไขและเส้นทางเรขาคณิต แสดงวิธีการทำงานกับ GeometryPath และ IGeometryPath เพื่อแก้ไขรูปร่างที่มีอยู่ ทำการดำเนินการแก้ไขเส้นทางพื้นฐาน เพิ่มหรือเอาจุดออก และนำเรขาคณิตที่อัปเดตกลับไปใช้กับรูปร่าง
เปลี่ยนรูปร่างโดยใช้จุดแก้ไข
พิจารณาสี่เหลี่ยมจัตุรัส ใน PowerPoint โดยใช้ edit points คุณสามารถ
- ย้ายมุมของสี่เหลี่ยมเข้าออก
- ระบุความโค้งของมุมหรือจุด
- เพิ่มจุดใหม่ลงในสี่เหลี่ยม
- จัดการจุดบนสี่เหลี่ยม เป็นต้น
โดยพื้นฐานแล้ว คุณสามารถทำงานที่อธิบายไว้กับรูปร่างใดก็ได้ โดยใช้จุดแก้ไข คุณสามารถเปลี่ยนรูปร่างหรือสร้างรูปร่างใหม่จากรูปร่างที่มีอยู่
เคล็ดลับการแก้ไขรูปร่าง
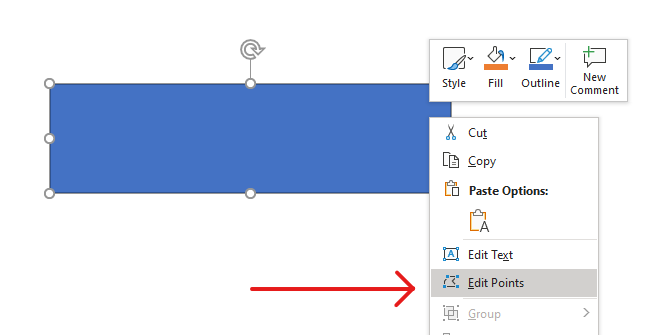
ก่อนที่คุณจะเริ่มแก้ไขรูปร่าง PowerPoint ผ่านจุดแก้ไข คุณอาจต้องพิจารณาข้อควรทราบต่อไปนี้เกี่ยวกับรูปร่าง:
- รูปร่าง (หรือเส้นทางของมัน) สามารถเป็นแบบปิดหรือเปิดได้
- เมื่อรูปร่างเป็นแบบปิด จะไม่มีจุดเริ่มต้นหรือสิ้นสุด ส่วนรูปร่างแบบเปิดจะมีจุดเริ่มต้นและสิ้นสุด
- รูปร่างทั้งหมดประกอบด้วยจุดยึดอย่างน้อย 2 จุด ที่เชื่อมต่อกันด้วยเส้น
- เส้นอาจเป็นเส้นตรงหรือเส้นโค้ง จุดยึดกำหนดลักษณะของเส้น
- จุดยึดมีอยู่ในรูปแบบจุดมุม, จุดตรง, หรือจุดเรียบ:
- จุดมุมคือจุดที่เส้นตรงสองเส้นมาบรรจบกันที่มุม
- จุดเรียบคือจุดที่มีฮันเดิลสองอันอยู่ในเส้นตรงและส่วนของเส้นเชื่อมต่อกันเป็นโค้งเรียบ ในกรณีนี้ ฮันเดิลทั้งสองห่างจากจุดยึดเท่าๆ กัน
- จุดตรงคือจุดที่มีฮันเดิลสองอันอยู่ในเส้นตรงและส่วนของเส้นเชื่อมต่อกันเป็นโค้งในกรณีนี้ ฮันเดิลไม่จำเป็นต้องห่างจากจุดยึดเท่าๆ กัน
- การย้ายหรือแก้ไขจุดยึด (ซึ่งเปลี่ยนมุมของเส้น) สามารถเปลี่ยนลักษณะของรูปร่างได้
เพื่อแก้ไขรูปร่าง PowerPoint ผ่านจุดแก้ไข Aspose.Slides มีคลาส GeometryPath และอินเทอร์เฟซ IGeometryPath ให้ใช้
- อินสแตนซ์ของ GeometryPath แสดงถึงเส้นทางเรขาคณิตของอ็อบเจกต์ IGeometryShape
- เพื่อดึง
GeometryPathจากอินสแตนซ์IGeometryShapeให้ใช้เมธอด IGeometryShape::GetGeometryPaths - เพื่อกำหนด
GeometryPathให้กับรูปร่าง ให้ใช้เมธอด IGeometryShape::SetGeometryPath() สำหรับ solid shapes หรือ IGeometryShape::SetGeometryPaths() สำหรับ composite shapes - เพื่อเพิ่มเซกเมนต์ ให้ใช้เมธอดภายใต้ IGeometryPath
- ด้วยเมธอด IGeometryPath::set_Stroke() และ IGeometryPath::set_FillMode() คุณสามารถกำหนดลักษณะการแสดงผลของเส้นทางเรขาคณิตได้
- ด้วยเมธอด IGeometryPath::get_PathData() คุณสามารถดึงข้อมูลเส้นทางของ
GeometryShapeเป็นอาเรย์ของเซกเมนต์เส้นทางได้ - เพื่อเข้าถึงตัวเลือกการปรับแต่งเรขาคณิตของรูปร่างเพิ่มเติม คุณสามารถแปลง GeometryPath เป็น GraphicsPath
- ใช้เมธอด GeometryPathToGraphicsPath และ GraphicsPathToGeometryPath (จากคลาส ShapeUtil) เพื่อแปลง GeometryPath ไปเป็น GraphicsPath และกลับกัน
การดำเนินการแก้ไขอย่างง่าย
โค้ด C++ นี้แสดงวิธีการ
เพิ่มเส้น to the end of a path
void LineTo(PointF point);
void LineTo(float x, float y);
เพิ่มเส้น to a specified position on a path:
void LineTo(PointF point, uint32_t index);
void LineTo(float x, float y, uint32_t index);
เพิ่มเส้นโค้งบีซิเยร์แบบลูกบาศก์ at the end of a path:
void CubicBezierTo(PointF point1, PointF point2, PointF point3);
void CubicBezierTo(float x1, float y1, float x2, float y2, float x3, float y3);
เพิ่มเส้นโค้งบีซิเยร์แบบลูกบาศก์ to the specified position on a path:
void CubicBezierTo(PointF point1, PointF point2, PointF point3, uint32_t index);
void CubicBezierTo(float x1, float y1, float x2, float y2, float x3, float y3, uint32_t index);
เพิ่มเส้นโค้งบีซิเยร์เชิงกำลังสอง at the end of a path:
void QuadraticBezierTo(PointF point1, PointF point2);
void QuadraticBezierTo(float x1, float y1, float x2, float y2);
เพิ่มเส้นโค้งบีซิเยร์เชิงกำลังสอง to a specified position on a path:
void QuadraticBezierTo(PointF point1, PointF point2, uint32_t index);
void QuadraticBezierTo(float x1, float y1, float x2, float y2, uint32_t index);
ต่อเติมโค้ง to a path:
void ArcTo(float width, float heigth, float startAngle, float sweepAngle);
ปิดรูปภาพปัจจุบัน of a path:
void CloseFigure();
กำหนดตำแหน่งสำหรับจุดถัดไป:
void MoveTo(PointF point);
void MoveTo(float x, float y);
ลบส่วนของเส้นทาง at a given index:
void RemoveAt(int32_t index);
เพิ่มจุดกำหนดเองให้กับรูปร่าง
- สร้างอินสแตนซ์ของคลาส GeometryShape และตั้งค่าเป็นประเภท ShapeType.Rectangle
- รับอินสแตนซ์ของคลาส GeometryPath จากรูปร่าง
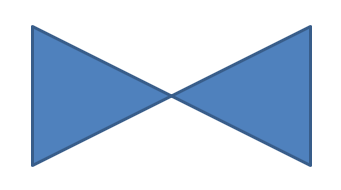
- เพิ่มจุดใหม่ระหว่างสองจุดบนสุดของเส้นทาง
- เพิ่มจุดใหม่ระหว่างสองจุดล่างของเส้นทาง
- นำเส้นทางไปใช้กับรูปร่าง
โค้ด C++ นี้แสดงวิธีการเพิ่มจุดกำหนดเองให้กับรูปร่าง:
SharedPtr<Presentation> pres = System::MakeObject<Presentation>();

SharedPtr<IShapeCollection> shapes = pres->get_Slides()->idx_get(0)->get_Shapes();
SharedPtr<GeometryShape> shape = System::ExplicitCast<GeometryShape>(shapes->AddAutoShape(ShapeType::Rectangle, 100.0f, 100.0f, 200.0f, 100.0f));

SharedPtr<IGeometryPath> geometryPath = shape->GetGeometryPaths()->idx_get(0);

geometryPath->LineTo(100.0f, 50.0f, 1);
geometryPath->LineTo(100.0f, 50.0f, 4);
shape->SetGeometryPath(geometryPath);
ลบจุดจากรูปร่าง
- สร้างอินสแตนซ์ของคลาส GeometryShape และตั้งค่าเป็นประเภท ShapeType.Heart
- รับอินสแตนซ์ของคลาส GeometryPath จากรูปร่าง
- ลบส่วนของเส้นทาง
- นำเส้นทางไปใช้กับรูปร่าง
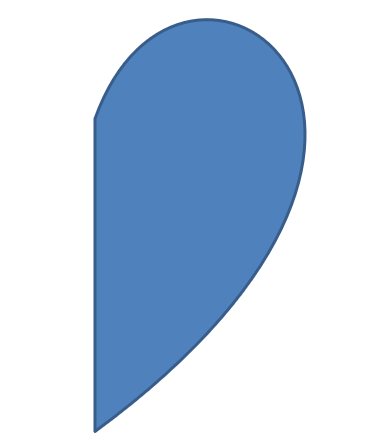
โค้ด C++ นี้แสดงวิธีการลบจุดจากรูปร่าง:
SharedPtr<Presentation> pres = System::MakeObject<Presentation>();

SharedPtr<IShapeCollection> shapes = pres->get_Slides()->idx_get(0)->get_Shapes();
SharedPtr<GeometryShape> shape = System::ExplicitCast<GeometryShape>(shapes->AddAutoShape(ShapeType::Heart, 100.0f, 100.0f, 300.0f, 300.0f));

SharedPtr<IGeometryPath> path = shape->GetGeometryPaths()->idx_get(0);
path->RemoveAt(2);
shape->SetGeometryPath(path);
สร้างรูปร่างกำหนดเอง
- คำนวณจุดสำหรับรูปร่าง
- สร้างอินสแตนซ์ของคลาส GeometryPath
- เติมเส้นทางด้วยจุดเหล่านั้น
- สร้างอินสแตนซ์ของคลาส GeometryShape
- นำเส้นทางไปใช้กับรูปร่าง
โค้ด C++ นี้แสดงวิธีการสร้างรูปร่างกำหนดเอง:
SharedPtr<List<PointF>> points = System::MakeObject<List<PointF>>();

float R = 100.0f, r = 50.0f;
int32_t step = 72;

for (int32_t angle = -90; angle < 270; angle += step)
{
    double radians = angle * (Math::PI / 180.f);
    double x = outerRadius * Math::Cos(radians);
    double y = outerRadius * Math::Sin(radians);
    points->Add(PointF((float)x + outerRadius, (float)y + outerRadius));

    radians = Math::PI * (angle + step / 2) / 180.0;
    x = innerRadiusr * Math::Cos(radians);
    y = innerRadiusr * Math::Sin(radians);
    points->Add(PointF((float)x + outerRadius, (float)y + outerRadius));
}

SharedPtr<GeometryPath> starPath = System::MakeObject<GeometryPath>();
starPath->MoveTo(points->idx_get(0));

for (int32_t i = 1; i < points->get_Count(); i++)
{
    starPath->LineTo(points->idx_get(i));
}

starPath->CloseFigure();

SharedPtr<Presentation> pres = System::MakeObject<Presentation>();

SharedPtr<IShapeCollection> shapes = pres->get_Slides()->idx_get(0)->get_Shapes();
SharedPtr<GeometryShape> shape = System::ExplicitCast<GeometryShape>(shapes->AddAutoShape(ShapeType::Rectangle, 100.0f, 100.0f, R * 2, R * 2));

shape->SetGeometryPath(starPath);

สร้างรูปร่างกำหนดเองแบบคอมโพสิต
- สร้างอินสแตนซ์ของคลาส GeometryShape
- สร้างอินสแตนซ์แรกของคลาส GeometryPath
- สร้างอินสแตนซ์ที่สองของคลาส GeometryPath
- นำเส้นทางไปใช้กับรูปร่าง
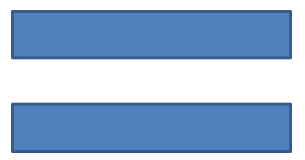
โค้ด C++ นี้แสดงวิธีการสร้างรูปร่างคอมโพสิตกำหนดเอง:
SharedPtr<Presentation> pres = System::MakeObject<Presentation>();

SharedPtr<IShapeCollection> shapes = pres->get_Slides()->idx_get(0)->get_Shapes();
SharedPtr<GeometryShape> shape = System::ExplicitCast<GeometryShape>(shapes->AddAutoShape(ShapeType::Rectangle, 100.0f, 100.0f, 200.0f, 100.0f));

SharedPtr<IGeometryPath> geometryPath0 = System::MakeObject<GeometryPath>();
geometryPath0->MoveTo(0.0f, 0.0f);
geometryPath0->LineTo(shape->get_Width(), 0.0f);
geometryPath0->LineTo(shape->get_Width(), shape->get_Height() / 3);
geometryPath0->LineTo(0.0f, shape->get_Height() / 3);
geometryPath0->CloseFigure();

SharedPtr<IGeometryPath> geometryPath1 = System::MakeObject<GeometryPath>();
geometryPath1->MoveTo(0.0f, shape->get_Height() / 3 * 2);
geometryPath1->LineTo(shape->get_Width(), shape->get_Height() / 3 * 2);
geometryPath1->LineTo(shape->get_Width(), shape->get_Height());
geometryPath1->LineTo(0.0f, shape->get_Height());
geometryPath1->CloseFigure();

shape->SetGeometryPaths(System::MakeArray<SharedPtr<IGeometryPath>>({ geometryPath0, geometryPath1 }));
สร้างรูปร่างกำหนดเองด้วยมุมโค้ง
โค้ด C++ นี้แสดงวิธีการสร้างรูปร่างกำหนดเองกับมุมโค้ง (ด้านใน);
float shapeX = 20.f;
float shapeY = 20.f;
float shapeWidth = 300.f;
float shapeHeight = 200.f;

float leftTopSize = 50.f;
float rightTopSize = 20.f;
float rightBottomSize = 40.f;
float leftBottomSize = 10.f;

auto presentation = System::MakeObject<Presentation>();

auto childShape = presentation->get_Slides()->idx_get(0)->get_Shapes()->AddAutoShape(ShapeType::Custom, shapeX, shapeY, shapeWidth, shapeHeight);

auto geometryPath = System::MakeObject<GeometryPath>();

PointF point1(leftTopSize, 0.0f);
PointF point2(shapeWidth - rightTopSize, 0.0f);
PointF point3(shapeWidth, shapeHeight - rightBottomSize);
PointF point4(leftBottomSize, shapeHeight);
PointF point5(0.0f, leftTopSize);

geometryPath->MoveTo(point1);
geometryPath->LineTo(point2);
geometryPath->ArcTo(rightTopSize, rightTopSize, 180.0f, -90.0f);
geometryPath->LineTo(point3);
geometryPath->ArcTo(rightBottomSize, rightBottomSize, -90.0f, -90.0f);
geometryPath->LineTo(point4);
geometryPath->ArcTo(leftBottomSize, leftBottomSize, 0.0f, -90.0f);
geometryPath->LineTo(point5);
geometryPath->ArcTo(leftTopSize, leftTopSize, 90.0f, -90.0f);

geometryPath->CloseFigure();

childShape->SetGeometryPath(geometryPath);

presentation->Save(u"output.pptx", SaveFormat::Pptx);
ตรวจสอบว่ารูปร่างเรขาคณิตเป็นแบบปิดหรือไม่
รูปร่างแบบปิดหมายถึงรูปร่างที่ด้านทั้งหมดเชื่อมต่อกันเป็นเส้นขอบเดียวโดยไม่มีช่องว่าง รูปร่างดังกล่าวอาจเป็นรูปทรงเรขาคณิตอย่างง่ายหรือโครงร่างกำหนดเองที่ซับซ้อน ตัวอย่างโค้ดต่อไปนี้แสดงวิธีการตรวจสอบว่ารูปร่างเรขาคณิตเป็นแบบปิดหรือไม่:
bool IsGeometryClosed(SharedPtr<IGeometryShape> geometryShape)
{
    bool isClosed = false;

    for (auto&& geometryPath : geometryShape->GetGeometryPaths())
    {
        auto dataLength = geometryPath->get_PathData()->get_Length();
        if (dataLength == 0)
            continue;

        auto lastSegment = geometryPath->get_PathData()[dataLength - 1];
        isClosed = lastSegment->get_PathCommand() == PathCommandType::Close;

        if (!isClosed)
            return false;
    }

    return isClosed;
}
แปลง GeometryPath เป็น GraphicsPath
- สร้างอินสแตนซ์ของคลาส GeometryShape
- สร้างอินสแตนซ์ของคลาส GraphicsPath ของเนมสเปซ System.Drawing.Drawing2D
- แปลงอินสแตนซ์ GraphicsPath ให้เป็นอินสแตนซ์ GeometryPath โดยใช้ ShapeUtil
- นำเส้นทางไปใช้กับรูปร่าง
โค้ด C++ นี้—การทำตามขั้นตอนข้างต้น—แสดงกระบวนการแปลง GeometryPath ไปเป็น GraphicsPath:
SharedPtr<Presentation> pres = System::MakeObject<Presentation>();

SharedPtr<IShapeCollection> shapes = pres->get_Slides()->idx_get(0)->get_Shapes();
SharedPtr<GeometryShape> shape = System::ExplicitCast<GeometryShape>(shapes->AddAutoShape(ShapeType::Rectangle, 100.0f, 100.0f, 300.0f, 100.0f));

SharedPtr<IGeometryPath> originalPath = shape->GetGeometryPaths()->idx_get(0);
originalPath->set_FillMode(PathFillModeType::None);

SharedPtr<Drawing2D::GraphicsPath> graphicsPath = System::MakeObject<Drawing2D::GraphicsPath>();
graphicsPath->AddString(u"Text in shape", System::MakeObject<FontFamily>(u"Arial"), 1, 40.0f, PointF(10.0f, 10.0f), StringFormat::get_GenericDefault());

SharedPtr<IGeometryPath> textPath = ShapeUtil::GraphicsPathToGeometryPath(graphicsPath);
textPath->set_FillMode(PathFillModeType::Normal);

shape->SetGeometryPaths(System::MakeArray<SharedPtr<IGeometryPath>>({ originalPath, textPath }));

คำถามที่พบบ่อย
เติมและเคลือบเส้นจะเป็นอย่างไรหลังจากเปลี่ยนเรขาคณิต?
สไตล์จะยังคงอยู่กับรูปร่าง; เพียงเส้นขอบเท่านั้นที่เปลี่ยน แรงเติมและเคลือบเส้นจะถูกนำไปใช้กับเรขาคณิตใหม่โดยอัตโนมัติ
ฉันจะหมุนรูปร่างกำหนดเองพร้อมกับเรขาคณิตอย่างถูกต้องอย่างไร?
ใช้คุณสมบัติ rotation ของรูปร่าง; เรขาคณิตจะหมุนตามรูปร่างเนื่องจากผูกกับระบบพิกัดของรูปร่างเอง
ฉันสามารถแปลงรูปร่างกำหนดเองเป็นรูปภาพเพื่อ “ล็อก” ผลลัพธ์ได้หรือไม่?
ได้ คุณสามารถส่งออก slide ที่ต้องการหรือ shape เองเป็นรูปแบบแรสเตอร์; วิธีนี้ทำให้การทำงานต่อกับเรขาคณิตที่ซับซ้อนได้ง่ายขึ้น