
Gerenciar parágrafos de texto do PowerPoint no Android
Visão geral
Aspose.Slides for Android via Java representa o texto como uma hierarquia de quadros de texto, parágrafos e porções:
- ITextFrame representa o contêiner de texto em uma forma e fornece acesso à sua coleção de parágrafos.
- IParagraph representa um parágrafo em um quadro de texto e fornece acesso às suas porções e à formatação ao nível do parágrafo.
- IPortion representa uma sequência de texto dentro de um parágrafo. Cada porção pode ter seu próprio texto e formatação ao nível de caractere.
Um parágrafo pode, portanto, conter texto com diferentes fontes, cores, tamanhos e outras formatações usando várias porções.
Criar e formatar parágrafos
Criar parágrafos com várias porções
Os passos a seguir criam um quadro de texto com três parágrafos, cada um contendo três porções:
- Crie uma instância da classe Presentation.
- Acesse o slide relevante pelo seu índice.
- Adicione uma IAutoShape retangular ao slide.
- Acesse o ITextFrame da forma.
- Use o parágrafo padrão e adicione mais dois objetos IParagraph ao quadro de texto.
- Adicione objetos IPortion suficientes para que cada parágrafo contenha três porções. O parágrafo padrão já contém uma porção vazia.
- Defina o texto de cada porção.
- Aplique formatação ao nível de caractere através de IPortion.getPortionFormat.
- Salve a apresentação modificada.
Este exemplo Android via Java implementa os passos:
import com.aspose.slides.*;
import android.graphics.Color;

Presentation presentation = new Presentation();
try {
    ISlide slide = presentation.getSlides().get_Item(0);
    IAutoShape shape = slide.getShapes().addAutoShape(ShapeType.Rectangle, 50, 150, 300, 150);
    ITextFrame textFrame = shape.getTextFrame();

    IParagraph firstParagraph = textFrame.getParagraphs().get_Item(0);
    firstParagraph.getPortions().add(new Portion());
    firstParagraph.getPortions().add(new Portion());

    IParagraph secondParagraph = new Paragraph();
    secondParagraph.getPortions().add(new Portion());
    secondParagraph.getPortions().add(new Portion());
    secondParagraph.getPortions().add(new Portion());
    textFrame.getParagraphs().add(secondParagraph);

    IParagraph thirdParagraph = new Paragraph();
    thirdParagraph.getPortions().add(new Portion());
    thirdParagraph.getPortions().add(new Portion());
    thirdParagraph.getPortions().add(new Portion());
    textFrame.getParagraphs().add(thirdParagraph);

    int paragraphCount = textFrame.getParagraphs().getCount();
    for (int paragraphIndex = 0; paragraphIndex < paragraphCount; paragraphIndex++) {
        IParagraph paragraph = textFrame.getParagraphs().get_Item(paragraphIndex);
        int portionCount = paragraph.getPortions().getCount();
        for (int portionIndex = 0; portionIndex < portionCount; portionIndex++) {
            IPortion portion = paragraph.getPortions().get_Item(portionIndex);
            portion.setText("Portion " + (paragraphIndex + 1) + "." + (portionIndex + 1));

            if (portionIndex == 0) {
                portion.getPortionFormat().getFillFormat().setFillType(FillType.Solid);
                portion.getPortionFormat().getFillFormat().getSolidFillColor().setColor(Color.RED);
                portion.getPortionFormat().setFontBold(NullableBool.True);
                portion.getPortionFormat().setFontHeight(15);
            } else if (portionIndex == 1) {
                portion.getPortionFormat().getFillFormat().setFillType(FillType.Solid);
                portion.getPortionFormat().getFillFormat().getSolidFillColor().setColor(Color.BLUE);
                portion.getPortionFormat().setFontItalic(NullableBool.True);
                portion.getPortionFormat().setFontHeight(18);
            }
        }
    }

    presentation.save("paragraphs_with_portions.pptx", SaveFormat.Pptx);
} finally {
    presentation.dispose();
}
Criar listas com marcadores e numeradas
Criar uma lista com marcadores ou numerada
Marcadores e numeração facilitam a visualização de itens relacionados. No Aspose.Slides, as configurações de lista são definidas através de IBulletFormat.
- Crie uma instância da classe Presentation.
- Acesse o slide relevante pelo seu índice.
- Adicione um IAutoShape ao slide selecionado.
- Acesse o ITextFrame da forma.
- Remova o parágrafo padrão do quadro de texto.
- Crie um Paragraph para um marcador de símbolo.
- Defina IBulletFormat.setType para BulletType.Symbol e especifique o caractere do marcador.
- Defina o texto do parágrafo, recuo, cor do marcador e altura do marcador.
- Adicione o parágrafo ao quadro de texto.
- Crie um segundo parágrafo e defina IBulletFormat.setType para BulletType.Numbered.
- Configure o estilo de marcador numerado e adicione o parágrafo ao quadro de texto.
- Salve a apresentação.
Este exemplo Android via Java cria um marcador de símbolo e um marcador numerado:
import com.aspose.slides.*;
import android.graphics.Color;

Presentation presentation = new Presentation();
try {
    ISlide slide = presentation.getSlides().get_Item(0);
    IAutoShape shape = slide.getShapes().addAutoShape(ShapeType.Rectangle, 200, 200, 400, 200);
    ITextFrame textFrame = shape.getTextFrame();
    textFrame.getParagraphs().clear();

    Paragraph symbolParagraph = new Paragraph();
    symbolParagraph.setText("Welcome to Aspose.Slides");
    symbolParagraph.getParagraphFormat().getBullet().setType(BulletType.Symbol);
    symbolParagraph.getParagraphFormat().getBullet().setChar((char) 0x2022);
    symbolParagraph.getParagraphFormat().setIndent(25);
    symbolParagraph.getParagraphFormat().getBullet().getColor().setColorType(ColorType.RGB);
    symbolParagraph.getParagraphFormat().getBullet().getColor().setColor(Color.BLACK);
    symbolParagraph.getParagraphFormat().getBullet().setBulletHardColor(NullableBool.True);
    symbolParagraph.getParagraphFormat().getBullet().setHeight(100);
    textFrame.getParagraphs().add(symbolParagraph);

    Paragraph numberedParagraph = new Paragraph();
    numberedParagraph.setText("This is a numbered item");
    numberedParagraph.getParagraphFormat().getBullet().setType(BulletType.Numbered);
    numberedParagraph.getParagraphFormat().getBullet().setNumberedBulletStyle(NumberedBulletStyle.BulletCircleNumWDBlackPlain);
    numberedParagraph.getParagraphFormat().setIndent(25);
    numberedParagraph.getParagraphFormat().getBullet().getColor().setColorType(ColorType.RGB);
    numberedParagraph.getParagraphFormat().getBullet().getColor().setColor(Color.BLACK);
    numberedParagraph.getParagraphFormat().getBullet().setBulletHardColor(NullableBool.True);
    numberedParagraph.getParagraphFormat().getBullet().setHeight(100);
    textFrame.getParagraphs().add(numberedParagraph);

    presentation.save("bulleted_and_numbered_list.pptx", SaveFormat.Pptx);
} finally {
    presentation.dispose();
}
Usar marcadores de imagem
Marcadores de imagem permitem usar uma imagem personalizada em vez de um símbolo ou número.
- Crie uma instância da classe Presentation.
- Acesse o slide relevante pelo seu índice.
- Adicione um IAutoShape e acesse seu ITextFrame.
- Remova o parágrafo padrão do quadro de texto.
- Carregue a imagem do marcador e adicione-a à coleção de imagens da apresentação como um IPPImage.
- Crie um Paragraph e defina seu texto.
- Defina IBulletFormat.setType para BulletType.Picture.
- Atribua a imagem através de IBulletFormat.getPicture e defina a altura do marcador.
- Adicione o parágrafo ao quadro de texto.
- Salve a apresentação modificada.
Este exemplo Android via Java cria um marcador de imagem:
import com.aspose.slides.*;

Presentation presentation = new Presentation();
try {
    ISlide slide = presentation.getSlides().get_Item(0);

    IImage bulletImage = Images.fromFile("bullets.png");
    IPPImage presentationImage;
    try {
        presentationImage = presentation.getImages().addImage(bulletImage);
    } finally {
        bulletImage.dispose();
    }

    IAutoShape shape = slide.getShapes().addAutoShape(ShapeType.Rectangle, 200, 200, 400, 200);
    ITextFrame textFrame = shape.getTextFrame();
    textFrame.getParagraphs().clear();

    Paragraph paragraph = new Paragraph();
    paragraph.setText("Welcome to Aspose.Slides");
    paragraph.getParagraphFormat().getBullet().setType(BulletType.Picture);
    paragraph.getParagraphFormat().getBullet().getPicture().setImage(presentationImage);
    paragraph.getParagraphFormat().getBullet().setHeight(100);
    textFrame.getParagraphs().add(paragraph);

    presentation.save("picture_bullet.pptx", SaveFormat.Pptx);
    presentation.save("picture_bullet.ppt", SaveFormat.Ppt);
} finally {
    presentation.dispose();
}
Criar uma lista multinível
Defina IParagraphFormat.setDepth para posicionar parágrafos em diferentes níveis de uma lista. O nível superior tem profundidade 0.
- Crie uma Presentation e acesse um slide.
- Adicione um IAutoShape e limpe o parágrafo padrão de seu quadro de texto.
- Crie quatro parágrafos e configure seus símbolos de marcador.
- Defina seus valores IParagraphFormat.setDepth para
0,1,2e3. - Adicione os parágrafos ao quadro de texto e salve a apresentação.
Este exemplo Android via Java cria uma lista com marcadores de quatro níveis:
import com.aspose.slides.*;
import android.graphics.Color;

Presentation presentation = new Presentation();
try {
    ISlide slide = presentation.getSlides().get_Item(0);
    IAutoShape shape = slide.getShapes().addAutoShape(ShapeType.Rectangle, 200, 200, 400, 200);
    ITextFrame textFrame = shape.getTextFrame();
    textFrame.getParagraphs().clear();

    IParagraph firstParagraph = new Paragraph();
    firstParagraph.setText("Content");
    firstParagraph.getParagraphFormat().getBullet().setType(BulletType.Symbol);
    firstParagraph.getParagraphFormat().getBullet().setChar((char) 0x2022);
    firstParagraph.getParagraphFormat().getDefaultPortionFormat().getFillFormat().setFillType(FillType.Solid);
    firstParagraph.getParagraphFormat().getDefaultPortionFormat().getFillFormat().getSolidFillColor().setColor(Color.BLACK);
    firstParagraph.getParagraphFormat().setDepth((short) 0);

    IParagraph secondParagraph = new Paragraph();
    secondParagraph.setText("Second level");
    secondParagraph.getParagraphFormat().getBullet().setType(BulletType.Symbol);
    secondParagraph.getParagraphFormat().getBullet().setChar('-');
    secondParagraph.getParagraphFormat().getDefaultPortionFormat().getFillFormat().setFillType(FillType.Solid);
    secondParagraph.getParagraphFormat().getDefaultPortionFormat().getFillFormat().getSolidFillColor().setColor(Color.BLACK);
    secondParagraph.getParagraphFormat().setDepth((short) 1);

    IParagraph thirdParagraph = new Paragraph();
    thirdParagraph.setText("Third level");
    thirdParagraph.getParagraphFormat().getBullet().setType(BulletType.Symbol);
    thirdParagraph.getParagraphFormat().getBullet().setChar((char) 0x2022);
    thirdParagraph.getParagraphFormat().getDefaultPortionFormat().getFillFormat().setFillType(FillType.Solid);
    thirdParagraph.getParagraphFormat().getDefaultPortionFormat().getFillFormat().getSolidFillColor().setColor(Color.BLACK);
    thirdParagraph.getParagraphFormat().setDepth((short) 2);

    IParagraph fourthParagraph = new Paragraph();
    fourthParagraph.setText("Fourth level");
    fourthParagraph.getParagraphFormat().getBullet().setType(BulletType.Symbol);
    fourthParagraph.getParagraphFormat().getBullet().setChar('-');
    fourthParagraph.getParagraphFormat().getDefaultPortionFormat().getFillFormat().setFillType(FillType.Solid);
    fourthParagraph.getParagraphFormat().getDefaultPortionFormat().getFillFormat().getSolidFillColor().setColor(Color.BLACK);
    fourthParagraph.getParagraphFormat().setDepth((short) 3);

    textFrame.getParagraphs().add(firstParagraph);
    textFrame.getParagraphs().add(secondParagraph);
    textFrame.getParagraphs().add(thirdParagraph);
    textFrame.getParagraphs().add(fourthParagraph);

    presentation.save("multilevel_list.pptx", SaveFormat.Pptx);
} finally {
    presentation.dispose();
}
Iniciar itens de lista numerada com valores personalizados
Use IBulletFormat.setNumberedBulletStartWith para definir o número inicial exibido para um parágrafo numerado.
- Crie uma Presentation e adicione um IAutoShape a um slide.
- Limpe o parágrafo padrão do quadro de texto da forma.
- Crie três parágrafos numerados.
- Defina IBulletFormat.setNumberedBulletStartWith para
2,3e7nos respectivos parágrafos. - Adicione os parágrafos ao quadro de texto e salve a apresentação.
Este exemplo Android via Java atribui um número inicial personalizado a cada parágrafo:
import com.aspose.slides.*;

Presentation presentation = new Presentation();
try {
    ISlide slide = presentation.getSlides().get_Item(0);
    IAutoShape shape = slide.getShapes().addAutoShape(ShapeType.Rectangle, 200, 200, 400, 200);
    ITextFrame textFrame = shape.getTextFrame();
    textFrame.getParagraphs().clear();

    Paragraph firstParagraph = new Paragraph();
    firstParagraph.setText("Start at 2");
    firstParagraph.getParagraphFormat().getBullet().setType(BulletType.Numbered);
    firstParagraph.getParagraphFormat().getBullet().setNumberedBulletStartWith((short) 2);
    textFrame.getParagraphs().add(firstParagraph);

    Paragraph secondParagraph = new Paragraph();
    secondParagraph.setText("Start at 3");
    secondParagraph.getParagraphFormat().getBullet().setType(BulletType.Numbered);
    secondParagraph.getParagraphFormat().getBullet().setNumberedBulletStartWith((short) 3);
    textFrame.getParagraphs().add(secondParagraph);

    Paragraph thirdParagraph = new Paragraph();
    thirdParagraph.setText("Start at 7");
    thirdParagraph.getParagraphFormat().getBullet().setType(BulletType.Numbered);
    thirdParagraph.getParagraphFormat().getBullet().setNumberedBulletStartWith((short) 7);
    textFrame.getParagraphs().add(thirdParagraph);

    presentation.save("custom_numbered_list.pptx", SaveFormat.Pptx);
} finally {
    presentation.dispose();
}
Controlar layout de parágrafos e propriedades de finalização
Definir recuo da primeira linha
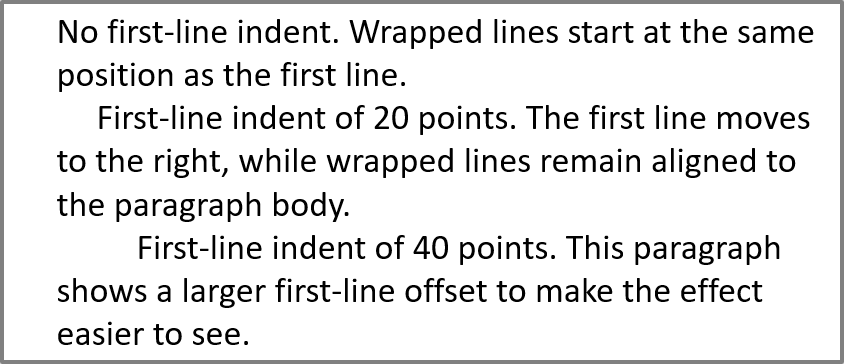
Use IParagraphFormat.setIndent para controlar o recuo da primeira linha de um parágrafo. Este método move apenas a primeira linha em relação à margem esquerda do parágrafo. Um valor positivo desloca a primeira linha para a direita, enquanto as linhas restantes permanecem alinhadas ao corpo do parágrafo.
Use IParagraphFormat.setMarginLeft quando precisar mover todo o parágrafo. Use IParagraphFormat.setIndent quando precisar mover apenas a primeira linha.
O exemplo abaixo cria vários parágrafos e aplica diferentes valores de IParagraphFormat.setIndent para demonstrar como o recuo da primeira linha afeta o layout do parágrafo.
- Crie uma instância da classe Presentation.
- Acesse o slide alvo.
- Adicione um IAutoShape retangular ao slide.
- Acesse o ITextFrame da forma e remova o parágrafo padrão.
- Crie vários parágrafos e defina diferentes valores de IParagraphFormat.setIndent para eles.
- Adicione os parágrafos ao quadro de texto.
- Salve a apresentação modificada.
Este código mostra como definir um recuo de parágrafo:
import com.aspose.slides.*;
import android.graphics.Color;

Presentation presentation = new Presentation();
try {
    ISlide slide = presentation.getSlides().get_Item(0);

    IAutoShape shape = slide.getShapes().addAutoShape(ShapeType.Rectangle, 50, 50, 420, 220);
    shape.getFillFormat().setFillType(FillType.NoFill);
    shape.getLineFormat().getFillFormat().setFillType(FillType.Solid);
    shape.getLineFormat().getFillFormat().getSolidFillColor().setColor(Color.GRAY);

    ITextFrame textFrame = shape.getTextFrame();
    textFrame.getTextFrameFormat().setAutofitType(TextAutofitType.Shape);
    textFrame.getParagraphs().clear();

    Paragraph firstParagraph = new Paragraph();
    firstParagraph.setText("No first-line indent. Wrapped lines start at the same position as the first line.");
    firstParagraph.getParagraphFormat().getDefaultPortionFormat().getFillFormat().setFillType(FillType.Solid);
    firstParagraph.getParagraphFormat().getDefaultPortionFormat().getFillFormat().getSolidFillColor().setColor(Color.BLACK);
    firstParagraph.getParagraphFormat().setMarginLeft(20f);
    firstParagraph.getParagraphFormat().setIndent(0f);

    Paragraph secondParagraph = new Paragraph();
    secondParagraph.setText("First-line indent of 20 points. The first line moves to the right, while wrapped lines remain aligned to the paragraph body.");
    secondParagraph.getParagraphFormat().getDefaultPortionFormat().getFillFormat().setFillType(FillType.Solid);
    secondParagraph.getParagraphFormat().getDefaultPortionFormat().getFillFormat().getSolidFillColor().setColor(Color.BLACK);
    secondParagraph.getParagraphFormat().setMarginLeft(20f);
    secondParagraph.getParagraphFormat().setIndent(20f);

    Paragraph thirdParagraph = new Paragraph();
    thirdParagraph.setText("First-line indent of 40 points. This paragraph shows a larger first-line offset to make the effect easier to see.");
    thirdParagraph.getParagraphFormat().getDefaultPortionFormat().getFillFormat().setFillType(FillType.Solid);
    thirdParagraph.getParagraphFormat().getDefaultPortionFormat().getFillFormat().getSolidFillColor().setColor(Color.BLACK);
    thirdParagraph.getParagraphFormat().setMarginLeft(20f);
    thirdParagraph.getParagraphFormat().setIndent(40f);

    textFrame.getParagraphs().add(firstParagraph);
    textFrame.getParagraphs().add(secondParagraph);
    textFrame.getParagraphs().add(thirdParagraph);

    presentation.save("paragraph_indent.pptx", SaveFormat.Pptx);
} finally {
    presentation.dispose();
}
O resultado:
Definir recuo suspenso
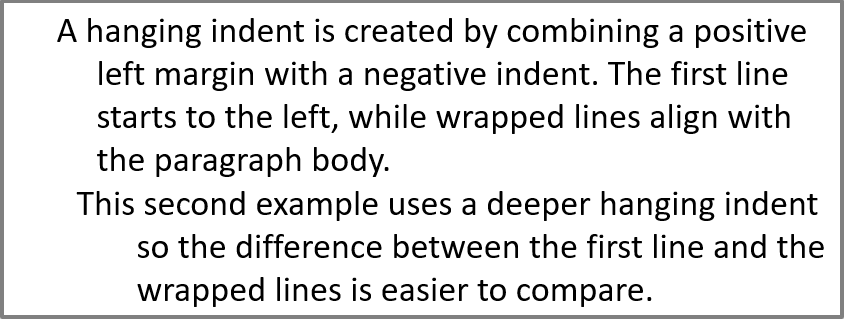
Um recuo suspenso é um layout de parágrafo em que a primeira linha começa à esquerda das linhas restantes. No Aspose.Slides, você cria esse efeito com IParagraphFormat.setIndent. Passe um valor negativo para mover a primeira linha para a esquerda em relação ao corpo do parágrafo.
Na prática, IParagraphFormat.setMarginLeft define a posição esquerda do corpo do parágrafo, e IParagraphFormat.setIndent define a posição da primeira linha em relação a essa margem. Para criar um recuo suspenso, passe um valor positivo para setMarginLeft e um valor negativo para setIndent.
Essa formatação é útil para bibliografias, referências, entradas de glossário e outros parágrafos onde as linhas enroladas devem alinhar-se sob o corpo do parágrafo e não sob o primeiro caractere da primeira linha.
- Crie uma instância da classe Presentation.
- Acesse o slide alvo.
- Adicione um IAutoShape retangular ao slide.
- Acesse o ITextFrame da forma e remova o parágrafo padrão.
- Crie parágrafos e passe um valor positivo para IParagraphFormat.setMarginLeft em cada parágrafo.
- Passe um valor negativo para IParagraphFormat.setIndent para criar o efeito de recuo suspenso.
- Adicione os parágrafos ao quadro de texto.
- Salve a apresentação modificada.
Este código mostra como definir um recuo suspenso para um parágrafo:
import com.aspose.slides.*;
import android.graphics.Color;

Presentation presentation = new Presentation();
try {
    ISlide slide = presentation.getSlides().get_Item(0);

    IAutoShape shape = slide.getShapes().addAutoShape(ShapeType.Rectangle, 50, 50, 420, 220);
    shape.getFillFormat().setFillType(FillType.NoFill);
    shape.getLineFormat().getFillFormat().setFillType(FillType.Solid);
    shape.getLineFormat().getFillFormat().getSolidFillColor().setColor(Color.GRAY);

    ITextFrame textFrame = shape.getTextFrame();
    textFrame.getTextFrameFormat().setAutofitType(TextAutofitType.Shape);
    textFrame.getParagraphs().clear();

    Paragraph firstParagraph = new Paragraph();
    firstParagraph.setText("A hanging indent is created by combining a positive left margin with a negative indent. The first line starts to the left, while wrapped lines align with the paragraph body.");
    firstParagraph.getParagraphFormat().getDefaultPortionFormat().getFillFormat().setFillType(FillType.Solid);
    firstParagraph.getParagraphFormat().getDefaultPortionFormat().getFillFormat().getSolidFillColor().setColor(Color.BLACK);
    firstParagraph.getParagraphFormat().setMarginLeft(40f);
    firstParagraph.getParagraphFormat().setIndent(-20f);

    Paragraph secondParagraph = new Paragraph();
    secondParagraph.setText("This second example uses a deeper hanging indent so the difference between the first line and the wrapped lines is easier to compare.");
    secondParagraph.getParagraphFormat().getDefaultPortionFormat().getFillFormat().setFillType(FillType.Solid);
    secondParagraph.getParagraphFormat().getDefaultPortionFormat().getFillFormat().getSolidFillColor().setColor(Color.BLACK);
    secondParagraph.getParagraphFormat().setMarginLeft(60f);
    secondParagraph.getParagraphFormat().setIndent(-30f);

    textFrame.getParagraphs().add(firstParagraph);
    textFrame.getParagraphs().add(secondParagraph);

    presentation.save("hanging_indent.pptx", SaveFormat.Pptx);
} finally {
    presentation.dispose();
}
O resultado:
Definir propriedades de execução do final do parágrafo
IParagraph.setEndParagraphPortionFormat controla a formatação da marca de fim de parágrafo. O exemplo a seguir atribui um tamanho de fonte e uma fonte latina à marca de fim do segundo parágrafo:
- Carregue uma Presentation e acesse um slide.
- Adicione um IAutoShape e limpe seu parágrafo padrão.
- Crie dois parágrafos e adicione porções de texto a eles.
- Crie um PortionFormat para a marca de fim do segundo parágrafo.
- Defina IBasePortionFormat.setFontHeight e IBasePortionFormat.setLatinFont.
- Atribua o formato com IParagraph.setEndParagraphPortionFormat e salve a apresentação.
import com.aspose.slides.*;

Presentation presentation = new Presentation("Test.pptx");
try {
    ISlide slide = presentation.getSlides().get_Item(0);
    IAutoShape shape = slide.getShapes().addAutoShape(ShapeType.Rectangle, 10, 10, 200, 250);
    ITextFrame textFrame = shape.getTextFrame();
    textFrame.getParagraphs().clear();

    Paragraph firstParagraph = new Paragraph();
    firstParagraph.getPortions().add(new Portion("Sample text"));

    Paragraph secondParagraph = new Paragraph();
    secondParagraph.getPortions().add(new Portion("Sample text 2"));

    PortionFormat endParagraphFormat = new PortionFormat();
    endParagraphFormat.setFontHeight(48);
    endParagraphFormat.setLatinFont(new FontData("Times New Roman"));
    secondParagraph.setEndParagraphPortionFormat(endParagraphFormat);

    textFrame.getParagraphs().add(firstParagraph);
    textFrame.getParagraphs().add(secondParagraph);

    presentation.save("end_paragraph_format.pptx", SaveFormat.Pptx);
} finally {
    presentation.dispose();
}
Contar linhas renderizadas
Para regras de parágrafo que afetam a quebra automática e pontuação no final das linhas, consulte Control Line Breaking e Control Hanging Punctuation.
Use IParagraph.getLinesCount para contar as linhas ocupadas por um parágrafo após o layout de texto, incluindo a quebra automática. Isso é útil ao verificar o comprimento do texto e o layout em modelos de apresentação.
Um parágrafo é um item em ITextFrame.getParagraphs e pode ocupar várias linhas renderizadas. Uma quebra de linha explícita dentro de um parágrafo força uma nova linha sem criar outro parágrafo. A quebra automática cria linhas com base na largura disponível sem inserir quebras de linha explícitas no texto. Contar parágrafos ou caracteres de quebra de linha, portanto, não fornece a contagem de linhas renderizadas.
O exemplo a seguir cria uma forma de texto, conta suas linhas, estreita a forma e então substitui o texto por uma string mais curta. A quebra automática está habilitada e o ajuste automático está desativado para que a largura da forma controle a quebra sem reduzir automaticamente o texto ou redimensionar a forma. As dimensões da forma são em pontos. Por fim, o exemplo adiciona outro parágrafo e soma as contagens de linhas em todo o quadro de texto.
import com.aspose.slides.*;

Presentation presentation = new Presentation();
try {
    ISlide slide = presentation.getSlides().get_Item(0);

    IAutoShape shape = slide.getShapes().addAutoShape(ShapeType.Rectangle, 50, 50, 400, 200);
    ITextFrame textFrame = shape.getTextFrame();
    textFrame.getTextFrameFormat().setWrapText(NullableBool.True);
    textFrame.getTextFrameFormat().setAutofitType(TextAutofitType.None);

    IParagraph paragraph = textFrame.getParagraphs().get_Item(0);
    paragraph.getParagraphFormat().getDefaultPortionFormat().setFontHeight(20);
    paragraph.setText("This text demonstrates how automatic wrapping changes the number of rendered lines.");
    System.out.println("Original width: " + paragraph.getLinesCount());

    shape.setWidth(150);
    System.out.println("Narrower shape: " + paragraph.getLinesCount());

    paragraph.setText("Short text.");
    System.out.println("Shorter text: " + paragraph.getLinesCount());

    Paragraph secondParagraph = new Paragraph();
    secondParagraph.setText("Another paragraph.");
    secondParagraph.getParagraphFormat().getDefaultPortionFormat().setFontHeight(20);
    textFrame.getParagraphs().add(secondParagraph);

    int totalLineCount = 0;
    for (IParagraph currentParagraph : textFrame.getParagraphs()) {
        totalLineCount += currentParagraph.getLinesCount();
    }
    System.out.println("Total lines in the text frame: " + totalLineCount);
} finally {
    presentation.dispose();
}
Com este texto e estas dimensões, estreitar a forma aumenta a contagem de linhas, enquanto substituir o texto pela string curta a reduz. Contagens exatas podem variar com a disponibilidade de fontes e substituição, tamanho da fonte, margens, recuos, quebra automática e configurações de ajuste automático. Use as fontes e configurações de layout destinadas ao ambiente de destino ao verificar um modelo.
A contagem de linhas por si só não determina se o texto transborda seu contêiner. A altura disponível, alturas de linha, espaçamento entre parágrafos e linhas e o comportamento de ajuste automático também importam; até uma única linha pode exceder a largura disponível quando a quebra automática está desativada.
Importar e exportar conteúdo de parágrafos
Importar texto HTML em parágrafos
Use ParagraphCollection.addFromHtml para converter marcação HTML em parágrafos e porções em um quadro de texto.
- Crie uma instância da classe Presentation.
- Acesse um slide e adicione um IAutoShape.
- Acesse o ITextFrame da forma e limpe seu parágrafo padrão.
- Leia o arquivo HTML de origem.
- Passe a string HTML para ParagraphCollection.addFromHtml.
- Salve a apresentação modificada.
Este exemplo Android via Java importa HTML em um quadro de texto:
import com.aspose.slides.*;
import java.io.IOException;
import java.nio.charset.StandardCharsets;
import java.nio.file.Files;
import java.nio.file.Paths;

Presentation presentation = new Presentation();
try {
    ISlide slide = presentation.getSlides().get_Item(0);
    float shapeWidth = (float) presentation.getSlideSize().getSize().getWidth() - 20;
    float shapeHeight = (float) presentation.getSlideSize().getSize().getHeight() - 20;
    IAutoShape shape = slide.getShapes().addAutoShape(ShapeType.Rectangle, 10, 10, shapeWidth, shapeHeight);
    shape.getFillFormat().setFillType(FillType.NoFill);
    shape.getTextFrame().getParagraphs().clear();

    try {
        byte[] htmlBytes = Files.readAllBytes(Paths.get("file.html"));
        String html = new String(htmlBytes, StandardCharsets.UTF_8);
        shape.getTextFrame().getParagraphs().addFromHtml(html);
        presentation.save("html_text.pptx", SaveFormat.Pptx);
    } catch (IOException exception) {
        System.out.println("The HTML file could not be read: " + exception.getMessage());
    }
} finally {
    presentation.dispose();
}
Exportar texto do parágrafo para HTML
Use ParagraphCollection.exportToHtml para exportar um intervalo selecionado de parágrafos como HTML.
- Crie uma instância da classe Presentation e carregue a apresentação desejada.
- Acesse o slide e encontre o IAutoShape que contém o texto.
- Acesse o ITextFrame.
- Chame ParagraphCollection.exportToHtml com o índice do parágrafo inicial e o número de parágrafos a exportar.
- Grave a string HTML retornada em um arquivo.
Este exemplo Android via Java exporta todos os parágrafos do primeiro quadro de texto:
import com.aspose.slides.*;
import java.io.IOException;
import java.nio.charset.StandardCharsets;
import java.nio.file.Files;
import java.nio.file.Paths;

Presentation presentation = new Presentation("ExportingHTMLText.pptx");
try {
    IShape shape = presentation.getSlides().get_Item(0).getShapes().get_Item(0);

    if (shape instanceof IAutoShape) {
        IAutoShape textShape = (IAutoShape) shape;
        ITextFrame textFrame = textShape.getTextFrame();
        if (textFrame != null) {
            IParagraphCollection paragraphs = textFrame.getParagraphs();
            String html = paragraphs.exportToHtml(0, paragraphs.getCount(), null);
            try {
                Files.write(Paths.get("paragraphs.html"), html.getBytes(StandardCharsets.UTF_8));
            } catch (IOException exception) {
                System.out.println("The HTML file could not be written: " + exception.getMessage());
            }
        } else {
            System.out.println("The first shape does not contain a text frame.");
        }
    } else {
        System.out.println("The first shape is not a text shape.");
    }
} finally {
    presentation.dispose();
}
Renderizar um parágrafo como imagem
IParagraph.getImage renderiza individualmente um parágrafo e devolve um IImage. Salve o resultado em um arquivo ou fluxo com IImage.save. Não é necessário renderizar a forma contenedora ou recortar um bitmap manualmente.
IParagraph.getImage pode retornar null se o parágrafo não for encontrado em sua coleção pai, não tiver limites de renderização válidos ou não puder ser renderizado. Verifique o resultado antes de salvá‑lo e descarte a imagem retornada após o uso.
Renderizar um parágrafo na escala padrão
Vamos supor que temos um arquivo de apresentação chamado sample.pptx com um slide, onde a primeira forma é uma caixa de texto contendo três parágrafos.
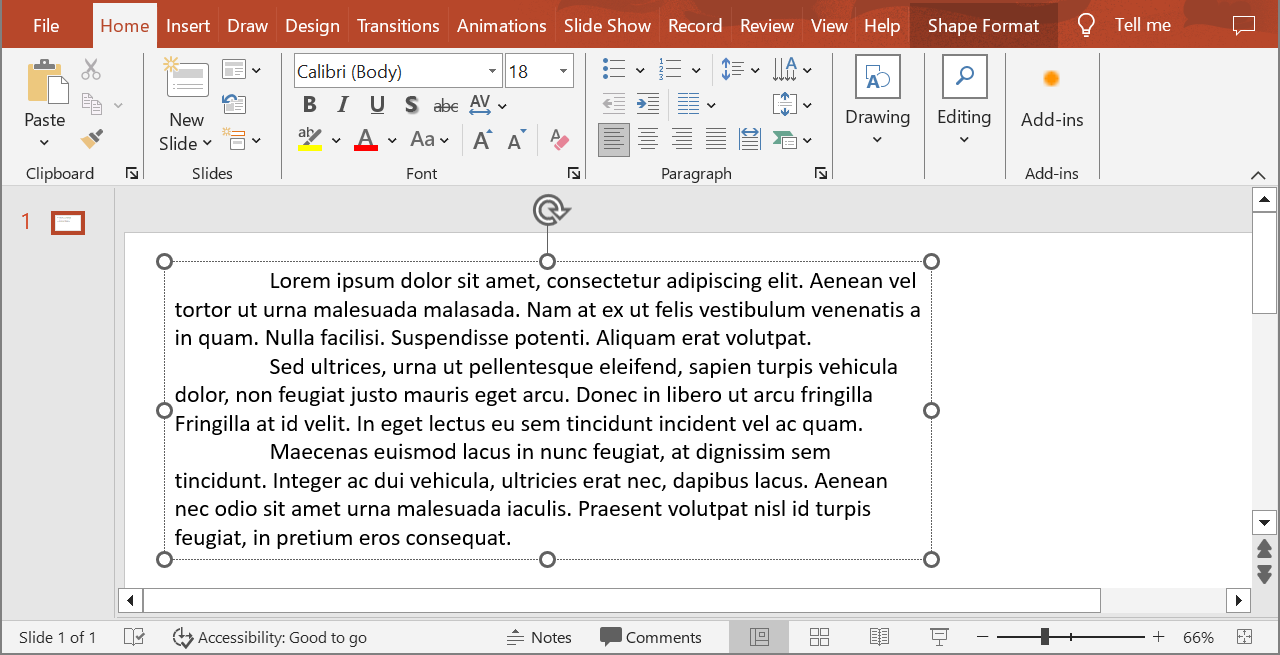
O exemplo a seguir renderiza o segundo parágrafo em uma forma de texto regular na escala padrão e salva a imagem retornada no formato PNG. O bloco finally garante que a imagem seja descartada corretamente.
import com.aspose.slides.*;

Presentation presentation = new Presentation("sample.pptx");
try {
    IShape shape = presentation.getSlides().get_Item(0).getShapes().get_Item(0);

    if (shape instanceof IAutoShape) {
        IAutoShape textShape = (IAutoShape) shape;
        ITextFrame textFrame = textShape.getTextFrame();
        if (textFrame != null && textFrame.getParagraphs().getCount() > 1) {
            IParagraph paragraph = textFrame.getParagraphs().get_Item(1);
            IImage paragraphImage = paragraph.getImage();

            if (paragraphImage != null) {
                try {
                    paragraphImage.save("paragraph.png", ImageFormat.Png);
                } finally {
                    paragraphImage.dispose();
                }
            } else {
                System.out.println("The paragraph could not be rendered.");
            }
        } else {
            System.out.println("The expected paragraph was not found.");
        }
    } else {
        System.out.println("The first shape is not a text shape.");
    }
} finally {
    presentation.dispose();
}
O resultado:

Renderizar um parágrafo em célula de tabela com dimensionamento
Use a sobrecarga de IParagraph.getImage que aceita os parâmetros float scaleX e float scaleY para definir os fatores de escala horizontal e vertical. O exemplo a seguir cria uma tabela, renderiza o parágrafo em sua primeira célula com o dobro da largura e altura padrão e salva o resultado como imagem PNG.
import com.aspose.slides.*;

float scaleX = 2f;
float scaleY = 2f;

Presentation presentation = new Presentation();
try {
    ISlide slide = presentation.getSlides().get_Item(0);
    ITable table = slide.getShapes().addTable(50, 50, new double[] { 300 }, new double[] { 80 });
    IParagraph paragraph = table.get_Item(0, 0).getTextFrame().getParagraphs().get_Item(0);
    paragraph.setText("Text in a table cell");

    IImage paragraphImage = paragraph.getImage(scaleX, scaleY);
    if (paragraphImage != null) {
        try {
            paragraphImage.save("table_paragraph.png", ImageFormat.Png);
        } finally {
            paragraphImage.dispose();
        }
    } else {
        System.out.println("The paragraph could not be rendered.");
    }
} finally {
    presentation.dispose();
}
Um fator de escala 1 mantém esse eixo no tamanho de pixel padrão. Por exemplo, 2 para ambos os fatores produz uma imagem cuja largura e altura são aproximadamente o dobro das dimensões padrão, resultando em quatro vezes mais pixels. Fatores maiores geralmente produzem texto mais nítido para zoom ou saída de alta resolução, mas também aumentam o uso de memória e o tamanho do arquivo. Fatores abaixo de 1 produzem imagens menores com menos detalhes. Use fatores iguais para preservar a proporção do parágrafo; fatores horizontais e verticais diferentes esticam a saída independentemente.
Renderizar uma forma inteira com IShape.getImage continua útil quando a saída deve incluir o preenchimento, a borda ou outro contexto visual da forma. Para uma imagem apenas do parágrafo, use IParagraph.getImage.
FAQ
Posso desativar completamente a quebra de linha dentro de um quadro de texto?
Sim. Defina ITextFrameFormat.setWrapText para desativar a quebra de modo que as linhas não se fragmentem nas bordas do quadro de texto.
Como posso obter os limites exatos na lâmina de um parágrafo específico?
Use IParagraph.getRect para recuperar o retângulo delimitador do parágrafo. IPortion.getRect fornece os limites de uma porção individual.
Onde a alinhamento de parágrafos (esquerda, direita, centralizado ou justificado) é controlado?
IParagraphFormat.setAlignment é uma configuração ao nível do parágrafo e se aplica a todo o parágrafo independentemente da formatação de porções individuais.
Para alinhar verticalmente porções de diferentes tamanhos de fonte dentro de cada linha, consulte Align Fonts Within a Line.
Posso definir o idioma de revisão para parte de um parágrafo?
Sim. Defina IBasePortionFormat.setLanguageId para porções individuais, de modo que um parágrafo possa conter texto em vários idiomas.