
จัดการย่อหน้าข้อความ PowerPoint บน Android
ภาพรวม
Aspose.Slides สำหรับ Android ผ่าน Java แสดงข้อความเป็นโครงสร้างของเฟรมข้อความ ย่อหน้า และส่วนย่อย:
- ITextFrame แสดงตัวคอนเทนเนอร์ข้อความในรูปร่างและให้การเข้าถึงคอลเลกชันของย่อหน้า
- IParagraph แสดงย่อหน้าเดียวในเฟรมข้อความและให้การเข้าถึงส่วนย่อยและการจัดรูปแบบระดับย่อหน้า
- IPortion แสดงช่วงข้อความภายในย่อหน้า แต่ละส่วนย่อยสามารถมีข้อความและการจัดรูปแบบระดับอักขระของตนเองได้
ดังนั้น ย่อหน้าจึงสามารถมีข้อความที่มีแบบอักษร สี ขนาด และการจัดรูปแบบอื่น ๆ ที่แตกต่างกันได้โดยใช้หลายส่วนย่อย
สร้างและจัดรูปแบบย่อหน้า
สร้างย่อหน้าด้วยหลายส่วนย่อย
ขั้นตอนต่อไปนี้สร้างเฟรมข้อความที่มีสามย่อหน้า แต่ละย่อหน้ามีสามส่วนย่อย:
- สร้างอินสแตนซ์ของคลาส Presentation
- เข้าถึงสไลด์ที่ต้องการผ่านดัชนีของมัน
- เพิ่ม IAutoShape สี่เหลี่ยมผืนผ้าไปยังสไลด์
- เข้าถึง ITextFrame ของรูปทราบ
- ใช้ย่อหน้าเริ่มต้นและเพิ่มอ็อบเจกต์ IParagraph อีกสองอ็อบเจกต์ไปยังเฟรมข้อความ
- เพิ่มอ็อบเจกต์ IPortion ให้พอเพียงสำหรับแต่ละย่อหน้าเพื่อให้มีสามส่วนย่อย ย่อหน้าเริ่มต้นมีส่วนย่อยว่างเปล่าอยู่แล้วหนึ่งส่วน
- ตั้งค่าข้อความของแต่ละส่วนย่อย
- ใช้การจัดรูปแบบระดับอักขระผ่าน IPortion.getPortionFormat
- บันทึกการนำเสนอที่แก้ไขแล้ว
ตัวอย่าง Android ผ่าน Java นี้ทำตามขั้นตอนเหล่านั้น:
import com.aspose.slides.*;
import android.graphics.Color;

Presentation presentation = new Presentation();
try {
    ISlide slide = presentation.getSlides().get_Item(0);
    IAutoShape shape = slide.getShapes().addAutoShape(ShapeType.Rectangle, 50, 150, 300, 150);
    ITextFrame textFrame = shape.getTextFrame();

    IParagraph firstParagraph = textFrame.getParagraphs().get_Item(0);
    firstParagraph.getPortions().add(new Portion());
    firstParagraph.getPortions().add(new Portion());

    IParagraph secondParagraph = new Paragraph();
    secondParagraph.getPortions().add(new Portion());
    secondParagraph.getPortions().add(new Portion());
    secondParagraph.getPortions().add(new Portion());
    textFrame.getParagraphs().add(secondParagraph);

    IParagraph thirdParagraph = new Paragraph();
    thirdParagraph.getPortions().add(new Portion());
    thirdParagraph.getPortions().add(new Portion());
    thirdParagraph.getPortions().add(new Portion());
    textFrame.getParagraphs().add(thirdParagraph);

    int paragraphCount = textFrame.getParagraphs().getCount();
    for (int paragraphIndex = 0; paragraphIndex < paragraphCount; paragraphIndex++) {
        IParagraph paragraph = textFrame.getParagraphs().get_Item(paragraphIndex);
        int portionCount = paragraph.getPortions().getCount();
        for (int portionIndex = 0; portionIndex < portionCount; portionIndex++) {
            IPortion portion = paragraph.getPortions().get_Item(portionIndex);
            portion.setText("Portion " + (paragraphIndex + 1) + "." + (portionIndex + 1));

            if (portionIndex == 0) {
                portion.getPortionFormat().getFillFormat().setFillType(FillType.Solid);
                portion.getPortionFormat().getFillFormat().getSolidFillColor().setColor(Color.RED);
                portion.getPortionFormat().setFontBold(NullableBool.True);
                portion.getPortionFormat().setFontHeight(15);
            } else if (portionIndex == 1) {
                portion.getPortionFormat().getFillFormat().setFillType(FillType.Solid);
                portion.getPortionFormat().getFillFormat().getSolidFillColor().setColor(Color.BLUE);
                portion.getPortionFormat().setFontItalic(NullableBool.True);
                portion.getPortionFormat().setFontHeight(18);
            }
        }
    }

    presentation.save("paragraphs_with_portions.pptx", SaveFormat.Pptx);
} finally {
    presentation.dispose();
}
สร้างรายการแบบสัญลักษณ์และลำดับเลข
สร้างรายการแบบสัญลักษณ์หรือหมายเลขลำดับ
สัญลักษณ์และการนับเลขทำให้รายการที่เกี่ยวข้องอ่านง่ายขึ้น ใน Aspose.Slides การตั้งค่ารายการจะกำหนดผ่าน IBulletFormat
- สร้างอินสแตนซ์ของคลาส Presentation
- เข้าถึงสไลด์ที่ต้องการผ่านดัชนีของมัน
- เพิ่ม IAutoShape ไปยังสไลด์ที่เลือก
- เข้าถึง ITextFrame ของรูปทราบ
- ลบย่อหน้าเริ่มต้นออกจากเฟรมข้อความ
- สร้าง Paragraph สำหรับสัญลักษณ์หัวข้อย่อย
- ตั้งค่า IBulletFormat.setType เป็น BulletType.Symbol และระบุตัวอักษรสัญลักษณ์
- ตั้งค่าข้อความย่อหน้า ระยะย่อหน้า สีสัญลักษณ์และความสูงสัญลักษณ์
- เพิ่มย่อหน้าลงในเฟรมข้อความ
- สร้างย่อหน้าที่สองและตั้งค่า IBulletFormat.setType เป็น BulletType.Numbered
- กำหนดสไตล์สัญลักษณ์ลำดับเลขและเพิ่มย่อหน้าลงในเฟรมข้อความ
- บันทึกการนำเสนอ
ตัวอย่าง Android ผ่าน Java นี้สร้างสัญลักษณ์หัวข้อย่อยและสัญลักษณ์ลำดับเลข:
import com.aspose.slides.*;
import android.graphics.Color;

Presentation presentation = new Presentation();
try {
    ISlide slide = presentation.getSlides().get_Item(0);
    IAutoShape shape = slide.getShapes().addAutoShape(ShapeType.Rectangle, 200, 200, 400, 200);
    ITextFrame textFrame = shape.getTextFrame();
    textFrame.getParagraphs().clear();

    Paragraph symbolParagraph = new Paragraph();
    symbolParagraph.setText("Welcome to Aspose.Slides");
    symbolParagraph.getParagraphFormat().getBullet().setType(BulletType.Symbol);
    symbolParagraph.getParagraphFormat().getBullet().setChar((char) 0x2022);
    symbolParagraph.getParagraphFormat().setIndent(25);
    symbolParagraph.getParagraphFormat().getBullet().getColor().setColorType(ColorType.RGB);
    symbolParagraph.getParagraphFormat().getBullet().getColor().setColor(Color.BLACK);
    symbolParagraph.getParagraphFormat().getBullet().setBulletHardColor(NullableBool.True);
    symbolParagraph.getParagraphFormat().getBullet().setHeight(100);
    textFrame.getParagraphs().add(symbolParagraph);

    Paragraph numberedParagraph = new Paragraph();
    numberedParagraph.setText("This is a numbered item");
    numberedParagraph.getParagraphFormat().getBullet().setType(BulletType.Numbered);
    numberedParagraph.getParagraphFormat().getBullet().setNumberedBulletStyle(NumberedBulletStyle.BulletCircleNumWDBlackPlain);
    numberedParagraph.getParagraphFormat().setIndent(25);
    numberedParagraph.getParagraphFormat().getBullet().getColor().setColorType(ColorType.RGB);
    numberedParagraph.getParagraphFormat().getBullet().getColor().setColor(Color.BLACK);
    numberedParagraph.getParagraphFormat().getBullet().setBulletHardColor(NullableBool.True);
    numberedParagraph.getParagraphFormat().getBullet().setHeight(100);
    textFrame.getParagraphs().add(numberedParagraph);

    presentation.save("bulleted_and_numbered_list.pptx", SaveFormat.Pptx);
} finally {
    presentation.dispose();
}
ใช้สัญลักษณ์หัวข้อย่อยเป็นรูปภาพ
สัญลักษณ์หัวข้อย่อยแบบรูปภาพช่วยให้คุณใช้ภาพกำหนดเองแทนสัญลักษณ์หรือเลข
- สร้างอินสแตนซ์ของคลาส Presentation
- เข้าถึงสไลด์ที่ต้องการผ่านดัชนีของมัน
- เพิ่ม IAutoShape และเข้าถึง ITextFrame ของมัน
- ลบย่อหน้าเริ่มต้นออกจากเฟรมข้อความ
- โหลดภาพสัญลักษณ์และเพิ่มลงในคอลเลกชันภาพของการนำเสนอเป็น IPPImage
- สร้าง Paragraph และตั้งค่าข้อความของมัน
- ตั้งค่า IBulletFormat.setType เป็น BulletType.Picture
- กำหนดภาพผ่าน IBulletFormat.getPicture และตั้งค่าความสูงสัญลักษณ์
- เพิ่มย่อหน้าลงในเฟรมข้อความ
- บันทึกการนำเสนอที่แก้ไขแล้ว
ตัวอย่าง Android ผ่าน Java นี้สร้างสัญลักษณ์หัวข้อย่อยแบบรูปภาพ:
import com.aspose.slides.*;

Presentation presentation = new Presentation();
try {
    ISlide slide = presentation.getSlides().get_Item(0);

    IImage bulletImage = Images.fromFile("bullets.png");
    IPPImage presentationImage;
    try {
        presentationImage = presentation.getImages().addImage(bulletImage);
    } finally {
        bulletImage.dispose();
    }

    IAutoShape shape = slide.getShapes().addAutoShape(ShapeType.Rectangle, 200, 200, 400, 200);
    ITextFrame textFrame = shape.getTextFrame();
    textFrame.getParagraphs().clear();

    Paragraph paragraph = new Paragraph();
    paragraph.setText("Welcome to Aspose.Slides");
    paragraph.getParagraphFormat().getBullet().setType(BulletType.Picture);
    paragraph.getParagraphFormat().getBullet().getPicture().setImage(presentationImage);
    paragraph.getParagraphFormat().getBullet().setHeight(100);
    textFrame.getParagraphs().add(paragraph);

    presentation.save("picture_bullet.pptx", SaveFormat.Pptx);
    presentation.save("picture_bullet.ppt", SaveFormat.Ppt);
} finally {
    presentation.dispose();
}
สร้างรายการหลายระดับ
ตั้งค่า IParagraphFormat.setDepth เพื่อวางย่อหน้าในระดับต่าง ๆ ของรายการ ระดับบนสุดมีความลึกเป็น 0
- สร้าง Presentation และเข้าถึงสไลด์หนึ่งสไลด์
- เพิ่ม IAutoShape และเคลียร์ย่อหน้าเริ่มต้นออกจากเฟรมข้อความของมัน
- สร้างสี่ย่อหน้าและกำหนดสัญลักษณ์หัวข้อย่อยให้แต่ละอัน
- ตั้งค่าความลึกผ่าน IParagraphFormat.setDepth เป็น
0,1,2และ3ตามลำดับ - เพิ่มย่อหน้าเหล่านั้นลงในเฟรมข้อความและบันทึกการนำเสนอ
ตัวอย่าง Android ผ่าน Java นี้สร้างรายการสัญลักษณ์สี่ระดับ:
import com.aspose.slides.*;
import android.graphics.Color;

Presentation presentation = new Presentation();
try {
    ISlide slide = presentation.getSlides().get_Item(0);
    IAutoShape shape = slide.getShapes().addAutoShape(ShapeType.Rectangle, 200, 200, 400, 200);
    ITextFrame textFrame = shape.getTextFrame();
    textFrame.getParagraphs().clear();

    IParagraph firstParagraph = new Paragraph();
    firstParagraph.setText("Content");
    firstParagraph.getParagraphFormat().getBullet().setType(BulletType.Symbol);
    firstParagraph.getParagraphFormat().getBullet().setChar((char) 0x2022);
    firstParagraph.getParagraphFormat().getDefaultPortionFormat().getFillFormat().setFillType(FillType.Solid);
    firstParagraph.getParagraphFormat().getDefaultPortionFormat().getFillFormat().getSolidFillColor().setColor(Color.BLACK);
    firstParagraph.getParagraphFormat().setDepth((short) 0);

    IParagraph secondParagraph = new Paragraph();
    secondParagraph.setText("Second level");
    secondParagraph.getParagraphFormat().getBullet().setType(BulletType.Symbol);
    secondParagraph.getParagraphFormat().getBullet().setChar('-');
    secondParagraph.getParagraphFormat().getDefaultPortionFormat().getFillFormat().setFillType(FillType.Solid);
    secondParagraph.getParagraphFormat().getDefaultPortionFormat().getFillFormat().getSolidFillColor().setColor(Color.BLACK);
    secondParagraph.getParagraphFormat().setDepth((short) 1);

    IParagraph thirdParagraph = new Paragraph();
    thirdParagraph.setText("Third level");
    thirdParagraph.getParagraphFormat().getBullet().setType(BulletType.Symbol);
    thirdParagraph.getParagraphFormat().getBullet().setChar((char) 0x2022);
    thirdParagraph.getParagraphFormat().getDefaultPortionFormat().getFillFormat().setFillType(FillType.Solid);
    thirdParagraph.getParagraphFormat().getDefaultPortionFormat().getFillFormat().getSolidFillColor().setColor(Color.BLACK);
    thirdParagraph.getParagraphFormat().setDepth((short) 2);

    IParagraph fourthParagraph = new Paragraph();
    fourthParagraph.setText("Fourth level");
    fourthParagraph.getParagraphFormat().getBullet().setType(BulletType.Symbol);
    fourthParagraph.getParagraphFormat().getBullet().setChar('-');
    fourthParagraph.getParagraphFormat().getDefaultPortionFormat().getFillFormat().setFillType(FillType.Solid);
    fourthParagraph.getParagraphFormat().getDefaultPortionFormat().getFillFormat().getSolidFillColor().setColor(Color.BLACK);
    fourthParagraph.getParagraphFormat().setDepth((short) 3);

    textFrame.getParagraphs().add(firstParagraph);
    textFrame.getParagraphs().add(secondParagraph);
    textFrame.getParagraphs().add(thirdParagraph);
    textFrame.getParagraphs().add(fourthParagraph);

    presentation.save("multilevel_list.pptx", SaveFormat.Pptx);
} finally {
    presentation.dispose();
}
เริ่มรายการลำดับเลขจากค่ากำหนดเอง
ใช้ IBulletFormat.setNumberedBulletStartWith เพื่อกำหนดหมายเลขเริ่มต้นสำหรับย่อหน้าที่เป็นลำดับเลข
- สร้าง Presentation และเพิ่ม IAutoShape ไปยังสไลด์หนึ่งสไลด์
- เคลียร์ย่อหน้าเริ่มต้นออกจากเฟรมข้อความของรูปทราบ
- สร้างย่อหน้าลำดับเลขสามย่อหน้า
- ตั้งค่า IBulletFormat.setNumberedBulletStartWith เป็น
2,3และ7สำหรับย่อหน้าแต่ละอันตามลำดับ - เพิ่มย่อหน้าเหล่านั้นลงในเฟรมข้อความและบันทึกการนำเสนอ
ตัวอย่าง Android ผ่าน Java นี้กำหนดหมายเลขเริ่มต้นที่กำหนดเองให้กับแต่ละย่อหน้า:
import com.aspose.slides.*;

Presentation presentation = new Presentation();
try {
    ISlide slide = presentation.getSlides().get_Item(0);
    IAutoShape shape = slide.getShapes().addAutoShape(ShapeType.Rectangle, 200, 200, 400, 200);
    ITextFrame textFrame = shape.getTextFrame();
    textFrame.getParagraphs().clear();

    Paragraph firstParagraph = new Paragraph();
    firstParagraph.setText("Start at 2");
    firstParagraph.getParagraphFormat().getBullet().setType(BulletType.Numbered);
    firstParagraph.getParagraphFormat().getBullet().setNumberedBulletStartWith((short) 2);
    textFrame.getParagraphs().add(firstParagraph);

    Paragraph secondParagraph = new Paragraph();
    secondParagraph.setText("Start at 3");
    secondParagraph.getParagraphFormat().getBullet().setType(BulletType.Numbered);
    secondParagraph.getParagraphFormat().getBullet().setNumberedBulletStartWith((short) 3);
    textFrame.getParagraphs().add(secondParagraph);

    Paragraph thirdParagraph = new Paragraph();
    thirdParagraph.setText("Start at 7");
    thirdParagraph.getParagraphFormat().getBullet().setType(BulletType.Numbered);
    thirdParagraph.getParagraphFormat().getBullet().setNumberedBulletStartWith((short) 7);
    textFrame.getParagraphs().add(thirdParagraph);

    presentation.save("custom_numbered_list.pptx", SaveFormat.Pptx);
} finally {
    presentation.dispose();
}
ควบคุมการจัดแ Layout ของย่อหน้าและคุณสมบัติสุดท้าย
ตั้งค่าการเยื้องบรรทัดแรก
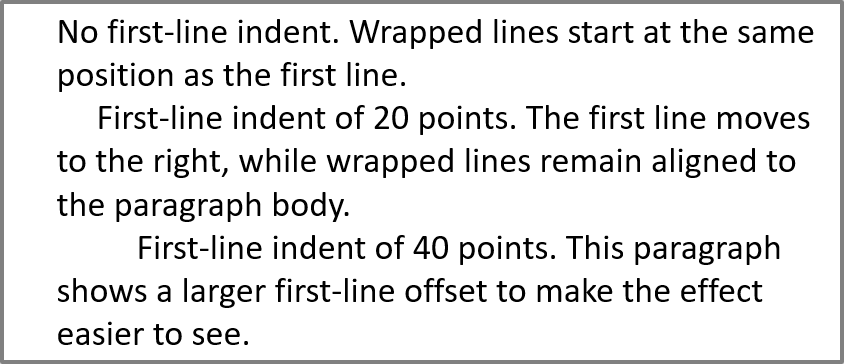
ใช้ IParagraphFormat.setIndent เพื่อควบคุมการเยื้องบรรทัดแรกของย่อหน้า วิธีนี้จะย้ายเฉพาะบรรทัดแรกเทียบกับระยะขอบซ้ายของย่อหน้า ค่าเป็นบวกจะเลื่อนบรรทัดแรกไปทางขวา ส่วนบรรทัดที่เหลือคงอยู่ในแนวกับเนื้อหาย่อหน้า
ใช้ IParagraphFormat.setMarginLeft เมื่อคุณต้องการย้ายย่อหน้าทั้งหมด ใช้ IParagraphFormat.setIndent เมื่อคุณต้องการย้ายเฉพาะบรรทัดแรก
ตัวอย่างด้านล่างสร้างหลายย่อหน้าและกำหนดค่า IParagraphFormat.setIndent ที่ต่างกันเพื่อสาธิตว่าการเยื้องบรรทัดแรกส่งผลต่อการจัด Layout อย่างไร
- สร้างอินสแตนซ์ของคลาส Presentation
- เข้าถึงสไลด์เป้าหมาย
- เพิ่ม IAutoShape สี่เหลี่ยมผืนผ้าไปยังสไลด์
- เข้าถึง ITextFrame ของรูปทราบและลบย่อหน้าเริ่มต้นออก
- สร้างหลายย่อหน้าและตั้งค่าค่า IParagraphFormat.setIndent ที่แตกต่างกันสำหรับแต่ละย่อหน้า
- เพิ่มย่อหน้าเหล่านั้นลงในเฟรมข้อความ
- บันทึกการนำเสนอที่แก้ไขแล้ว
โค้ดนี้แสดงวิธีตั้งค่าการเยื้องย่อหน้า:
import com.aspose.slides.*;
import android.graphics.Color;

Presentation presentation = new Presentation();
try {
    ISlide slide = presentation.getSlides().get_Item(0);

    IAutoShape shape = slide.getShapes().addAutoShape(ShapeType.Rectangle, 50, 50, 420, 220);
    shape.getFillFormat().setFillType(FillType.NoFill);
    shape.getLineFormat().getFillFormat().setFillType(FillType.Solid);
    shape.getLineFormat().getFillFormat().getSolidFillColor().setColor(Color.GRAY);

    ITextFrame textFrame = shape.getTextFrame();
    textFrame.getTextFrameFormat().setAutofitType(TextAutofitType.Shape);
    textFrame.getParagraphs().clear();

    Paragraph firstParagraph = new Paragraph();
    firstParagraph.setText("No first-line indent. Wrapped lines start at the same position as the first line.");
    firstParagraph.getParagraphFormat().getDefaultPortionFormat().getFillFormat().setFillType(FillType.Solid);
    firstParagraph.getParagraphFormat().getDefaultPortionFormat().getFillFormat().getSolidFillColor().setColor(Color.BLACK);
    firstParagraph.getParagraphFormat().setMarginLeft(20f);
    firstParagraph.getParagraphFormat().setIndent(0f);

    Paragraph secondParagraph = new Paragraph();
    secondParagraph.setText("First-line indent of 20 points. The first line moves to the right, while wrapped lines remain aligned to the paragraph body.");
    secondParagraph.getParagraphFormat().getDefaultPortionFormat().getFillFormat().setFillType(FillType.Solid);
    secondParagraph.getParagraphFormat().getDefaultPortionFormat().getFillFormat().getSolidFillColor().setColor(Color.BLACK);
    secondParagraph.getParagraphFormat().setMarginLeft(20f);
    secondParagraph.getParagraphFormat().setIndent(20f);

    Paragraph thirdParagraph = new Paragraph();
    thirdParagraph.setText("First-line indent of 40 points. This paragraph shows a larger first-line offset to make the effect easier to see.");
    thirdParagraph.getParagraphFormat().getDefaultPortionFormat().getFillFormat().setFillType(FillType.Solid);
    thirdParagraph.getParagraphFormat().getDefaultPortionFormat().getFillFormat().getSolidFillColor().setColor(Color.BLACK);
    thirdParagraph.getParagraphFormat().setMarginLeft(20f);
    thirdParagraph.getParagraphFormat().setIndent(40f);

    textFrame.getParagraphs().add(firstParagraph);
    textFrame.getParagraphs().add(secondParagraph);
    textFrame.getParagraphs().add(thirdParagraph);

    presentation.save("paragraph_indent.pptx", SaveFormat.Pptx);
} finally {
    presentation.dispose();
}
ผลลัพธ์:
ตั้งค่าการเยื้องแบบห้อยลง
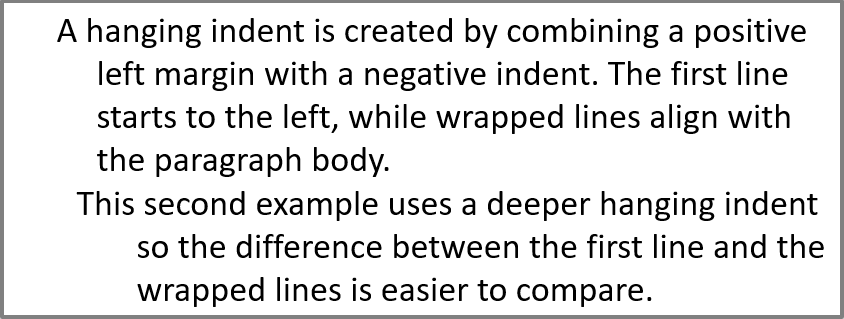
การเยื้องแบบห้อยลงคือการจัด Layout ของย่อหน้าที่บรรทัดแรกเริ่มอยู่ทางซ้ายของบรรทัดที่เหลือ ใน Aspose.Slides คุณสร้างเอฟเฟกต์นี้ด้วย IParagraphFormat.setIndent โดยใส่ค่าลบเพื่อย้ายบรรทัดแรกไปทางซ้ายเทียบกับเนื้อหาย่อหน้า
โดยปฏิบัติ IParagraphFormat.setMarginLeft กำหนดตำแหน่งซ้ายของเนื้อหาย่อหน้าและ IParagraphFormat.setIndent กำหนดตำแหน่งของบรรทัดแรกเทียบกับระยะขอบนั้น เพื่อสร้างการเยื้องแบบห้อยลง ให้ใส่ค่าบวกให้กับ setMarginLeft และค่าลบให้กับ setIndent
การจัดรูปแบบนี้มีประโยชน์สำหรับบรรณานุกรม การอ้างอิง รายการสารานุกรม และย่อหน้าอื่น ๆ ที่ต้องการให้บรรทัดต่อเนื่องจัดแนวภายใต้เนื้อหาย่อหน้าแทนจะจัดแนวใต้ตัวอักษรแรกของบรรทัดแรก
- สร้างอินสแตนซ์ของคลาส Presentation
- เข้าถึงสไลด์เป้าหมาย
- เพิ่ม IAutoShape สี่เหลี่ยมผืนผ้าไปยังสไลด์
- เข้าถึง ITextFrame ของรูปทราบและลบย่อหน้าเริ่มต้นออก
- สร้างย่อหน้าและใส่ค่าบวกให้กับ IParagraphFormat.setMarginLeft สำหรับแต่ละย่อหน้า
- ใส่ค่าลบให้กับ IParagraphFormat.setIndent เพื่อสร้างเอฟเฟกต์การเยื้องแบบห้อยลง
- เพิ่มย่อหน้าเหล่านั้นลงในเฟรมข้อความ
- บันทึกการนำเสนอที่แก้ไขแล้ว
โค้ดนี้แสดงวิธีตั้งค่าการเยื้องแบบห้อยลงสำหรับย่อหน้า:
import com.aspose.slides.*;
import android.graphics.Color;

Presentation presentation = new Presentation();
try {
    ISlide slide = presentation.getSlides().get_Item(0);

    IAutoShape shape = slide.getShapes().addAutoShape(ShapeType.Rectangle, 50, 50, 420, 220);
    shape.getFillFormat().setFillType(FillType.NoFill);
    shape.getLineFormat().getFillFormat().setFillType(FillType.Solid);
    shape.getLineFormat().getFillFormat().getSolidFillColor().setColor(Color.GRAY);

    ITextFrame textFrame = shape.getTextFrame();
    textFrame.getTextFrameFormat().setAutofitType(TextAutofitType.Shape);
    textFrame.getParagraphs().clear();

    Paragraph firstParagraph = new Paragraph();
    firstParagraph.setText("A hanging indent is created by combining a positive left margin with a negative indent. The first line starts to the left, while wrapped lines align with the paragraph body.");
    firstParagraph.getParagraphFormat().getDefaultPortionFormat().getFillFormat().setFillType(FillType.Solid);
    firstParagraph.getParagraphFormat().getDefaultPortionFormat().getFillFormat().getSolidFillColor().setColor(Color.BLACK);
    firstParagraph.getParagraphFormat().setMarginLeft(40f);
    firstParagraph.getParagraphFormat().setIndent(-20f);

    Paragraph secondParagraph = new Paragraph();
    secondParagraph.setText("This second example uses a deeper hanging indent so the difference between the first line and the wrapped lines is easier to compare.");
    secondParagraph.getParagraphFormat().getDefaultPortionFormat().getFillFormat().setFillType(FillType.Solid);
    secondParagraph.getParagraphFormat().getDefaultPortionFormat().getFillFormat().getSolidFillColor().setColor(Color.BLACK);
    secondParagraph.getParagraphFormat().setMarginLeft(60f);
    secondParagraph.getParagraphFormat().setIndent(-30f);

    textFrame.getParagraphs().add(firstParagraph);
    textFrame.getParagraphs().add(secondParagraph);

    presentation.save("hanging_indent.pptx", SaveFormat.Pptx);
} finally {
    presentation.dispose();
}
ผลลัพธ์:
ตั้งค่าคุณสมบัติการทำงานของส่วนย่อยท้ายย่อหน้า
IParagraph.setEndParagraphPortionFormat ควบคุมการจัดรูปแบบของเครื่องหมายสิ้นสุดย่อหน้า ตัวอย่างต่อไปนี้กำหนดขนาดตัวอักษรและแบบอักษร Latin ให้กับเครื่องหมายสิ้นสุดของย่อหน้าที่สอง:
- โหลด Presentation แล้วเข้าถึงสไลด์หนึ่งสไลด์
- เพิ่ม IAutoShape แล้วลบย่อหน้าเริ่มต้นของมันออก
- สร้างสองย่อหน้าและเพิ่มส่วนย่อยข้อความลงในแต่ละย่อหน้า
- สร้าง PortionFormat สำหรับเครื่องหมายสิ้นสุดของย่อหน้าที่สอง
- ตั้งค่า IBasePortionFormat.setFontHeight และ IBasePortionFormat.setLatinFont
- ใส่ฟอร์แมตนี้ด้วย IParagraph.setEndParagraphPortionFormat แล้วบันทึกการนำเสนอ
import com.aspose.slides.*;

Presentation presentation = new Presentation("Test.pptx");
try {
    ISlide slide = presentation.getSlides().get_Item(0);
    IAutoShape shape = slide.getShapes().addAutoShape(ShapeType.Rectangle, 10, 10, 200, 250);
    ITextFrame textFrame = shape.getTextFrame();
    textFrame.getParagraphs().clear();

    Paragraph firstParagraph = new Paragraph();
    firstParagraph.getPortions().add(new Portion("Sample text"));

    Paragraph secondParagraph = new Paragraph();
    secondParagraph.getPortions().add(new Portion("Sample text 2"));

    PortionFormat endParagraphFormat = new PortionFormat();
    endParagraphFormat.setFontHeight(48);
    endParagraphFormat.setLatinFont(new FontData("Times New Roman"));
    secondParagraph.setEndParagraphPortionFormat(endParagraphFormat);

    textFrame.getParagraphs().add(firstParagraph);
    textFrame.getParagraphs().add(secondParagraph);

    presentation.save("end_paragraph_format.pptx", SaveFormat.Pptx);
} finally {
    presentation.dispose();
}
นับจำนวนบรรทัดที่แสดงผล
สำหรับกฎของย่อหน้าที่มีผลต่อการตัดบรรทัดอัตโนมัติและเครื่องหมายวรรคตอนที่ส่วนท้ายบรรทัด ดูที่ Control Line Breaking และ Control Hanging Punctuation
ใช้ IParagraph.getLinesCount เพื่อคำนวณจำนวนบรรทัดที่ย่อหน้าครอบครองหลังจากการจัด Layout ของข้อความรวมถึงการตัดบรรทัดอัตโนมัติ ซึ่งเป็นประโยชน์เมื่อทำการตรวจสอบความยาวข้อความและ Layout ในเทมเพลตการนำเสนอ
ย่อหน้าเป็นรายการหนึ่งใน ITextFrame.getParagraphs และอาจครอบคลุมหลายบรรทัดที่แสดงผล การตัดบรรทัดโดยตรงภายในย่อหน้าจะบังคับให้เกิดบรรทัดใหม่โดยไม่ต้องสร้างย่อหน้าใหม่ การตัดบรรทัดอัตโนมัติก็สร้างบรรทัดตามความกว้างที่มีอยู่โดยไม่ใส่ตัวตัดบรรทัดลงในข้อความ ดังนั้นการนับย่อหน้าหรืออักขระตัดบรรทัดจึงไม่ได้ให้จำนวนบรรทัดที่แสดงผล
ตัวอย่างต่อไปนี้สร้างรูปร่างข้อความ คำนวณจำนวนบรรทัดของมัน ทำให้รูปร่างแคบลง แล้วแทนที่ข้อความด้วยสตริงสั้นลง การตัดบรรทัดเปิดอยู่และการปรับขนาดอัตโนมัติปิดอยู่เพื่อให้ความกว้างของรูปร่างควบคุมการตัดบรรทัดโดยไม่ทำให้ข้อความหดหรือรูปร่างเปลี่ยนขนาด มิติของรูปร่างเป็นจุด ในที่สุดตัวอย่างจะเพิ่มย่อหน้าอีกหนึ่งอันและรวมจำนวนบรรทัดจากทุกเฟรมข้อความ
import com.aspose.slides.*;

Presentation presentation = new Presentation();
try {
    ISlide slide = presentation.getSlides().get_Item(0);

    IAutoShape shape = slide.getShapes().addAutoShape(ShapeType.Rectangle, 50, 50, 400, 200);
    ITextFrame textFrame = shape.getTextFrame();
    textFrame.getTextFrameFormat().setWrapText(NullableBool.True);
    textFrame.getTextFrameFormat().setAutofitType(TextAutofitType.None);

    IParagraph paragraph = textFrame.getParagraphs().get_Item(0);
    paragraph.getParagraphFormat().getDefaultPortionFormat().setFontHeight(20);
    paragraph.setText("This text demonstrates how automatic wrapping changes the number of rendered lines.");
    System.out.println("Original width: " + paragraph.getLinesCount());

    shape.setWidth(150);
    System.out.println("Narrower shape: " + paragraph.getLinesCount());

    paragraph.setText("Short text.");
    System.out.println("Shorter text: " + paragraph.getLinesCount());

    Paragraph secondParagraph = new Paragraph();
    secondParagraph.setText("Another paragraph.");
    secondParagraph.getParagraphFormat().getDefaultPortionFormat().setFontHeight(20);
    textFrame.getParagraphs().add(secondParagraph);

    int totalLineCount = 0;
    for (IParagraph currentParagraph : textFrame.getParagraphs()) {
        totalLineCount += currentParagraph.getLinesCount();
    }
    System.out.println("Total lines in the text frame: " + totalLineCount);
} finally {
    presentation.dispose();
}
ด้วยข้อความและมิติเหล่านี้ การทำให้รูปร่างแคบลงจะเพิ่มจำนวนบรรทัด ในขณะที่การแทนที่ข้อความด้วยสตริงสั้นจะลดจำนวนบรรทัด จำนวนที่แน่นอนอาจแตกต่างกันขึ้นกับการใช้งานแบบอักษร การทดแทน ขนาดแบบอักษร ระยะขอบ การเยื้อง การตัดบรรทัดและการตั้งค่า autofit ใช้แบบอักษรและการตั้งค่า Layout ที่ตั้งใจสำหรับสภาพแวดล้อมเป้าหมายเมื่อทำการตรวจสอบเทมเพลต
จำนวนบรรทัดเดียวไม่บ่งบอกว่าข้อความล้นพื้นที่หรือไม่ ความสูงที่มีให้, ความสูงของบรรทัด, ระยะห่างของย่อหน้าและบรรทัด, และพฤติกรรม autofit ล้วนมีผล แม้บรรทัดเดียวก็อาจเกินความกว้างที่มีให้เมื่อปิดการตัดบรรทัด
นำเข้าและส่งออกเนื้อหาย่อหน้า
นำเข้า HTML ไปยังย่อหน้า
ใช้ ParagraphCollection.addFromHtml เพื่อแปลงเครื่องหมาย HTML ให้เป็นย่อหน้าและส่วนย่อยในเฟรมข้อความ
- สร้างอินสแตนซ์ของคลาส Presentation
- เข้าถึงสไลด์และเพิ่ม IAutoShape
- เข้าถึง ITextFrame ของรูปทราบและลบย่อหน้าเริ่มต้นออก
- อ่านไฟล์ HTML ต้นฉบับ
- ส่งสตริง HTML ไปที่ ParagraphCollection.addFromHtml
- บันทึกการนำเสนอที่แก้ไขแล้ว
ตัวอย่าง Android ผ่าน Java นี้นำเข้า HTML ไปยังเฟรมข้อความ:
import com.aspose.slides.*;
import java.io.IOException;
import java.nio.charset.StandardCharsets;
import java.nio.file.Files;
import java.nio.file.Paths;

Presentation presentation = new Presentation();
try {
    ISlide slide = presentation.getSlides().get_Item(0);
    float shapeWidth = (float) presentation.getSlideSize().getSize().getWidth() - 20;
    float shapeHeight = (float) presentation.getSlideSize().getSize().getHeight() - 20;
    IAutoShape shape = slide.getShapes().addAutoShape(ShapeType.Rectangle, 10, 10, shapeWidth, shapeHeight);
    shape.getFillFormat().setFillType(FillType.NoFill);
    shape.getTextFrame().getParagraphs().clear();

    try {
        byte[] htmlBytes = Files.readAllBytes(Paths.get("file.html"));
        String html = new String(htmlBytes, StandardCharsets.UTF_8);
        shape.getTextFrame().getParagraphs().addFromHtml(html);
        presentation.save("html_text.pptx", SaveFormat.Pptx);
    } catch (IOException exception) {
        System.out.println("The HTML file could not be read: " + exception.getMessage());
    }
} finally {
    presentation.dispose();
}
ส่งออกข้อความย่อหน้าเป็น HTML
ใช้ ParagraphCollection.exportToHtml เพื่อส่งออกช่วงย่อหน้าที่เลือกเป็น HTML
- สร้างอินสแตนซ์ของคลาส Presentation และโหลดการนำเสนอที่ต้องการ
- เข้าถึงสไลด์และค้นหา IAutoShape ที่มีข้อความ
- เข้าถึง ITextFrame ของรูปทราบ
- เรียก ParagraphCollection.exportToHtml โดยระบุดัชนีย่อหน้าเริ่มต้นและจำนวนย่อหน้าที่ต้องการส่งออก
- เขียนสตริง HTML ที่ได้ลงไฟล์
ตัวอย่าง Android ผ่าน Java นี้ส่งออกรายการย่อหน้าทั้งหมดจากเฟรมข้อความแรก:
import com.aspose.slides.*;
import java.io.IOException;
import java.nio.charset.StandardCharsets;
import java.nio.file.Files;
import java.nio.file.Paths;

Presentation presentation = new Presentation("ExportingHTMLText.pptx");
try {
    IShape shape = presentation.getSlides().get_Item(0).getShapes().get_Item(0);

    if (shape instanceof IAutoShape) {
        IAutoShape textShape = (IAutoShape) shape;
        ITextFrame textFrame = textShape.getTextFrame();
        if (textFrame != null) {
            IParagraphCollection paragraphs = textFrame.getParagraphs();
            String html = paragraphs.exportToHtml(0, paragraphs.getCount(), null);
            try {
                Files.write(Paths.get("paragraphs.html"), html.getBytes(StandardCharsets.UTF_8));
            } catch (IOException exception) {
                System.out.println("The HTML file could not be written: " + exception.getMessage());
            }
        } else {
            System.out.println("The first shape does not contain a text frame.");
        }
    } else {
        System.out.println("The first shape is not a text shape.");
    }
} finally {
    presentation.dispose();
}
เรนเดอร์ย่อหน้าเป็นภาพ
IParagraph.getImage เรนเดอร์ย่อหน้าเดี่ยวโดยตรงและคืนค่า IImage บันทึกผลลัพธ์เป็นไฟล์หรือสตรีมด้วย IImage.save คุณไม่จำเป็นต้องเรนเดอร์รูปทราบทั้งหมดหรือครอบตัดบิตแมพด้วยตนเอง
IParagraph.getImage อาจคืนค่า null หากไม่พบย่อหน้าในคอลเลกชันแม่ มีขอบเขตการเรนเดอร์ที่ไม่ถูกต้อง หรือไม่สามารถเรนเดอร์ได้ ตรวจสอบผลลัพธ์ก่อนบันทึกและทำลายภาพที่คืนค่าหลังใช้งาน
เรนเดอร์ย่อหน้าที่สเกลเริ่มต้น
สมมติว่ามีไฟล์การนำเสนอชื่อ sample.pptx มีสไลด์เดียวโดยรูปทราบแรกเป็นกล่องข้อความที่มีสามย่อหน้า
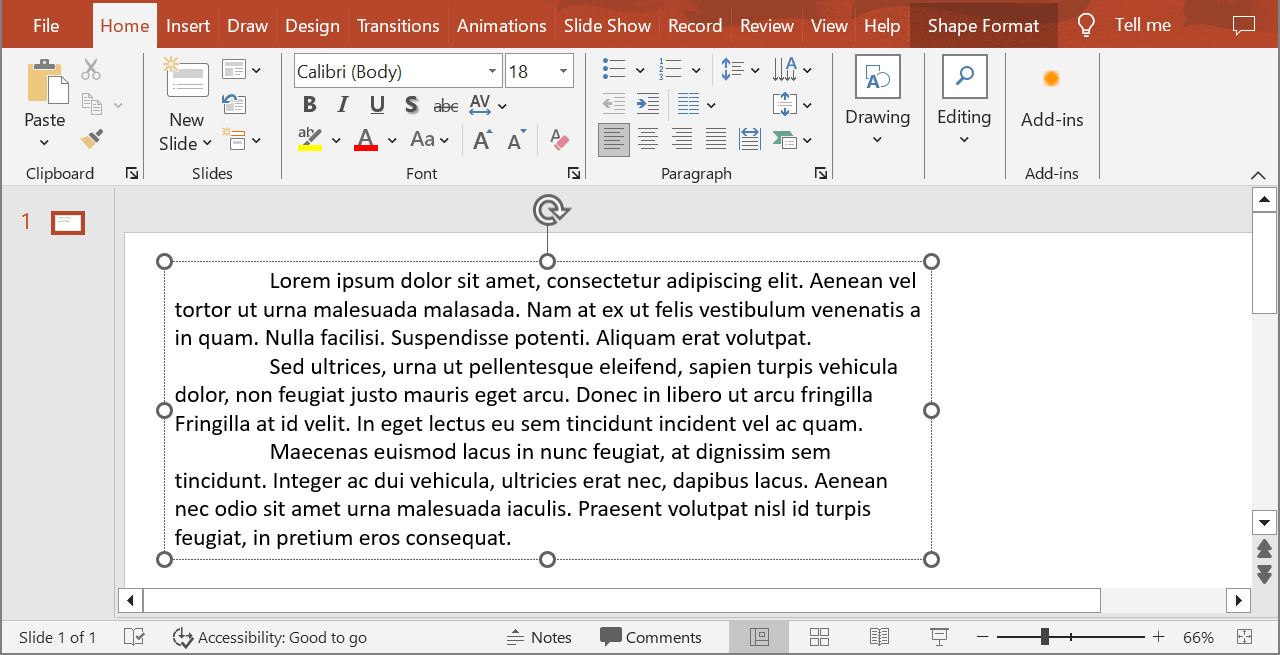
ตัวอย่างต่อไปนี้เรนเดอร์ย่อหน้าที่สองในรูปทราบข้อความทั่วไปที่สเกลเริ่มต้นและบันทึกภาพที่ได้เป็น PNG บล็อก finally จะทำให้แน่ใจว่าภาพถูกทำลายอย่างถูกต้อง
import com.aspose.slides.*;

Presentation presentation = new Presentation("sample.pptx");
try {
    IShape shape = presentation.getSlides().get_Item(0).getShapes().get_Item(0);

    if (shape instanceof IAutoShape) {
        IAutoShape textShape = (IAutoShape) shape;
        ITextFrame textFrame = textShape.getTextFrame();
        if (textFrame != null && textFrame.getParagraphs().getCount() > 1) {
            IParagraph paragraph = textFrame.getParagraphs().get_Item(1);
            IImage paragraphImage = paragraph.getImage();

            if (paragraphImage != null) {
                try {
                    paragraphImage.save("paragraph.png", ImageFormat.Png);
                } finally {
                    paragraphImage.dispose();
                }
            } else {
                System.out.println("The paragraph could not be rendered.");
            }
        } else {
            System.out.println("The expected paragraph was not found.");
        }
    } else {
        System.out.println("The first shape is not a text shape.");
    }
} finally {
    presentation.dispose();
}
ผลลัพธ์:

เรนเดอร์ย่อหน้าในเซลล์ตารางพร้อมสเกล
ใช้การโอเวอร์โหลดของ IParagraph.getImage ที่รับพารามิเตอร์ float scaleX และ float scaleY เพื่อกำหนดค่าอัตราส่วนแนวนอนและแนวตั้ง ตัวอย่างต่อไปนี้สร้างตาราง เรนเดอร์ย่อหน้าในเซลล์แรกด้วยความกว้างและความสูงเป็นสองเท่าของสเกลเริ่มต้นและบันทึกผลเป็นภาพ PNG
import com.aspose.slides.*;

float scaleX = 2f;
float scaleY = 2f;

Presentation presentation = new Presentation();
try {
    ISlide slide = presentation.getSlides().get_Item(0);
    ITable table = slide.getShapes().addTable(50, 50, new double[] { 300 }, new double[] { 80 });
    IParagraph paragraph = table.get_Item(0, 0).getTextFrame().getParagraphs().get_Item(0);
    paragraph.setText("Text in a table cell");

    IImage paragraphImage = paragraph.getImage(scaleX, scaleY);
    if (paragraphImage != null) {
        try {
            paragraphImage.save("table_paragraph.png", ImageFormat.Png);
        } finally {
            paragraphImage.dispose();
        }
    } else {
        System.out.println("The paragraph could not be rendered.");
    }
} finally {
    presentation.dispose();
}
ค่าอัตราส่วน 1 จะคงแกนนั้นไว้ที่ขนาดพิกเซลเริ่มต้น ตัวอย่างเช่น 2 สำหรับทั้งสองค่า จะทำให้ภาพที่ได้มีความกว้างและความสูงประมาณสองเท่าของขนาดเริ่มต้น ส่งผลให้จำนวนพิกเซลมากกว่าสี่เท่า อัตราส่วนที่ใหญ่กว่าจะทำให้ข้อความคมชัดขึ้นสำหรับการซูมหรือเอาต์พุตความละเอียดสูง แต่ก็เพิ่มการใช้หน่วยความจำและขนาดไฟล์ อัตราส่วนต่ำกว่า 1 จะสร้างภาพที่เล็กลงและรายละเอียดน้อยลง ใช้อัตราส่วนเท่ากันเพื่อรักษาอัตราส่วนภาพของย่อหน้า; อัตราส่วนแนวนอนและแนวตั้งที่ต่างกันจะยืดขนาดเอาต์พุตแยกจากกัน
การเรนเดอร์รูปทราบทั้งหมดด้วย IShape.getImage ยังมีประโยชน์เมื่อเอาต์พุตต้องรวมการเติมสี เส้นขอบ หรือบริบทภาพอื่น ๆ สำหรับภาพที่มีเพียงย่อหน้า ให้ใช้ IParagraph.getImage
คำถามที่พบบ่อย
ฉันสามารถปิดการตัดบรรทัดอัตโนมัติภายในเฟรมข้อความได้หรือไม่?
ได้. ตั้งค่า ITextFrameFormat.setWrapText เพื่อปิดการตัดบรรทัดเพื่อให้บรรทัดไม่แตกที่ขอบของเฟรมข้อความ
ฉันจะรับพิกัดขอบของย่อหน้าที่ระบุบนสไลด์ได้อย่างแม่นยำอย่างไร?
ใช้ IParagraph.getRect เพื่อดึงสี่เหลี่ยมขอบของย่อหน้า IPortion.getRect ให้ขอบเขตของส่วนย่อยแต่ละส่วน
การจัดแนวของย่อหน้า (ซ้าย, ขวา, กลาง หรือจัดเต็ม) ถูกควบคุมที่ใด?
IParagraphFormat.setAlignment เป็นการตั้งค่าระดับย่อหน้าและใช้กับย่อหน้าทั้งหมดไม่ว่าจะมีการจัดรูปแบบส่วนย่อยแยกต่างหาก
เพื่อจัดแนวแนวตั้งของส่วนย่อยที่มีขนาดแบบอักษรต่างกันภายในแต่ละบรรทัด ดูที่ Align Fonts Within a Line
ฉันสามารถตั้งค่าภาษา proofing สำหรับส่วนของย่อหน้าได้หรือไม่?
ได้. ตั้งค่า IBasePortionFormat.setLanguageId สำหรับส่วนย่อยแต่ละส่วน เพื่อให้ย่อหน้าเดียวสามารถมีข้อความหลายภาษาได้