
Quản lý các đoạn văn bản PowerPoint trên Android
Tổng quan
Aspose.Slides for Android via Java đại diện cho văn bản dưới dạng một phân cấp của khung văn bản, đoạn văn và phần:
- ITextFrame đại diện cho bộ chứa văn bản trong một hình dạng và cung cấp quyền truy cập vào bộ sưu tập đoạn văn của nó.
- IParagraph đại diện cho một đoạn văn trong khung văn bản và cung cấp quyền truy cập vào các phần và định dạng ở mức độ đoạn.
- IPortion đại diện cho một dải văn bản trong một đoạn. Mỗi phần có thể có văn bản và định dạng ký tự riêng.
Do đó, một đoạn văn có thể chứa văn bản với các phông chữ, màu sắc, kích thước và định dạng khác nhau bằng cách sử dụng nhiều phần.
Tạo và Định dạng Đoạn văn
Tạo Đoạn văn với Nhiều Phần
Các bước sau tạo một khung văn bản với ba đoạn, mỗi đoạn chứa ba phần:
- Tạo một thể hiện của lớp Presentation.
- Truy cập slide tương ứng thông qua chỉ mục của nó.
- Thêm một IAutoShape hình chữ nhật vào slide.
- Truy cập ITextFrame của hình dạng.
- Sử dụng đoạn mặc định và thêm hai đối tượng IParagraph nữa vào khung văn bản.
- Thêm đủ đối tượng IPortion cho mỗi đoạn để chứa ba phần. Đoạn mặc định đã chứa một phần trống.
- Đặt văn bản cho mỗi phần.
- Áp dụng định dạng cấp ký tự thông qua IPortion.getPortionFormat.
- Lưu bản trình bày đã chỉnh sửa.
Ví dụ Android qua Java này thực hiện các bước:
import com.aspose.slides.*;
import android.graphics.Color;

Presentation presentation = new Presentation();
try {
    ISlide slide = presentation.getSlides().get_Item(0);
    IAutoShape shape = slide.getShapes().addAutoShape(ShapeType.Rectangle, 50, 150, 300, 150);
    ITextFrame textFrame = shape.getTextFrame();

    IParagraph firstParagraph = textFrame.getParagraphs().get_Item(0);
    firstParagraph.getPortions().add(new Portion());
    firstParagraph.getPortions().add(new Portion());

    IParagraph secondParagraph = new Paragraph();
    secondParagraph.getPortions().add(new Portion());
    secondParagraph.getPortions().add(new Portion());
    secondParagraph.getPortions().add(new Portion());
    textFrame.getParagraphs().add(secondParagraph);

    IParagraph thirdParagraph = new Paragraph();
    thirdParagraph.getPortions().add(new Portion());
    thirdParagraph.getPortions().add(new Portion());
    thirdParagraph.getPortions().add(new Portion());
    textFrame.getParagraphs().add(thirdParagraph);

    int paragraphCount = textFrame.getParagraphs().getCount();
    for (int paragraphIndex = 0; paragraphIndex < paragraphCount; paragraphIndex++) {
        IParagraph paragraph = textFrame.getParagraphs().get_Item(paragraphIndex);
        int portionCount = paragraph.getPortions().getCount();
        for (int portionIndex = 0; portionIndex < portionCount; portionIndex++) {
            IPortion portion = paragraph.getPortions().get_Item(portionIndex);
            portion.setText("Portion " + (paragraphIndex + 1) + "." + (portionIndex + 1));

            if (portionIndex == 0) {
                portion.getPortionFormat().getFillFormat().setFillType(FillType.Solid);
                portion.getPortionFormat().getFillFormat().getSolidFillColor().setColor(Color.RED);
                portion.getPortionFormat().setFontBold(NullableBool.True);
                portion.getPortionFormat().setFontHeight(15);
            } else if (portionIndex == 1) {
                portion.getPortionFormat().getFillFormat().setFillType(FillType.Solid);
                portion.getPortionFormat().getFillFormat().getSolidFillColor().setColor(Color.BLUE);
                portion.getPortionFormat().setFontItalic(NullableBool.True);
                portion.getPortionFormat().setFontHeight(18);
            }
        }
    }

    presentation.save("paragraphs_with_portions.pptx", SaveFormat.Pptx);
} finally {
    presentation.dispose();
}
Tạo Danh sách Gạch đầu dòng và Đánh số
Tạo Danh sách Gạch đầu dòng hoặc Đánh số
Các dấu đầu dòng và đánh số giúp người đọc dễ dàng quét các mục liên quan hơn. Trong Aspose.Slides, các thiết lập danh sách được xác định thông qua IBulletFormat.
- Tạo một thể hiện của lớp Presentation.
- Truy cập slide tương ứng thông qua chỉ mục của nó.
- Thêm một IAutoShape vào slide đã chọn.
- Truy cập ITextFrame.
- Xóa đoạn mặc định khỏi khung văn bản.
- Tạo một Paragraph cho một dấu đầu dòng ký hiệu.
- Đặt IBulletFormat.setType thành BulletType.Symbol và chỉ định ký tự dấu đầu dòng.
- Đặt văn bản đoạn, thụt lề, màu dấu đầu dòng và chiều cao dấu đầu dòng.
- Thêm đoạn vào khung văn bản.
- Tạo đoạn thứ hai và đặt IBulletFormat.setType thành BulletType.Numbered.
- Cấu hình kiểu dấu đầu dòng đánh số và thêm đoạn vào khung văn bản.
- Lưu bản trình bày.
Ví dụ Android qua Java này tạo một dấu đầu dòng ký hiệu và một dấu đầu dòng đánh số:
import com.aspose.slides.*;
import android.graphics.Color;

Presentation presentation = new Presentation();
try {
    ISlide slide = presentation.getSlides().get_Item(0);
    IAutoShape shape = slide.getShapes().addAutoShape(ShapeType.Rectangle, 200, 200, 400, 200);
    ITextFrame textFrame = shape.getTextFrame();
    textFrame.getParagraphs().clear();

    Paragraph symbolParagraph = new Paragraph();
    symbolParagraph.setText("Welcome to Aspose.Slides");
    symbolParagraph.getParagraphFormat().getBullet().setType(BulletType.Symbol);
    symbolParagraph.getParagraphFormat().getBullet().setChar((char) 0x2022);
    symbolParagraph.getParagraphFormat().setIndent(25);
    symbolParagraph.getParagraphFormat().getBullet().getColor().setColorType(ColorType.RGB);
    symbolParagraph.getParagraphFormat().getBullet().getColor().setColor(Color.BLACK);
    symbolParagraph.getParagraphFormat().getBullet().setBulletHardColor(NullableBool.True);
    symbolParagraph.getParagraphFormat().getBullet().setHeight(100);
    textFrame.getParagraphs().add(symbolParagraph);

    Paragraph numberedParagraph = new Paragraph();
    numberedParagraph.setText("This is a numbered item");
    numberedParagraph.getParagraphFormat().getBullet().setType(BulletType.Numbered);
    numberedParagraph.getParagraphFormat().getBullet().setNumberedBulletStyle(NumberedBulletStyle.BulletCircleNumWDBlackPlain);
    numberedParagraph.getParagraphFormat().setIndent(25);
    numberedParagraph.getParagraphFormat().getBullet().getColor().setColorType(ColorType.RGB);
    numberedParagraph.getParagraphFormat().getBullet().getColor().setColor(Color.BLACK);
    numberedParagraph.getParagraphFormat().getBullet().setBulletHardColor(NullableBool.True);
    numberedParagraph.getParagraphFormat().getBullet().setHeight(100);
    textFrame.getParagraphs().add(numberedParagraph);

    presentation.save("bulleted_and_numbered_list.pptx", SaveFormat.Pptx);
} finally {
    presentation.dispose();
}
Sử dụng Dấu đầu dòng Hình ảnh
Dấu đầu dòng hình ảnh cho phép bạn sử dụng hình ảnh tùy chỉnh thay vì ký hiệu hoặc số.
- Tạo một thể hiện của lớp Presentation.
- Truy cập slide tương ứng thông qua chỉ mục của nó.
- Thêm một IAutoShape và truy cập ITextFrame của nó.
- Xóa đoạn mặc định khỏi khung văn bản.
- Tải hình ảnh dấu đầu dòng và thêm nó vào bộ sưu tập hình ảnh của bản trình bày dưới dạng IPPImage.
- Tạo một Paragraph và đặt văn bản cho nó.
- Đặt IBulletFormat.setType thành BulletType.Picture.
- Gán hình ảnh thông qua IBulletFormat.getPicture và đặt chiều cao dấu đầu dòng.
- Thêm đoạn vào khung văn bản.
- Lưu bản trình bày đã chỉnh sửa.
Ví dụ Android qua Java này tạo một dấu đầu dòng hình ảnh:
import com.aspose.slides.*;

Presentation presentation = new Presentation();
try {
    ISlide slide = presentation.getSlides().get_Item(0);

    IImage bulletImage = Images.fromFile("bullets.png");
    IPPImage presentationImage;
    try {
        presentationImage = presentation.getImages().addImage(bulletImage);
    } finally {
        bulletImage.dispose();
    }

    IAutoShape shape = slide.getShapes().addAutoShape(ShapeType.Rectangle, 200, 200, 400, 200);
    ITextFrame textFrame = shape.getTextFrame();
    textFrame.getParagraphs().clear();

    Paragraph paragraph = new Paragraph();
    paragraph.setText("Welcome to Aspose.Slides");
    paragraph.getParagraphFormat().getBullet().setType(BulletType.Picture);
    paragraph.getParagraphFormat().getBullet().getPicture().setImage(presentationImage);
    paragraph.getParagraphFormat().getBullet().setHeight(100);
    textFrame.getParagraphs().add(paragraph);

    presentation.save("picture_bullet.pptx", SaveFormat.Pptx);
    presentation.save("picture_bullet.ppt", SaveFormat.Ppt);
} finally {
    presentation.dispose();
}
Tạo Danh sách Đa cấp
Đặt IParagraphFormat.setDepth để đặt các đoạn ở các mức độ khác nhau của danh sách. Cấp độ cao nhất có độ sâu là 0.
- Tạo một Presentation và truy cập một slide.
- Thêm một IAutoShape và xóa đoạn mặc định khỏi khung văn bản của nó.
- Tạo bốn đoạn và cấu hình ký hiệu dấu đầu dòng của chúng.
- Đặt giá trị IParagraphFormat.setDepth của chúng thành
0,1,2và3. - Thêm các đoạn vào khung văn bản và lưu bản trình bày.
Ví dụ Android qua Java này tạo một danh sách gạch đầu dòng bốn cấp:
import com.aspose.slides.*;
import android.graphics.Color;

Presentation presentation = new Presentation();
try {
    ISlide slide = presentation.getSlides().get_Item(0);
    IAutoShape shape = slide.getShapes().addAutoShape(ShapeType.Rectangle, 200, 200, 400, 200);
    ITextFrame textFrame = shape.getTextFrame();
    textFrame.getParagraphs().clear();

    IParagraph firstParagraph = new Paragraph();
    firstParagraph.setText("Content");
    firstParagraph.getParagraphFormat().getBullet().setType(BulletType.Symbol);
    firstParagraph.getParagraphFormat().getBullet().setChar((char) 0x2022);
    firstParagraph.getParagraphFormat().getDefaultPortionFormat().getFillFormat().setFillType(FillType.Solid);
    firstParagraph.getParagraphFormat().getDefaultPortionFormat().getFillFormat().getSolidFillColor().setColor(Color.BLACK);
    firstParagraph.getParagraphFormat().setDepth((short) 0);

    IParagraph secondParagraph = new Paragraph();
    secondParagraph.setText("Second level");
    secondParagraph.getParagraphFormat().getBullet().setType(BulletType.Symbol);
    secondParagraph.getParagraphFormat().getBullet().setChar('-');
    secondParagraph.getParagraphFormat().getDefaultPortionFormat().getFillFormat().setFillType(FillType.Solid);
    secondParagraph.getParagraphFormat().getDefaultPortionFormat().getFillFormat().getSolidFillColor().setColor(Color.BLACK);
    secondParagraph.getParagraphFormat().setDepth((short) 1);

    IParagraph thirdParagraph = new Paragraph();
    thirdParagraph.setText("Third level");
    thirdParagraph.getParagraphFormat().getBullet().setType(BulletType.Symbol);
    thirdParagraph.getParagraphFormat().getBullet().setChar((char) 0x2022);
    thirdParagraph.getParagraphFormat().getDefaultPortionFormat().getFillFormat().setFillType(FillType.Solid);
    thirdParagraph.getParagraphFormat().getDefaultPortionFormat().getFillFormat().getSolidFillColor().setColor(Color.BLACK);
    thirdParagraph.getParagraphFormat().setDepth((short) 2);

    IParagraph fourthParagraph = new Paragraph();
    fourthParagraph.setText("Fourth level");
    fourthParagraph.getParagraphFormat().getBullet().setType(BulletType.Symbol);
    fourthParagraph.getParagraphFormat().getBullet().setChar('-');
    fourthParagraph.getParagraphFormat().getDefaultPortionFormat().getFillFormat().setFillType(FillType.Solid);
    fourthParagraph.getParagraphFormat().getDefaultPortionFormat().getFillFormat().getSolidFillColor().setColor(Color.BLACK);
    fourthParagraph.getParagraphFormat().setDepth((short) 3);

    textFrame.getParagraphs().add(firstParagraph);
    textFrame.getParagraphs().add(secondParagraph);
    textFrame.getParagraphs().add(thirdParagraph);
    textFrame.getParagraphs().add(fourthParagraph);

    presentation.save("multilevel_list.pptx", SaveFormat.Pptx);
} finally {
    presentation.dispose();
}
Bắt đầu các mục danh sách đánh số với Giá trị Tùy chỉnh
Sử dụng IBulletFormat.setNumberedBulletStartWith để đặt số ban đầu hiển thị cho một đoạn đánh số.
- Tạo một Presentation và thêm một IAutoShape vào một slide.
- Xóa đoạn mặc định khỏi khung văn bản của hình dạng.
- Tạo ba đoạn có đánh số.
- Đặt IBulletFormat.setNumberedBulletStartWith thành
2,3và7cho các đoạn tương ứng. - Thêm các đoạn vào khung văn bản và lưu bản trình bày.
Ví dụ Android qua Java này gán số bắt đầu tùy chỉnh cho mỗi đoạn:
import com.aspose.slides.*;

Presentation presentation = new Presentation();
try {
    ISlide slide = presentation.getSlides().get_Item(0);
    IAutoShape shape = slide.getShapes().addAutoShape(ShapeType.Rectangle, 200, 200, 400, 200);
    ITextFrame textFrame = shape.getTextFrame();
    textFrame.getParagraphs().clear();

    Paragraph firstParagraph = new Paragraph();
    firstParagraph.setText("Start at 2");
    firstParagraph.getParagraphFormat().getBullet().setType(BulletType.Numbered);
    firstParagraph.getParagraphFormat().getBullet().setNumberedBulletStartWith((short) 2);
    textFrame.getParagraphs().add(firstParagraph);

    Paragraph secondParagraph = new Paragraph();
    secondParagraph.setText("Start at 3");
    secondParagraph.getParagraphFormat().getBullet().setType(BulletType.Numbered);
    secondParagraph.getParagraphFormat().getBullet().setNumberedBulletStartWith((short) 3);
    textFrame.getParagraphs().add(secondParagraph);

    Paragraph thirdParagraph = new Paragraph();
    thirdParagraph.setText("Start at 7");
    thirdParagraph.getParagraphFormat().getBullet().setType(BulletType.Numbered);
    thirdParagraph.getParagraphFormat().getBullet().setNumberedBulletStartWith((short) 7);
    textFrame.getParagraphs().add(thirdParagraph);

    presentation.save("custom_numbered_list.pptx", SaveFormat.Pptx);
} finally {
    presentation.dispose();
}
Kiểm soát Bố cục Đoạn và Thuộc tính Kết thúc
Đặt Thụt đầu dòng đầu tiên
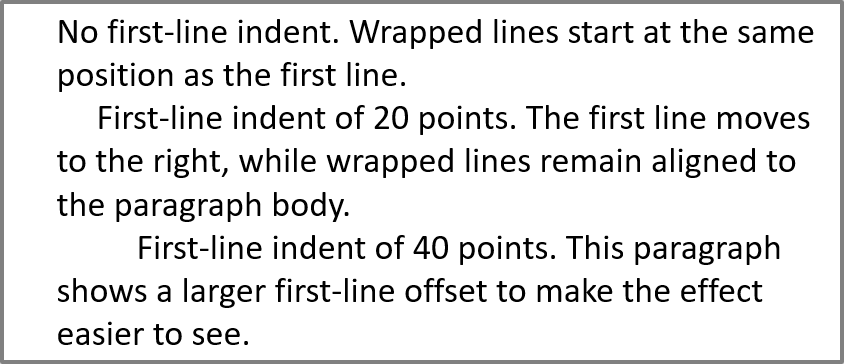
Sử dụng IParagraphFormat.setIndent để điều khiển thụt đầu dòng đầu tiên của một đoạn. Phương pháp này chỉ di chuyển dòng đầu tiên so với lề trái của đoạn. Giá trị dương sẽ dịch dòng đầu tiên sang bên phải, trong khi các dòng còn lại vẫn được căn chỉnh với thân đoạn.
Sử dụng IParagraphFormat.setMarginLeft khi bạn cần di chuyển toàn bộ đoạn. Sử dụng IParagraphFormat.setIndent khi bạn chỉ cần di chuyển dòng đầu tiên.
Ví dụ dưới đây tạo một số đoạn và áp dụng các giá trị IParagraphFormat.setIndent khác nhau để minh họa cách thụt đầu dòng đầu tiên ảnh hưởng đến bố cục đoạn.
- Tạo một thể hiện của lớp Presentation.
- Truy cập slide mục tiêu.
- Thêm một IAutoShape hình chữ nhật vào slide.
- Truy cập ITextFrame của hình dạng và xóa đoạn mặc định.
- Tạo một số đoạn và đặt các giá trị IParagraphFormat.setIndent khác nhau cho chúng.
- Thêm các đoạn vào khung văn bản.
- Lưu bản trình bày đã chỉnh sửa.
Mã này cho bạn thấy cách đặt thụt đoạn:
import com.aspose.slides.*;
import android.graphics.Color;

Presentation presentation = new Presentation();
try {
    ISlide slide = presentation.getSlides().get_Item(0);

    IAutoShape shape = slide.getShapes().addAutoShape(ShapeType.Rectangle, 50, 50, 420, 220);
    shape.getFillFormat().setFillType(FillType.NoFill);
    shape.getLineFormat().getFillFormat().setFillType(FillType.Solid);
    shape.getLineFormat().getFillFormat().getSolidFillColor().setColor(Color.GRAY);

    ITextFrame textFrame = shape.getTextFrame();
    textFrame.getTextFrameFormat().setAutofitType(TextAutofitType.Shape);
    textFrame.getParagraphs().clear();

    Paragraph firstParagraph = new Paragraph();
    firstParagraph.setText("No first-line indent. Wrapped lines start at the same position as the first line.");
    firstParagraph.getParagraphFormat().getDefaultPortionFormat().getFillFormat().setFillType(FillType.Solid);
    firstParagraph.getParagraphFormat().getDefaultPortionFormat().getFillFormat().getSolidFillColor().setColor(Color.BLACK);
    firstParagraph.getParagraphFormat().setMarginLeft(20f);
    firstParagraph.getParagraphFormat().setIndent(0f);

    Paragraph secondParagraph = new Paragraph();
    secondParagraph.setText("First-line indent of 20 points. The first line moves to the right, while wrapped lines remain aligned to the paragraph body.");
    secondParagraph.getParagraphFormat().getDefaultPortionFormat().getFillFormat().setFillType(FillType.Solid);
    secondParagraph.getParagraphFormat().getDefaultPortionFormat().getFillFormat().getSolidFillColor().setColor(Color.BLACK);
    secondParagraph.getParagraphFormat().setMarginLeft(20f);
    secondParagraph.getParagraphFormat().setIndent(20f);

    Paragraph thirdParagraph = new Paragraph();
    thirdParagraph.setText("First-line indent of 40 points. This paragraph shows a larger first-line offset to make the effect easier to see.");
    thirdParagraph.getParagraphFormat().getDefaultPortionFormat().getFillFormat().setFillType(FillType.Solid);
    thirdParagraph.getParagraphFormat().getDefaultPortionFormat().getFillFormat().getSolidFillColor().setColor(Color.BLACK);
    thirdParagraph.getParagraphFormat().setMarginLeft(20f);
    thirdParagraph.getParagraphFormat().setIndent(40f);

    textFrame.getParagraphs().add(firstParagraph);
    textFrame.getParagraphs().add(secondParagraph);
    textFrame.getParagraphs().add(thirdParagraph);

    presentation.save("paragraph_indent.pptx", SaveFormat.Pptx);
} finally {
    presentation.dispose();
}
Kết quả:
Đặt Thụt Lề Treo
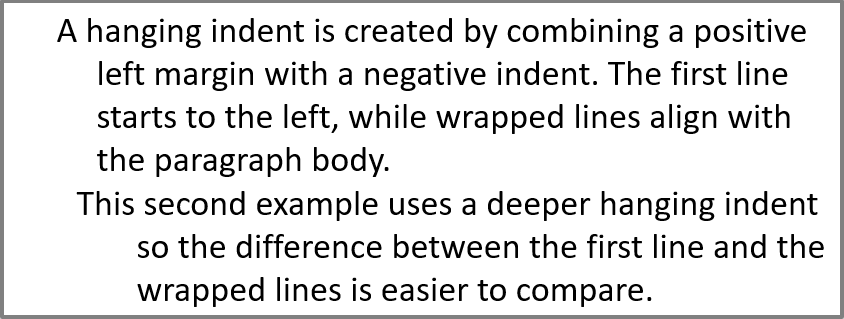
Thụt lề treo là một bố cục đoạn trong đó dòng đầu tiên bắt đầu ở bên trái các dòng còn lại. Trong Aspose.Slides, bạn tạo hiệu ứng này bằng IParagraphFormat.setIndent. Gửi một giá trị âm để di chuyển dòng đầu tiên sang bên trái so với thân đoạn.
Trong thực tế, IParagraphFormat.setMarginLeft xác định vị trí bên trái của thân đoạn, và IParagraphFormat.setIndent xác định vị trí của dòng đầu tiên so với lề đó. Để tạo thụt lề treo, truyền một giá trị dương cho setMarginLeft và một giá trị âm cho setIndent.
Định dạng này hữu ích cho thư mục, tham chiếu, mục từ điển, và các đoạn khác mà các dòng gói cần căn dưới thân đoạn thay vì dưới ký tự đầu tiên của dòng đầu.
- Tạo một thể hiện của lớp Presentation.
- Truy cập slide mục tiêu.
- Thêm một IAutoShape hình chữ nhật vào slide.
- Truy cập ITextFrame của hình dạng và xóa đoạn mặc định.
- Tạo các đoạn và truyền một giá trị dương cho IParagraphFormat.setMarginLeft cho mỗi đoạn.
- Truyền một giá trị âm cho IParagraphFormat.setIndent để tạo hiệu ứng thụt lề treo.
- Thêm các đoạn vào khung văn bản.
- Lưu bản trình bày đã chỉnh sửa.
Mã này cho bạn thấy cách đặt thụt lề treo cho một đoạn:
import com.aspose.slides.*;
import android.graphics.Color;

Presentation presentation = new Presentation();
try {
    ISlide slide = presentation.getSlides().get_Item(0);

    IAutoShape shape = slide.getShapes().addAutoShape(ShapeType.Rectangle, 50, 50, 420, 220);
    shape.getFillFormat().setFillType(FillType.NoFill);
    shape.getLineFormat().getFillFormat().setFillType(FillType.Solid);
    shape.getLineFormat().getFillFormat().getSolidFillColor().setColor(Color.GRAY);

    ITextFrame textFrame = shape.getTextFrame();
    textFrame.getTextFrameFormat().setAutofitType(TextAutofitType.Shape);
    textFrame.getParagraphs().clear();

    Paragraph firstParagraph = new Paragraph();
    firstParagraph.setText("A hanging indent is created by combining a positive left margin with a negative indent. The first line starts to the left, while wrapped lines align with the paragraph body.");
    firstParagraph.getParagraphFormat().getDefaultPortionFormat().getFillFormat().setFillType(FillType.Solid);
    firstParagraph.getParagraphFormat().getDefaultPortionFormat().getFillFormat().getSolidFillColor().setColor(Color.BLACK);
    firstParagraph.getParagraphFormat().setMarginLeft(40f);
    firstParagraph.getParagraphFormat().setIndent(-20f);

    Paragraph secondParagraph = new Paragraph();
    secondParagraph.setText("This second example uses a deeper hanging indent so the difference between the first line and the wrapped lines is easier to compare.");
    secondParagraph.getParagraphFormat().getDefaultPortionFormat().getFillFormat().setFillType(FillType.Solid);
    secondParagraph.getParagraphFormat().getDefaultPortionFormat().getFillFormat().getSolidFillColor().setColor(Color.BLACK);
    secondParagraph.getParagraphFormat().setMarginLeft(60f);
    secondParagraph.getParagraphFormat().setIndent(-30f);

    textFrame.getParagraphs().add(firstParagraph);
    textFrame.getParagraphs().add(secondParagraph);

    presentation.save("hanging_indent.pptx", SaveFormat.Pptx);
} finally {
    presentation.dispose();
}
Kết quả:
Đặt Thuộc tính Chạy Đoạn Kết Thúc
IParagraph.setEndParagraphPortionFormat kiểm soát định dạng của ký hiệu kết thúc đoạn. Ví dụ sau gán kích thước phông chữ và phông Latin cho ký hiệu kết thúc của đoạn thứ hai:
- Tải một Presentation và truy cập một slide.
- Thêm một IAutoShape và xóa đoạn mặc định của nó.
- Tạo hai đoạn và thêm các phần văn bản vào chúng.
- Tạo một PortionFormat cho ký hiệu kết thúc của đoạn thứ hai.
- Đặt IBasePortionFormat.setFontHeight và IBasePortionFormat.setLatinFont.
- Gán định dạng bằng IParagraph.setEndParagraphPortionFormat và lưu bản trình bày.
import com.aspose.slides.*;

Presentation presentation = new Presentation("Test.pptx");
try {
    ISlide slide = presentation.getSlides().get_Item(0);
    IAutoShape shape = slide.getShapes().addAutoShape(ShapeType.Rectangle, 10, 10, 200, 250);
    ITextFrame textFrame = shape.getTextFrame();
    textFrame.getParagraphs().clear();

    Paragraph firstParagraph = new Paragraph();
    firstParagraph.getPortions().add(new Portion("Sample text"));

    Paragraph secondParagraph = new Paragraph();
    secondParagraph.getPortions().add(new Portion("Sample text 2"));

    PortionFormat endParagraphFormat = new PortionFormat();
    endParagraphFormat.setFontHeight(48);
    endParagraphFormat.setLatinFont(new FontData("Times New Roman"));
    secondParagraph.setEndParagraphPortionFormat(endParagraphFormat);

    textFrame.getParagraphs().add(firstParagraph);
    textFrame.getParagraphs().add(secondParagraph);

    presentation.save("end_paragraph_format.pptx", SaveFormat.Pptx);
} finally {
    presentation.dispose();
}
Đếm các Dòng Đã Render
Đối với các quy tắc đoạn ảnh hưởng đến việc tự động ngắt dòng và dấu câu ở cuối dòng, xem Control Line Breaking và Control Hanging Punctuation.
Sử dụng IParagraph.getLinesCount để đếm số dòng mà một đoạn chiếm sau khi bố cục văn bản, bao gồm cả việc ngắt dòng tự động. Điều này hữu ích khi kiểm tra độ dài văn bản và bố cục trong mẫu bản trình bày.
Một đoạn là một mục trong ITextFrame.getParagraphs, và nó có thể chiếm nhiều dòng đã render. Một ký tự ngắt dòng rõ ràng trong một đoạn buộc một dòng mới mà không tạo ra đoạn khác. Việc ngắt dòng tự động tạo ra các dòng dựa trên độ rộng có sẵn mà không chèn ký tự ngắt dòng vào văn bản. Do đó, đếm số đoạn hoặc ký tự ngắt dòng không cho ra số dòng đã render.
Ví dụ dưới đây tạo một hình dạng văn bản, đếm các dòng của nó, thu hẹp hình dạng, và sau đó thay thế văn bản bằng một chuỗi ngắn hơn. Việc ngắt dòng được bật và tự động điều chỉnh (autofit) bị tắt để chiều rộng hình dạng kiểm soát việc ngắt dòng mà không tự động thu nhỏ văn bản hoặc thay đổi kích thước hình dạng. Kích thước hình dạng tính bằng point. Cuối cùng, ví dụ thêm một đoạn khác và cộng tổng số dòng trong toàn khung văn bản.
import com.aspose.slides.*;

Presentation presentation = new Presentation();
try {
    ISlide slide = presentation.getSlides().get_Item(0);

    IAutoShape shape = slide.getShapes().addAutoShape(ShapeType.Rectangle, 50, 50, 400, 200);
    ITextFrame textFrame = shape.getTextFrame();
    textFrame.getTextFrameFormat().setWrapText(NullableBool.True);
    textFrame.getTextFrameFormat().setAutofitType(TextAutofitType.None);

    IParagraph paragraph = textFrame.getParagraphs().get_Item(0);
    paragraph.getParagraphFormat().getDefaultPortionFormat().setFontHeight(20);
    paragraph.setText("This text demonstrates how automatic wrapping changes the number of rendered lines.");
    System.out.println("Original width: " + paragraph.getLinesCount());

    shape.setWidth(150);
    System.out.println("Narrower shape: " + paragraph.getLinesCount());

    paragraph.setText("Short text.");
    System.out.println("Shorter text: " + paragraph.getLinesCount());

    Paragraph secondParagraph = new Paragraph();
    secondParagraph.setText("Another paragraph.");
    secondParagraph.getParagraphFormat().getDefaultPortionFormat().setFontHeight(20);
    textFrame.getParagraphs().add(secondParagraph);

    int totalLineCount = 0;
    for (IParagraph currentParagraph : textFrame.getParagraphs()) {
        totalLineCount += currentParagraph.getLinesCount();
    }
    System.out.println("Total lines in the text frame: " + totalLineCount);
} finally {
    presentation.dispose();
}
Với văn bản và các kích thước này, thu hẹp hình dạng làm tăng số dòng, trong khi thay thế văn bản bằng chuỗi ngắn làm giảm số dòng. Các phép đếm chính xác có thể thay đổi tùy theo khả năng và thay thế phông chữ, kích thước phông, lề, thụt lề, việc gói và cài đặt autofit. Hãy sử dụng phông và cài đặt bố cục dự kiến cho môi trường mục tiêu khi kiểm tra mẫu.
Chỉ số dòng một mình không xác định liệu văn bản có tràn ra khỏi vùng chứa hay không. Chiều cao khả dụng, chiều cao dòng, khoảng cách giữa các đoạn và dòng, và hành vi autofit cũng quan trọng; ngay cả một dòng duy nhất cũng có thể vượt quá chiều rộng khả dụng khi tắt việc gói.
Nhập và Xuất Nội dung Đoạn
Nhập Văn bản HTML vào Đoạn
Sử dụng ParagraphCollection.addFromHtml để chuyển đổi mã HTML thành các đoạn và phần trong một khung văn bản.
- Tạo một thể hiện của lớp Presentation.
- Truy cập một slide và thêm một IAutoShape.
- Truy cập ITextFrame của hình dạng và xóa đoạn mặc định.
- Đọc tệp HTML nguồn.
- Truyền chuỗi HTML vào ParagraphCollection.addFromHtml.
- Lưu bản trình bày đã chỉnh sửa.
Ví dụ Android qua Java này nhập HTML vào một khung văn bản:
import com.aspose.slides.*;
import java.io.IOException;
import java.nio.charset.StandardCharsets;
import java.nio.file.Files;
import java.nio.file.Paths;

Presentation presentation = new Presentation();
try {
    ISlide slide = presentation.getSlides().get_Item(0);
    float shapeWidth = (float) presentation.getSlideSize().getSize().getWidth() - 20;
    float shapeHeight = (float) presentation.getSlideSize().getSize().getHeight() - 20;
    IAutoShape shape = slide.getShapes().addAutoShape(ShapeType.Rectangle, 10, 10, shapeWidth, shapeHeight);
    shape.getFillFormat().setFillType(FillType.NoFill);
    shape.getTextFrame().getParagraphs().clear();

    try {
        byte[] htmlBytes = Files.readAllBytes(Paths.get("file.html"));
        String html = new String(htmlBytes, StandardCharsets.UTF_8);
        shape.getTextFrame().getParagraphs().addFromHtml(html);
        presentation.save("html_text.pptx", SaveFormat.Pptx);
    } catch (IOException exception) {
        System.out.println("The HTML file could not be read: " + exception.getMessage());
    }
} finally {
    presentation.dispose();
}
Xuất Văn bản Đoạn sang HTML
Sử dụng ParagraphCollection.exportToHtml để xuất một phạm vi đã chọn của các đoạn dưới dạng HTML.
- Tạo một thể hiện của lớp Presentation và tải bản trình bày mong muốn.
- Truy cập slide và tìm IAutoShape chứa văn bản.
- Truy cập ITextFrame.
- Gọi ParagraphCollection.exportToHtml với chỉ mục đoạn bắt đầu và số lượng đoạn cần xuất.
- Ghi chuỗi HTML trả về vào tệp.
Ví dụ Android qua Java này xuất tất cả các đoạn từ hình dạng văn bản đầu tiên:
import com.aspose.slides.*;
import java.io.IOException;
import java.nio.charset.StandardCharsets;
import java.nio.file.Files;
import java.nio.file.Paths;

Presentation presentation = new Presentation("ExportingHTMLText.pptx");
try {
    IShape shape = presentation.getSlides().get_Item(0).getShapes().get_Item(0);

    if (shape instanceof IAutoShape) {
        IAutoShape textShape = (IAutoShape) shape;
        ITextFrame textFrame = textShape.getTextFrame();
        if (textFrame != null) {
            IParagraphCollection paragraphs = textFrame.getParagraphs();
            String html = paragraphs.exportToHtml(0, paragraphs.getCount(), null);
            try {
                Files.write(Paths.get("paragraphs.html"), html.getBytes(StandardCharsets.UTF_8));
            } catch (IOException exception) {
                System.out.println("The HTML file could not be written: " + exception.getMessage());
            }
        } else {
            System.out.println("The first shape does not contain a text frame.");
        }
    } else {
        System.out.println("The first shape is not a text shape.");
    }
} finally {
    presentation.dispose();
}
Kết xuất một Đoạn dưới dạng Hình ảnh
IParagraph.getImage kết xuất trực tiếp một đoạn riêng lẻ và trả về một IImage. Lưu kết quả vào tệp hoặc luồng bằng IImage.save. Bạn không cần phải kết xuất hình dạng chứa hoặc cắt bitmap một cách thủ công.
IParagraph.getImage có thể trả về null nếu đoạn không thể tìm thấy trong bộ sưu tập cha, không có giới hạn kết xuất hợp lệ, hoặc không thể được kết xuất. Kiểm tra kết quả trước khi lưu và giải phóng hình ảnh trả về sau khi sử dụng.
Kết xuất một Đoạn ở Tỷ lệ Mặc định
Giả sử chúng ta có một tệp bản trình bày có tên sample.pptx với một slide, trong đó hình dạng đầu tiên là một hộp văn bản chứa ba đoạn.
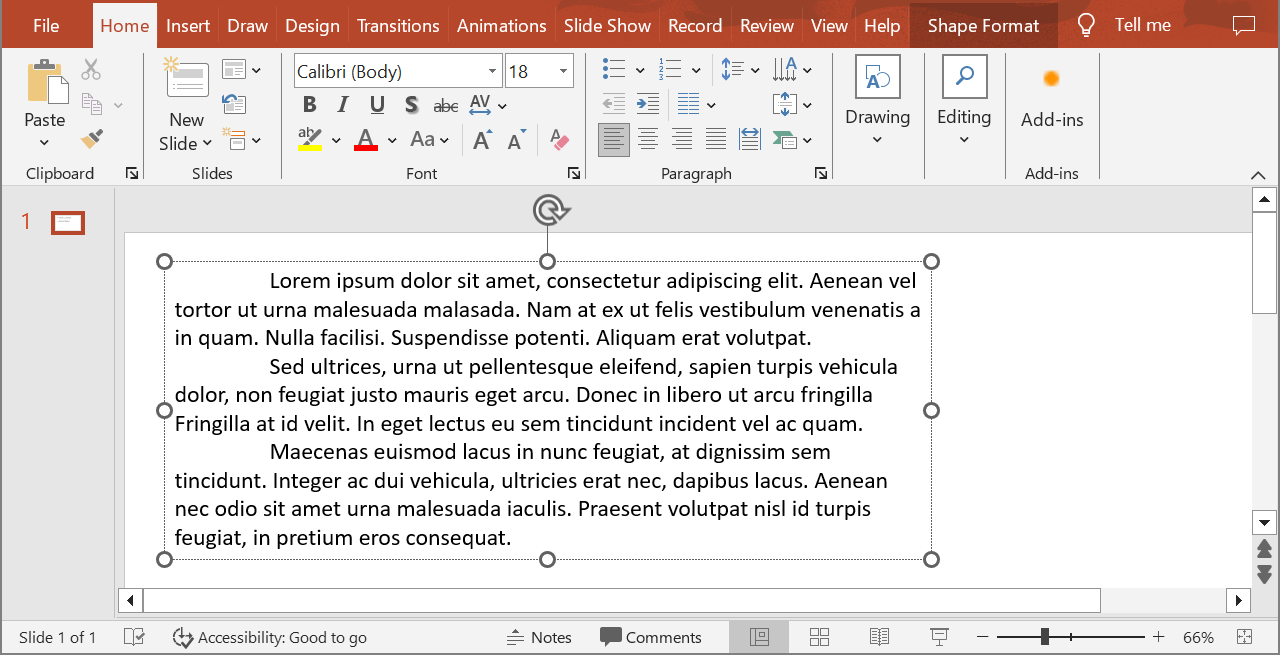
Ví dụ dưới đây kết xuất đoạn thứ hai trong một hình dạng văn bản thông thường ở tỷ lệ mặc định và lưu hình ảnh trả về ở định dạng PNG. Khối finally đảm bảo hình ảnh được giải phóng đúng cách.
import com.aspose.slides.*;

Presentation presentation = new Presentation("sample.pptx");
try {
    IShape shape = presentation.getSlides().get_Item(0).getShapes().get_Item(0);

    if (shape instanceof IAutoShape) {
        IAutoShape textShape = (IAutoShape) shape;
        ITextFrame textFrame = textShape.getTextFrame();
        if (textFrame != null && textFrame.getParagraphs().getCount() > 1) {
            IParagraph paragraph = textFrame.getParagraphs().get_Item(1);
            IImage paragraphImage = paragraph.getImage();

            if (paragraphImage != null) {
                try {
                    paragraphImage.save("paragraph.png", ImageFormat.Png);
                } finally {
                    paragraphImage.dispose();
                }
            } else {
                System.out.println("The paragraph could not be rendered.");
            }
        } else {
            System.out.println("The expected paragraph was not found.");
        }
    } else {
        System.out.println("The first shape is not a text shape.");
    }
} finally {
    presentation.dispose();
}
Kết quả:

Kết xuất một Đoạn trong Ô Bảng với Tỷ lệ
Sử dụng phiên bản quá tải của IParagraph.getImage chấp nhận các tham số float scaleX và float scaleY để đặt các hệ số tỷ lệ theo chiều ngang và chiều dọc. Ví dụ sau tạo một bảng, kết xuất đoạn trong ô đầu tiên với độ rộng và chiều cao gấp đôi so với mặc định, và lưu kết quả dưới dạng hình PNG.
import com.aspose.slides.*;

float scaleX = 2f;
float scaleY = 2f;

Presentation presentation = new Presentation();
try {
    ISlide slide = presentation.getSlides().get_Item(0);
    ITable table = slide.getShapes().addTable(50, 50, new double[] { 300 }, new double[] { 80 });
    IParagraph paragraph = table.get_Item(0, 0).getTextFrame().getParagraphs().get_Item(0);
    paragraph.setText("Text in a table cell");

    IImage paragraphImage = paragraph.getImage(scaleX, scaleY);
    if (paragraphImage != null) {
        try {
            paragraphImage.save("table_paragraph.png", ImageFormat.Png);
        } finally {
            paragraphImage.dispose();
        }
    } else {
        System.out.println("The paragraph could not be rendered.");
    }
} finally {
    presentation.dispose();
}
Hệ số tỷ lệ 1 giữ trục đó ở kích thước pixel mặc định. Ví dụ, 2 cho cả hai hệ số tạo ra một hình ảnh có chiều rộng và chiều cao khoảng gấp đôi kích thước mặc định, và có bốn lần số pixel. Các hệ số lớn hơn thường tạo ra văn bản sắc nét hơn cho việc phóng to hoặc xuất độ phân giải cao, nhưng chúng cũng làm tăng bộ nhớ và kích thước tệp. Các hệ số dưới 1 tạo ra hình ảnh nhỏ hơn với ít chi tiết hơn. Sử dụng các hệ số bằng nhau để duy trì tỉ lệ khung hình của đoạn; các hệ số ngang và dọc khác nhau sẽ kéo dài đầu ra một cách độc lập.
Việc kết xuất toàn bộ hình dạng bằng IShape.getImage vẫn hữu ích khi đầu ra phải bao gồm màu nền, viền hoặc ngữ cảnh trực quan khác của hình dạng. Đối với hình ảnh chỉ chứa đoạn, hãy sử dụng IParagraph.getImage.
Câu hỏi thường gặp
Tôi có thể tắt hoàn toàn việc ngắt dòng trong khung văn bản không?
Có. Đặt ITextFrameFormat.setWrapText để tắt việc ngắt dòng để các dòng không bị cắt tại các cạnh của khung văn bản.
Làm sao tôi có thể lấy ranh giới chính xác trên slide của một đoạn cụ thể?
Sử dụng IParagraph.getRect để lấy hình chữ nhật bao quanh của đoạn. IPortion.getRect cung cấp ranh giới của một phần riêng lẻ.
Căn đoạn (trái, phải, giữa, hoặc canh đều) được điều khiển ở đâu?
IParagraphFormat.setAlignment là thiết lập mức đoạn và áp dụng cho toàn bộ đoạn bất kể định dạng của các phần riêng lẻ.
Để căn dọc các phần có kích thước phông chữ khác nhau trong mỗi dòng, xem Align Fonts Within a Line.
Tôi có thể đặt ngôn ngữ kiểm tra cho một phần của đoạn không?
Có. Đặt IBasePortionFormat.setLanguageId cho các phần riêng lẻ, để một đoạn có thể chứa văn bản bằng nhiều ngôn ngữ.