
Hantera PowerPoint-textstycken på Android
Översikt
Aspose.Slides för Android via Java representerar text som en hierarki av textramar, stycken och segment:
- ITextFrame representerar textbehållaren i en form och ger åtkomst till dess styckesamling.
- IParagraph representerar ett stycke i en textram och ger åtkomst till dess segment och formateringsinställningar på stycknivå.
- IPortion representerar ett textsegment inom ett stycke. Varje segment kan ha sin egen text och teckenformatering.
Ett stycke kan därför innehålla text med olika typsnitt, färger, storlekar och annan formatering genom att använda flera segment.
Skapa och formatera stycken
Skapa stycken med flera segment
Följande steg skapar en textram med tre stycken, där varje innehåller tre segment:
- Skapa en instans av klassen Presentation.
- Få åtkomst till den relevanta bilden via dess index.
- Lägg till en rektangulär IAutoShape på bilden.
- Få åtkomst till formens ITextFrame.
- Använd standardstycket och lägg till två ytterligare IParagraph-objekt i textramen.
- Lägg till tillräckligt många IPortion‑objekt för att varje stycke ska innehålla tre segment. Standardstycket innehåller redan ett tomt segment.
- Ange texten för varje segment.
- Tillämpa teckenformatering via IPortion.getPortionFormat.
- Spara den modifierade presentationen.
Detta Android via Java‑exempel implementerar stegen:
import com.aspose.slides.*;
import android.graphics.Color;

Presentation presentation = new Presentation();
try {
    ISlide slide = presentation.getSlides().get_Item(0);
    IAutoShape shape = slide.getShapes().addAutoShape(ShapeType.Rectangle, 50, 150, 300, 150);
    ITextFrame textFrame = shape.getTextFrame();

    IParagraph firstParagraph = textFrame.getParagraphs().get_Item(0);
    firstParagraph.getPortions().add(new Portion());
    firstParagraph.getPortions().add(new Portion());

    IParagraph secondParagraph = new Paragraph();
    secondParagraph.getPortions().add(new Portion());
    secondParagraph.getPortions().add(new Portion());
    secondParagraph.getPortions().add(new Portion());
    textFrame.getParagraphs().add(secondParagraph);

    IParagraph thirdParagraph = new Paragraph();
    thirdParagraph.getPortions().add(new Portion());
    thirdParagraph.getPortions().add(new Portion());
    thirdParagraph.getPortions().add(new Portion());
    textFrame.getParagraphs().add(thirdParagraph);

    int paragraphCount = textFrame.getParagraphs().getCount();
    for (int paragraphIndex = 0; paragraphIndex < paragraphCount; paragraphIndex++) {
        IParagraph paragraph = textFrame.getParagraphs().get_Item(paragraphIndex);
        int portionCount = paragraph.getPortions().getCount();
        for (int portionIndex = 0; portionIndex < portionCount; portionIndex++) {
            IPortion portion = paragraph.getPortions().get_Item(portionIndex);
            portion.setText("Portion " + (paragraphIndex + 1) + "." + (portionIndex + 1));

            if (portionIndex == 0) {
                portion.getPortionFormat().getFillFormat().setFillType(FillType.Solid);
                portion.getPortionFormat().getFillFormat().getSolidFillColor().setColor(Color.RED);
                portion.getPortionFormat().setFontBold(NullableBool.True);
                portion.getPortionFormat().setFontHeight(15);
            } else if (portionIndex == 1) {
                portion.getPortionFormat().getFillFormat().setFillType(FillType.Solid);
                portion.getPortionFormat().getFillFormat().getSolidFillColor().setColor(Color.BLUE);
                portion.getPortionFormat().setFontItalic(NullableBool.True);
                portion.getPortionFormat().setFontHeight(18);
            }
        }
    }

    presentation.save("paragraphs_with_portions.pptx", SaveFormat.Pptx);
} finally {
    presentation.dispose();
}
Skapa punkt- och numrerade listor
Skapa en punkt- eller numrerad lista
Punkter och numrering gör relaterade objekt lättare att skanna. I Aspose.Slides definieras listinställningar via IBulletFormat.
- Skapa en instans av klassen Presentation.
- Få åtkomst till den relevanta bilden via dess index.
- Lägg till en IAutoShape på den valda bilden.
- Få åtkomst till formens ITextFrame.
- Ta bort standardstycket från textramen.
- Skapa ett Paragraph för en symbolpunkt.
- Ställ in IBulletFormat.setType till BulletType.Symbol och ange punkttecknet.
- Ange styckets text, indrag, punktfärg och punktens höjd.
- Lägg till stycket i textramen.
- Skapa ett andra stycke och ställ in IBulletFormat.setType till BulletType.Numbered.
- Konfigurera den numrerade punktstilen och lägg till stycket i textramen.
- Spara presentationen.
Detta Android via Java‑exempel skapar en symbolpunkt och en numrerad punkt:
import com.aspose.slides.*;
import android.graphics.Color;

Presentation presentation = new Presentation();
try {
    ISlide slide = presentation.getSlides().get_Item(0);
    IAutoShape shape = slide.getShapes().addAutoShape(ShapeType.Rectangle, 200, 200, 400, 200);
    ITextFrame textFrame = shape.getTextFrame();
    textFrame.getParagraphs().clear();

    Paragraph symbolParagraph = new Paragraph();
    symbolParagraph.setText("Welcome to Aspose.Slides");
    symbolParagraph.getParagraphFormat().getBullet().setType(BulletType.Symbol);
    symbolParagraph.getParagraphFormat().getBullet().setChar((char) 0x2022);
    symbolParagraph.getParagraphFormat().setIndent(25);
    symbolParagraph.getParagraphFormat().getBullet().getColor().setColorType(ColorType.RGB);
    symbolParagraph.getParagraphFormat().getBullet().getColor().setColor(Color.BLACK);
    symbolParagraph.getParagraphFormat().getBullet().setBulletHardColor(NullableBool.True);
    symbolParagraph.getParagraphFormat().getBullet().setHeight(100);
    textFrame.getParagraphs().add(symbolParagraph);

    Paragraph numberedParagraph = new Paragraph();
    numberedParagraph.setText("This is a numbered item");
    numberedParagraph.getParagraphFormat().getBullet().setType(BulletType.Numbered);
    numberedParagraph.getParagraphFormat().getBullet().setNumberedBulletStyle(NumberedBulletStyle.BulletCircleNumWDBlackPlain);
    numberedParagraph.getParagraphFormat().setIndent(25);
    numberedParagraph.getParagraphFormat().getBullet().getColor().setColorType(ColorType.RGB);
    numberedParagraph.getParagraphFormat().getBullet().getColor().setColor(Color.BLACK);
    numberedParagraph.getParagraphFormat().getBullet().setBulletHardColor(NullableBool.True);
    numberedParagraph.getParagraphFormat().getBullet().setHeight(100);
    textFrame.getParagraphs().add(numberedParagraph);

    presentation.save("bulleted_and_numbered_list.pptx", SaveFormat.Pptx);
} finally {
    presentation.dispose();
}
Använd bildpunkter
Bildpunkter låter dig använda en anpassad bild istället för en symbol eller ett tal.
- Skapa en instans av klassen Presentation.
- Få åtkomst till den relevanta bilden via dess index.
- Lägg till en IAutoShape och få åtkomst till dess ITextFrame.
- Ta bort standardstycket från textramen.
- Läs in punktbilden och lägg till den i presentationens bildsamling som en IPPImage.
- Skapa ett Paragraph och ange dess text.
- Ställ in IBulletFormat.setType till BulletType.Picture.
- Tilldela bilden via IBulletFormat.getPicture och ange punktens höjd.
- Lägg till stycket i textramen.
- Spara den modifierade presentationen.
Detta Android via Java‑exempel skapar en bildpunkt:
import com.aspose.slides.*;

Presentation presentation = new Presentation();
try {
    ISlide slide = presentation.getSlides().get_Item(0);

    IImage bulletImage = Images.fromFile("bullets.png");
    IPPImage presentationImage;
    try {
        presentationImage = presentation.getImages().addImage(bulletImage);
    } finally {
        bulletImage.dispose();
    }

    IAutoShape shape = slide.getShapes().addAutoShape(ShapeType.Rectangle, 200, 200, 400, 200);
    ITextFrame textFrame = shape.getTextFrame();
    textFrame.getParagraphs().clear();

    Paragraph paragraph = new Paragraph();
    paragraph.setText("Welcome to Aspose.Slides");
    paragraph.getParagraphFormat().getBullet().setType(BulletType.Picture);
    paragraph.getParagraphFormat().getBullet().getPicture().setImage(presentationImage);
    paragraph.getParagraphFormat().getBullet().setHeight(100);
    textFrame.getParagraphs().add(paragraph);

    presentation.save("picture_bullet.pptx", SaveFormat.Pptx);
    presentation.save("picture_bullet.ppt", SaveFormat.Ppt);
} finally {
    presentation.dispose();
}
Skapa en flernivålista
Ställ in IParagraphFormat.setDepth för att placera stycken på olika nivåer i en lista. Den översta nivån har ett djup på 0.
- Skapa en Presentation och få åtkomst till en bild.
- Lägg till en IAutoShape och rensa standardstycket från dess textram.
- Skapa fyra stycken och konfigurera deras punkt‑symboler.
- Ställ in deras IParagraphFormat.setDepth‑värden till
0,1,2och3. - Lägg till styckena i textramen och spara presentationen.
Detta Android via Java‑exempel skapar en fyranivåpunktlista:
import com.aspose.slides.*;
import android.graphics.Color;

Presentation presentation = new Presentation();
try {
    ISlide slide = presentation.getSlides().get_Item(0);
    IAutoShape shape = slide.getShapes().addAutoShape(ShapeType.Rectangle, 200, 200, 400, 200);
    ITextFrame textFrame = shape.getTextFrame();
    textFrame.getParagraphs().clear();

    IParagraph firstParagraph = new Paragraph();
    firstParagraph.setText("Content");
    firstParagraph.getParagraphFormat().getBullet().setType(BulletType.Symbol);
    firstParagraph.getParagraphFormat().getBullet().setChar((char) 0x2022);
    firstParagraph.getParagraphFormat().getDefaultPortionFormat().getFillFormat().setFillType(FillType.Solid);
    firstParagraph.getParagraphFormat().getDefaultPortionFormat().getFillFormat().getSolidFillColor().setColor(Color.BLACK);
    firstParagraph.getParagraphFormat().setDepth((short) 0);

    IParagraph secondParagraph = new Paragraph();
    secondParagraph.setText("Second level");
    secondParagraph.getParagraphFormat().getBullet().setType(BulletType.Symbol);
    secondParagraph.getParagraphFormat().getBullet().setChar('-');
    secondParagraph.getParagraphFormat().getDefaultPortionFormat().getFillFormat().setFillType(FillType.Solid);
    secondParagraph.getParagraphFormat().getDefaultPortionFormat().getFillFormat().getSolidFillColor().setColor(Color.BLACK);
    secondParagraph.getParagraphFormat().setDepth((short) 1);

    IParagraph thirdParagraph = new Paragraph();
    thirdParagraph.setText("Third level");
    thirdParagraph.getParagraphFormat().getBullet().setType(BulletType.Symbol);
    thirdParagraph.getParagraphFormat().getBullet().setChar((char) 0x2022);
    thirdParagraph.getParagraphFormat().getDefaultPortionFormat().getFillFormat().setFillType(FillType.Solid);
    thirdParagraph.getParagraphFormat().getDefaultPortionFormat().getFillFormat().getSolidFillColor().setColor(Color.BLACK);
    thirdParagraph.getParagraphFormat().setDepth((short) 2);

    IParagraph fourthParagraph = new Paragraph();
    fourthParagraph.setText("Fourth level");
    fourthParagraph.getParagraphFormat().getBullet().setType(BulletType.Symbol);
    fourthParagraph.getParagraphFormat().getBullet().setChar('-');
    fourthParagraph.getParagraphFormat().getDefaultPortionFormat().getFillFormat().setFillType(FillType.Solid);
    fourthParagraph.getParagraphFormat().getDefaultPortionFormat().getFillFormat().getSolidFillColor().setColor(Color.BLACK);
    fourthParagraph.getParagraphFormat().setDepth((short) 3);

    textFrame.getParagraphs().add(firstParagraph);
    textFrame.getParagraphs().add(secondParagraph);
    textFrame.getParagraphs().add(thirdParagraph);
    textFrame.getParagraphs().add(fourthParagraph);

    presentation.save("multilevel_list.pptx", SaveFormat.Pptx);
} finally {
    presentation.dispose();
}
Starta numrerade listobjekt med anpassade värden
Använd IBulletFormat.setNumberedBulletStartWith för att ange det initiala numret som visas för ett numrerat stycke.
- Skapa en instans av klassen Presentation.
- Lägg till en IAutoShape på en bild.
- Rensa standardstycket från formens textram.
- Skapa tre numrerade stycken.
- Ställ in IBulletFormat.setNumberedBulletStartWith till
2,3och7för respektive stycke. - Lägg till styckena i textramen och spara presentationen.
Detta Android via Java‑exempel tilldelar ett eget startnummer till varje stycke:
import com.aspose.slides.*;

Presentation presentation = new Presentation();
try {
    ISlide slide = presentation.getSlides().get_Item(0);
    IAutoShape shape = slide.getShapes().addAutoShape(ShapeType.Rectangle, 200, 200, 400, 200);
    ITextFrame textFrame = shape.getTextFrame();
    textFrame.getParagraphs().clear();

    Paragraph firstParagraph = new Paragraph();
    firstParagraph.setText("Start at 2");
    firstParagraph.getParagraphFormat().getBullet().setType(BulletType.Numbered);
    firstParagraph.getParagraphFormat().getBullet().setNumberedBulletStartWith((short) 2);
    textFrame.getParagraphs().add(firstParagraph);

    Paragraph secondParagraph = new Paragraph();
    secondParagraph.setText("Start at 3");
    secondParagraph.getParagraphFormat().getBullet().setType(BulletType.Numbered);
    secondParagraph.getParagraphFormat().getBullet().setNumberedBulletStartWith((short) 3);
    textFrame.getParagraphs().add(secondParagraph);

    Paragraph thirdParagraph = new Paragraph();
    thirdParagraph.setText("Start at 7");
    thirdParagraph.getParagraphFormat().getBullet().setType(BulletType.Numbered);
    thirdParagraph.getParagraphFormat().getBullet().setNumberedBulletStartWith((short) 7);
    textFrame.getParagraphs().add(thirdParagraph);

    presentation.save("custom_numbered_list.pptx", SaveFormat.Pptx);
} finally {
    presentation.dispose();
}
Kontrollera stycke‑layout och slut‑egenskaper
Ställ in ett första‑rad‑indrag
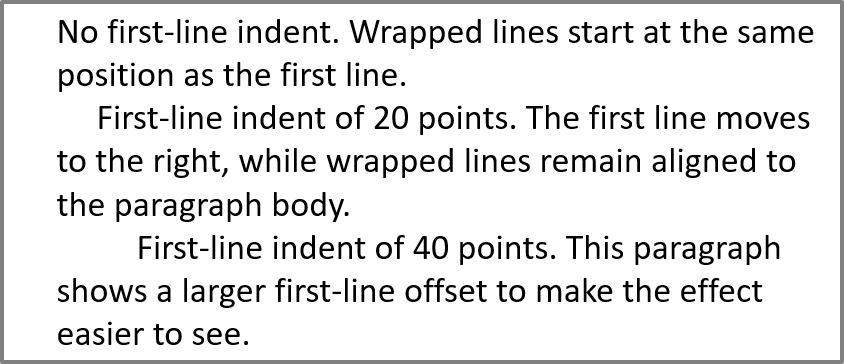
Använd IParagraphFormat.setIndent för att kontrollera första‑rad‑indraget i ett stycke. Denna metod flyttar endast den första raden relativt styckets vänstermarginal. Ett positivt värde flyttar den första raden åt höger, medan de återstående raderna förblir justerade med styckets kropp.
Använd IParagraphFormat.setMarginLeft när du behöver flytta hela stycket. Använd IParagraphFormat.setIndent när du endast behöver flytta den första raden.
Exemplet nedan skapar flera stycken och tillämpar olika IParagraphFormat.setIndent‑värden för att demonstrera hur första‑rad‑indraget påverkar stycke‑layouten.
- Skapa en instans av klassen Presentation.
- Få åtkomst till mål‑bilden.
- Lägg till en rektangulär IAutoShape på bilden.
- Få åtkomst till formens ITextFrame och ta bort standardstycket.
- Skapa flera stycken och ange olika IParagraphFormat.setIndent‑värden för dem.
- Lägg till styckena i textramen.
- Spara den modifierade presentationen.
Denna kod visar hur du ställer in ett styckeindrag:
import com.aspose.slides.*;
import android.graphics.Color;

Presentation presentation = new Presentation();
try {
    ISlide slide = presentation.getSlides().get_Item(0);

    IAutoShape shape = slide.getShapes().addAutoShape(ShapeType.Rectangle, 50, 50, 420, 220);
    shape.getFillFormat().setFillType(FillType.NoFill);
    shape.getLineFormat().getFillFormat().setFillType(FillType.Solid);
    shape.getLineFormat().getFillFormat().getSolidFillColor().setColor(Color.GRAY);

    ITextFrame textFrame = shape.getTextFrame();
    textFrame.getTextFrameFormat().setAutofitType(TextAutofitType.Shape);
    textFrame.getParagraphs().clear();

    Paragraph firstParagraph = new Paragraph();
    firstParagraph.setText("No first-line indent. Wrapped lines start at the same position as the first line.");
    firstParagraph.getParagraphFormat().getDefaultPortionFormat().getFillFormat().setFillType(FillType.Solid);
    firstParagraph.getParagraphFormat().getDefaultPortionFormat().getFillFormat().getSolidFillColor().setColor(Color.BLACK);
    firstParagraph.getParagraphFormat().setMarginLeft(20f);
    firstParagraph.getParagraphFormat().setIndent(0f);

    Paragraph secondParagraph = new Paragraph();
    secondParagraph.setText("First-line indent of 20 points. The first line moves to the right, while wrapped lines remain aligned to the paragraph body.");
    secondParagraph.getParagraphFormat().getDefaultPortionFormat().getFillFormat().setFillType(FillType.Solid);
    secondParagraph.getParagraphFormat().getDefaultPortionFormat().getFillFormat().getSolidFillColor().setColor(Color.BLACK);
    secondParagraph.getParagraphFormat().setMarginLeft(20f);
    secondParagraph.getParagraphFormat().setIndent(20f);

    Paragraph thirdParagraph = new Paragraph();
    thirdParagraph.setText("First-line indent of 40 points. This paragraph shows a larger first-line offset to make the effect easier to see.");
    thirdParagraph.getParagraphFormat().getDefaultPortionFormat().getFillFormat().setFillType(FillType.Solid);
    thirdParagraph.getParagraphFormat().getDefaultPortionFormat().getFillFormat().getSolidFillColor().setColor(Color.BLACK);
    thirdParagraph.getParagraphFormat().setMarginLeft(20f);
    thirdParagraph.getParagraphFormat().setIndent(40f);

    textFrame.getParagraphs().add(firstParagraph);
    textFrame.getParagraphs().add(secondParagraph);
    textFrame.getParagraphs().add(thirdParagraph);

    presentation.save("paragraph_indent.pptx", SaveFormat.Pptx);
} finally {
    presentation.dispose();
}
Resultatet:
Ställ in ett hängande indrag
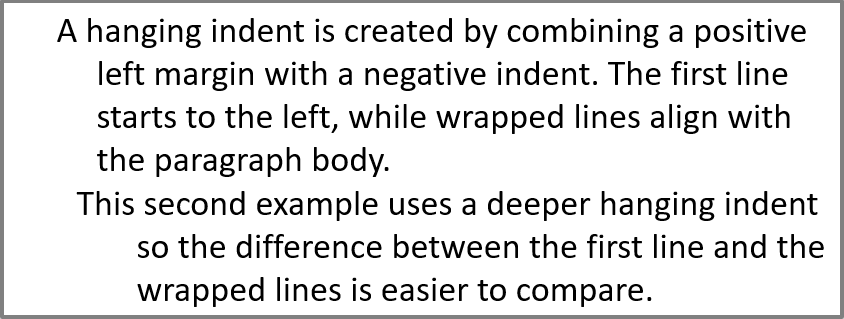
Ett hängande indrag är en stycke‑layout där den första raden börjar till vänster om de återstående raderna. I Aspose.Slides skapar du denna effekt med IParagraphFormat.setIndent. Skicka ett negativt värde för att flytta den första raden åt vänster relativt styckets kropp.
I praktiken definierar IParagraphFormat.setMarginLeft den vänstra positionen för styckets kropp, och IParagraphFormat.setIndent definierar positionen för den första raden relativt den marginalen. För att skapa ett hängande indrag, skicka ett positivt värde till setMarginLeft och ett negativt värde till setIndent.
Denna formatering är användbar för bibliografier, referenser, ordlistaposter och andra stycken där radbrytningar måste justeras under styckets kropp snarare än under det första tecknet i den första raden.
- Skapa en instans av klassen Presentation.
- Få åtkomst till mål‑bilden.
- Lägg till en rektangulär IAutoShape på bilden.
- Få åtkomst till formens ITextFrame och ta bort standardstycket.
- Skapa stycken och skicka ett positivt värde till IParagraphFormat.setMarginLeft för varje stycke.
- Skicka ett negativt värde till IParagraphFormat.setIndent för att skapa det hängande indrags‑effektet.
- Lägg till styckena i textramen.
- Spara den modifierade presentationen.
Denna kod visar hur du ställer in ett hängande indrag för ett stycke:
import com.aspose.slides.*;
import android.graphics.Color;

Presentation presentation = new Presentation();
try {
    ISlide slide = presentation.getSlides().get_Item(0);

    IAutoShape shape = slide.getShapes().addAutoShape(ShapeType.Rectangle, 50, 50, 420, 220);
    shape.getFillFormat().setFillType(FillType.NoFill);
    shape.getLineFormat().getFillFormat().setFillType(FillType.Solid);
    shape.getLineFormat().getFillFormat().getSolidFillColor().setColor(Color.GRAY);

    ITextFrame textFrame = shape.getTextFrame();
    textFrame.getTextFrameFormat().setAutofitType(TextAutofitType.Shape);
    textFrame.getParagraphs().clear();

    Paragraph firstParagraph = new Paragraph();
    firstParagraph.setText("A hanging indent is created by combining a positive left margin with a negative indent. The first line starts to the left, while wrapped lines align with the paragraph body.");
    firstParagraph.getParagraphFormat().getDefaultPortionFormat().getFillFormat().setFillType(FillType.Solid);
    firstParagraph.getParagraphFormat().getDefaultPortionFormat().getFillFormat().getSolidFillColor().setColor(Color.BLACK);
    firstParagraph.getParagraphFormat().setMarginLeft(40f);
    firstParagraph.getParagraphFormat().setIndent(-20f);

    Paragraph secondParagraph = new Paragraph();
    secondParagraph.setText("This second example uses a deeper hanging indent so the difference between the first line and the wrapped lines is easier to compare.");
    secondParagraph.getParagraphFormat().getDefaultPortionFormat().getFillFormat().setFillType(FillType.Solid);
    secondParagraph.getParagraphFormat().getDefaultPortionFormat().getFillFormat().getSolidFillColor().setColor(Color.BLACK);
    secondParagraph.getParagraphFormat().setMarginLeft(60f);
    secondParagraph.getParagraphFormat().setIndent(-30f);

    textFrame.getParagraphs().add(firstParagraph);
    textFrame.getParagraphs().add(secondParagraph);

    presentation.save("hanging_indent.pptx", SaveFormat.Pptx);
} finally {
    presentation.dispose();
}
Resultatet:
Ställ in slut‑styckeegenskaper
IParagraph.setEndParagraphPortionFormat styr formateringen av styckets slutmarkering. Följande exempel tilldelar en teckenstorlek och ett latinskt teckensnitt till slutmarkeringen av det andra stycket:
- Läs in en Presentation och få åtkomst till en bild.
- Lägg till en IAutoShape och rensa dess standardstycke.
- Skapa två stycken och lägg till textsegment i dem.
- Skapa ett PortionFormat för det andra styckets slutmarkering.
- Ställ in IBasePortionFormat.setFontHeight och IBasePortionFormat.setLatinFont.
- Tilldela formatet med IParagraph.setEndParagraphPortionFormat och spara presentationen.
import com.aspose.slides.*;

Presentation presentation = new Presentation("Test.pptx");
try {
    ISlide slide = presentation.getSlides().get_Item(0);
    IAutoShape shape = slide.getShapes().addAutoShape(ShapeType.Rectangle, 10, 10, 200, 250);
    ITextFrame textFrame = shape.getTextFrame();
    textFrame.getParagraphs().clear();

    Paragraph firstParagraph = new Paragraph();
    firstParagraph.getPortions().add(new Portion("Sample text"));

    Paragraph secondParagraph = new Paragraph();
    secondParagraph.getPortions().add(new Portion("Sample text 2"));

    PortionFormat endParagraphFormat = new PortionFormat();
    endParagraphFormat.setFontHeight(48);
    endParagraphFormat.setLatinFont(new FontData("Times New Roman"));
    secondParagraph.setEndParagraphPortionFormat(endParagraphFormat);

    textFrame.getParagraphs().add(firstParagraph);
    textFrame.getParagraphs().add(secondParagraph);

    presentation.save("end_paragraph_format.pptx", SaveFormat.Pptx);
} finally {
    presentation.dispose();
}
Räkna renderade rader
För stycke‑regler som påverkar automatisk radbrytning och interpunktion vid radslut, se Control Line Breaking och Control Hanging Punctuation.
Använd IParagraph.getLinesCount för att räkna antalet rader som ett stycke upptar efter textlayout, inklusive automatisk radbrytning. Detta är användbart när man kontrollerar textlängd och layout i presentationsmallar.
Ett stycke är ett objekt i ITextFrame.getParagraphs och kan upptäcka flera renderade rader. En explicit radbrytning inom ett stycke tvingar en ny rad utan att skapa ett nytt stycke. Automatisk radbrytning skapar rader baserat på tillgänglig bredd utan att infoga explicita radbrytningar i texten. Att räkna stycken eller radbrytningstecken ger därför inte det renderade radantalet.
Följande exempel skapar en textform, räknar dess rader, smalnar av formen och ersätter sedan texten med en kortare sträng. Radbrytning är aktiverad och autofit är inaktiverad så att formens bredd styr radbrytning utan att automatiskt krympa texten eller ändra formens storlek. Formens dimensioner är i punkter. Slutligen lägger exemplet till ett ytterligare stycke och summerar radantalet över textramen.
import com.aspose.slides.*;

Presentation presentation = new Presentation();
try {
    ISlide slide = presentation.getSlides().get_Item(0);

    IAutoShape shape = slide.getShapes().addAutoShape(ShapeType.Rectangle, 50, 50, 400, 200);
    ITextFrame textFrame = shape.getTextFrame();
    textFrame.getTextFrameFormat().setWrapText(NullableBool.True);
    textFrame.getTextFrameFormat().setAutofitType(TextAutofitType.None);

    IParagraph paragraph = textFrame.getParagraphs().get_Item(0);
    paragraph.getParagraphFormat().getDefaultPortionFormat().setFontHeight(20);
    paragraph.setText("This text demonstrates how automatic wrapping changes the number of rendered lines.");
    System.out.println("Original width: " + paragraph.getLinesCount());

    shape.setWidth(150);
    System.out.println("Narrower shape: " + paragraph.getLinesCount());

    paragraph.setText("Short text.");
    System.out.println("Shorter text: " + paragraph.getLinesCount());

    Paragraph secondParagraph = new Paragraph();
    secondParagraph.setText("Another paragraph.");
    secondParagraph.getParagraphFormat().getDefaultPortionFormat().setFontHeight(20);
    textFrame.getParagraphs().add(secondParagraph);

    int totalLineCount = 0;
    for (IParagraph currentParagraph : textFrame.getParagraphs()) {
        totalLineCount += currentParagraph.getLinesCount();
    }
    System.out.println("Total lines in the text frame: " + totalLineCount);
} finally {
    presentation.dispose();
}
Med denna text och dessa dimensioner ökar ett smalare format radantalet, medan ersättningen med den korta strängen minskar det. Exakta tal kan variera beroende på typtillgänglighet och ersättning, teckenstorlek, marginaler, indrag, radbrytning och autofit‑inställningar. Använd de teckensnitt och layoutinställningar som är avsedda för målmiljön när du granskar en mall.
Radantalet i sig avgör inte om texten överskrider sin behållare. Tillgänglig höjd, radhöjder, stycke‑ och radavstånd samt autofit‑beteende spelar också in; även en enda rad kan överstiga tillgänglig bredd när radbrytning är avstängd.
Importera och exportera styckeinnehåll
Importera HTML‑text i stycken
Använd ParagraphCollection.addFromHtml för att konvertera HTML‑markup till stycken och segment i en textram.
- Skapa en instans av klassen Presentation.
- Få åtkomst till en bild och lägg till en IAutoShape.
- Få åtkomst till formens ITextFrame och rensa dess standardstycke.
- Läs in käll‑HTML‑filen.
- Skicka HTML‑strängen till ParagraphCollection.addFromHtml.
- Spara den modifierade presentationen.
Detta Android via Java‑exempel importerar HTML i en textram:
import com.aspose.slides.*;
import java.io.IOException;
import java.nio.charset.StandardCharsets;
import java.nio.file.Files;
import java.nio.file.Paths;

Presentation presentation = new Presentation();
try {
    ISlide slide = presentation.getSlides().get_Item(0);
    float shapeWidth = (float) presentation.getSlideSize().getSize().getWidth() - 20;
    float shapeHeight = (float) presentation.getSlideSize().getSize().getHeight() - 20;
    IAutoShape shape = slide.getShapes().addAutoShape(ShapeType.Rectangle, 10, 10, shapeWidth, shapeHeight);
    shape.getFillFormat().setFillType(FillType.NoFill);
    shape.getTextFrame().getParagraphs().clear();

    try {
        byte[] htmlBytes = Files.readAllBytes(Paths.get("file.html"));
        String html = new String(htmlBytes, StandardCharsets.UTF_8);
        shape.getTextFrame().getParagraphs().addFromHtml(html);
        presentation.save("html_text.pptx", SaveFormat.Pptx);
    } catch (IOException exception) {
        System.out.println("The HTML file could not be read: " + exception.getMessage());
    }
} finally {
    presentation.dispose();
}
Exportera stycketext till HTML
Använd ParagraphCollection.exportToHtml för att exportera ett valt intervall av stycken som HTML.
- Skapa en instans av klassen Presentation och läs in den önskade presentationen.
- Få åtkomst till bilden och hitta den IAutoShape som innehåller texten.
- Få åtkomst till formens ITextFrame.
- Anropa ParagraphCollection.exportToHtml med start‑stycke‑indexet och antalet stycken som ska exporteras.
- Skriv den returnerade HTML‑strängen till en fil.
Detta Android via Java‑exempel exporterar alla stycken från den första textformen:
import com.aspose.slides.*;
import java.io.IOException;
import java.nio.charset.StandardCharsets;
import java.nio.file.Files;
import java.nio.file.Paths;

Presentation presentation = new Presentation("ExportingHTMLText.pptx");
try {
    IShape shape = presentation.getSlides().get_Item(0).getShapes().get_Item(0);

    if (shape instanceof IAutoShape) {
        IAutoShape textShape = (IAutoShape) shape;
        ITextFrame textFrame = textShape.getTextFrame();
        if (textFrame != null) {
            IParagraphCollection paragraphs = textFrame.getParagraphs();
            String html = paragraphs.exportToHtml(0, paragraphs.getCount(), null);
            try {
                Files.write(Paths.get("paragraphs.html"), html.getBytes(StandardCharsets.UTF_8));
            } catch (IOException exception) {
                System.out.println("The HTML file could not be written: " + exception.getMessage());
            }
        } else {
            System.out.println("The first shape does not contain a text frame.");
        }
    } else {
        System.out.println("The first shape is not a text shape.");
    }
} finally {
    presentation.dispose();
}
Rendera ett stycke som en bild
IParagraph.getImage renderar ett enskilt stycke direkt och returnerar en IImage. Spara resultatet till en fil eller ström med IImage.save. Du behöver inte rendera den omgivande formen eller beskära en bitmap manuellt.
IParagraph.getImage kan returnera null om stycket inte kan hittas i sin föräldrasamling, saknar giltiga renderingsgränser, eller inte kan renderas. Kontrollera resultatet innan du sparar det och avge den returnerade bilden efter användning.
Rendera ett stycke i standardskala
Låt oss anta att vi har en presentationsfil som heter sample.pptx med en bild, där den första formen är en textruta som innehåller tre stycken.
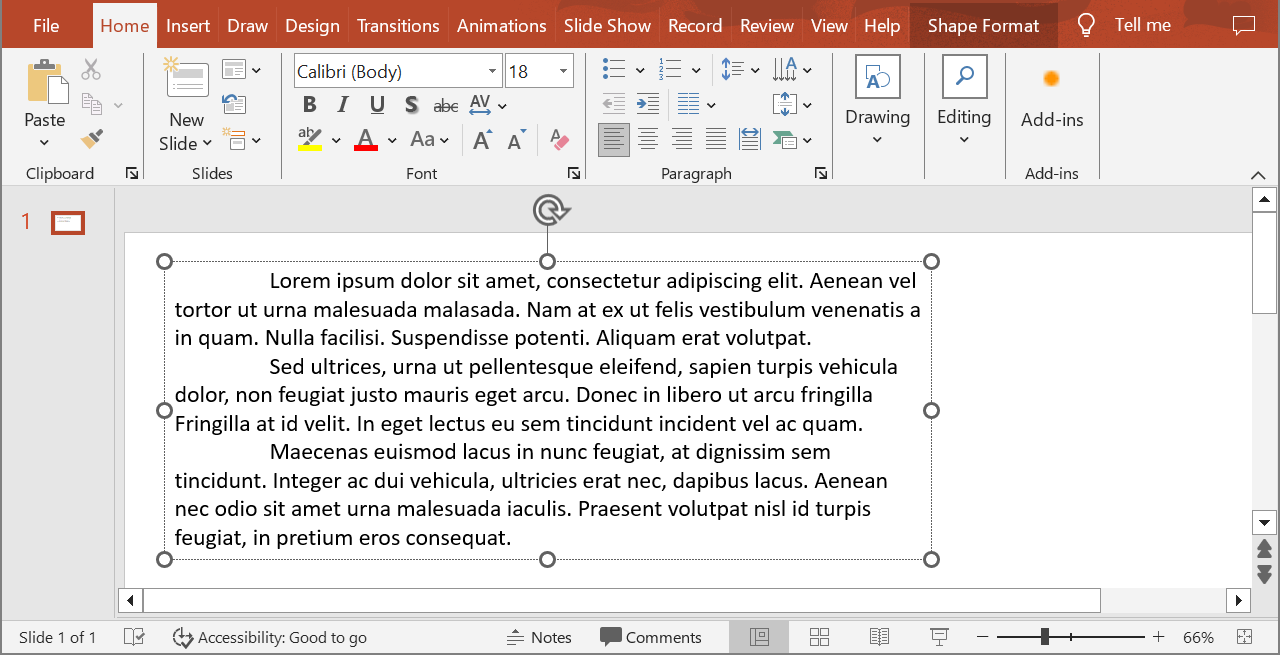
Följande exempel renderar det andra stycket i en vanlig textruta i standardskala och sparar den returnerade bilden i PNG‑format. finally‑blocket säkerställer att bilden avges korrekt.
import com.aspose.slides.*;

Presentation presentation = new Presentation("sample.pptx");
try {
    IShape shape = presentation.getSlides().get_Item(0).getShapes().get_Item(0);

    if (shape instanceof IAutoShape) {
        IAutoShape textShape = (IAutoShape) shape;
        ITextFrame textFrame = textShape.getTextFrame();
        if (textFrame != null && textFrame.getParagraphs().getCount() > 1) {
            IParagraph paragraph = textFrame.getParagraphs().get_Item(1);
            IImage paragraphImage = paragraph.getImage();

            if (paragraphImage != null) {
                try {
                    paragraphImage.save("paragraph.png", ImageFormat.Png);
                } finally {
                    paragraphImage.dispose();
                }
            } else {
                System.out.println("The paragraph could not be rendered.");
            }
        } else {
            System.out.println("The expected paragraph was not found.");
        }
    } else {
        System.out.println("The first shape is not a text shape.");
    }
} finally {
    presentation.dispose();
}
Resultatet:

Rendera ett stycke i en tabellcell med skalning
Använd IParagraph.getImage‑översättningen som accepterar float scaleX och float scaleY‑parametrar för att ange horisontella och vertikala skalningsfaktorer. Följande exempel skapar en tabell, renderar stycket i dess första cell med dubbelt så stor bredd och höjd som standard, och sparar resultatet som en PNG‑bild.
import com.aspose.slides.*;

float scaleX = 2f;
float scaleY = 2f;

Presentation presentation = new Presentation();
try {
    ISlide slide = presentation.getSlides().get_Item(0);
    ITable table = slide.getShapes().addTable(50, 50, new double[] { 300 }, new double[] { 80 });
    IParagraph paragraph = table.get_Item(0, 0).getTextFrame().getParagraphs().get_Item(0);
    paragraph.setText("Text in a table cell");

    IImage paragraphImage = paragraph.getImage(scaleX, scaleY);
    if (paragraphImage != null) {
        try {
            paragraphImage.save("table_paragraph.png", ImageFormat.Png);
        } finally {
            paragraphImage.dispose();
        }
    } else {
        System.out.println("The paragraph could not be rendered.");
    }
} finally {
    presentation.dispose();
}
En skalningsfaktor på 1 behåller den axeln i sin standardpixelstorlek. Till exempel ger 2 för båda faktorerna en bild vars bredd och höjd är ungefär dubbelt så stora som standardmåtten, vilket resulterar i fyra gånger så många pixlar. Större faktorer ger generellt skarpare text för zoomning eller högupplöst utskrift, men ökar även minnesanvändning och filstorlek. Faktorer under 1 ger mindre bilder med mindre detaljrikedom. Använd lika faktorer för att bevara styckets bildförhållande; olika horisontella och vertikala faktorer sträcker ut resultatet oberoende.
Att rendera en hel form med IShape.getImage är fortfarande användbart när utskriften måste inkludera formens fyllning, kantlinje eller annan visuell kontext. För en bild som bara visar stycket, använd IParagraph.getImage.
FAQ
Kan jag helt inaktivera radbrytning inom en textram?
Ja. Ställ in ITextFrameFormat.setWrapText för att inaktivera radbrytning så att raderna inte bryts vid textrammens kanter.
Hur kan jag få de exakta gränserna på bilden för ett specifikt stycke?
Använd IParagraph.getRect för att hämta styckets omgivande rektangel. IPortion.getRect ger gränserna för ett enskilt segment.
Var styrs styckejustering (vänster, höger, centrerad eller justified)?
IParagraphFormat.setAlignment är en inställning på stycknivå och gäller hela stycket oavsett individuell segmentformatering.
För att vertikalt justera segment med olika typsnittsstorlekar inom varje rad, se Align Fonts Within a Line.
Kan jag ställa in korrekturspråk för en del av ett stycke?
Ja. Ställ in IBasePortionFormat.setLanguageId för enskilda segment, så att ett stycke kan innehålla text på flera språk.